
Streak Retinoscopy
Part Number 18200
La rétinoscopie à strie
No de référence :18200
Strichskiaskop
Teile-Nr. 18200
Retinoscopía de franja
No. de repuesto 18200
Retinoscopia a striscia
N. referenza 18200
English . . . . . . . .1
Français . . . . . .14
Deutsch . . . . . .28
Español . . . . . .42
Italiano . . . . . . .56
• Streak Retin Foreign2 11/10/98 4:58 PM Page 1

ii
Thank you for purchasing the Welch Allyn No. 18200
3.5v halogen streak retinoscope. This instrument
has been designed to meet the needs of today’s
practitioners and incorporates features not found
on any other retinoscope:
1. External Focusing Sleeve—unique planetary gear
system allows for easy adjustment no matter what size
hand or how instrument is held. Continuous 360°
rotation. Maintains the same plane of focus during
rotation.
2. Improved Light Output—brighter halogen lamp
provides 50 percent more intensity than previous lamps.
The reflex is now crisper and easier to see in all patient’s
eyes. Retinoscopy can be done faster and more accurately.
3. Dust-free Optics—new housings and glass cover on the
front keep the instrument cleaner longer.
4. Crossed Linear Polarizing Filter—dramatically
reduces glare from lenses. Allows retinoscopy to be
performed closer to the axis of the correcting lenses.
5. Fixation Cards—new cards that easily attach increase
the ease with which dynamic retinoscopy is performed.
6. Improved Optics—glare and shadows have been
eliminated for a clearer and more precise view.
7. Interchangeability—By simply changing the lamp,
the streak retinoscope can be converted to a spot
retinoscope.
• Streak Retin Foreign2 11/10/98 4:58 PM Page 2

1
Introduction
Retinoscopy is a technique for objective refraction of the eye. There
are two basic types of retinoscopy. Static retinoscopy (described in
this booklet) is done with the patient fixating at a distance. Dynamic
retinoscopy is done with the patient fixating at a near target. These
techniques require diligence and expertise that can result in a
precise measurement of the refractive error of an eye.
There are two types of self-illuminated retinoscopes. The streak
retinoscope featured in this booklet is the most widely used
scope today and has largely supplanted the spot retinoscope. In
retinoscopy, a parallel or slightly divergent beam of light is directed
into the patient’s eye. This results in illumination of the retina, and
the reflected light from the retina causes reflexes observed by the
examiner in the patient’s pupil. The refractive status of the eye is
found by using correcting trial lenses to make the far point of the
ametropic eye conjugate to the pupil of the examiner’s eye. When this
is achieved, the movement of the reflex will be neutralized.
The material in the booklet is presented with the assumption that
the reader is familiar with retinoscopy in general. Two excellent
references for retinoscopic technique are:
Corboy, J.M.; The Retinoscopy Book, 3rd Edition, 1989, SLACK Incorporated.
or on videotape: Guyton, D.L.; Retinoscopy: Minus Cylinder Technique or
Retinoscopy: Plus Cylinder Technique, 1986, American Academy of
Ophthalmology—Continuing Ophthalmic Video Education.
• Streak Retin Foreign2 11/10/98 4:58 PM Page 1

The streak retinoscope is found by most practitioners to be easy to
use, fast, accurate, and especially valuable in determining the axis of
astigmatism.
There are several features of the streak retinoscope that make
determining the refractive state of the eye easy and accurate. These
are:
1. Each meridian can be neutralized separately.
2. All errors can be neutralized using either “with” or “against”
motion or perhaps using both.
3. The axis of astigmatism is apparent.
4. Streak retinoscopy is easy because one watches a band of light
instead of a shadow.
5. Streak retinoscopy may easily be done with undilated pupils.
2
• Streak Retin Foreign2 11/10/98 4:58 PM Page 2

3
Technique
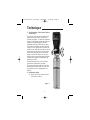
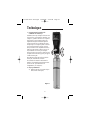
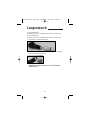
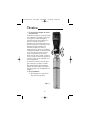
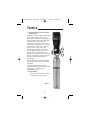
1. The Operation of the Control Sleeve
of the Scope
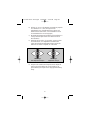
The operator will note that the width of the
streak varies as the sleeve is raised and
lowered (see Figure 1). When the operating
sleeve is in the lowest position the light rays
emitted are slightly divergent. Here the
instrument acts with a plano mirror effect,
which reflects divergent rays that will never
come to a focus. As the sleeve is raised, the
streak focuses. With the sleeve all the way up,
the retinoscope acts with a concave mirror
effect, where the light rays cross and then
diverge. Because the rays cross, the eye’s
reflex moves in opposite directions with the
concave mirror effect as compared to the
plano mirror effect.
Throughout this booklet, we will use the
plano mirror effect unless specified.
The rotary movement of the control sleeve
mechanism allows the streak to rotate 360°
to ascertain the axis of astigmatism (see
Figure 1).
2. Preliminary Steps
A) Set the sleeve in its lowest position
(plano-mirror effect).
Figure 1
• Streak Retin Foreign2 11/10/98 4:58 PM Page 3

B) Position yourself 2/3 meter (26") from the patient. This
distance implies a working lens of +1.50D (computed as the
reciprocal of working distance in meters). Working distance
and lens may be varied to suit the practitioner’s needs. (In
this instruction book the 2/3 meter (26") working distance
is assumed. Different working distances can be used, but
remember to adjust for your working distance.)
C) With the refracting equipment in place, direct the patient’s
attention to a fixation spot at 15 feet or more from the eye
and align the streak vertically.
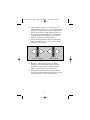
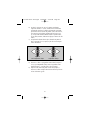
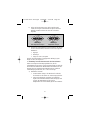
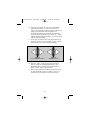
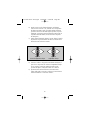
D) Observe the “reflex” which will appear as in Figure 2,
providing no oblique astigmatism is present. If oblique
astigmatism is present, the reflex will appear more like
Figure 3, where the reflex does not appear vertical.
E) Move the vertical streak horizontally across the pupil and
back again and observe whether the reflex moves in the same
direction as the streak or in the opposite direction.
4
Figure 2 Figure 3
No oblique astigmatism Oblique astigmatism
• Streak Retin Foreign2 11/10/98 4:58 PM Page 4

5
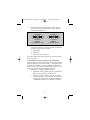
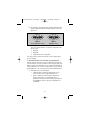
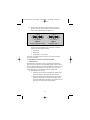
F) Rotate the control sleeve until the streak is horizontal
and move the streak vertically. The reflex will appear as in
Figures 4 or 5.
G) If the streak and the reflex move in the same direction with
no lens in the refractive apparatus, the refraction is one of
these:
1. Hyperopia;
2. Emmetropia;
3. Myopia of less than 1.50 diopters.
If the reflex moves in the opposite direction, the error is myopia
greater than 1.50 diopters.
3. Determining Refractive Error By Neutralization
Before starting, make sure the eye not being refracted has some
“against” motion using the plano mirror effect. This will blur vision
to prevent accommodation. If “with” or neutral motion is noticed
initially, place about a +1.00 sphere before the eye once neutral
motion is seen.
A) Neutralizing with spheres only:
1. Change sphere in the minus direction until the reflexes in
all axes have “with” motion.
2. Adjust in the plus direction until the reflex fills the pupil
in one meridian and all motion has stopped. This will be
one of the principal meridians if astigmatism is present.
That meridian is then said to be neutralized.
Figure 4 Figure 5
No oblique astigmatism Oblique astigmatism
• Streak Retin Foreign2 11/10/98 4:58 PM Page 5

3. Test for neutralization by one of these methods:
a) Move the sleeve all the way up (concave mirror
position); the reflex should also appear neutralized;
b) Move closer to the patient and “with” motion should
return; move away and “against” motion should
appear, or
c) Place an extra +0.25 sphere in the apparatus and
“against” motion should appear;
4. Repeat the neutralization in the meridian 90° away.
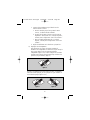
B) Locating the axis of astigmatism:
Two phenomena help in determining the axis of astigmatism:
break and width. Break is observed when the streak is not
aligned with a principal meridian of the astigmatism (Figures 3
and 5). The streak will be aligned with a principal meridian
when the break effect disappears and the width of the reflex is
narrowest (and it appears its brightest) (Figure 6).
Proceed with neutralization as before—neutralizing one principal
meridian first, then 90° away to neutralize the second principal
meridian (Figures 7 and 8).
6
Figure 6
Figure 7 Figure 8
• Streak Retin Foreign2 11/10/98 4:58 PM Page 6

7
4. Interpretation of Results
A) Hyperopia
1. Hyperopia exists when, at the 2/3 meter distance using the
plano mirror effect, “with” motion is neutralized using a
plus lens greater than +1.50 diopters and both meridians
neutralize with the same strength lens.
2. Total hyperopia is estimated by subtracting 1.50 diopters
from the total strength lens used. For example, if it takes a
+2.50 lens to neutralize motion at 2/3 meter, the total
hyperopic error is +1.00 diopter.
B) Myopia
1. Myopia exists under several circumstances.
a) When “with” motion, using the plano mirror effect at 2/3
meter, is neutralized with a plus lens of less than 1.50
diopter strength. (When motion is neutralized with
exactly a 1.50 diopter lens, the eye is emmetropic.)
b) When at 2/3 meter, using the plano mirror effect, no
motion appears at all. In other words, when the motion
is neutralized with no lens in the refracting apparatus.
The myopia is then exactly 1.50 diopters.
c) When the motion is “against” using the plano mirror
effect, and is neutralized with a minus lens.
C) Astigmatism
1. Astigmatism exists when the two principal meridians
neutralize with different strength lenses. It may be present
in many forms.
a) Simple hyperopic;
b) Simple myopic;
c) Compound hyperopic;
d) Compound myopic;
e) In the mixed form
(one meridian hyperopic and the opposite one myopic).
• Streak Retin Foreign2 11/10/98 4:58 PM Page 7

2. Astigmatism can be measured in one of two ways:
a) Neutralize one principal meridian first. Then add the
appropriate plus or minus cylindrical lens until the
other principal meridian is neutralized.
b) Neutralization may also be done by continuing to add
spherical lenses until the second principal meridian
is neutralized. Then the astigmatic error is equal to
the difference in strength of lenses necessary to
neutralize the two meridians.
5. Special Considerations
A) Axis of astigmatism: Extreme care must be used in setting the
axis of the cylinder. If the correcting cylinder is of the proper
power, a 10° error in axis will produce a new astigmatism
of approximately one third of the strength of the original
astigmatism with its principal meridian at approximately 45°
to those of the original astigmatism. The technique for setting
the axis is referred to as “straddling”. When you have an
approximate correction of the refractive error and wish to
refine the axis setting, the following technique will be helpful.
Move up closer to the eye so that the edges of the reflex can
be seen, and compare the widths of the two reflexes as you
rotate the streak 45° to either side of the correcting cylinder
axis. Recede slowly while doing this. Compare the widths of
the two reflexes. If there is an axis error, the reflex will be
different widths in the two positions. If you are using plus
cylinders, rotate the axis toward the narrow band until the
reflex widths are equal. With minus cylinders, move the axis
away from the narrow band. When the reflex widths are
equal, the proper axis has been determined. It is important
that the spherical and cylindrical strength be checked again
after completion of this maneuver.
8
• Streak Retin Foreign2 11/10/98 4:58 PM Page 8

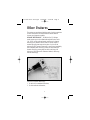
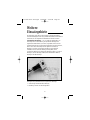
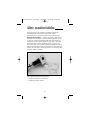
Other Features
This retinoscope was designed with the needs of today’s practitioner
in mind. Listed below are several additional features that will
increase your diagnostic capability.
DYNAMIC RETINOSCOPY—The Welch Allyn 3.5v Halogen
streak retinoscope can be outfitted with magnetic fixation cards
(No. 18250) to help perform dynamic retinoscopy. In dynamic
retinoscopy, the patient is asked to fixate on words, shapes or
another age-appropriate target in the plane of or even on the
retinoscope itself. Dynamic retinoscopy is usually done immediately
after completing static retinoscopy. There are many methods of
dynamic retinoscopy, among these are book retinoscopy, bell
retinoscopy, MEM (Monocular Estimation Method) retinoscopy
and near retinoscopy.
Some uses of Dynamic Retinoscopy:
1. To check for accommodative disorders;
2. To obtain refractive information;
9
• Streak Retin Foreign2 11/10/98 4:58 PM Page 9

10
3. To help decide amplyopic therapy;
4. To determine the adequacy of
cyclopegia.
For more information on Dynamic
Retinoscopy, read the following:
Guyton, D.L., O’Connor, G.M.: Dynamic
Retinoscopy, Current Opinion in
Ophthalmology 1991, 2:78-80.
Locke, L.C., Somers, W.: A Comparison
Study of Dynamic Retinoscopy Techniques.
Optom Vis Sci 1989, 66:540-544.
Mazow, M.L., France, T.D., Finkleman,
S., Frank, J.: Acute Accommodative and
Convergence Insufficiency. Trans Am
Ophthalmol Soc. 1989, 87:158-173.
SPIRALLING—Spiralling is a method for
estimating ametropia without lenses. This
can be helpful in determining the starting
point for lens introduction when working with patients who have a
high unknown ametropia. The Welch Allyn No. 18200 streak
retinoscope is particularly well suited for this technique because the
instrument maintains the same focal plane during streak rotation.
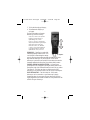
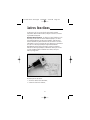
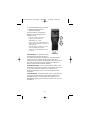
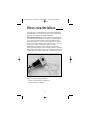
CROSSED LINEAR POLARIZING FILTER—A crossed linear
polarizing filter can be engaged by moving the sliding switch on the
practitioner’s side of the instrument from the down to the up position
(see Figure 9). This filter cuts down on reflections and allows
retinoscopy to be performed closer to the axis of the correcting lens.
SPOT RETINOSCOPY—The Welch Allyn No. 18200 streak
retinoscope can be converted to a spot retinoscope by simply
changing the lamp. In recent years the spot retinoscope has been
largely supplanted by the streak but there are some practitioners who
still favor the spot retinoscope.
Figure 9
• Streak Retin Foreign2 11/10/98 4:58 PM Page 10

11
Some arguments presented for using the spot retinoscope are:
1. When working with pediatric patients, it is important to get the
most information in the shortest amount of time. The spot scope,
based on the shape of the reflex, can help detect astigmatism very
quickly. Also significant amounts of myopia and hyperopia can be
determined rapidly.
2. For vision screening a large number of patients, e.g. school
screenings, the spot retinoscope can help provide more
information in a shorter period of time.
3. For judging the fit of hard contact lenses the spot scope can be
helpful in assessing power correction, centration, tear film layer,
etc.; and to check soft lenses for indications of buckling, lens
transparency, and steep or flat corneal correspondence.
To convert the No. 18200 streak retinoscope to a spot
retinoscope, simply insert the No. 08300 lamp (see directions
on page 12). The spot retinoscope is used in the plano mirror
position (sleeve all the way down).
For more information on Spot Retinoscopy, read the following:
Borish, I.M.; Clinical Refraction 3rd Edition, 1970, The Professional
Press Inc. Pg 672.
Cleaning Instructions
Retinoscope—External housings may be cleaned with a mild
detergent and soft cloth. Do not immerse. Windows may be
cleaned with alcohol on a cotton swab or lens paper.
Fixation Cards—May be cleaned with a mild detergent.
• Streak Retin Foreign2 11/10/98 4:58 PM Page 11

12
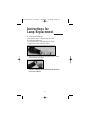
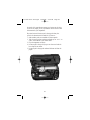
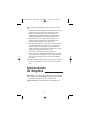
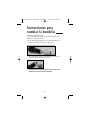
Instructions for
Lamp Replacement
No. 18200 Streak Retinoscope
(Use only Welch Allyn 3.5v Halogen Lamp No. 08200)
No. 18300 Spot Retinoscope
(Use only Welch Allyn 3.5v Halogen Lamp No. 08300)
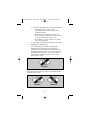
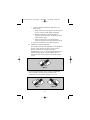
1. Remove retinoscope from power source.
2. Remove lamp: Lift out with nail file, letter opener or similar
instrument under base flange.
CAUTION: Lamp may be hot and should be allowed to
cool before removal.
• Streak Retin Foreign2 11/10/98 4:58 PM Page 12

13
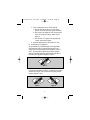
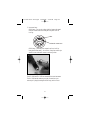
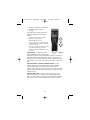
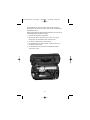
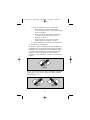
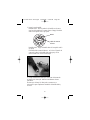
3. Insert new lamp:
08200 lamp—line up pin on lamp with slot between the metal
electrical contact wires. Push lamp into receptacle as far as
it will go.
08300 lamp—push lamp into receptacle as far as it will go.
Lamp should insert easily—do not force. Lamp base contact pin
should be even with metal cutouts in retinoscope base.
4. Replace retinoscope on power source.
The No. 18200 and No. 18300 are essentially the same instrument.
The No. 18200 streak retinoscope can be converted to a spot
retinoscope by simply inserting the 08300 lamp, and vice versa.
Slot
Electrical contact wires
• Streak Retin Foreign2 11/10/98 4:58 PM Page 13

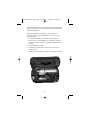
Merci d’avoir fait l’achat du rétinoscope à strie à
halogène 3,5 V no 18200 de Welch Allyn. Cet instrument
a été conçu pour répondre aux besoins des praticiens
d’aujourd’hui et comprend des fonctions qu’aucun autre
rétinoscope ne peut offrir :
1. Manchon de focalisation externe – ce système exclusif à
engrenage planétaire facilite le réglage, quelles que soient la
taille de la main et la manière dont l’instrument est tenu. Il
permet une rotation continue sur 360° et conserve le même
plan de convergence pendant la rotation.
2. Rendement lumineux accru – la lampe à halogène
améliorée procure 50 % de plus d’intensité lumineuse que
les lampes précédentes. Le réflexe, plus net, est plus facile à
voir dans l’oeil de tous les patients. La rétinoscopie est
effectuée plus rapidement et plus efficacement.
3. Protection des composants optiques contre la
poussière – Le nouveau boîtier muni d’un couvercle en
verre à l’avant garde l’instrument propre plus longtemps.
4. Filtre polarisant à champs linéaires croisés – il réduit
considérablement l’éblouissement causé par les lentilles et
permet d’effectuer la rétinoscopie plus près de l’axe des
lentilles correctrices.
5. Cartes de fixation – de nouvelles cartes à installation
rapide facilitent l’exécution de la rétinoscopie dynamique.
6. Composants optiques améliorés – l’éblouissement et les
ombres ont été éliminés pour assurer une vue plus claire et
plus précise.
7. Interchangeabilité – il suffit de changer la lampe pour
convertir le rétinoscope à strie en rétinoscope à spot.
14
• Streak Retin Foreign2 11/10/98 4:58 PM Page 14

15
Introduction
La rétinoscopie, technique de réfraction objective de l’œil, se divise en deux
types fondamentaux : la rétinoscopie statique (décrite dans cette brochure),
au cours de laquelle le patient fixe une cible à une distance, et la
rétinoscopie dynamique, au cours de laquelle le patient fixe une cible
rapprochée. Ces techniques, qui exigent diligence et compétence, permettent
de mesurer avec précision les erreurs de réfraction de l'œil.
Il existe deux types de rétinoscope à éclairage intégré : le rétinoscope à
strie, dont il est question dans cette brochure, le plus couramment employé
aujourd'hui, et le rétinoscope à spot, largement supplanté par le premier. La
rétinoscopie consiste à diriger un faisceau lumineux parallèle ou légèrement
divergent dans l’œil du patient, dont la rétine est alors éclairée. La lumière
réfléchie par la rétine provoque des réflexes, observés par le praticien dans
l’œil du patient. Pour mesurer l'état de réfraction de l’œil, on utilise des
lentilles correctrices d'essai afin de faire correspondre le punctum remotum
de l’œil amétropique avec la pupille du praticien. Lorsqu’on obtient ce
résultat, le déplacement du réflexe est neutralisé.
L’information que nous présentons dans cette brochure suppose que le
lecteur connaît les principes généraux de la rétinoscopie. Voici deux
excellents ouvrages de référence concernant cette technique :
Corboy, J.M. ; The Retinoscopy Book, 3
e
édition, 1989, SLACK Incorporated
Sur bande vidéo : Guyton, D.I. ; Retinoscopy: Minus Cylinder Technique ou
Retinoscopy : Plus Cylinder Technique, 1986, American Academy of
Ophthalmology – Continuing Ophthalmic Video Education.
• Streak Retin Foreign2 11/10/98 4:58 PM Page 15

La plupart des praticiens jugent le rétinoscope à strie facile d’emploi, rapide,
précis et particulièrement utile pour déterminer l’axe d’astigmatisme.
Le rétinoscope à strie comporte plusieurs fonctions grâce auxquelles il est
facile de déterminer avec précision l’état de réfraction de l’œil :
1. Chaque méridien peut être neutralisé séparément.
2. Toutes les erreurs peuvent être neutralisées par un déplacement « dans
le même sens », « dans le sens contraire » ou les deux.
3. L’axe d’astigmatisme est visible.
4. La rétinoscopie à strie est facile à effectuer, car le praticien regarde une
bande de lumière au lieu d’une ombre.
5. La rétinoscopie à strie peut facilement s’effectuer lorsque la pupille n’est
pas dilatée.
16
• Streak Retin Foreign2 11/10/98 4:58 PM Page 16

Technique
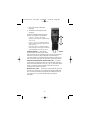
1. Fonctionnement du manchon de
commande du rétinoscope
L’utilisateur notera que la largeur de la strie varie
selon qu’il lève ou qu’il abaisse le manchon (voir
1a figure 1.) Quand le manchon est à sa position
la plus basse, les rayons lumineux émis sont
légèrement divergents. L’instrument agit alors
comme un miroir plan, en reflétant des rayons
divergents qui ne convergeront jamais. A mesure
que l’on relève le manchon, la strie converge.
Lorsque le manchon est complètement relevé, le
rétinoscope agit comme un miroir concave ; les
rayons lumineux se croisent, puis divergent.
Lorsque les rayons se croisent, le réflexe de l’œil
se déplace dans la direction opposée par rapport
à l’effet de miroir plan.
Nous utiliserons dans cette brochure l’effet de
miroir plan, sauf indication contraire.
Le mouvement de rotation du mécanisme du
manchon de commande permet de faire tourner
la strie sur 360° pour déterminer l’axe
d’astigmatisme (voir 1a figure 1).
2. Étapes préliminaires
A) Régler le manchon à sa position la plus
basse (effet de miroir plan).
17
Figure 1
• Streak Retin Foreign2 11/10/98 4:59 PM Page 17

B) Se placer à environ 66 cm (26 po) du patient. Cette distance
requiert une lentille de + 1,50 D (la valeur inverse de la distance
opérationnelle en mètres). La distance opérationnelle et la lentille
peuvent varier selon les besoins du praticien. (Dans cette brochure,
nous supposons que la distance opérationnelle est de 66 cm (26
po). Il est possible d’utiliser différentes distances opérationnelles ;
ne pas oublier, toutefois, d’effectuer les réglages en fonction de cette
valeur.)
C) Le dispositif de réfraction étant en place, demander au patient de
fixer un point situé à 5 m (15 pieds) ou plus de son œil et aligner
la strie verticalement.
D) Observer le « réflexe » qui apparaîtra comme illustré à la figure 2
s’il n’y a pas d’astigmatisme oblique. Sinon, il apparaîtra comme
illustré à la figure 3, c’est-à-dire qu’il ne sera pas vertical.
E) Déplacer la strie verticale de gauche à droite sur la pupille, et
observer si le réflexe se déplace dans la même direction que la strie
ou dans la direction opposée.
18
Figure 2 Figure 3
Pas d’astigmatisme oblique Astigmatisme Oblique
• Streak Retin Foreign2 11/10/98 4:59 PM Page 18
La pagina si sta caricando...
La pagina si sta caricando...
La pagina si sta caricando...
La pagina si sta caricando...
La pagina si sta caricando...
La pagina si sta caricando...
La pagina si sta caricando...
La pagina si sta caricando...
La pagina si sta caricando...
La pagina si sta caricando...
La pagina si sta caricando...
La pagina si sta caricando...
La pagina si sta caricando...
La pagina si sta caricando...
La pagina si sta caricando...
La pagina si sta caricando...
La pagina si sta caricando...
La pagina si sta caricando...
La pagina si sta caricando...
La pagina si sta caricando...
La pagina si sta caricando...
La pagina si sta caricando...
La pagina si sta caricando...
La pagina si sta caricando...
La pagina si sta caricando...
La pagina si sta caricando...
La pagina si sta caricando...
La pagina si sta caricando...
La pagina si sta caricando...
La pagina si sta caricando...
La pagina si sta caricando...
La pagina si sta caricando...
La pagina si sta caricando...
La pagina si sta caricando...
La pagina si sta caricando...
La pagina si sta caricando...
La pagina si sta caricando...
La pagina si sta caricando...
La pagina si sta caricando...
La pagina si sta caricando...
La pagina si sta caricando...
La pagina si sta caricando...
La pagina si sta caricando...
La pagina si sta caricando...
La pagina si sta caricando...
La pagina si sta caricando...
La pagina si sta caricando...
La pagina si sta caricando...
La pagina si sta caricando...
La pagina si sta caricando...
La pagina si sta caricando...
La pagina si sta caricando...
-
 1
1
-
 2
2
-
 3
3
-
 4
4
-
 5
5
-
 6
6
-
 7
7
-
 8
8
-
 9
9
-
 10
10
-
 11
11
-
 12
12
-
 13
13
-
 14
14
-
 15
15
-
 16
16
-
 17
17
-
 18
18
-
 19
19
-
 20
20
-
 21
21
-
 22
22
-
 23
23
-
 24
24
-
 25
25
-
 26
26
-
 27
27
-
 28
28
-
 29
29
-
 30
30
-
 31
31
-
 32
32
-
 33
33
-
 34
34
-
 35
35
-
 36
36
-
 37
37
-
 38
38
-
 39
39
-
 40
40
-
 41
41
-
 42
42
-
 43
43
-
 44
44
-
 45
45
-
 46
46
-
 47
47
-
 48
48
-
 49
49
-
 50
50
-
 51
51
-
 52
52
-
 53
53
-
 54
54
-
 55
55
-
 56
56
-
 57
57
-
 58
58
-
 59
59
-
 60
60
-
 61
61
-
 62
62
-
 63
63
-
 64
64
-
 65
65
-
 66
66
-
 67
67
-
 68
68
-
 69
69
-
 70
70
-
 71
71
-
 72
72


in altre lingue
- English: Welch Allyn 18200 User manual
- français: Welch Allyn 18200 Manuel utilisateur
- español: Welch Allyn 18200 Manual de usuario
- Deutsch: Welch Allyn 18200 Benutzerhandbuch
Documenti correlati


Altri documenti
-
Hill-Rom MacroView Otoscope Istruzioni per l'uso
-
 Steris Amsco 7053Hp Washer Disinfector Istruzioni per l'uso
-
-
-
3B SCIENTIFIC PHYSICS U40110 Operating Instructions Manual
-
 Kowa Avansee Preload1P Manuale utente
-
Dell Mobile Streak 7 Wifi Only Guida utente
-
Yamaha DPX-830 Manuale del proprietario
-
-
Dell STREAK mobile Manuale del proprietario

