
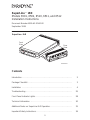
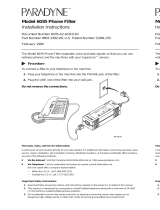
1
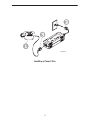
SuperLine IAD
Models 6501, 6502, 6510, 6511, and 6512
Installation Instructions
Document Number 6500-A2-GN10-00
September 1999
TST
LINE
ALM
ETHERNET
99-16014a-03
BASE
PHONE
Rear
View
Front
View
SuperLine
TM
IAD
PWR
6512
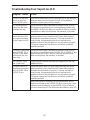
Contents
Introduction 2. . . . . . . . . . . . . . . . . . . . . . . . . . . . . . . . . . . . . . . . . . . . . . . . . . . . .
Package Checklist 3. . . . . . . . . . . . . . . . . . . . . . . . . . . . . . . . . . . . . . . . . . . . . . .
Installation 4. . . . . . . . . . . . . . . . . . . . . . . . . . . . . . . . . . . . . . . . . . . . . . . . . . . . .
Troubleshooting 25. . . . . . . . . . . . . . . . . . . . . . . . . . . . . . . . . . . . . . . . . . . . . . . . .
Front Panel Indicator Lights 28. . . . . . . . . . . . . . . . . . . . . . . . . . . . . . . . . . . . . . .
Technical Information 30. . . . . . . . . . . . . . . . . . . . . . . . . . . . . . . . . . . . . . . . . . . .
Additional Notes on SuperLine IAD Operation 35. . . . . . . . . . . . . . . . . . . . . . .
Important Safety Instructions 36. . . . . . . . . . . . . . . . . . . . . . . . . . . . . . . . . . . . . .

2
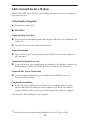
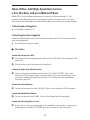
Introduction: What Your SuperLine IAD Does
Your SuperLine Integrated Access Device (IAD) is a line adapter that allows you to
connect multiple phones, fax machines, or modems using your existing phone wiring.
99-16257-01
TST
LINE
ALMPWR
ETHERNET
Existing
Phone Line
Existing (BASE) Phone
Additional Line (PHONE 1/2)
Additional Line (PHONE 2)
High-Speed Data (ETHERNET)
6512
Your service provider enables SuperLine service and assigns phone numbers to the
additional phone lines.
The SuperLine IAD:
H Transforms your existing single phone line into multiple phone lines to support up
to two additional phones, fax machines, or modems simultaneously.
H Provides high-speed Internet access through an Ethernet connection. (Available in
some areas. Ask your service provider about availability of this service.)
H Operates with Touch Tonet phones only.
Features By Model Number
The features available to you depend on the services you have requested from your
service provider and the SuperLine IAD model you have. The following table shows the
features available on each model.
Feature 6501 6502 6510 6511 6512
Additional Line 1
n n
—
n n
Additional Line 2 —
n
— —
n
High-Speed Data — —
n n n
Your SuperLine IAD may have only the jacks required for your application.

3
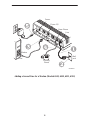
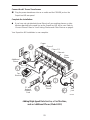
Package Checklist
Verify that your package contains the following items. If anything is missing or you need
to order additional hardware, contact your service provider. Refer to
Technical
Information
on page 30 for further information.
99-16510b
Wall
Jack
Line
T
S
T
L
I
N
E
A
L
M
P
W
R
E
T
H
E
R
N
E
T
T
M
T
M
SuperLine IAD
(Filter not required)
99-16510a
99-16510c
Base Phone
Existing
Phone
Phone 1/2
Modem
LINE
PHONE
99-16510d
99-165510e
Phone 2
Fax
Power
99-165510f
SuperLine
IAD
6' RJ11
Phone
Cable
AC Power
Transformer
99-16519
Phone Filter
LINE
PHONE
geprufte
Sicherheit
R
LR92997
TM
TUY
PRODUCT SERVICE
Phone Filter
P/N 0802-3392-00
Made in China / Fabriquè China
Bel Fuse Inc. 1198
ACCESSARY
L.T.E. EQUIPMENT
E100296
TM
TS
T
LINE
ALMPW
R
ETHERNE
T
T
M
T
M
B
A
S
E
P
H
O
N
E
TM
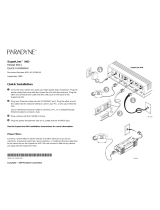
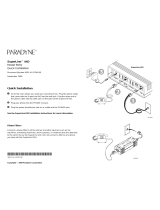
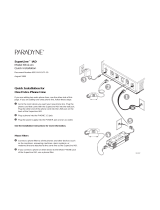
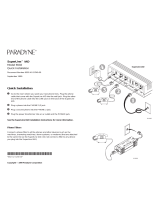
Quick Installation
Installation
Instructions
TST
LINE
ALMPWR
ETHERNET
TM
TM
The Model 6510 also includes a ferrite choke.

4
Installation
Before you install your SuperLine IAD, read the
Additional Notes on SuperLine IAD
Operation
on page 35, and the
Important Safety Instructions
on page 36.
Installation consists of two main procedures:
H Connect phone filters
H Connect your SuperLine IAD
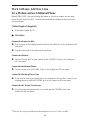
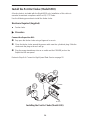
Connect Phone Filters to Your
Existing Phones and Other Devices
Each phone or other device elsewhere in your home or office that is connected to the
same line as the SuperLine IAD must be connected through a phone filter to minimize
background noise from the additional lines. This includes any wall phone, cordless
phone, answering machine, fax machine, modem, caller ID display device, security
alarm system, TV-based Internet access device, and direct broadcast satellite receiver
on the same line.
If you have a device you cannot unplug, such as an alarm system, call your
service provider.
Phone filters are not required if your service provider installed a jack specifically for
SuperLine service.
Use the following procedure to install phone filters on your existing phones and other
devices. Do not install a filter on the jack where the SuperLine IAD will be.
Hardware Required (Not Supplied)
You may need to obtain additional phone filters from your service provider. One filter is
supplied with your SuperLine IAD.
" Procedure
Disconnect the phone cord of your existing phone or other device from the wall
jack.
Plug the phone filter into the wall jack.
Plug the phone cord into the PHONE jack on the phone filter.
Repeat Steps 1–3 for each phone or other device in your home or office that uses the
same line as your SuperLine IAD. Then proceed to page 7.

5
LINE
PHONE
99-16210-01
g
e
p
ru
fte
S
ic
h
e
rh
e
it
R
LR92997
TM
TUY
PRODUCT SERVICE
Phone Filter
P/N 0802-3392-00
Made in China / Fabriquè China
Bel Fuse Inc. 1198
ACCESSARY
L.T.E. EQUIPMENT
E100296
Installing a Phone Filter

6
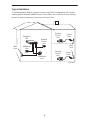
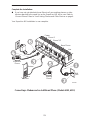
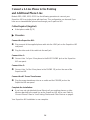
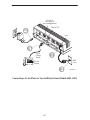
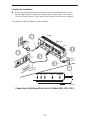
Typical Installation
The following figure depicts a typical home or small office configuration with several
existing phones and two additional lines. Phone filters are connected to your existing
phones to reduce interference from the new line or lines.
99-16018a-02
Wall
Jack
SuperLine
IAD
Wall
Jack
Phone
Filter
Phone
Filter
Existing
Phone
Line
Existing
Phone
Line
Existing
Phone
Line
Additional
Line
Additional
Line

7
Choose the procedure that sounds most like what you want to do:
H Add a Second Line for a Phone Page 8. . . . . . . . . . . . . . . . . . . . . . . . . . . . . . . . .
Models 6501, 6502, 6511, 6512. This procedure describes how to add a second
line for a phone.
H Add a Second Line for a Modem Page 10. . . . . . . . . . . . . . . . . . . . . . . . . . . . . . . .
Models 6501, 6502, 6511, 6512. This procedure describes how to add a second
line for a modem.
H Work at Home Page 12. . . . . . . . . . . . . . . . . . . . . . . . . . . . . . . . . . . . . . . . . . . . . . . . .
Models 6502, 6512. This procedure describes how to add new lines for a modem
and an additional phone.
H Run a Home Office Page 14. . . . . . . . . . . . . . . . . . . . . . . . . . . . . . . . . . . . . . . . . . . .
Model 6512. This procedure describes how to connect an additional phone, fax
machine, and Ethernet-ready PC to your SuperLine IAD.
H Connect a 2-Line Phone to the Existing
and Additional Phone Line Page 16. . . . . . . . . . . . . . . . . . . . . . . . . . . . . . . . . . . . .
Models 6501, 6502, 6511, 6512. This procedure describes how to connect a 2-line,
2-cord phone to your SuperLine IAD.
H Connect a 2-Line Phone to Two Additional Phone Lines Page 18. . . . . . . . . .
Models 6502, 6512. This procedure describes how to connect a 2-line, 1-cord
phone to your SuperLine IAD if you have ordered two additional lines.
H Use an Additional Phone Line in Other Rooms Page 20. . . . . . . . . . . . . . . . . . .
Models 6501, 6502, 6511, 6512. This procedure describes how to connect multiple
phones, fax machines, or modems in separate rooms. This configuration may not
be applicable in all homes or small offices.
H Connect to High-Speed Data Service Page 22. . . . . . . . . . . . . . . . . . . . . . . . . . . .
Models 6510, 6511, 6512. This procedure describes how to connect your
SuperLine IAD to a PC or hub for high-speed Internet services using the Ethernet
port.

8
Add a Second Line for a Phone
Models 6501, 6502, 6511, 6512. Use the following procedure to add a new phone line.
Cables Required (Supplied)
H 6-foot phone cable (RJ11)
" Procedure
Connect the SuperLine IAD:
¶ Plug one end of the supplied phone cable into the LINE jack on the SuperLine IAD
rear panel.
· Plug the other end of the cable into the wall jack.
Add a Second Phone Line:
¸ Connect a phone to the PHONE 1/2 jack on the SuperLine IAD rear panel.
Connect the Existing Phone Line:
¹ If you wish to have your existing phone line available in this location, connect your
existing phone to the BASE PHONE jack on the SuperLine IAD rear panel.
Connect the AC Power Transformer:
º Plug the power transformer into an ac outlet and the POWER jack on the
SuperLine IAD rear panel.
Complete the Installation:
l If you have not yet attached phone filters to all your existing phones or other
devices attached to the same line as the SuperLine IAD, do so now. Refer to
Connect Phone Filters to Your Existing Phones and Other Devices
on page 4.
Your SuperLine IAD installation is now complete.

9
Additional
Phone
Phone 1/2
Base
Phone
Line
Wall
Jack
Existing
Phone
99-16430
Power
Adding a Second Line for a Phone (Models 6501, 6502, 6511, 6512)

10
Add a Second Line for a Modem
Models 6501, 6502, 6511, 6512. Use the following procedure to connect a modem to
your SuperLine IAD.
Cables Required (Supplied)
H 6-foot phone cable (RJ11)
" Procedure
Connect the SuperLine IAD:
¶ Plug one end of the supplied phone cable into the LINE jack on the SuperLine IAD
rear panel.
· Plug the other end of the cable into the wall jack.
Connect the Modem:
¸ Connect the line jack
1
of your modem to the PHONE 1/2 jack on the SuperLine
IAD rear panel.
Connect the Existing Phone Line:
¹ If you wish to have your existing phone line available in this location, connect your
existing phone to the BASE PHONE jack on the SuperLine IAD rear panel.
Connect the AC Power Transformer:
º Plug the power transformer into an ac outlet and the POWER jack on the
SuperLine IAD rear panel.
Complete the Installation:
l If you have not yet attached phone filters to all your existing phones or other
devices attached to the same line as the SuperLine IAD, do so now. Refer to
Connect Phone Filters to Your Existing Phones and Other Devices
on page 4.
Your SuperLine IAD installation is now complete.
___
1
The line jack on your modem may be labeled Line, Line In, Telco, or Wall.

11
99-16066-03
Phone 1/2
Base Phone
Wall
Jack
Line
Existing
Phone
Power
Modem
LINE
PHONE
Adding a Second Line for a Modem (Models 6501, 6502, 6511, 6512)

12
Work At Home: Add New Lines
for a Modem and an Additional Phone
Models 6502, 6512. Use the following procedure to connect a modem and an extra
phone to your SuperLine IAD. You must have ordered two additional lines from your
service provider.
Cables Required (Supplied)
H 6-foot phone cable (RJ11)
" Procedure
Connect the SuperLine IAD:
¶ Plug one end of the supplied phone cable into the LINE jack on the SuperLine IAD
rear panel.
· Plug the other end of the cable into the wall jack.
Connect the Modem:
¸ Connect the line jack
1
of your modem to the PHONE 1/2 jack on the SuperLine
IAD rear panel.
Connect the Additional Phone:
¹ Connect a phone to the PHONE 2 jack on the SuperLine IAD rear panel.
Connect the Existing Phone Line:
º If you wish to have your existing phone line available in this location, connect your
existing phone to the BASE PHONE jack on the SuperLine IAD rear panel.
Connect the AC Power Transformer:
» Plug the power transformer into an ac outlet and the POWER jack on the
SuperLine IAD rear panel.
___
1
The line jack on your modem may be labeled Line, Line In, Telco, or Wall.

13
Complete the Installation:
If you have not yet attached phone filters to all your existing phones or other
devices attached to the same line as the SuperLine IAD, do so now. Refer to
Connect Phone Filters to Your Existing Phones and Other Devices
on page 4.
Your SuperLine IAD installation is now complete.
Modem
LINE
PHONE
99-16434
Phone 1/2
Base Phone
Wall
Jack
Line
Existing
Phone
Phone 2
Additional
Phone
Power
Connecting a Modem and an Additional Phone (Models 6502, 6512)

14
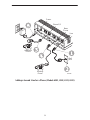
Home Office: Add High-Speed Data Service,
a Fax Machine, and an Additional Phone
Model 6512. Use the following procedure to connect an Ethernet-ready PC, fax
machine, and additional phone to your SuperLine IAD in the same room. You must
have ordered two additional lines and Ethernet data service from your service provider.
Cables Required (Supplied)
H 6-foot phone cable (RJ11)
Cables Required (Not Supplied)
Obtain the following from your local electronics or phone store if it is not provided with
your other equipment.
H 8-pin Ethernet crossover cable
" Procedure
Connect the SuperLine IAD:
¶ Plug one end of the supplied phone cable into the LINE jack on the SuperLine IAD
rear panel.
· Plug the other end of the cable into the wall jack.
Connect to High-Speed Data Service:
¸ Connect the network interface card of your PC to the ETHERNET jack on the
SuperLine IAD rear panel with a crossover cable. (If you are connecting to a hub,
you need a straight-through Ethernet cable. See
Connect to High-Speed Data
Service
on page 22.)
Connect the Fax Machine:
¹ Connect a fax machine to the PHONE 1/2 jack on the SuperLine IAD rear panel.
Connect the Additional Phone:
º Connect a phone to the PHONE 2 jack on the SuperLine IAD rear panel.
Connect the Existing Phone Line:
» If you wish to have your existing phone line available in this location, connect your
existing phone to the BASE PHONE jack on the SuperLine IAD rear panel.

15
Connect the AC Power Transformer:
Plug the power transformer into an ac outlet and the POWER jack on the
SuperLine IAD rear panel.
Complete the Installation:
If you have not yet attached phone filters to all your existing phones or other
devices attached to the same line as the SuperLine IAD, do so now. Refer to
Connect Phone Filters to Your Existing Phones and Other Devices
on page 4.
Your SuperLine IAD installation is now complete.
Fax
Machine
Phone 2
Phone 1/2
Base
Phone
Line
99-16433
Ethernet
Existing
Phone
PC with
Network
Interface
Card
Additional
Phone
Wall
Jack
Power
Adding High-Speed Data Service, a Fax Machine,
and an Additional Phone (Model 6512)

16
Connect a 2-Line Phone to the Existing
and Additional Phone Line
Models 6501, 6502, 6511, 6512. Use the following procedure to connect your
SuperLine IAD to a single phone with two lines. This configuration can be used if you
have one or two additional phone lines through your SuperLine IAD.
Cables Required (Supplied)
H 6-foot phone cable (RJ11)
" Procedure
Connect the SuperLine IAD:
¶ Plug one end of the supplied phone cable into the LINE jack on the SuperLine IAD
rear panel.
· Plug the other end of the cable into the wall jack.
Connect Line 1:
¸ Connect Line 1 of your 2-line phone to the BASE PHONE jack on the SuperLine
IAD rear panel.
Connect Line 2:
¹ Connect Line 2 of the 2-line phone to the PHONE 1/2 jack on the rear of the
SuperLine IAD.
Connect the AC Power Transformer:
º Plug the power transformer into an ac outlet and the POWER jack on the
SuperLine IAD rear panel.
Complete the Installation:
l If you have not yet attached phone filters to all your existing phones or other
devices attached to the same line as the SuperLine IAD, do so now. Refer to
Connect Phone Filters to Your Existing Phones and Other Devices
on page 4.
Your SuperLine IAD installation is now complete.

17
99-16100-03
Phone 1/2
Base Phone
Line 2
Line 1
2-Line
Phone
Wall
Jack
Line
Power
Connecting a 2-Line Phone to the Existing and Additional Phone Line
(Models 6501, 6502, 6511, 6512)

18
Connect a 2-Line Phone to Two Additional Phone Lines
Models 6502, 6512. Use the following procedure to connect your SuperLine IAD to a
single phone with two lines. Use this configuration only if you have two additional phone
lines through your SuperLine IAD.
Cables Required (Supplied)
H 6-foot phone cable (RJ11)
Cables Required (Not Supplied)
Obtain the following from your local electronics or phone store if it is not provided with
your other equipment.
H A 2-line phone cable (RJ14C) to connect Lines 1 and 2 of your 2-line phone to your
SuperLine IAD. (Refer to
Technical Information
on page 30 for more information.)
" Procedure
Connect the SuperLine IAD:
¶ Plug one end of the supplied phone cable into the LINE jack on the SuperLine IAD
rear panel.
· Plug the other end of the cable into the wall jack.
Connect Lines 1 and 2:
¸ Connect your 2-line phone using your 2-line RJ14C phone cable to the PHONE 1/2
jack on the SuperLine IAD rear panel. The 2-line phone cable connects both lines
through the PHONE 1/2 jack.
Connect the AC Power Transformer:
¹ Plug the power transformer into an ac outlet and the POWER jack on the
SuperLine IAD rear panel.
Complete the Installation:
l If you have not yet attached phone filters to all your existing phones or other
devices attached to the same line as the SuperLine IAD, do so now. Refer to
Connect Phone Filters to Your Existing Phones and Other Devices
on page 4.
Your SuperLine IAD installation is now complete.

19
99-16036a-03
Phone 1/2
RJ14
Phone
Cable
2-Line
Phone
Wall
Jack
Line
Phone 2
(not used in
this configuration)
Connecting a 2-Line Phone to Two Additional Lines (Models 6502, 6512)

20
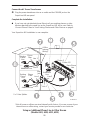
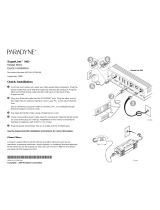
Use an Additional Phone Line in Other Rooms
Models 6501, 6502, 6511, 6512. If your home or office phone jacks are wired internally
with 4 wires, you may be able to connect phones in other rooms to your SuperLine IAD
by using optional hardware purchased from your local electronics or phone store. If you
are unsure if your home or office is wired with 4 wires, contact an electrician or your
service provider.
Use the following procedure to install your SuperLine IAD with multiple phones, fax
machines, or modems connected in other rooms.
Cables Required (Supplied)
H 6-foot phone cable (RJ11)
Cables and Hardware Required (Not Supplied)
You may need to obtain additional phone filters from your service provider. One filter is
supplied with your SuperLine IAD. Obtain the following from your local electronics or
phone store if they are not provided with your other equipment.
H 2-line splitters. Refer to
2-Line Splitter
on page 32 for 2-line splitter
specifications. They may also be called duplex or triplex adapters.
H RJ11 phone cables to connect the SuperLine IAD to the 2-line splitter and your
existing phone to the SuperLine IAD.
" Procedure
Connect the SuperLine IAD:
¶ Plug a 2-line splitter into the wall jack of the room where the SuperLine IAD is
located.
· Plug one end of the supplied phone cable into the LINE jack on the SuperLine IAD
rear panel.
¸ Plug the other end of the cable into Line 1 of the 2-line splitter.
¹ Plug a phone cable into Line 2 of the 2-line splitter.
º Plug the other end of the cable into the PHONE 1/2 jack on the SuperLine IAD rear
panel.
» If applicable, connect an additional phone, fax machine, or modem into the
PHONE 2 jack on the SuperLine IAD rear panel using one of your existing cables.
Connect a Phone, Fax Machine, or Modem In Another Room:
¼ Plug a second 2-line splitter into the wall jack of another room.
½ Connect the additional phone, fax machine, or modem to Line 2 of the 2-line
splitter. You can connect a phone to your existing phone line using Line 1 of the
2-line splitter and a phone filter as shown.
Repeat Steps 7 and 8 for any additional rooms you want to connect.
La pagina sta caricando ...
La pagina sta caricando ...
La pagina sta caricando ...
La pagina sta caricando ...
La pagina sta caricando ...
La pagina sta caricando ...
La pagina sta caricando ...
La pagina sta caricando ...
La pagina sta caricando ...
La pagina sta caricando ...
La pagina sta caricando ...
La pagina sta caricando ...
La pagina sta caricando ...
La pagina sta caricando ...
La pagina sta caricando ...
La pagina sta caricando ...
La pagina sta caricando ...
La pagina sta caricando ...
-
 1
1
-
 2
2
-
 3
3
-
 4
4
-
 5
5
-
 6
6
-
 7
7
-
 8
8
-
 9
9
-
 10
10
-
 11
11
-
 12
12
-
 13
13
-
 14
14
-
 15
15
-
 16
16
-
 17
17
-
 18
18
-
 19
19
-
 20
20
-
 21
21
-
 22
22
-
 23
23
-
 24
24
-
 25
25
-
 26
26
-
 27
27
-
 28
28
-
 29
29
-
 30
30
-
 31
31
-
 32
32
-
 33
33
-
 34
34
-
 35
35
-
 36
36
-
 37
37
-
 38
38


Paradyne 6501 Installation Instructions Manual
- Tipo
- Installation Instructions Manual
- Questo manuale è adatto anche per
in altre lingue
- English: Paradyne 6501
Documenti correlati
-
 Paradyne 6512-A2 Installation Instructions Manual
-
 Paradyne 6512-A2 Installation Instructions Manual
-
 Paradyne SuperLine 6511 Quick Installation
-
 Paradyne 6501 Quick Installation
-
 Paradyne 6035 Guida d'installazione
-
 Paradyne SuperLine 6512-A1 Quick Installation
-
 Paradyne 6512 Installation Instructions Manual
-
 Paradyne SuperLine 6510 Quick Installation
-
 Paradyne SuperLine 6502 Quick Installation


