
Important
Please read this “User’s Manual”, and “Setup Manual” (separate
volume) carefully to familiarize yourself with safe and effective usage.
• Refer to the “Setup Manual” for information on the installation /
connection of the monitor.
• For the latest product information including the “User’s Manual”,
refer to our web site :
http://www.eizoglobal.com
Touch Panel Color LCD Monitor
User’s Manual

2
This product has been adjusted specically for use in the region to which it was originally shipped. If
operated outside this region, the product may not perform as stated in the specications.
No part of this manual may be reproduced, stored in a retrieval system, or transmitted, in any form or by
any means, electronic, mechanical, or otherwise, without the prior written permission of EIZO Corporation.
EIZO Corporation is under no obligation to hold any submitted material or information condential unless
prior arrangements are made pursuant to EIZO Corporation’s receipt of said information. Although every
effort has been made to ensure that this manual provides up-to-date information, please note that EIZO
monitor specications are subject to change without notice.

3
Notice for this monitor
Notice for this monitor
This product is suited to general purposes like creating documents, viewing multimedia content.
This product has been adjusted specically for use in the region to which it was originally shipped. If the
product is used outside the region, it may not operate as specied in the specications.
This product may not be covered by warranty for uses other than those described in this manual.
The specications noted in this manual are only applicable when the following are used:
• Power cords provided with the product
• Signal cables specied by us
Only use optional products manufactured or specied by us with this product.
If you place this product on a lacquer-coated desk, the color may adhere to the bottom of the stand due to
the composition of the rubber. Check the desk surface before use.
It takes about 30 minutes (under our measurement conditions) for the monitor display to stabilize. Please
wait 30 minutes or more after the monitor power has been turned on, and then adjust the monitor.
Monitors should be set to a lower brightness to reduce changes in luminosity caused by long-term use and
maintain a stable display.
When the screen image is changed after displaying the same image for extended periods of time, an
afterimage may appear. Use the screen saver or power save function to avoid displaying the same image for
extended periods of time. Depending on the image, an afterimage may appear even if it was displayed for
a short period of time. To remove such a phenomenon, change the image or keep the power turned off for
several hours.
If the monitor displays continuously over a long period of time, dark smudges or burn-in may appear. To
maximize the life of the monitor, we recommend the monitor be turned off periodically.
Periodic cleaning is recommended to keep the monitor looking new and to prolong its operation lifetime (refer
to “Cleaning” (page 4)).
The LCD panel is manufactured using high-precision technology. Although, missing pixels or lit pixels may
appear on the LCD panel, this is not a malfunction. Percentage of effective dots: 99.9994 % or higher.
The backlight of the LCD panel has a xed lifetime. Depending on the usage pattern, such as usage for
long continuous periods, the lifespan of the backlight may run out sooner, requiring replacement. When the
screen becomes dark or begins to icker, please contact your local EIZO representative.
Do not scratch or press on the LCD panel with any sharp objects, at this may result in damage to the LCD
panel. Do not attempt to brush with tissues as this may scratch the panel.
When the monitor is cold and brought into a room or the room temperature goes up quickly, dew
condensation may occur on the interior and exterior surfaces of the monitor. In that case, do not turn the
monitor on. Instead wait until the dew condensation disappears, otherwise it may cause some damage to the
monitor.
(Cautions for the Use of the Touch Panel)
• During touch operation
Be careful of the following points. Otherwise, damage to the monitor or malfunctions may occur.
-
Do not strongly press, scratch, or poke the panel.
-
Do not touch the panel with hard objects such as ballpoint pens or metals.
-
Do not touch the black periphery of the screen.
-
Do not stick tape or anything else onto the panel or the black periphery of the panel.
-
If any liquid comes into contact with the panel, wipe it off immediately.
-
Do not allow liquid to enter between the panel and the panel frame.

4
Notice for this monitor
Cleaning
The stains on the cabinet and LCD panel surface can be removed by moistening part of a soft cloth with water.
Attention
• Do not allow liquid to enter the clearance between the panel and the panel frame.
• Chemicals such as alcohol and antiseptic solution may cause gloss variation, tarnishing, and fading of the cabinet
or LCD panel, and also quality deterioration of the image.
• Never use thinner, benzine, wax, or abrasive cleaner as they may damage the cabinet or LCD panel surface.
Note
• It is recommended that ScreenCleaner (available as an option) be used to clean the cabinet and LCD panel surface.
To use the monitor comfortably
• An excessively dark or bright screen may affect your eyes. Adjust the brightness of the monitor
according to the environmental conditions.
• Staring at the monitor for a long time tires your eyes. Take a 10-minute rest every hour.

5
CONTENTS
CONTENTS
Notice for this monitor ......................................... 3
Cleaning .................................................................... 4
To use the monitor comfortably ............................. 4
CONTENTS ............................................................. 5
Chapter 1 Introduction ....................................... 6
1-1. Features ......................................................... 6
1-2. EIZO LCD Utility Disk.................................... 6
●
Disk contents and software overview ............. 6
1-3. Basic Operations and Functions ................ 7
●
Basic operation of the Setting menu ............... 7
●
Functions ......................................................... 8
Chapter 2 Adjusting Screens ............................ 9
2-1. Setting the Resolution ................................. 9
●
Windows 10 ..................................................... 9
●
Windows 8.1 / Windows 7 ............................... 9
2-2. Adjusting Color ............................................10
●
To select the display mode
(FineContrast Mode) ......................................10
●
To perform advanced adjustments ................11
●
Adjustable settings in each mode ..................11
●
To adjust brightness .......................................11
●
To adjust contrast ...........................................12
●
To adjust color temperature ...........................12
●
To adjust gamma ...........................................13
●
To adjust the color saturation .........................13
●
To adjust hue ..................................................13
●
To adjust gain .................................................14
2-3. Screen Adjustment ......................................15
●
Digital Signal Input .........................................15
●
Analog Signal Input ........................................15
2-4. Screen Size Changing .................................19
●
Screen Size Changing ...................................19
●
To adjust brightness of non-display area .......19
Chapter 3 Setting Monitor ............................... 20
3-1. Adjusting Volume........................................ 20
3-2. Selecting sound source while using the
DisplayPort signal input............................. 20
3-3. Enabling / Disabling DDC/CI
communication .......................................... 20
3-4. Locking Operation Buttons ........................21
3-5. Showing and hiding the EIZO logo ............21
3-6.
Changing Setting Menu Display Position ...
21
3-7. Setting Language .........................................21
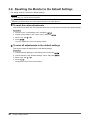
3-8. Resetting the Monitor to the Default
Settings ........................................................ 22
●
To reset the color adjustments ...................... 22
●
To reset all adjustments to the default
settings .......................................................... 22
Chapter 4 Touch Panel Settings .................... 23
4-1. Calibrating the Monitor .............................. 23
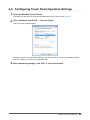
4-2. ConguringTouchPanelOperation
Settings ........................................................ 25
Chapter 5 Power Saving Functions ................ 26
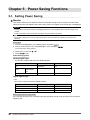
5-1. Setting Power Saving ................................. 26
●
Monitor .......................................................... 26
●
Audio Output ................................................. 27
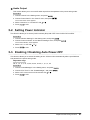
5-2. Setting Power Indicator .............................. 27
5-3. Enabling / Disabling Auto Power-OFF ...... 27
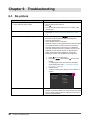
Chapter 6 Troubleshooting .............................. 28
6-1. No picture .................................................... 28
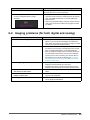
6-2. Imaging problems (for both digital and
analog) .......................................................... 29
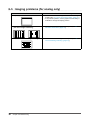
6-3. Imaging problems (for analog only) ......... 30
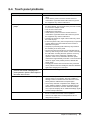
6-4. Touch panel problems .................................31
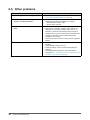
6-5. Other problems ........................................... 32
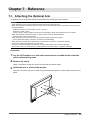
Chapter 7 Reference ........................................ 33
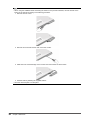
7-1. Attaching the Optional Arm ....................... 33
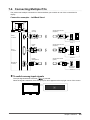
7-2. Connecting Multiple PCs ........................... 35
●
To switch among input signals ...................... 35
●
To set input signal selection .......................... 36
7-3. Displaying Monitor Information ................ 36
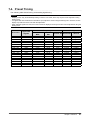
7-4. Preset Timing ...............................................37
Chapter 8 Glossary .......................................... 38
Appendix .............................................................. 40
Trademark ............................................................... 40
License / Copyright ................................................ 40
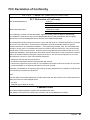
FCC Declaration of Conformity .............................41
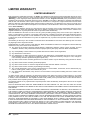
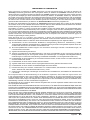
LIMITED WARRANTY ............................................. 42
Recycling Information ........................................... 52
China Measures for RoHS Compliance in
ChinaRoHS .............................................................. 56

6
Chapter 1 Introduction
Chapter 1 Introduction
Thank you very much for choosing an EIZO color LCD monitor.
1-1. Features
• 21.5″ wide format LCD
• Supports a resolution of 1920 × 1080
• Touch Panel provided
- Surface Acoustic Wave technology
- Supported OS: Microsoft Windows 10 / Windows 8.1 / Windows 7
- Supports the Windows Touch function (multi-touch) of Microsoft Windows 10 / Windows 8.1 /
Windows 7.
*1
*1 This product supports up to two simultaneous touches (multi-touch support).
• 3 signal input terminals (DVI-D × 1, DisplayPort × 1, D-Sub × 1)
- Applicable to DisplayPort (applicable to 8 bit)
*2
The DisplayPort input receives both an image signal and an audio signal via a single DisplayPort cable.
*2 When transmitting an audio signal using the DisplayPort cable, the graphics board must be compatible
with audio output (see “Specications” in the Setup Manual).
• The FineContrast function allows the user to select the display mode optimum to the displayed
image.
• Flattening of the bezel allows smooth touch operations.
• Small footprint achieved through low-prole and lightweight design
The monitor can be readily moved and its position adjusted.
• Power saving function
Suppressing the power consumption reduces the carbon dioxide emissions. This product is equipped with
power saving function.
- 0 W power consumption when the main power is off
Equipped with main power switch.
When the monitor is not required, the power supply can be shut off using the main power switch.
• Displays HDCP (High-bandwidth Digital Protection) protected contents.
1-2. EIZO LCD Utility Disk
An “EIZO LCD Utility Disk” (CD-ROM) is supplied with this product. The following table shows the disk
contents and the overview of the software programs.
●
Disk contents and software overview
The disk includes software programs for adjustment, and User’s Manual. Refer to Readme.txt le on
the disk for software startup procedures or le access procedures.
Item Overview
Screen adjustment pattern les Used when adjusting the image of analog signal input manually.
User’s Manual of this monitor (PDF le)
Readme.txt le

7
Chapter 1 Introduction
1-3. Basic Operations and Functions
●
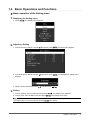
Basic operation of the Setting menu
1.
Displaying the Setting menu
1. Press . The Setting menu appears.
2.
Adjusting / Setting
1. Choose a menu to adjust / set with , , and then press . The Sub menu appears.
2. Choose an item to adjust / set with , , and then press . The adjustment / setting menu
appears.
3. Adjust / set the selected item with , , and then press .
3.
Exiting
1. Choose “Return” from the Sub menu and press . The Setting menu appears.
2. Choose “Exit” from the Main menu and press
. The Setting menu quits.
Note
• The Setting menu can also be exited by pressing twice quickly.

8
Chapter 1 Introduction
●
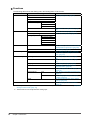
Functions
The following table shows the Setting menu and setting items of each menu.
Main menu Setting Reference
Color
*1
Brightness “2-2. Adjusting Color” (page 10)
Contrast
Temperature
Gamma
Advanced Settings Saturation
Hue
Gain
Color Reset “To reset the color adjustments” (page
22)
Screen Screen Size “Screen Size Changing” (page 19)
Smoothing “2-3. Screen Adjustment” (page 15)
Analog Adjustment
*2
Auto Screen Adjust
Auto Range Adjust
Clock
Phase
Hor.Position
Ver.Position
Sound Source “3-2. Selecting sound source while using
the DisplayPort signal input” (page 20)
Power Save “Audio Output” (page 27)
PowerManager Power Save “5-1. Setting Power Saving” (page 26)
Eco Timer “5-3. Enabling / Disabling Auto Power-
OFF” (page 27)
Monitor Settings Input Signal “To set input signal selection” (page
36)
Power Indicator “5-2. Setting Power Indicator” (page
27)
Language “3-7. Setting Language” (page 21)
DDC/CI “3-3. Enabling / Disabling DDC/CI
communication” (page 20)
Border Intensity “To adjust brightness of non-display area”
(page 19)
Menu Settings Logo “3-5. Showing and hiding the EIZO logo”
(page 21)
Menu Position “3-6. Changing Setting Menu Display
Position” (page 21)
Reset “To reset all adjustments to the default
settings” (page 22)
Information “7-3. Displaying Monitor Information”
(page 36)
*1 The adjustment / settings available on the “Color” menu depend on the selected Color mode. (“Adjustable
settings in each mode” (page 11))
*2 These functions can be adjusted with analog input.

9
Chapter 2 Adjusting Screens
Chapter 2 Adjusting Screens
2-1. Setting the Resolution
When you connect the monitor to the PC and nd that the resolution is improper, or when you want to
change the resolution, follow the procedure below.
●
Windows 10
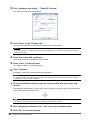
1. Right-click the mouse anywhere on the desktop except for icons.
2. From the displayed menu, click “Display Settings”.
3. On the “Customize your display” dialog box, click “Advanced display settings”.
4. Select a monitor, then choose a resolution from the “Resolution” pull-down menu.
5. Click the “Apply” button.
6. When a conrmation dialog box is displayed, click “Keep changes”.
●
Windows 8.1 / Windows 7
1. For Windows 8.1, click the “Desktop” tile on the Start Screen to display the desktop.
2. Right-click the mouse anywhere on the desktop except for icons.
3. From the displayed menu, click “Screen resolution”.
4. On the “Screen Resolution” dialog box, select the monitor.
5. Click “Resolution” to select the desired resolution.
6. Click the “OK” button.
7. When a conrmation dialog box is displayed, click “Keep changes”.

10
Chapter 2 Adjusting Screens
2-2. Adjusting Color
●
To select the display mode (FineContrast Mode)
This function allows easy selection of a desired mode according to monitor application.
Display Modes
Mode Purpose
User1 Select this to dene a desired set of parameter settings.
User2
sRGB Suitable for color matching with sRGB compatible peripherals.
The mode menu
appears.
Procedure
1. Press
.
The mode menu appears at the bottom left of the screen.
2. The mode among the list is highlighted in turn each time is pressed.
You can switch the mode with or while the mode menu is displayed.
→User1←→User2←→sRGB←
Note
• The Setting menu and the Mode menu cannot be displayed at the same time.

11
Chapter 2 Adjusting Screens
●
To perform advanced adjustments
The “Color” menu of the Setting menu allows you to set and save the independent color adjustment
for each mode.
Attention
• It takes about 30 minutes for the performance of electrical parts to stabilize. Please wait 30 minutes or more
after the monitor power has been turned on, and then adjust the monitor.
• Perform the range adjustment rst when adjusting color for analog signals (see “To adjust color gradation
automatically” (page 18)).
• The same image may be seen in different colors on multiple monitors due to their monitor-specic
characteristics. Make ne color adjustment visually when matching colors on multiple monitors.
●
Adjustable settings in each mode
The adjustable settings depend on the mode. (Non-adjustable or non-settable function cannot be
selected.)
√: Adjustable -: Not adjustable
Function
FineContrast Mode
User1 User2 sRGB
Brightness √ √ √
Contrast √ √ -
Temperature √ √ -
Gamma √ √ -
Advanced Settings Saturation √ √ -
Hue √ √ -
Gain √ √ -
Color Reset √ √ √
●
To adjust brightness
The screen brightness is adjusted by changing the brightness of the backlight (light source from the
LCD back panel).
Adjustable range
0 to 100
Procedure
1. Press
.
2. Use
or for adjustment.
3. Press
to exit.
Note
• If you feel that the image is too dark even if the brightness is set to 100, adjust the contrast.
• Alternatively, you can use “Brightness” under “Color” in the Adjustment menu to adjust it.

12
Chapter 2 Adjusting Screens
●
To adjust contrast
The brightness of the screen is adjusted by varying the video signal level.
Adjustable range
0 to 100
Procedure
1. Choose “Color” in the Setting menu, and press
.
2. Choose “Contrast” in the “Color” menu, and press
.
The “Contrast” menu appears.
3. Use or for adjustment.
4. Press
to exit.
Note
• In the contrast of 50, every color gradation is displayed.
• When adjusting the monitor, it is recommended to perform the brightness adjustment which may not lose the
gradation characteristics, prior to the contrast adjustment.
• Perform the contrast adjustment in the following cases.
- When you feel the image is too dark even if the brightness is set to 100 (Set the contrast to higher than 50.)
●
To adjust color temperature
Color temperature can be adjusted.
The color temperature is normally used to express the hue of “White” and / or “Black” by a numerical
value. The value is expressed in degrees “K” (Kelvin).
The screen becomes reddish at a low color temperature, and bluish at a high color temperature, like
the ame temperature. A gain preset value is set for each color temperature setting value.
Adjustable range
Off, 4000 K-10000 K (specied by every 500 K unit, including 9300 K)
Procedure
1. Choose “Color” in the Setting menu, and press
.
2. Choose “Temperature” in the “Color” menu, and press
.
The “Temperature” menu appears.
3. Use or for adjustment.
4. Press
to exit.
Note
• The value shown in “K” is available only as reference.
• “Gain” allows you to perform more advanced adjustment (see “To adjust gain” (page 14)).
• If you set to “Off”, the image is displayed in the preset color of the monitor (Gain: 100 for each RGB).
• When gain is changed, the color temperature is changed to “Off”.

13
Chapter 2 Adjusting Screens
●
To adjust gamma
Gamma can be adjusted. The brightness of the monitor varies depending on the input signal,
however, the variation rate is not proportional to the input signal. To keep the balance between the
input signal and the brightness of the monitor is called as “Gamma correction”.
Adjustable range
1.8, 2.0, 2.2
Procedure
1. Choose “Color” in the Setting menu, and press
.
2. Choose “Gamma” in the “Color” menu, and press
.
The “Gamma” menu appears.
3. Use or for adjustment.
4. Press
to exit.
●
To adjust the color saturation
This function allows you to adjust color saturation.
Adjustable range
-50 to 50
Procedure
1. Choose “Color” in the Setting menu, and press
.
2. Choose “Advanced Settings” in the “Color” menu, and press
.
3. Choose “Saturation” in the “Advanced Settings” menu, and press
.
The “Saturation” menu appears.
4. Use or for adjustment.
5. Press
to exit.
Attention
• Using this function may make some color gradations unavailable for display.
Note
• The minimum value (-50) changes the screen to monochrome.
●
To adjust hue
This function allows you to adjust hue.
Adjustable range
-50 to 50
Procedure
1. Choose “Color” in the Setting menu, and press
.
2. Choose “Advanced Settings” in the “Color” menu, and press
.
3. Choose “Hue” in the “Advanced Settings” menu, and press
.
The “Hue” menu appears.
4. Use or for adjustment.
5. Press
to exit.
Attention
• Using this function may make some color gradations unavailable for display.

14
Chapter 2 Adjusting Screens
●
To adjust gain
The brightness of each color component red, green, and blue is called “Gain”. You can change the
hue of “white” by adjusting gain.
Adjustable range
0 to 100
Procedure
1. Choose “Color” in the Setting menu, and press
.
2. Choose “Advanced Settings” in the “Color” menu, and press
.
3. Choose “Gain” in the “Advanced Settings” menu, and press
.
The “Gain” menu appears.
4. Adjust gain with or for each of red, green, and blue.
5. Press
to exit.
Attention
• Using this function may make some color gradations unavailable for display.
Note
• The value of gain changes with that of color temperature.
• When gain is changed, the color temperature is changed to “Off”.

15
Chapter 2 Adjusting Screens
2-3. Screen Adjustment
●
Digital Signal Input
When digital signals are input, images are displayed correctly based on the preset data of the
monitor, but if characters and / or lines appear blurred, go to “To modify blurred characters / lines”
(page 18).
When performing more advanced adjustment, see “2-2. Adjusting Color” (page 10) and subsequent
pages.
●
Analog Signal Input
Attention
• It takes about 30 minutes for the performance of electrical parts to stabilize. Please wait 30 minutes or more
after the monitor power has been turned on, and then adjust the monitor.
• The Self Adjust (automatic screen adjustment) function does not work for the images under the resolution of
800 × 600 (SVGA).
• The self adjustment (or automatic screen adjustment) function works correctly when an image is fully
displayed over the Windows or Macintosh display area. They do not work properly in the cases below:
- When an image is displayed only on a part of the screen (command prompt window, for example)
- When a black background (wallpaper, etc.) is in use
Also, these functions cannot work properly in some graphic boards.
The monitor screen adjustment is used to suppress ickering of the screen or adjust screen position
and screen size correctly according to the PC to be used.
Note
• The Self Adjust function works when all of the following conditions are satised:
- When a signal is input into the monitor for the rst time or when a resolution or vertical / horizontal scan
frequency not used before is set
If the screen is not displayed correctly even after performing the Self Adjust operation, adjust the
screen according to the procedures on the following pages to use the monitor comfortably.
Setting Procedures
1.
Perform the auto adjustment.
●
Toadjustickering,screenposition,andscreensizeautomatically
Procedure
1. Choose “Screen” in the Setting menu, and press
.
2. Choose “Analog Adjustment” in the “Screen” menu, and press
.
3. Choose “Auto Screen Adjust” in the “Analog Adjustment” menu, and press
.
4. Select “Yes” with
or , and press .
Flickering, screen position, and screen size are corrected by the auto-adjustment function.
If the screen is not displayed correctly even after performing the auto adjustment, perform adjustments
according to the following procedure. If the screen is displayed correctly, go to “5. Adjusting color gradation.”
(page 18).

16
Chapter 2 Adjusting Screens
2.
Prepare to use analog screen adjustment patterns.
Load the “EIZO LCD Utility Disk” to your PC, and then open the “Screen adjustment pattern les”.
Note
• For details and instructions on opening the “Screen adjustment pattern les”, refer to the Readme.txt le.
3.
Perform the auto adjustment again with the analog screen adjustment pattern
displayed.
●
Toadjustickering,screenposition,andscreensizeautomatically
Procedure
1. Display Pattern 1 in full screen on the monitor using the “Screen adjustment pattern les”.
2. Choose “Screen” in the Setting menu, and press .
3. Choose “Analog Adjustment” in the “Screen” menu, and press
.
4. Choose “Auto Screen Adjust” in the “Analog Adjustment” menu, and press
.
5. Select “Yes” with
or , and press .
Flickering, screen position, and screen size are corrected by the auto-adjustment function.
If the screen is not displayed correctly even after performing the auto adjustment, perform adjustments
according to the following procedure. If the screen is displayed correctly, go to “5. Adjusting color gradation.”
(page 18).
4.
Choose “Screen” from the Setting menu to perform advanced adjustments.
Adjust the clock, phase and position, in this order.
●
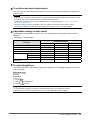
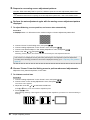
To eliminate vertical bars
Procedure
1. Choose “Analog Adjustment” in the “Screen” menu, and press
.
2. Choose “Clock” in the “Analog Adjustment” menu, and press
.
The “Clock” menu appears.
3. Adjust the clock with or to eliminate vertical bars.
Press or slowly so as not to miss the adjustment point.
4. Press to exit.
When blurring, ickering or bars appear on the screen after adjustment, proceed to “To remove ickering or
blurring ”.

17
Chapter 2 Adjusting Screens
●
Toremoveickeringorblurring
Procedure
1. Choose “Analog Adjustment” in the “Screen” menu, and press
.
2. Choose “Phase” in the “Analog Adjustment” menu, and press
.
The “Phase” menu appears.
3. Adjust the phase with or to minimize ickering or blurring.
4. Press
to exit.
When vertical bars appear on the screen after adjustment, go back to “To eliminate vertical bars ”.
(Clock → Phase → Position)
Attention
• Flickering or blurring may not be eliminated depending on your PC or graphics board.
●
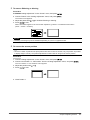
To correct the screen position
Note
• Since the number of pixels and the pixel positions are xed on the LCD monitor, only one position is provided
to display images correctly. The position adjustment is made to shift an image to the correct position.
Procedure
1. Choose “Analog Adjustment” in the “Screen” menu, and press
.
2. Choose “Hor.Position” or “Ver.Position” from the “Analog Adjustment” menu, and press
.
The “Hor. Position” or “Ver. Position” menu appears.
3. Adjust the position with or .
4. Press
to exit.
5. Close Pattern 1.

18
Chapter 2 Adjusting Screens
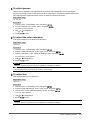
5.
Adjusting color gradation.
●
To adjust color gradation automatically
Every color gradation (0 to 255) can be displayed by adjusting the signal output level.
Procedure
1. Display Pattern 2 in full screen on the monitor using the “Screen adjustment pattern les”.
2. Choose “Screen” in the Setting menu, and press .
3. Choose “Analog Adjustment” in the “Screen” menu, and press
.
4. Choose “Auto Range Adjust” in the “Analog Adjustment” menu, and press
.
5. Select “Yes” with
or , and press .
The output range is set automatically.
6. Close Pattern 2.
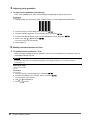
6.
Modify blurred characters or lines.
●
To modify blurred characters / lines
When an image is displayed with a resolution other than recommended, the characters or lines of
the displayed image may blur.
Attention
• Smoothing setting may not be required depending on the display resolution. (You cannot choose the
smoothing icon.)
Adjustable range
1 to 5
Procedure
1. Choose “Screen” in the Setting menu, and press
.
2. Choose “Smoothing” in the “Screen” menu, and press
.
The “Smoothing” menu appears.
3. Use or for adjustment.
4. Press
to exit.

19
Chapter 2 Adjusting Screens
2-4. Screen Size Changing
●
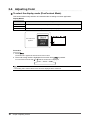
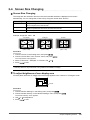
Screen Size Changing
The image with the resolution other than the recommended resolution is displayed in full screen
automatically. You can change the screen size by using the “Screen Size” function.
Setting Function
Full Screen Displays an image in full screen. Images are distorted in some cases because the vertical
rate is not equal to the horizontal rate.
Enlarged Displays an image in full screen. In some cases, a blank horizontal or vertical border
appears to equalize the vertical rate and the horizontal rate.
Normal Displays images with the specied resolution.
Example: Image size 1024 × 768
Full Screen Enlarged Normal
(1920 × 1080) (1440 × 1080) (1024 × 768)
Procedure
1. Choose “Screen” in the Setting menu, and press
.
2. Choose “Screen Size” in the “Screen” menu, and press
.
The “Screen Size” menu appears.
3. Select “Full Screen”, “Enlarged”, or “Normal” with or .
4. Press
to exit.
Attention
• Selecting “Normal” may make some color gradations unavailable for display.
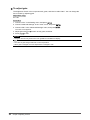
●
To adjust brightness of non-display area
A border (black area with no image) around the image appears in the “Normal” or “Enlarged” mode.
Border
Procedure
1. Choose “Monitor Settings” in the Setting menu, and press
.
2. Choose “Border Intensity” in the “Monitor Settings” menu, and press
.
The “Border Intensity” menu appears.
3. Use or for adjustment.
4. Press
to exit.

20
Chapter 3 Setting Monitor
Chapter 3 Setting Monitor
3-1. Adjusting Volume
This function allows you to adjust the speaker volume.
Adjustable range
0 to 30
Procedure
1. Press
.
2. Use
or for adjustment.
3. Press
to exit.
3-2. Selecting sound source while using the DisplayPort
signal input
This function allows you to switch sound source during DisplayPort signal input. You can select the
Stereo Mini Jack or DisplayPort.
Procedure
1. Choose “Sound” in the Setting menu, and press
.
2. Choose “Source” in the “Sound” menu, and press
.
The “Source” menu appears.
3. Select “Stereo Mini Jack” or “DisplayPort” with or .
4. Press
to exit.
Note
• This function is available with DisplayPort signal input.
3-3. Enabling / Disabling DDC/CI communication
This function allows you to enable / disable the DDC/CI communication (see “Chapter 8 Glossary” (page
38)).
Procedure
1. Choose “Monitor Settings” in the Setting menu, and press
.
2. Choose “DDC/CI” in the “Monitor Settings” menu, and press
.
The “DDC/CI” menu appears.
3. Select “On” or “Off” with or .
4. Press
to exit.
Note
• The DisplayPort input of this monitor does not support DDC/CI communication.
La pagina si sta caricando...
La pagina si sta caricando...
La pagina si sta caricando...
La pagina si sta caricando...
La pagina si sta caricando...
La pagina si sta caricando...
La pagina si sta caricando...
La pagina si sta caricando...
La pagina si sta caricando...
La pagina si sta caricando...
La pagina si sta caricando...
La pagina si sta caricando...
La pagina si sta caricando...
La pagina si sta caricando...
La pagina si sta caricando...
La pagina si sta caricando...
La pagina si sta caricando...
La pagina si sta caricando...
La pagina si sta caricando...
La pagina si sta caricando...
La pagina si sta caricando...
La pagina si sta caricando...
La pagina si sta caricando...
La pagina si sta caricando...
La pagina si sta caricando...
La pagina si sta caricando...
La pagina si sta caricando...
La pagina si sta caricando...
La pagina si sta caricando...
La pagina si sta caricando...
La pagina si sta caricando...
La pagina si sta caricando...
La pagina si sta caricando...
La pagina si sta caricando...
La pagina si sta caricando...
La pagina si sta caricando...
La pagina si sta caricando...
-
 1
1
-
 2
2
-
 3
3
-
 4
4
-
 5
5
-
 6
6
-
 7
7
-
 8
8
-
 9
9
-
 10
10
-
 11
11
-
 12
12
-
 13
13
-
 14
14
-
 15
15
-
 16
16
-
 17
17
-
 18
18
-
 19
19
-
 20
20
-
 21
21
-
 22
22
-
 23
23
-
 24
24
-
 25
25
-
 26
26
-
 27
27
-
 28
28
-
 29
29
-
 30
30
-
 31
31
-
 32
32
-
 33
33
-
 34
34
-
 35
35
-
 36
36
-
 37
37
-
 38
38
-
 39
39
-
 40
40
-
 41
41
-
 42
42
-
 43
43
-
 44
44
-
 45
45
-
 46
46
-
 47
47
-
 48
48
-
 49
49
-
 50
50
-
 51
51
-
 52
52
-
 53
53
-
 54
54
-
 55
55
-
 56
56
-
 57
57


in altre lingue
- English: Eizo FDF2121WT-A User manual
- français: Eizo FDF2121WT-A Manuel utilisateur
Documenti correlati
-
Eizo FDSV1201T Manuale utente
-
Eizo MX242W Manuale del proprietario
-
-
-
-
-
-
-
-
Eizo MX215 Manuale utente