
version 3.10
USER MANUAL

Thank you for choosing Analog Way and the ORCHESTRA. By following these simple steps,
you should be able to setup and use your powerful remote controller within minutes. Discover the
ORCHESTRA’s
in combination with the all new Eikos, Eikos LE, OPS300, OPS200, Pulse, Pulse LE, SmartVu,
SmartVu LE, Smart MatriX, Smart MatriX LE, Smart Edge, Smart Quad or Di-VentiX II, unleash
all your creativity for a new experience in show and event management by Analog Way.
THANK YOU
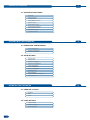
TABLE OF CONTENTS
1
INTRODUCTION
5
1-1. WHAT IS THE ORCHESTRA
1-2. USEFUL TERMS AND DEFINITIONS
1-3. ORCHESTRA COLOR CODES
7
HARDWARE INSTALLATION
2-1. SAFETY INSTRUCTION
2-2. UNPACKING AND INSPECTION
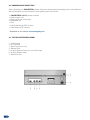
2-3. THE ORCHESTRA REAR PANEL
2-4. HARDWARE SPECIFICATIONS
Input specications
Screens
Output specications
Presets
Communication specications
Layers
Environmental specications
Frames & Backgrounds
Pin outs
PIP (Picture in Picture)
HDCP compliance
Keying & Titling
1

ORCHESTRA OVERVIEW
14
3-1. ORCHESTRA FRONT PANEL
4-1. OPERATIONAL CONFIGURATION
5-1. USING THE JOYSTICK
5-2. LAYER SETTINGS
4-2. SHOW SETTINGS
STARTING WITH THE ORCHESTRA
16
OPERATING THE ORCHESTRA
24
2
Overview
Settings section
Layout section
Source Preview section
Preset Memory section
Preset Edition section
User conguration
Screen setup
Position
Layer Settings
Video Out conguration
Source conguration
Screen section
User Effect section
System conguration
Edit devices
Size
Element Settings
Input conguration
Soft Edge setup
Logos & Frames conguration
Source Main section
Transition section
Show conguration
Output conguration
Zoom
Source Settings
Audio conguration
Image settings
Controls menu

5-3. LIVE BACKGROUND
5-4. FRAME BACKGROUND
5-5. WORKING WITH PIPs
5-6. WORKING WITH LOGOS
5-7. PRESET MEMORIES
5-8. TRANSITIONS
6-1. MATRIX SETUP
7-1. ABOUT APPLICATION EXAMPLES
6-2. MATRIX CONFIGURATION
7-2. APPLICATION EXAMPLES
WORKING WITH A MATRIX
APPLICATION EXAMPLES AND TIPS
36
38
3
Adding a Live Background
Adding a Frame Background
Clearing a Live Background
Clearing a Frame Background
Adding a PIP
Adding a logo
User Effects
Loading a Preset Memory
Soft Edge setup
Manipulating a logo
Take
Reloading Memory from Main
Logos & Frames conguration
Clearing a logo
Step back (Toggle)
Selecting a PIP
Selecting a logo
Saving a Preset Memory
Image settings
Logo depth
T-Bar
Accessing Memory pages
Controls menu
Clearing all logos
Take Cut

SOFT EDGE BLENDING
42
7-1. SOFT EDGE BLENDING
HOW TO CONTACT US
INFORMATION ON DISPOSAL
CONTACT INFORMATION
46
WARRANTY AND SERVICES INFORMATION
45
9-1. ANALOG WAY LIMITED WARRANTY
9-2. SERVICES AND RMA
8-1. SOFT EDGE SETUP
8-2. SOFT EDGE CONFIGURATION
4

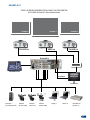
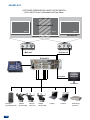
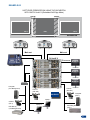
ORCHESTRA is a powerful intuitive and ergonomic remote controller designed to manage several switchers
such as Eikos, Eikos LE, OPS300, OPS200, Pulse, Pulse LE, SmartVu, SmartVu LE, Smart MatriX, Smart
MatriX LE, Smart Edge, Smart Quad or Di-VentiX II systems, independently or simultaneously in any kind of
combination, including Soft Edge Blending.
ORCHESTRA
ORCHESTRA controls the effects and functionalities of the Di-VentiX II and Eikos, Eikos LE, OPS300,
OPS200, Pulse, Pulse LE, SmartVu, SmartVu LE, Smart MatriX, Smart MatriX LE, Smart Edge or Smart
Quad systems.
* NOTE * : ORCHESTRA offers the control of matrices in order to multiply the number of live sources,
whatever the Analog Way switcher number of inputs is.
ORCHESTRA is especially
of your events can be saved for future use.
With its new Interface Human Machine, ORCHESTRA will help you manage multi-screen and multi-location
live presentations with total peace of mind.
SCREENS: a Screen on the ORCHESTRA is a containing element, which corresponds to a projection
Eikos, Eikos LE, OPS300, OPS200, Pulse, Pulse
LE, SmartVu, SmartVu LE, Smart MatriX, Smart MatriX LE, Smart Edge, Smart Quad or a Di-VentiX II
PRESET: a Preset on the ORCHESTRA
presets allow to record or recall the state of sources and elements in a Screen at any given moment.
LAYERS:
has an associated visual priority — either in front of another layer or behind.
BACKGROUND FRAME: a Background Frame is a full screen image which is selected from one of the
machine.
BACKGROUND LIVE:
which is selected from one of the available sources of the slave device.
INTRODUCTION
1-1. WHAT IS THE ORCHESTRA
1-2. USEFUL TERMS AND DEFINITIONS
5

The ORCHESTRA buttons were designed with a handy color code to guide users, avoid mistakes, and give a
constant status of the device. Thus, all ORCHESTRA
depending on their function and their current state.
green, other than the Source Main buttons
which light up in red.
ORCHESTRA turns a bright yellow.
red, and will blink red when active.
The ORCHESTRA
Finally, some of the ORCHESTRAyellow when they
have been selected, are active, but are not currently being worked with.
PIP:
background image or another PIP. PIPs can be reduced, enlarged, bordered and shadowed. They can
overlap one another, depending on their visual priority.
LOGO:
or image cut-out. Logos can be positioned anywhere on your screen.
KEYING & TITLING:
1-3. ORCHESTRA COLOR CODES
6

CAUTION:
maintained for further reference. Please follow all of the warnings on this product and its operating instructions.
• WARNING:
for ventilation and to avoid overheating. Make sure the device is never placed near a textile surface that
• POWER:
a grounding plug should only be used with a grounding type outlet. In no way should this grounding be
• POWER CORD:
initiated by the main switch.
Caution:
from the main power.
accessible and located outside the unit.
- The outlet should always be near the device and easily accessible.
- Power supply cords should be routed so that they are not likely to be walked on or
pinched by items placed upon or against them.
• CONNECTIONS:
• SERVICING: Do not attempt to service this product yourself by opening or removing covers and screws
service personnel.
• OPENINGS:
technician.
HARDWARE INSTALLATION
SAFETY INSTRUCTIONS
2-1. SAFETY INSTRUCTIONS
7

• ATTENTION:
• INSTALLATION:
fonctionnement et un accident.
• ALIMENTATION:
• CORDON D’ALIMENTATION:
le cordon d’alimentation constitue le seul moyen de débrancher l’appareil totalement de l’alimentation
murale.
- Débrancher le cordon d’alimentation de la prise murale si vous prévoyez de ne pas utiliser l’appareil
Si le cordon d’alimentation est endommagé, débranchez-le immédiatement de la prise murale. Il est
revendeur ou le service après-vente pour un remplacement.
• CONNEXIONS:
• RÉPARATION ET MAINTENANCE: L’utilisateur ne doit en aucun cas essayer de procéder aux opérations
de dépannage, car l’ouverture des appareils par retrait des capots ou de toutes autres pièces constituant
• OUVERTURES ET ORIFICES:
INSTRUCTIONS DE SECURITE
8

e sull’apparecchiatura.
• ATTENZIONE:
• INSTALLAZIONE:
provocare un erroneo funzionamento e un incidente.
• ALIMENTAZIONE: Far funzionare l’apparecchiatura solo con la sorgente d’alimentazione indicata
• CAVO DI ALIMENTAZIONE:
Attenzione
assicurarsi che totalemente l’apparecchio non è più collegato, il cavo deve essere disconesso della presa
murale.
- Il materiale collegato a residenza alla rete, deve avere un dispositivo di sezionamento facile da
raggiongere eche deve essere inserito all’esterno del apparecchio.
- Per disconnettere il cavo tirare facendo forza sul connettore.
accessibile.
Se il cavo di alimentazione é danneggiato, spegnere immediatamente l’apparecchiatura.
• CONNESSIONE:
• RIPARAZIONI E ASSISTENZA: L’utilizzatore non deve in nessun caso cercare di riparare l’apparecchiatura,
shock elettrico o altri rischi.
• APERTURE DI VENTILAZIONE: Le apparecchiature possono comportare delle aperture di ventilazione,
rimetterla in servizio.
INSTRUZIONI DI SECUREZZA
9

und Betriebsanweisungen genau zu lesen. Diese Sicherheits- und Betriebsanweisungen für einen
Sicherheitsanweisungen einhalten.
• ACHTUNG:
• EINBAU:
• STROMVERSORGUNG:
• NETZKABEL:
und -unterbrechung über diesen Hauptschalter.
Achtung:
• ANSCHLÜSSE:
• REPARATUR UND WARTUNG:
• ÖFFNUNGEN UND MUNDUNGEN:
SICHERHEITSHINWEISE
10

• CUIDADO:
la lluvia, a la humedad ni a fuentes de calorintensas.
• INSTALACIÓN:
o boca de aire caliente, ni en un lugar expuesto a los rayos solares directos o al polvo excesivo, a las
• ALIMENTACIÓN:
suprimido.
• CABLE DE ALIMENTACIÓN:
toma de corriente.
su distribuidor o con el servicio de posventa si necesita cambiarlo.
• CONEXIONES:
• REPARACIÓN Y MANTENIMIENTO:
• ABERTURAS Y ORIFICIOS:
en servicio.
INSTRUCCIONES DE SEGURIDAD
11

When unpacking your ORCHESTRA, please mind not to discard product packaging, as the removable feet
and the rackmount ruler and screws are in the packing foam of the device.
1 x ORCHESTRA (ORC50) remote controller
1 x Power supply cord
1 x Pen
* Download on our website: www.analogway.com
4 - Ethernet Port
2-2. UNPACKING AND INSPECTION
2-3. THE ORCHESTRA REAR PANEL
12

17.71”W x 17.32”D x 7.1”H.
2-4. HARDWARE SPECIFICATIONS
13

1 - Settings section
2 - Layout section
3 - Preset memory section
4 - Screen section
5 - Source Main section
6 - Source Preview section
7 - Preset Edition section
9 - Transition section
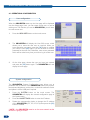
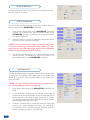
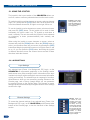
The settings section of the ORCHESTRA allows you to access all
of the ORCHESTRA
The color widescreen 7” inch TFT touch screen will give you intuitive
knobs will allow you to set values, while the last knob will allow to
navigate through the interface, to access source or element settings
for example.
The Layout section of the ORCHESTRA
Backgrounds, and position parameters for Logos). The settings can
be changed with the ORCHESTRA joystick, then memorized into
be called back at any time during your show.
The preset memory section of the ORCHESTRA is where you can
* NOTE *: press the
simultaneously to access the 8 possible preset pages. When
available pages will light up green.
OPERATING THE ORCHESTRA
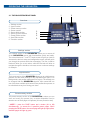
3-1. THE ORCHESTRA FRONT PANEL
Overview
Settings section
Layout section
Preset memory section
14
1
3
4
5
6
7
8
9
2

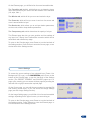
The Screen section of the ORCHESTRA allows you to select
and edit screens. Screens on the ORCHESTRA contain all of
the settings and information of any given device connected to the
ORCHESTRA. In other words, any device connected to, and piloted
by the ORCHESTRA, becomes an individual screen, though several
Di-VentiX II in a Soft Edge setup can be considered as a Screen.
The Source Preview section of the ORCHESTRA allows you to
select and work with sources on the Preview output of the device
connected to the ORCHESTRA. 8 pages with 8 live sources per
or Logos, 8 sources are available.
The Preset Edition section of the ORCHESTRA is the true operations
center of the machine, and will give users instant access to all of the
functions needed to properly manage your events and shows.
Here you can manipulate, store, erase, or modify all elements on
screen. You can also create, use, and rearrange PIPs, logos and
frames, create, store and recall user presets, or simply toggle Main
and Preview selection amongst other features.
ORCHESTRA
allows to store and recall layer transitions as presets via the 3 handy
[ buttons.
Screen section
Source Preview section
Preset Edition section
User Effect section
15
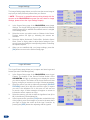
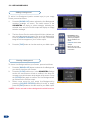
The Transition section of the ORCHESTRA will allow you to go live
with whatever image, logo or PIP settings or changes you have made
on your preview screen. The Transition section of the ORCHESTRA
also contains of a [ button, for instant transitions from
Preview to Main, and a handy [STEP button, to toggle from
Main back to Preview. The smooth T-bar of the ORCHESTRA will
glide from Preview to Main for elegant transitions.
The init T-Bar button will help the unit to reduce the T-Bar delay
warning the device that the user wants to take smoothly
Transition section

16
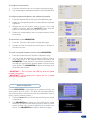
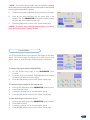
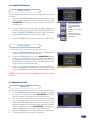
When the ORCHESTRA starts up, the User page will be displayed
over the Home page. Here, you can create a new user, or use an
ORCHESTRA, you will have
to create a new user.
1/ Press the button on the touch screen.
2/ The ORCHESTRA will display the User Edit screen, which
have entered a user name, press the button to validate
your choice. Press again if you do not wish to create a
which will be asked every time you wish to log in as that user.
User page, choose the user you have just created,
and press the button again. The ORCHESTRA will now
display its home page.
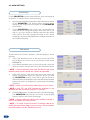
The ORCHESTRA
parameter the IP address of the ORCHESTRA, caliber the joystick,
the keyboard brightness, set the time, or check the software version
1/ Press the SYSTEM button on the touch screen. The
ORCHESTRA
the System menu.
2/ Press the button to enter the IP adress.
of the ORCHESTRA
button to validate.
* NOTE *: the ORCHESTRA must be on the same network as the
devices it is going to control.
STARTING WITH THE ORCHESTRA
4-1. OPERATIONAL CONFIGURATION
User conguration
System conguration

17
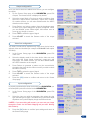
For the ORCHESTRA
must create a show to work in. The show will hold parameters for
inputs, outputs, screens, presets...).
1/ Press the Shows button on the touch screen, then press Create
a New Show.
2/ The ORCHESTRA will display the Show Edit screen, which
chosen a show name, press the button to validate your
choice. The ORCHESTRA will display a blank show page.
To congure an auto launch:
1/ Press the Autolaunch
To congure keyboard brightness and calibrate the joystick:
1/ Press the Keyboard
brightness.
3/ Wriggle and turn the joystick, then let it return to its initial
position. If need be, press the button which will
adjust the neutral position of the joystick precisely.
Saver Delay
To set the time on the ORCHESTRA:
1/ Press the Time
buttons on
the onscreen clock.
To check and update rmware version of the ORCHESTRA:
1/ Press the Update
up to date version of the software on the front panel of the
ORCHESTRA. Press Refresh
press Update. The ORCHESTRA will display a message while
it loads the new sofware.
* IMPORTANT * :
process is in progress.
* IMPORTANT * : Do not press yes if a popup ask you to restart
Show conguration

18
For the ORCHESTRA to pilote external devices, they must be set up
of the ORCHESTRA. The Screen button will blink, and a
display of your empty screen will appear on the ORCHESTRA
touch screen.
ORCHESTRA touch screen, press Screen Setup to
Edit if you
wish to give your Screen a different name than the default
accordingly, and press the button to validate and return to
the Screen Setup page.
To add a device to a Screen, activate it, and start piloting it, do the
1/ In the Type dropdown menu on the touch screen, select the
Di-VentiX II).
2/ In the Mode dropdown menu on the touch screen, select the
* NOTE *: Screen parameters other than Edit Devices will not be
available until a device is stored into a Screen and activated.
3/ Press Edit Devices, and press Add, the touch screen will
display a page which will let you select the device you want
the ORCHESTRA to pilote. Press Edit to give the device a
different name than the default name, select the communication
* NOTE *:
*
NOTE *:
4/ Press the Devices page.
The ORCHESTRA will connect to the device. Press the
button to return to the Screen Setup page.
* NOTE *: Screen parameters should all be available now that a
device is activated in the current Screen.
* NOTE *:
4-2. SHOW SETTINGS
Screen setup
Edit devices

19
its outputs.
Screen Setup page of the ORCHESTRA, press Edit
Outputs. The format screen is displayed by default.
detection on the outputs.
3/ Press Pattern, and select a pattern from the dropdown menu
Pattern again, and choose none to
revert to your image on screen.
4/ Press TYPE to select the type of signal
5/ Press
selected.
The Video Out tab will be available only if the slave device has an
Di-VentiX II with option
1/ In the Screen Setup page of the ORCHESTRA, press Edit
Video Out.
2/ Select the display mode for the slave device video out card,
3/ Press Pattern to generate a pattern on the screen/device
plugged to the slave device video out card if you wish to check
4/ Press TYPE to select the type of signal
5/ Press
selected.
6/ Press the Screen
Setup page.
Output conguration
Video Out conguration
To properly synchronize the slave device with your ORCHESTRA, you
must setup the inputs of the device into the ORCHESTRA.
1/ In the Screen Setup page of the ORCHESTRA, press Edit
Inputs.
2/ Select the input you wish to parameter, then select the plug
dropdown menu) should display image resolution and rate.
* NOTE *: If you are working with a matrix, you can route your image
Working
With a Matrix).
3/ Press the
the Screen Setup page.
Input conguration
La pagina si sta caricando...
La pagina si sta caricando...
La pagina si sta caricando...
La pagina si sta caricando...
La pagina si sta caricando...
La pagina si sta caricando...
La pagina si sta caricando...
La pagina si sta caricando...
La pagina si sta caricando...
La pagina si sta caricando...
La pagina si sta caricando...
La pagina si sta caricando...
La pagina si sta caricando...
La pagina si sta caricando...
La pagina si sta caricando...
La pagina si sta caricando...
La pagina si sta caricando...
La pagina si sta caricando...
La pagina si sta caricando...
La pagina si sta caricando...
La pagina si sta caricando...
La pagina si sta caricando...
La pagina si sta caricando...
La pagina si sta caricando...
La pagina si sta caricando...
La pagina si sta caricando...
La pagina si sta caricando...
La pagina si sta caricando...
-
 1
1
-
 2
2
-
 3
3
-
 4
4
-
 5
5
-
 6
6
-
 7
7
-
 8
8
-
 9
9
-
 10
10
-
 11
11
-
 12
12
-
 13
13
-
 14
14
-
 15
15
-
 16
16
-
 17
17
-
 18
18
-
 19
19
-
 20
20
-
 21
21
-
 22
22
-
 23
23
-
 24
24
-
 25
25
-
 26
26
-
 27
27
-
 28
28
-
 29
29
-
 30
30
-
 31
31
-
 32
32
-
 33
33
-
 34
34
-
 35
35
-
 36
36
-
 37
37
-
 38
38
-
 39
39
-
 40
40
-
 41
41
-
 42
42
-
 43
43
-
 44
44
-
 45
45
-
 46
46
-
 47
47
-
 48
48


in altre lingue
- English: Analog way ORCHESTRA User manual
Documenti correlati
-
Analog way Smart MatriX SMX200 Manuale utente
-
-
-
-
-
-
-
-
-