

No
t
for
Co
m
m
ercial
Us
e
E
ri
c
ss
o
n
Bu
s
i
n
e
ss M
o
b
il
e
N
etwor
k
s
B
V
Cordless Phone
User’s Guide
230i

Not for
C
o
m
me
rc
ia
l
Us
e
Eric
s
s
o
n Bus
i
ne
s
s
Mo
bi
le
N
e
twork
s
BV
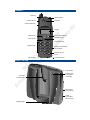
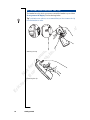
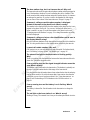
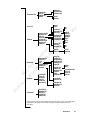
HANDSET
BASE STATION
Earpiece
Volume up key
Volume down key
Off hook key
Clear/Mute key
On Hook/On/Off key
R key
Internal call key
Scroll up key
Scroll down key
Microphone
Battery compartment
Warning light
Number keys
Display
Charge contacts
Antenna
(on the back)
Page button
Desk stand
Cable
External line/
Charging light
Handset
compartment
subscription
mode light
(on the back)
connections
(on the back)

This user’s guide is published by
Ericsson Business Mobile Networks BV,
without any warranty. Improvements and
changes to this user’s guide necessi-
tated by typographical errors, inaccura-
cies of current information, or changes
to programs and/or equipment, may be
made by Ericsson Business Mobile Net-
works BV at any time and without notice.
Such changes will, however, be incorpo-
rated into new editions of this user’s
guide. All rights reserved.
No
t
for
Co
m
m
ercial
Us
e
E
ri
c
sson
Bu
s
i
n
e
ss mObi
l
e
N
etworks
B
V
Contents at a
glance
Getting started 5
Preparing for use 5
A brief guide 7
Using the menus 8
Battery 9
Attaching and removing the clip 10
Basic use and settings 11
Telephoning 11
Phone book 14
Advanced telephoning 16
Personalising the handset 19
Personalising the base station 20
PIN codes and blocking handset keys 22
Extra features 25
Baby monitor 25
Direct call 25
Cost manager 26
Voice mail notification 27
Connecting handsets to base stations 28
Reference 31
Safety instructions 31
Troubleshooting 31
Buttons, keys, icons and signals 34
Menus 36
Maintenance 38
Warranty 38
Index 40

No
t
for
Co
m
m
ercial
Us
e
E
ri
c
ss
o
n
Bu
s
i
n
e
ss
Mo
b
il
e
N
etwo
rk
s
B
V
Standards and regulations
• The base station BS230i complies with: RTTE directive 99/5/EC, EMC directive 89/336/EC,
LVD directive 73/23/EC.
• The DT200 handset complies with: TTE directive 91/263/EC, EMC directive 89/336/EC,
LVD directive 73/23/EC.
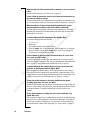
Environmental policy
Ericsson will contribute to the sustainable development of global society by developing, produc-
ing and offering low environmental impact products and services that also allows customers to
reduce their environmental impact. This means that we shall:
• Increase knowledge and consciousness about environmental issues among all employees to a
level where it becomes a natural and pro-active part of the everyday decision-making process.
• Base our environmental knowledge on scientific grounds and use life cycle assessment tech-
niques as a guide and a basis for communicating environmental issues.
• Introduce and maintain certifiable environmental management systems within all organiza-
tions that have any significant influence on the environmental impact from processes, prod-
ucts or services.
• Meet or exceed legal requirements to protect the environment and use designing for the envi-
ronment as a means to introduce environmentally improved processes, products and services.
• Involve suppliers in our on-going work to improve environmental performance.
• Where appropriate support and participate in environmental research relating to our field of
interest and actively participate in international harmonization of environmental
standardization.

Getting started 5
No
t
for
Co
m
m
ercial
Us
e
E
ri
c
ss
o
n
Bu
s
i
n
e
ss M
o
b
il
e
N
etwor
k
s
B
V
Getting started
About ISDN
This cordless phone is suitable for use with Euro-ISDN. ISDN, which stands
for Integrated Services Digital Network, integrates the simultaneous transmis-
sion of speech and data. With Euro-ISDN you have access to two digital tele-
phone lines. This makes it possible, for example, to have two telephone
conversations at the same time or to have an ISDN internet connection with
your computer on one line and still be able to make and receive telephone
calls on the other line.
ISDN comes with several telephone numbers (network operator and subscrip-
tion dependent), making it possible to reserve a phone number for instance for
business calls and another number for private phone calls (see “Multiple Sub-
scriber Numbers (MSN)” on page 20 for more information). The ISDN serv-
ices described in this manual are operator and subscription dependent.
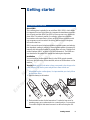
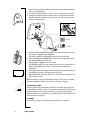
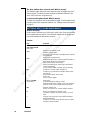
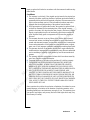
Installation
You can install the cordless phone directly to the ISDN network terminal,
which may also have other devices attached, such as an ISDN modem or a fax
machine.
Warning Make sure the local mains voltage corresponds to the voltage on the
power adaptor. Only use the power adaptor that comes with the set.
When installing the cordless phone, it is important that you closely follow
the procedure below:
1. Insert the battery in the handset.
2. Find a suitable location for the base station. To make the best use of its
operating range, put your base station in a central position. You can place
it on a table using the desk stand or mount it on the wall using the wall
PREPARING FOR USE

6 Getting started
No
t
for
Co
m
m
ercial
Us
e
E
ri
c
ss
o
n
Bu
s
i
n
e
ss
Mo
b
il
e
N
etwo
rk
s
B
V
mount. Due to possible interference, do not place the cordless phone near
audio or video equipment.
3. If you place the base station on a wall, screw the wall mount to the wall.
4. Connect the telephone cable to the base station’s telephone socket and to
the ISDN network terminator. Connect the power cord to the power plug
socket of the base station.
5. Connect the desk stand to the base station or connect the base station to the
wall mount. Locate the lower hooks first.
For the desk stand, route the cables through the slots at the back.
6. Place the handset into the base station as shown in the illustration. Make
sure that the handset is switched off.
7. Plug the power adaptor into the wall socket.
The red light on top of the base station should now be on continuously. If
you see a red, flashing light, there is a fault with the telephone line
connection.
After a few minutes the handset will subscribe itself to the base station and
the red light on the top of the base station will go off.
8. Leave the handset in the base station for at least 3 hours to charge the bat-
tery for the first time.
When the battery is charged, the handset is ready for use. For more informa-
tion about charging the battery, please refer to “Battery” on page 9.
If subscription fails
Normally the handset automatically subscribes to the base station when the
cordless phone is installed. However if automatic subscription fails (the signal
strength indicator is not visible in the display), you have to manually sub-
scribe the handset to the base station see “Subscribing a DT200 handset to the
230i base station” on page 29.
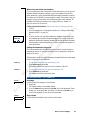
Language
At this point you may wish to change the language of your handset.
Line
Power
Home 1

Getting started 7
No
t
for
Co
m
m
ercial
Us
e
E
ri
c
ss
o
n
Bu
s
i
n
e
ss M
o
b
il
e
N
etwor
k
s
B
V
To change the handset menu language:
1. Press
CLR the handset returns to the standby display.
2. Go to the
Handset
menu using the UP or DOWN key and press YES. Using
the
UP or DOWN key again, go to the
Language
option and press YES to
confirm. Select the language of your choice from the list and press
YES.
Note if you need more information on how to use the menus please refer to
“Using the menus” on page 8.
Important. It is important to make a note of the IPEI code. You may need it to
reset the handset’s PIN code. The IPEI code can be found on a label on the
handset packaging. You can write down the IPEI code in the space provided in
“IPEI code handset” on page 24.
We also recommend that you change the PIN code of the base station immedi-
ately after installing the cordless phone. See “Changing the base station PIN
code” on page 23 for more information.
Operating range. You can use your handset in the area that is covered by the
base station. Outside this area, you will lose contact with the base station and
the signal strength indicator in the display will disappear. The warning light
will flash and you will hear short, fast, warning beeps.
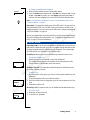
Switching on. Before you can use the handset you must first switch it on.
To switch the handset on:
• Press
NO for at least one second to switch the handset on.
The standby display appears. The number on the right-hand side is the
internal number of the handset on the base station.
Making a first call. Check that the cordless telephone is installed correctly
by dialling a person you know.
To make a call:
1. Dial the number of the person you want to call using the number keys and
press
YES.
A red light appears on the top of the base station.
2. Wait for an answer and on completing your call, ask the person to call you
back.
3. Press
NO to end the call.
Receiving a call. If someone calls you, the handset and the base station ring.
To receive a call:
1. Press
YES to answer the call.
2. To end the call, press
NO.
A BRIEF GUIDE
>Handset
>Language
Home 1
0:00:06
020148257
ExternalCall
020148257

8 Getting started
No
t
for
Co
m
m
ercial
Us
e
E
ri
c
ss
o
n
Bu
s
i
n
e
ss
Mo
b
il
e
N
etwo
rk
s
B
V
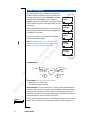
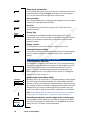
The cordless phone can be operated via menus in the
handset, which are arranged in loops. For instance, you
can enter the main menu option
PhoneBook
by pressing
either the
UP or the DOWN key. Press the UP or
DOWN key again to scroll through other options. Press
YES to confirm an option. Some options take you into
a new menu.
When scrolling through the menu you can return to the
standby display or previous menu by pressing
NO once
or repeatedly, at any time.
If you do not press a key for a minute, the handset
reverts to the standby display.
Note The handset makes use of “dynamic” menus,
which means that some menu options may change
name or are only visible when applicable.
Navigation keys.
Cancel menus. You can cancel any operation:
• Press
NO once or repeatedly.
The handset returns to standby.
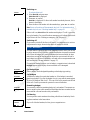
Menu operation. The topic that follows (“Adding a name and number as an
example”) shows you how the menus work. For adding a name and number,
every step of the procedure is given in detail. For all other procedures, it is
assumed that you know your way around the menus. This guide only tells you
what menu option to select for a specific function.
To help you locate the menu options, a route through the menus is given in the
margin. These routes show you what menu options to select in sequence in
USING THE MENUS
>PhoneBook
Handset
>Handset
BaseStation
>BaseStation
Networks
>Networks
Information
>Information
PhoneBook
BackConfirm
Up Down
>PhoneBook
>Store
>AddNew

Getting started 9
No
t
for
Co
m
m
ercial
Us
e
E
ri
c
ss
o
n
Bu
s
i
n
e
ss M
o
b
il
e
N
etwor
k
s
B
V
order to get to a specific function. In most cases, the next menu option is not
immediately visible so you have to use the
UP or DOWN key to locate it.
If a route through the menus is the same as the previous route except for the
last menu option, this will be indicated as shown here in the margin. See also
“Menus” on page 36 for a menu overview.
Adding a name and number as an example. You can use the
AddNew
option
to enter names and numbers in the phone book.
To add a new phone book entry:
1. Use the
UP or DOWN key to scroll to
PhoneBook
and press YES.
2. Use the
UP or DOWN key again scroll to
Store
and press YES.
3. Scroll to
AddNew
and press YES.
4. Use the number keys to enter the name. Press a key once for the first letter
of the key, press it twice for the second letter, three times for the third letter
and so on then press
YES to confirm.
5. Correct the name if necessary. To delete a letter, press
CLR or, if you want
to clear the entire name, press
CLR for one second. These keys work in the
same way when you enter numbers.
6. Enter the telephone number and press
YES to confirm.
The handset is powered by a rechargeable Nickel Metal Hydride (NiMH)
battery.
Charging the battery. You can fully charge a flat battery by placing the
handset in the base station for 3 hours. A fully charged battery gives you up to
15 hours of calling time or up to 100 hours of standby time. The handset has a
battery meter, which indicates how much power is left in the battery. You will
hear a warning sound if there is less then 15 minutes’ calling time left. To
keep the battery fully charged, you can leave the handset in the base station
without any problem.
Changing the battery. Under normal conditions the handset battery will last
at least a year. When the standby time for the handset becomes too short, you
should replace the battery. Please contact your dealer or retailer for more
information.
Warning Only use batteries as specified in “Spare parts and accessories” on
page 38.
The battery does not contain cadmium and is therefore more environmentally-
friendly than other rechargeable batteries. However, all batteries should be
disposed of properly.
BATTERY
>AddLastDial
>PhoneBook
>Store
>AddNew

10 Getting started
No
t
for
Co
m
m
ercial
Us
e
E
ri
c
ss
o
n
Bu
s
i
n
e
ss
Mo
b
il
e
N
etwo
rk
s
B
V
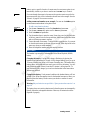
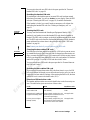
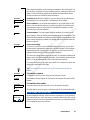
The handset has a clip which you can use to attach the handset to your clothes.
Do not press on the display! See the drawings below.
Tip To minimize wear and tear, we recommend that you do not remove the clip
from the handset too often.
ATTACHING AND REMOVING THE CLIP
Attaching the clip
Removing the clip

Basic use and settings 11
No
t
for
Co
m
m
ercial
Us
e
E
ri
c
ss
o
n
Bu
s
i
n
e
ss M
o
b
il
e
N
etwor
k
s
B
V
Basic use and settings
Making a call
To make a call:
1. Enter the number.
The number is displayed.
2. Correct the number if necessary (
CLR = delete; UP = move left; DOWN =
move right).
3. When the number is correct, press
YES and wait for an answer.
Press
NO to end the call.
Note When you dial a number and that number is forwarded, you see the
number to which you are forwarded in your display. This is called COLP
(Connected Line identification Presentation) and is network operator depend-
ent. See “Restricting your telephone number from being sent” on page 21 for
more information.
Receiving a call
When the handset rings:
1. Press
YES to answer the call.
2. Press
NO to end the call.
Sometimes the handset rings at an inconvenient moment. Press
NO to mute
the ringing. Press
YES if you still want to answer the call.
Caller identification. ISDN provides calling line identification. This means
that in case of an incoming call, the caller’s phone number is displayed. If the
caller’s number is included in your handset’s phone book, the corresponding
name is displayed instead.
Making a call using the phone book
Your handset contains a phone book for storing names and numbers. You can
conveniently make calls using this phone book. There are several ways to
access the phone book as described below. To add names and numbers to the
phone book, see “Phone book” on page 14.
Calling by name. The call by name option lets you search for a name and
number in the phone book.
TELEPHONING
053555450
ExternalCall
074291802

12 Basic use and settings
No
t
for
Co
m
m
ercial
Us
e
E
ri
c
ss
o
n
Bu
s
i
n
e
ss
Mo
b
il
e
N
etwo
rk
s
B
V
Calling by name:
1. Select
Find&Call
and press YES.
2. Press the key which has the first letter of the name you are searching for.
Press once for the first letter of that key, twice for the second and three
times for the third letter of the key. To narrow down the search, you can
also enter the next letter(s) of the name.
3. Correct the name if necessary (
CLR = delete; DOWN key = move left; UP
key = move right) and press
YES to confirm.
The first name in the phone book beginning with the entered letter(s) or, if
it does not exist, a name beginning with the next letter is displayed.
4. If necessary scroll until you find the right name and press
YES to dial the
number.
Quick call by name. You can also search for a telephone number by name in
your phone book without using the menus.
To use quick call by name:
1. Press the key which has the first letter of the name and hold down the key
until the display shows the first name in the phone book beginning with
the letter on the key you have just pressed. For the second letter of that
particular key, press the key again, without holding it down. For the third
letter, press the key again and so on.
The display shows the first name in the phone book beginning with the
chosen letter or, if it does not exist, only the letters you entered. In the lat-
ter case, the last and incorrect letter flashes. You can enter another letter to
correct it.
2. You can now enter more letters as in step 1, or scroll until you find the
right name and press
YES to dial the number.
Example:
Suppose you want to call someone whose name is ‘Jones’. Press 5 and hold
until the first name in the phone book beginning with ‘J’ appears. Press 6
three times for the ‘O’. The first name in the phone book beginning with ‘Jo’
appears. You can now continue by pressing 6 twice for the ‘N’ and so on or
scroll until you find the name ‘Jones’. Press
YES to dial the number.
Redialling
The last ten numbers you dialled are available for redial.
To dial one of the ten last dialled numbers:
1. Press and hold
YES and wait until the last dialled number or name
appears.
The handset beeps if there are no names or numbers available for redial. If
the number appears in the phone book, the name is shown instead.
2. Scroll until you have the right number or name.
Press
YES to dial for an external number or INT for an internal number.
If you press
CLR instead of YES or INT for an internal number, you can edit
the number before dialling.
>PhoneBook
>Find&Call
Jones
053450512

Basic use and settings 13
No
t
for
Co
m
m
ercial
Us
e
E
ri
c
ss
o
n
Bu
s
i
n
e
ss M
o
b
il
e
N
etwor
k
s
B
V
You can also access the last dialled number list via the
Information
menu option
LastDialled
. This menu option is only available if names or numbers are availa-
ble for redial.
When you switch off your handset, the last dialled numbers are erased. To
store the last dialled numbers in your phone book. See “Adding last dialled
and a caller’s number” on page 15.
Returning a call
Unanswered calls with caller identification, are stored in the who called mem-
ory. The call info icon shows you if there are new unanswered calls. By using
the call return function, you can easily return a call to these numbers. The who
called memory holds up to ten numbers.
You can access the who called memory via the
Information
menu option
WhoCalled
. This menu option is only present if names or numbers are available
for returning a call.
To return one of the last ten calls received:
1. Select
WhoCalled
and press YES.
A list of numbers appears. If the number appears in the phone book, the
name is shown instead.
New entries are marked with an exclamation mark. Calls that have been
answered with the handset are marked with the letter
A
.
2. Scroll until you have the right number or name.
3. Press
INT to dial an internal number and YES to dial an external number.
The number is removed from the who called memory and stored in the last
dialled memory.
Note If you press
CLR instead of INT or YES, you can edit the number before
dialling.
When you switch off your handset, the who called list is erased. You can store
the who called numbers in the phone book. See “Adding last dialled and a
caller’s number” on page 15.
Making an emergency call
Your handset is equipped with an emergency call feature. This allows you to
call the emergency services even when the handset is blocked or direct call is
on. The emergency numbers available with this feature are 112 or 999. Check
which emergency number is for your country.
Turning off the microphone
During a call you may want to talk to someone else, without the caller
hearing.
To switch the microphone off:
• Press
CLR until you are ready to talk to the caller again.
Short beeps and the ring off icon indicate that the microphone is off.
Or
Check
Who Called ?
>Information
>WhoCalled
ExternalCall
Anna

14 Basic use and settings
No
t
for
Co
m
m
ercial
Us
e
E
ri
c
ss
o
n
Bu
s
i
n
e
ss
Mo
b
il
e
N
etwo
rk
s
B
V
• Press CLR briefly.
Short beeps and the ring off icon indicate that the microphone is off. To
switch the microphone on, press
CLR again.
Turning off the ringer and warning sound
If your handset rings or a warning sounds at an inconvenient moment, you can
turn off the sound.
To turn off the ring sound temporarily:
• Press
NO when the handset rings.
The ring off icon appears.
The call is still there, only the ringer has been muted. The warning light and
hook icon keep flashing. Press
YES if you still want to answer the call.
To turn the ring and warning sound off or on:
• Press
CLR while in standby mode.
The ring off icon appears when the ring and warning sound are switched
off.
If for example you hear a low battery warning and you press
CLR only the
sound is turned off. The warning light continues to flash.
You can also turn off the ringer permanently by adjusting the ring volume to
its lowest level. See “Ring volume” on page 19.
About the phone book
Your handset contains an alphabetized phone book for 100 names and num-
bers. You can get to the phone book via the
PhoneBook
menu option.
Entering numbers. When you enter a phone number, there are a few things
that might be useful to know.
While entering a phone number, you can press
UP to move the cursor to the
left or press
DOWN to move it to the right. You can also “jump” to the far left
or right by pressing
UP or DOWN respectively for one second. If you want to
delete a digit, press
CLR or, if you want to clear the entire number, press CLR
for one second. These keys work in the same way when you enter names.
In certain situations you may need to insert a pause in a number to wait for the
dial tone. If so, press for one second. A dash marks the pause.
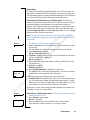
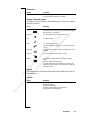
Entering names. Use the number keys to enter names in the phone book.
Press a key once for the first letter of the key, press it twice for the second let-
ter, three times for the third letter and so on. To enter special characters or to
enter a digit, press the same key a few more times.
For example: to insert
Ä
press number 2 five times; to insert
È
press number 3
four times and to enter a space, press number 1 once. See the table below for
more details.
PHONE BOOK
ExternalCall
Anna
Home 1
01–Dec 11:32
EnterNumber:
053405_
Enter Name:
John_

Basic use and settings 15
No
t
for
Co
m
m
ercial
Us
e
E
ri
c
ss
o
n
Bu
s
i
n
e
ss M
o
b
il
e
N
etwor
k
s
B
V
To insert lower case letters, press the letter first and then . To revert to upper
case letters again, press the letter and then . To insert an asterisk ( ) in a
name, press # twice.
Tip If you want a different letter to the one currently shown, you can erase the
letter with the
CLR key and then enter the correct letter.
Note Depending on the selected menu language, the character order may dif-
fer. For example when Greek is selected, Greek characters have precedence
over less frequently used characters.
Adding a name and number
You can use the
AddNew
option to enter names and numbers in the phone book.
To add a number to the phone book:
1. Select
AddNew
and press YES.
2. Enter a name and press
YES to confirm.
3. Enter the telephone number and press
YES to confirm.
Adding last dialled and a caller’s number
The last ten numbers dialled can be added to the phone book.
To add a number from the call list:
1. Select:
•
AddLastDial
to add one of the last dialled numbers and press YES.
•
AddWhoCall
to add a caller’s number and press YES
2. Scroll through the list of numbers until you find the number you want to
store and press
YES.
3. Edit the number if necessary and press
YES to confirm.
4. Enter a name and press
YES to confirm.
Changing names and numbers
Use the
Edit
option to change the names and numbers in the phone book. You
can correct a misspelled name or give a new name to an existing telephone
number.
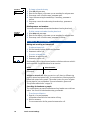
Press the corresponding key this many times for the character
Key12345678910111213
1 -?!,.:"’ ()1
2 ABCÅÄÆÀÁÂÃÇ2 Γ
3 DEFÈÉÊË3 ∆Φ
4 GH I
Ğİ ÌÍÎÏ4
5 JKL5Λ
6 MNOÑÖØÒÓÔÕŒ6
7 PQRSß
Ş 7 ΠΣ
8 TUVÜÙÚÛ8
9 WXYZÝŸ9
0 0+&@/$%£ΘΞΨΩ
# #
>PhoneBook
>Store
>AddNew
>PhoneBook
>Store
>AddLastDial
>AddWhoCall

16 Basic use and settings
No
t
for
Co
m
m
ercial
Us
e
E
ri
c
ss
o
n
Bu
s
i
n
e
ss
Mo
b
il
e
N
etwo
rk
s
B
V
To change a phone book entry:
1. Select
Edit
and press YES.
2. Enter the first letter(s) of the name you are searching for and press
YES.
3. If necessary scroll to find the name, press
YES again.
4. Correct the name using the number keys if necessary, press
YES to
confirm.
5. If necessary correct the number using the number keys, press
YES to
confirm.
Deleting names and numbers
You can also delete names and associated numbers from the phone book.
To delete a name and number from the phone book:
1. Select
Delete
and press YES.
2. Enter the first letter(s) of the name you are searching for and press
YES.
3. If necessary scroll to find the name, press
YES to confirm.
Making and receiving an internal call
To make an internal call:
1. Dial the internal telephone number and press
INT.
2. Press
NO to end the call
To receive an internal call:
1. Press
YES to answer the call.
2. Press
NO to end the call.
Each handset or device has an internal number on the base station on which it
can be contacted. See the table below for an overview.
Internal or external call? When you receive a call, there is a different ring
signal for internal and external calls. You can set the tune of the ring signal for
internal and external calls yourself. This makes it easier for you to recognize
the ring signal of your own handset. For more information, please read
“Ringer tones and melodies” on page 20.
Searching for handsets or people
The cordless phone can search for handsets and any handset user on the base
station. You can call all other handsets using your handset.
To use the search function:
1. Press the key and press
INT.
All handsets connected to the base station will ring.
2. Wait for an answer.
You are connected to the first person that answers the call.
ADVANCED TELEPHONING
Device Internal number
Handset 1 - 8 1 - 8
All handsets
>PhoneBook
>Find&Edit
>Edit
>PhoneBook
>Find&Edit
>Delete
InternalCall
2

Basic use and settings 17
No
t
for
Co
m
m
ercial
Us
e
E
ri
c
ss
o
n
Bu
s
i
n
e
ss M
o
b
il
e
N
etwor
k
s
B
V
If you receive a search call from another handset on the base station,
Page Call
appears. Press
YES to answer the call. The first to answer is connected.
Paging a handset from the base station. You can also search for or page
handsets from the base station by briefly pressing the
PAGE button. To stop
the paging, press briefly the
PAGE button on the base station or YES and then
NO on a handset.
Receiving a second call (call waiting)
If this function is turned on, when you are engaged in a call and another call
comes in, you are notified by two short beeps in your earpiece at regular
intervals.
When a second call is waiting you have the following options:
• Press the
R key to switch to the other call.
The first call is now on hold.
You can use the
R key to switch back and forth between the calls.
Or
• Press the
YES key to switch to the other call.
The first call is terminated.
To set the call waiting function:
• Use this path to turn the call waiting function on or off.
Transferring a call or consulting with another handset
The cordless phone allows you to transfer an external call to another handset.
It is also possible to consult with another handset before transferring the call
or switching back to the external call.
Transferring a call to another handset. You have an external call and want
to transfer it to a person using another handset
1. Press
INT to put the external call on hold.
You hear the dial tone.
2. Dial the internal number of the handset you want to call.
If you hear the handset ring, go to step 3
If you hear a congestion tone, the handset is out of range or otherwise
engaged. return to the first call by pressing
INT.
3. You now have four options:
• Wait until the call is answered. You can now switch back and forth by
pressing
INT.
• If the call is not answered, return to the external call by pressing
INT.
• Transfer the external caller using
NO.
• Continue the call after it has been answered as a three-party call by
pressing 3.
Call back. The base station will call you back when you transfer an external
call to another handset without waiting for an answer, and the third party does
not respond within 30 seconds.
Page Call
A Call Is
Waiting
>BaseStation
>Access
>CallWaiting
Call Back
Anna

18 Basic use and settings
No
t
for
Co
m
m
ercial
Us
e
E
ri
c
ss
o
n
Bu
s
i
n
e
ss
Mo
b
il
e
N
etwo
rk
s
B
V
You can select a different ring signal when being called back by the base sta-
tion. For more information, please read “Ringer tones and melodies” on
page 20.
Involving an external party. You have an external call and want to consult
with another external party:
1. Press the
R key to put the external call on hold.
You hear the dial tone.
2. Dial the number for the external party.
If you hear the handset ring, go to step 3
If you hear a congestion tone, return to the first call by pressing the
R key.
3. You have three options:
• Wait until the call is answered. You can now switch back and forth by
pressing the
R key.
• If the call is not answered, return to the external call by pressing the
R
key.
• Continue the call after it has been answered as a three-party call by
pressing 3.
Making a three-party call
You can have a three-party call with two external parties or with one external
party and one internal party. A three-party call is also known as a conference
call.
Involving another handset. You are engaged in an external call and you
wish to involve an internal party.
1. Press
INT to put the external call on hold.
You hear the dial tone.
2. Dial the internal number.
If you hear the handset ring, go to step 3
If you hear a congestion tone, return to the first call by pressing the
INT
key.
3. Wait for a connection.
4. Press 3 to connect all parties.
Involving an external party. You are engaged in an external call and you
wish to involve another external party.
1. Press the
R key to put the external call on hold.
You hear the dial tone.
2. Dial the external number.
If the handset is free, you hear it ring, go to step 3.
If the number you dialled is not available or engaged, you hear the busy
tone. Return to the original call by pressing
R again.
3. Wait for a connection.
4. Press 3 to connect all parties.
Note To make a three-party call with two external parties the second ISDN
telephone line must be available. Only one conference call at a time is possi-
ble. No other calls can be accepted while the conference call is active.

Basic use and settings 19
No
t
for
Co
m
m
ercial
Us
e
E
ri
c
ss
o
n
Bu
s
i
n
e
ss M
o
b
il
e
N
etwor
k
s
B
V
When using more than one handset
If you are using more than one handset with the base station you can give all
handsets different telephone numbers or up to two handsets the same tele-
phone number. By giving the handsets different telephone numbers a particu-
lar handset can be called by its own telephone number. This makes it easy, for
example, to keep private phone calls and business phone calls separate. All
handsets will then ring according to the ringing order (see “Ringer” on
page 21) when a call is received.
Calling a particular handset. There are two ways of calling a particular
handset:
• Give each handset its own telephone number (see “Multiple Subscriber
Numbers (MSN)” on page 20).
Or
• A caller can also call a particular handset on the base station even when
two handsets have the same telephone number. You can call a particular
handset by dialling the telephone number followed by # and the handset’s
internal number (operator dependent). Contact your network operator for
more information.
Setting the handset to long tones
The tones transmitted by the handset may be too short for some interactive
information services. If you have problems, you can temporarily change the
length of the tones.
If the handset is set to long tones, the tones are transmitted for the same length
of time as the keys are pressed down.
To switch the handset to long tones during a call:
• Select
DTMFLong
and press YES.
The handset switches to long tones for the duration of the call.
To switch the handset back to short tones during a call:
• Select
DTMFShort
and press YES.
The handset switches to short tones again.
Language
You can change the language of your handset
1. Press
CLR.
The handset returns to the standby display.
2. Go to the
Handset
menu pressing the DOWN key 2x and press YES. Press
the
UP key 3x and press YES to confirm. Use the UP or DOWN key to
scroll to the language of your choice and press
YES.
Ring volume
You can adjust the handset’s ring volume via the menus.
PERSONALISING THE HANDSET
ExternalCall
053432514#2
>DTMFLong
>DTMFShort
>Handset
>Language
>Handset
>Alerts
>RingVolume
La pagina sta caricando ...
La pagina sta caricando ...
La pagina sta caricando ...
La pagina sta caricando ...
La pagina sta caricando ...
La pagina sta caricando ...
La pagina sta caricando ...
La pagina sta caricando ...
La pagina sta caricando ...
La pagina sta caricando ...
La pagina sta caricando ...
La pagina sta caricando ...
La pagina sta caricando ...
La pagina sta caricando ...
La pagina sta caricando ...
La pagina sta caricando ...
La pagina sta caricando ...
La pagina sta caricando ...
La pagina sta caricando ...
La pagina sta caricando ...
La pagina sta caricando ...
La pagina sta caricando ...
La pagina sta caricando ...
La pagina sta caricando ...
La pagina sta caricando ...
-
 1
1
-
 2
2
-
 3
3
-
 4
4
-
 5
5
-
 6
6
-
 7
7
-
 8
8
-
 9
9
-
 10
10
-
 11
11
-
 12
12
-
 13
13
-
 14
14
-
 15
15
-
 16
16
-
 17
17
-
 18
18
-
 19
19
-
 20
20
-
 21
21
-
 22
22
-
 23
23
-
 24
24
-
 25
25
-
 26
26
-
 27
27
-
 28
28
-
 29
29
-
 30
30
-
 31
31
-
 32
32
-
 33
33
-
 34
34
-
 35
35
-
 36
36
-
 37
37
-
 38
38
-
 39
39
-
 40
40
-
 41
41
-
 42
42
-
 43
43
-
 44
44
-
 45
45


in altre lingue
- English: Ericsson 230i User manual
Documenti correlati
-
Ericsson DT288 Manuale utente
-
-
-
-
-
Ericsson S868 Manuale utente
-
-
-
-