
User Guide
1
EN
Safety & Regulations
Regulations according to R&TTE
English Hereby, Philips Consumer Electronics, Remote Control Systems, declares that this
ProntoPro NG is in compliance with the essential requirements and other relevant provisions of
Directive 1999/5/EC.
Finnish Philips Consumer Electronics, Remote Control Systems vakuuttaa täten että
ProntoPro NG tyyppinen laite on direktiivin 1999/5/EY oleellisten vaatimusten ja sitä koskevien
direktiivin muiden ehtojen mukainen.
Dutch Hierbij verklaart, Philips Consumer Electronics, Remote Control Systems dat het toestel
ProntoPro NG in overeenstemming is met de essentiële eisen en de andere relevante bepalingen
van richtlijn 1999/5/EG.
French Par la présente, Philips Consumer Electronics, Remote Control Systems, déclare que l’appareil
ProntoPro NG est conforme aux exigences essentielles et aux autres dispositions pertinentes de
la directive 1999/5/CE.
Swedish Härmed intygar, Philips Consumer Electronics, Remote Control Systems, att denna
ProntoPro NG står I överensstämmelse med de väsentliga egenskapskrav och övriga relevanta
bestämmelser som framgår av direktiv 1999/5/EG.
Danish Undertegnede Philips Consumer Electronics, Remote Control Systems erklærer herved, at
følgende udstyr ProntoPro NG overholder de væsentlige krav og øvrige relevante krav i direktiv
1999/5/EF
German Hiermit erklärt Philips Consumer Electronics, Remote Control Systems die Übereinstimmung des
Gerätes ProntoPro NG mit den grundlegenden Anforderungen und den anderen relevanten
Festlegungen der Richtlinie 1999/5/EG.
Greek ΜΕ ΤΗΝ ΠΑΡΟΥΣΑ Philips Consumer Electronics, Remote Control Systems ∆ΗΛΩΝΕΙ ΟΤΙ
ProntoPro NG ΣΥΜΜΟΡΦΩΝΕΤΑΙ ΠΡΟΣ ΤΙΣ ΟΥΣΙΩ∆ΕΙΣ ΑΠΑΙΤΗΣΕΙΣ ΚΑΙ ΤΙΣ
ΛΟΙΠΕΣ ΣΧΕΤΙΚΕΣ ∆ΙΑΤΑΞΕΙΣ ΤΗΣ Ο∆ΗΛΙΑΣ 1999/5/ΕΚ.
Italian Con la presente Philips Consumer Electronics, Remote Control Systems dichiara che questo
ProntoPro NG è conforme ai requisiti essenziali ed alle altre disposizioni pertinenti stabilite dalla
direttiva 1999/5/CE.
Spanish Por medio de la presente, Philips Consumer Electronics, Remote Control Systems, declara que
el ProntoPro NG cumple con los requisitos esenciales y cualesquiera otras disposiciones
aplicables o exigibles de la Directiva 1999/5/CE.
Portuguese Philips Consumer Electronics, Remote Control Systems declara que este ProntoPro NG está
conforme com os requisitos essenciais e outras disposições da Directiva 1999/5/CE.
Declaration of Conformity (DoC) can be found at
http://www.pronto.philips.com/products/DoC.
© 2003 Royal Philips Electronics NV
All rights are reserved. Reproduction in whole or in part is prohibited without prior
consent of the copyright owner.
This device can be used in:
AT ✓ BE ✓ CH ✓ DE ✓ DK ✓ GR ✓ ES ✓ FI ✓ FR ✓
IRE ✓ ISR ✓ IT ✓ LU ✓ NL ✓ NO PT ✓ SE ✓ UK ✓
SBCRU980_ML_UK1004.qxd 19-10-2004 16:08 Pagina 1

User Guide
2
Table of Contents
Taking a First Look 4
ProntoPro NG: The Home Theatre Control Panel 4
The Device 5
The Touch Screen 7
The Docking Station 8
What’s New for ProntoPro Next Generation? 9
Before You Start 10
Installing the Battery Pack 10
Charging the ProntoPro NG 11
Getting Started 13
Turning on ProntoPro NG 13
Setting Time and Date 14
Changing the Time Format 14
Changing the Time 14
Changing the Date 15
Setting the Language 16
Operating ProntoPro NG 17
Device Overview 17
Page Overview 18
Customising ProntoPro NG 19
Using the Tools 19
Defining the Brand for a Device 20
Learning Commands 23
Labelling Elements 25
Adding Devices 28
Deleting Elements 30
Moving Devices 31
Adjusting the Settings 32
Setting the Brightness of the Backlight 33
Setting the Timeout of the LCD Screen 33
Setting the Volume Level 34
Setting the Navigation for ProntoPro NG 34
Setting the Animation Mode 35
Calibrating the Touch Screen 35
Adjusting the Screen Activation Settings 36
SBCRU980_ML_UK1004.qxd 19-10-2004 16:08 Pagina 2

User Guide
3
EN
Table of Contents
Using the Power Features 38
Creating and Editing Macros 38
Creating a Macro 38
Editing a Macro 40
Creating and Editing Timers 51
Activating Timers 41
Creating and Editing Timers 42
Operating ProntoPro NG with the Cursor 48
Operating ProntoPro NG with RF 50
Selecting RF to Operate your Devices 51
Selecting IR to Operate your Devices 52
ProntoProEdit NG 53
FAQ 55
Troubleshooting 57
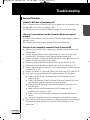
General Problems 57
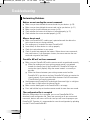
Customising Problems 58
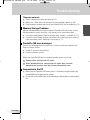
Memory Storage Problems 59
ProntoPro NG error messages 61
Connection to the PC 59
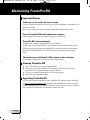
Maintaining ProntoPro NG 60
Important Notices 60
Cleaning ProntoPro NG 60
Upgrading ProntoPro NG 60
List of Symbols 61
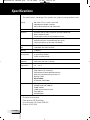
Specifications 64
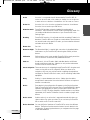
Glossary 65
Index 68
SBCRU980_ML_UK1004.qxd 19-10-2004 16:08 Pagina 3

User Guide
4
Taking a First Look
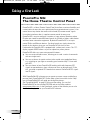
ProntoPro NG:
The Home Theatre Control Panel
ProntoPro NG is a Home Theatre Control Panel that allows maximum flexibility and
customisation for even the most sophisticated home entertainment system. It can
control almost any device that works with infrared (IR) remote control signals.
Its intuitive interface makes it a perfect remote control for every user.
ProntoPro NG is easy to configure. It contains a huge universal database where
IR codes are stored to control different brands for all kinds of video, audio devices
and even home automation equipment. By default ProntoPro NG is set up to
control Philips and Marantz devices. For other brands you simply choose the
brands of your devices when you use ProntoPro NG for the first time.
Furthermore the ProntoPro NG is equipped with a colour touch screen. This TFT-
display supports 65536 colours so you can upload any colour picture.
ProntoPro NG offers you some extra powerful features:
■ You can create and edit macros, allowing you to send a series of commands
with one single touch.
■ You can set timers for certain actions to be carried out at predefined times,
e.g. switching on your lights or recording your favourite daily TV-show with
your VCR.
■ You can choose to have ProntoPro NG working with radio frequency (RF)
signals to operate devices from a distance or from an adjacent room. To do
this, you need an optional RF Extender that converts ProntoPro NG RF signals
into IR signals.
With ProntoProEdit NG software you can create your own screens and define a
personal look. ProntoProEdit NG’s Online Help system (accessible via the ‘Help’
icon in ProntoProEdit NG) will guide you through the process.
See ‘ProntoProEdit NG’ on page 53 for more information. You can find
ProntoProEdit NG on the included CD-ROM and on the Philips website
www
.pronto.philips.com. In the Downloads section of the website you can also
find the latest upgrades for your ProntoPro NG software.
SBCRU980_ML_UK1004.qxd 19-10-2004 16:08 Pagina 4

User Guide
5
EN
Taking a First Look
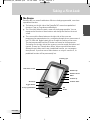
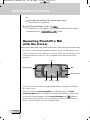
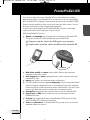
The Device
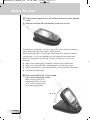
ProntoPro NG has several hard buttons. Most are freely programmable, some have
a predefined function:
■ The buttons on the left side of the ProntoPro NG screen have predefined
functions: Page up, Page down and Backlight.
■ The 4 firm keys below the touch screen are freely programmable. You can
reprogram the function of these buttons and change the label on the touch
screen.
■ The cursor and the Home button on the right side of the cursor are
programmed to operate devices (e.g. navigating through the on screen menu of
your TV). With the Toggle button you can change the working of the cursor.
The free programmable and the OK button are meant for future purposes.
The buttons on the right side of the screen are used to control the volume and
channel: Channel up, Channel down, Mute, Volume up and Volume down.
Although these buttons each have a predefined function, you can program
them yourself. If you learn one of these buttons or assign a macro to it, its
predefined function will be permanently lost.
Learning eye
LCD touch screen
Firm keys
Free programmable
Toggle button
Cursor
Channel up
Channel down
Mute
Volume up
Volume down
OK
Home
SBCRU980_ML_UK1004.qxd 19-10-2004 16:08 Pagina 5

User Guide
6
Taking a First Look
Backlight
Page up
Page down
USB port
Reset button
Connection to docking station
Battery
compartment
SBCRU980_ML_UK1004.qxd 19-10-2004 16:08 Pagina 6

User Guide
7
EN
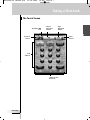
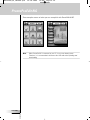
Taking a First Look
Labels for the
firm keys
Next
Device
Previous
Device
ProntoPro NG
Icon
Device
Overview
button
Page
Overview
button
Soft
buttons
The Touch Screen
SBCRU980_ML_UK1004.qxd 19-10-2004 16:08 Pagina 7

User Guide
8
Taking a First Look
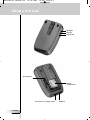
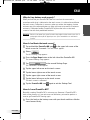
The Docking Station
The docking station is used to charge the ProntoPro NG’s battery pack.
When your ProntoPro NG is placed in the docking station, you can connect
ProntoPro NG to your computer via the USB port of the docking station, instead of
the USB port of the ProntoPro NG.
USB port
Connector for
ProntoPro NG
Adapter Connector
SBCRU980_ML_UK1004.qxd 19-10-2004 16:08 Pagina 8

EN
User Guide
9
Taking a First Look
What’s New for ProntoPro Next Generation?
This new ProntoPro NG (SBC RU980) offers several new features compared to the
previous model of ProntoPro. The most important ones are:
■ Transparency
ProntoPro NG supports transparency in buttons and other objects. This makes
it easier to create complex user interfaces. You can now place buttons with a
transparent background on top of a background image, let transparent buttons
overlap or create transparency effects within buttons.
■ 65536 colours
The number of colours has increased from 256 to 65536 (64k). Therefore the
buttons look much more natural.
■ USB
ProntoPro NG has a USB port to make downloading much easier.
■ 32 MB of Memory
ProntoPro NG has 32 Megabyte of memory. This enables you to download
larger configuration files to ProntoPro NG.
■ Integrated Macros
Macros are now better integrated in the configuration file. Each button can be
a macro, this means each button can contain more than one action.
■ More advanced Timers
Your ProntoPro NG is able to set timers for certain actions to be carried out at
any time you choose. Timers are not an entirely new feature of ProntoPro NG,
but they are easier to use and better integrated with the configuration file. You
can activate and deactivate the timers you created and you can also set them
to repeat daily or weekly. For instance, you can have the lights switched on
every day at sunset. You can also create a timer to set your VCR to record your
favourite TV-show on Wednesday and Saturday.
■ Page Overview
The Page Overview offers you a list of all the pages for one device. Every
device comes with a Page Overview, making it easier and faster to browse
through the device pages.
■ Cursor Navigation
By default the cursor is programmed to operate devices. The functions
assigned to the cursor button depend on the device active on ProntoPro NG.
ProntoPro NG also offers you the possibility to use the cursor for navigating
through devices and pages on the screen. The Left and Right cursor buttons
allow you to scroll through the devices, with the Up and Down cursor buttons
you scroll through the different pages.
■ Animation Mode
ProntoPro NG provides navigation feedback through graphical animations of
mode transitions and page transitions. You can enable and disable the
animations of your ProntoPro NG in the Settings Pages.
■ Multi Language Support
ProntoPro NG now supports besides English also Spanish, French, German and
Dutch.
SBCRU980_ML_UK1004.qxd 19-10-2004 16:08 Pagina 9

User Guide
10
When you use ProntoPro NG for the first time, you will have to:
■ install the battery pack;
■ place ProntoPro NG in the docking station and charge it.
Attention Use the docking station only with the Philips NiMH rechargeable battery pack.
Never plug other appliances (like mobile phones, PDA’s, …) into the docking
station. This causes damage to the connector and the appliance.
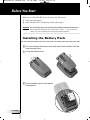
Installing the Battery Pack
1Press the latch on the battery cover with your thumb and then slide the
cover forward firmly.
2 Lift up the battery cover.
Before You Start
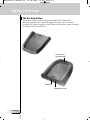
3 Place the battery pack in the battery
compartment.
SBCRU980_ML_UK1004.qxd 19-10-2004 16:08 Pagina 10

User Guide
11
EN
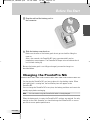
4 Plug the cable of the battery pack in
the connector.
5 Slide the battery cover back on.
Make sure the wires of the battery pack do not get stuck while sliding the
cover on.
After a few seconds, the ProntoPro NG starts up automatically and an
introduction screen appears. The ProntoPro NG beeps twice to indicate that it
has finished starting up.
Because the battery pack is not fully pre-charged, you need to charge it as
described below.
Charging the ProntoPro NG
For charging the ProntoPro NG, you have to place it in the docking station. When
the battery pack is running low, the Low Battery icon will appear on the
ProntoPro NG.
You can charge the ProntoPro NG at any time; the battery pack does not have to be
entirely empty before recharging.
Note You can continue using the ProntoPro NG while it is being charged.
When the battery pack is empty, the ProntoPro NG’s settings are retained. You only
need to set the clock. However, you should recharge the ProntoPro NG as soon as
possible to ensure perfect performance.
Before You Start
SBCRU980_ML_UK1004.qxd 19-10-2004 16:08 Pagina 11

User Guide
12
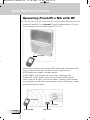
1Plug the power adapter into a wall outlet and connect it to the docking
station.
2 Slide the ProntoPro NG in the docking station until it clicks.
Before You Start
30° to 45°
Charging starts immediately. The blue charging LEDs on the front of the docking
station indicate that the battery pack is being charged.
When the ProntoPro NG is fully charged, the charging LEDs switch off. Normal
charging time is 2 to 3 hours, depending on the condition of the battery pack.
When the charging LEDs are flashing, an error has occurred. Try one of the
following:
■ Make sure the battery pack is properly installed in your ProntoPro NG.
■ Make sure the ProntoPro NG is placed properly in the docking station.
■ Check if the connector in the docking station is clean and free of obstructions.
■ Cool down the battery pack.
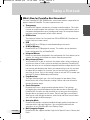
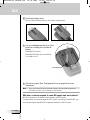
3 When the ProntoPro NG is fully charged,
take it out of the docking station.
Make sure that you first tilt
the ProntoPro NG to an angle
of 30° to 45° and then take it
out of the docking station.
SBCRU980_ML_UK1004.qxd 19-10-2004 16:08 Pagina 12

User Guide
13
EN
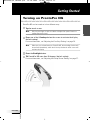
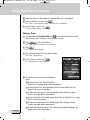
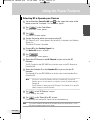
Turning on ProntoPro NG
ProntoPro NG can be turned on in four different ways:
Tap the touch screen.
Note Only use your finger, a stylus or a blunt soft object like a pencil eraser to
operate the touch screen.
Press one of the 4 firm keys below the screen to activate the display
(default setting).
For more information, see ‘Adjusting the Firm Keys Settings’ on page 36.
Note When you press a hard button on ProntoPro NG, the according function will
be executed immediately, while the 4 firm keys below the touch screen will
activate the display.
Press the Backlight button.
Tilt ProntoPro NG more than 50 degrees (default setting).
For more information, see ‘Adjusting the Pickup Sensor Settings’ on page 37.
Getting Started
50°
SBCRU980_ML_UK1004.qxd 19-10-2004 16:08 Pagina 13

User Guide
14
Getting Started
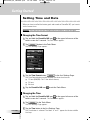
Setting Time and Date
When you have installed the battery pack and turned on ProntoPro NG, you have to
set the current time.
Attention Every time you reset your ProntoPro NG you will have to set the time again.
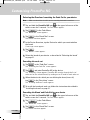
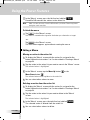
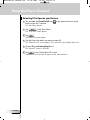
Changing the Time Format
1Tap and hold the ProntoPro NG icon in the upper left corner of the
touch screen for 3 seconds. The Tools Menu appears.
2Tap button in the Tools Menu.
The first Settings Page appears.
3Tap the Time Format button in the first Settings Page.
The Time Format button toggles between the three time formats:
■ 12 hour (AM/PM): This is the default format;
■ 24 hour;
■ No time.
4Tap the ProntoPro NG icon to exit the Tools Menu.
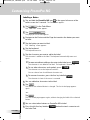
Changing the Time
1Tap and hold the ProntoPro NG icon in the upper left corner of the
touch screen for 3 seconds. The Tools Menu appears.
2Tap in the Tools Menu.
The first Settings Page appears.
3Tap the Time button in the first Settings Page.
The Time button is selected. The labels ‘+’ and ‘-’ appear for the two middle
firm keys.
SBCRU980_ML_UK1004.qxd 19-10-2004 16:08 Pagina 14

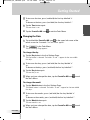
4To increase the time, press (and hold) the firm key labelled ‘+’.
-or-
To decrease the time, press (and hold) the firm key labelled ‘-’.
5Tap the Time button again.
The new time is set.
6Tap the ProntoPro NG icon to exit the Tools Menu.
Changing the Date
1Tap and hold the ProntoPro NG icon in the upper left corner of the
touch screen for 3 seconds. The Tools Menu appears.
2Tap in the Tools Menu.
The first Settings Page appears.
To change the day
1Tap the Day button in the first Settings Page.
The Day button is selected. The labels ‘+’ and ‘-’ appear for the two middle
firm keys.
2To increase the days, press (and hold) the firm key labelled ‘+’.
-or-
To decrease the days, press (and hold) the firm key labelled ‘-’.
3Tap the Day button again.
The new day is set.
4When you have changed the date, tap the ProntoPro NG icon to exit
the Tools Menu.
To change the month
1Tap the Month button in the first Settings Page.
The Month button is selected. The labels ‘+’ and ‘-’ appear for the two middle
firm keys.
2To increase the months, press (and hold) the firm key labelled ‘+’.
-or-
To decrease the months, press (and hold) the firm key labelled ‘-’.
3Tap the Month button again.
The new month is set.
4When you have changed the date, tap the ProntoPro NG icon to exit
the Tools Menu.
User Guide
15
EN
Getting Started
SBCRU980_ML_UK1004.qxd 19-10-2004 16:08 Pagina 15

User Guide
16
Getting Started
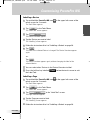
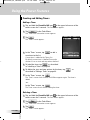
To change the year
1Tap the Year button in the first Settings Page.
The Year button is selected. The labels ‘+’ and ‘-’ appear for the two middle
firm keys.
2To increase the years, press (and hold) the firm key labelled ‘+’.
-or-
To decrease the years, press (and hold) the firm key labelled ‘-’.
3Tap the Year button again.
The new year is set.
4When you have changed the date, tap the ProntoPro NG icon to exit
the Tools Menu.
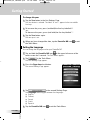
Setting the Language
You can change the language used on your ProntoPro NG.
1Tap and hold the ProntoPro NG icon in the upper left corner of the
touch screen for 3 seconds. The Tools Menu appears.
2Tap in the Tools Menu.
The first Settings Page appears.
3Press the Page down hard button.
The second Settings Page appears.
4Tap in the second Settings Page.
The Language button toggles between five languages:
■ English;
■ German;
■ French;
■ Dutch;
■ Spanish.
5Tap the ProntoPro NG icon to exit the Tools Menu.
SBCRU980_ML_UK1004.qxd 19-10-2004 16:08 Pagina 16

User Guide
17
EN
Getting Started
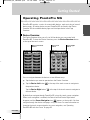
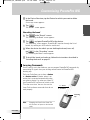
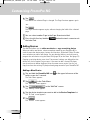
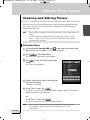
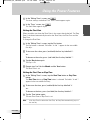
Operating ProntoPro NG
ProntoPro NG contains a series of customisable devices, each consisting of several
device pages. All active devices on your ProntoPro NG are listed in the Device
Overview. All the available device pages are listed per device in the Page
Overview.
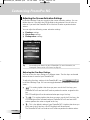
Device Overview
The Device Overview offers you a list of all the devices you can control with
ProntoPro NG. To view the Device Overview, press the Device Overview button
at the top of the touch screen.
You can navigate between the devices in two different ways:
■ Tap the device you want to operate from the Device Overview.
■ Tap the Device Left button at the top of the touch screen to navigate to
the previous device.
Tap the Device Right button at the top of the touch screen to navigate to
the next device.
By default you navigate through ProntoPro NG, using this touch screen navigation.
When cursor navigation is enabled, the Device Left and Device Right button
disappear and the Cursor Navigation icon appears at the top left. You then
navigate through the devices and pages using the cursor. For more information on
changing the touch screen navigation to cursor navigation, see ‘Operating
ProntoPro NG with the Cursor’ on page 48.
Device Right
button
Device Left
button
Device Overview
button
SBCRU980_ML_UK1004.qxd 19-10-2004 16:08 Pagina 17

User Guide
18
Getting Started
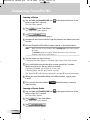
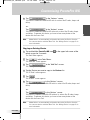
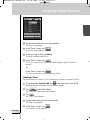
Page Overview
The Page Overview offers you a list of all the pages for one device. To view the
Page Overview, tap the Page Overview button, which displays the page number
in the upper area of touch screen.
You can navigate between the different pages in two different ways:
■ Tap the page you want to operate from the Page Overview.
■ Press the Page Up or Page Down hard button on the left side of
ProntoPro NG.
Page
Overview
button
SBCRU980_ML_UK1004.qxd 19-10-2004 16:08 Pagina 18

User Guide
19
EN
What makes ProntoPro NG so powerful is the ability to extend its functionality in
multiple ways, like programming additional functions, adding supplementary
devices and changing the interface as it suits you best.
For full editing you can use ProntoProEdit NG software. See ‘ProntoProEdit NG’ on
page 53 for more information.
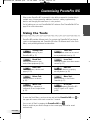
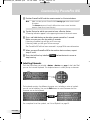
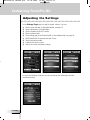
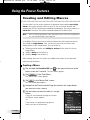
Using the Tools
ProntoPro NG provides different tools. For customising ProntoPro NG you have to
switch to the appropriate tool. ProntoPro NG offers 10 different tools in the Tools
Menu, each providing different functionalities:
Customising ProntoPro NG
Settings Tool:
Defining the settings of your
ProntoPro NG (p. 32)
Brand Tool:
Defining the brands of your
audio/video equipment (p. 20)
Label Tool:
Labelling buttons, devices and
pages (p. 25)
Delete Tool:
Deleting buttons or devices
(p. 30)
Macro Tool:
Programming a sequence of
commands for one single button
(p. 38)
Timer Tool:
Defining timer actions to be carried
out at predefined times (p. 41)
Learn Tool:
Learning IR codes from other remote
controls (p. 23)
Add Tool:
Adding new devices or copying
existing devices (p. 28)
Move Tool:
Moving devices in the Device
Overview (p. 31)
RF IR Tool:
Defining to operate ProntoPro NG
with IR signals or RF signals
(p. 50)
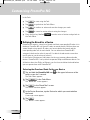
To enter the Tools Menu, you have to tap and hold the ProntoPro NG icon in
the upper left corner of the touch screen for 3 seconds.
You can exit all Tools by tapping the ProntoPro NG icon .
Keep in mind that your latest changes to the current page will not be saved
automatically.
SBCRU980_ML_UK1004.qxd 19-10-2004 16:08 Pagina 19

User Guide
20
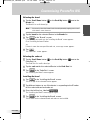
In the Tools:
■ Tap to start using the Tool.
■ Tap to go back to the Tools Menu.
■ Tap to confirm an action and save the changes you made.
■ Tap to cancel an action without saving the changes.
■ Press the firm key labelled to end a series of actions and go back to
the Tools Menu.
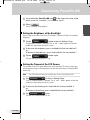
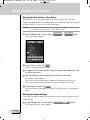
Defining the Brand for a Device
ProntoPro NG contains a huge list of brands and their corresponding IR codes in its
database. ProntoPro NG uses these IR codes to control devices. Because there are
several brands using specific IR codes, you have to define the brands and the
corresponding code sets for each device. You can either have ProntoPro NG
autosearch the brand or select it yourself. If a device’s brand contains more than
one IR code set, you also have to select it.
On the Device Overview you find buttons for the most common video and audio
devices. ProntoPro NG is set by default to operate Philips and Marantz devices. For
all devices other than Philips or Marantz, you first have to define the brand before
you can operate them with ProntoPro NG.
Selecting the Brand and Code Set for your Device
1Tap and hold the ProntoPro NG icon in the upper left corner of the
touch screen for 3 seconds.
The Tools Menu appears.
2Tap in the Tools Menu.
The ‘Brand Tool’ screen appears.
3Tap in the ‘Brand Tool’ screen.
The Device Overview appears.
4 In the Device Overview, tap the Device for which you want to define
the brand.
A message screen appears.
5Tap .
The ‘Brands’ screen appears.
Customising ProntoPro NG
SBCRU980_ML_UK1004.qxd 19-10-2004 16:08 Pagina 20
La pagina sta caricando ...
La pagina sta caricando ...
La pagina sta caricando ...
La pagina sta caricando ...
La pagina sta caricando ...
La pagina sta caricando ...
La pagina sta caricando ...
La pagina sta caricando ...
La pagina sta caricando ...
La pagina sta caricando ...
La pagina sta caricando ...
La pagina sta caricando ...
La pagina sta caricando ...
La pagina sta caricando ...
La pagina sta caricando ...
La pagina sta caricando ...
La pagina sta caricando ...
La pagina sta caricando ...
La pagina sta caricando ...
La pagina sta caricando ...
La pagina sta caricando ...
La pagina sta caricando ...
La pagina sta caricando ...
La pagina sta caricando ...
La pagina sta caricando ...
La pagina sta caricando ...
La pagina sta caricando ...
La pagina sta caricando ...
La pagina sta caricando ...
La pagina sta caricando ...
La pagina sta caricando ...
La pagina sta caricando ...
La pagina sta caricando ...
La pagina sta caricando ...
La pagina sta caricando ...
La pagina sta caricando ...
La pagina sta caricando ...
La pagina sta caricando ...
La pagina sta caricando ...
La pagina sta caricando ...
La pagina sta caricando ...
La pagina sta caricando ...
La pagina sta caricando ...
La pagina sta caricando ...
La pagina sta caricando ...
La pagina sta caricando ...
La pagina sta caricando ...
La pagina sta caricando ...
La pagina sta caricando ...
La pagina sta caricando ...
-
 1
1
-
 2
2
-
 3
3
-
 4
4
-
 5
5
-
 6
6
-
 7
7
-
 8
8
-
 9
9
-
 10
10
-
 11
11
-
 12
12
-
 13
13
-
 14
14
-
 15
15
-
 16
16
-
 17
17
-
 18
18
-
 19
19
-
 20
20
-
 21
21
-
 22
22
-
 23
23
-
 24
24
-
 25
25
-
 26
26
-
 27
27
-
 28
28
-
 29
29
-
 30
30
-
 31
31
-
 32
32
-
 33
33
-
 34
34
-
 35
35
-
 36
36
-
 37
37
-
 38
38
-
 39
39
-
 40
40
-
 41
41
-
 42
42
-
 43
43
-
 44
44
-
 45
45
-
 46
46
-
 47
47
-
 48
48
-
 49
49
-
 50
50
-
 51
51
-
 52
52
-
 53
53
-
 54
54
-
 55
55
-
 56
56
-
 57
57
-
 58
58
-
 59
59
-
 60
60
-
 61
61
-
 62
62
-
 63
63
-
 64
64
-
 65
65
-
 66
66
-
 67
67
-
 68
68
-
 69
69
-
 70
70


in altre lingue
- English: Philips SBCRU980/00 User manual
Documenti correlati
Altri documenti
-
Datalogic 911350058 Manuale utente
-
Datalogic Joya Touch A6 Manuale utente
-
 Psion Teklogix netpad Manuale utente
-
Datalogic Industrial PDA Manuale utente
-
Saitek Pro Flight Yoke System Manuale del proprietario
-
Handspring 600 Manuale utente
-
Palm TREO 600 Using Manual
-
-
Getac QYLEM7355T Manuale utente
-
LG KS20.ASWSBK Manuale utente
