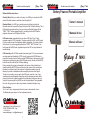
Audiodesign Gipsy 8 MKII Battery Powered Portable Amplifier Manuale del proprietario
- Tipo
- Manuale del proprietario

Gipsy 8 MKII
Gipsy 8
Battery Powered Portable Amplifier
Owner’s manual
Manuale d’uso
Portable Acoustic Guitar Amplifier
7
Multimedia Mode instructions:
Stand by Mode: When you switch on the amp, if no USB key is inserted, the USB
reader / Bluetooth receiver is switched off and the light is off.
Bluetooth Mode: if no USB key is inserted, press any button to activate the
Bluetooth mode that connects the Gipsy 8 device and the LED starts flashing. The lit
LED indicates successful pairing. You can control your Bluetooth device with the
"PREV" "NEXT" buttons pressed briefly. If you briefly press the MODE button,
playback will pause and LED light will be fixed.
USB reader mode: automatically turns on when a USB key (2.0 or 3.0 with
maximum capacity 32 GB) is inserted. The player reads files in WAV or MP3 format.
If the key contains songs it automatically switches to playback, if it is empty it will be
left to record. You can manage playback with the "PREV" "NEXT" buttons. If you
briefly press the MODE button, playback stops and the LED no longer flashes but
remains steady.
USB recording: with a USB key inserted (necessarily type 3.0 to have an adequate
recording speed and formatted in FAT32 format), long press the MODE button to
access the recording function. Briefly press the MODE button to start recording (LED
flashing) and press again to pause (the LED flashes slowly). Double click the MODE
button to save the audio file (the LED stops flashing).
During recording the volume is determined by the volume of the individual input
channels while the MASTER has no influence on the volume of the recording and
therefore it could also be put to the minimum. It is therefore possible to record,
listening to yourself on headphones without amplifying the sound from Gipsy8
To listen to a recording, once you get to the USB menu, press the > and < keys
simultaneously and immediately release them and the recording just made will be
played (in the case of multiple recordings they will be played in sequence and in a
loop) until, by pressing the key MODE you want to stop playback. During playback,
the> and <keys give you the option to go forward or backward through a song.
Other functions:
The V+ and V- keys, long pressed allow to increase or decrease the volume.
The Tone button gives access to 5 tone adjustment presets.
Gipsy 8 MKII
Audiodesign Srl Via dell’industria, 28
42025 CAVRIAGO (RE) - Italy
+39 0522 941444
www.audiodesign.it - [email protected]
Portable Acoustic Guitar Amplifier
Gipsy 8 MKII
Manuel utiliseur

16
Presentazione
Complimenti per aver scelto l'amplificatore per chitarra Gipsy 8. Si tratta di un
prodotto di ultima generazione con prestazioni generose che grazie alla batteria,
integrata all'interno, e consente la massima versatilità e flessibilità di utilizzo.
Caratteristiche generali:
* Portatile a batteria agli Ioni di Litio (durata di funzionamento 8-10 ore).
* Bluetooth per collegarsi a un computer portatile, smartphone, tablet o lettore Mp3.
* Lettore USB per file musicali in formato MP3 e WAV.
* Registratore su chiavetta USB in formato Mp3.
* Ingresso bilanciato per chitarra acustica con regolazione dei bassi, alti e reverbero.
* Ingresso sbilanciato per chitarra elettrica, tastiere o microfono con regolazione dei
bassi, alti e reverbero.
* Possibilità di variazione rapida (- 10 dB) del livello degli ingressi Jack e combo.
* Ingresso mini jack stereo 3,5 mm per collegare una sorgente esterna (computer ,
smartphone, tablet o lettore MP3)
* Presa 13,8 VDC - 2A per carica batterie esterno (il positivo è il polo centrale)
* Flangia per stativo
* Attacchi per tracolla e tracolla fornita a corredo
* Inclinazione tipo monitor da palco
* Maniglia per il trasporto
* Amplificatore in classe D: 25W RMS - 50W Max
* Misure: LxAxP: 34 x 25 x 23 cm
* Peso: 4 Kg
Portable Acoustic Guitar Amplifier Portable Acoustic Guitar Amplifier
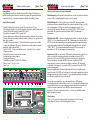
(1) (2) (3) (4) (5) (6) (12)
(7) (8) (9) (10) (11) (13) (15)
(14)
Istruzioni sulle funzioni dell'area multimediale:
Modalità stand by: all'accensione dell'amplificatore, se non è inserita una chiavetta,
il lettore USB / ricevitore Bluetooth è spento e la luce è spenta.
Modalità Bluetooth: se non è inserita alcuna chiave USB, premere qualsiasi
pulsante per attivare la modalità Bluetooth che collega il dispositivo Gipsy 8 e il LED
inizia a lampeggiare. Il LED acceso indica un accoppiamento riuscito. Puoi
comandare il tuo dispositivo Bluetooth con i pulsanti "PREV" "NEXT" premuti
brevemente. Se si preme brevemente il pulsante MODE, si interrompe la
riproduzione.
Modalità lettore USB: si accende automaticamente quando si inserisce una chiave
USB (2.0 o 3.0 con capacità massima 32 GB). Il lettore legge file in formato WAV o
MP3. Se la chiavetta contiene brani passa automaticamente alla riproduzione, se è
vuota sarà pornta per registrare.È possibile gestire la riproduzione con i pulsanti
"PREV" "NEXT". Se si preme brevemente il pulsante MODE, si interrompe la
riproduzione e il LED non lampeggia più ma rimane fisso.
Registrazione USB: con una chiave USB inserita (necessariamente di tipo 3.0 per
avere una velocità di registrazione adeguata e formattata in formato FAT32),
premere a lungo il pulsante MODE per accedere alla funzione di registrazione.
Premere brevemente il pulsante MODE per avviare la registrazione (LED
lampeggiante) e premere nuovamente per mettere in pausa (il LED lampeggia
lentamente). Fare doppio clic sul pulsante MODE per salvare il file audio (il LED
smette di lampeggiare).
Durante la registrazione il volume è determinato dal volume dei singoli canali in
ingresso mentre il MASTER non ha influenza sul volume della registrazione e quindi
potrebbe essere anche messo al minimo. E’ quindi possibile registrare, ascoltandosi
in cuffia senza amplificare il suono dalla Gipsy8
Per ascoltare una registrazione, una volta arrivati al menù USB, premere
contemporaneamente e rilasciarli subito, i tasti > e < e sarà riprodotta la registrazione
appena effettuata (nel caso di più registrazioni saranno riprodotte in sequenza e in
loop) fino a quando, premendo il tasto MODE si desideri interrompere la
riproduzione. Durante la riproduzione i tasti > e < danno la possibilità di andare
avanti o indietro di un brano.
Altre funzioni:
I tasti V+ e V-, premuti a lungo permettono di aumentare o ridurre il volume.
Il tasto Tone da l’accesso a 5 preset di regolazione dei toni.
-10dB-10dB
Gipsy 8 MKII Gipsy 8 MKII
(20)
(22)
(23)
(21)
(19)

2 5
Connessioni e controlli:
1. Ingresso Ch 1: ACOUSTIC GUITAR - Jack bilanciato, impedenza d'ingresso 10
KOhm
2. Volume Ch 1 e pulsante - 10 dB
3. Bass: regola i toni bassi sul Ch 1 - 60 Hz +/- 15 dB
4. Treble: regola i toni alti sul Ch 1 - 10 KHz +/- 15 dB
5. Reverb: regola l'intensità dell'effetto Reverbero sul Ch 1
6. Ingresso CH2: MICROFONO o STRUMENTI - XLR o Jack sbilanciato,
impedenza 1 Kohm
7. Volume Ch 2 e pulsante - 10 dB
8. Bass: regola i toni bassi sul Ch 2 - 60 Hz +/- 15 dB
9. Treble: regola i toni alti sul Ch 2 - 10 KHz +/- 15 dB
10. Reverb: regola l'intensità dell'effetto Reverbero sul Ch 2
11. Ingresso Ch 3 AUX IN: Jack 3,5 stereo
12. Master: regola il volume generale da inviare all'amplificatore
13. V-: una pressione lieve ha la funzione "precedente", una lunga riduce il volume
14. Mode: Una pressione lieve mette in pausa la riproduzione, una lunga permette
di scegliere tra le funzioni USB / Bluetooth e registrazione. Queste ultime disponibili
solo con una chiavetta inserita.
15. V+: una pressione lieve ha la funzione "seguente", una lunga aumenta il volume
16. Tone: Premendo questo pulsante, si può scegliere tra 5 preset di toni e una
riproduzione senza modifiche. L'ultimo preset è memorizzato separatamente per
Bluetooth e USB.
17. USB: Inserire una chiavetta USB oppure utilizzare la presa per alimentare a 5V
un device esterno. (l'utilizzo come carica di un device ovviamente riduce la durata
della batteria)
18. LED: Indica il funzionamento del lettore / ricevitore Bluetooth. (vedi pag 7)
19. Power: On/Off switch
20. Phones: Inserendo il Jack Stereo 6,3 mm di una cuffia, l’altoparlante viene
automaticamente scollegato.
21. Power indicator: Il led può avere 3 colori:
* Blu: batteria completamente carica
* Fucsia: batteria parzialmente scarica
* Rosso: batteria scarica: spegnere e ricaricare.
* Per ricaricare, spegnere l'amplificatore e collegare il carica batteria alla presa DC
IN. Durante la carica il LED rimarrà fucsia lampeggiante e a fine carica diventerà
blu fisso. Se con il carica batteria collegato il LED non si illumina la batteria deve
essere caricata per almeno 24 ore o fino a che il led diventi Blu fisso. Se alla fine
non si accende nessun LED, cambiare la batteria (vedi manuale)
22. DC: Collegare qui il carica batterie esterno in dotazione (DC 13,8 V - 2000 mA -
positivo all'interno)
23. DI OUT: Uscita stereo pre-master.
Portable Acoustic Guitar Amplifier Portable Acoustic Guitar Amplifier
Batteria al Litio
Quando la Gipsy è accesa e la batteria è carica, il led posto sul retro è di colore blu,
quando diventa fucsia la batteria è parzialmente carica, mentre quando diventa
rosso e lampeggia, la batteria è quasi scarica e deve essere ricaricata al più presto,
altrimenti in pochi minuti, il led diventerà rosso fisso (oppure si spegnerà) e la Gipsy
diventerà muta. In ogni caso, in presenza del led rosso (a luce lampeggiante o
fissa), si dovrà OBBLIGATORIAMENTE RICARICARE la batteria con l'apposito
caricabatteria.
Per ricaricare la batteria, ci sono due possibilità:
1) Con la Gipsy ancora accesa, si colleghi subito il caricabatteria in dotazione (il led
lampeggerà in fucsia) e la Gipsy, dopo pochi secondi, riprenderà a funzionare e si
potrà continuare la performance.
2) Con la Gipsy spenta, si colleghi il caricabatteria in dotazione e il led lampeggerà
inizialmente in fucsia per arrivare a Blue a fine carica.
NON LASCIARE MAI LA BATTERIA SCARICA E RICARICARLA SEMPRE
PRIMA E DOPO OGNI UTILIZZO ED ALMENO UNA VOLTA OGNI 3 MESI
altrimenti la batteria si danneggerà.
La batteria può comunque essere ricaricata anche se il led è blu (batteria quasi
carica) oppure fucsia (batteria parzialmente carica).
Il tempo di ricarica con l’amplificatore spento è di circa 3 ore che possono diventare
di più se nel frattempo si sta utilizzando l’amplificatore. Un circuito di protezione
permette di lasciare sotto carica l’amplificatore anche per tempi più lunghi senza
pericolo di danneggiamento. La batteria agli Ioni di Litio contenuta all'interno deve essere
sostituita da personale qualificato.
Lithium Battery:
When the Gipsy is on and the battery is charged, the LED on the back is blue, when
it becomes fuchsia the battery is partially charged, while when it turns red and
flashes, the battery is almost empty and must be recharged as soon as possible,
otherwise in a few minutes, the LED will turn solid red (or it will turn off) and the
Gipsy will become silent. In any case, in the presence of the red LED (flashing or
fixed light), you MUST REALLY charge the battery with the supplied battery charger.
To recharge the battery, there are two possibilities:
1) Leaving the Gipsy turned on, you connect the supplied charger (the LED will flash
in fuchsia) and the Gipsy, after a few seconds, will start working again and you can
continue the performance.
2) The Gipsy turned off and the supplied charger connected. The LED will flash in
fuchsia and later will become blu.
NEVER LEAVE THE BATTERY DOWNLOAD AND RECHARGE IT ALWAYS
BEFORE AND AFTER EVERY USE AND AT LEAST ONCE EVERY 3 MONTHS
otherwise the battery will be damaged.
The battery can be recharged even if the LED is blue (battery almost full) or fuchsia
(battery partially charged).
The charging time with the amplifier switched off is about 3 hours which can become
more if in the meantime you are using the amplifier. A protection circuit allows the
amplifier to be left on charge even for longer time without danger of damage. The Li
Ion battery inside must be replaced from qualified service technicians.
Gipsy 8 MKII Gipsy 8 MKII

4
Congratulations on choosing the Gipsy 8 guitar amplifier. It is a latest generation
product with generous performance that, thanks to the battery, integrated inside,
allows maximum versatility and flexibility of use.
Main features:
* Fully portable with Li Ion battery (up to 8-10 hours working time)
* Bluetooth connection: to reproduce music in connection with a computer , a
smartphone, a tablet or a portable MP3 reader
* USB Reader (for MP3 and WAV files)
* USB Recorder (MP3 files)
* Balanced Input for acoustic guitar with bass / high / reverb control
* Unbalanced Input for microphone or instrument with bass / high / reverb control
* Possibility of fast variation (- 10 dB) of the Jack and combo input level
* Stereo 3,5 mm Jack Input: to connect and external source (computer ,
smartphone, tablet or MP3 reader)
* Speaker stand pole
* Shoulder strap hooks and strap included.
* Angled shape for better sound reproduction
* Transport handle
* Class D amplifier (25 W RMS - 50 W Max)
* Size: LxHxD: 34 x 25 x 23 cm
* Weight: 4 Kg
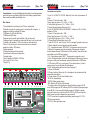
Connections and controls:
1. Input Ch 1: ACOUSTIC GUITAR - Balanced 6.3 mm Jack, input impedance 10
KOhm
2. Volume Ch 1 and push button - 10dB
3. Bass: Adjust low tones on Ch 1 - 60 Hz +/- 15 dB
4. Treble: Adjust high tones on Ch 1 - 10 KHz +/- 15 dB
5. Reverb: Adjust the Reverb effect level on Ch 1
6. Input CH2: MICROPHONE or INSTRUMENT - Unbalanced XLR or 6.3 Jack,
impedance 1 KOhm
7. Volume Ch 2 and push button - 10dB
8. Bass: Adjust low tones on Ch 2 - 60 Hz +/- 15 dB
9. Treble: Adjust high tones on Ch 2 - 10 KHz +/- 15 dB
10. Reverb: Adjust the Reverb effect level on Ch 2
11. Input Ch 3 AUX IN: Jack 3,5 stereo. This Ch is managed by master volume only.
12. Master: Adjust the volume of signal to send to the amplifier.
13. V-: a short pressure means "PREVIOUS". A long pressure reduce the volume
14. Mode: A short pression pause the reproduction. A long pression change the
function between Bluetooth / USB reader and USB recording. These last functions
are available only if a USB key is inserted.
15. V+: A short pression means "NEXT". A long pression increase the volume.
16. Tone: Pushing this button, there is the choice between 5 different tone preset or a
flat response. Last preset is memorized, separately for Bluetooth or USB Reader.
17. USB: Insert a USB key or use to power ( 5V) an external device. (If used to
power a device of course the battery life will decrease)
18. LED: Indicate working status of each mode (See page 7)
19. Power: On/Off switch
20. Phones: Inserting a Stereo Jack 6,3 of a headphone, the main speaker will be
automatically disconnected
21. Power indicator: LED can have 3 different colors:
* BLUE: Full charged battery
* PURPLE: Battery medium charge
* RED: Battery LOW. Switch off and recharge.
* To recharge, switch off the amplifier and connect the battery charger to DC IN
socket. When charging the LED is flashing PURPLE and when fully charged change
to fixed BLUE. If, once connected the battery charger no LED light on, please
charge for 24 hours or up to get a fixed BLUE LED. If the LED have no light, the
battery is dead and must be replaced (see owner manual)
22. DC: Connect here the supplied external battery power charger (DC 13,8 V -
2000 mA - inside positive)
23. DI OUT: Stereo pre-master output
Portable Acoustic Guitar Amplifier Portable Acoustic Guitar Amplifier
Gipsy 8 MKII Gipsy 8 MKII
(1) (2) (3) (4) (5) (6) (12)
(7) (8) (9) (10) (11) (13) (15)
(14)
-10dB-10dB
(20)
(22)
(23)
(21)
(19)
-
 1
1
-
 2
2
-
 3
3
-
 4
4


Audiodesign Gipsy 8 MKII Battery Powered Portable Amplifier Manuale del proprietario
- Tipo
- Manuale del proprietario
in altre lingue
Altri documenti
-
Roland BK-7m Manuale utente
-
 Orla KX10 Piano Accordion Manuale del proprietario
-
KETRON SD1000 Manuale del proprietario
-
 Simpso-lawrence Horizon 600 Owners Installation, Operation & Servicing Manual
-
Roland KR-117M Manuale utente
-
Regal 29 OBX Manuale del proprietario
-
M-Audio Black Box Guida utente
-
Silvercrest KH 2382 Operating Instructions Manual
-
Ibiza Sound PORT12UHF-WH-MKII Manuale del proprietario
-

