Ubiquiti mPower mini Quick Start Manuals
- Tipo
- Quick Start Manuals

mFi Power Adapter with
Wi-Fi Connectivity
Model: mPower mini (EU)


1
Introduction
Introduction
Thank you for purchasing the Ubiquiti Networks
™
mFi
™
mPower
™
mini (EU). The mPower mini (EU) is a European
power adapter with Wi-Fi capability that is designed for
use with the Ubiquiti mFi platform. Once connected, you
can use the mFi Controller software to monitor the energy
usage of the attached device and define automation rules
using your web browser. Rules detail what actions occur
when trigger conditions are met. This Quick Start Guide is
designed to guide you through the installation and also
includes the Warranty terms.
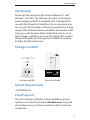
Package Contents
mFi Power Adapter with
Wi-Fi Connectivity
Model: mPower mini (EU)
mPower mini (EU) Quick Start Guide
System Requirements
• Wi-Fi Network
Cloud Support
The mFi Controller software can be installed on a local
system or run from the cloud at mfi.ubnt.com. Using the
cloud allows you access from anywhere with an Internet
connection.

2
mPower
™
mini (EU) Quick Start Guide
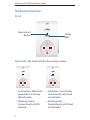
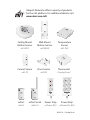
Hardware Overview
Front
Status
LED
Device Reset
Button
Status LED The Status LED has four primary states:
• Solid yellow When first
powered on in factory
default mode.
• Flashing yellow
Connecting to a Wi-Fi
network.
• Solid blue Successfully
connected to mFi Cloud
or Controller.
• Flashing blue
Connecting to mFi Cloud
or Controller.

3
Hardware Installation
Device Reset Button The Device Reset button serves two
functions:
• Restart Restarts the device when you press and release
it quickly.
• Restore Factory Defaults Press and hold until the LED
alternates colors to restore the device to the factory
default settings.
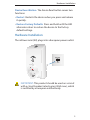
Hardware Installation
The mPower mini (EU) plugs into a European power outlet.
IMPORTANT: This product should be used on a circuit
with a circuit breaker (rated current 20A max.), which
is certified by a European notified body.

4
mPower
™
mini (EU) Quick Start Guide
Software Download and Installation
For local mFi Controller installations, the mFi Controller
software is installed just once when you initially create a
mFi network. It is not necessary to go through the software
installation process every time you add another mFi device.
Note: If you are using the cloud, there is no need to
install the mFi Controller software locally. Skip to
Configuring the mPower mini (EU) via Wi-Fi on page 11.
The mFi Controller software can be downloaded from the
Ubiquiti Networks website.
1. Go to downloads.ubnt.com/mfi
2. Mac users should download mFi.dmg and Windows
users should download mFi-installer.exe.
3. Follow the instructions for your computer type.
Mac Users
1. Open the mFi.dmg file.
2. Click the Install icon.

5
Software Download and Installation
3. Click Continue and follow the on-screen instructions
to install the software.
4. Go to Go > Applications and double-click the mFi
icon.
Proceed to Configuring the mFi Controller Software on page 8.

6
mPower
™
mini (EU) Quick Start Guide
PC Users
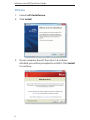
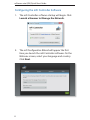
1. Launch mFi-installer.exe.
2. Click Install.
3. If your computer doesn’t have Java 1.6 or above
installed, you will be prompted to install it. Click Install
to continue.

7
Software Download and Installation
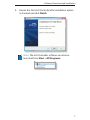
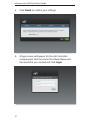
4. Ensure the Start mFi Controller after installation option
is checked and click Finish.
Note: The mFi Controller software can also be
launched from Start > All Programs.

8
mPower
™
mini (EU) Quick Start Guide
Configuring the mFi Controller Software
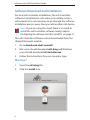
1. The mFi Controller software startup will begin. Click
Launch a Browser to Manage the Network.
2. The mFi Configuration Wizard will appear the first
time you launch the mFi Controller software. On the
Welcome screen, select your language and country.
Click Next.

9
Software Download and Installation
3. Select the device(s) that you want to configure.
The Refresh button can be used to refresh the list of
devices. Click Next to continue.
4. Enter an administrator name in the Admin Name field.
Enter a password in the Password and Confirm fields.
Click Next.

10
mPower
™
mini (EU) Quick Start Guide
5. Click Finish to confirm your settings.
6. A login screen will appear for the mFi Controller
management interface. Enter the Admin Name and
Password that you created and click Login.

11
Configuring the mPower mini (EU) via Wi-Fi
Configuring the mPower mini (EU) via Wi-Fi
To configure the mPower mini (EU), you must access it via
Wi-Fi from a computer. The mPower mini (EU) has a default
SSID (wireless network name) labeled mFi followed by the
last six characters of the MAC address.
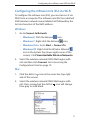
Windows
1. Go to Connect to Network.
- Windows 8 Click the Network icon.
- Windows 7 Right-click the Network icon.
- Windows Vista Go to Start > Connect To.
- Windows XP Right-click the Wireless Network
icon in the System Tray (lower right corner of the
screen). Click View Available Wireless Networks.
2. Select the wireless network (SSID) that begins with
mFi and then click Connect. Go to Accessing the
Configuration Portal on page 12.
Mac
1. Click the AirPort icon in the menu bar (top right
side of the screen).
2. Select the wireless network (SSID) that begins with
mFi. Once connected, the AirPort icon will change
from gray to solid black.

12
mPower
™
mini (EU) Quick Start Guide
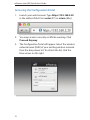
Accessing the Configuration Portal
1. Launch your web browser. Type https://192.168.2.20
in the address field. Press enter (PC) or return (Mac).
2. You may receive a security certificate warning. Click
Proceed Anyway.
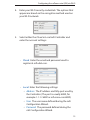
3. The Configuration Portal will appear. Select the wireless
network name (SSID) of your existing wireless network
from the drop-down list. To refresh the list, click the
blue arrows on the right.

13
Configuring the mPower mini (EU) via Wi-Fi
4. Enter your Wi-Fi security credentials. The options that
appear are based on the encryption method used on
your Wi-Fi network.
5. Select either the Cloud or Local mFi Controller and
enter the account settings:
- Cloud Enter the email and password used to
register at mfi.ubnt.com.
- Local Enter the following settings:
• Address The IP address and http port used by
the Controller. (The port is usually 6080, for
example: 1.1.1.1:6080 or mfi.acme.com:6080).
• User The user name defined during the mFi
Configuration Wizard.
• Password The password defined during the
mFi Configuration Wizard.

14
mPower
™
mini (EU) Quick Start Guide
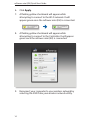
6. Click Apply.
7. A flashing yellow checkmark will appear while
attempting to connect to the Wi-Fi network. It will
appear green once the mPower mini (EU) is connected.
8. A flashing yellow checkmark will appear while
attempting to connect to the Controller. It will appear
green once the mPower mini (EU) is connected.
9. Reconnect your computer to your wireless network by
selecting the SSID from your wireless network utility.

15
Configuring the mPower mini (EU) via Wi-Fi
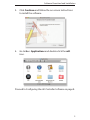
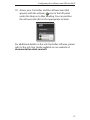
10. Access your Controller, and the mPower mini (EU)
appears with the mPower icon in the left panel
under the Drag on to Map heading. You can position
the mPower mini (EU) in the appropriate location.
For additional details on the mFi Controller software, please
refer to the mFi User Guide available on our website at:
documentation.ubnt.com/mfi

16
mPower
™
mini (EU) Quick Start Guide
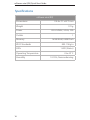
Specifications
mPower mini (EU)
Dimensions 110.8 x 71 x 67.7 mm
Weight 170 g
Power 220-250VAC, 50 Hz, 10A
Outlets 1
Memory 16 MB RAM, 8 MB Flash
Wi-Fi Standards 802.11b/g/n
LEDs 1 LED (Status)
Operating Temperature 0 to 45° C
Humidity 10-95%, Noncondensing

17
Safety Notices
Safety Notices
1. Read, follow, and keep these instructions.
2. Heed all warnings.
3. Only use attachments/accessories specified by the
manufacturer.
WARNING: Use only in a dry location.
WARNING: Do not plug in to another relocatable
power tap.
WARNING: To reduce the risk of electric shock, use
only indoors.
IMPORTANT: This product should be used on a circuit
with a circuit breaker (rated current 20A max.), which
is certified by a European notified body.

18
mPower
™
mini (EU) Quick Start Guide
Limited Warranty
UBIQUITI NETWORKS, Inc (“UBIQUITI NETWORKS”) warrants
that the product(s) furnished hereunder (the “Product(s)”)
shall be free from defects in material and workmanship
for a period of one (1) year from the date of shipment by
UBIQUITI NETWORKS under normal use and operation.
UBIQUITI NETWORKS’ sole and exclusive obligation
and liability under the foregoing warranty shall be for
UBIQUITI NETWORKS, at its discretion, to repair or replace
any Product that fails to conform to the above warranty
during the above warranty period. The expense of removal
and reinstallation of any Product is not included in this
warranty. The warranty period of any repaired or replaced
Product shall not extend beyond its original term.
Warranty Conditions
The above warranty does not apply if the Product:
(I) has been modified and/or altered, or an addition
made thereto, except by Ubiquiti Networks, or Ubiquiti
Networks’ authorized representatives, or as approved
by Ubiquiti Networks in writing;
(II) has been painted, rebranded or physically modified
in any way;
(III) has been damaged due to errors or defects in cabling;
(IV) has been subjected to misuse, abuse, negligence,
abnormal physical, electromagnetic or electrical stress,
including lightning strikes, or accident;
(V) has been damaged or impaired as a result of using
third party firmware; or
(VI) has no original Ubiquiti MAC label, or is missing any
other original Ubiquiti label(s).
La pagina si sta caricando...
La pagina si sta caricando...
La pagina si sta caricando...
La pagina si sta caricando...
La pagina si sta caricando...
La pagina si sta caricando...
La pagina si sta caricando...
La pagina si sta caricando...
La pagina si sta caricando...
La pagina si sta caricando...
La pagina si sta caricando...
La pagina si sta caricando...
-
 1
1
-
 2
2
-
 3
3
-
 4
4
-
 5
5
-
 6
6
-
 7
7
-
 8
8
-
 9
9
-
 10
10
-
 11
11
-
 12
12
-
 13
13
-
 14
14
-
 15
15
-
 16
16
-
 17
17
-
 18
18
-
 19
19
-
 20
20
-
 21
21
-
 22
22
-
 23
23
-
 24
24
-
 25
25
-
 26
26
-
 27
27
-
 28
28
-
 29
29
-
 30
30
-
 31
31
-
 32
32


Ubiquiti mPower mini Quick Start Manuals
- Tipo
- Quick Start Manuals
in altre lingue
- English: Ubiquiti mPower mini
- română: Ubiquiti mPower mini