UltraCella - Controllo per celle refrigerate / Control for cold rooms MESSA IN SERVIZIO
/
COMMISSIONING
+0500085IE- rel. 2.3 - 19.10.2015
Per ulteriori informazioni, consultare il manuale d’uso (cod.+0300083IT) dispo-
nibile sul sito www.carel.com, alla sezione “Documentazione”. Prima della messa
in servizio impostare i parametri di prima confi gurazione, riportati di seguito ed
evidenziati in scuro nella tabella parametri (cfr. foglio istruzioni cod. +0500084IE
Tabella parametri di prima confi gurazione
Cod. Descrizione
/P Tipo B1…B3
/A2 Confi gurazione B2
/A3 Confi gurazione B3
/P4 Tipo B4
/A4 Confi gurazione B4
/P5 Tipo B5
/A5 Confi gurazione B5
St Set point
rd Diff erenziale
c1
Tempo minimo tra accensioni successive compressore
c2
Tempo minimo di spegnimento compressore
c3 Tempo minimo di accensione compr.
d0 Tipo di sbrinamento
dt1 Temperatura di fi ne sbrinamento, evaporatore principale
dP1 Durata massima sbrinamento
dd Tempo di gocciolamento post sbrinamento
A5 Confi gur. ingresso digitale 2 (DI2)
A9 Confi gur. ingresso digitale 3 (DI3)
F3
Ventilatori evaporatore durante sbrinamento 0/1=accesi/spenti
Fd
Tempo post gocciolamento
c12 Tempo sicurezza compressore, interruttore porta
d8d Tempo ripartenza compressore, interruttore porta
A3 Disabilitazione micro porta
tLi Luce accesa con porta aperta
A4 Gestione luce
Rimuovere la cornice
inferiore e collegare
UltraCella Service al controllo
Se il controllo UltraCella non è mai stato confi gurato, non appena il terminale
UltraCella Service è collegato, il wizard è proposto automaticamente. È comun-
que possibile entrare nel menu Wizard e ripetere la procedura guidata di prima
messa in servizio
1
2
1
2
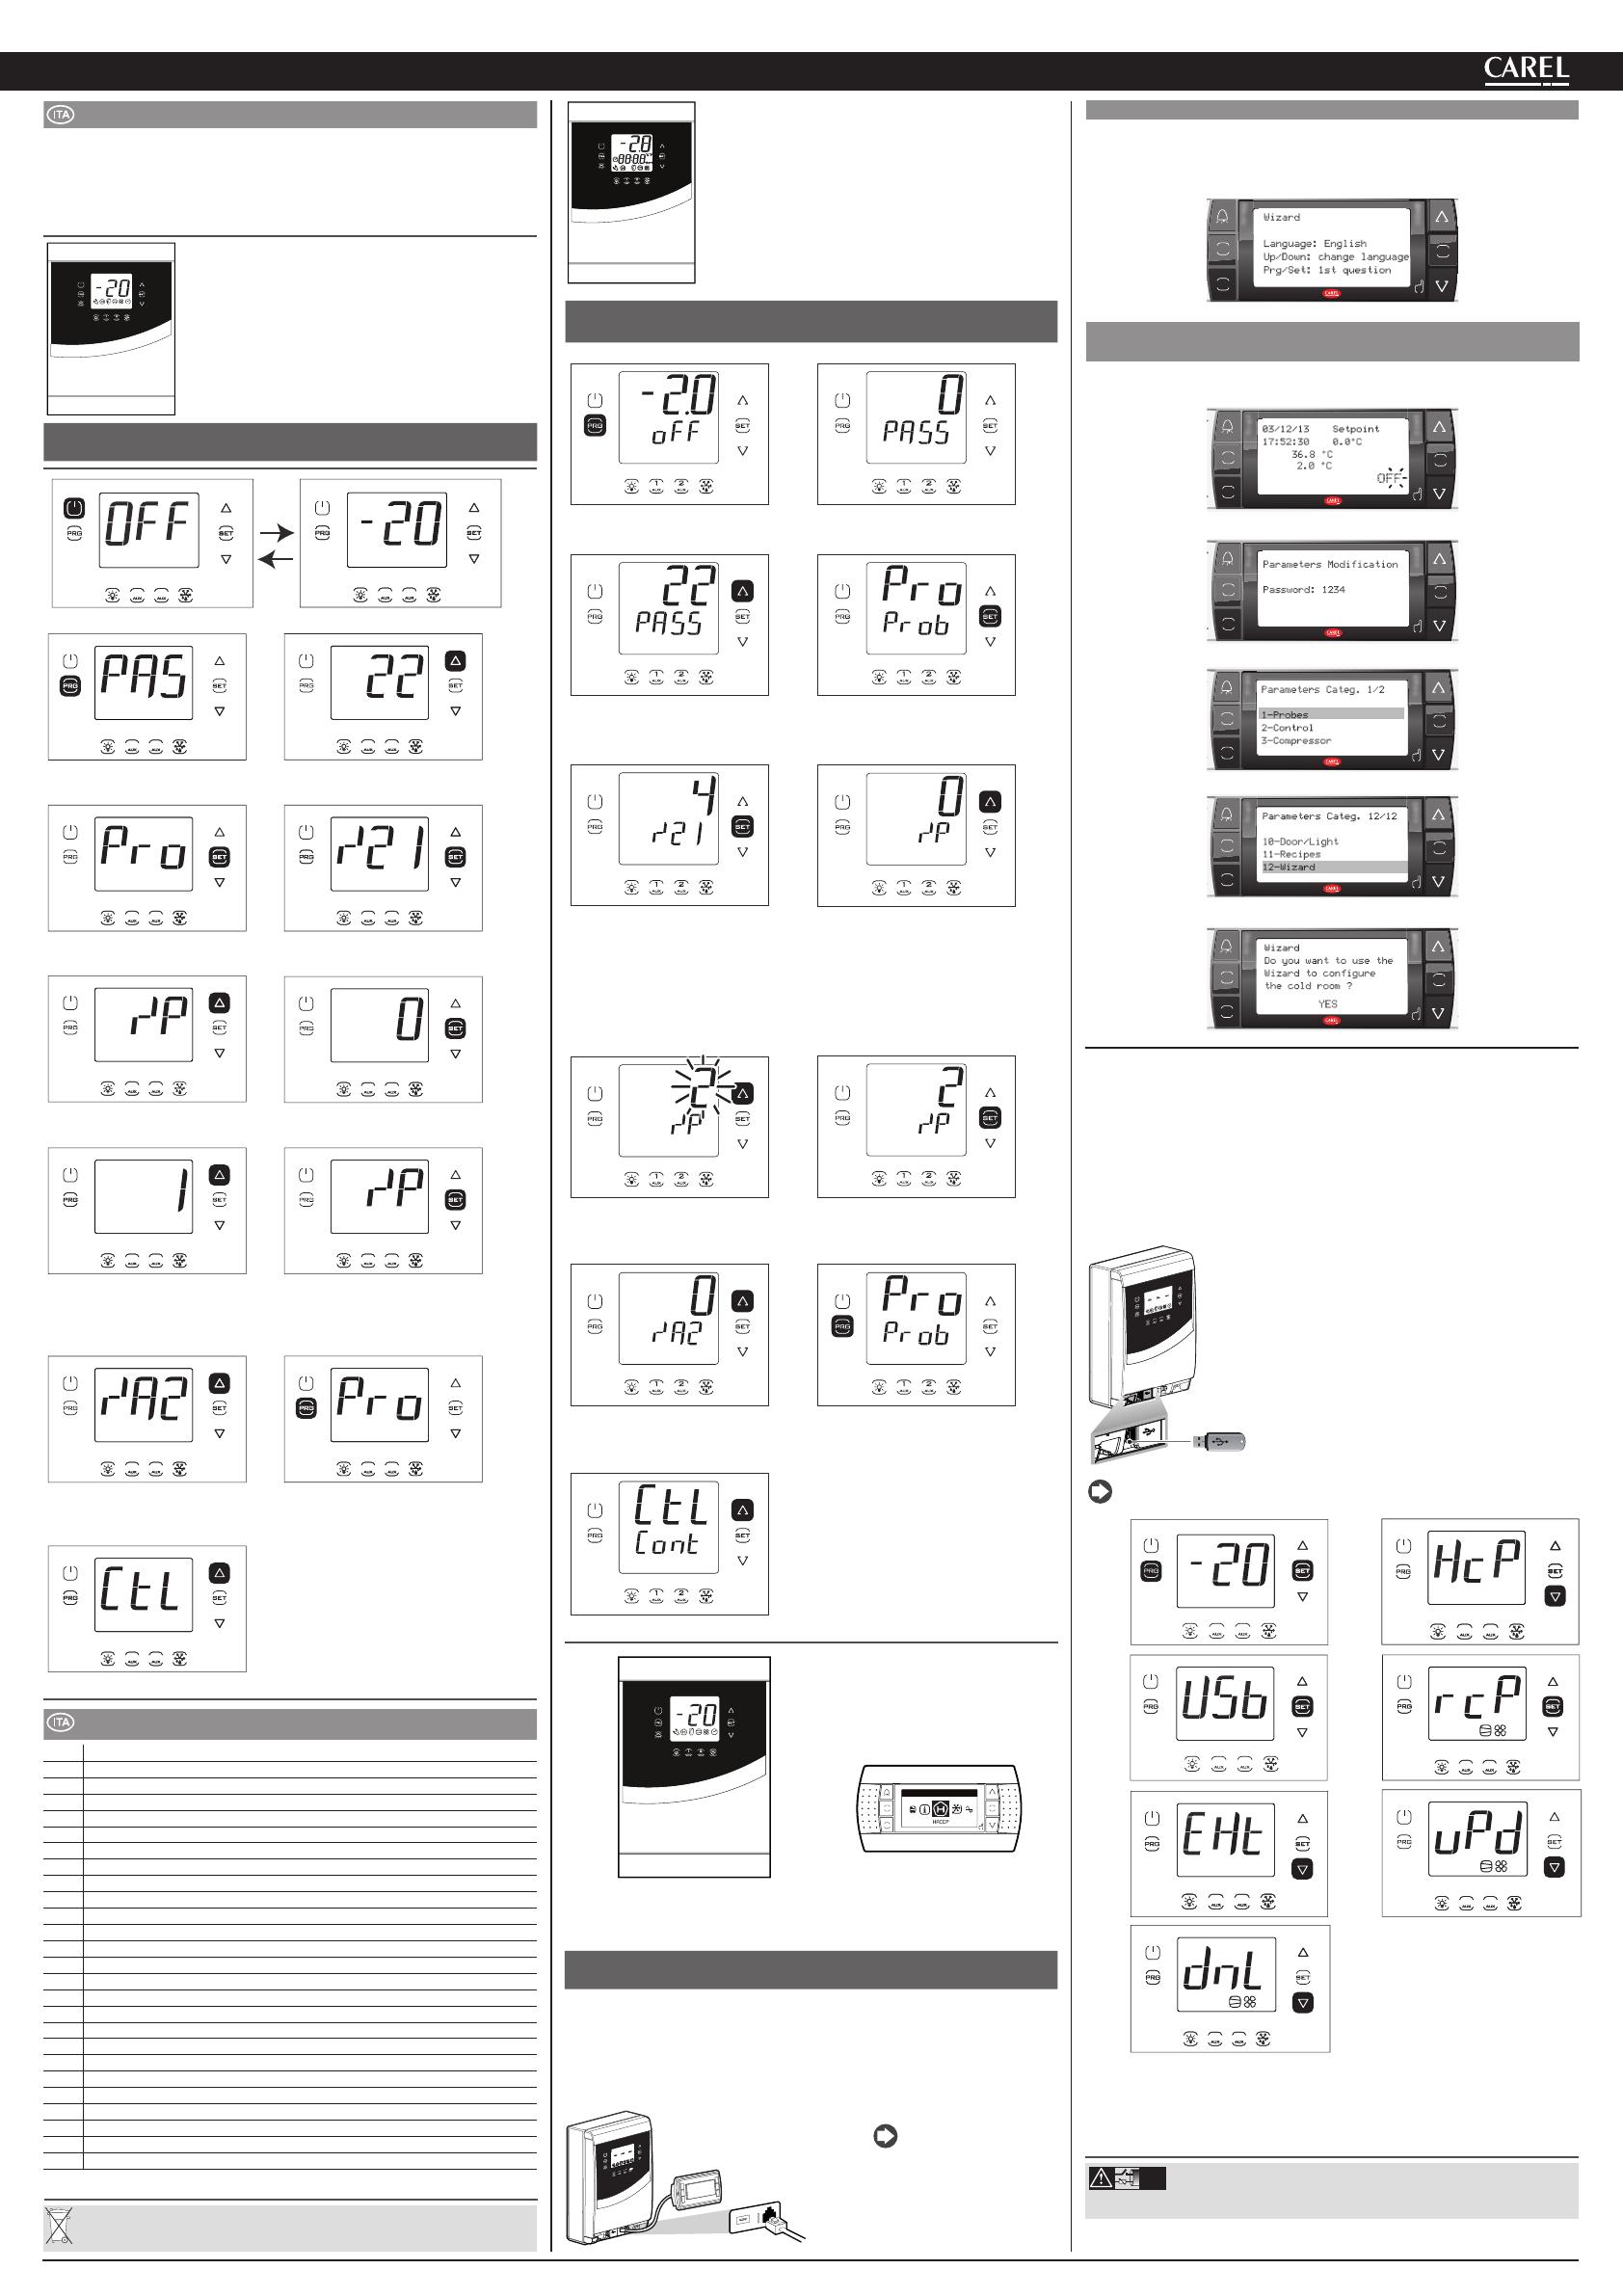
MESSA IN SERVIZIO UltraCella DISPLAY SINGOLA RIGA
(cod. WB000S*)
UltraCella con display a SINGOLA RIGA
MESSA IN SERVIZIO CON ULTRACELLA SERVICE
(cod. PGDEWB0FZ0)
+
UltraCella Service
(accessorio)
SET
PRG
ESC
M
E
N
U
H
E
L
P
Multifunction menu
HACCP
1 21 2
1 21 2
1. Si consiglia di portare il controllo in OFF (premere tasto ON/OFF).
1 21 2
1 21 2
2. Premere Prg per 2 s: compare la
richiesta di password (PAS).
3. Premere UP e inserire la password: 22.
1 21 2 1 21 2
4. Premere Set: compare la prima
categoria: Pro (Probes = sonde).
5. Premere Set: compare il primo para-
metro: /21.
1 21 2
1 21 2
6. Premere più volte UP per rag-
giungere il parametro /P.
7. Premere Set per visualizzare il valore del
parametro (vedere selezioni nella tab.par.).
1 21 2 1 21 2
8. Premere UP per modifi care il
valore.
9. Premere Set per confermare e tornare al
codice del parametro. In questo momento
il nuovo valore inserito è memorizzato nel
controllo.
1 21 2
1 21 2
10. Premere UP per passare ai
parametri /A2…/A5; eff ettuare
l’eventuale modifi ca.
11. Premere Prg per tornare alle catego-
rie di parametri.
1 21 2
12. Premere UP per passare alla categoria
CtL e seguire i passi precedenti per
impostare St e i parametri successivi evi-
denziati nella tabella successiva e nella
tabella parametri.
UltraCella
con display a LED
UltraCella con display a DOPPIA RIGA
MESSA IN SERVIZIO UltraCella DISPLAY DOPPIA RIGA
(cod. WB000D*)
1. Si consiglia di portare il controllo in OFF (premere tasto ON/OFF).
2. Premere Prg per 2 s: compare la richiesta di password (PAS).
3. Premere UP e inserire la password:
22.
4. Premere Set: nella seconda riga del
display appare, a scorrimento la prima
categoria Pro (Probes = sonde)
.
5. Premere Set: nella seconda riga
di display appaiono, a scorrimento,
il codice e la descrizione del primo
parametro della categoria: /21 –
Probe1 meas. stab.; nella prima riga
del display appare il valore corrente
del parametro
6. Premere più volte UP per
raggiungere il parametro /P. Nella
seconda riga del display appaiono, a
scorrimento, il codice e la descrizione
del parametro: /P – type B1 to B3; nella
prima riga del display appare il valore
corrente del parametro.
7. Premere Set e UP/DOWN per
impostare il valore desiderato del
parametro.
8. Premere Set per confermare. In que-
sto momento il nuovo valore inserito è
memorizzato nel controllo.
9. Premere UP per passare ai parame-
tri /A2…/A5; eff ettuare l’eventuale
modifi ca.
10. Premere Prg per tornare alle cate-
gorie di parametri.
11. Premere UP per passare alla cate-
goria CtL (nella seconda riga appare,
a scorrimento, il nome della seconda
categoria di parametri: Control) e se-
guire i passi precedenti per impostare
St e i parametri successivi evidenziati
nella tabella precedente e nella tabella
parametri.
A: Prima accensione
Nel caso di prima accensione, una volta collegato UltraCella Service, il wizard è
proposto automaticamente
Selezionare la lingua desiderata e rispondere alle domande per impostare gli
altri parametri.
SET
PRG
ESC
M
E
N
U
H
E
L
P
Wizard
Language: English
Up/Down: change language
Prg/Set: 1st question
B: è possibile ripetere la procedura di prima messa in servizio
accedendo al menu wizard.
1. Portare il controllo in OFF (premere DOWN e selezionare l’icona On/Off ; premere
Set 2 volte e UP per portare il controllo in OFF; premere Esc 2 volte per uscire)
SET
PRG
ESC
M
E
N
U
H
E
L
P
03/12/13 Setpoint
17:52:30 0.0°C
36.8 °C
OFF
2.0 °C
2. Per entrare in modo Programmazione: Premere Prg ed inserire la Password: 1234
SET
PRG
ESC
M
E
N
U
H
E
L
P
Parameters Modification
Password: 1234
3. Premere DOWN fi no a raggiungere il menu “Wizard”
SET
PRG
ESC
M
E
N
U
H
E
L
P
Parameters Categ. 1/2
1-Probes
2-Control
3-Compressor
4. Confermare con Set
SET
PRG
ESC
M
E
N
U
H
E
L
P
Parameters Categ. 12/12
10-Door/Light
11-Recipes
12-Wizard
5. Premere Up e SET per entrare nella procedura guidata di prima messa in servizio
SET
PRG
ESC
M
E
N
U
H
E
L
P
YES
Wizard
Do you want to use the
Wizard to configure
the cold room ?
Chiave di memoria USB
Tramite la chiave USB è possibile:
• Scaricare la lista dei parametri nella chiave (download)
• Caricare la lista dei parametri dalla chiave (upload)
• Scaricare il log delle temperature registrate
• Scaricare il log degli allarmi registrati
Operazioni preliminari:
1. togliere la cornice inferiore e inserire la chiave USB;
2. porre il controllo in OFF.
1
2
1
2
USB key
Accedere al menu multifunzione premendo
contemporaneamente PRG e SET; selezionare
con UP/DOWN la scritta “USb”.
Procedura: Premere Set due volte: appaiono i
comandi seguenti scorrendo con UP/DOWN:
• EXt: premere Set per uscire;
• dnL: premere Set, il controllo salva nella
chiave i 10 set di parametri: r01…r10;
• uPd: premere Set, il controllo carica dalla
chiave i 10 set di parametri: r01…r10;
Nota: i parametri sono salvati in un fi le di testo di tipo .txt, che può essere
visualizzato a computer.
1 2
1 21 2
1 2
1 21 2
1 21 2
1 21 2
1 21 2
Nota: Le Figure fanno riferimento alla navigazione su modelli con display a sin-
gola riga cod. WB000S*. Nei modelli a doppia riga cod. WB000D*, oltre a quanto
indicato appare, a scorrimento, il messaggio “recipes in USB device”.
Smaltimento del prodotto: L’apparecchiatura (o il prodotto) deve essere oggetto di raccolta separata in conformità
alle vigenti normative locali in materia di smaltimento
NO POWER
& SIGNAL
CABLES
TOGETHER
READ CAREFULLY IN THE TEXT!
ATTENZIONE: separare quanto più possibile i cavi delle sonde e degli ingressi digitali dai cavi dei carichi
induttivi e di potenza per evitare possibili disturbi elettromagnetici. Non inserire mai nelle stesse canaline
(comprese quelle dei quadri elettrici) cavi di potenza e cavi di segnale.
CAREL INDUSTRIES si riserva la possibilità di apportare modi che o cambiamenti ai propri prodotti senza alcun preavviso

