La pagina si sta caricando...

SonicPoint-Ne / SonicPoint-Ni Getting Started Guide

SonicWALL SonicPoint Getting Started Guide Page 1
SonicWALL SonicPoint-Ne / SonicPoint-Ni
Getting Started Guide
This Getting Started Guide provides instructions for basic installation and configuration of the SonicWALL SonicPoint-Ne / SonicPoint-Ni
wireless appliances in single-unit or distributed wireless deployments.
Setup
Additional Configuration and Information
Support and Training Options - page 31
Product Safety and Regulatory Information - page 37
Step Procedure Est. Time
Before You Begin - page 3
Introduction to Secure Wireless - page 7
Registering Your Appliance - page 13
Configuring Your UTM Appliance for Wireless - page 17
Setting Up Your SonicPoint - page 23
1
2
3
4
5

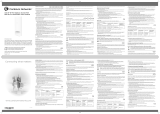
Page 2 SonicPoint Top Panel / Status LEDs
SonicPoint Top Panel / Status LEDs
link
wlan
lan
act
link
act
A
n
t
e
n
n
a
C
o
n
n
e
c
t
i
o
n
s
(
S
o
n
i
c
P
o
i
n
t
-
N
e
O
n
l
y
)
link
wlan
lan
act
link
act
Status LEDs
Power
Test SafeMode
Wireless Link
Wireless Activity
1000mbps 100mbps 10Mbps
Ethernet Activity
link
wlan
lan
act
link
act
c
o
n
s
o
l
e
l
a
n
Power Port
(SonicPoint-Ne only)
Provides 12VDC power connection
LAN/PoE Port
Provides Power over Ethernet (PoE)
and Ethernet connection
Console Port
Provides management connection using
CLI->DB9 cable (for command line management only)
Reset Button
Press and hold to manually reset

SonicWALL SonicPoint Getting Started Guide Page 3
1
Before You Begin
In this Section:
This section provides a basic checklist of materials and information you will need before you begin.
• Check Package Contents - page 4
• What You Need to Begin - page 5
1

Page 4 Check Package Contents
Check Package Contents
Before continuing, ensure that your SonicPoint package contains the following materials:
Any Items Missing?
If any of the items corresponding to your product are missing from the package, please contact SonicWALL support.
A listing of the most current support documents are available online at:
<http://www.sonicwall.com/us/support.html>
SonicPoint-Ne Appliance Checklist SonicPoint-Ni Appliance Checklist
This Getting Started Guide Document
SonicPoint-Ne Appliance
Mounting Kit (Ceiling Braces, Anchor and Screw Kit)
Front LED/Logo Cover Plate
Antennas (3)
Power Adaptor
a
a. The included power cord is intended for use in North America only.
This Getting Started Guide Document
SonicPoint-Ni Appliance
Mounting Kit (Ceiling Braces, Anchor and Screw Kit)
Front LED/Logo Cover Plate

SonicWALL SonicPoint Getting Started Guide Page 5
What You Need to Begin
The SonicWALL SonicPoint-Ne/Ni security appliances are centrally managed by SonicWALL NSA E-Class appliances. For more
information on deploying this SonicPoint with SonicWALL NSA series and TZ series platforms, contact your local SonicWALL sales
representative for the supported SonicOS releases. SonicPoints receive auto-firmware updates from the central gateway SonicWALL,
this device supports SonicOS 5.6.0.3 or higher releases.
In addition to the above SonicOS firmware and hardware requirements, ensure that your network deployment includes:
• An 802.3af compliant PoE injector or PoE-capable switch (optional when using the SonicPoint-Ne)
• An active Internet connection
• A configured interface on the SonicWALL security appliance set to a zone type of “wireless”
• A location selected for placement of your SonicPoint such as a wall or ceiling
• Clients capable of 802.11n wireless communications
1
1. Although clients with 802.11a/b/g hardware are supported, the presence of these legacy clients within range of your network may affect the connection
speed of your 802.11n clients.

Page 6

SonicWALL SonicPoint Getting Started Guide Page 7
2
Introduction to Secure Wireless
In this Section:
This section contains excerpts from the SonicWALL Secure Wireless Network Integrated Solutions Guide.
The content is meant to provide a brief introduction to Radio Frequency (RF) technology as it
pertains to different deployment scenarios.
• Wireless RF Introduction - page 8
• Placing Access Points - page 10
• SonicWALL Wireless Firewalling - page 12
2

Page 8 Wireless RF Introduction
Wireless RF Introduction
There are currently four widely adopted standards for 802.11
wireless network types: a, b, g, and n. Although 802.11n is the
newest and highest capacity standard, each of the four
standards has its own strengths and weaknesses. This section
provides overviews of these standards.
The following section provides a brief overview of RF
technologies:
• Frequency Bands and Channels - page 8
• 802.11 Comparison Chart - page 8
• Radio Frequency Barriers - page 9
• RF Interference - page 9
Frequency Bands and Channels
To allow multiple separate wireless networks in a shared and
confined space, the RF medium is divided into channels. For
devices in the 5GHz range (802.11a), this means the possibility
of up to 23 discrete channels. For devices using the 2.4GHz
range (802.11b, 802.11g), the wireless space is limited to a
maximum of 14 overlapping channels. As a result of these
overlapping channels, 2.4GHz technology provides only a total
of three discrete channels.
The newer 802.11n technology does not fit into either of these
categories, as it is capable of using both 2.4GHz and 5GHz, but
is limited to 14 overlapping channels for backward compatibility.
802.11 Comparison Chart
The following table compares signal characteristics as they
apply to the current 802.11 standards:
802.11a 802.11b 802.11g 802.11n
# of Channels in USA 23 11 11 11
# of Channels in EU 23 13 13 13
# of Channels in Japan 15 14 14 14
Frequency Band 5GHz 2.4GHz 2.4GHz 2.4/5GHz
Max. Data Rate 54Mbps 11Mbps 54Mbps 150Mbps
300Mbps
a
a. Full 300Mbps throughput is possible only in environments free from
2.4Ghz interference.
Note: Although 802.11b/g/n standards provide between 11
and 14 channels, only 3 of those channels are fully
discrete (non-overlapping) channels.
For more information on this topic, refer to the
SonicWALL Secure Wireless Networking Integrated
Solutions Guide.
Radius (Range) 90ft/25m 120ft/
35m
120ft/
35m
300ft/90m

SonicWALL SonicPoint Getting Started Guide Page 9
Radio Frequency Barriers
Determining the location of RF barriers can be a painful part of
the placement process, but keep in mind that they can be used
beneficially in an attempt to block signals where you do not
want coverage.
The following tables list some common RF barrier types:
RF Interference
RF interference from home, office, and medical equipment is a
common source of frustration in wireless deployments from the
smallest home office to the largest multi-building campus.
The following table lists several common sources of RF
interference:
Barrier Type RF Signal
Blocking
Open air Very Low
Glass, drywall, cube partitions Low
Stone floors and walls (brick/marble/granite) Medium
Concrete, security glass, stacked books/paper High
Metal, metal mesh (chicken wire), re-enforced
concrete, water
Very High
Faraday cage Extremely High
Interference Source Possible RF
Interference
Band(s)
Affected
2.4GHz phones Entire range (hundreds
of feet)
802.11b/g/n
Bluetooth devices Within 30 feet 802.11b/g/n
Microwave oven
a
a. Most newer model microwave ovens have sufficient shielding to
negate possible RF interference.
Within 10-20 feet 802.11b/g/n
Scientific and medical
equipment
Short distance, varies 802.11b/g/n
Off-network access
points
Entire range All
RF reflective objects Long-range wireless
bridging
All

Page 10 Placing Access Points
Placing Access Points
Physical placement of an access point has a measurable effect
on who can and cannot access your wireless signal. The
following sections provide an overview of wireless access point
placement, signal strength, and signal direction in common
wireless deployment situations:
• Making Hardware Decisions - page 10
• Solutions to RF Interference and Barriers - page 11
Tip: For the latest SonicPoint wireless deployment
information from switching recommendations to
site survey, see the SonicWALL SonicPoint
Deployment Best Practices Guide at:
<http://www.sonicwall.com/us/support.html>
Making Hardware Decisions
The first decision in hardware is the access point. While access
point technology (802.11a/b/g/n) is one factor in determining
your placement, based on distance served and bandwidth
needed, taking note of other hardware-based factors is just as
important.
Some of the more important hardware decisions include:
• Number of access points versus user density – If too
many users are serviced by a single access point,
maximum transfer rates are reached and that point may
become a bottleneck for the whole system.
• Bandwidth – How much data is moving upstream and
downstream for a given type of user?
• Ethernet cabling – Where are you running the powered
Ethernet (PoE) cable to and how are you securing that
cable. Is your PoE switch able to power all access points?
• Hubs / Switches / UTM – Your wireless deployment has to
tie back into your UTM appliance and LAN resources at
some point. What speed is needed for your Ethernet
connection to accommodate the number of access points
you are installing? Also consider where your key
networking devices are deployed and how they will connect
efficiently with your wireless appliances.
• Upgrade your Ethernet connections for 802.11n – In
most cases, 802.11n wireless hardware requires more
bandwidth than a single (or even dual) 10/100 Ethernet
connection can handle. Gigabit Ethernet connectivity
between the WLAN and the LAN is required to take full
advantage of 802.11n speed.
• Power up that PoE for 802.11n – Part of your wireless
network planning should include verifying that your PoE
equipment is 802.3af compliant, and that a full 15 watts of
power can be supplied to each SonicPoint.

SonicWALL SonicPoint Getting Started Guide Page 11
Solutions to RF Interference and Barriers
These days, finding an environment with no RF interference or
noise is nearly impossible. Only if you are setting up an office in
a secluded redwood grove can you count on RF interference to
be a non-issue. Even then, the redwood trees might just be
among those fitted with high-gain cellular antennas, an all-too-
common occurrence today. Regardless, you should expect to
deal with some level of signal interference in your deployment.
Location A – Rogue access points or wireless test lab
• Problem – Wireless product test labs and other (non-
malicious) rogue access points are problems in many Wi-Fi
deployments.
• Solution – Either eliminate all rogue access points, or
force their owners to use a set channel that does not
overlap with your distributed wireless solution.
Location B – Spectrum noise for 2.4 GHz and 5 GHz
• Problem – Your phone system is partially wireless and
uses the 2.4GHz spectrum.
• Solution – Give VoIP a try. VoIP will work in tandem with
your wireless network, instead of against it. For more on
SonicWALL VoIP implementation and capabilities, refer to
the Configuring VoIP SonicOS feature module available at:
http://www.sonicwall.com/us/support.html
Location C – Off-network access points
• Problem – Your neighbors need wireless, too!
Unfortunately, only a few sheets of drywall separate you.
Solution – Overpowering your neighbors with high-gain
antennas is an option, but not a particularly neighborly one.
Instead, you could simply use a different channel for
wireless access points bordering this wall and ensure that
your neighbors do the same. Performance in some dual-
channel wireless devices may take a hit, but it is better than
dropped connections—or unhappy neighbors.
A
C
B

Page 12 SonicWALL Wireless Firewalling
SonicWALL Wireless Firewalling
When a wireless device uses an access point to communicate
with a device on another subnet or on a completely different
network, traffic between the devices is forced to traverse the
network gateway. This traversal enables Unified Threat
Management (UTM) services to be enforced at the gateway.
Standard practice for wireless firewalling (where one wireless
client is communicating with another) bypasses many of the
critical UTM security services. The illustration below shows the
standard practice for wireless firewalling.
Many security products on the market share this potential
vulnerability when two users connected by a common hub or
wireless access point wish to exchange data.
SonicWALL addresses this security shortcoming by managing
the SonicPoint access points from the UTM appliance. This
allows complete control of the wireless space, including zone
enforcement of security services and complete firewalling
capabilities, as shown in the illustration below.
WLAN Zone
Security Services
?
Content Filtering Service
Client Anti-Virus Enforcement
Gateway Anti-Virus
Gateway Anti-Spyware
Intrusion Prevention Service
Other Security Appliance
WLAN Zone
Security Services
SonicWALL
appliance
SonicWALL
SonicPoint
Content Filtering Service
Client Anti-Virus Enforcement
Gateway Anti-Virus
Gateway Anti-Spyware
Intrusion Prevention Service
link
wlan
lan
act
link
act

SonicWALL SonicPoint Getting Started Guide Page 13
3
Registering Your Appliance
In this Section:
This section provides instructions for registering your SonicWALL SonicPoint appliance.
• Creating a MySonicWALL Account - page 14
• Registering and Licensing Your Appliance on MySonicWALL - page 14
• Using SonicWALL UTM Security Services for Wireless Clients - page 15
Note: Registration is an important part of the setup process and is necessary to receive the full benefits of SonicWALL security
services, firmware updates, and technical support.
3

Page 14 Creating a MySonicWALL Account
Creating a MySonicWALL Account
A MySonicWALL account is required for product registration. If
you already have an account, continue to the Registering and
Licensing Your Appliance on MySonicWALL section.
To create a MySonicWALL account:
1. In your browser, navigate to www.mysonicwall.com.
2. In the login screen, click the Not a registered user? link.
3. Complete the Registration form and click Register.
4. Verify that the information is correct and click Submit.
5. In the screen confirming that your account was created,
click Continue.
Registering and Licensing Your Appliance
on MySonicWALL
You must register your SonicWALL security appliance on
MySonicWALL to enable full functionality.
To register your SonicPoint, perform the following tasks:
1. Login to your MySonicWALL account. If you do not have an
account, you can create one at www.mysonicwall.com.
2. Enter the serial number of your product in the REGISTER
A PRODUCT field and click the Next button.
3. Type a friendly name for the appliance, select the
Product Group if any, type the authentication code into
the appropriate text boxes, and then click Register.
4. On the Product Survey page, fill in the requested
information and then click Continue.
5. To pair your SonicPoint with a SonicWALL UTM
appliance, navigate to the Service Management page
by clicking on the device you wish to pair with your
SonicPoint.
6. Scroll to the Associated Products section and click the
SonicWALL SonicPoint link to associate your SonicPoint
with the appliance.

SonicWALL SonicPoint Getting Started Guide Page 15
Using SonicWALL UTM Security Services
for Wireless Clients
Any security services you purchased for your SonicWALL UTM
appliance can also be applied to wireless clients. Simply enable
the security services on the WLAN zone or on a custom
wireless zone, and your wireless traffic will be protected along
with your wired traffic.
If you have not yet purchased a security service
subscription for your SonicWALL UTM appliance, please
speak with a sales representative or visit www.mysonicwall.com
to register for free trials.
• To try a Free Trial of a service, click Try in the Service
Management page.
• To purchase a product or service, click Buy Now in the
Service Management page.
If you recently purchased security services, you will receive an
activation key. This key is emailed to you after online
purchases, or is on the front of the certificate that was included
with your purchase.
To activate existing licenses:
1. Log into mysonicwall.com and navigate to the My
Products page.
2. Select the registered product you want to manage.
3. Locate the product on the Service Management page and
click Enter Key in that row.
4. In the Activate Service page, type or paste your key into the
Activation Key field and then click Submit.
When activation is complete, MySonicWALL displays an
activation screen with service status and expiration information.
You have successfully registered your SonicWALL appliance,
and now you need to enable UTM security services on the
SonicWALL appliance itself. SonicWALL UTM security services
are not enabled by default.

Page 16 Using SonicWALL UTM Security Services for Wireless Clients

SonicWALL SonicPoint Getting Started Guide Page 17
4
Configuring Your UTM Appliance for Wireless
In this Section:
This section provides instructions for configuring the SonicWALL UTM appliance to connect with your SonicWALL SonicPoint.
• An Introduction to Zones and Interfaces - page 18
• Configuring Wireless Access - page 18
4

Page 18 An Introduction to Zones and Interfaces
An Introduction to Zones and Interfaces
Zones split a network infrastructure into logical areas, each with
its own set of usage rules, security services, and policies. Most
networks include multiple definitions for zones, including those
for trusted, untrusted, public, encrypted, and wireless traffic.
Some basic (default) zone types include:
WAN - Untrusted resources outside your local network
LAN - Trusted local network resources
WLAN - Local wireless network resources originating from
SonicWALL wireless enabled appliances
DMZ - Local network assets that must be accessible from the
WAN zone (such as Web and FTP servers)
VPN - Trusted endpoints in an otherwise untrusted zone (such
as the WAN)
The security features and settings configured for the zones are
enforced by binding a zone to one or more physical interfaces
(such as, X0, X1, or X2) on the SonicWALL UTM appliance.
The X1 and X0 interfaces are preconfigured as WAN and LAN
respectively. The remaining ports (X2-X6) are also LAN ports by
default. However, these ports can be configured to meet the
needs of your network, either by using basic zone types (WAN,
LAN, WLAN, DMZ, VPN) or configuring a custom zone type to
fit your network requirements (for example: Gaming Console
Zone, Wireless Printer Zone, Wireless Ticket Scanner Zone).
Configuring Wireless Access
This section describes how to configure SonicPoints with a
SonicWALL UTM appliance.
SonicWALL SonicPoints are wireless access points specially
engineered to work with SonicWALL UTM appliances. Before
you can manage SonicPoints in the management interface,
perform the following steps:
• Configuring Provisioning Profiles - page 19
• Configuring a Wireless Zone - page 21
• Configuring the Network Interface - page 22

SonicWALL SonicPoint Getting Started Guide Page 19
Configuring Provisioning Profiles
SonicPoint Profile defines settings that can be configured on a
SonicPoint, such as radio SSIDs, and channels of operation.
These profiles make it easy to apply basic settings to a wireless
zone, especially when that zone contains multiple SonicPoints.
When a SonicPoint is connected to a zone, it is automatically
provisioned with the profile assigned to that zone. If a
SonicPoint is connected to a zone that does not have a custom
profile assigned to it, a default profile is used.
To add a new profile:
1. Navigate to the SonicPoint > SonicPoints page in the
SonicOS interface.
2. Click Add SonicPoint below the list of SonicPoint
provisioning profiles.
3. The Add/Edit SonicPoint Profile window displays.
Settings Tab
1. Select Enable SonicPoint.
2. Enter a Name Prefix to be used internally as the first part
of the name for each SonicPoint provisioned.
3. Select the Country Code for the area of operation.
802.11n Radio Tab
1. Select Enable Radio.
2. Optionally, select a schedule for the radio to be enabled
from the drop-down list. The most common work and
weekend hour schedules are pre-populated for selection.
3. Select a Radio Mode to dictate the radio frequency
band(s). The default setting is 2.4GHz 802.11n/g/b Mixed.
4. Enter an SSID. This is the access point name that will
appear in clients’ lists of available wireless connections.
5. Select a Primary Channel and Secondary Channel. You
may choose AutoChannel unless you have a reason to use
or avoid specific channels.
6. Under WEP/WPA Encryption, select the Authentication
Type for your wireless network. SonicWALL recommends
using WPA2 as the authentication type.
7. Fill in the fields specific to the authentication type that you
selected. The remaining fields change depending on the
selected authentication type.
1/48