Paso P8083-2ALL Manuale del proprietario
- Categoria
- Lettore CD
- Tipo
- Manuale del proprietario

Serie P8083Serie P8083
P8083-2ALLP8083-2ALL
S.p.A.
Nel continuo intento di migliorare i propri prodotti, la
PASO S.p.A. si riserva il diritto di apportare modifiche
ai disegni e alle caratteristiche tecniche in qualsiasi
momento e senza alcun preavviso.
PASO S.p.A. strive to improve their products continuously,
and therefore reserve the right to make changes to the
drawings and technical specifications at any time and
without notice.
Important information for correct disposal of the product in accordance with EC Directive
2002/96/EC This product must not be disposed of as urban waste at the end of its working life. It must be
taken to a special waste collection centre licensed by the local authorities or to a dealer providing this service.
Separate disposal of electric and/or electronic equipment (WEEE) will avoid possible negative consequences for
the environment and for health resulting from inappropriate disposal, and will enable the constituent materials
to be recovered, with significant savings in energy and resources. As a reminder of the need to dispose of this
equipment separately, the product is marked with a crossed-out wheeled dustbin.
Avvertenze per lo smaltimento del prodotto ai sensi della Direttiva Europea 2002/96/EC
Alla fine della sua vita utile il prodotto non deve essere smaltito insieme ai rifiuti urbani, ma deve
essere consegnato presso gli appositi centri di raccolta differenziata predisposti dalle amministrazioni
comunali, oppure presso i rivenditori che forniscono questo servizio. Smaltire separatamente un rifiuto
elettrico e/o elettronico (RAEE) consente di evitare possibili conseguenze negative per l’ambiente e
per la salute derivanti da un suo smaltimento inadeguato e permette di recuperare i materiali di cui
è composto al fine di ottenere un importante risparmio di energia e di risorse. Su ciascun prodotto
è riportato a questo scopo il marchio del contenitore di spazzatura barrato.
Questo prodotto è conforme alle Direttive
della Comunità Europea sotto le quali lo
stesso ricade.
This product is in keeping with the relevant
European Community Directives.
1. DESCRIZIONE GENERALE
Il P8083-2ALL è un sistema di sorgenti sonore composto
da:
• Doppio modulo lettore CD anti-shock/SD card/
USB e sintonizzatori stereo AM/FM digitali con 20
memorie;
• Accessori: antenne FM ed antenne AM.
1. GENERAL DESCRIPTION
The P8083-2ALL is a complete sound source system,
composed of:
• D
ouble shockproof CD/USB/SD card players
and digital AM/FM tuners with 20 preset station
memories;
• Accessories: FM and AM antennas.
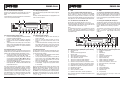
1.1 Riferimenti numerati
1) Interruttore di rete.
2) Modulo A Lettore CD/USB/SD card e tuner AM/FM.
3) Modulo B Lettore CD/USB/SD card e tuner AM/FM.
4) Uscita di linea (modulo B).
5) Uscita di linea prioritaria (solo per modulo A).
6)
Uscita di linea (modulo A).
7) Ingresso registratore (non utilizzato).
8) Prese per antenne AM/FM (modulo A).
9) Prese per antenne AM/FM (modulo B).
10) Morsettiera per alimentazione esterna 24VCC.
11) Spina di rete.
12) Connessione telaio.
Via Settembrini, 34 - 20020 LAINATE (MI) - ITALIA
TEL. +39-02-580 77 1 - FAX +39-02-580 77 277
http://www.paso.it - UDT - 02/11 - 11/702-2
GARANZIA
Questo prodotto è garantito esente da difetti nelle
sue materie prime e nel suo montaggio; il periodo
di garanzia è regolamentato dalle norme vigenti. La
Paso riparerà gratuitamente il prodotto difettoso
qui garantito se il difetto risulterà essersi verificato
durante l’uso normale; la garanzia non si estende
quindi a prodotti usati ed installati in modo errato,
danneggiati meccanicamente, danneggiati da
liquidi o da agenti atmosferici. Il prodotto, risultato
difettoso, dovrà essere inviato alla Paso franco di
spese di spedizione e ritorno. Questa garanzia non
ne comprende altre, esplicite od implicite, e non
comprende danni o incidenti conseguenti a persone
o cose. Contattare i distributori PASO della zona per
maggiori informazioni sulla garanzia.
Importante! L’utente ha la responsabilità di produrre
una prova d’acquisto (fattura o ricevuta) se vuole servirsi
dell’assistenza coperta da garanzia. Dovrà inoltre fornire
data di acquisto, modello e numero di serie riportati
sull’apparecchio.
WARRANTY
This product is warranted to be free from defects in
raw materials and assembly. The warranty period is
governed by the applicable provisions of law. Paso
will repair the product covered by this warranty
free of charge if it is faulty, provided the defect has
occurred during normal use. The warranty does not
cover products that are improperly used or installed,
mechanically damaged or damaged by liquids or
the weather. If the product is found to be faulty, it
must be sent to Paso free of charges for shipment
and return. This warranty does not include any
others, either explicit or implicit, and does not cover
consequential damage to property or personal injury.
For further information concerning the warranty
contact your local PASO distributor.
Important! Should the user wish to avail himself of
servicing under the warranty, he must provide evidence
of the purchase (invoice or receipt). The user shall also
indicate the date of purchase, model and serial number
indicated on the equipment.
1.1 Numbered references
1) Mains switch.
2) Mod
ule A: CD/USB/SD card player and AM/FM tuner.
3) Mod
ule B: CD/USB/SD card player and AM/FM tuner.
4) Line output (module B).
5) Priority output line (for module A only).
6) Line output (module A)
.
7) Recorder input (not used).
8) Sockets for AM/FM antennas (module A).
9) Sockets for AM/FM antennas (module B).
10) Terminal strip for 24VDC external power supply.
11) Mains plug.
12) Frame connection.
2. AVVERTENZE GENERALI
2.1 Installazione
Tutti gli apparecchi PASO sono costruiti nel rispetto delle
più severe normative internazionali di sicurezza ed in
ottemperanza ai requisiti della Comunità Europea. Per
un corretto ed efficace uso dell’apparecchio è importante
prendere conoscenza di tutte le caratteristiche leggendo
attentamente le presenti istruzioni ed in particolare le note
di sicurezza. Durante il funzionamento dell’apparecchio è
necessario assicurare un’adeguata ventilazione. Evitare di
racchiudere l’apparecchio in un mobile privo di aerazione
o di tenerlo in prossimità di sorgenti di calore.
2. GENERAL PRECAUTIONS
2.1 Installation
All PASO equipment is manufactured in accordance with
the most stringent international safety standards and
in compliance with European Community requisites. In
order to use the equipment correctly and effectively, it is
important to be aware of all its characteristics by reading
these instructions and in particular the safety notes
carefully. While the equipment is working, it is necessary
to provide adequate ventilation. The equipment must not
be closed inside cabinets without ventilation or kept in
the vicinity of sources of heat.
8 1
Mod. A Mod. B

Serie P8083Serie P8083
P8083-2ALLP8083-2ALL
2.2 Alimentazione e messa a terra
Questo apparecchio è predisposto per il funzionamento
con tensione di rete a 230 V ± 10% 50/60 Hz.
L’interruttore di accensione (1) agisce sulla tensione
di rete. In dotazione all’apparecchio é fornito un cavo
di alimentazione con filo di terra; il terminale di terra
della spina di rete non deve essere rimosso in alcun
caso. Collegare la spina di rete (11) dell’apparecchio
alla rete elettrica utilizzando l’apposito cavo fornito in
dotazione; assicurarsi che la presa di corrente sia dotata
di collegamento di terra a norma di legge. Il circuito di
alimentazione dell’apparecchio è protetto da un fusibile
situato sulla presa di rete dell’apparecchio.
2.2 Power supply and earthing
This equipment is designed for use with a mains voltage of
230 V ± 10% 50/60 Hz. The ON/OFF switch (1) controls
the mains voltage. The equipment is supplied with its own
powersupply cable, which is equipped with an earthing
wire. The earth terminal of the mains plug should never
be removed under any circumstances. Connect the mains
plug (11) of the equipment to the power mains using
the cable included in the supply. Make sure that the
power outlet is equipped with a connection to earth in
accordance with the law. The power-supply circuit of the
equipment is protected by a fuse installed on the mains
plug of the equipment.
2.3 Note di sicurezza
Ogni intervento all’interno dell’apparecchio, quale
operazioni di manutenzione od altro, deve essere
effettuato solo da personale specializzato: la rimozione
del coperchio rende accessibili parti con rischio di scosse
elettriche.
Prima di rimuovere il coperchio accertarsi
sempre che il cavo di rete sia staccato. Nel caso di
accidentale caduta di liquidi sull’apparecchio, staccare
immediatamente la spina di rete ed interpellare il centro
di assistenza PASO più vicino. La connessione di telaio
(12) consente di collegare altre apparecchiature per la
sola funzione di schermatura dei segnali a basso livello:
questa presa non deve essere utilizzata per il collegamento
di sicurezza del telaio alla terra.
2.3 Safety notes
Any activities inside the equipment such as maintenance
and so on may only be carried out by specialised
personnel: when the cover is removed, parts liable to
cause electric shocks are exposed. Before removing the
cover, always make sure that the power cord has been
disconnected.
In the event that liquid is accidentally spilt onto the
apparatus, disconnect the mains plug immediately and
contact the nearest PASO Service Centre. The chassis
connection (12) may be used to connect other equipment
only for the purpose of shielding the low signals: this
socket may not be used to connect the chassis to earth
for safety purposes.
3. CONNESSIONI
L’apparecchiatura è predisposta per fornire due uscite
audio: a tale scopo sono disponibili le prese stereo RCA (4)
e (6). La sorgente sonora in uscita deve essere selezionata
tra CD, USB, SD card o RADIO attraverso l’apposito tasto
sul pannello frontale (5).
3. CONNECTIONS
The equipment is designed to provide two audio outputs:
for this purpose the stereo RCA sockets (4) and (6) are
available. The sound source output must be selected from
CD, USB, SD card or RADIO through the appropriate key
(5) on the front panel.
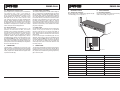
6. MONTAGGIO A RACK
6.1 Istruzioni di montaggio
Montare l’apparecchio a rack tramite le apposite viti (A)
e le rondelle (B), come in Figura 6.1.1.
6. RACK MOUNTING
6.1 Mounting instruction
Fix the tuner to the rack by means of the screws (A) the
relative washers (B), see figure 6.1.1.
CARATTERISTICHE TECNICHE P8083-2ALL TECHNICAL SPECIFICATIONS
Alimentazione da rete 230 VAC ±10% 50/60 Hz Mains power supply
Alimentazione esterna in CC 24 VDC DC External power supply
Consumo con alimentazione da rete 45 VA Mains consumption
Consumo con alimentazione esterna 1 A (max) DC consumption
Livello d’uscita 700 mV Output level
Peso (netto) 5 kg Weight (net)
Peso (imballato) 6 kg Weight (packaged)
Dimensioni (ingombro massimo) 482 x 44 x 285 mm Overall dimensions
Dimensioni imballo 530 x 125 x 370 mm Package dimensions
Fig. 6.1.1
2 7

Serie P8083Serie P8083
P8083-2ALLP8083-2ALL
4. USO
4.1 Avvio e selezione della sorgente sonora
Premere l’interruttore di rete (1) e quindi il tasto POWER
(3) sul modulo: il display si illumina ed è possibile
selezionare la sorgente sonora da utilizzare tra CD, USB,
SD card o sintonizzatore AM/FM premendo ripetutamente il
ta
sto (5) fino a che viene visualizzata quella desiderata.
4.2 Uso del lettore CD/USB/SD card
Questo lettore CD accetta CDR da 12 cm e 8 cm.
Non inserire CD-RW, CD-ROM, CD-I, CDV e Computer CD;
è inoltre possibile inserire memorie esterne quali SD card
o unità disco USB contenenti file *.mp3.
Nota
Le funzionalità del lettore e le operazioni di seguito
descritte - nelle quali, per semplificare, ci riferiremo al
CD - si applicano indifferentemente a tutti e tre i supporti
CD/USB/SD CARD.
4. USE
4.1 Power on and sound source selection
Press the mains switch (1) an then the module POWER
key (3): the display lights up and it’s possible to select
the sound source between CD, USB, SD card or AM/FM
tuner by pressing the key (5) repeatedly until the required
one is shown.
4.2 Using the CD/USB/SD card player
This CD player will take 12 and 8-cm CDR’s. Do not insert
CD-RW’s, CD-ROM’s, CD-I’s, CDV’s and Computer CD’s.
It is also possible to insert external memories such as SD
cards or USB disc units containing *.mp3 files.
Note
The functions of the player and the actions described
below – in which for simplicity’s sake reference is
made only to a CD - apply equally to all three types of
medium.
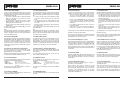
Riferimenti funzione CD/USB/SD (colore bianco)
1. Vano lettore CD.
2. Display.
3. Tasto d’accensione/spegnimento.
4. Ingresso USB.
5. Tasto selezione sorgente sonora.
6. Tasto riproduzione casuale dei brani.
7. Tasto ripetizione dei brani.
8. Tasto per scorrimento cartelle (indietro).
9. Tasto per scorrimento cartelle (avanti).
10.
Selezione traccia precedente / Arretramento veloce.
11.
Selezione traccia successiva / Avanzamento veloce.
12. Ammutolimento uscita audio del brano riprodotto.
13. Modificare la sequenza di riproduzione dei brani.
14. Regolazione di volume.
15. Ingresso SD CARD.
16. Avvio riproduzione / Pausa.
17. Espulsione CD inserito / Arresto riproduzione.
Nota: le funzioni dei tasti in modalità sintonizzatore sono
descritte a pag. 6.
CD/USB/SD function references (white colour)
1. CD player compartment.
2. Display.
3. ON/OFF key.
4. USB input.
5. Sound source selection key.
6. Random function key.
7. Repeat function key.
8. Folder scrolling key (backward).
9. Folder scrolling key (forward).
10.
Previous track selection / Fast rewind.
11.
Next track selection / Fast forward.
12. Mute key.
13. Program key.
14. Volume adjustment.
15. SD card compartment.
16. Play/Pause key.
17. CD eject/Stop.
Note: the functions of the keys in tuner mode are
described on page 6.
4.3.1 Selezione delle stazioni radio
• Premere il tasto BAND (16) per selezionare la banda
di ricezione desiderata AM/FM;
• Premere i tasti TUN (12) e (13) per impostare
la frequenza di ricezione visualizzata sull’apposito
display;
• Tenendo premuti i tasti TUN per più di 3 secondi si
avvia la ricerca automatica delle stazioni; al rilascio
del tasto, la prima stazione con segnale sufficiente
viene agganciata.
4.3.1 Selecting radio stations
• Press the BAND key (16) to select the band you
require, AM or FM;
• Pre
ss the TUN keys (12) and (13) to set the
frequency you require, which will be shown on the
display;
• To start automatic station searching press the TUN
keys, holding them down for more than 3 seconds.
When the key is released, the search will stop on
the first station with a sufficiently strong signal.
4.3.2 Memorizzazione dei canali
Il sintonizzatore dispone di 10 posizioni di memoria per la
banda FM e di 10 per la banda AM. Per memorizzare una
stazione radio precedentemente sintonizzata, occorre:
• eseguire l’operazione di scelta del canale da voler
memorizzare, tramite i tasti TUN (12) e (13);
• Una volta scelto un canale, premere per 3 secondi
uno dei tasti programma da M1 a M5 (6÷10) per
memorizzarlo; sul display (2) apparirà il numero del
canale memorizzato (es. CH 3);
• premendo il tasto M+5 (11) - sul display appare la
scritta piccola +5 - si attiva la memorizzazione del
programma dal 6 al 10.
Una volta memorizzata una stazione radio, comparirà,
a lato della frequenza visualizzata sul display, il numero
della posizione di memoria ad essa associata. Per richia-
mare una stazione memorizzata nei canali da 1 a 5 è
sufficiente premere il tasto memoria relativo alla posi-
zione desiderata; per le stazioni memorizzate nei canali
da 6 a 10, premere +5 ed il tasto memoria relativo alla
posizione desiderata (+5 > 1=6……5=10).
4.3.2 Storing channels
The tuner has 10 storage cells for the FM band and 10 for
the AM band. To store a previously tuned radio station,
you must proceed as follows:
• using the TUN keys (12) and (13), select the station
to store (see above procedure);
• once you choose a station, press for 3 seconds one
of the memory keys (from M1 to M5, 6÷10) in
order to store it; the stored station (es. CH 3) will
appear on the display (2);
• if you press the M+5 (11) - a small +5 will appear
on the display - storage of the programme from 6
to 10 will start.
Once a radio station has been stored, the number of the
MEMORY cell associated with it will appear next to the
frequency shown on the display. To call up one of the
stations stored in channels 1 to 5, it is sufficient to press
the MEMORY key corresponding to the required position;
for stations memorized from 6 to 10 press +5 and the
MEMORY key corresponding to the required position (+5
> 1=6……5=10).
6 3
4.3 Uso del sintonizzatore AM/FM
Premere il tasto di selezione sorgente (5) fino a che sul
display verrà visualizzata una frequenza radiofonica.
Nota:
I tasti utilizzati per la funzione RADIO sono evidenziati in
colore rosso sul pannello frontale.
4.3 Using the AM/FM tuner
Press the selection key (5) until a radio frequency appears
on the display.
Note:
The keys used for RADIO function are highlighted in red
colour on the front panel.

Serie P8083Serie P8083
P8083-2ALLP8083-2ALL
4.2.2 Funzioni REW/FWD
Per selezionare le tracce durante la riproduzione premere i
tasti REW (10) e FWD (11), rispettivamente se si desidera
riprodurre la traccia precedente o quella successiva.
Premendo il tasto PLAY/PAUSE (16) la riproduzione
continuerà mentre il display visualizzerà la traccia
selezionata. Il passaggio da una cartella alla successiva
è automatico.
4.2.2 REW/FWD functions
To select tracks while the CD is being played out, press
the REW key (10) to go back to the previous track or
FWD (11) to go on to the next one. If you press the
PLAY/PAUSE key (16), the CD will continue to play while
the track you have selected will appear on the display.
Transition from one folder to the next is automatic.
4.2.3 Ricerca veloce durante la riproduzione
Premere e tenere premuto i tasti REW (10) e FWD
(11) rispettivamente per avanzare o tornare indietro
rapidamente fino al punto desiderato.
Rilasciare il pulsante appena raggiunto il punto desiderato
per riprendere la normale riproduzione del CD.
4.2.3 Fast rewind or forward while playing
Press the REW key (10) or the FWD key (11) and hold
them down to go backwards or forwards rapidly to the
required place.
To resume playing of the CD as soon as the place you
want is reached, release the key.
4.2.4 Funzione REPEAT
Premere il pulsante REPEAT (7) più volte per selezionare
le seguenti modalità di funzionamento:
• REPEAT Ripete il brano corrente.
• REPEAT ALL Ripete tutto il CD in sequenza.
• REPEAT FOLDER Ripete il contenuto della cartella
selezionata.
Un’ultima pressione del tasto REPEAT riporterà la
riproduzione alla modalità normale.
4.2.4 REPEAT function
ress the REPEAT (7) key several times to select one of
the following operating modes:
• REPEAT To repeat the current track.
• REPEAT ALL To repeat the whole CD in sequence.
• REPEAT FOLDER To repeat all tracks of the selected
folder.
To return to the normal playing mode, press the REPEAT
key again.
4.2.1 Funzioni PLAY/PAUSE
Inserire un disco nell’apposita fessura (1) con il lato da
riprodurre rivolto verso il basso. La riproduzione si attiverà
automaticamente. Il numero della traccia e la durata verrà
visualizzata sul display (2).
• Per mettere in pausa premere il tasto PLAY/PAUSE
(16); per riprendere la riproduzione normale,
premerlo nuovamente.
• Per interrompere la riproduzione premere il tasto
EJECT/STOP (17). Il display (2) mostrerà il numero
totale delle tracce presenti sul CD.
• Premere ancora il tasto (17) per fermare il lettore ed
espellere il CD.
Se verrà premuto il tasto PLAY/PAUSE (16), il CD verrà
reinserito in automatico.
Nota
Nel caso il display mostrasse un messaggio di ERRORE o
diventasse illeggibile, provare a riavviare il CD player e/o
estrarre e reinserire il CD stesso. Pulire opportunamente
il CD prima dell’inserimento.
4.2.1 PLAY/PAUSE function
Insert a disk into the slot (1) with the side to be played
facing downwards. It will start playing out automatically.
The track number and time will appear on the display
(2).
• To make a break, press the PLAY/PAUSE key (16).
To resume normal playing press the same key
again.
• To stop playing, press the EJECT/STOP key (17).
The display (2) will show the total number of tracks
on the CD.
• Press the same key (17) again to stop the CD player
and eject the CD.
If you then press the PLAY/PAUSE key (16), the CD will
be inserted again.
Note
If an ERROR message appears on the display, or the CD
becomes illegible, try starting the player again and/or
taking out the CD and putting it back in again. Clean the
CD properly before inserting it.
4.2.5 Funzione RANDOM
Premere il pulsante RAN/ENTER (6) per selezionare la
riproduzione casuale dei brani.
4.2.5 RANDOM function
Press the RAN/ENTER (6) key to select random playing
of tracks.
4.2.7 Funzione FOLDER (solo *.mp3)
Una volta inserito un supporto con brani *.mp3 suddivisi in
cartelle, il display mostrerà il numero totale delle cartelle
e di brani contenuti: premendo i tasti FOLDER (8) e (9)
è possibile scorrere avanti (>>) e indietro (<<) le tra
cartelle contenenti i brani, mentre i tasti REW (10) e
FWD (10) permetteranno di selezionare le diverse tracce
in sequenza.
4.2.8 FOLDER function (*.mp3 only)
Once the medium with its *.mp3 tracks, separated into
folders, is inserted, the total number of folders and of
tracks contained will be shown on the display. It is possible
to press the FOLDER (8) and (9) keys while the player
is running to select one of the folders and scroll forward
(>>) or backward (<<) through the files in it, while the
REW (10) and FWD (11) keys can then be used to select
the various tracks in sequence.
4.2.8 Funzione MUTE
Premendo il tasto MUTE (12) durante la riproduzione del
lettore CD/USB/SD, l’apparecchio viene ammutolito. Per
tornare alla normale riproduzione, premere nuovamente
il tasto MUTE.
4.2.8 MUTE function
If the MUTE (12) key is pr
essed while playing, the device
is muted. To return to normal playing, press MUTE again.
Press the MUTE key again for normal playing.
4.2.6 Funzione PROG
I
lettori CD del P8083-2ALL offrono la possibilità di
modificare la sequenza di riproduzione dei brani musicali:
• Premere il pulsante PROG (13) a lettore fermo
ed usare i pulsanti REW (10) e FWD (11) per
selezionare le tracce da inserire nel programma.
• Premere il tasto RAN/ENTER (6)
per memorizzare
le varie tracce selezionate: il display mostrerà il
numero della traccia selezionata e il numero totale
del
le tracce.
• Se si desidera memorizzare più tracce, ripetere la
suddetta procedura.
• Infine premere il tasto PLAY/PAUSE (16) per
confermare e riprodurre le canzoni programmate.
Il programma può essere eliminato in qualsiasi momento
premendo nuovamente il tasto PROG.
Nota: la sequenza impostata non rimarrà memorizzata
in caso d’improvvisa mancanza di corrente, spegnimento
dell’apparecchio e/o rimozione del CD.
4.2.6 PROG function
With the CD players of the P8083-2ALL it is possible to alter
the sequence in which the pieces of music are played:
• To
pro
gram
me a selection of tracks, press the PROG
key (13) while the CD is not being played out, then
use the REW (10) and FWD (11) keys to move
backward and forward.
• Press the RA
N/ENTER key (6) to store the track you
have selected. The display will show the number of
the track you have selected and the total number of
tracks.
• If you wish to store other tracks, repeat the above
procedure.
• Upon completion of the selection, press the PLAY/
PAUSE key (16) to confirm and to play out all the
tracks you have programmed.
The programme can be erased at any time by pressing
the PROG key again.
Note: the tracks you have programmed will not be stored if
there is a sudden power cut, if the equipment is switched
off or if the CD has been removed.
4.2.9 Regolazione del volume
Ruotare la manopola VOLUME (14) per regolare e
controllare il volume desiderato.
Nota: quando si deve inserire o estrarre un CD dal
lettore, non forzare l’operazione che verrà eseguita
automaticamente dall’apparecchio stesso. Non tentare
di estrarre il CD manualmente prima che sia stato
completamente espulso dal CD player, ciò potrebbe
causare danni all’apparecchio.
4.2.9 Volume adjustment
To adjust the volume to the required level, turn the
VOLUME knob (14).
Note: when inserting a CD into the player or removing
it, do not force it. This operation will be carried out
automatically by the device. Do not attempt to remove
the CD by hand before it has been properly expelled
from the player, as this could damage the device.
4 5

Serie P8083Serie P8083
P8083-2ALLP8083-2ALL
4.2.2 Funzioni REW/FWD
Per selezionare le tracce durante la riproduzione premere i
tasti REW (10) e FWD (11), rispettivamente se si desidera
riprodurre la traccia precedente o quella successiva.
Premendo il tasto PLAY/PAUSE (16) la riproduzione
continuerà mentre il display visualizzerà la traccia
selezionata. Il passaggio da una cartella alla successiva
è automatico.
4.2.2 REW/FWD functions
To select tracks while the CD is being played out, press
the REW key (10) to go back to the previous track or
FWD (11) to go on to the next one. If you press the
PLAY/PAUSE key (16), the CD will continue to play while
the track you have selected will appear on the display.
Transition from one folder to the next is automatic.
4.2.3 Ricerca veloce durante la riproduzione
Premere e tenere premuto i tasti REW (10) e FWD
(11) rispettivamente per avanzare o tornare indietro
rapidamente fino al punto desiderato.
Rilasciare il pulsante appena raggiunto il punto desiderato
per riprendere la normale riproduzione del CD.
4.2.3 Fast rewind or forward while playing
Press the REW key (10) or the FWD key (11) and hold
them down to go backwards or forwards rapidly to the
required place.
To resume playing of the CD as soon as the place you
want is reached, release the key.
4.2.4 Funzione REPEAT
Premere il pulsante REPEAT (7) più volte per selezionare
le seguenti modalità di funzionamento:
• REPEAT Ripete il brano corrente.
• REPEAT ALL Ripete tutto il CD in sequenza.
• REPEAT FOLDER Ripete il contenuto della cartella
selezionata.
Un’ultima pressione del tasto REPEAT riporterà la
riproduzione alla modalità normale.
4.2.4 REPEAT function
ress the REPEAT (7) key several times to select one of
the following operating modes:
• REPEAT To repeat the current track.
• REPEAT ALL To repeat the whole CD in sequence.
• REPEAT FOLDER To repeat all tracks of the selected
folder.
To return to the normal playing mode, press the REPEAT
key again.
4.2.1 Funzioni PLAY/PAUSE
Inserire un disco nell’apposita fessura (1) con il lato da
riprodurre rivolto verso il basso. La riproduzione si attiverà
automaticamente. Il numero della traccia e la durata verrà
visualizzata sul display (2).
• Per mettere in pausa premere il tasto PLAY/PAUSE
(16); per riprendere la riproduzione normale,
premerlo nuovamente.
• Per interrompere la riproduzione premere il tasto
EJECT/STOP (17). Il display (2) mostrerà il numero
totale delle tracce presenti sul CD.
• Premere ancora il tasto (17) per fermare il lettore ed
espellere il CD.
Se verrà premuto il tasto PLAY/PAUSE (16), il CD verrà
reinserito in automatico.
Nota
Nel caso il display mostrasse un messaggio di ERRORE o
diventasse illeggibile, provare a riavviare il CD player e/o
estrarre e reinserire il CD stesso. Pulire opportunamente
il CD prima dell’inserimento.
4.2.1 PLAY/PAUSE function
Insert a disk into the slot (1) with the side to be played
facing downwards. It will start playing out automatically.
The track number and time will appear on the display
(2).
• To make a break, press the PLAY/PAUSE key (16).
To resume normal playing press the same key
again.
• To stop playing, press the EJECT/STOP key (17).
The display (2) will show the total number of tracks
on the CD.
• Press the same key (17) again to stop the CD player
and eject the CD.
If you then press the PLAY/PAUSE key (16), the CD will
be inserted again.
Note
If an ERROR message appears on the display, or the CD
becomes illegible, try starting the player again and/or
taking out the CD and putting it back in again. Clean the
CD properly before inserting it.
4.2.5 Funzione RANDOM
Premere il pulsante RAN/ENTER (6) per selezionare la
riproduzione casuale dei brani.
4.2.5 RANDOM function
Press the RAN/ENTER (6) key to select random playing
of tracks.
4.2.7 Funzione FOLDER (solo *.mp3)
Una volta inserito un supporto con brani *.mp3 suddivisi in
cartelle, il display mostrerà il numero totale delle cartelle
e di brani contenuti: premendo i tasti FOLDER (8) e (9)
è possibile scorrere avanti (>>) e indietro (<<) le tra
cartelle contenenti i brani, mentre i tasti REW (10) e
FWD (10) permetteranno di selezionare le diverse tracce
in sequenza.
4.2.7 FOLDER function (*.mp3 only)
Once the medium with its *.mp3 tracks, separated into
folders, is inserted, the total number of folders and of
tracks contained will be shown on the display. It is possible
to press the FOLDER (8) and (9) keys while the player
is running to select one of the folders and scroll forward
(>>) or backward (<<) through the files in it, while the
REW (10) and FWD (11) keys can then be used to select
the various tracks in sequence.
4.2.8 Funzione MUTE
Premendo il tasto MUTE (12) durante la riproduzione del
lettore CD/USB/SD, l’apparecchio viene ammutolito. Per
tornare alla normale riproduzione, premere nuovamente
il tasto MUTE.
4.2.8 MUTE function
If the MUTE (12) key is pr
essed while playing, the device
is muted. To return to normal playing, press MUTE again.
Press the MUTE key again for normal playing.
4.2.6 Funzione PROG
I
lettori CD del P8083-2ALL offrono la possibilità di
modificare la sequenza di riproduzione dei brani musicali:
• Premere il pulsante PROG (13) a lettore fermo
ed usare i pulsanti REW (10) e FWD (11) per
selezionare le tracce da inserire nel programma.
• Premere il tasto RAN/ENTER (6)
per memorizzare
le varie tracce selezionate: il display mostrerà il
numero della traccia selezionata e il numero totale
del
le tracce.
• Se si desidera memorizzare più tracce, ripetere la
suddetta procedura.
• Infine premere il tasto PLAY/PAUSE (16) per
confermare e riprodurre le canzoni programmate.
Il programma può essere eliminato in qualsiasi momento
premendo nuovamente il tasto PROG.
Nota: la sequenza impostata non rimarrà memorizzata
in caso d’improvvisa mancanza di corrente, spegnimento
dell’apparecchio e/o rimozione del CD.
4.2.6 PROG function
With the CD players of the P8083-2ALL it is possible to alter
the sequence in which the pieces of music are played:
• To
pro
gram
me a selection of tracks, press the PROG
key (13) while the CD is not being played out, then
use the REW (10) and FWD (11) keys to move
backward and forward.
• Press the RA
N/ENTER key (6) to store the track you
have selected. The display will show the number of
the track you have selected and the total number of
tracks.
• If you wish to store other tracks, repeat the above
procedure.
• Upon completion of the selection, press the PLAY/
PAUSE key (16) to confirm and to play out all the
tracks you have programmed.
The programme can be erased at any time by pressing
the PROG key again.
Note: the tracks you have programmed will not be stored if
there is a sudden power cut, if the equipment is switched
off or if the CD has been removed.
4.2.9 Regolazione del volume
Ruotare la manopola VOLUME (14) per regolare e
controllare il volume desiderato.
Nota: quando si deve inserire o estrarre un CD dal
lettore, non forzare l’operazione che verrà eseguita
automaticamente dall’apparecchio stesso. Non tentare
di estrarre il CD manualmente prima che sia stato
completamente espulso dal CD player, ciò potrebbe
causare danni all’apparecchio.
4.2.9 Volume adjustment
To adjust the volume to the required level, turn the
VOLUME knob (14).
Note: when inserting a CD into the player or removing
it, do not force it. This operation will be carried out
automatically by the device. Do not attempt to remove
the CD by hand before it has been properly expelled
from the player, as this could damage the device.
4 5

Serie P8083Serie P8083
P8083-2ALLP8083-2ALL
4. USO
4.1 Avvio e selezione della sorgente sonora
Premere l’interruttore di rete (1) e quindi il tasto POWER
(3) sul modulo: il display si illumina ed è possibile
selezionare la sorgente sonora da utilizzare tra CD, USB,
SD card o sintonizzatore AM/FM premendo ripetutamente il
ta
sto (5) fino a che viene visualizzata quella desiderata.
4.2 Uso del lettore CD/USB/SD card
Questo lettore CD accetta CDR da 12 cm e 8 cm.
Non inserire CD-RW, CD-ROM, CD-I, CDV e Computer CD;
è inoltre possibile inserire memorie esterne quali SD card
o unità disco USB contenenti file *.mp3.
Nota
Le funzionalità del lettore e le operazioni di seguito
descritte - nelle quali, per semplificare, ci riferiremo al
CD - si applicano indifferentemente a tutti e tre i supporti
CD/USB/SD CARD.
4. USE
4.1 Power on and sound source selection
Press the mains switch (1) an then the module POWER
key (3): the display lights up and it’s possible to select
the sound source between CD, USB, SD card or AM/FM
tuner by pressing the key (5) repeatedly until the required
one is shown.
4.2 Using the CD/USB/SD card player
This CD player will take 12 and 8-cm CDR’s. Do not insert
CD-RW’s, CD-ROM’s, CD-I’s, CDV’s and Computer CD’s.
It is also possible to insert external memories such as SD
cards or USB disc units containing *.mp3 files.
Note
The functions of the player and the actions described
below – in which for simplicity’s sake reference is
made only to a CD - apply equally to all three types of
medium.
Riferimenti funzione CD/USB/SD (colore bianco)
1. Vano lettore CD.
2. Display.
3. Tasto d’accensione/spegnimento.
4. Ingresso USB.
5. Tasto selezione sorgente sonora.
6. Tasto riproduzione casuale dei brani.
7. Tasto ripetizione dei brani.
8. Tasto per scorrimento cartelle (indietro).
9. Tasto per scorrimento cartelle (avanti).
10.
Selezione traccia precedente / Arretramento veloce.
11.
Selezione traccia successiva / Avanzamento veloce.
12. Ammutolimento uscita audio del brano riprodotto.
13. Modificare la sequenza di riproduzione dei brani.
14. Regolazione di volume.
15. Ingresso SD CARD.
16. Avvio riproduzione / Pausa.
17. Espulsione CD inserito / Arresto riproduzione.
Nota: le funzioni dei tasti in modalità sintonizzatore sono
descritte a pag. 6.
CD/USB/SD function references (white colour)
1. CD player compartment.
2. Display.
3. ON/OFF key.
4. USB input.
5. Sound source selection key.
6. Random function key.
7. Repeat function key.
8. Folder scrolling key (backward).
9. Folder scrolling key (forward).
10.
Previous track selection / Fast rewind.
11.
Next track selection / Fast forward.
12. Mute key.
13. Program key.
14. Volume adjustment.
15. SD card compartment.
16. Play/Pause key.
17. CD eject/Stop.
Note: the functions of the keys in tuner mode are
described on page 6.
4.3.1 Selezione delle stazioni radio
• Premere il tasto BAND (16) per selezionare la banda
di ricezione desiderata AM/FM;
• Premere i tasti TUN (12) e (13) per impostare
la frequenza di ricezione visualizzata sull’apposito
display;
• Tenendo premuti i tasti TUN per più di 3 secondi si
avvia la ricerca automatica delle stazioni; al rilascio
del tasto, la prima stazione con segnale sufficiente
viene agganciata.
4.3.1 Selecting radio stations
• Press the BAND key (16) to select the band you
require, AM or FM;
• Pre
ss the TUN keys (12) and (13) to set the
frequency you require, which will be shown on the
display;
• To start automatic station searching press the TUN
keys, holding them down for more than 3 seconds.
When the key is released, the search will stop on
the first station with a sufficiently strong signal.
4.3.2 Memorizzazione dei canali
Il sintonizzatore dispone di 10 posizioni di memoria per la
banda FM e di 10 per la banda AM. Per memorizzare una
stazione radio precedentemente sintonizzata, occorre:
• eseguire l’operazione di scelta del canale da voler
memorizzare, tramite i tasti TUN (12) e (13);
• Una volta scelto un canale, premere per 3 secondi
uno dei tasti programma da M1 a M5 (6÷10) per
memorizzarlo; sul display (2) apparirà il numero del
canale memorizzato (es. CH 3);
• premendo il tasto M+5 (11) - sul display appare la
scritta piccola +5 - si attiva la memorizzazione del
programma dal 6 al 10.
Una volta memorizzata una stazione radio, comparirà,
a lato della frequenza visualizzata sul display, il numero
della posizione di memoria ad essa associata. Per richia-
mare una stazione memorizzata nei canali da 1 a 5 è
sufficiente premere il tasto memoria relativo alla posi-
zione desiderata; per le stazioni memorizzate nei canali
da 6 a 10, premere +5 ed il tasto memoria relativo alla
posizione desiderata (+5 > 1=6……5=10).
4.3.2 Storing channels
The tuner has 10 storage cells for the FM band and 10 for
the AM band. To store a previously tuned radio station,
you must proceed as follows:
• using the TUN keys (12) and (13), select the station
to store (see above procedure);
• once you choose a station, press for 3 seconds one
of the memory keys (from M1 to M5, 6÷10) in
order to store it; the stored station (es. CH 3) will
appear on the display (2);
• if you press the M+5 (11) - a small +5 will appear
on the display - storage of the programme from 6
to 10 will start.
Once a radio station has been stored, the number of the
MEMORY cell associated with it will appear next to the
frequency shown on the display. To call up one of the
stations stored in channels 1 to 5, it is sufficient to press
the MEMORY key corresponding to the required position;
for stations memorized from 6 to 10 press +5 and the
MEMORY key corresponding to the required position (+5
> 1=6……5=10).
6 3
4.3 Uso del sintonizzatore AM/FM
Premere il tasto di selezione sorgente (5) fino a che sul
display verrà visualizzata una frequenza radiofonica.
Nota:
I tasti utilizzati per la funzione RADIO sono evidenziati in
colore rosso sul pannello frontale.
4.3 Using the AM/FM tuner
Press the selection key (5) until a radio frequency appears
on the display.
Note:
The keys used for RADIO function are highlighted in red
colour on the front panel.

Serie P8083Serie P8083
P8083-2ALLP8083-2ALL
2.2 Alimentazione e messa a terra
Questo apparecchio è predisposto per il funzionamento
con tensione di rete a 230 V ± 10% 50/60 Hz.
L’interruttore di accensione (1) agisce sulla tensione
di rete. In dotazione all’apparecchio é fornito un cavo
di alimentazione con filo di terra; il terminale di terra
della spina di rete non deve essere rimosso in alcun
caso. Collegare la spina di rete (11) dell’apparecchio
alla rete elettrica utilizzando l’apposito cavo fornito in
dotazione; assicurarsi che la presa di corrente sia dotata
di collegamento di terra a norma di legge. Il circuito di
alimentazione dell’apparecchio è protetto da un fusibile
situato sulla presa di rete dell’apparecchio.
2.2 Power supply and earthing
This equipment is designed for use with a mains voltage of
230 V ± 10% 50/60 Hz. The ON/OFF switch (1) controls
the mains voltage. The equipment is supplied with its own
powersupply cable, which is equipped with an earthing
wire. The earth terminal of the mains plug should never
be removed under any circumstances. Connect the mains
plug (11) of the equipment to the power mains using
the cable included in the supply. Make sure that the
power outlet is equipped with a connection to earth in
accordance with the law. The power-supply circuit of the
equipment is protected by a fuse installed on the mains
plug of the equipment.
2.3 Note di sicurezza
Ogni intervento all’interno dell’apparecchio, quale
operazioni di manutenzione od altro, deve essere
effettuato solo da personale specializzato: la rimozione
del coperchio rende accessibili parti con rischio di scosse
elettriche.
Prima di rimuovere il coperchio accertarsi
sempre che il cavo di rete sia staccato. Nel caso di
accidentale caduta di liquidi sull’apparecchio, staccare
immediatamente la spina di rete ed interpellare il centro
di assistenza PASO più vicino. La connessione di telaio
(12) consente di collegare altre apparecchiature per la
sola funzione di schermatura dei segnali a basso livello:
questa presa non deve essere utilizzata per il collegamento
di sicurezza del telaio alla terra.
2.3 Safety notes
Any activities inside the equipment such as maintenance
and so on may only be carried out by specialised
personnel: when the cover is removed, parts liable to
cause electric shocks are exposed. Before removing the
cover, always make sure that the power cord has been
disconnected.
In the event that liquid is accidentally spilt onto the
apparatus, disconnect the mains plug immediately and
contact the nearest PASO Service Centre. The chassis
connection (12) may be used to connect other equipment
only for the purpose of shielding the low signals: this
socket may not be used to connect the chassis to earth
for safety purposes.
3. CONNESSIONI
L’apparecchiatura è predisposta per fornire due uscite
audio: a tale scopo sono disponibili le prese stereo RCA (4)
e (6). La sorgente sonora in uscita deve essere selezionata
tra CD, USB, SD card o RADIO attraverso l’apposito tasto
sul pannello frontale (5).
3. CONNECTIONS
The equipment is designed to provide two audio outputs:
for this purpose the stereo RCA sockets (4) and (6) are
available. The sound source output must be selected from
CD, USB, SD card or RADIO through the appropriate key
(5) on the front panel.
6. MONTAGGIO A RACK
6.1 Istruzioni di montaggio
Montare l’apparecchio a rack tramite le apposite viti (A)
e le rondelle (B), come in Figura 6.1.1.
6. RACK MOUNTING
6.1 Mounting instruction
Fix the tuner to the rack by means of the screws (A) the
relative washers (B), see figure 6.1.1.
CARATTERISTICHE TECNICHE P8083-2ALL TECHNICAL SPECIFICATIONS
Alimentazione da rete 230 VAC ±10% 50/60 Hz Mains power supply
Alimentazione esterna in CC 24 VDC DC External power supply
Consumo con alimentazione da rete 45 VA Mains consumption
Consumo con alimentazione esterna 1 A (max) DC consumption
Livello d’uscita 700 mV Output level
Peso (netto) 5 kg Weight (net)
Peso (imballato) 6 kg Weight (packaged)
Dimensioni (ingombro massimo) 482 x 44 x 285 mm Overall dimensions
Dimensioni imballo 530 x 125 x 370 mm Package dimensions
Fig. 6.1.1
2 7

Serie P8083Serie P8083
P8083-2ALLP8083-2ALL
S.p.A.
Nel continuo intento di migliorare i propri prodotti, la
PASO S.p.A. si riserva il diritto di apportare modifiche
ai disegni e alle caratteristiche tecniche in qualsiasi
momento e senza alcun preavviso.
PASO S.p.A. strive to improve their products continuously,
and therefore reserve the right to make changes to the
drawings and technical specifications at any time and
without notice.
Important information for correct disposal of the product in accordance with EC Directive
2002/96/EC This product must not be disposed of as urban waste at the end of its working life. It must be
taken to a special waste collection centre licensed by the local authorities or to a dealer providing this service.
Separate disposal of electric and/or electronic equipment (WEEE) will avoid possible negative consequences for
the environment and for health resulting from inappropriate disposal, and will enable the constituent materials
to be recovered, with significant savings in energy and resources. As a reminder of the need to dispose of this
equipment separately, the product is marked with a crossed-out wheeled dustbin.
Avvertenze per lo smaltimento del prodotto ai sensi della Direttiva Europea 2002/96/EC
Alla fine della sua vita utile il prodotto non deve essere smaltito insieme ai rifiuti urbani, ma deve
essere consegnato presso gli appositi centri di raccolta differenziata predisposti dalle amministrazioni
comunali, oppure presso i rivenditori che forniscono questo servizio. Smaltire separatamente un rifiuto
elettrico e/o elettronico (RAEE) consente di evitare possibili conseguenze negative per l’ambiente e
per la salute derivanti da un suo smaltimento inadeguato e permette di recuperare i materiali di cui
è composto al fine di ottenere un importante risparmio di energia e di risorse. Su ciascun prodotto
è riportato a questo scopo il marchio del contenitore di spazzatura barrato.
Questo prodotto è conforme alle Direttive
della Comunità Europea sotto le quali lo
stesso ricade.
This product is in keeping with the relevant
European Community Directives.
1. DESCRIZIONE GENERALE
Il P8083-2ALL è un sistema di sorgenti sonore composto
da:
• Doppio modulo lettore CD anti-shock/SD card/
USB e sintonizzatori stereo AM/FM digitali con 20
memorie;
• Accessori: antenne FM ed antenne AM.
1. GENERAL DESCRIPTION
The P8083-2ALL is a complete sound source system,
composed of:
• D
ouble shockproof CD/USB/SD card players
and digital AM/FM tuners with 20 preset station
memories;
• Accessories: FM and AM antennas.
1.1 Riferimenti numerati
1) Interruttore di rete.
2) Modulo A Lettore CD/USB/SD card e tuner AM/FM.
3) Modulo B Lettore CD/USB/SD card e tuner AM/FM.
4) Uscita di linea (modulo B).
5) Uscita di linea prioritaria (solo per modulo A).
6)
Uscita di linea (modulo A).
7) Ingresso registratore (non utilizzato).
8) Prese per antenne AM/FM (modulo A).
9) Prese per antenne AM/FM (modulo B).
10) Morsettiera per alimentazione esterna 24VCC.
11) Spina di rete.
12) Connessione telaio.
Via Settembrini, 34 - 20020 LAINATE (MI) - ITALIA
TEL. +39-02-580 77 1 - FAX +39-02-580 77 277
http://www.paso.it - UDT - 02/11 - 11/702-2
GARANZIA
Questo prodotto è garantito esente da difetti nelle
sue materie prime e nel suo montaggio; il periodo
di garanzia è regolamentato dalle norme vigenti. La
Paso riparerà gratuitamente il prodotto difettoso
qui garantito se il difetto risulterà essersi verificato
durante l’uso normale; la garanzia non si estende
quindi a prodotti usati ed installati in modo errato,
danneggiati meccanicamente, danneggiati da
liquidi o da agenti atmosferici. Il prodotto, risultato
difettoso, dovrà essere inviato alla Paso franco di
spese di spedizione e ritorno. Questa garanzia non
ne comprende altre, esplicite od implicite, e non
comprende danni o incidenti conseguenti a persone
o cose. Contattare i distributori PASO della zona per
maggiori informazioni sulla garanzia.
Importante! L’utente ha la responsabilità di produrre
una prova d’acquisto (fattura o ricevuta) se vuole servirsi
dell’assistenza coperta da garanzia. Dovrà inoltre fornire
data di acquisto, modello e numero di serie riportati
sull’apparecchio.
WARRANTY
This product is warranted to be free from defects in
raw materials and assembly. The warranty period is
governed by the applicable provisions of law. Paso
will repair the product covered by this warranty
free of charge if it is faulty, provided the defect has
occurred during normal use. The warranty does not
cover products that are improperly used or installed,
mechanically damaged or damaged by liquids or
the weather. If the product is found to be faulty, it
must be sent to Paso free of charges for shipment
and return. This warranty does not include any
others, either explicit or implicit, and does not cover
consequential damage to property or personal injury.
For further information concerning the warranty
contact your local PASO distributor.
Important! Should the user wish to avail himself of
servicing under the warranty, he must provide evidence
of the purchase (invoice or receipt). The user shall also
indicate the date of purchase, model and serial number
indicated on the equipment.
1.1 Numbered references
1) Mains switch.
2) Mod
ule A: CD/USB/SD card player and AM/FM tuner.
3) Mod
ule B: CD/USB/SD card player and AM/FM tuner.
4) Line output (module B).
5) Priority output line (for module A only).
6) Line output (module A)
.
7) Recorder input (not used).
8) Sockets for AM/FM antennas (module A).
9) Sockets for AM/FM antennas (module B).
10) Terminal strip for 24VDC external power supply.
11) Mains plug.
12) Frame connection.
2. AVVERTENZE GENERALI
2.1 Installazione
Tutti gli apparecchi PASO sono costruiti nel rispetto delle
più severe normative internazionali di sicurezza ed in
ottemperanza ai requisiti della Comunità Europea. Per
un corretto ed efficace uso dell’apparecchio è importante
prendere conoscenza di tutte le caratteristiche leggendo
attentamente le presenti istruzioni ed in particolare le note
di sicurezza. Durante il funzionamento dell’apparecchio è
necessario assicurare un’adeguata ventilazione. Evitare di
racchiudere l’apparecchio in un mobile privo di aerazione
o di tenerlo in prossimità di sorgenti di calore.
2. GENERAL PRECAUTIONS
2.1 Installation
All PASO equipment is manufactured in accordance with
the most stringent international safety standards and
in compliance with European Community requisites. In
order to use the equipment correctly and effectively, it is
important to be aware of all its characteristics by reading
these instructions and in particular the safety notes
carefully. While the equipment is working, it is necessary
to provide adequate ventilation. The equipment must not
be closed inside cabinets without ventilation or kept in
the vicinity of sources of heat.
8 1
Mod. A Mod. B
-
 1
1
-
 2
2
-
 3
3
-
 4
4
-
 5
5
-
 6
6
-
 7
7
-
 8
8


Paso P8083-2ALL Manuale del proprietario
- Categoria
- Lettore CD
- Tipo
- Manuale del proprietario
in altre lingue
- English: Paso P8083-2ALL Owner's manual
- português: Paso P8083-2ALL Manual do proprietário