La pagina si sta caricando...

User’s and operator’s manual for art. 0702 and art. 07021
Manuale d’uso e dell’operatore per art. 0702 e art. 07021

This page is intentionally left blank

1Rel/05-08
Safety information:
Precauzioni di sicurezza: ......................................................... pag. 2
Technical features:
Caratteristiche tecniche: .......................................................... pag. 4
Main supply connection:
Collegamento fonte di alimentazione: .................................... pag. 5
DMX signal connection:
Collegamento segnale DMX: ................................................... pag. 5
Connection of DMX controller to spot:
Collegamento centralina DMX-fari: ......................................... pag. 6
Control panel FUNCTIONS:
FUNZIONI del pannello di controllo: ........................................ pag. 7
DMX Listing:
Lista dei valori DMX: ................................................................ pag. 8
SERVICE:
Servizio: .................................................................................... pag. 9
Electric diagrams:
Schemi elettrici: ......................................................................... pag. 12
INDEX / INDICE

2
Rel/05-08
eng
WARNING
SAFETY INFORMATION (service personnel)
READ ALL CAUTIONS AND WARNINGS PRIOR TO OPERATE THIS EQUIPMENT.
INSTRUCTION TO PREVENT INJURY OR DAMAGE DUE TO ELECTRIC SHOCK, FIRE, MECHANICAL HAZARDS,
DANGEROUS MATTERS.
•PROTECTION AGAINTS FIRE
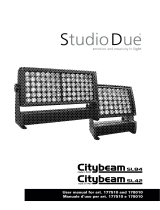
1) Maintain minimum distance of 0.3 meter from walls or any other type flammable surfaces.
2) Maintain minimum distance of 0.5 meter to lighted objects .
3) Replace fuses (if present) only with the specified type and rating.
4) Do not install the spot close to heat sources. Do not lay the connection cable on the spot when it is warm.
5) Fixture designed to be installed on normally flammable surfaces.
•PROTECTION AGAINST ELECTRIC SHOCK
1) This equipment must be earthed.
2) Class I equipment. The power supply cord includes a protective earthing conductor as part of the cord.
3) Disconnect power before installing the lamp or servicing (service personnel).
•PROTECTION AGAINST MECHANICAL HAZARDS
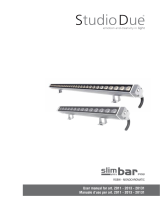
1) Use secondary safety chain when fixing this equipment.
2) Equipment surface may reach temperature up to 40°C.
•PROTECTION AGAINST DANGEROUS MATTERS
At the end of its working life, the product must not be disposed of as urbamn waste. It must be taken to a special local
authority differentiate waste collection centre or to a dealer providing this service. The wrong disposal must be cause
of environment and people damages in the presence of possible dangerous matters. There are provided for sanctions
to a unauthorized disposal of these products.
0,5m
F
INFORMAZIONI DI SICUREZZA (personale di servizio)
LEGGERE ATTENTAMENTE TUTTI GLI AVVERTIMENTI PRIMA DI COMPIERE QUALUNQUE OPERAZIONE SU QUESTO
APPARECCHIO. ISTRUZIONI PER PREVENIRE LESIONI O DANNI DOVUTI AL FUOCO, ALLE SCOSSE ELETTRICHE,
AI RISCHI MECCANICI ED A SOSTANZE PERICOLOSE.
•PROTEZIONE CONTRO IL FUOCO
1) Mantenere la distanza minima di 0.3 metri da pareti ed altre superfici infiammabili.
2) Mantenere la distanza minima di 0,5 metri dagli oggetti illuminati.
3) Sostituire i fusibili (se presenti) solo con altri dello stesso tipo e valore.
4) Non installare il faro vicino fonti di calore. Non appoggiare il cavo di connessione sul faro quando questo è caldo.
5) Questo apparecchio è adatto per il montaggio su superfici normalmente infiammabili.
•PROTEZIONE CONTRO SCOSSE ELETTRICHE
1) Questo apparecchio necessita di messa a terra.
2) Apparecchio di Classe I. Il conduttore di protezione deve far parte del cavo di alimentazione.
3) Disconnettere l’alimentazione prima di sostituire la lampada o aprire l’apparecchio (personale di servizio).
•PROTEZIONE CONTRO RISCHI MECCANICI
1) Usare la catena di sicurezza supplementare quando installate il faro.
2) La temperatura dell’apparecchio può raggiungere 40°C.
IMPORTANTE
•PROTEZIONE CONTRO SOSTANZE PERICOLOSE
Questo prodotto a fine vita è oggetto di raccolta separata, non gettare nei comuni cassonetti di rifiuti urbani, né
tantomeno nell’ambiente. Può essere consegnato presso gli appositi centri di raccolta differenziata predisposti dalle
amministrazioni comunali, oppure presso i rivenditori che forniscono questo servizio. Lo smaltimento errato può cau-
sare danni alle persone e all’ambiente per la possibile presenza di sostanze pericolose. Sono previste sanzioni in caso
di smaltimento abusivo dei suddetti prodotti.
F
0,5m
ita
catena di sicurezza
safety chain

3Rel/05-08
YOUR REFERENCE
Always remeber to give the serial number and to specify the model any time you address the seller for information or assistance.
BASIC KIT
The basic kit of the NanoLed consists of:
•Projector
•User’s manual
•Studio Due warranty
•Fast lock braket
WARNING
Check that the spot has not been damaged during transport. If it has been damaged or it does not work, address
the seller. Whether the spot has been shipped to you directly, please contact the shipping company.
Only the consignee (person or company) can claim for these damages.
INTRODUCTION
Thanking for choosing NanoLed.
The NanoLed is designe to be used in every kind of environment, thanks to its charming design and to an incredible chromatic
surrender. The modern and reliable electronic circuit, grant stability and safe function for a long time.
To make the most of its possibilites and for a correct functioning of this unit in the years to come, we suggest you to read carefully
this manual before connecting or putting the spot into use. By doing so you will gain experience with its commands and connections
and you will be easily able to use it.
INTRODUZIONE
Vi ringraziamo per aver scelto NanoLed.
Caratterizzato da un design accattivante e da una resa cromatica incredibile, il NanoLed si inserisce elegantemente in ogni tipo di
ambiente. Un circuito elettronico moderno ed affidabile ne garantisce stabilità e sicurezza di funzionamento per lungo tempo.
Per ottenere il meglio delle prestazioni ed un corretto funzionamento negli anni di questa unità, Vi consigliamo di leggere attenta-
mente questo manuale prima di collegarla e metterla in uso. In questo modo acquisirete familiarità con i suoi comandi e collegamenti
affinché possiate facilmente utilizzarla.
VOSTRA REFERENZA
Citate il numero del modello e di serie ogni volta che Vi rivolgete al vostro rivenditore per informazioni o assistenza.
CONFEZIONE BASE
La confezione base del proiettore NanoLed contiene:
•Proiettore
•Manuale d’uso
•Garanzia Studio Due
•Staffa fast lock
Controllate che l’apparecchio non abbia subito alcun danno durante il trasporto.
Se avesse subito dei danni o se non dovesse funzionare, rivolgetevi al vostro rivenditore.
Se l’apparecchio vi è stato spedito direttamente, rivolgetevi subito alla ditta di trasporto.
Solo il destinatario (la persona o ditta ricevente l’apparecchio) può reclamare per questo tipo di danni.
IMPORTANTE
eng
ita
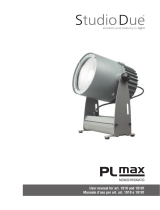
AVAILABLE VERSIONS
Art. 0702 RGB NanoLed/C
Art. 07021 W+A NanoLed/C (bianco+ambra)
VERSIONI:
Art. 0702 RGB NanoLed/C
Art. 07021 W+A NanoLed/C (white+amber)

4
Rel/05-08
TECHNICAL FEATURES / CARATTERISTICHE TECNICHE
MOVEMENTS:
Both horizontal and vertical movements take place smoothly. This is possible by using a sofisticated microstepper control system of 16 bit stepper
motors.
MOVIMENTO:
Il movimento orizzontale e verticale avviene con estrema linearità ed accuratezza del puntamento sia per spostamenti veloci che lenti, grazie ad un
sofisticato sistema di gestione a micropassi dei motori stepper a 16 bit.
RGB COLOURS HI-POWER HIGH EFFICIENCY 3W LEDS
LEDS / LED
4 RED leds 3W (each) total 240 lumen
5 GREEN leds 3W (each) total 440 lumen
5 BLUE leds 3W (each) total 150 lumen
Totale LUMEN 830 lumen
CONTROL INPUT / SEGNALE DI CONTROLLO
Standard interface RS-485, opto-coupled input, protocol: USITT DMX 512 - 10/12 channels.
interfaccia standard RS-485, ingresso opto-isolato, protocollo: USITT DMX 512 - 10/12 canali.
COLOURS / COLORI
RGB system
Sistema RGB
STROBO/BLACKOUT/DIMMER
Blackout and strobe effect with linear speed. (min. 0.4 flash/sec. max. 25 flash/sec.) + dimmer: 0÷100%
Oscuramento con effetto strobo a frequenza regolabile (min. 0.4 flash/sec. max 25 flash/sec.) + funzione dimmer: 0÷100%
HORIZONTAL MOVEMENT / MOVIMENTO ORIZZONTALE
Pan 350°. Revolution time: min. 1.5 sec. 16 bit resolution.
Pan 350°. Tempo di rivoluzione: min. 1.5 sec. a 16 bit di risoluzione.
VERTICAL MOVEMENT / MOVIMENTO VERTICALE
Tilt 243°. Revolution time: min. 1.1 sec 16 bit resolution.
Tilt 243°. Tempo di rivoluzione: min. 1.1 sec. a 16 bit di risoluzione.
AUTO MODE / MODO AUTOMATICO
With Master/Slave functions + music sync / con funzione Master/Slave + musicale
MAIN POWER SUPPLY / ALIMENTAZIONE
Electronic switching power supply / alimentatore elettronico univarsale
• Rated voltage / Tensione di rete : 100-240 Volts
~
/ 50-60 Hz
• Rated wattage / Assorbimento : 60 VA Fuse: 1.6 AT
WEIGHT / PESO : 4.3 KGS NET
DIMENSIONS / DIMENSIONI: (WxDxH)
272x242x280
eng
ita

5Rel/05-08
CONNECTION TO THE MAIN POWER / CONNESSIONE ALLA RETE ELETTRICA
This equipment must be earthed.
Class I equipment. The power supply cord includes a protective earthing conductor as part of the cord.
Questo apparecchio necessita di messa a terra.
Apparecchio di Classe I. Il conduttore di protezione deve far parte del cavo di alimentazione.
eng
ita
DMX TERMINAL LINE
The wrong connection of the terminal line or its non-connection are probably the most frequent reasons for the defective functioning of the DMX
line. The terminator is a terminal resistor fitted at the end of the cable furthest from the transmitter.
The terminal resistor should have the same value as the impedance of the connection cable.
We suggest to use a terminal with a 100 ohm resistor.
It is recommanded that all DMX 512 system has the terminal resistor fitted in the DMX output of the last fixture.
TERMINALE LINEA DMX
L’incorretto o il mancato collegamento del terminale di linea è probabilmente la più comune causa del difettoso funzionamento della linea DMX.
Il terminale di linea DMX consiste in una resistenza posta alla fine della linea.
La resistenza terminale dovrebbe avere idealmente lo stesso valore dell’impedenza del cavo di collegamento.
Noi consigliamo di usare come terminale una resistenza da 100 ohm.
E’ raccomandato per tutti i sistemi DMX 512 inserire il teminale di linea nel connettore uscita DMX dell’ultimo apparecchio collegato.
eng
ita
DMX CONNECTION / CONNESSIONE DMX

6
Rel/05-08
When the fixture is switched on, all the motors and the displays start a reset and then position themselves in the deafult settings: Now you can start
the set-up of the fixture through the electronic panel with 4 keys.
All'accensione dell'apparecchio, tutti i motori ed i diplay faranno un ciclo di reset per poi posizionarsi nella configurazione di default, a questo punto
si potrà effettuare il set-up dell'apparecchio a mezzo del pannello elettronico provvisto di 4 tasti.
eng
ita
CONTROL PANEL
On the control panel of the NanoLed/C you can find, besides the display, the led and the buttons to use to set the spot.
Sulla base del NanoLed/C troverete il pannello dei comandi per il SetUp composto da 4 tasti, un display ed 1 led di controllo.
LED
• “DMX” led -------------------- flashing: DMX input present / presenza del segnale DMX
off: no DMX input / DMX assente
BUTTONS
Four buttons are used to programme the spot:
Usare i quattro pulsanti per la programmazione:
• ESC - exit from menu and return to a previus menu level
- esce dal menu e torna ad un livello inferiore
• DOWN - to go backward in the selected options
- scorrimento indietro
• UP - to go forward in the selected options
- scorrimento avanti
• ENTER - to confirm the selected options
- conferma delle opzioni selezionate
• UP + DOWN = Fixture reset
reset dell’apparecchio
DISPLAY
Shows the various menus and the selected options.
Mostra i vari menu e le opzioni selezionate.
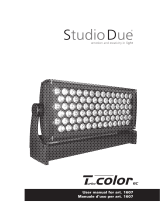
EXAMPLE OF CONNECTION DMX CONTROLLER-SPOT / ESEMPIO DI COLLEGAMENTO CENTRALINA-FARI

7Rel/05-08
CONTROL PANEL FUNCTIONS / FUNZIONI DEL PANNELLO DI CONTROLLO
Control Spot
StudioDue
R
CHANNEL8/
10
CHANNEL7/
9
CHANNEL4CHANNEL3CHANNEL2CHANNEL1
STANDBY
PROGRAM
FADING
AUTO
MUSIC
MANUALSTEPS
STEPTIME FADING
789
456
123
0
SPOT MORE ALL NONE
TILTPA NCOPYCLEARCOPYDELETEINSERT
SELECT SPOTS SPOTS SPOTS
INVERTINVERTPROGRAMPROGRAMSTEPSTEPSTEP
ENTEREXIT
PROGRAMMING
SPOTSFUNCTIONS
PROGRAMSSPOTS STEPS
SELECT
PLAY
DMX controller
NORMAL MASTER / SLAVE
Spot-1 Spot-1
Set-up = MASTER Set-up = SLAVE Set-up = SLAVE Set-up = SLAVE
Spot-2 Spot-3 Spot-4
Address
16bit= C001
8bit= C001
Address
16bit= C013
8bit= C011
Address
16bit= C025
8bit= C021
Address
16bit= C037
8bit= C031
Spot-2 Spot-3 Spot-4
TL
TL

8
Rel/05-08
DMX Listing RGB+A / Lista dei valori DMX RGB+A
STUDIODUE s.r.l.
str. Poggino, 100 - 01100 VITERBO ITALY - tel. +39 0761 352520 - fax +39 0761 352653
http://www.studiodue.com E-Mail: info@studiodue.com - service@studiodue.com

9Rel/05-08
DMX Listing WHITE+A/ Lista dei valori DMX WHITE+A

10
Rel/05-08

11 Rel/05-08

12
Rel/05-08

13 Rel/05-08
ELECTRIC DIAGRAM / SCHEMI ELETTRICI

14
Rel/05-08

15 Rel/05-08

16
Rel/05-08
NANOLED EXPLODED VIEW / ESPLOSO DISEGNO NANOLED

17 Rel/05-08
NANOLED SPARE PARTS / LISTA COMPONENTI NANOLED

18
Rel/05-08
Warranty CARD
WARRANTY / GARANZIA
&RPSDQ\QDPH
0U0UV0LVV
$GGUHVV
7HORU(PDLO
'HDOHU
1/24