Datalogic Industrial PDA Manuale utente
- Categoria
- Computer portatili palmari
- Tipo
- Manuale utente
Questo manuale è adatto anche per

Industrial PDA
with Windows
®
CE
Quick Reference Guide
Pegaso
Pegaso in Dock

Datalogic Mobile, Inc
1505 Westec Dr.
Eugene, Oregon 97402
Telephone: (541) 743-4800
Fax: (541) 743-4900
An Unpublished Work - All rights reserved. No part of the contents of this documentation or the procedures
described therein may be reproduced or transmitted in any form or by any means without prior written per-
mission of Datalogic Mobile, Inc. or its affiliates or subsidiaries ("Datalogic" or “Datalogic Mobile”) . Owners
of Datalogic products are hereby granted a non-exclusive, revocable license to reproduce and transmit this
documentation for the purchaser's own internal business purposes. Purchaser shall not remove or alter
any proprietary notices, including copyright notices, contained in this documentation and shall ensure that
all notices appear on any reproductions of the documentation.
Should future revisions of this manual be published, you can acquire printed versions by contacting your
Datalogic representative. Electronic versions may either be downloadable from the Datalogic Mobile web-
site (www.mobile.datalogic.com) or provided on appropriate media. If you visit our website and would
like to make comments or suggestions about this or other Datalogic publications, please let us know via the
“Contact Datalogic” page.
Disclaimer
Datalogic has taken reasonable measures to provide information in this manual that is complete and accu-
rate, however, Datalogic reserves the right to change any specification at any time without prior notice.
Datalogic is a registered trademark of Datalogic S.p.A. and the Datalogic logo is a trademark of Datalogic
S.p.A. all licensed to Datalogic Mobile, Inc. All other trademarks and trade names referred to herein are
property of their respective owners.
Falcon
®
is a registered trademark of Datalogic Mobile, Inc. and of its wholly owned subsidiaries.
Microsoft Windows
®
, Windows
®
2000, Windows
®
CE, Windows
®
NT, and Windows
®
XP are registered
trademarks of Microsoft Corporation.
Wavelink
®
and Wavelink Avalanche
®
are registered trademarks of Wavelink
®
Corporation and Avalanche
Site Edition™ is a trademark of Wavelink
®
Corporation.
Patents
This product may be covered by one or more of the following patents:
4,861,972 • 4,866,257 • 4,879,456 • 5,198,649 • 5,208,449 • 5,212,372 • 5,247,161 • 5,311,000 • 5,440,110 • 5,481,098 •
5,493,108 • 5,508,505 • 5,664,231 • 5,671,374 • 5,686,716 • 6,041,374 • 6,412,698 • 6,415,978 • 6,454,168 • 6,478,224 •
6,513,714 • 6,536,670 • 6,561,427 • 6,585,157 • 6,923,377 • 7,108,170 • D377345 • CA2,188,399 • Other U.S. and Foreign
Patents Pending.

Quick Reference Guide 1
Table of Contents
Pegaso™ Industrial PDA with Windows
®
CE ................................ 3
Overview ............................................................................................ 3
Features ....................................................................................... 3
Getting Started ................................................................................... 5
Powering the Pegaso ............................................................................ 5
Battery Pack ................................................................................. 5
Installing the Battery Pack .............................................................. 7
Battery Power .................................................................................... 8
System Tray Battery Status Indicators ............................................. 8
Charging the Batteries ................................................................. 10
Charging with the Dock ................................................................ 11
Charging with a Battery Charger .................................................... 12
Backup Battery ........................................................................... 12
Setting Up the Mobile Computer .......................................................... 12
Touchscreen Calibration ............................................................... 13
Getting Connected ....................................................................... 13
Setting the Date and Time ............................................................ 15
Using the Stylus .......................................................................... 15
Ambient Light Sensor ................................................................... 16
Navigating the Display ....................................................................... 16
Keypad ............................................................................................ 19
Scanning Bar Codes ........................................................................... 22
Laser Scanning ........................................................................... 22
Persistent Memory ............................................................................. 23
Context Sensitive Help ....................................................................... 24
Resetting the Pegaso .......................................................................... 24
Warm Reset ................................................................................ 24
Cold Reset .................................................................................. 25
Safe Reset .................................................................................. 26
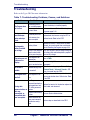
Maintaining the Pegaso ....................................................................... 27
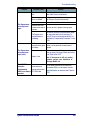
Troubleshooting ................................................................................ 28
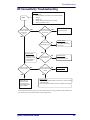
RF Connectivity Troubleshooting .................................................... 31
Technical Support .............................................................................. 32
Datalogic Mobile Website Support .................................................. 32
Reseller Technical Support ............................................................ 32
Telephone Technical Support ......................................................... 32
Resources ......................................................................................... 32
Wavelink Avalanche SE™ ........................................................... 33
Quick Start ....................................................................................... 33
Install Avalanche SE .................................................................... 33
Access the Avalanche SE Console .................................................. 35
Connect To Your Mobile Devices .................................................... 36
Manage Mobile Devices ................................................................ 37
Configure Network and Wireless Settings ........................................ 38
Install Additional Software Packages .............................................. 39

2 Pegaso™ Industrial PDA with Windows
®
CE
Connect to Devices Using Remote Control .......................................40
Additional Resources ....................................................................42
Datalogic Mobile Pegaso™
Windows
®
CE
End User License Agreement......................................................43
Appendix A: Microsoft
®
Windows
®
CE
End User License Agreement......................................................48
Datalogic Mobile Pegaso™ Windows
®
CE
Product Warranty.......................................................................50
Safety Information.....................................................................52
Laser Safety Label .............................................................................. 52
Advisory Statement ......................................................................52
Regulatory Statements .......................................................................52
Industry Canada statement: ..........................................................53
Laser Safety ...............................................................................55
English .......................................................................................55
French ........................................................................................ 55
German ......................................................................................56
Italian ........................................................................................ 56
Danish ........................................................................................57
Dutch .........................................................................................57
Swedish ......................................................................................57
Finnish .......................................................................................58
Norwegian ..................................................................................58
Portuguese ..................................................................................59
Spanish ......................................................................................59
Chinese ...................................................................................... 60
Japanese .................................................................................... 61
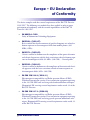
Europe – EU Declaration of Conformity ......................................62

Quick Reference Guide 3
Pegaso
™
Industrial PDA
with Windows
®
CE
Overview
The Datalogic™ Pegaso industrial PDA combines the flexibility of Windows
®
CE with the power of the Intel XScale processor, Wi-Fi wireless technology, a
large color display, and laser scanning in an ergonomic PDA. The Pegaso is a
rugged device suitable for both Commercial and Industrial environments, as
well as Retail-in-Store inventory management applications (back room inven-
tory management and shipping/receiving, shelf inventory management, price
lookup, and relabeling applications). The Pegaso will handle 5’ / 1.5M drops to
concrete, and has an IP64 environmental rating.
The Datalogic Desktop Utility (DDU), Datalogic Configuration Utility
(DCU), and Wavelink Avalanche™ are included with every unit, providing
remote management and configurability.
Features
• End user configurable keypad with custom overlay available
• Best in class Full VGA 3.6” Display for indoor and outdoor use
• Ergonomic design
• 2200 mAHr battery or 3300 mAh extended battery
• Bluetooth direct to Host PC (no dock necessary), 802.11b/g available
• User accessible SDIO slot on top
• No tools required for attachables & expansion
• High power output (500mA) on base connector, allows multiple attach-
ables or tethered/powered scanners
• Single piece quick-replace battery/cover
• 64 or 128 MB RAM, 128 MB Flash

Overview
4 Pegaso™ Industrial PDA with Windows
®
CE
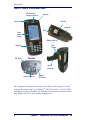
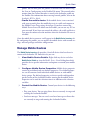
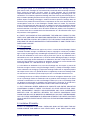
Figure 1. Pegaso Front & Rear Views
For a complete description of each key on the Pegaso, refer to page 19 in this
manual. Also refer to the Pegaso Windows
®
CE Product Reference Guide (PRG),
available on the Pegaso Product CD included with each unit, or from the Data-
logic Mobile web site at www.mobile.datalogic.com.
To u c h-
screen
Display
LED Scanning/
Charging Indicators
Keypad
SD Door
Top View
Antenna
(GPRS only)
Scanner Aperture
Belt Clip
Handle
(Optional)
Stylus
Scan
Triggers
Power Key
Handstrap
Battery Pack
Speaker

Getting Started
Quick Reference Guide 5
Getting Started
Before using the Pegaso for the first time, you must install the Battery Pack into
the unit, then charge both the Battery Pack and the Backup Battery. See Install-
ing the Battery Pack on page 7 for instructions
.
Powering the Pegaso
Battery Pack
The battery pack in the Pegaso is a 3.7 V, 2200
mAh or 3300 mAh Lithium Ion battery pack. A
message dialog box will appear when the battery
pack reaches a low state.
After charging the first time, a complete charge
takes about four (4) hours depending on the bat-
tery pack’s state and the recharging method. A
sample battery pack label is shown at right. The
label on your unit may vary from the illustration.
CAUTION
You must charge the battery pack and backup battery in a dock or
with a power cable prior to your first use of the Pegaso. The initial
charge time is approximately 4 hours. See Charging the Batteries on
page 10 for more information.
Datalogic Mobile, Inc Made in China
P/N: xxxx-xxxx (High Capacity P/N: xxxx-xxxx)
S/N: xxxxxx
Li-Ion 3.7V 2200mAh (High Capacity 3300mAh)
CAUTION: Do not short circuit, disassemble,
incinerate or mutilate pack.
C
US
®
LISTED
NWGQ7 2Z78

Powering the Pegaso
6 Pegaso™ Industrial PDA with Windows
®
CE
CAUTION
You must charge the battery pack and backup battery in a dock or
with a power cable prior to your first use of the Pegaso. The initial
charge time is approximately 4 hours.
If you remove the battery pack or it fails, there is a 30-minute window
in which to insert a charged battery pack before the backup battery
fails. If your backup battery fails, the contents of the RAM memory
will be lost. If your backup battery is less than fully charged, there is a
smaller window of time available. Usage time will be reduced, also.
Always charge within temperature range of 32°–113°F (0°–40°C). Reg-
ularly charging near the temperature limits will increase the time nec-
essary to fully charge the battery, and will shorten the battery’s useful
life.
Use only the authorized power supplies, battery packs, chargers, and
docks supplied by your Datalogic reseller. Use only the battery pack
that is specified. Only use the battery with a charging system that has
been qualified with the system per this standard. Use of an unquali-
fied battery or charger may present a risk of fire, explosion, leakage,
or other hazard. Unauthorized battery pack and improper use of either
battery pack or charging system may present a risk of fire, explosion,
leakage or other hazards. The use of other power supplies can dam-
age the unit and void your warranty. Refer to the PRG for the correct
power supplies and Accessories.

Powering the Pegaso
Quick Reference Guide 7
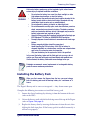
Installing the Battery Pack
The Pegaso’s Battery and its cover are integrated — they do not come apart.
Complete the following instructions to install the battery pack:
1. Loosen the elastic handstrap by releasing it from the bottom of the unit
(refer to the PRG).
2. Orient the battery pack with the latch facing toward the top of the Pegaso
(refer to
Figure 2 on page 8).
3. Replace the battery door by inserting the bottom tab into the unit, then
clicking the latch into place. If the battery pack is installed incorrectly, it
will not seat properly.
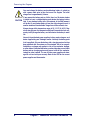
WARNING
Lithium-ion battery packs may get hot, explode, ignite, or/and cause
serious injury if exposed to abusive conditions.
• Do not place the battery in or near fire, direct sunlight, or other
high temperature locations, or heat the battery.
• Do not connect the positive terminal and negative terminal of the
battery to each other or short circuit battery terminals with any
metal object (such as wire, coin or metallic object).
• Do not expose the battery to liquids, or allow to get wet.
• Do not disassemble, modify, open, crush, bend, deform, puncture,
shred, remanufacture or pierce the battery. The battery contains
safety and protection devices, which, if damaged, may cause the
battery to generate heat, explode or ignite.
• Use only battery packs that have been authorized by Datalogic per
IEEE Standard 1725-200x for GSM/GPRS/EDGE operation.
• Promptly dispose of used batteries in accordance with local regu-
lations.
• Battery usage by children should be supervised.
• Avoid dropping the PDA or battery. If the PDA or battery is
dropped, especially on a hard surface, and the user suspects dam-
age, return it to a service center for inspection.
• Only use the battery for the system for which it is specified.
In the event the battery leaks and the fluid gets into your eye, do not
rub the eye. Rinse well with water and immediately seek medical care.
If left untreated, the battery fluid could cause damage to the eye.
Datalogic recommends annual replacement of rechargeable battery
packs to ensure maximum performance.
When you first remove the Pegaso from the box, you must charge
both the battery pack and the backup battery for a minimum of 4
hours.

Battery Power
8 Pegaso™ Industrial PDA with Windows
®
CE
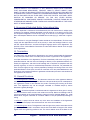
4. Replace the handstrap at the bottom of the unit.
Figure 2. Installing the Battery Pack
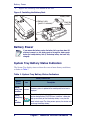
Battery Power
System Tray Battery Status Indicators
The System Tray displays icons to show the status of some battery conditions,
as shown in Ta ble 1 .
Table 1. System Tray Battery Status Indicators
If you remove the battery pack or the battery fails, you have about 30
minutes to swap in a new battery pack or charge the battery pack
before the backup battery fails (if the backup battery has been fully
charged).
Battery Status Icons
Battery
Status
Icon Description
Backup
Battery Low
Condition
no icon
The battery status is updated in the control panel, but no icon is
displayed.
Backup
Battery Very
Low
Condition
When the backup battery is very low, the system tray contains a
very low backup battery CAUTION icon. In addition, a dialog box
pops up and alerts you that the backup battery is very low and
needs to be charged. The dialog comes up every five minutes until
you charge the backup battery.
Battery Pack
Seat this
end first
Battery Latch
(push in to release)
ab

Battery Power
Quick Reference Guide 9
Battery
Charging
Condition
This icon indicates that the battery pack is currently charging.
Battery Low
Condition
This icon indicates that the battery pack is low.
Battery Very
Low
Condition
When the battery pack is very low, the system tray shows a very
low battery CAUTION icon. Also, a dialog box pops up and alerts
you to charge the battery pack. A battery warning dialog will pop up
every five minutes until you charge the battery.
Battery
Power
Gauge
The Power control applet displays a battery
power gauge.
Start > Settings > Control Panel > Power.
Discharged
Battery
Condition
no icon
When the battery is totally discharged, the battery sensor initiates a
shutdown of all applications, and closes the RF Network connec-
tion. If the battery pack has completely discharged, when the bat-
tery pack is charged or replaced, the unit will resume as before
after a cold reset.
Refer to Persistent Memory on page 23 regarding the data loss of
applications and data stored in RAM.
Battery Status Icons
Battery
Status
Icon Description
Main batteries
Remaining power:
0 100

Battery Power
10 Pegaso™ Industrial PDA with Windows
®
CE
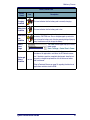
Charging the Batteries
There are several methods for charging the battery pack and backup battery.
LEDs on the Pegaso, the Single-Slot Dock, and the Four-Slot Battery Charger
give visual indication of the charge state.
Table 2 on page 10 gives an overview
of all the LEDs and what they indicate.
Table 2. Battery Charging Methods and Indications
Charging
Location:
Pegaso seated in
a Dock (Single or
Four-Slot)
Pegaso
connected to an
external power
supply
Charging slot of
Dock (Single or
Four-Slot)
Pegaso
Four-Slot
Battery Charger
Charging
Duration
4-6 hours
4-6 hours 3-5 hours > 3 hours
Battery Pack
Charge
Indication:
Charging: RED
Fully Charged:
GREEN
Battery above or
below allowed
charging
temperature, or
Battery
Communication
Fault:
FLASHING RED
Charging: RED
Fully Charged:
GREEN
Battery above or
below allowed
charging
temperature, or
Battery
Communication
Fault:
FLASHING RED
N/A N/A
Pegaso
Charge LED
Dock or
Charger
Battery
Charge LED(s)
No effect No effect
Charging:
Solid RED
Fully charged:
GREEN
Fault:
FLASHING RED
Charging:
LEDs are RED
Fully charged:
Ready LEDs are
GREEN
Error: AMBER
Simulta-
neously
Charges
Backup Bat-
tery
YES YES N/A N/A

Battery Power
Quick Reference Guide 11
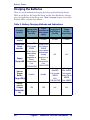
Charging with the Dock
A Single-Slot Dock powered by an external power supply (AC adaptor) is avail-
able for the Pegaso. Pegasos communicate with the host PC using Microsoft
ActiveSync protocol via either a USB or serial port.
Two methods exist for charging a battery pack using a Single-Slot Dock. Refer
to
Table 2 on page 10. The amber light on the dock will blink when a battery is
inserted, to indicate a successful connection. For more information on the
Dock, refer to the PRG, or the instructions that come with each dock.
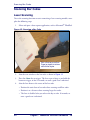
Figure 3. Charging the Battery Pack in a Dock
Refer to Table 2 on page 10 for a list of LED indicators and their purpose.
Refer to the PRG for more info on storage and disposal of batteries.
USB/Serial Connector
Pull Upward to Remove
LEDs
Battery Pack in
Charger

Setting Up the Mobile Computer
12 Pegaso™ Industrial PDA with Windows
®
CE
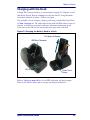
Charging with a Battery Charger
The Pegaso is available with a Four-Slot Battery Charger. Use the Battery
Charger to charge batteries independently of the unit.
Figure 4. Four-Slot Battery Charger
Backup Battery
The rechargeable 3.7V Lithium Backup Battery receives its charge from the Bat-
tery Pack. To retain date, time, data, and other settings for the Pegaso, maintain
at least a minimal charge on the Battery Pack.
To maximize the backup battery usable life always store the unit with a main
battery installed or place the unit in a charging dock when not in use.
When the backup battery is low, an icon will display on the status bar (see
Table 1 on page 8), and a dialog box will open to alert you.
Setting Up the Mobile Computer
At first use or cold reset, the unit will go through an initial bootup sequence:
1. Touchscreen Calibration on page 13.
2. Getting Connected on page 13.
3. IP Network Setup on page 13.
4. Setting the Date and Time on page 15.
LEDs

Setting Up the Mobile Computer
Quick Reference Guide 13
Touchscreen Calibration
Figure 5. Touchscreen Calibration
Getting Connected
Bluetooth Setup
1. Open the Bluetooth control panel at Start > Settings > Control Panel >
Bluetooth Manager
.
2. Search for available Bluetooth Devices by tapping the button for the type
of device you want
(Printer, Serial or All) .
3. Create a pairing by double tapping the listing for the device you want and
selecting the service. If you want to specify encryption or require authen-
tication, enable the appropriate checkbox.
4. Tap
OK to complete.
For detailed instructions, reference the PRG.
Connecting to a PC
In order for the Pegaso to communicate with a host PC, Microsoft® ActiveSync
must be installed on the computer. Go to www.microsoft.com/downloads/ for
information. Reference the Pegaso PRG for detailed instructions.
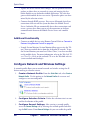
IP Network Setup
1. Select Start > Settings > Network and Dialup Connections.
2. Double-tap on the item (varies based on the radio installed and the num-
ber of connections).
Follow the on-screen directions to calibrate
the touchscreen.
For more information on touchscreen cali-
bration, refer to the PRG.

Setting Up the Mobile Computer
14 Pegaso™ Industrial PDA with Windows
®
CE
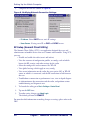
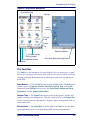
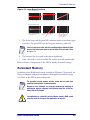
3. Complete the two tabs (shown in Figure 6):
Figure 6. Modifying Network Connection Settings.
• IP Address: Select DHCP or set static IP settings.
•
Name Servers: If using static IP, set DNS and WINS servers.
RF Setup (Summit Client Utility)
The Summit Client Utility (SCU) is an application designed for users and
administrators of mobile devices that use a Summit radio module. Using SCU,
you can:
• Disable and enable the radio (turn it off and on)
• View the contents of configuration profiles, or configs, each of which
houses the RF, security, and other settings for the radio
• Select the config to be used to connect to a WLAN
• View global settings, which apply to every config
• View status information on the radio, the access point (AP) or WLAN
router to which it is connected, and the RF connection or link between
the two
• Troubleshoot a connection or performance issue, view in-depth diagnos-
tic information on the connection and the radio, and perform various
troubleshooting and diagnostic tests
1. To launch the utility go to
Start > Settings > Control Panel.
2. Tap on the Wi-Fi icon.
3. To make setting changes tap
Admin Login.
The default password is
SUMMIT.
For more detailed information on making changes to settings, please refer to the
PRG.

Setting Up the Mobile Computer
Quick Reference Guide 15
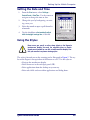
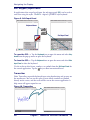
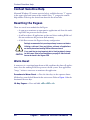
Setting the Date and Time
1. From the Start menu, select Settings >
Control Panel > Date/Time
. Use the arrows to
navigate or change the time or date.
2. Change the year by backspacing, or enter-
ing a new year.
3. Select the month to open a pull-down list
of months.
4. Tap the checkbox to
Automatically adjust
clock for daylight savings time
, if desired.
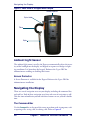
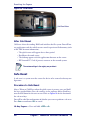
Using the Stylus
The stylus is located next to the scanning pod as illustrated in Figure 7. The sty-
lus on the Pegaso is the equivalent of the mouse on a PC. Use the stylus to:
• Navigate the touchscreen display.
• Select characters in the soft input panel (SIP).
• Select applications from the desktop or system tray.
• Select tabs, fields and text within applications and dialog boxes.
Never use a pen, pencil, or other sharp object on the Pegaso’s
touchscreen display. Use only the supplied stylus or plastic-
tipped pens intended for use with a touch-sensitive display. Con-
tact your reseller to replace a missing stylus.

Navigating the Display
16 Pegaso™ Industrial PDA with Windows
®
CE
Figure 7. Back View of a Pegaso with a Stylus
Ambient Light Sensor
The ambient light sensor is used by the Pegaso to automatically adjust the inten-
sity of the backlight on the display and keypad in response to changes in light-
ing conditions. It is located on the keypad. Reference the Pegaso PRG for
information on enabling or disabling this feature.
Screen Protector
A Screen Protector is available for the Pegaso. Reference the Pegaso PRG for
information on installation.
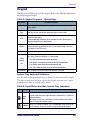
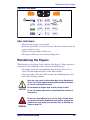
Navigating the Display
There are several navigation areas on your display, including the command bar,
and task bar. Each of these navigation areas have sub-areas of navigation as well.
Take the time to familiarize yourself with these features to save yourself valuable
time.
The Command Bar
Use the Command bar at the top of the screen to perform tasks in programs, such
as opening a file, saving a file, or editing a file. Refer to
Figure 8.
Stylus
Stylus Holder
Scanner Aperture
Tether

Navigating the Display
Quick Reference Guide 17
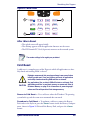
Figure 8. Application Navigation
The Task Bar
The Task bar at the bottom of the screen displays the start menu icon, an icon
for the active program, the current time, and system icons for utilities loaded in
memory, including the keyboard icon, which opens and closes the soft input
panel (SIP).
Start Button —
Click the Start button to open the Start menu. The Start menu
includes access to
Programs, Favorites, Documents, Settings, Help, and the Run
command. From
Settings you can access the Control Panel, Network and Dial-up
Connections
, and the Taskbar and Start Menu.
System Tray —
The System Tray contains icons for key presses, utilities and
applets running in the background. Click the small arrow(s) in the
System Tray
to view icons for current input mode(s), keypress, power management, and net-
work connections.
Extras Menu —
Tap Extras Menu at the far right of the Task bar to select from
open applications or to access the desktop while leaving a program open.
Task Bar (Bottom)
Command Bar (Top)
Extras Menu Button (Open Applications)
System
Tray
Soft Input
Panel
Start Button
Network Connection
Active Application Window
Desktop
Applica-
tion Icons
AC Power Indicator

Navigating the Display
18 Pegaso™ Industrial PDA with Windows
®
CE
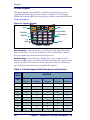
Soft Keypad/Input Panel
In applications that accept keyed input, the soft input panel (SIP) can be used to
enter data using the stylus. The
SIP is a digital, QWERTY-style keyboard.
Figure 9. Soft Input Panel
To open the SIP: —
Tap the Keyboard icon to open the menu and select Key-
board
from the pop-up menu to open the keyboard.
To close the SIP: —
Tap the Keyboard icon to open the menu and select Hide
Input Panel
to close the keyboard.
Use the stylus to select letters, numbers, or symbols from the
Soft Input Panel for
the current application. Tap the key to show international letters.
Transcriber
Select Transcriber to provide keyboard input using handwriting and gestures on
the touchscreen. You can use the stylus to write words, numbers or symbols
directly on the screen, and the result will be sent to the current application. A
help screen will appear upon first use.
Figure 10. Transcriber
Soft Input Panel
Keyboard Icons
La pagina si sta caricando...
La pagina si sta caricando...
La pagina si sta caricando...
La pagina si sta caricando...
La pagina si sta caricando...
La pagina si sta caricando...
La pagina si sta caricando...
La pagina si sta caricando...
La pagina si sta caricando...
La pagina si sta caricando...
La pagina si sta caricando...
La pagina si sta caricando...
La pagina si sta caricando...
La pagina si sta caricando...
La pagina si sta caricando...
La pagina si sta caricando...
La pagina si sta caricando...
La pagina si sta caricando...
La pagina si sta caricando...
La pagina si sta caricando...
La pagina si sta caricando...
La pagina si sta caricando...
La pagina si sta caricando...
La pagina si sta caricando...
La pagina si sta caricando...
La pagina si sta caricando...
La pagina si sta caricando...
La pagina si sta caricando...
La pagina si sta caricando...
La pagina si sta caricando...
La pagina si sta caricando...
La pagina si sta caricando...
La pagina si sta caricando...
La pagina si sta caricando...
La pagina si sta caricando...
La pagina si sta caricando...
La pagina si sta caricando...
La pagina si sta caricando...
La pagina si sta caricando...
La pagina si sta caricando...
La pagina si sta caricando...
La pagina si sta caricando...
La pagina si sta caricando...
La pagina si sta caricando...
La pagina si sta caricando...
La pagina si sta caricando...
La pagina si sta caricando...
La pagina si sta caricando...
-
 1
1
-
 2
2
-
 3
3
-
 4
4
-
 5
5
-
 6
6
-
 7
7
-
 8
8
-
 9
9
-
 10
10
-
 11
11
-
 12
12
-
 13
13
-
 14
14
-
 15
15
-
 16
16
-
 17
17
-
 18
18
-
 19
19
-
 20
20
-
 21
21
-
 22
22
-
 23
23
-
 24
24
-
 25
25
-
 26
26
-
 27
27
-
 28
28
-
 29
29
-
 30
30
-
 31
31
-
 32
32
-
 33
33
-
 34
34
-
 35
35
-
 36
36
-
 37
37
-
 38
38
-
 39
39
-
 40
40
-
 41
41
-
 42
42
-
 43
43
-
 44
44
-
 45
45
-
 46
46
-
 47
47
-
 48
48
-
 49
49
-
 50
50
-
 51
51
-
 52
52
-
 53
53
-
 54
54
-
 55
55
-
 56
56
-
 57
57
-
 58
58
-
 59
59
-
 60
60
-
 61
61
-
 62
62
-
 63
63
-
 64
64
-
 65
65
-
 66
66
-
 67
67
-
 68
68


Datalogic Industrial PDA Manuale utente
- Categoria
- Computer portatili palmari
- Tipo
- Manuale utente
- Questo manuale è adatto anche per
in altre lingue
- English: Datalogic Industrial PDA User manual
Documenti correlati
-
Datalogic Pegaso Quick Reference Manual
-
Datalogic SR Manuale utente
-
-
-
Datalogic S.r.l. Joya R2U Manuale utente
-
-
Datalogic Rhino 10 Manuale utente
-
-
Datalogic Rhino II™ Manuale utente
-
Altri documenti
-
Toshiba PA5356A-1PRP Guida utente
-
Toshiba Copier Manuale utente
-
 Hach LANGE DR 900 Manuale utente
-
Monnit Alta Long range Wireless Carbon Monoxide Sensor Guida utente
-
Alpha innotec alpha home Manuale del proprietario
-
Philips SBCRU980/00 Manuale utente
-
Metrologic SP5700 Series Quick Start Manuals
-
Monnit Alta Guida utente
-
ACU-RITE Weather Radio 522 Manuale utente
-
Optoelectronics H15 Manuale utente
