Hoover IronSpeed SFD4101/1 Manuale utente
- Categoria
- Stazioni di stiratura a vapore
- Tipo
- Manuale utente


Summary
English...................................................1
Français.................................................13
Deutsch.................................................25
Italiano..................................................37
Nederlands............................................49
Português..............................................61
Español..................................................73
Slovenčina.............................................85

1 -
GB
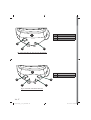
Parts Description
1 Control Panel
2 Iron Lock System
3 Iron Resting Mat
4 Water Tank Filler Cover
5 Cord Storage for Hose & Mains
6 Supply Hose
7 Mains
Fig. 1: Base and Tank Description
10 Temperature Dial
11 Steam Trigger
12 Multi Steam Technology
Selector
13 Temperature Dial Indicator
14 Pads for Vertical Positioning
15 Calc Clean Knob
Fig. 2: Domestic Iron Description
4
10
11
12
13
15
Fig. 3: Pro Iron Description
1
2
3
4
5
7
6
4
10
11
12
13
14
15
English
Ironspeed_SF__1-12_union.indd 1 19-10-2009 17:57:50

2 -
GB
1B
1A
1C
1 A On/O Switch
1B “Water Tank Empty” Light
1C “Steam Ready” Light
Fig. 4: Domestic Iron Control Panel
1D On/O Iron
1 E On/O Boiler
Fig. 5: Pro Iron Control Panel
1B
1D
1C
1E
Ironspeed_SF__1-12_union.indd 2 19-10-2009 17:57:50

3 -
GB
Introduction
Dear customer,
Congratulations on the purchase of your new Hoover ironing system. This appliance
has been manufactured to the highest standards. Used correctly, your Hoover ironing
system will delivery many years of quick, hassle free ironing.
Before using your new Hoover appliance, please take the time to read this user
manual carefully. If you need further information or if you encounter any issues
which are not dealt with in this manual, please contact your local dealer.
Important Safety Instructions
Please read this user manual carefully before your rst use and save it for future
reference.
t5IJTQSPEVDUIBTCFFOEFTJHOFEGPSEPNFTUJDVTFPOMZ*ODBTFPGBOZDPNNFSDJBM
use, inappropriate use or failure to comply with the instructions, the manufacturer
is not responsible and the guarantee will be invalid.
t#FGPSFDPOOFDUJOHZPVSBQQMJBODFDIFDLJGUIFNBJOWPMUBHFJTUIFTBNFBTUIF
voltage indicated on your appliance and that the power outlet is connected to the
earth.
t&OTVSFCFGPSFFBDIVTFUIBUUIFFMFDUSJDDPSEPSBOZPUIFSJNQPSUBOUQBSUJTOPU
damaged.
t5IJTBQQMJBODFJTOPUJOEFOUFEUPGPSVTFCZDIJMESFOPSQFSTPOTXJUISFEVDFE
physical, sensory or mental capabilities, unless they are adequately supervised in
its operation and use by an adult responsible for their safety.
t$IJMESFOTIPVMECFTVQFSWJTFEUPFOTVSFUIBUUIFZEPOPUQMBZXJUIUIFBQQMJBODF
t5IFJSPONVTUCFVTFEBOEQMBDFEPOBøBUBOETUBCMFTVSGBDF8IFOZPVSFQMBDF
the iron on its stand, make sure that the surface on which you place it is stable.
t/FWFSEJSFDUUIFTUFBNUPXBSETQFSTPOTPSBOJNBMT/FWFSEJSFDUUIFTUFBNKFU
towards any other electrical or/and electronic appliances.
t%POPUVTFUIFBQQMJBODFJGJUIBTGBMMFOEPXOPSJGUIFBQQMJBODFTIPXTFWJEFODF
of breakdown, malfunction, leakages. Please have the product checked by
authorized Service Centre to avoid any danger.
t"MXBZTNBLFTVSFUIFBQQMJBODFJTTXJUDIFEPòVOQMVHHFEBOEDPPMFEEPXO
before doing any maintenance work.
t/FWFSMFBWFUIFBQQMJBODFVOBUUFOEFEXIFOQMVHHFEJOBOECFGPSFJUIBTDPPMFE
down.
t%POPUVOQMVHUIFBQQMJBODFCZQVMMJOHPOUIFDPSEPSPOUIFBQQMJBODF
t/FWFSJNNFSTFUIFJSPOUIFTUBOEUIFDBCMFPSUIFQMVHTJOXBUFS/FWFSIPME
them under the water tap.
t5IFTPMFQMBUFPGUIFJSPODBOCFDPNFFYUSFNFMZIPUBOENBZDBVTFCVSOTJG
UPVDIFE/FWFSUPVDIUIFFMFDUSJDDPSETXJUIUIFTPMFQMBUF
t*GUIFTVQQMZDPSEJTEBNBHFEJUNVTUCFSFQMBDFECZUIFNBOVGBDUVSFSTFSWJDF
agent or similarly qualied persons in order to avoid a hazard.
Ironspeed_SF__1-12_union.indd 3 19-10-2009 17:57:51

4 -
GB
Chapter 1.1 - Control Panel
On/o switch (1a): A light on the switch will illuminate to indicate that the appliance
is switched on. (domestic irons models only)
On/o iron (1d): By switching it on, the iron soleplate will start to heat up.
Recommended for dry ironing session. (only with professional iron)
On/o boiler (1e): By switching it on, the boiler will start to heat up. Please note
that iron switch (1d) needs to be switched on to heat up the boiler. (only with
professional iron)
Chapter 1.2 - Lock System
In order to facilitate the carrying and the storage of your ironing system, your
appliance is designed with a lock system (2). This system locks the iron on the upper
tray. It’s therefore very easy to move and store the appliance. Please follow the
instructions below to lock the iron on the resting mat (3).
Fig. 6: Domestic Iron Lock System
Fig. 7: Pro Iron Lock System
To unlock it, do the opposite to the instructions above.
Warning: Do not carry your appliance by the iron.
“Water tank empty” light (1b) is on: There is no more water in the tank. Please rell
the tank following the instructions in the chapter 2.2
When the appliance is switched on and “Steam ready” light (1c) is o, it means that
steam is ready. You can press the steam trigger and steam will escape from the
soleplate. Please note that during use, the steam light will switch on but you can
continue steam ironing.
Ironspeed_SF__1-12_union.indd 4 19-10-2009 17:57:52

5 -
GB
Chapter 2: Preparation for Use
Due to the powerful output of steam, Hoover recommends the use of an active
ironing board with blowing and vacuuming function which allows escape of any
FYDFTTTUFBN
1MBDFUIFJSPOJOHTZTUFNPOBTUBCMFBOEMFWFMTVSGBDFGPSFYBNQMFPOUIFIBSEQBSU
of an ironing board or on a heat-resistant surface.
Chapter 2.1 - What Kind of Water May be Used?
The Hoover ironing system has been designed to be used with tap water only. There
JTOPOFFEUPVTFEJTUJMMFEPSQVSFEJTUJMMFEXBUFS/FWFSUIFMFTTJODBTFZPVMJWFJOB
IBSEXBUFSBSFBZPVDBONJYPGEJTUJMMFEXBUFSXJUIPGUBQXBUFS%POPU
use any other kind of water or do not add any contents to the removable water tank
as it can damage your appliance.
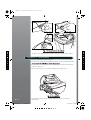
Chapter 2.2 - Filling the Water Tank
Open the water tank ller cover (4) to gain access to the water tank. Fill it with tap
XBUFSXJUIUIFIFMQPGBCPUUMF%POPUFYDFFEUIFNBYNBSL
Fig. 8: Water Tank Filling
Warning: Do not add vinegar, hot water, perfume, or any other kind of chemical
agents or any other contents in the water tank. It could damage the steam
generator and shorten its life use.
Chapter 2.3 - Switching On the Appliance
Domestic Iron Models:
Connect the appliance with the mains cord to an earthed socket and switch on the
power. Press the on/o switch. The light (1a) will illuminate, this tells you that the
appliance is working and that the boiler is heating up.
"GUFSBQQSPYJNBUFMZNJOVUFTUIFiTUFBNSFBEZwMFEXJMMMJHIUPòBOEZPVDBOOPX
start to use the steam feature.
Professional Iron Models:
Connect the appliance with the main cord to an earthed socket. Press the iron on/
o switch (1d) and the boiler on/o switch (1e). The lights of both switches should
light up and inform you that the appliance is working and the iron soleplate and
boiler are heating up.
Ironspeed_SF__1-12_union.indd 5 19-10-2009 17:57:52

6 -
GB
Select the temperature of the soleplate by turning the dial (10) on the iron to the
will indicate to you that the soleplate has reached the requested temperature.
adjusts without interrupting your ironing.
Help
Check the laundry care label of the garment to select the best temperature for each
textile. Please note that during use, the temperature light goes on from time to time.
delicate fabric.
If the temperature is too low, some drops of water could escape from the soleplate.
Please raise up the temperature abovFUIFEPUTttto avoid this issue.
Chapter 3: Using Your Steam Generator
N.B.
smell appear. This is quite normal and will disappear quickly.
Chapter 3.2 - Ironing
Dry Ironing
Domestic Iron Models:
Select the temperature of the soleplate following the indications of chapter 3.1.
When the soleplate reaches the required temperature, start your ironing without
pressing the steam trigger (11).
Professional Iron Models:
Only turn on the iron switch (1d). Select the temperature of the soleplate following
the instructions in chapter 3.1. Start your ironing when the soleplate reaches the
appropriate temperature.
Steam Ironing
Select the temperature of the soleplate following the instructions in chapter 3.1. On
Starting from that time you can begin your ironing and press the steam trigger (11).
selector (12). In order to achieve the best results, please refer to the dedicated
chapter 3.3 for more information.
Ironspeed_SF__1-12_union.indd 6 19-10-2009 17:57:53
C
M
Y
CM
MY
CY
CMY
K
48001377 -1 - Ironspeed SF - User Manual.pdf 11/03/2010 10:53:04

7 -
GB
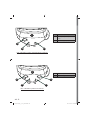
Fig. 9: Pressing Steam Trigger Graphic
Professional Iron Models Only
Steam lock function: The steam lock allows you to steam iron without pressing the
TUFBNUSJHHFS4UFBNXJMMUIFSFGPSFøPXDPOUJOVPVTMZ5PBDUJWBUFPSEFBDUJWBUFUIF
steam lock, slide the steam lock forwards or backwards.
To obtain the best results, it is really important to set the correct temperature of the
TPMFQMBUFBOEUIFTUFBNøPXZPVBSFVTJOH:PVS)PPWFSBQQMJBODFIBTBVOJRVF
Multi Steam Technology selector (12). If correctly used, it will simplify your ironing
and provide outstanding results, making ironing easier and faster.
Your iron features innovative Multi Steam Technology, you can use steam on most
UFYUJMFTUPHJWFHSFBUSFTVMUT:PVIBWFUIFDIPJDFCFUXFFOQSFTFUTFUUJOHT%JòVTF
Caresse, Profound Care and Precise Power. Each setting will adapt the humidity,
QPXFSBOEEJSFDUJPOPGUIFTUFBNøPXTPZPVDBOBEBQUUIFTUFBNøPXUPTVJUUIF
garment giving outstanding results.
Fig. 10: Steam Trigger Lock Graphic
/#
During use, you may hear noise coming from your steam generator. This is normal. It
TJHOJöFTUIBUBQVNQJTJOKFDUJOHXBUFSJOUPUIFCPJMFS*EFBMMZBWPJEVTJOHUIFTUFBN
trigger at this precise moment to avoid a fall in pressure.
Chapter 3.3 - How to Choose the Correct Soleplate
Temperature and Steam?
Ironspeed_SF__1-12_union.indd 7 19-10-2009 17:57:53

8 -
GB
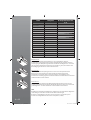
Textile Steam Type Soleplate T°C
8SJOLMFE5FYUJMFT Precise Power ttt.BY
Tricky Zone Precise Power ttttt
Jeans Profound Care .BY
Cotton Profound Care ttt
Linen Profound Care .BY
Starched Clothes Profound Care ttt
Velvet/Alcantara Profound Care tt
Wool Profound Care tt
Silk Diuse Caresse tt
Cashmere Diuse Caresse tt
Rayon Diuse Caresse tt
Polyester /P t
/ZMPO /P t
Acrylic /P t
Lycra /P t
Polyamid /P t
Diuse Caresse
5IJTTUFBNøPXJTEFEJDBUFEUPJSPOXJUIHSFBUDBSFUIFNPTUEFMJDBUFUFYUJMFTMJLFTJML
BOEDBTINFSFXJUIBTPGUBOEEFMJDBUFøPX"SFEVDFETUFBNøPXJTTQSFBEDBSFGVMMZ
JOGSPOUPGUIFJSPOPOBMBSHFQBSUPGUFYUJMF'JCSFTBSFCFUUFSMPPTFOFEJOPSEFSUP
take away delicately and faster all the creases.
Help
When steam ironing clothes on which shiny patches may occur, we recommend you to
set the soleplate temperature to a lower temperature or iron the garment on the reverse.
4UBSUXJUIUIFGBCSJDTUIBUOFFEFEUPCFJSPOFEBUBMPXFSUFNQFSBUVSFtBOEöOJTIXJUI
UIPTFUIBUOFFEFEUPCFJSPOFEBUUIFIJHIFSUFNQFSBUVSFttt.BY
Precise Power
5IFøPXJTEJSFDUFEUPXBSETUIFUJQ*UQFSNJUTUPBDDFTTUIFNPTUEJóDVMU[POFT
MJLFCVUUPOTTMFFWFTBOEMPPQTUISPVHIUIFDPODFOUSBUFEøPXJOUIFUJQBOEPòFST
BDPOTUBOUDPODFOUSBUFEBOEQPXFSGVMTQSPVU%JóDVMU[POFTBSFCFUUFSIVNJEJöFE
and hence creases removed faster.
Profound Care
5IJTWFSUJDBMTUFBNøPXBMMPXTSFNPWJOHNPSFFBTJMZBOERVJDLMZUIFXSJOLMFTPOBMM
UFYUJMFTXJUIBTUSPOHBOEIVNJEKFU4UFBNJNQSFHOBUFTCFUUFSUIFöCSFTBOEUIF
MBSHFTPMFQMBUFESJFTUIFUFYUJMF8SJOLMFTBSFUIFSFGPSFSFNPWFEGBTUFS
Ironspeed_SF__1-12_union.indd 8 19-10-2009 17:57:54

9 -
GB
Set the soleplate temperature to the max temperature and set the Multi Steam
Technology selector (12) to the Profound care program.
Hang curtains and clothes (jackets, suits, coats). Hold the iron in vertical position at a
short distance of the fabric to avoid burning it. Press the steam trigger (11) to steam
iron moving it from top to bottom.
Warning: Do not direct the steam jet towards people or animals.
When the water tank is empty, the “Empty water tank” light (1b) will switch on. No
the water tank with the help of a bottle of water without exceeding the max mark
level.
Please refer to chapter 2.2 for more detailed instructions.
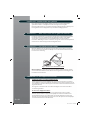
Chapter 3.4 - Vertical Steam Ironing
To prevent any risk of burns, all maintenance and cleaning operations should only be
carried out when the unplugged appliance has cooled down for at least 2 hours.
Chapter 4: Maintenance and Cleaning
Do not use any detergent or descaling products for cleaning the soleplate. Regularly
clean it with a humid and non-metallic pad.
Empty the water tank after each use before storing it.
To clean the plastic parts of the stand, please use soft clothes.
Chapter 4.1 - Cleaning the Appliance
In order to maximise the life of your appliance, you should rinse the boiler every 2
months to avoid scale deposit in the boiler.
Before proceeding, be sure that the appliance is cooled down and unplugged for at
least 2 hours.
the calc removal cap (15). Unscrew the boiler rinse safety cap anti-clockwise with
a coin and remove it. Fill the boiler with 0,2 liters of tap water using a funnel and a
in the sink. We recommend repeating this operation twice. Screw the boiler rinse
safety cap with a coin and put back the calc removal cap (15).
Chapter 4.2 - Rinsing the Boiler for Scale Maintenance
Ironspeed_SF__1-12_union.indd 9 19-10-2009 17:57:55

10 -
GB
Fig. 11: Cleaning Operation
In any case, do not use any descaling products to clean or rinse the boiler.
Chapter 4.3 - Storage
Put the iron on the heat-resistant iron resting mat (3). Wait at least 30 minutes allowing
the soleplate and the generator to cool down.
Lock the iron with the iron lock system (2). Please report to the dedicated chapter 1.2
for further instructions.
Store both steam and electrical cables in the cord storage feature (5).
Fig. 12: Cord Storage
Then you can take away your appliance in order to store it safely and easily.
Ironspeed_SF__1-12_union.indd 10 19-10-2009 17:57:55
C
M
Y
CM
MY
CY
CMY
K
48001377 -1 - Ironspeed SF - User Manual.pdf 11/03/2010 11:01:35

11 -
GB
Troubleshooting
Problem Cause Solution
The appliance does not
become hot
There is a connection
problem
Check the mains cord, the
plug and the wall socket
The appliance is not
switched on
Press on the on/o switch
The soleplate temperature
is too low
Set a higher temperature
of the soleplate
The appliance does not
produce steam
The appliance is not
switched on
Press on the on/o switch
The boiler has not yet
heated up
Wait a few moments until
the steam ready LED is o
The water tank may be
empty
Rell the water tank
You are not pressing the
steam trigger
Press the steam trigger
The soleplate temperature
JTTFUUPUIFNBYJNVN
It works but steam is not
visible as very hot and dry.
Steam escapes from the
calc removal cap when
ironing
The calc removal valve is
not tightened enough
Switch o the appliance
and let it cool down.
Remove the calc removal
cap and tighten the valve
correctly
The anti-scale valve is
damaged
Contact your after sales
service
The empty water tank
LED is on
There is no more water in
the tank
Rell the water tank with
water
The soleplates becomes
dirty or brown
There should be chemical or
additives in the water used
for ironing
/FWFSVTFBOZDIFNJDBMPS
additives in the water.
Contact your after sales
service if the linen is still
dirty
The linen is still dirty Clean the soleplate with a
non-metallic sponge
Water stripes appear on
UIFUFYUJMF
Your ironing board cover is
saturated in water
Change the cover or use a
mesh ironing board
Some scale deposit
appears on the soleplate
Your boiler has not been
rinsed for a while
Follow the indications in
the appropriate chapter
Ironspeed_SF__1-12_union.indd 11 19-10-2009 17:57:56

12 -
GB
Important Information
Hoover spares and Consumables
Always replace parts with genuine Hoover spares. These are available from your local
Hoover dealer or direct from Hoover. When ordering spare parts, always check your
model number.
Hoover Service
4IPVMEZPVSFRVJSFTFSWJDFBUBOZUJNFQMFBTFDPOUBDUZPVSMPDBM)PPWFS4FSWJDF0óDF
Please see all the contact details below.
Safety
Hoo ver believes that independent approval is the best way of demonstrating safety
in design and manufacture. “Istituto del Marchio di Qualità” (IMQ) ), the independent
italian national authority for the safety of domestic electrical appliances, ensures that
Euro pean safety standards are met and maintained throughout the production life of
an appli ance. All appliances that pass the requirements are permitted to carry the IMQ
mark of safety.
Quality
ISO 9001
Hoover’s factories have been independently assessed for quality. Our products are
made using a quality system which meets the requirements of ISO 9001
The Environment
This appliance is marked according to the European Directive 2002/96/EC on Waste
Electrical and Electronic Equipment (WEEE).
By ensuring this product is disposed of correctly you will help prevent potential
negative consequences for the environment and human health, which could
otherwise be caused by inappropriate waste handling of this product.
The symbol on the product indicates that this product may not be treated as
household waste. Instead it shall be handed over to the appliance collection point for
recycling of electrical and electronic equipment.
Disposal must be carried out in accordance with the local environmental regulations
for waste disposal.
For more detailed information about treatment, recovery and recycling of this product,
QMFBTFDPOUBDUZPVSMPDBMDJUZPóDFZPVSIPVTFIPMEXBTUFEJTQPTBMTFSWJDFPSUIFTIPQ
where you purchased the product.
Your Guarantee
The guarantee conditions for this appliance are as dened by our representative in the
country in which it is sold. Details regarding these conditions can be obtained from
the dealer from whom the appliance was purchased. The bill of sale or receipt must be
produced when making any claim under the terms of this guarantee.
4VCKFDUUPDIBOHFXJUIPVUOPUJDF
Ironspeed_SF__1-12_union.indd 12 19-10-2009 17:57:56

13 -13 -
FR
Description
1 Panneau de commande
2 Système de blocage du fer
3 Tapis support
4 Couvercle du réservoir d’eau
5 3BOHFNFOUQPVSøFYJCMFFU
cordon
6 'MFYJCMFEBMJNFOUBUJPO
7 Cordon
g. 1: Description de la base et du réservoir
10 Température de la semelle
11 Déclencheur de vapeur
12 Sélecteur Multi Steam
Technology
13 Cadran indicateur de
température
14 Protections pour le
positionnement vertical
15 Bouton de nettoyage du
calcaire
g. 2: Description du fer domestique
4
10
11
12
13
15
g. 3: Description du fer professionnel
1
2
3
4
5
7
6
4
10
11
12
13
14
15
Français
Ironspeed_SF__1-12_union.indd 13 19-10-2009 17:57:56

14 -
FR
1B
1A
1C
1 A Bouton de Marche/Arrêt.
1B Témoin de réservoir vide
1C Témoin de vapeur prête
g. 4: Panneau de commande du fer domestique
1D Bouton de Marche/Arrêt du fer
1 E Bouton de Marche/Arrêt de de la
chaudière
g. 5: Panneau de commande du fer professionnel
1B
1D
1C
1E
Ironspeed_SF__1-12_union.indd 14 19-10-2009 17:57:57

15 -
FR
Introduction
Cher Client,
/PVTTPVIBJUPOTUPVUEBCPSEWPVTSFNFSJDFSEBWPJSBDIFUÏVOFDFOUSBMFWBQFVS
Hoover et d’avoir fait conance à la marque Hoover. Cet appareil a été fabriqué
DPOGPSNÏNFOUBVYOPSNFTMFTQMVTÏMFWÏFT4JMFTUVUJMJTÏDPSSFDUFNFOUWPUSF
système de repassage Hoover vous assurera des années de repassage rapide et sans
problème.
Avant d’utiliser votre nouvel appareil Hoover, prenez le temps de lire attentivement
ce manuel. Si vous avez besoin d’informations supplémentaires ou si vous rencontrez
des problèmes non traités dans ce manuel, veuillez contacter votre revendeur local.
Instructions importantes de sécurité
Veuillez lire attentivement ce manuel d’utilisation avant d’utiliser le fer pour la
première fois et gardez-le pour pouvoir le consulter à d’autres occasions..
t$FQSPEVJUBÏUÏDPOÎVVOJRVFNFOUQPVSMVTBHFEPNFTUJRVF&ODBTEVTBHF
commercial, d’utilisation inappropriée ou de non respect des instructions, le
fabricant décline toute responsabilité et la garantie sera invalidée.
t"WBOUEFCSBODIFSMBQQBSFJMWÏSJöF[RVFMBUFOTJPOEVDPVSBOUFTUMBNÐNFRVF
celle indiquée sur l’appareil et que la prise est connectée à la terre.
t"WBOUDIBRVFVUJMJTBUJPOWÏSJöF[RVFMFDPSEPOÏMFDUSJRVFPVUPVUFBVUSFQJÒDF
importante n’est pas endommagé(e).
t$FUBQQBSFJMOFEPJUQBTÐUSFVUJMJTÏQBSEFTFOGBOUTPVEFTQFSTPOOFTBZBOUEFT
capacités physiques, sensorielles ou mentales réduites, à moins que leur sécurité
soit adéquatement assurée par un adulte lors de l’utilisation.
t4VSWFJMMF[RVFMFTFOGBOUTOFKPVFOUQBTBWFDMBQQBSFJM
t-FGFSEPJUÐUSFVUJMJTÏFUQPTÏTVSVOFTVSGBDFQMBUFFUTUBCMF2VBOEWPVTSFQMBDF[
le fer sur son support, assurez-vous que la surface de pose est stable.
t/FEJSJHF[KBNBJTMFKFUEFWBQFVSWFSTEFTQFSTPOOFTPVEFTBOJNBVY/FEJSJHF[
KBNBJTMFKFUEFWBQFVSWFSTEBVUSFTBQQBSFJMTÏMFDUSJRVFTPVÏMFDUSPOJRVFT
t/VUJMJTF[QBTMBQQBSFJMTJMFTUUPNCÏPVTJMQSÏTFOUFEFTEPNNBHFT
dysfonctionnements ou fuites. Pour éviter tout danger, veuillez faire vérier
l’appareil par un centre de service agréé.
t"WBOUUPVUFJOUFSWFOUJPOEFOUSFUJFOWÏSJöF[UPVKPVSTRVFMBQQBSFJMFTUÏUFJOU
débranché et a refroidi.
t/FMBJTTF[KBNBJTMBQQBSFJMTBOTTVSWFJMMBODFRVBOEJMFTUCSBODIÏFUOBQBT
encore refroidi.
t/FEÏCSBODIF[QBTMBQQBSFJMFOUJSBOUTVSMFDPSEPOPVTVSMBQQBSFJM
t/JNNFSHF[KBNBJTMFGFSMFTVQQPSUMFDÉCMFPVMFTöDIFTEBOTMFBV/FMFT
NFUUF[KBNBJTTPVTMFSPCJOFU
t-BTFNFMMFEVGFSQFVUEFWFOJSFYUSÐNFNFOUDIBVEFFUQSPWPRVFSEFTCSßMVSFT
FODBTEFDPOUBDU/FUPVDIF[KBNBJTMFTDPSEPOTÏMFDUSJRVFTBWFDMBTFNFMMF
t4JMFDPSEPOEBMJNFOUBUJPOFTUFOEPNNBHÏJMEPJUÐUSFSFNQMBDÏQBSMFGBCSJDBOU
le service après-vente ou d’autres personnes qualiées pour éviter tout danger.
Ironspeed_SF__1-12_union.indd 15 19-10-2009 17:57:58

16 -
FR
Chapitre 1.1 - Panneau de commande
Bouton de Marche/Arrêt (1a): Un témoin s’allume sur le commutateur pour indiquer
que l’appareil est allumé. (Concerne les modèles de fers pour usage domestique
uniquement)
Fer allumé/éteint (1d): Quand ce bouton est allumé, la semelle commence à
chauer. Conseillé pour le repassage à sec. (uniquement avec un fer professionnel)
Chaudière allumée/éteinte (1e): Quand ce bouton est allumé, le bouilleur
DPNNFODFËDIBVòFS/PUF[RVFMFDPNNVUBUFVSEVGFSEEPJUÐUSFBMMVNÏQPVS
que le bouilleur chaue. (uniquement avec un fer professionnel)
Chapitre 1.2 - Système de blocage
Pour faciliter le transport et le rangement de votre système de repassage, l’appareil
comprend un système de blocage (2). Ce système bloque le fer sur le support
supérieur. Cela facilite le déplacement et le rangement de l’appareil. Suivez les
instructions ci-dessous pour bloquer le fer sur le tapis support (3).
g. 5: Système de blocage du fer domestique
g. 7: Système de blocage du fer professionnel
Pour le débloquer, suivez les instructions ci-dessus en sens inverse.
Mise en garde: /FQPSUF[QBTWPUSFBQQBSFJMFOMFUFOBOUQBSMFGFS
Le témoin de réservoir vide (1b) est allumé : il n’y a plus d’eau dans le réservoir.
Remplissez le réservoir en suivant les instructions du chapitre 2.2.
Quand l’appareil est allumé et que le témoin de vapeur prête (1c) est éteint, la
vapeur est prête à l’emploi. Vous pouvez appuyer sur le déclencheur an de faire
sortir de la vapeur sous la semelle. Remarque : le témoin de vapeur s’allume
pendant l’utilisation du fer, mais vous pouvez continuer à repasser à la vapeur.
Ironspeed_SF__1-12_union.indd 16 19-10-2009 17:57:59

17 -
FR
Chapitre 2: Préparation à l’emploi
Étant donné la sortie puissante de vapeur, Hoover conseille d’utiliser une planche à
repasser active, avec fonctions de souerie et d’aspiration permettant l’évacuation
EFMBWBQFVSFOFYDÒT
1MBDF[MBDFOUSBMFWBQFVSTVSVOFTVSGBDFTUBCMFFUQMBOFQBSFYFNQMFTVSMBQBSUJF
dure d’une planche à repasser ou une surface résistante à la chaleur.
Chapitre 2.1 - Quel type d’eau peut être utilisé ?
-FTZTUÒNFEFSFQBTTBHF)PPWFSBÏUÏDPOÎVQPVSÐUSFVUJMJTÏBWFDEFMFBVEV
robinet. Il n’est pas nécessaire d’utiliser de l’eau distillée ou pure. Cependant, si
WPVTWJWF[EBOTVOFSÏHJPOPáMFBVFTUUSÒTEVSFWPVTQPVWF[NÏMBOHFS
EFBVEJTUJMMÏFFUEFBVEVSPCJOFU/VUJMJTF[QBTEBVUSFTUZQFTEFBVFU
OBKPVUF[BVDVOBVUSFÏMÏNFOUEBOTMFSÏTFSWPJSËFBVBNPWJCMFDBSDFMBSJTRVFSBJU
d’endommager l’appareil.
Chapitre 2.2 - Remplissage du réservoir d’eau
Ouvrez le couvercle du réservoir d’eau (4) pour pouvoir accéder au réservoir.
Remplissez d’eau du robinet à l’aide d’une bouteille, d’un pichet ou autre récipient
BWFDCFDWFSTFVS/FEÏQBTTF[QBTMFSFQÒSFEFOJWFBVNBYJNVN
g. 8: Remplissage du réservoir d’eau
Mise en garde:/BKPVUF[QBTEFWJOBJHSFEFBVDIBVEFEFQBSGVNPVUPVUBVUSF
agent chimique ou autre dans le réservoir à eau. Cela risquerait d’endommager le
générateur de vapeur et d’écourter sa durée de vie.
Chapitre 2.3 - Mise sous tension de l’appareil
Modèles de fers domestiques:
Branchez l’appareil à l’aide du cordon d’alimentation à une prise mise à la terre, puis
allumez l’appareil. Appuyez sur le bouton de Marche/Arrêt. Le témoin (1a) s’allume
pour vous indiquer que l’appareil fonctionne et que la chaudière est en train de
chauer.
"QSÒTEFVYNJOVUFTFOWJSPOMFUÏNPJOEFWBQFVSQSÐUFTÏUFJOUFUWPVTQPVWF[
commencer à utiliser la vapeur.
Modèles de fers à repasser professionnels:
Branchez l’appareil à l’aide du cordon à une prise mise à la terre. Appuyez sur
le bouton de Marche/Arrêt (1d) du fer et sur le bouton de Marche/Arrêt de la
DIBVEJÒSFF-FTUÏNPJOTEFTEFVYCPVUPOTEPJWFOUTBMMVNFSQPVSWPVTJOGPSNFS
que l’appareil fonctionne et que la semelle du fer et la chaudière sont en train de
chauer.
Ironspeed_SF__1-12_union.indd 17 19-10-2009 17:58:00

18 -
FR
Sélectionnez la température de la semelle en tournant le cadran (10) du fer à
la position souhaitée. Attendez quelques instants jusqu’à ce que l’indicateur
de température (13) s’éteigne, vous indiquant ainsi que la semelle a atteint la
température demandée.
Pendant le repassage, l’indicateur de température peut s’allumer et s’éteindre, ce
qui indique un réglage de la température, mais il n’est pas nécessaire d’interrompre
le repassage.
Aide
Consultez l’étiquette de lavage du vêtement pour sélectionner la température la mieux
adaptée à chaque tissu. Notez que le témoin de température s’allume de temps en temps
toujours la température de la semelle en fonction du tissu le plus délicat.
Si la température est trop basse, il est possible que quelques gouttes d’eau s’échappent
de la semelle. Réglez la température au-dessus des deux pPJOUTttpour éviter ce
problème.
Chapitre 3: Utilisation de la centrale vapeur
N.B.
Lors de la première utilisation de l’appareil, il est possible que le fer fume et qu’une
odeur forte soit produite. Cela est parfaitement normal et disparaîtra rapidement.
Chapitre 3.2 - Repassage
Repassage à sec
Modèles de fers domestiques:
Sélectionnez la température de la semelle en suivant les indications du Chapitre
3.1. Quand la semelle atteint la température requise, commencez à repasser sans
appuyer sur le déclencheur de vapeur (11).
Modèles de fers à repasser professionnels:
Allumez uniquement le commutateur du fer (1d). Sélectionnez la température de la
semelle en suivant les instructions du chapitre 3.1. Commencez à repasser quand la
semelle atteint la température appropriée.
Repassage à vapeur
Sélectionnez la température de la semelle en suivant les instructions du chapitre
3.1. Sur le support, le témoin (1d) s’éteint quand la fonction vapeur est prête. Dès
ce moment, vous pouvez commencer à repasser et appuyer sur le déclencheur de
vapeur (11). Le débit de vapeur s’arrête quand vous relâchez le déclencheur.
Vous pouvez régler le débit à l’aide du sélecteur Multi Steam Technology (12). Pour
obtenir de plus amples informations à ce sujet, ainsi que des résultats optimaux,
consultez le chapitre 3.3.
Ironspeed_SF__1-12_union.indd 18 19-10-2009 17:58:00
C
M
Y
CM
MY
CY
CMY
K
48001377 -1 - Ironspeed SF - User Manual.pdf 11/03/2010 10:54:03
La pagina sta caricando ...
La pagina sta caricando ...
La pagina sta caricando ...
La pagina sta caricando ...
La pagina sta caricando ...
La pagina sta caricando ...
La pagina sta caricando ...
La pagina sta caricando ...
La pagina sta caricando ...
La pagina sta caricando ...
La pagina sta caricando ...
La pagina sta caricando ...
La pagina sta caricando ...
La pagina sta caricando ...
La pagina sta caricando ...
La pagina sta caricando ...
La pagina sta caricando ...
La pagina sta caricando ...
La pagina sta caricando ...
La pagina sta caricando ...
La pagina sta caricando ...
La pagina sta caricando ...
La pagina sta caricando ...
La pagina sta caricando ...
La pagina sta caricando ...
La pagina sta caricando ...
La pagina sta caricando ...
La pagina sta caricando ...
La pagina sta caricando ...
La pagina sta caricando ...
La pagina sta caricando ...
La pagina sta caricando ...
La pagina sta caricando ...
La pagina sta caricando ...
La pagina sta caricando ...
La pagina sta caricando ...
La pagina sta caricando ...
La pagina sta caricando ...
La pagina sta caricando ...
La pagina sta caricando ...
La pagina sta caricando ...
La pagina sta caricando ...
La pagina sta caricando ...
La pagina sta caricando ...
La pagina sta caricando ...
La pagina sta caricando ...
La pagina sta caricando ...
La pagina sta caricando ...
La pagina sta caricando ...
La pagina sta caricando ...
La pagina sta caricando ...
La pagina sta caricando ...
La pagina sta caricando ...
La pagina sta caricando ...
La pagina sta caricando ...
La pagina sta caricando ...
La pagina sta caricando ...
La pagina sta caricando ...
La pagina sta caricando ...
La pagina sta caricando ...
La pagina sta caricando ...
La pagina sta caricando ...
La pagina sta caricando ...
La pagina sta caricando ...
La pagina sta caricando ...
La pagina sta caricando ...
La pagina sta caricando ...
La pagina sta caricando ...
La pagina sta caricando ...
La pagina sta caricando ...
La pagina sta caricando ...
La pagina sta caricando ...
La pagina sta caricando ...
La pagina sta caricando ...
La pagina sta caricando ...
La pagina sta caricando ...
La pagina sta caricando ...
La pagina sta caricando ...
La pagina sta caricando ...
-
 1
1
-
 2
2
-
 3
3
-
 4
4
-
 5
5
-
 6
6
-
 7
7
-
 8
8
-
 9
9
-
 10
10
-
 11
11
-
 12
12
-
 13
13
-
 14
14
-
 15
15
-
 16
16
-
 17
17
-
 18
18
-
 19
19
-
 20
20
-
 21
21
-
 22
22
-
 23
23
-
 24
24
-
 25
25
-
 26
26
-
 27
27
-
 28
28
-
 29
29
-
 30
30
-
 31
31
-
 32
32
-
 33
33
-
 34
34
-
 35
35
-
 36
36
-
 37
37
-
 38
38
-
 39
39
-
 40
40
-
 41
41
-
 42
42
-
 43
43
-
 44
44
-
 45
45
-
 46
46
-
 47
47
-
 48
48
-
 49
49
-
 50
50
-
 51
51
-
 52
52
-
 53
53
-
 54
54
-
 55
55
-
 56
56
-
 57
57
-
 58
58
-
 59
59
-
 60
60
-
 61
61
-
 62
62
-
 63
63
-
 64
64
-
 65
65
-
 66
66
-
 67
67
-
 68
68
-
 69
69
-
 70
70
-
 71
71
-
 72
72
-
 73
73
-
 74
74
-
 75
75
-
 76
76
-
 77
77
-
 78
78
-
 79
79
-
 80
80
-
 81
81
-
 82
82
-
 83
83
-
 84
84
-
 85
85
-
 86
86
-
 87
87
-
 88
88
-
 89
89
-
 90
90
-
 91
91
-
 92
92
-
 93
93
-
 94
94
-
 95
95
-
 96
96
-
 97
97
-
 98
98
-
 99
99


Hoover IronSpeed SFD4101/1 Manuale utente
- Categoria
- Stazioni di stiratura a vapore
- Tipo
- Manuale utente
Documenti correlati
-
Hoover PRB2500 011 Manuale utente
-
Hoover PRP2400 011 Manuale utente
-
Hoover PMP2400 011 Manuale utente
-
-
-
-
Hoover VAPORLITE PRO Manuale del proprietario
-
-
Altri documenti
-
DeLonghi VVX 1660 Manuale del proprietario
-
DeLonghi VVX 1640 Manuale del proprietario
-
Toyotomi TD-C300 Istruzioni per l'uso
-
Peavey XR 1212 Manuale utente
-
-
Korona 73917 Manuale del proprietario
-
Krups YY1800FD Manuale del proprietario
-
Rotel 9461 Manuale utente
-
AEG DBS7135-U Manuale utente
-
DeLonghi Stirella VVX1570 Manuale utente