
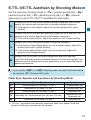
Advanced User Guide
E

2
Introduction
To avoid shooting problems and accidents, rst read the “Safety
Instructions” (pages 8-9). Also, read this manual carefully to
ensure that you use the product correctly.
Read This Instruction Manual while also Referring to Your
Camera’s Instruction Manual
Before using the product, read this Instruction Manual and your
camera’s Instruction Manual to familiarize yourself with their operations.
Be sure to store this manual safely, too, so that you can refer to it again
when necessary.
* Explanations in this manual are based on use with an EOS DIGITAL
camera.
Using with an EOS Film Camera
Autoash photography is possible in conjunction with EOS lm
cameras equipped with an E-TTL II/E-TTL autoash metering system.
Note that autoash photography is not possible with EOS lm cameras
equipped with a TTL autoash metering system.

3
1
2
3
4
5
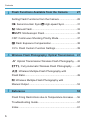
Chapters
Introduction
2
Getting Started and Basic Operations
11
Preparing for ash photography and basic ash photography
Flash Functions
21
Setting ash functions
Flash Functions Available from the Camera
27
Setting ash functions from the camera
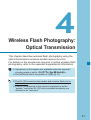
Wireless Flash Photography: Optical Transmission
41
Wireless ash photography using optical transmission
Reference
55
Common ash questions

4
Conventions Used in this Manual
Icons in this Manual
(p.**) : Reference page numbers for more information.
: Warning to prevent shooting problems.
: Supplemental information.
Basic Assumptions
z
The operation procedures assume that the Speedlite is attached to
the camera and that both are turned on.
z
The icons used for buttons, dials, and symbols in the text match the
icons found on the Speedlite and the camera.
z
The operation procedures assume that the Custom Functions of the
Speedlite, and the menu and Custom Functions of the camera are at
their default settings.
z
All gures such as the ash counts are based on the use of two AA/
LR6 alkaline batteries and Canon’s testing standards.

5
Contents
Introduction 2
Chapters ..............................................................................3
Conventions Used in this Manual ........................................4
Index to Features .................................................................7
Safety Instructions ...............................................................8
Nomenclature.....................................................................10
1
Getting Started and Basic Operations 11
Installing the Batteries........................................................12
Attaching and Detaching the Speedlite to and from the
Camera ..............................................................................14
Switching Flash Coverage .................................................15
Turning on the Power .........................................................16
a
:
Fully Automatic Flash Photograph
y .......................18
E-TTL II/E-TTL Autoash by Shooting Mode .....................19
2
Flash Functions 21
Bounce ...............................................................................22
Modeling Flash...................................................................23
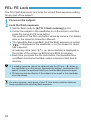
FEL: FE Lock .....................................................................24
Other Functions .................................................................25

6
Contents
3
Flash Functions Available from the Camera 27
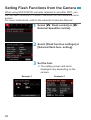
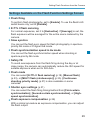
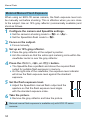
Setting Flash Functions from the Camera .........................28
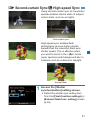
r
Second-curtain Sync/
c
High-speed Sync ..................31
a
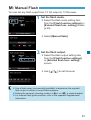
: Manual Flash ...............................................................33
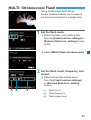
MULTI
:
Stroboscopic Flash ..............................................35
CSP: Continuous Shooting Priority Mode ..........................37
f
Flash Exposure Compensation ....................................38
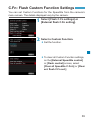
C.Fn: Flash Custom Function Settings ..............................39
4
Wireless Flash Photography: Optical Transmission
41
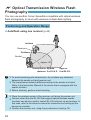
:
Optical Transmission Wireless Flash Photography ....42
a
: Fully Automatic Wireless Flash Photography .......44
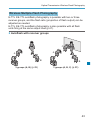
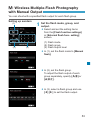
5
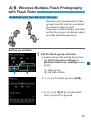
:
Wireless Multiple-Flash Photography with
Flash Ratio .........................................................................49
q
: Wireless Multiple-Flash Photography with
Manual Output ...................................................................53
5
Reference 55
Flash Firing Restrictions due to Temperature Increase .....56
Troubleshooting Guide .......................................................57
Index ..................................................................................61

7
Index to Features
Power Source
z
Batteries
è
p.12
z
Firing interval/count
è
p.11
z
Power ON/OFF
è
p.16
z
Flash ready
è
p.16
z
Auto power o
è
p.25
Operations
z
Attaching and detaching the
Speedlite
è
p.14
Normal Flash Photography
z
E-TTL autoash
è
p.18
z
Autoash by shooting
mode
è
p.19
z
Manual ash
è
p.33
z
Metered manual ash
è
p.34
z
TTL autoash
è
p.2
Functions
z
Flash exposure
compensation
è
p.38
z
FE lock
è
p.24
z
High-speed sync
è
p.31
z
Second-curtain sync
è
p.31
z
Modeling ash
è
p.23
z
AF-assist beam
è
p.25
z
Flash coverage
è
p.15
z
Clearing settings
(Reverting to defaults)
è
p.39
z
Flash function settings
è
p.21
z
Flash ring restriction
è
p.56
z
Bounce ash
photography
è
p.22
z
Continuous shooting
priority mode
è
p.37
Optical Transmission
Wireless Flash Photography
z
E-TTL autoash
è
p.44
Customization
z
Custom Functions
(C.Fn)
è
p.40
z
Clear all
è
p.39

8
Safety Instructions
Be sure to read these instructions in order to operate the product
safely.
Follow these instructions to prevent injury or harm to the operator of
the product or others.
WARNING
Denotes the risk of serious injury or death.
o
Useonlypowersourcesspeciedinthisinstructionmanualforusewiththe
product.
o
Do not disassemble or modify the product.
o
Do not expose the product to strong shocks or vibration.
o
Do not touch any exposed internal parts.
o
Stop using the product in any case of unusual circumstances such as the
presence of smoke or a strange smell.
o
Do not use organic solvents such as alcohol, benzine or paint thinner to clean
the product.
o
Do not get the product wet. Do not insert foreign objects or liquids into the
product.
o
Donotusetheproductwhereammablegasesmaybepresent.
Thismaycauseelectricshock,explosionorre.
o
Observe the following instructions when using commercially available batteries
or provided battery packs.
• Usebatteries/batterypacksonlywiththeirspeciedproduct.
• Donotheatbatteriesorexposethemtore.
• Do not charge batteries/battery packs using non-authorized battery chargers.
• Do not expose the terminals to dirt or let them come into contact with metallic
pins or other metal objects.
• Do not use leaking batteries/battery packs.
• When disposing of batteries/battery packs, insulate the terminals with tape or
other means.
Thismaycauseelectricshock,explosionorre.
If a battery/battery pack leaks and the material contacts your skin or clothing,
ushtheexposedareathoroughlywithrunningwater.Incaseofeyecontact,
ushthoroughlywithcopiousamountsofcleanrunningwaterandseek
immediate medical assistance.
o
Do not allow the product to maintain contact with the same area of skin for
extended periods of time during use.
This may result in low-temperature contact burns, including skin redness and
blistering, even if the product does not feel hot. The use of a tripod or similar
equipment is recommended when using the product in hot places and for people
with circulation problems or less sensitive skin.

9
Safety Instructions
CAUTION
Denotes the risk of injury.
o
Donotretheashneartheeyes.
It may hurt the eyes.
o
Flashemitshightemperatureswhenred.Keepngers,anyotherpartofyour
body,andobjectsawayfromtheashunitwhiletakingpictures.
Thismaycauseburnsormalfunctionoftheash.
o
Do not leave the product in places exposed to extremely high or low
temperatures.
The product may become extremely hot/cold and cause burns or injury when
touched.
o
Do not touch any parts inside the product.
This may cause injury.

10
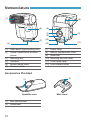
Nomenclature
(6)
(7)
(9)
(10)
(12)
(4)
(8)
(5)
(11)
(1)
(3)
(2)
(1) Flash head (Light-emitting unit)
(2) Optical transmission wireless
sensor
(3) Mounting foot
(4) Contacts
(5) Bounce angle index
(6) Channel switch
(7) Power lamp
(8) Battery compartment cover
(9) Mode dial
(10) Mounting foot lock lever
(11) Flash-ready lamp
(12) Lock-release button
Accessories Provided
(2)
(1)
Speedlite case Mini stand
(1) Mini stand pocket
(2) Attachment

1111
1
Getting Started and
Basic Operations
This chapter describes the preparations before starting ash
photography and the basic shooting operations.
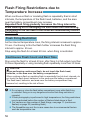
Cautions for ring continuous ash
o
To avoid wearing out and damaging the ash head due to
overheating, do not re the ash continuously at full output
more than 30 times. After ring the ash continuously at full
output this many times, stop using the ash for at least 40
min.
o
If you re the ash continuously at full output for the
above listed number of times, and then re the ash
again repeatedly at short intervals, the safety function
may activate and restrict ash ring. When ash ring is
restricted, the ring interval is automatically set to approx.
45 sec. Stop using the ash for at least 40 min.
o
For details, see “Flash Firing Restrictions due to
Temperature Increase” on page 56.

12
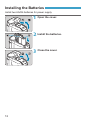
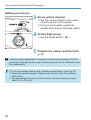
Installing the Batteries
Install two AA/R6 batteries for power supply.
1
Open the cover.
2
Install the batteries.
3
Close the cover.

13
Installing the Batteries
CAUTION
o
Do not use “AA/R6 lithium batteries”.
Note that certain AA/R6 lithium batteries may become extremely hot in
rare cases during use. Due to safety reasons, do not use “AA/R6 lithium
batteries”.
o
Do not use the Speedlite while touching the same part for a long
period of time.
Even if the product does not feel too hot, prolonged contact with the same
body part may cause skin redness or blistering due to low-temperature
contact burns. Using a tripod is recommended in very hot places or for
people with circulation problems or less sensitive skin.
Using AA/R6 batteries other than the alkaline type may cause contact
failure due to the irregular shape of the battery contacts.
o
Use a new set of two batteries of the same brand. When replacing the
batteries, replace both at the same time.
o
AA/HR6 Ni-MH batteries can also be used.
o
For details on the ash interval and ash count, refer to the separate
Supplemental Information.

14
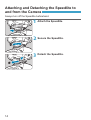
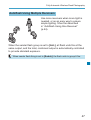
Attaching and Detaching the Speedlite to
and from the Camera
Always turn o the Speedlite beforehand.
1
Attach the Speedlite.
2
Secure the Speedlite.
3
Detach the Speedlite.

15
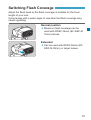
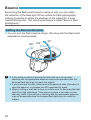
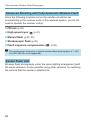
Switching Flash Coverage
Adjust the ash head so the ash coverage is suitable for the focal
length of your lens.
Using lenses with a wider angle of view than the ash coverage may
cause vignetting.
Normal position
z
Maximum ash coverage can be
used with RF/EF 24mm (EF-S/EF-M
15mm) lenses.
Extended
z
Can be used with RF/EF 50mm (EF-
S/EF-M 30mm) or larger lenses.

16
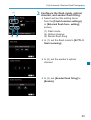
Turning on the Power
(1) (3)(2)
1
Set the Mode dial to <
a
> (1) or
<
K
> (2).
2
Check that the ash is ready.
z
The ash-ready lamp (3) is red when
the ash is fully charged.
z
Shooting is also possible while the
ash-ready lamp is blinking (using
Quick ash). Flash output will be 1/2
to 1/6 of full output.
Mode Dial
z
<
K
>
The ash res constantly as you shoot.
z
<
a
>
The ash res automatically as needed (depending on shooting
modes and conditions) when used with cameras that support auto
ash ring.
In [
A
] or [
d
] mode on the EOS R, the ash also turns on or o in
response to these operations with the camera power switch.
z
<
J
>
Turns the ash o.
z
<
[
.
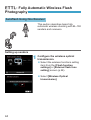
4
/
5
/
6
>
Set when using the ash as a receiver in optical wireless
ash photography. For details, see Chapter 4, “Wireless Flash
Photography: Optical Transmission.”

17
Turning on the Power
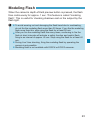
o
Leaving the Mode dial set to <
a
> when using cameras that support
auto ash ring may prevent full charging and ring during shooting,
depending on shooting conditions or the state of the battery.
o
Quick ash is not available under these conditions.
• Cameras that do not support E-TTL II/E-TTL
• Optical wireless ash photography
• Stroboscopic ash
• Manual ash photography with ash output outside the range 1/4 to
1/128
o
With the Mode dial set to <
a
>, aiming the ash head straight ahead is
recommended. Switch to suitable ash coverage for the lens’ angle of
view (p.15).
o
With cameras that do not support auto ash ring, the ash will always
re when you shoot with the Mode dial set to <
a
>.

18
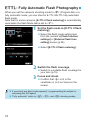
a
:
Fully Automatic Flash Photograph
y
When you set the camera’s shooting mode to <
d
> (Program AE) or a
fully automatic mode, you can shoot in E-TTL II/E-TTL fully automatic
ash mode.
Note that for some cameras, [E-TTL II ash metering] is automatically
used when the ash Mode dial is set to <
a
>.
1
Set the ash mode to [E-TTL II ash
metering].
z
Select the ash mode setting item
from the camera’s [Flash function
settings] or [External ash func.
setting] screen (p.28).
z
Select [E-TTL II ash metering].
2
Switch the ash coverage.
z
Switch to a suitable ash coverage for
your lens (p.15).
3
Focus and shoot.
z
Conrm that <
I
> is lit in the
viewnder or (in Live View) on the
screen.
o
If your shots are dark (underexposed), try approaching the subject or
increasing the ISO speed.
o
“Fully automatic” refers to <
A
>, <
1
>, and <
C
> shooting modes.

19
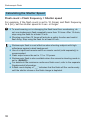
E-TTL II/E-TTL Autoflash by Shooting Mode
Set the camera’s shooting mode to <
s
> (shutter-priority AE), <
f
>
(aperture-priority AE), <
t
> (exible-priority AE), or <
a
> (manual
exposure) to use E-TTL II/E-TTL autoash for that mode.
s
Enables you to set the shutter speed manually. Based on your shutter
speed, the camera sets an aperture to provide standard exposure.
o
If the aperture value blinks, adjust the shutter speed until it stops
blinking.
f
Enables you to set the aperture manually. Based on your aperture, the
camera sets a shutter speed to provide standard exposure.
o
If the shutter speed blinks, adjust the aperture until it stops blinking.
t
Enables you to set the shutter speed or aperture manually.
o
If the aperture value blinks when you set a shutter speed, adjust the
shutter speed until it stops blinking.
o
If the shutter speed blinks when you set an aperture, adjust the
aperture until it stops blinking.
a
Enables you to set both the shutter speed and aperture manually.
Light from the ash provides standard exposure for the main subject, but
exposure for the background varies depending on your specied shutter
speed and aperture.
If you use the <
Z
> or <
Y
> shooting mode, the result will be the same
as using the <
d
> (Program AE) mode.
Flash Sync Speeds and Apertures by Shooting Mode
Shutter Speed Aperture
d
Automatically set (at least 1/X sec.) Automatically set
s
Manually set (at least 1/X sec.) Automatically set
f
Automatically set (at least 1/X sec.) Manually set
t
Manually set / Automatically set (at least 1/X sec.)
Automatically set /
Manually set
a
Manually set (at least 1/X sec.) Manually set
o
“1/X sec.” represents the camera’s maximum ash sync speed. Note that
minimum ash sync speeds vary by camera.

20
La pagina si sta caricando...
La pagina si sta caricando...
La pagina si sta caricando...
La pagina si sta caricando...
La pagina si sta caricando...
La pagina si sta caricando...
La pagina si sta caricando...
La pagina si sta caricando...
La pagina si sta caricando...
La pagina si sta caricando...
La pagina si sta caricando...
La pagina si sta caricando...
La pagina si sta caricando...
La pagina si sta caricando...
La pagina si sta caricando...
La pagina si sta caricando...
La pagina si sta caricando...
La pagina si sta caricando...
La pagina si sta caricando...
La pagina si sta caricando...
La pagina si sta caricando...
La pagina si sta caricando...
La pagina si sta caricando...
La pagina si sta caricando...
La pagina si sta caricando...
La pagina si sta caricando...
La pagina si sta caricando...
La pagina si sta caricando...
La pagina si sta caricando...
La pagina si sta caricando...
La pagina si sta caricando...
La pagina si sta caricando...
La pagina si sta caricando...
La pagina si sta caricando...
La pagina si sta caricando...
La pagina si sta caricando...
La pagina si sta caricando...
La pagina si sta caricando...
La pagina si sta caricando...
La pagina si sta caricando...
La pagina si sta caricando...
La pagina si sta caricando...
La pagina si sta caricando...
La pagina si sta caricando...
-
 1
1
-
 2
2
-
 3
3
-
 4
4
-
 5
5
-
 6
6
-
 7
7
-
 8
8
-
 9
9
-
 10
10
-
 11
11
-
 12
12
-
 13
13
-
 14
14
-
 15
15
-
 16
16
-
 17
17
-
 18
18
-
 19
19
-
 20
20
-
 21
21
-
 22
22
-
 23
23
-
 24
24
-
 25
25
-
 26
26
-
 27
27
-
 28
28
-
 29
29
-
 30
30
-
 31
31
-
 32
32
-
 33
33
-
 34
34
-
 35
35
-
 36
36
-
 37
37
-
 38
38
-
 39
39
-
 40
40
-
 41
41
-
 42
42
-
 43
43
-
 44
44
-
 45
45
-
 46
46
-
 47
47
-
 48
48
-
 49
49
-
 50
50
-
 51
51
-
 52
52
-
 53
53
-
 54
54
-
 55
55
-
 56
56
-
 57
57
-
 58
58
-
 59
59
-
 60
60
-
 61
61
-
 62
62
-
 63
63
-
 64
64


in altre lingue
- English: Canon Speedlite EL-100 User manual
Documenti correlati
Altri documenti
-
Sony HVL-F42AM Manuale del proprietario
-
Sony HVL-F56AM Manuale del proprietario
-
-
Sigma EF-610 DG SUPER - Manuale utente
-
Sony HVL-F36AM Manuale utente
-
-
-
-
Yamaha CSP-170 Guida d'installazione
-