
01
EN
H5 V4.1
STARTUP GUIDE
BAŞLANGIÇ REHBERİ
GUÍA DE INICIO
GUIDE DE DÉMARRAGE
GUIDA ALL’AVVIO
STARTUP-LEITFADEN

02
EN
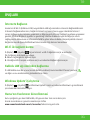
You can find the latest Huma support information.
When you need any help for using your Huma, visit our website first.
https://www.monsternotebook.com.tr/monster-cozum-merkezi/
Monster Notebook Support Website
Welcome to the Monster Notebook Family. Below is the startup guide we have prepared for
your new Huma.
• Startup Guide
Please read this guide first. You can find basic information, including connecting accessories
to your Huma, setting up Windows, and connecting your Huma to the Internet.
• Safety Guide/Recovery and Troubleshooting Guide
Please be sure to read this guide. You can find information that helps you use your
Huma safely, including troubleshooting FAQs as well as instructions on recovering your
Huma and creating recovery media.
• Features and apps mentioned in these startup guide may not be available or preinstalled,
depending on the model of your Huma.
• With the latest Windows updates applied to your Huma,
the operation procedures described in the startup guide may vary from the actual ones.
• The visual contents, such as illustrations, photos, and screenshots,
used in the manual may look different from what you actually see on your Huma.
Supplied Startup Guide
Notes

03
EN
Declaration of Conformity
Product bearing the CE marking comply with one or more of the following EU directives as
may be applicable.
- EMC Directive 2014/30/EU
- Low Voltage Directive 2014/35/EU
- Radio Equipment Directive 2014/53/EU
- RoHS Directive 2011/65/EU
- Eco Design Directive 2009/125/EC
- Commission Regulation ErP 617/2013/EU
Products with Radio Functionality (EMF)
This product incorporates a radio transmitting and receiving device.
For computers and notebook computers in normal use, a separation distance of 20 cm
ensures that radio frequency exposure levels comply with EU requirements.
Products designed to be operated at closer proximities, such as tablet computers,
comply with applicable EU requirements in typical operating positions.
Products can be operated without maintaining a separation distance unless otherwise
indicated in instructions specific to the product.
European Union Regulatory Notices

04
EN
CAUTION Hot surface
To avoid burn, do not use the computer on your lap for a long time.
• AC adapter
• Startup Guide
• Warranty Book
• Safety Guide/Recovery and Troubleshooting Guide
• USB drive containing the drivers
• Keep the shipping box of your Huma until you make sure that you have all the supplied
items. If you notice a missing or damaged product, before discarding the box contact our
support specialists via our website.
• The supplied accessories were tested and found functional solely with your Huma.
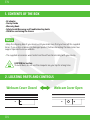
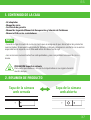
1. CONTENTS OF THE BOX
Notes
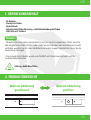
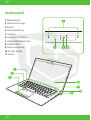
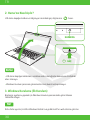
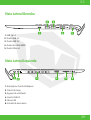
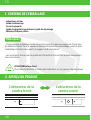
2. LOCATING PARTS AND CONTROLS
Webcam Cover Closed Webcam Cover Open

05
EN
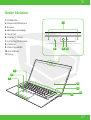
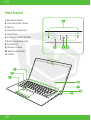
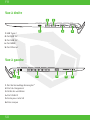
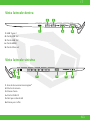
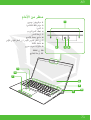
Frontal View
1
2 3 4
5
6
7
8
9
10
11
1. Dual microphones
2. Camera LED Indicator
3. Camera
4. Camera cover
5. Touch Pad
6. Fingerprint Scanner
7. Left/Right button
8. LCD screen
9. Stereo speakers
10. Power button
11. Keyboard

06
EN
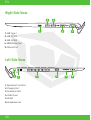
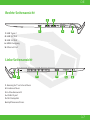
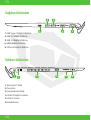
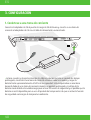
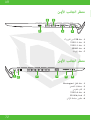
Right Side View
Left Side View
1 4 5
2 3
123 4 5 6
1. USB Type-C
2. USB 3.2 Port
3. USB 3.2 Port
4. HDMI Output port
5. Ethernet Port
1. Kensington® Lock Port
2. Charging Port
3. Air Exhaust Vent
4. USB 2.0 port
5. SD Slot
6. Headphone Jack

07
EN
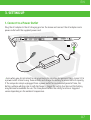
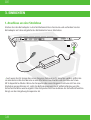
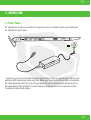
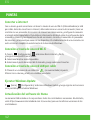
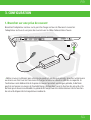
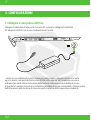
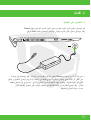
3. SETTING UP
Plug the AC adapter to the AC charging port on the Huma and connect the AC adapter and a
power outlet with the supplied power cord.
• Even when you do not intend to use your Huma for an extended period of time, connect it to
a power outlet at least every three months and charge the battery to around 50% of capacity.
If the computer is kept unplugged from a power outlet for an extended period of time, the
battery voltage will drop due to self-discharge to trigger the safety function and the battery
may become unavailable for use. The time period before the safety function is triggered
varies depending on the ambient temperature.
1. Connect to a Power Outlet

08
EN
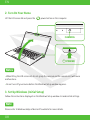
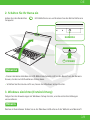
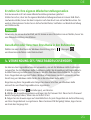
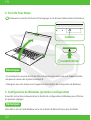
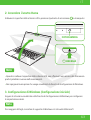
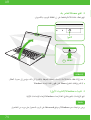
Follow the instructions displayed on the Windows Setup window to make initial settings.
Lift the LCD screen lid and press the power button on the computer.
• When lifting the LCD screen lid, do not grasp the area around the camera as it will cause
malfunctions.
• Do not turn off your Huma before the Windows Setup window appears.
Please refer to Windows Help or Microsoft’s website for more details.
3. Set Up Windows (Initial Setup)
2. Turn On Your Huma
Notes
Note
CAMERA
POWER

09
EN
TIPS
With your Huma, you can connect to the Internet either via a Wi-Fi {wireless LAN) or
wired LAN network. Before connecting to the Internet, you need to select a connection service,
make a contract with an Internet service provider accordingly, and make the Internet
connection settings on the computer. For detailed information on the Internet connection
settings and required network devices, refer to the manual from your service provider and
the manual that came with your device. Establishing a successful connection to the Internet
completes Windows license authentication.
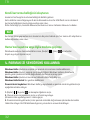
1. Select (start), (Settings), Network & Internet, and Wi-Fi, and then set Wi-Fi to On.
2. Select Show available networks.
3. Select the desired Wi-Fi access point, and then select Connect.
1. Plug one end of a LAN cable {not supplied) to the .
Ethernet port on your Huma and the other to your modem/router.
Connect to the Internet
Connecting via a Wi-Fi network
Connecting via a Wired LAN network
1. Select (start), (Settings), and Windows Update, and then follow the on-screen
instructions to update the Windows.
The USB drive included in the box contains all the drivers you need.
However, please visit https://www.monsternotebook.com.tr/suruculer/
for the latest versions of the drivers.
Running Windows Update
Updating Huma’s Software

10
EN
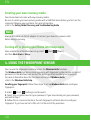
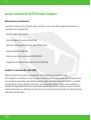
You can use the fingerprint sensor to access the Windows Hello functions.
The Windows Hello functions include signing in with fingerprint authentication instead of
password, to the Windows user account for which you have enrolled your fingerprint .
For more information about the functions and setup of Windows Hello,
refer to the Windows Hello help.
Enrolling your fingerprint Follow these steps to set up Windows Hello and enroll your
fingerprint.
1. Select (start), (Settings), and Accounts.
2. Select Sign-in options and set your password. If you have already set your password,
proceed to step 3.
3. Follow the on-screen instructions for each fingerprint authentication to enroll your
fingerprint. If you have not set a PIN, set it at the end of the procedure.
Your Huma does not come with any recovery media.
Be sure to create your own recovery media with a USB flash drive before you first use the
computer following your purchase. For more information,
refer to the Safety Guide/ Recovery and Troubleshooting Guide.
Upon completion of the Windows setup, select (start), (Power},
and then Shut down or Sleep.
Creating your own recovery media
Turning off or placing your Huma into Sleep mode
Always be sure to use the AC adapter to connect your Huma to a power outlet
before doing a recovery.
Note
4. USING THE FINGERPRINT SENSOR

11
EN
• The fingerprint authentication technology does not assure complete verification of personal
identity, nor do they guarantee absolute protection of your data and hardware.
Monster Notebook assumes no liabilities arising out of your use of or inability to use the
fingerprint sensor.
• The fingerprint recognition rate varies depending on your use of the fingerprint sensor.
They are not consistent among individuals as well.
• Keep the fingerprint sensor clean to prevent failures or malfunctions.
• Please be aware that your enrolled data for fingerprint authentication and face recognition
may be erased in the course of repair work to your Huma.
• When you enroll fingerprints, be sure to enroll more than one finger, in case of injuries.
• Depending on the state of your fingerprint or your use of the fingerprint sensor,
enrollment or authentication of the fingerprint may fail. When fingerprint authentication fails,
try the following:
- Use another finger.
- Clean the finger.
- Delete the fingerprint already enrolled, and then enroll it once again.
- During a dry season, such as winter, be sure to touch a metal object to discharge static
electricity from your body before scanning your fingerprint. Static electricity may cause
malfunctions of the fingerprint sensor.
Notes

DE
12
H5 V4.1
STARTUP-LEITFADEN

DE
13
Hier finden Sie die neuesten Informationen zum Huma-Support.
Wenn Sie Hilfe bei der Benutzung Ihres Huma benötigen,
besuchen Sie zuerst unsere Website.
https://www.monsternotebook.com.tr/monster-cozum-merkezi/
Monster-Notebook-Support-Website
Willkommen bei der Familie der Monster Notebooks. Nachfolgend finden Sie die
Bedienungsanleitung, die wir für Ihren neuen Huma erstellt haben.
• Startup-Leitfaden
Bitte lesen Sie zuerst dieses Startup-Leitfaden. Hier finden Sie grundlegende Informationen
wie das Anschließen von Zubehör an Ihr Huma, das Installieren von Windows und das
Verbinden Ihres Huma mit dem Internet.
• Sicherheitsleitfaden/Recovery- und Fehlerbehebungsleitfaden
Bitte lesen Sie unbedingt dieses Startup-Leitfaden. Hier finden Sie Informationen, die Ihnen
helfen, Ihr Huma sicher zu nutzen, einschließlich FAQs zur Fehlerbehebung sowie Anleitungen
zur Wiederherstellung Ihrer Huma und zur Erstellung von Wiederherstellungsmedien.
• Die in dieser Startup-Leitfaden erwähnten Funktionen und Anwendungen sind je nach
Ihrem Huma-Modell möglicherweise nicht verfügbar oder vorinstalliert.
• Wenn Sie die neuesten Windows-Updates auf Ihrem Huma installieren, können die im
Startup-Leitfaden beschriebenen Bedienungsabläufe von den tatsächlichen abweichen.
• Die visuellen Inhalte, wie z.B. Abbildungen, Fotos und Screenshots, können sich von dem
unterscheiden, was Sie tatsächlich auf Ihrer Huma sehen.
Startup-Leitfaden
Hinweise

DE
14
Konformitätserklärung
Produkte mit der CE-Aufschrift sind ordnungsmäßig im Einklang mit einer oder mehreren der
nachfolgenden EU-Richtlinien.
- Richtlinie für Elektromagnetische Verträglichkeit 2014/30/AB
- Niederspannungsrichtlinie 2014/35/AB
- Richtlinie für Funkanlagen 2014/53/AB
- RoHS-Richtlinie 2011/65/AB
- Eco-Design-Richtlinie 2009/125/AB
- Verordnung der Kommission ErP-Richtlinie 617/2013/AB
Produkte mit Funk-Funktionalität (EMF)
Dieses Produkt enthält ein Funkgerät zum Senden und Empfangen von Funksignalen.
Bei Computern und Laptops im normalen Gebrauch stellt der Trennungsabstand von 20 cm
sicher, dass die Hochfrequenz-Expositionswerte den EU-Richtlinien entsprechen.
Produkte wie z.B. Tablet-Computer, die für den Einsatz auf kürzere Distanzen ausgelegt sind,
erfüllen die geltenden EU-Richtlinien an typischen Einsatzorten.
Sofern in produktspezifischen Anweisungen nicht anders angegeben,
können Produkte ohne Einhaltung des Trennungsabstands betrieben werden.
Zulassungshinweis für die Europäische Union

DE
15
Achtung, Heiße Oberfläche
• AC-Adapter
• Startup-Leitfaden
• Garantiebuch
• Sicherheitsleitfaden/Recovery- und Fehlerbehebungsleitfaden
• USB-Stick mit Treibern
• Bewahren Sie Ihren Huma-Versandkarton auf, bis Sie sich vergewissert haben, dass Sie
alle mitgelieferten Teile erhalten haben. Falls Sie ein fehlendes oder beschädigtes Produkt
vorfinden, wenden Sie sich über die Website an unsere Support-Spezialisten, bevor Sie die
Verpackung entsorgen.
• Das mitgelieferte Zubehör wurde ausschließlich mit Ihrem Huma getestet und für
funktionsfähig befunden.
1. VERPACKUNGSINHALT
Hinweis
2. PRODUKTÜBERSICHT
Webcam-Abdeckung
geschlossen
Webcam-Abdeckung
geöffnet

DE
16
Vorderansicht
1
2 3 4
5
6
7
8
9
10
11
1. Doppelmikrofon
2. Kamera-LED-Anzeige
3. Kamera
4. Kamera Abdeckung
5. Touchpad
6. Fingerabdruck-Scanner
7. Linksklick/Rechtsklick-Taste
8. LCD-Bildschirm
9. Stereo-Lautsprecher
10. An-/Aus-Schalter
11. Tastatur

DE
17
Rechte Seitenansicht
Linke Seitenansicht
1 4 5
2 3
123 4 5 6
1. USB Type-C
2. USB 3.2 Port
3. USB 3.2 Port
4. HDMI-Ausgang
5. Ethernet Port
1. Kensington® Lock-Anschluss
2. Ladeanschluss
3. Luftauslassventil
4. USB 2.0 port
5. SD-Steckplatz
6. Kopfhöreranschluss

DE
18
3. EINRICHTEN
Stecken Sie den Netzadapter in den Netzladeanschluss des Huma und verbinden Sie den
Netzadapter mit dem mitgelieferten Netzkabel mit einer Steckdose.
• Auch wenn Sie Ihr Huma über einen längeren Zeitraum nicht benutzen wollen, sollten Sie
sie mindestens alle drei Monate an eine Steckdose anschließen und den Akku auf etwa
50 % Kapazität aufladen. Wenn der Computer über einen längeren Zeitraum nicht an eine
Steckdose angeschlossen ist, sinkt die Batteriespannung durch Selbstentladung und die
Sicherheitsfunktion wird ausgelöst. Die Zeitspanne bis zum Auslösen der Sicherheitsfunktion
hängt von der Umgebungstemperatur ab.
1. Anschluss an eine Steckdose

DE
19
Folgen Sie den Anweisungen im Windows-Setup-Fenster, um die ersten Einstellungen
vorzunehmen.
Heben Sie den Deckel des LCD-Bildschirms an und drücken Sie den Netzschalter am
Computer.
• Fassen Sie beim Anheben des LCD-Bildschirmdeckels nicht in den Bereich um die Kamera
herum, da dies zu Fehlfunktionen führen kann.
• Schalten Sie Ihre Huma nicht aus, bevor das Windows-Setup-Fenster.
Weitere Informationen finden Sie in der Windows-Hilfe oder auf der Website von Microsoft.
3. Windows einrichten (Ersteinrichtung)
2. Schalten Sie Ihr Huma ein
Hinweise
Hinweis
KAMERA
POWER

DE
20
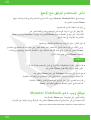
1. Wahlen Sie (start), (Einstellungen), und Windows Update und folgen Sie dann den
Anweisungen auf dem Bildschirm, um Windows zu aktualisieren.
1. Stecken Sie ein Ende des LAN-Kabels
(nicht im Lieferumfang enthalten) in den Ethernet-Port Ihres Huma und das andere
Ende in Ihr Modem/Router.
1. Wählen (start), (Einstellungen), Netzwerk & Internet und Wi-Fi, und setzen Sie dann
Wi-Fi auf Ein
2. Sie Verfügbare Netzwerke anzeigen.
3. Wählen Sie den gewünschten Wi-Fi-Zugangspunkt aus und wählen Sie dann Verbinden.
TIPPS
Mit Ihrem Huma können Sie eine Verbindung zum Internet entweder über ein Wi-Fi (wireless
LAN) oder ein kabelgebundenes LAN-Netzwerk. Bevor Sie sich mit dem Internet verbinden
können, müssen Sie einen Verbindungsdienst auswählen, einen entsprechenden Vertrag mit
einem Internetdienstanbieter abschließen und die Internetverbindungseinstellungen auf dem
Computer vornehmen. Ausführliche Informationen zu den Internetverbindungseinstellungen
und den erforderlichen Netzwerkgeräten finden Sie in der Anleitung Ihres Dienstanbieters und
in dem Handbuch, das mit Ihrem Gerät geliefert wurde. Mit dem Aufbau einer erfolgreichen
Verbindung zum Internet ist die Authentifizierung der Windows-Lizenz abgeschlossen.
Verbindung zum Internet
Verbinden über ein Wi-Fi-Netzwerk
Verbinden über ein kabelgebundenes LAN-Netzwerk
Der im Lieferumfang enthaltene USB-Stick enthält alle Treiber die Sie benötigen. Für die
neuesten Treiberversionen besuchen Sie bitte die Seite:
https://www.monsternotebook.com.tr/suruculer/
Ausführen von Windows-Update
Aktualisierung von Huma-Software
La pagina si sta caricando...
La pagina si sta caricando...
La pagina si sta caricando...
La pagina si sta caricando...
La pagina si sta caricando...
La pagina si sta caricando...
La pagina si sta caricando...
La pagina si sta caricando...
La pagina si sta caricando...
La pagina si sta caricando...
La pagina si sta caricando...
La pagina si sta caricando...
La pagina si sta caricando...
La pagina si sta caricando...
La pagina si sta caricando...
La pagina si sta caricando...
La pagina si sta caricando...
La pagina si sta caricando...
La pagina si sta caricando...
La pagina si sta caricando...
La pagina si sta caricando...
La pagina si sta caricando...
La pagina si sta caricando...
La pagina si sta caricando...
La pagina si sta caricando...
La pagina si sta caricando...
La pagina si sta caricando...
La pagina si sta caricando...
La pagina si sta caricando...
La pagina si sta caricando...
La pagina si sta caricando...
La pagina si sta caricando...
La pagina si sta caricando...
La pagina si sta caricando...
La pagina si sta caricando...
La pagina si sta caricando...
La pagina si sta caricando...
La pagina si sta caricando...
La pagina si sta caricando...
La pagina si sta caricando...
La pagina si sta caricando...
La pagina si sta caricando...
La pagina si sta caricando...
La pagina si sta caricando...
La pagina si sta caricando...
La pagina si sta caricando...
La pagina si sta caricando...
La pagina si sta caricando...
La pagina si sta caricando...
La pagina si sta caricando...
La pagina si sta caricando...
La pagina si sta caricando...
La pagina si sta caricando...
La pagina si sta caricando...
La pagina si sta caricando...
La pagina si sta caricando...
La pagina si sta caricando...
La pagina si sta caricando...
-
 1
1
-
 2
2
-
 3
3
-
 4
4
-
 5
5
-
 6
6
-
 7
7
-
 8
8
-
 9
9
-
 10
10
-
 11
11
-
 12
12
-
 13
13
-
 14
14
-
 15
15
-
 16
16
-
 17
17
-
 18
18
-
 19
19
-
 20
20
-
 21
21
-
 22
22
-
 23
23
-
 24
24
-
 25
25
-
 26
26
-
 27
27
-
 28
28
-
 29
29
-
 30
30
-
 31
31
-
 32
32
-
 33
33
-
 34
34
-
 35
35
-
 36
36
-
 37
37
-
 38
38
-
 39
39
-
 40
40
-
 41
41
-
 42
42
-
 43
43
-
 44
44
-
 45
45
-
 46
46
-
 47
47
-
 48
48
-
 49
49
-
 50
50
-
 51
51
-
 52
52
-
 53
53
-
 54
54
-
 55
55
-
 56
56
-
 57
57
-
 58
58
-
 59
59
-
 60
60
-
 61
61
-
 62
62
-
 63
63
-
 64
64
-
 65
65
-
 66
66
-
 67
67
-
 68
68
-
 69
69
-
 70
70
-
 71
71
-
 72
72
-
 73
73
-
 74
74
-
 75
75
-
 76
76
-
 77
77
-
 78
78


in altre lingue
- français: Monster HUMA H5 V4.1 Mode d'emploi
- español: Monster HUMA H5 V4.1 Guía del usuario
- Deutsch: Monster HUMA H5 V4.1 Benutzerhandbuch
- Türkçe: Monster HUMA H5 V4.1 Kullanici rehberi
Altri documenti
-
Klarstein 10045662 Manuale del proprietario
-
3M Single Touch Displays Guida utente
-
Archos Diamond 2 Plus Manuale del proprietario
-
-
-
-
-
 BORMANN PRO BWR5219 Kurbadoros Plumber Manuale utente
-
BorMann BLG4400 Double Gas Burner Manuale utente
-
 BORMANN PRO BWR5217 Wheel Jack Manuale utente

