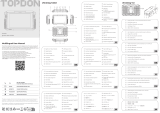
8. OK Button
9. Selection Button
10. Help Buttons
11. Read DTC Shortcut
12. LED for Different DTCs
13. LCD Screen
1. Diagnostic Cable
2. DB-15 Diagnostic Connector
3. USB Port
4. TF Card Slot
5. Erase DTC Shortcut
6. I/M Shortcut
7. EXIT Button
- The ignition is turned on.
- The vehicle battery voltage is 9~18 volts.
- The throttle is in the closed position.
- Locate the vehicle’s DLC port
for OBDII connection.
- Connect ArtiLink600’s OBDII
cable to the vehicle’s DLC port.
ArtiLink600 will power on
automatically, and be ready
to use.
Register & Upgrade
The registration and upgrade is not a necessary procedure
for ArtiLink600’s normal use.
1. Go to https://www.topdon.com/products/artilink600 to
download, decompress and install TOPDON Update Tool on
Windows XP, 7, 8 & 10.
2. Connect ArtiLink600 to the computer via the USB cable.
Enter main menu -> HELP -> Tool Information to get the
Serial Number and Register code for later use. Disconnect
ArtiLink600.
3. Remove the TF card in ArtiLink600. Insert the supplied
adaptor with TF card into the USB port of the computer.
4. Run the TOPDON Update Tool. Follow the prompts, and
input the information required to finish the registration. Click
Submit.
5. Select the updates you desire, and download the update
package into the memory card.
6. Insert the TF card with the downloaded update
package into ArtiLink600.
7. Power up ArtiLink600 via the USB cable. ArtiLink600 will
automatically start updating if a newer version is detected
in the memory card.
IMPORTANT: Read the instruction carefully before operating.
Failure to do so may cause damage and/or personal injury.
NOTE: This Quick Start Guide is subject to change without
written notice.
IF YOU HAVE QUESTIONS OR COMMENTS, CONTACT US.
Schnellstart-Anleitung
8. OK-Taste
9. Auswahltasten
10. HILFE-Taste
11. Verknüpfung für DTC lesen
12. LED für verschiedene DTCs
13. LCD Bildschirm
1. Diagnosekabel
2. DB-15 Diagnosestecker
3. USB-Anschluss
4. TF-Kartensteckplatz
5. Verknüpfung für DTC löschen
6. I/M-Verknüpfung
7. EXIT-Taste
Registrieren und Aktualisieren
7. Pulsante EXIT
8. Tasto OK
9. Pulsante di selezione
10. Tasto HELP
11. Leggere scorciatoia Codici
Guasto
12. Diodo luminoso per codici
guasti differenti
13. Schermo LCD
1. Cavo diagnostico
2. Connettore di diagnostica
DB-15
3. Porta USB
4. Slot per scheda TF
5. Cancellare scorciatoia
Codici guasto
6. Scorciatoia I/M
Registro e aggiornamento
8. Bouton OK
9. Boutons de sélection
10. Bouton HELP
11. Lire le raccourci DTC
12. LED pour différents DTCs
13. Écran LCD
1. Câble de diagnostic
2. Connecteur de diagnostic DB-15
3. Port USB
4.Fente pour carte TF
5. Effacer le raccourci DTC
6. Raccourci I / M
7. Bouton EXIT
- Le contact est mis..
- La tension de la batterie du véhicule est de 9 ~ 18 volts.
- Le papillon est en position fermée.
- Localisez le port DLC du véhicule
pour la connexion OBDII.
- Connectez le câble OBDII
ArtiLink600 au port DLC du véhicule.
ArtiLink600 s'allumera
automatiquement, et sera prêt
à utiliser.
L’enregistrement et la mise à niveau ne sont pas la
procédure nécessaire pour l’utilisation normale de ArtiLink600.
1. Accédez à https://www.topdon.com/products/artilink600
pour télécharger, décompresser et installer l’outil de mise
à jour TOPDON sur Windows XP, 7, 8 et 10.
2. Connectez ArtiLink600 à l'ordinateur via le câble USB.
Entrez dans le menu principal -> «AIDE» ->
«Informations sur l'outil» pour obtenir le numéro de série et
le code d'enregistrement pour une utilisation ultérieure.
Déconnectez ArtiLink600.
3. Retirez la carte TF de ArtiLink600.
Insérez l'adaptateur fourni avec la carte TF dans le port USB
de l'ordinateur.
4. Exécutez l'outil de mise à jour TOPDON. Suivez les
invites et saisissez les informations requises pour terminer
l'enregistrement. Cliquez sur «Soumettre».
5. Sélectionnez les mises à jour souhaitées et téléchargez le
package de mise à jour sur la carte mémoire..
6. Insérez la carte TF avec le package de mise à jour
téléchargé dans ArtiLink600.
7. Allumez ArtiLink600 via le câble USB. ArtiLink600
démarrera automatiquement la mise à jour si une
version plus récente est détectée dans la carte mémoire.
Guide de démarrage rapide Démarrage du Diagnostic
Inscription & mise à niveau
IMPORTANT: Lisez attentivement les instructions avant d'utiliser.
Le non-respect de cette consigne peut entraîner des dommages et /
ou des blessures.
Remarque: Ce guide de démarrage rapide est sujet à
changement sans avis écrit. - Die Zündung ist eingeschaltet.
- Die Batteriespannung des Fahrzeugs beträgt 9 ~ 18 Volt.
- Die Drosselklappe befindet sich in der geschlossenen Position.
Starten Sie die Diagnose
- Finden Sie den DLC-Anschluss
des Fahrzeugs für die OBDII-Verbindung.
- Schließen Sie das OBDII-Kabel von
ArtiLink600 an den DLC-Anschluss des
Fahrzeugs an.
ArtiLink600 ist automatisch eingeschaltet
und einsatzbereit.
Die Registrierung und Aktualisierung ist nicht das erforderliche
Verfahren für die normale Verwendung von ArtiLink600.
1. Gehen Sie zu https://www.topdon.com/products/artilink600,
um TOPDON Update Tool unter Windows XP, 7, 8 und 10
herunterzuladen, zu dekomprimieren und zu installieren.
2. Schließen Sie ArtiLink600 über das USB-Kabel an den
Computer an. Rufen Sie Hauptmenü -> "HILFE" ->
"Werkzeuginformationen" auf, um die Seriennummer und
den Registrierungscode für die spätere Verwendung zu
erhalten. Trennen Sie ArtiLink600.
3. Entfernen Sie die TF-Karte in ArtiLink600. Stecken Sie den
mitgelieferten Adapter mit TF-Karte in den USB-Anschluss
des Computers ein.
4. Führen Sie TOPDON Update Tool aus. Befolgen Sie die
Anweisungen und geben Sie die Informationen ein, die zum
Abschluss der Registrierung erforderlich sind. Klicken Sie
auf "Senden".
5. Wählen Sie die gewünschten Updates aus und laden Sie
das Update-Paket auf die Speicherkarte herunter.
6. Stecken Sie die TF-Karte mit dem heruntergeladenen
Update-Paket in ArtiLink600 ein.
7. Schalten Sie ArtiLink600 über das USB-Kabel ein.
ArtiLink600 wird automatisch aktualisiert, wenn auf der
Speicherkarte eine neuere Version erkannt wird.
WICHTIG: Lesen Sie die Anweisungen vor dem Betrieb
sorgfältig durch. Andernfalls kann es zu Schäden und/oder
Verletzungen kommen.
HINWEIS: Diese Schnellstart-Anleitung kann ohne
schriftliche Ankündigung geändert werden.
WENN SIE FRAGEN ODER KOMMENTARE HABEN,
KONTAKTIEREN SIE UNS.
SI VOUS AVEZ DES QUESTIONS OU COMMENTAIRES,
CONTACTEZ-NOUS.
DE
DE
RU
RU
8. Кнопка OK
9. SКнопки выбора
10. Кнопка помощи
11. Считывание ярлыка DTC
12. LED для различных
кодов неисправности
13. ЖК-дисплей
1. диагностический кабель
2. Диагностический разъём DB-15
3. USB-порт
4. Слот для TF-карты
5. Удалить ярлык DTC
6. Ярлык I/M
7. Кнопка EXIT
- Зажигание включено.
- Напряжение аккумуляторной батареи автомобиля
составляет 9 ~ 18 В..
- Дроссельная заслонка находится в закрытом положении.
- Найдите порт DLC автомобиля
для подключения OBD II.
- Подключите кабель OBD II
ArtiLink600 к порту DLC автомобиля.
ArtiLink600 автоматически
включен и будет готов к
использованию.
Регистрация и обновление
Регистрация и обновление не являются необходимой
процедурой для нормального использования ArtiLink600.
1. Перейдите на страницу
https://www.topdon.com/products/artilink600 чтобы загрузить,
распаковать и установить Инструмент обновления TOPDON
в Windows XP, 7, 8 и 10.
2. Подключите ArtiLink600 к компьютеру через USB-кабель.
Войдите в главное меню -> ‘ПОМОЩЬ’ -> ‘Информация об
инструменте’, чтобы получить серийный номер и
регистрационный код для дальнейшего использования.
Отключите ArtiLink600.
3. Снимите карту TF из ArtiLink600. Вставьте прилагаемый
адаптер с TF-картой в USB-порт компьютера.
4. Запустите инструмент обновления TOPDON. Следуйте
инструкциям и введите необходимую информацию для
завершения регистрации. Щелкните ‘Отправить’.
5. Выберите нужные обновления и загрузите пакет
обновлений на карту памяти.
6. Вставьте TF-карту с загруженным пакетом обновлений в
ArtiLink600.
7. Включите ArtiLink600 через USB-кабель. ArtiLink600
автоматически начнет обновление, если самая новая
версия будет обнаружена на карте памяти .
Важная информация: Внимательно прочтите инструкцию
перед использованием. Несоблюдение этого требования
может привести к несчастному случаю или тяжелой травме.
Примечание: Краткое руководство пользователя может
быть изменено без предварительного уведомления.
Если у вас возникли какие-либо вопросы, свяжитесь с нами.
Краткое руководство пользователя
Подготовка
Начать диагностику
1. Cable de diagnóstico
2. DB-15 Conector de Diagnóstico
3. Puerto USB
4. Ranura de Tarjeta TF
5. Borrar Acceso Directo DTC
6. Acceso Directo I/M
7. Botón EXIT
Guía de Inicio Rápido
8. Botón OK
9. Botones de Selección
10. Botón HELP
11. Leer Acceso Directo DTC
12. LED para Diferentes DTC
13. Pantalla LCD
Vorbereitung
Préparation
ES
ES
- El encendido está conectado.
- El voltaje de la batería del vehículo es de 9-18 voltios.
- El acelerador está en la posición cerrada.
Preparación
Iniciar el Diagnóstico
- Localice el puerto DLC del
vehículo para la conexión OBDII.
- Conecte el cable OBDII de
ArtiLink600 al puerto DLC del
vehículo.
ArtiLink600 se encenderá
automáticamente y estará listo
para usar.
Registrarse y Actualizar
El registro y la actualización no es el procedimiento necesario
para el uso normal de ArtiLink600.
1. Vaya a https://www.topdon.com/products/artilink600 para
descargar, descomprimir e instalar la Herramienta de
Actualización TOPDON en Windows XP, 7, 8 & 10.
2. Conecte ArtiLink600 a la computadora mediante el cable USB.
Ingrese al menú principal -> “HELP” -> “Tool Information” para
obtener el Número de Serie y el Código de Registro para su
uso posterior. Desconecte ArtiLink600.
3. Quite la tarjeta TF en ArtiLink600. Inserte el adaptador
proporcionado con tarjeta TF en el puerto USB de la
computadora.
4. Ejecute la Herramienta de Actualización TOPDON. Siga las
indicaciones e ingrese la información requerida para terminar
el registro. Haga clic en “Submit”
5. Seleccione las actualizaciones que desee y descargue el
paquete de actualización en la tarjeta de memoria.
6. Inserte la tarjeta TF con el paquete de actualización
descargado en ArtiLink600.
7. Encienda ArtiLink600 a través del cable USB. ArtiLink600
comenzará a actualizarse automáticamente si se detecta una
versión más nueva en la tarjeta de memoria.
IIMPORTANTE: Lea atentamente las instrucciones antes de
operar. Si no lo hace, puede causar daños y/o lesiones
personales.
NOTA: Esta Guía de Inicio Rápido está sujeta a cambiar sin
previo aviso por escrito.
SI TIENE PREGUNTAS O COMENTARIOS, POR FAVOR,
PÓNGASE EN CONTACTO CON NOSOTROS.
8. OK
9.
10.
11.
12. LED
13. LCD
1.
2. DB-15
3. USB
4. TF
5.
6. I/M
7. EXIT
-
- 918
-
OBDIIDLC
ArtiLink600OBDII
DLC
ArtiLink600
ArtiLink600
1. https://www.topdon.com/products/artilink600
Windows XP 7 8 10 TOPDON
2. ArtiLink600 USB
-> ->
ArtiLink600
3. ArtiLink600TF TF
USB
4. TOPDON
5.
6. TF
ArtiLink600
7. USB ArtiLink600
ArtiLink600
La registrazione e aggiornamento non è necessaria
procedura per uso normale ArtiLink600.
1. Vai https://www.topdon.com/products/artilink600 per
scaricare, riaprire file compressi e installare Strumento
aggiornamento TOPDON su Windows XP, 7, 8 & 10.
2. Collegare ArtiLink600 al computer tramite cavo USB.
Inserire Menu principale -> “HELP” -> “Informazioni strumento”
per ottenere il N. di serie e codice registro per un uso successivo.
Distaccare ArtiLink600.
3. Rimuovere la scheda TF in ArtiLink600. Inserire l’adattatore
in dotazione con la scheda TF nella porta USB del computer.
4. Eseguire lo strumento di aggiornamento TOPDON. Seguire
le istruzioni, e inserire le informazioni richieste per terminare
la registrazione. Premi “Presentare”.
5. Seleziona gli aggiornamenti che desideri, e scarica il p
acchetto di aggiornamento nella scheda di memoria.
6. Inserire la scheda TF con il pacchetto di aggiornamento
scaricato nel ArtiLink600.
7. Accendi ArtiLink600 tramite il cavo USB. ArtiLink600
inizierà automaticamente l’automaticamente se ne viene
rilevata una nuova versione nella scheda di memoria.
IMPORTANTE : LEGGERE ATTENTAMENTE LE ISTRUZIONI
PRIMA DI METTERLA IN FUNZIONE. In caso contrario può
causare danni e/o lesione personale.
Avviso: Questa Guida rapida è soggetta a modifiche senza
alcun avviso scritto.
SEI HAI DOMANDE E COMMENTI, CONTATTACI.
IT
IT
Preparazione
- La chiave viene girata su marcia.
- La tensione della batteria del veicolo è tra 9~18V.
- La valvola a farfalla è nella posizione chiusa.
- LIndividuare la porta DLC
(presa di diagnosi) della vettura
per la connessione OBDII.
- Collegare il cavo OBDII
ArtiLink600 alla porta DLC
(Presa di diagnosi) del veicolo.
ArtiLink600 alimenterà acceso
automaticamente, ed essere
pronti per l’uso.
Avviare diagnostica
Guida Rapida
Registrar & atualizar
O registro e a atualização não são os procedimentos
necessários para o uso normal do ArtiLink600.
1. Vá para https://www.topdon.com/products/artilink600 para
baixar, descompactar e instalar a ferramenta de atualização
TOPDON no Windows XP, 7, 8 & 10.
2. Conecte o ArtiLink600 ao computador através do cabo de
USB. Entre no menu principal -> “AJUDAR” ->
“Informações da ferramenta” para obter o número de série e o
código de registro para uso posterior. Desconecte o ArtiLink600.
3. Remova o cartão TF no ArtiLink600. Insira o adaptador
fornecido com o cartão TF na porta de USB do computador.
4. Execute a ferramenta de atualização TOPDON. Siga as
instruções e insira as informações necessárias para concluir o
registro. Clique em “Enviar”.
5. Selecione as atualizações que você deseja, e baixe o pacote
de atualização para o cartão de memória.
6. Insira o cartão TF com o pacote de atualização baixado no
ArtiLink600.
7. Ligue o ArtiLink600 através do cabo de USB. O ArtiLink600
iniciará a atualização automaticamente se uma versão mais
recente for detectada no cartão de memória.
IMPORTANTE: Leia as instruções cuidadosamente antes de
operar. Não fazer isso pode causar danos e/ou ferimentos
pessoais.
NOTA: Este Guia de início rápido está sujeito a alterações sem
aviso prévio por escrito.
SE VOCÊ TIVER DÚVIDAS OU COMENTÁRIOS,
CONTATE-NOS.
Preparação
- A ignição está ligada
- A voltagem da bateria do veículo é de 9~18 volts.
- O acelerador está na posição fechada.
- Localize a porta de DLC do
veículo para a conexão OBDII.
- Conecte o cabo OBDII do
ArtiLink600 à porta de DLC do
veículo.
O ArtiLink600 ligará
automaticamente e estará
pronto para uso.
Inicie os diagnósticos
Guia de início rápido
PT
PT
8. Botão OK
9. Botões de seleção
10. Botão AJUDAR
11. Leia o atalho de DTC
12. LED para DTCs diferentes
13. Tela LCD
1. Cabo de diagnóstico
2. Conector de diagnóstico
DB-15
3. Porta de USB
4.Ranhura para cartão TF
5. Apague o atalho de DTC
6. Atalho de I/M
7. Botão EXIT
1
4
6
5
7
8
2
3
11
10
9
12
13
1
4
6
5
7
8
2
3
11
10
9
12
13
1
4
6
5
7
8
2
3
11
10
9
12
13
1
4
6
5
7
8
2
3
11
10
9
12
13
1
4
6
5
7
8
2
3
11
10
9
12
13
1
4
6
5
7
8
2
3
11
10
9
12
13
1
4
6
5
7
8
2
3
11
10
9
12
13
1
4
6
5
7
8
2
3
11
10
9
12
13
-
 1
1

in altre lingue
- français: Topdon ArtiLink600 Guide de démarrage rapide
- español: Topdon ArtiLink600 Guía de inicio rápido
- português: Topdon ArtiLink600 Guia rápido
- 日本語: Topdon ArtiLink600 クイックスタートガイド