La pagina si sta caricando...

ArtiDiag600 S
USER MANUAL
Professional Diagnostic Tool


Welcome
DEEN
1 25 49 75 101 127
1 25 49 75 101 127
1 25 49 75 101 127
1 25 49 75 101 127
1 25 49 75 101 127
226 50 76 102 128
226 50 76 102 128
327 51 77 103 129
4
23
22
22
21
21
2
28
47
47
46
45
45
31
52
72
71
70
70
70
55
78
98
97
96
96
96
81
106
124
123
122
122
122
107
130
148
148
147
147
147
133
FR ES IT JP
About
Package List
Compatibility
Notice
General Information
of OBDII (On-Board
Diagnostics II)
Diagnostic Trouble
Codes (DTCs)
Product Descriptions
Warnings
Operation Introduction
FAQ
Preparation &
Connection
Cautions
Technical Specication
Warranty
Contents

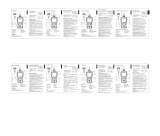
English

EN
1
Welcome
Thank you for purchasing TOPDON automotive diagnostic tool
ArtiDiag600 S. Please patiently read and understand this User Manual
before operating this product.
About
TOPDON ArtiDiag600 S is designed with technicians in mind. This 5”
Android tablet-style scanner boasts high-quality features with easy
workflow to tackle the common and complex vehicle diagnostic issues
for most modern vehicles worldwide.
Package List
• ArtiDiag600 S
• TYPE-C Charging Cable
• Quick User Guide
• User Manual
Compatibility
TOPDON ArtiDiag600 S is compatible with the following protocols:
• KWP2000
• ISO9141
• J1850 VPW
• J1850 PWM
• CAN (Controller Area Network)
• And more
Notice
ArtiDiag600 S may automatically reset while being disturbed by strong
static electricity. THIS IS A NORMAL REACTION.
This Product Manual is subject to change without written notice.
Read the instruction carefully and use the unit properly before operating.
Failure to do so may cause damage and/or personal injury, which will void
the product warranty.
*Visit www.topdon.com/products/artidiag600 s to download the
multilingual user manual.

2
General Information of OBDII (On-Board
Diagnostics II)
The OBDII system is designed to monitor emission control systems and
key engine components by performing either continuous or periodic tests
of specic components and vehicle conditions, which will offer three
pieces of such valuable information:
• Whether the Malfunction Indicator Light (MIL) is commanded “on” or “off ”;
• Which, if any, Diagnostic Trouble Codes (DTCs) are stored;
• Readiness Monitor status.
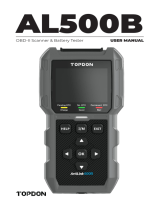
Diagnostic Trouble Codes (DTCs)
DTC Example
P0202
SYSTEMS IDENTIFYING SPECIFIC
SUB-SYSTEMS
CODE TYPE
B
C
P
U
1
2
3
4
5
6
7
8
=Body
=Chassis
=Powertrain
=Network
=Fuel and Air Metering
=Fuel and Air Metering
=Ignition System or Engine Misre
=Auxiliary Emission Controls
=Vehicle Speed Control and Idle
Controls
=Computer Output Circuits
=Transmission Controls
=Transmission Controls
Malfunctioning
Section of the Systems
Generic (SAE):
P0, P2, P34-P39
B0, B3
C0, C3
U0, U3
Manufacturer
Specic:
P1, P30-P33
B1, B2
C1, C2
U1, U2

EN
3
Product Descriptions
NO. Name Description
1 Power/Screen Lock Button Long press for 5 seconds to turn on or
off
2 5” Touchable Screen Display 480 x 854 resolution
3 Diagnostic Cable Used to connect car OBD connector
4 OK Button Conrm button
5 Selection Buttons Up, down, left and right direction
selection
6 TF Card Slot Support expandable SD memory card
(please purchase by yourself)
7 TYPE-C Interface (5V-1.2A) TYPE-C port supports voltage 5V-1.2A,
please do not exceed the range!
8 Reset Button Power on and off reset
9 Return Button Return to the previous step

4
Preparation & Connection
1. Turn the ignition off.
2. Locate the vehicle’s DLC socket.
3. Plug the TOPDON ArtiDiag600 S diagnostic cable into the vehicle’s DLC
socket.
4. Turn the ignition on. The engine can be off or running.

EN
5
5. Hold the Power button for 5 seconds to turn the TOPDON ArtiDiag600
S on. The tablet will start initializing and enter the following interface.
* Note: Don’t connect or disconnect any test equipment with the ignition
on or engine running.
6. Language Setting
Select the tool language in the following interface:

6
7. Choose Time
Choose the time zone where you are in. The system will automatically
congure the time according to the time zone you selected.
8. Connect Wi-Fi
The system will automatically search all available Wi-Fi networks. You
can choose the Wi-Fi needed. Tap ”Next”. It will automatically jump to the
Home Menu.

EN
7
Operation Introduction
TOPDON ArtiDiag600 S has 9 major modules, Diagnosis, I/M Readiness,
OBDII/EOBD, Repair Info, Maintenance, Update, ArtiFolder, Feedback,
Settings.
1. Diagnosis
TOPDON ArtiDiag600 S supports Smart Diagnosis and Manual
Diagnosis for Engine, Transmission, ABS, and SRS systems of most
modern vehicles across the globe.
A diagnostic report will be automatically generated after the diagnosis.
1.1 Smart Diagnosis
Connect the unit to the DLC’s port via OBDII cable. Turn the
ignition key on. Tap “Diagnosis” in the main interface, and then tap
”AutoSearch”.
The system will automatically start scanning the vehicle’s VIN data.

8
*Note: Follow the prompts to proceed if the communication failure
occurs.
1.2 Manual Diagnosis
If the tool cannot obtain or analyze the VIN information, you can
also perform Manual Diagnosis. In this mode, you need to execute
the menu-driven command and follow the on-screen instruction to
proceed.
Refer to the flowchart illustrated as below to run the manual system
diagnostics.
*Note:
• Before diagnosing, please make sure the corresponding vehicle
manufacturer software has been installed in the scanner.
• The diagnostic menu may vary by the vehicle’s make, model and year.

EN
9
Select "Diagnosis"
Select Vehicle Manufacturer
Select Vehicle Model
Select Scan Mode
Select Test Function
Automatic System Detection
(System Scan)
Read Data
Stream Clear Fault Code Read Fault Code Read Version
Information
Manual System Detection
(System Selection)
Take “Demo” as an example to demonstrate how to manually
diagnose a vehicle.
After selecting the vehicle manufacturer, the following screen may
appear:

10
1.3 Health Report
This function can quickly reveal the vehicle's health status.
Tap “Health Report”. The system will start scanning DTCs and show
the test results.
The DTC will be displayed on the screen in red font, with a specic
denition.
*Note: This function will be available only when the diagnostic
software supports it.
1.4 System Scan
This function will automatically scan Engine, Transmission, ABS, and
SRS systems of the vehicle.
1.5 System Selection
This function allows you to manually choose the automotive
electronic control system.
Tap “ECM” (e.g.). The screen will show the selection interface.

EN
11
Choose the system to be tested. The following screen may vary by
vehicle’s make, model, and year.
1.5.1 Version Information
This function reads the current version information of ECU.
1.5.2 Read Fault Code
This function can read the Diagnostic Trouble Codes (DTCs) in
the ECU memory, helping quickly identify the cause of the vehicle
breakdown.
Tap “Read Fault Code”. The screen will display diagnostic results.

12
*Explanation of terms:
Freeze Frame: Records specic data streams for verication when
the car breaks down.
Report: Saves the current diagnosis result as a diagnosis report,
which can be sent to a specic E-Mail address.
1.5.3 Clear Fault Code
This function can clear the DTC of the ECU memory of the tested
system.
1.5.4 Read Data Stream
This function can read and display the real-time data and
parameters of ECU.
To view the specic data stream, check the box next to its name,
and then tap “OK”.
The system will display a maximum of four dynamic data streams
in three modes:
1) Value (default): Shows parameters with numbers and lists.
2) Figure: Displays parameters with wave patterns.
3) Combine: The graphs can be merged for easier comparisons.

EN
13
*Explanation of terms:
• : To have the data streams displayed in wave patterns.
• Report: To save the number of current data streams.
• Record: To record the diagnostic data for further analysis.
• Help: To check the help information.
• Tap to have the data streams displayed in wave patterns.
Tap “Combine”: The system will display the merged parameters of the
selected data streams with wave patterns.

14
1.6 Diagnostic History
The tablet will record the details of every diagnostic session.
The History function provides direct access to the previously tested
vehicles. Users can resume from the last operation, without the
necessity of starting from scratch.
Tap “HISTORY” in the “Scan” module. All diagnostic records will be
listed on the screen in a date sequence.
2. I/M Readiness
This function checks whether or not the various emissions-related
systems on the vehicle are operating properly, and are ready for
Inspection and Maintenance testing.
It can also be used to check the Monitor Run Status and to conrm if
the repair of a car fault has been performed correctly.
3. OBDII/EOBD Diagnostics
This function presents a quick way to check for DTCs, isolate the cause
of the illuminated Malfunction Indicator Lamp (MIL), check monitor
status prior to emissions certication testing, verify repairs, and
perform other services that are emission-related.
Tap “OBDII/EOBD” in the Home Menu after the tablet is properly
connected to the vehicle’s DLC port. The tablet will start an automatic
check of the vehicle’s computer to determine which type of
communication protocol it is using, then display the Monitor Status as
follows:

EN
15
Tap “OK”, the following OBDII function list appears.
3.1 Read Codes
This function can identify which section of the emission control
system has malfunctioned.
3.2 Erase Codes
This function erases the codes from the vehicle, after retrieving codes
from the vehicle and certain repairs have been carried out.
Make sure the vehicle’s ignition key is in the ON position with the
engine being off before the operation.
3.3 Data Stream
This function retrieves and displays live data and parameters from
the vehicle’s ECU.
3.4 View Freeze Frame
This function takes a snapshot of the operating conditions when an
emission-related fault occurs.
3.5 O2 Sensor Test
This function retrieves O2 sensor monitor test results of the most
recently completed tests from the vehicle’s on-board computer.

16
3.6 On-Board Monitor Test
This function retrieves test results for emission-related powertrain
components and systems that are not continuously monitored. The
test’s availability is determined by the vehicle manufacturer.
3.7 EVAP System Test
This function initiates a leak test for the vehicle’s EVAP system.
Refer to the vehicle’s service repair manual to determine the
procedures necessary to stop the test.
3.8 Vehicle Info
This function retrieves a list of information (provided by the vehicle
manufacturer) from the vehicle’s on-board computer.
This information may include:
• VIN (Vehicle Identication Number).
• CID (Calibration ID).
• CVN (Calibration Verication Number).
4. Repair Info
This module includes four sections:
1) OBD Fault Code Library: The detailed explanation of the fault codes.
2) Coverage List: The supported vehicles’ information.
3) Videos: Contains table usage tips, maintenance, and diagnostic
guides.
4) Learning Course: Demonstrates how to operate the tool.
5. Maintenance & Reset
TOPDON ArtiDiag600 S features 8 most commonly used maintenance
and reset functions.
5.1 BLEED (ABS Bleeding)
This function enables you to perform tests to check the operating
conditions of the Anti-lock Braking System (ABS).
It needs to be performed in the following cases:
When the ABS contains air.
When the ABS computer, ABS pump, brake master cylinder, brake
cylinder, brake line, or brake fluid is replaced.
/