La pagina si sta caricando...

To replace the Auto-Shut-Off valve on your RO system, please follow steps below:
NOTE: If you get no water after replacing the ASO valve, that means the lines did
not go to the correct ports. Check and verify all 4 line connections will fix such problem.
Auto-Shut-Off (ASO) Valve Replacement
1) Turn off the feed water to the RO system. Close the tank’s ball valve. Turn on the RO spigot,
this relieves the pressure in the RO system, making line removal easier.
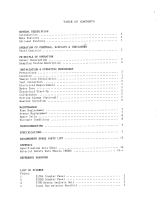
2) The ASO valve is mounted on the RO frame. There are 4 ports on the ASO valve, see diagram
below. Each port connects to a water line: Two RED or WHITE lines in ports #1 and #2 (at bottom),
two CLEAR lines in ports #3 and #4 (on top).
3) Take ASO valve out of its bracket. Please note how the 4 lines are connected to the old ASO,
so you can re-connect the lines to the correct ports on the new ASO valve.
Remove the lines:
- Disconnect all 4 lines from the old ASO.
4) After ASO replacement, turn on feed water, open the tank valve. Re-start RO system as usual.
©2018 APEC Water Systems. All rights reserved. v.2018.1 www.freedrinkingwater.com
Connect the New ASO:
- To connect line: simply push line into port (don’t add inserts or Teflon tape).
- Connect the lower left RED or WHITE line to port #1 (marked “IN” on ASO).
- Connect the lower right RED or WHITE line to port #2 (marked “OUT” on ASO).
- Connect the upper right CLEAR line to port #3, no marking.
- Connect the upper left CLEAR line to port #4, no marking.
- After connecting the 4 lines, the ASO side that has the “IN” and “OUT” markings should face
down. Mount ASO valve back into bracket.
- Each port is a “quick-connect” type fitting. To remove line, press in and hold down on the
small “collet” ring around the opening of the port, this will release the line. Pull line out while
holding down the collet ring.
(Depends on your model, tubings
at bottom can be RED or WHITE)
1
3
IN OUT
4
2
ToToTo
r
r
r
ep
ep
ep
lace the Auto-Shut-O
ff
v
v
v
al
al
al
ve
ve
ve
o
o
o
n
n
n
your RO system, please
f
ol
olol
lololo
w
w
w
s
s
st
eps below
:
NO
NO
NO
TETETE
:
:
:
I
f
y
ou
g
et no water a
f
ter
re
re
re
plpl
pl
ac
ac
ac
i
i
in
g
the ASO valve, that me
an
an
an
s
th
th
th
e
e
e
lines di
d
nonono
t
t
t
g
g
go
to the correct ports. C
he
e
e
ck
ck
ck
aaa
nd
n
n
veri
f
y all 4 line connect
io
ns
ns
ns
w
w
w
il
il
il
l
f
ix such problem.
Auto-Shut-O
ff
(
AS
O
O
O
)
)
)
VVV
alve Replacement
1) Turn o
ff
the
f
eed water to the R
O
O
O
sysysy
st
st
st
em
em
em
. Close the tank’s ball valve. Turn on the RO spigot
,
this relieves the pressure in the RO system, making line removal easie
r.
2
) The ASO valve is mounted on the RO
f
rame. There are 4 ports on the ASO valve, see diagra
m
below. Each
po
rt connects to a water line: Two RED or WHITE lines in
p
orts #1 and #2
(
at botto
m)
)
)
,
,
,
two CLEAR lines in ports #3 and #4 (on top).
3
) Take ASO valve out o
f
f
f
it
it
it
s
s
s
brbr
br
acket. Please note how the 4 lines are connected to the old ASO
,
s
o you can re-connect the lines to the correct ports on the new ASO valve.
R
e
m
o
v
e
th
e
lin
es:
-
Disconnect all 4 lines
f
rom the old ASO.
4
)A
f
ter ASO replacement, turn on
f
eed wate
r,
open the tank valve. Re-start RO system
a
a
a
s
s
s
ususus
ua
u
u
l.
©2018 APEC Water Systems. All rights reser
ved
d
d
. v
v
v
.20
18.
18
18
1
www.
f
reedrinkingwater.com
Co
nn
ec
t th
e
Ne
w
AS
O:
-
To connect line: simply p
us
s
s
h h h
li
li
li
ne
ne
ne
i
nto port (don’t add inserts or Te
f
lo
lo
lo
n
n
n
ta
tata
pe).
-
Connect the lower le
f
t
RE
RE
RE
D
D
D
or
or
or
WHITE line to port #1 (ma
rk
k
k
ed
ed
ed
“
““
IN
IN
IN
”
”
o
o
on
ASO).
-
Connect the low
er
er
er
rr
r
ig
ig
ig
ht
h
h
R
R
R
E
E
ED
or WHITE line to port #2 (m
ar
ar
ar
ke
k
ke
d
d
d
“O
“O
“O
UT” on ASO
).
-
Connect the u
pp
p
p
er
er
er
r
igig
ig
ht
ht
ht
CLEAR line to
p
ort #3, no marki
ng
g
g
.
.
.
-
Connect the u
pp
p
p
ererer
l
l
l
efefef
t
t
t
CL
EAR line to port #4, no marking.
-
A
f
ter connecting the 4 lines, the ASO side that has the “IN” and “OUT” markings should
fa
a
a
ce
ce
ce
d
own. Mount ASO valve back into bracket.
-E
E
E
ac
a
a
h port is a “quick-connect” type fitti
ng
g
g
.
.
.
ToToTo
rrr
em
e
e
ove line, press in and hold do
wn
wn
wn
ooo
n
n
n
th
e
sm
smsm
al
a
a
l “collet” ring around the opening
o
o
o
f f
f
th
th
th
e
e
e
port, this will release the line.
Pu
u
ll
l
l
l
ininin
e
e
e
out whil
e
h
h
ho
l
ding down the collet ring
.
(De
pends on
you
u
u
r mr mr m
odeode
ode
l,
l,
l,
tub
ings
at bottom can be RED or WHITE
)
1
11
3
IN
IN
IN
OU
T
4
2
1/1