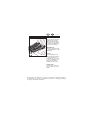
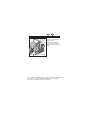
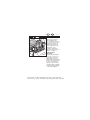
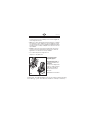
RECARO Young Profi plus Manuale del proprietario
- Categoria
- Sedili dell'auto
- Tipo
- Manuale del proprietario

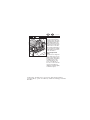
Young Profi plus
Montage- und Gebrauchsanleitung
Gruppe 0+ (-13 kg)
Assembly and Usage Instructions
Group 0+ (-13 kg)
Nur zur Benutzung in Fahrzeugen geeignet, die mit nach der ECE-Regelung Nr.
16 oder nach anderen vergleichbaren Standards genehmigten 3-Punkt-
Sicherheitsgurten ausgestattet sind.
Dies ist ein Sitz der Gewichtsklasse 0+ für Kinder im Alter bis 18 Monaten mit
einem Körpergewicht bis 13 kg.
Diese Montage- und Gebrauchsanleitung unbedingt dem Kunden aushändigen.
Druckfehler, Irrtümer und technische Änderungen vorbehalten.
Only suitable for use in vehicles fitted with approved 3-point safety belts that
conform with ECE Regulation No. 16 or comparable standards.
This is a seat in the Weight Class 0+ for babies up to the age of 18 months
weighing up to 13 kg.
These Assembly and Usage Instructions must be given to the client.
Subject to printing errors, mistakes and technical changes.
sto2278-4-12/1 disk STM Recaro Young Profi plus, Vorderseite Montageanleitung
erst. 01.08.2005 ps / geänd. am 19.08.05 ps, 24.08.05 tk, 26.09.05 tk, 04.10.05gg,
25.01.06 tk, 23.02.06 tk / 15.09.06 ps / 16.10.06 ps / 05.03.07 ps
sto2278-4-12/1 - Version 050307
F NL IGBD

2300-4-11/1
Inhalt Contents Kap.
Chap.
Beschreibung Description 1
Schaukelfunktion Rocking-seat function 2
Einbau mit Isofix Installing with Isofix 3
Verankern der Babyschale Anchoring the infant carrier 4
Ausbau der Babyschale Removing the infant carrier 5
Ausbau Isofix Releasing Isofix 6
Kind anschnallen Strapping-in the child 7
Schultergurtführung Shoulder belt guidance 8
Einbau mit Fahrzeuggurt Installing with the vehicle belt 9
Bezug abnehmen Removing the cover 10
Sicherheitshinweise Safety instructions 11
Allgemeine Hinweise General instructions 12
Gewährleistung Warranty 13
Garantiefall oder nicht? Warranty claim or not? 14
Young Expert plus - Young Expert plus - 15
der Experte für Gruppe 1 the expert for Group I
TÜV Rheinland
B
a
u
a
r
t
g
e
p
r
ü
f
t
T
y
p
e
a
p
p
r
o
v
e
d
VERTRIEB: RECARO GmbH & Co. KG
DISTRIBUTION: Competence-Center Child Safety
Guttenbergstr. 2
D-95352 Marktleugast-Mannsflur
D GB
sto2300-4-11/1 disk STM RECARO Young Profi plus, Inhaltsverzeichnis Montageanleitung
erst. 02.08.05 ps / geänd. am 19.08.05 ps, 30.08.05 tk, 14.09.05gg / 26.09.05 tk,
20.10.05gg. 27.01.06 tk, 23.02.06 tk, 03.03.06 tk, 14.03.06 tk, 21.03.06 tk
Young Profi plus
universal
–13 kg
04301187
Gruppe 0+
E
1

2279-4-06/1
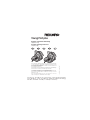
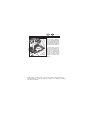
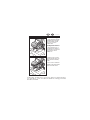
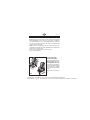
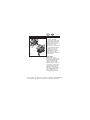
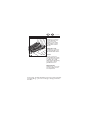
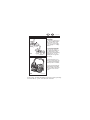
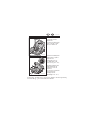
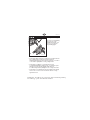
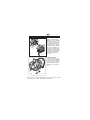
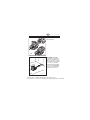
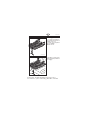
1. Beschreibung
Babyschale von Geburt bis
13 kg, die sowohl mit dem
Dreipunktgurt, als auch auf
der passenden Isofixplatt-
form ins Fahrzeug eingebaut
werden kann. Das Isofixsy-
stem entspricht der Isofixgrö-
ßenklasse E. Wenn Sie das
Isofix nutzen wollen, prüfen
Sie in Ihrem Fahrzeughand-
buch, ob diese Größenklasse
für Ihr Fahrzeug freigegeben
ist.
1. Description
Infant carrier from birth until
a maximum weight of 13 kg
for installation in a vehicle
either with a three-point belt
or on the matching Isofix
base. The Isofix system
corresponds with Isofix Size
Class E. If you intend using
the Isofix system then please
check beforehand in your
vehicle manual whether this
size class is approved for your
vehicle.
D GB
sto2279-4-06/1 disk STM Recaro Young Profi 0+, Bild 1 Montageanleitung
erst. 01.08.2005 ps / geänd. am 19.08.05 ps, 24.08.05 tk, 30.08.05 tk, 20.10.05gg,
25.01.06 tk, 23.02.06 tk, 03.03.06 tk
1
2200F-4-03/1

2772-4-06/1
D GB
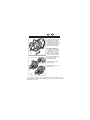
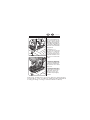
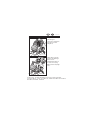
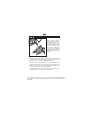
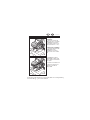
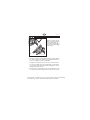
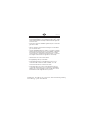
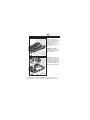
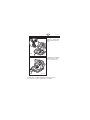
2. Schaukelfunktion:
2.1 Die Babyschale kann auf
Grund Ihrer Form als Wippe
benutzt werden. Um die
Schaukelfunktion außer Kraft
zu setzen, legen Sie den Tra-
gebügel über den Kopfbe-
reich bis zur Einrastung um.
2. Rocking-seat function:
2.1 The shape of the infant
carrier allows it to be rocked.
To eliminate the rocking
function fold the carrying
handle over the head area
until it locks in place. When
the child is in the infant carrier
the harness should be
fastened at all times!
2.2 Verschiedene Trage-
bügelstellungen
2.2 Different positions of the
carrying handle
sto2772-4-06/1 disk STM Recaro Young Profi 0+, Bild 2 Montageanleitung
erst. 30.08.05 tk / geänd. am 20.10.05gg, 21.10.05gg. 27.01.06 tk, 01.02.06 tk,
03.03.06 tk, 07.03.06 tk
2.2
3557F-4-01/1
2.1
2183F-4-02/1
2
1

2296-4-07/1
D GB
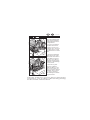
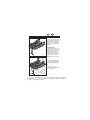
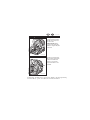
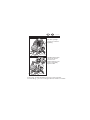
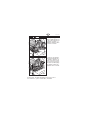
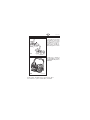
3. Einbau mit Isofix
3.1 Stecken Sie die Einführhil-
fen durch den Polsterschlitz
von Rückenlehne und Sitzflä-
che auf die Isofixbügel, nicht
erforderlich bei bereits fest
installierten Einführhilfen, z.B.
BMW. Achten Sie darauf,
dass die offene Seitenfläche
oben ist.
3. Installing with Isofix
3.1 Insert the guides through
the upholstery slot between
the back rest and seat and
on to the Isofix bracket. This
is not necessary when such
guides have already been
installed, e.g. BMW. Ensure
that the open side area
faces upwards. In some
vehicles, the isofix brackets
are located behind the seat
fabric and are not visable; in
this situation please contact
your vehicle manufacturer
or dealer.
sto2296-4-07/1 disk STM Recaro Young Profi 0+, Bild 3.1 Montageanleitung
erst. 02.08.2005 ps / geänd. am 19.08.05 ps, 24.08.05 tk, 11.10.05gg, 19.10.05gg,
20.01.06 tk, 27.01.06 tk, 03.03.06 tk
3.1
2205F-4-01/1

2280-4-07/1
D GB
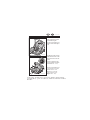
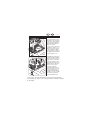
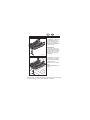
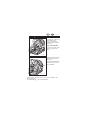
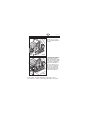
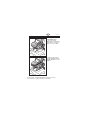
3.2 Isofix:
Die Isofixkonnektoren müssen
herausgezogen werden
durch drücken der grünen
Knöpfe. Dies ist erforderlich
vor jedem Neueinbau in ei-
nem anderen Fahrzeug.
Einbau mit Isofix:
Stecken Sie die Isofixkonnek-
toren (A) der Plattform in die
Einführhilfen.
3.2 Isofix:
Before installing the Isofix
Base, press the green buttons
to FULLY extend the con-
necting arms to the locked
position (see diagram 3.2).
This is necessary before
installation in any vehicle.
Insert the Isofix:
Insert the Isofix connectors
(A) of the platform into the
guides.
sto2280-4-07/1 disk STM Recaro Young Profi 0+, Bild 2.3+2.4 Montageanleitung
erst. 01.08.2005 ps / geänd. am 19.08.05 ps, 24.08.05 tk, 11.10.05gg, 20.10.05gg,
21.10.05gg, 27.01.06 tk, 03.03.06 tk
A
3.2
2193-4-02/1

2281-4-06/1
D GB
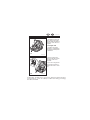
3.3 Rasten Sie die Isofixkon-
nektoren in die Isofixbügel
ein. Die rote Markierung an
den Entriegelungsknöpfen
muss weg sein! Prüfen Sie die
Verrastung durch beidseiti-
ges ziehen an der Plattform.
3.3 Lock the Isofix connectors
into the Isofix brackets. The
red mark on the unlocking
buttons will completely dis-
appear out of sight when the
connectors lock! Check both
arms are securely locked by
pulling on both sides of the
platform.
sto2281-4-06/1 disk STM Recaro Young Profi 0+, Bild 3.3 Montageanleitung
erst. 01.08.2005 ps / geänd. am 19.08.05 ps, 24.08.05 tk, 11.10.05gg, 20.10.05gg,
27.01.06 tk, 03.03.06 tk
2194F-4-02/1
3.3
Klick

2282-4-10/1
D GB
3.4 Stützfuß einstellen:
Ziehen Sie den Rastknopf her-
aus und verstellen Sie den
Stützfuß so, dass er auf dem
Fahrzeugboden aufliegt. Las-
sen Sie dann den Rastknopf
los und achten darauf, dass
der untere Teil des Stützfußes
eingerastet ist.
3.4 Setting the foot:
Pull out the latch knob and
adjust the foot so that it rests
on the floor of the vehicle.
Then release the latch knob
and make sure that the lower
part of the foot is latched in
position.
4. Verankern der Babyschale:
4.1 Setzen Sie die Babyschale
in die hintere Verankerung
ein, und ziehen Sie sie etwas
nach vorne.
4. Anchoring the infant carrier:
4.1 Insert the the rear fittings
of the infant carrier in the
rear anchor points of the
Isofix base and pull slightly
forwards.
sto2282-4-10/1 disk STM Recaro Young Profi 0+, Bild 3.4+4.1 Montageanleitung
erst. 02.07.2005 ps / geänd. am 19.08.05 ps, 24.08.05 tk, 03.09.05 tk / 06.09.05 tk,
11.10.05gg, 20.10.05gg, 21.10.05gg, 27.01.06 tk, 03.03.06 tk / 22.08.06 ps
2195F-4-01/1
4.1
2199F-4-03/1
3.4
Klick

2283-4-08/1
D GB
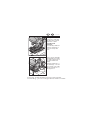
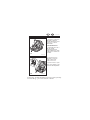
4.3 Drücken Sie die beiden
grünen Knöpfe (A) um die
Sperre für die erste Raste zu
lösen. Danach können Sie
das System ohne drücken
der grünen Knöpfe nach hin-
ten bis kurz vor das Fahrzeug-
polster schieben.
4.3 Press the two green
buttons (A) together to
release the latches on the
legs of the isofix base. The
system can then be pushed
rearwards, until it contacts
the vehicle’s upholstery,
without having to hold down
the green buttons.
4.2 Rasten Sie die Schale in
die vordere Verankerung ein.
Prüfen Sie durch anheben,
ob die Schale hinten und vor-
ne eingerastet ist.
4.2 Lock the front fittings of
the infant carrier into the
front anchor points of the
Isofix base. Lift to check that
the infant carrier is securely
locked at both the front and
back.
sto2283-4-08/1 disk STM Recaro Young Profi 0+, Bild 4.2+4.3 Montageanleitung
erst. 02.07.2005 ps / geänd. am 19.08.05 ps, 24.08.05 tk, 04.10.05gg, 20.10.05gg,
27.01.06 tk, 02.02.06 tk, 23.02.06 tk, 03.03.06 tk
2196F-4-01/1
4.2
Klick
2197F-4-02/1
4.3
A

2773-4-07/1
D GB
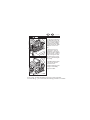
4.4 Beim Transport im Fahr-
zeug muss der Tragebügel
aufrecht stehen.
4.4 During transportation in
the vehicle, the carrying
handle must be in the upright
position.
sto2773-4-07/1 disk STM RECARO Young Profi plus, Bild 4.4 Montageanleitung
erst. 30.08.05 tk / geänd. am 04.10.05gg, 20.10.05gg, 21.10.05gg,
20.01.06 tk, 27.01.06 tk, 03.03.06 tk, 14.03.06 tk
2198F-4-04/1
4.4

2284-4-05/1
D GB
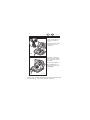
5. Ausbau der Babyschale:
Drücken Sie den Entriegel-
ungshebel (A) für die vorde-
ren Einrastungen und heben
Sie die Babyschale an. Die
Babyschale etwas nach hin-
ten drücken und nach oben
heraus nehmen. Sollte dies
auf Grund Ihres Fahrzeugpol-
sters schwierig sein, verstellen
Sie die Plattform etwas nach
vorne, siehe Bild 6.1.
5. Removing the infant
carrier:
Press down the locking lever
(A) to release the front locks
and lift off the infant carrier.
Push the infant carrier slightly
towards the rear of the
vehicle and lift out. If this
proves to be difficult on
account of collision with the
vehicle’s rear seat, then
readjust the Isofix base slightly
forwards (see fig. 6.1).
2202F-4-02/1
5
1
2
3
A
sto2284-4-05/1 disk STM Recaro Young Profi 0+, Bild 5 Montageanleitung
erst. 02.07.2005 ps / geänd. am 19.08.05 ps, 24.08.05 tk, 20.10.05gg, 27.01.06 tk,
03.03.06 tk

2285-4-07/1
D GB
6. Ausbau Isofix:
6.1 Die Isofixkonnektoren müs-
sen herausgezogen werden
durch drücken der grünen
Knöpfe. Dies ist erforderlich
vor jedem Ausbau aus dem
Fahrzeug.
6. Releasing Isofix:
6.1 The Isofix base can be ex-
tended on it`s connectors by
pressing the green buttons
together and moving the
Isofix base towards the front
of the vehicle. This is neces-
sary before any renewed
installation in another vehicle.
6.2 Lösen Sie die Isofixkonnek-
toren durch ziehen an den
beiden Entriegelungsknöp-
fen.
6.2 Release the Isofix
connectors by pulling the two
unlocking buttons.
sto2285-4-07/1 disk STM Recaro Young Profi 0+, Bild 6.1+6.2 Montageanleitung
erst. 02.07.2005 ps / geänd. am 19.08.05 ps, 24.08.05 tk, 03.09.05 tk, 20.10.05gg,
21.10.05gg, 27.01.06 tk, 03.03.06 tk
2302F-4-01/1
6.1
6.2
2201F-4-01/1

2286-4-06/1
D GB
7. Kind anschnallen:
7.1 Verlängern Sie die Gurte
durch drücken des Zentral-
verstellers, halten ihn gedrückt
und ziehen Sie an den Schul-
tergurten.
7. Securing the child:
7.1 Lengthen the belts by
pressing the central adjuster,
keep depressed and pull the
shoulder belts.
7.2 Öffnen Sie das Schloss
durch Druck auf die rote Taste
und legen Sie die Gurte
seitlich ab.
7.2 Open the locking buckle
by pressing the red button
and place the belts to either
side.
sto2286-4-06/1 disk STM Recaro Young Profi 0+, Bild 6.3+6.4 Montageanleitung
erst. 02.07.2005 ps / geänd. am 19.08.05 ps, 24.08.05 tk, 20.10.05gg, 21.10.05gg,
27.01.06 tk, 03.03.06 tk
7.2
2178F-4-01/1
7.1
2179F-4-01/1

2287-4-07/1
D GB
7.3 Legen Sie das Kind in die
Schale und schließen Sie das
Schloss mit einem hörbaren
Klick.
7.3 Place the child in the seat,
position the upper belts over
the child's shoulders, locate
the buckle tabs into each
other (see diagram 7.3) and
secure into the locking buckle
with an audible click.
7.4 Straffen Sie die Gurte
durch ziehen am Mittelgurt.
Die Gurte müssen straff anlie-
gen.
7.4 Pull the crotch-strap up-
wards and tighten the belts
by pulling the forward sec-
tion of the belt as shown in
diagram 7.4. The belts should
be pulled tight, so that one
finger can just be inserted
between the belt and childs
body.
sto2287-4-07/1 disk STM Recaro Young Profi 0+, Bild 7.3+7.4 Montageanleitung
erst. 02.07.2005 ps / geänd. am 19.08.05 ps, 24.08.05 tk, 02.09.05 tk, 20.10.05gg,
27.01.06 tk, 03.03.06 tk
7.3
2181F-4-01/1
2182F-4-01/1
7.4

3887-4-02/1
7.5 Korrekt angeschnalltes
Kind mit 3-Punkt-Gurt.
7.5 Correctly strapped-in
child with a 3-point belt.
7.6 Korrekt angeschnalltes
Kind mit 5-Punkt-Gurt.
Bedienung siehe Bild 7.1-7.4
7.6 Correctly strapped-in
child with a 5-point belt.
For the use, refer to
fig. 7.1-7.4.
D GB
sto3887-4-02/1 disk Storchenmühle Recaro Young Profi Plus, Bild 7.5
Montageanleitung
erst. 15.09.2006 ps / geänd. am 20.09.06 ps / 16.10.06 ps
3886F-4-00/1
7.6
3899F-4-00/1
7.5

2288-4-07/1
D GB
8.1 Achten Sie auf eine kor-
rekte Schultergurtführung. Die
Schultergurte sollten wie im
Bild dargestellt verlaufen. Ein-
stellung siehe nächstes Bild.
8.1 Ensure that the shoulder
belt is correctly positioned
with the belts either level or
slightly below the childs
shoulders, as shown in
the manner indicated in
diagram 8.1. For adjustments
see next picture.
8.2 Ziehen Sie den Hebel an
der Rückseite der Schale ein
Stück und bringen Sie die
Kopfstütze in die erforderliche
Position.
8.2 Loosen the harness, then
pull the lever at the back of
the shell and adjust the head-
rest to the required position.
sto2288-4-07/1 disk STM Recaro Young Profi 0+, Bild 8.1+8.2 Montageanleitung
erst. 02.07.2005 ps / geänd. am 19.08.05 ps, 24.08.05 tk, 20.10.05gg,
20.01.06 tk, 27.01.06 tk, 03.03.06 tk
8.1
2180-4-01/1
2203F-4-00/1
8.2

2303-4-06/1
D GB
9.2 Ziehen Sie den Schulter-
gurt aus und legen Sie ihn um
den Kopfbereich der Baby-
schale.
9.2 Pull out the shoulder belt
and place it around the head
area of the infant carrier.
9. Einbau mit Fahrzeuggurt:
9.1 Legen Sie den Beckengurt
beidseitig in die Führungen
ein und schließen Sie das
Gurtschloss mit einem
hörbaren Klick.
9. Installing with the vehicle belt:
9.1 Insert the lap section of
the seatbelt in the guides on
both sides and close the belt
locking buckle with an
audible click.
sto2303-4-06/1 disk STM Recaro Young Profi 0+, Bild 9.1+9.2 Montageanleitung
erst. 19.08.2005 ps / geänd. am 24.08.05 tk / 06.09.05 tk, 19.10.05gg, 27.01.06 tk,
23.02.06 tk, 03.03.06 tk
Klick
9.1
2184F-4-02/1
9.2
2185F-4-03/1

2289-4-07/1
D GB
9.4 Beim Transport im Fahr-
zeug muss der Tragebügel
aufrecht stehen.
9.4 During transportation in
the vehicle, the carrying
handle must be in the upright
position.
9.3 Legen Sie den Schultergurt
in die Führung ein.
9.3 Insert the shoulder belt in
the guide (see the blue
routing arrow).
sto2289-4-07/1 disk STM RECARO Young Profi plus, Montageanleitung
erst. 02.07.2005 ps / geänd. am 19.08.05 ps, 24.08.05 tk, 03.09.05 tk, 27.01.06 tk,
23.02.06 tk, 03.03.06 tk, 14.03.06 tk
2186F-4-05/1
9.3
9.4
2187F-4-04/1

2290-4-03/1
10.2 Nehmen Sie den Sitzver-
kleinerer heraus und knöpfen
Sie das Sonnendach ab.
10.2 Remove the head-
support and unbutton the
sunshade.
D GB
10. Bezug abnehmen:
10.1 Ziehen Sie die Schulter-
und das Gurtschlosspolster
von den Gurten.
10. Removing the cover:
10.1 Pull the shoulder pads
and belt locking buckle pad
off the belts.
sto2290-4-03/1 disk STM Recaro Young Profi 0+, Bild 10.1+10.2 Montageanleitung
erst. 02.07.2005 ps / geänd. am 24.08.05 tk, 27.01.06 tk, 03.03.06 tk
10.2
6x
2189F-4-01/1
10.1
2188F-4-01/1

2291-4-05/1
10.4 Hängen Sie die Gummis
an der Innenseite der Schale
aus und nehmen Sie den Be-
zug ab.
Bezug in umgekehrter Rei-
henfolge wieder befestigen
(siehe Bilder 10.4 – 10.1).
10.4 Unhook the rubber loops
from the inside of the shell
and remove the cover.
Fasten the cover in the
reverse sequence (see
diagrams 10.4 – 10.1).
D GB
10.3 Schlaufen Sie die Gum-
mis aus und ziehen Sie den
Kopfstützenbezug ab.
10.3 Unhook the rubber loops
and pull off the head support
cover.
sto2291-4-05/1 disk STM Recaro Young Profi 0+, Bild 10.4 Montageanleitung
erst. 02.06.2005 ps / geänd. am 19.08.05 ps, 24.08.05 tk, 20.01.06 tk, 27.01.06 tk,
03.03.06 tk
2308F-4-00/1
10.4
2190F-4-00/1
10.3
La pagina si sta caricando...
La pagina si sta caricando...
La pagina si sta caricando...
La pagina si sta caricando...
La pagina si sta caricando...
La pagina si sta caricando...
La pagina si sta caricando...
La pagina si sta caricando...
La pagina si sta caricando...
La pagina si sta caricando...
La pagina si sta caricando...
La pagina si sta caricando...
La pagina si sta caricando...
La pagina si sta caricando...
La pagina si sta caricando...
La pagina si sta caricando...
La pagina si sta caricando...
La pagina si sta caricando...
La pagina si sta caricando...
La pagina si sta caricando...
La pagina si sta caricando...
La pagina si sta caricando...
La pagina si sta caricando...
La pagina si sta caricando...
La pagina si sta caricando...
La pagina si sta caricando...
La pagina si sta caricando...
La pagina si sta caricando...
La pagina si sta caricando...
La pagina si sta caricando...
La pagina si sta caricando...
La pagina si sta caricando...
La pagina si sta caricando...
La pagina si sta caricando...
La pagina si sta caricando...
La pagina si sta caricando...
La pagina si sta caricando...
La pagina si sta caricando...
La pagina si sta caricando...
La pagina si sta caricando...
La pagina si sta caricando...
La pagina si sta caricando...
La pagina si sta caricando...
La pagina si sta caricando...
La pagina si sta caricando...
La pagina si sta caricando...
La pagina si sta caricando...
La pagina si sta caricando...
La pagina si sta caricando...
La pagina si sta caricando...
La pagina si sta caricando...
La pagina si sta caricando...
La pagina si sta caricando...
La pagina si sta caricando...
La pagina si sta caricando...
La pagina si sta caricando...
-
 1
1
-
 2
2
-
 3
3
-
 4
4
-
 5
5
-
 6
6
-
 7
7
-
 8
8
-
 9
9
-
 10
10
-
 11
11
-
 12
12
-
 13
13
-
 14
14
-
 15
15
-
 16
16
-
 17
17
-
 18
18
-
 19
19
-
 20
20
-
 21
21
-
 22
22
-
 23
23
-
 24
24
-
 25
25
-
 26
26
-
 27
27
-
 28
28
-
 29
29
-
 30
30
-
 31
31
-
 32
32
-
 33
33
-
 34
34
-
 35
35
-
 36
36
-
 37
37
-
 38
38
-
 39
39
-
 40
40
-
 41
41
-
 42
42
-
 43
43
-
 44
44
-
 45
45
-
 46
46
-
 47
47
-
 48
48
-
 49
49
-
 50
50
-
 51
51
-
 52
52
-
 53
53
-
 54
54
-
 55
55
-
 56
56
-
 57
57
-
 58
58
-
 59
59
-
 60
60
-
 61
61
-
 62
62
-
 63
63
-
 64
64
-
 65
65
-
 66
66
-
 67
67
-
 68
68
-
 69
69
-
 70
70
-
 71
71
-
 72
72
-
 73
73
-
 74
74
-
 75
75
-
 76
76


RECARO Young Profi plus Manuale del proprietario
- Categoria
- Sedili dell'auto
- Tipo
- Manuale del proprietario
in altre lingue
- English: RECARO Young Profi plus Owner's manual
- français: RECARO Young Profi plus Le manuel du propriétaire
- Deutsch: RECARO Young Profi plus Bedienungsanleitung
- Nederlands: RECARO Young Profi plus de handleiding
Documenti correlati
-
RECARO Young Sport HERO Manuale del proprietario
-
RECARO Young Style Manuale del proprietario
-
RECARO Young Sport Installation Instructions Manual
-
-
-
RECARO Young Sport Bellini Istruzioni per l'uso
-
RECARO Young Expert Istruzioni per l'uso
-
-
-