CHAUVIN ARNOUX CA 6161 MULTITESTER Guida Rapida
- Categoria
- Tester di rete via cavo
- Tipo
- Guida Rapida
Questo manuale è adatto anche per

Machine & Panel Tester
CA 6161
CA 6163
Quick Start Guide

Testeurs de machine et de tableaux
Machine & Panel Tester
Prüfer für Maschinen und Schaltschränke
Controllori di macchine e di quadri
Controladores de máquinas y cuadros
Maskin- och paneltestare
Sähköasennustesteri
Controllers voor machines en schakelborden
Tester maszyn i tablic
Тестеры электрозащиты машин и распределительных щитов
仪器仪表控制器
เครื่องจักรและตัวควบคุมแผง
FR - Guide de démarrage rapide ........................................................................................ 3
EN - Quick start guide ....................................................................................................... 11
DE - Schnellstartanleitung ................................................................................................ 19
IT - Guida di Utilizzo rapido ............................................................................................. 27
ES - Guía de inicio rápido ................................................................................................. 35
SV - Snabbstartsguide ...................................................................................................... 43
FI - Pikaopas ................................................................................................................... 51
NL - Snelstartgids ............................................................................................................. 59
PL - Skrócona instrukcja uruchomienia ............................................................................ 67
RO - .............................................................................................. 75
CS - ........................................................................................... 83
....................................................................................... 91
RU - ................................................................... 99
ZH - 快速入门指南 .................................................................................................................. 107
TH - คู่มือการใช้งานแบบย่อ ................................................................................................................... 115
VI - ............................................................................................ 123

3
GUIDE DE DÉMARRAGE RAPIDE DES CA 6161 ET CA 6163 (FR)
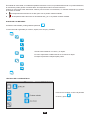
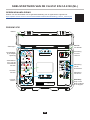
NOTICE DE FONCTIONNEMENT
ou
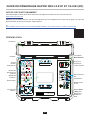
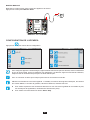
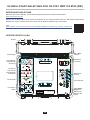
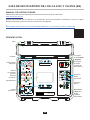
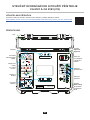
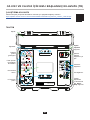
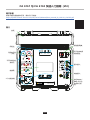
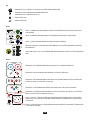
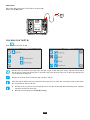
PRÉSENTATION
START
STOP
CA 6163
MACHINE & PANEL TESTER
F1 F2 F3
30 A 300 V
6,3 x 32
16 A 300 V
6,3 x 32
16 A 300 V
6,3 x 32
230 V 50 Hz 16 A
30 V
MAX
30 V
MAX
30 V
MAX
600 V
CAT III
440 V
Max
C1 C2P1 P2
RCD, DISCH, PHSEQ, Zs, Zi
PE
L3
N
L2
L
230 V 16 A
TEST SOCKET
CONTINUITY
TOUCH CURRENT
HV DIELECTRIC
INSULATION
CONTINUITY
L1
5 kV
1 kV
600 V CAT III
300 V CAT III
300 V CAT III
600 V CAT III
25 A
12 V
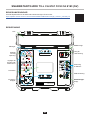
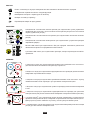
Fusibles.
Voyant
tension
dangereuse.
branchement
pour les
fonctions.
Écran tactile.
4 touches de
fonction.
Interrupteur
Marche/Arrêt.
Prise pour
brancher le
cordon secteur.
Raccordement
des
accessoires.
du PC.
Start
/ Stop pour
démarrer et
arrêter les
tests.

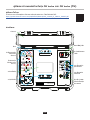
4
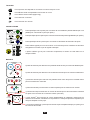
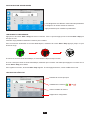
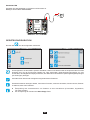
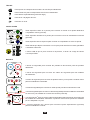
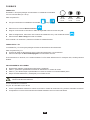
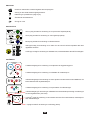
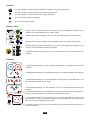
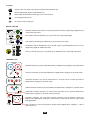
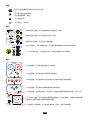
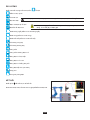
TOUCHES
CONNECTEURS
START
STOP
30 V
MAX
30 V
MAX
30 V
MAX
600 V
CAT III
440 V
Max
C1 C2P1 P2
RCD, DISCH, PHSEQ, Zs, Zi
PE
L3
N
L2
L
230 V 16 A
TEST SOCKET
CONTINUITY
TOUCH CURRENT
HV DIELECTRIC
INSULATION
CONTINUITY
L1
5 kV
1 kV
600 V CAT III
300 V CAT III
300 V CAT III
600 V CAT III
25 A
12 V
récepteur RFID.
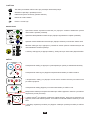
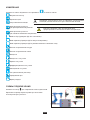
BORNES
2 prises de sécurité pour brancher les pistolets haute tension pour les tests diélectriques.
pour les mesures de continuité.
3 prises de sécurité pour brancher le cordon tripode pour les mesures sur secteur.
1 prise de sécurité pour brancher un cordon de sécurité pour et les mesures de continuité
1 prise Schuko®
les mesures de courant.

5
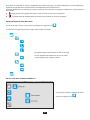
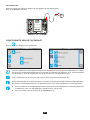
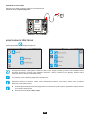
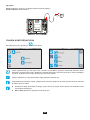
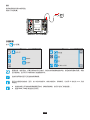
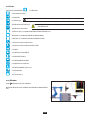
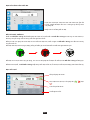
MISE EN MARCHE
Marche / Arrêt.
CA 6163
MACHINE & PANEL TESTER
F1 F2 F3
30 A 300 V
6,3 x 32
16 A 300 V
6,3 x 32
16 A 300 V
6,3 x 32
230 V 50 Hz 16 A
30 V
MAX
30 V
MAX
30 V
MAX
600 V
CAT III
440 V
Max
C1 C2P1 P2
RCD, DISCH, PHSEQ, Zs, Zi
PE
L3
N
L2
L
230 V 16 A
TEST SOCKET
CONTINUITY
TOUCH CURRENT
HV DIELECTRIC
INSULATION
CONTINUITY
L1
5 kV
1 kV
600 V CAT III
300 V CAT III
300 V CAT III
600 V CAT III
25 A
12 V
230 V
50/60 Hz
16 A
CONFIGURATION DE L’APPAREIL
Start / Stop.

6
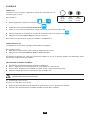
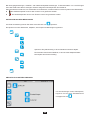
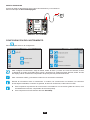
MESURES
Continuité
Isolement
Diélectrique rampe
x5
Impédance de boucle
Impédance de ligne
Puissance
Puissance et courant de fuite
Courant de fuite direct
Courant de fuite par substitution
Rotation de phase
Temps de décharge
BRANCHEMENTS
pour afficher les schémas de
branchement.

7
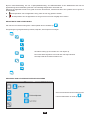
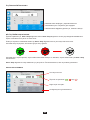
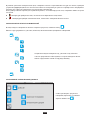
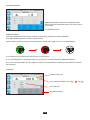
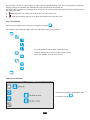
CONFIGURATION DES MESURES
LANCEMENT D’UNE MESURE
Start / StopStart / Stop que
Start / Stop
START
STOP
START
STOP
START
STOP
bouton Start / Stop
Start / Stop
LECTURE DU RÉSULTAT
Résultat de mesure principal.
ou

8
!
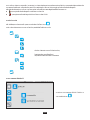
ENREGISTREMENT DES MESURES
.
RELECTURE DES ENREGISTREMENTS
Enregistrez chaque mesure dans un site et un objet.
.

9
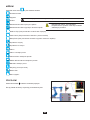
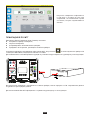
LOGICIEL D’APPLICATION MTT
CA 6163
F1 F2 F3
C1 C2P1 P2
données enregistrées.

10
Choisissez le branchement Bornes extérieures .
Faites un court-circuit en branchant un cordon de sécurité entre les bornes C1 et C2.
.
Start / Stop pour lancer la mesure.
FUSIBLES F2 ET F3
Marche / Arrêt
PROCÉDURE DE REMPLACEMENT
caractéristiques strictement identiques.
F
U
S
E
F
U
S
E
F
U
S
E
F1
30 A 300 V
6,3 x 32
16 A 300 V
6,3 x 32
16 A 300 V
6,3 x 32
F2 F3
FUSIBLE F1
puis .
FUSIBLES

11
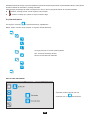
QUICK START GUIDE FOR THE CA 6161 AND CA 6163 (EN)
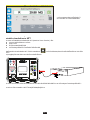
USER MANUAL
Download it.
or
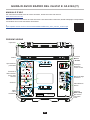
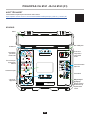
DESCRIPTION
START
STOP
CA 6163
MACHINE & PANEL TESTER
F1 F2 F3
30 A 300 V
6,3 x 32
16 A 300 V
6,3 x 32
16 A 300 V
6,3 x 32
230 V 50 Hz 16 A
30 V
MAX
30 V
MAX
30 V
MAX
600 V
CAT III
440 V
Max
C1 C2P1 P2
RCD, DISCH, PHSEQ, Zs, Zi
PE
L3
N
L2
L
230 V 16 A
TEST SOCKET
CONTINUITY
TOUCH CURRENT
HV DIELECTRIC
INSULATION
CONTINUITY
L1
5 kV
1 kV
600 V CAT III
300 V CAT III
300 V CAT III
600 V CAT III
25 A
12 V
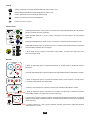
Fuses.
Dangerous
indicator.
Connection
terminals for
functions.
Touch screen.
4 function
keys.
switch.
Socket for
connecting
the power cord.
Connection
of accessories.
PC connection.
Start / Stop
button to start
and stop tests.

12
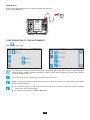
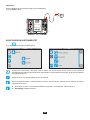
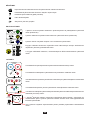
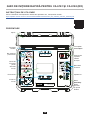
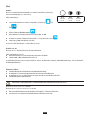
KEYS
To display help corresponding to the current function.
To return to home.
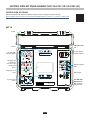
CONNECTORS
START
STOP
30 V
MAX
30 V
MAX
30 V
MAX
600 V
CAT III
440 V
Max
C1 C2P1 P2
RCD, DISCH, PHSEQ, Zs, Zi
PE
L3
N
L2
L
230 V 16 A
TEST SOCKET
CONTINUITY
TOUCH CURRENT
HV DIELECTRIC
INSULATION
CONTINUITY
L1
5 kV
1 kV
600 V CAT III
300 V CAT III
300 V CAT III
600 V CAT III
25 A
12 V
TERMINALS
2 safety terminals for connecting safety leads for insulation measurements.
measurements.
3 safety terminals to connect the tripod cord for mains measurements.
1 safety terminal to connect a safety lead for continuity measurements on sockets
1 Schuko®
or power measurements. This plug can be replaced by a plug suitable for your country.
measurements.

13
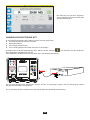
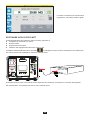
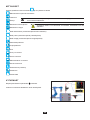
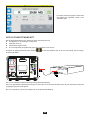
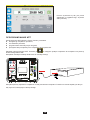
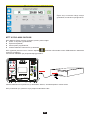
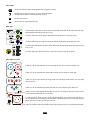
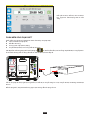
STARTING UP
Connect the mains lead between the instrument socket and the mains.
Press the switch.
CA 6163
MACHINE & PANEL TESTER
F1 F2 F3
30 A 300 V
6,3 x 32
16 A 300 V
6,3 x 32
16 A 300 V
6,3 x 32
230 V 50 Hz 16 A
30 V
MAX
30 V
MAX
30 V
MAX
600 V
CAT III
440 V
Max
C1 C2P1 P2
RCD, DISCH, PHSEQ, Zs, Zi
PE
L3
N
L2
L
230 V 16 A
TEST SOCKET
CONTINUITY
TOUCH CURRENT
HV DIELECTRIC
INSULATION
CONTINUITY
L1
5 kV
1 kV
600 V CAT III
300 V CAT III
300 V CAT III
600 V CAT III
25 A
12 V
230 V
50/60 Hz
16 A
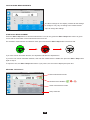
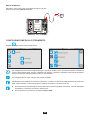
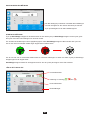
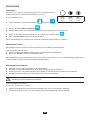
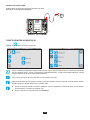
CONFIGURATION OF THE INSTRUMENT
Press to enter setup.
status for dielectric testing.
To check the operation of the Start / Stop button.

14
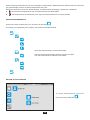
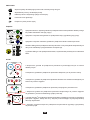
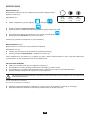
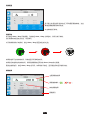
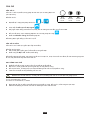
MEASUREMENTS
Tap the single test icon
Visual inspection
Continuity
Insulation
Dielectric ramp
x5
Loop impedance
Line impedance
Power
Power and leakage current
Direct leakage current
Leakage current by substitution
Phase rotation
Discharge time
Continuity measurements and insulation measurements must be performed
it can cause electric shock.
CONNECTIONS
Press the key to display the connection diagrams.

15
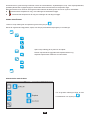
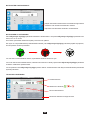
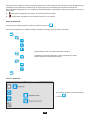
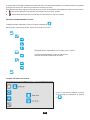
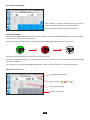
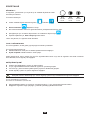
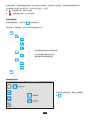
CONFIGURING MEASUREMENTS
STARTING A MEASUREMENT
Press the Start / Stop button to start the measurement. You can only press the Start / Stop button when it is green.
Start / Stop button until it turns red.
The blue rectangle on the display contains all the settings
Tap it to change the settings.
START
STOP
START
STOP
START
STOP
Start / Stop button
again to stop it.
Start / Stop
READING THE RESULT
or
Other measurement results.
Setup reminder.

16
can generate high currents. Its internal temperature then rises.
!
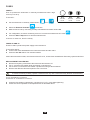
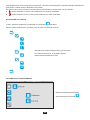
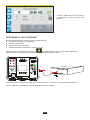
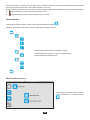
SAVING MEASUREMENTS
.
REVIEW OF RECORDINGS
The site represents the building where the object is located.
The object represents the machine to be tested.
the home screen and press .

17
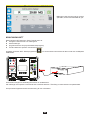
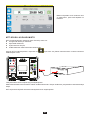
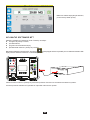
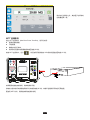
MTT APPLICATION SOFTWARE
Refer to the user manual for full installation details.
The measurement is displayed as it was
is yellow.
CA 6163
F1 F2 F3
C1 C2P1 P2
data.

18
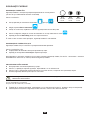
Select the External Terminals connection.
C1 and C2.
.
Press the Start / Stop button to start the measurement.
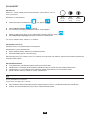
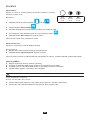
FUSES F2 AND F3
Fuses F2 and F3 protect the power supply to the instrument.
Connect the mains lead between the instrument socket and the mains.
Press the switch. The instrument starts.
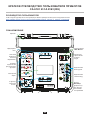
REPLACEMENT PROCEDURE
F
U
S
E
F
U
S
E
F
U
S
E
F1
30 A 300 V
6,3 x 32
16 A 300 V
6,3 x 32
16 A 300 V
6,3 x 32
F2 F3
FUSE F1
Fuse F1 protects the instrument in continuity measurement with a high
then .
FUSES

19
SCHNELLSTART-ANLEITUNG FÜR CA 6161 UND CA 6163 (DE)
BEDIENUNGSANLEITUNG
oder
GERÄTEVORSTELLUNG
START
STOP
CA 6163
MACHINE & PANEL TESTER
F1 F2 F3
30 A 300 V
6,3 x 32
16 A 300 V
6,3 x 32
16 A 300 V
6,3 x 32
230 V 50 Hz 16 A
30 V
MAX
30 V
MAX
30 V
MAX
600 V
CAT III
440 V
Max
C1 C2P1 P2
RCD, DISCH, PHSEQ, Zs, Zi
PE
L3
N
L2
L
230 V 16 A
TEST SOCKET
CONTINUITY
TOUCH CURRENT
HV DIELECTRIC
INSULATION
CONTINUITY
L1
5 kV
1 kV
600 V CAT III
300 V CAT III
300 V CAT III
600 V CAT III
25 A
12 V
Deckel
Sicherungen
-
Spannung
-
buchsen der
Funktionen
Touchscreen
4 Funktions-
tasten
Ein- / Aus-
schalter
Netzkabel-
anschluss
-
schluss
Taste Start /
Stopp zum
Starten und
Stoppen der
Tests

20
TASTEN
Hilfe der aktuellen Funktion aufrufen
Eine Ebene hinauf
STECKVERBINDER
START
STOP
30 V
MAX
30 V
MAX
30 V
MAX
600 V
CAT III
440 V
Max
C1 C2P1 P2
RCD, DISCH, PHSEQ, Zs, Zi
PE
L3
N
L2
L
230 V 16 A
TEST SOCKET
CONTINUITY
TOUCH CURRENT
HV DIELECTRIC
INSULATION
CONTINUITY
L1
5 kV
1 kV
600 V CAT III
300 V CAT III
300 V CAT III
600 V CAT III
25 A
12 V
Fußschalter
BUCHSEN
Steckdose ersetzt werden.
-
messungen
La pagina sta caricando ...
La pagina sta caricando ...
La pagina sta caricando ...
La pagina sta caricando ...
La pagina sta caricando ...
La pagina sta caricando ...
La pagina sta caricando ...
La pagina sta caricando ...
La pagina sta caricando ...
La pagina sta caricando ...
La pagina sta caricando ...
La pagina sta caricando ...
La pagina sta caricando ...
La pagina sta caricando ...
La pagina sta caricando ...
La pagina sta caricando ...
La pagina sta caricando ...
La pagina sta caricando ...
La pagina sta caricando ...
La pagina sta caricando ...
La pagina sta caricando ...
La pagina sta caricando ...
La pagina sta caricando ...
La pagina sta caricando ...
La pagina sta caricando ...
La pagina sta caricando ...
La pagina sta caricando ...
La pagina sta caricando ...
La pagina sta caricando ...
La pagina sta caricando ...
La pagina sta caricando ...
La pagina sta caricando ...
La pagina sta caricando ...
La pagina sta caricando ...
La pagina sta caricando ...
La pagina sta caricando ...
La pagina sta caricando ...
La pagina sta caricando ...
La pagina sta caricando ...
La pagina sta caricando ...
La pagina sta caricando ...
La pagina sta caricando ...
La pagina sta caricando ...
La pagina sta caricando ...
La pagina sta caricando ...
La pagina sta caricando ...
La pagina sta caricando ...
La pagina sta caricando ...
La pagina sta caricando ...
La pagina sta caricando ...
La pagina sta caricando ...
La pagina sta caricando ...
La pagina sta caricando ...
La pagina sta caricando ...
La pagina sta caricando ...
La pagina sta caricando ...
La pagina sta caricando ...
La pagina sta caricando ...
La pagina sta caricando ...
La pagina sta caricando ...
La pagina sta caricando ...
La pagina sta caricando ...
La pagina sta caricando ...
La pagina sta caricando ...
La pagina sta caricando ...
La pagina sta caricando ...
La pagina sta caricando ...
La pagina sta caricando ...
La pagina sta caricando ...
La pagina sta caricando ...
La pagina sta caricando ...
La pagina sta caricando ...
La pagina sta caricando ...
La pagina sta caricando ...
La pagina sta caricando ...
La pagina sta caricando ...
La pagina sta caricando ...
La pagina sta caricando ...
La pagina sta caricando ...
La pagina sta caricando ...
La pagina sta caricando ...
La pagina sta caricando ...
La pagina sta caricando ...
La pagina sta caricando ...
La pagina sta caricando ...
La pagina sta caricando ...
La pagina sta caricando ...
La pagina sta caricando ...
La pagina sta caricando ...
La pagina sta caricando ...
La pagina sta caricando ...
La pagina sta caricando ...
La pagina sta caricando ...
La pagina sta caricando ...
La pagina sta caricando ...
La pagina sta caricando ...
La pagina sta caricando ...
La pagina sta caricando ...
La pagina sta caricando ...
La pagina sta caricando ...
La pagina sta caricando ...
La pagina sta caricando ...
La pagina sta caricando ...
La pagina sta caricando ...
La pagina sta caricando ...
La pagina sta caricando ...
La pagina sta caricando ...
La pagina sta caricando ...
La pagina sta caricando ...
La pagina sta caricando ...
La pagina sta caricando ...
La pagina sta caricando ...
-
 1
1
-
 2
2
-
 3
3
-
 4
4
-
 5
5
-
 6
6
-
 7
7
-
 8
8
-
 9
9
-
 10
10
-
 11
11
-
 12
12
-
 13
13
-
 14
14
-
 15
15
-
 16
16
-
 17
17
-
 18
18
-
 19
19
-
 20
20
-
 21
21
-
 22
22
-
 23
23
-
 24
24
-
 25
25
-
 26
26
-
 27
27
-
 28
28
-
 29
29
-
 30
30
-
 31
31
-
 32
32
-
 33
33
-
 34
34
-
 35
35
-
 36
36
-
 37
37
-
 38
38
-
 39
39
-
 40
40
-
 41
41
-
 42
42
-
 43
43
-
 44
44
-
 45
45
-
 46
46
-
 47
47
-
 48
48
-
 49
49
-
 50
50
-
 51
51
-
 52
52
-
 53
53
-
 54
54
-
 55
55
-
 56
56
-
 57
57
-
 58
58
-
 59
59
-
 60
60
-
 61
61
-
 62
62
-
 63
63
-
 64
64
-
 65
65
-
 66
66
-
 67
67
-
 68
68
-
 69
69
-
 70
70
-
 71
71
-
 72
72
-
 73
73
-
 74
74
-
 75
75
-
 76
76
-
 77
77
-
 78
78
-
 79
79
-
 80
80
-
 81
81
-
 82
82
-
 83
83
-
 84
84
-
 85
85
-
 86
86
-
 87
87
-
 88
88
-
 89
89
-
 90
90
-
 91
91
-
 92
92
-
 93
93
-
 94
94
-
 95
95
-
 96
96
-
 97
97
-
 98
98
-
 99
99
-
 100
100
-
 101
101
-
 102
102
-
 103
103
-
 104
104
-
 105
105
-
 106
106
-
 107
107
-
 108
108
-
 109
109
-
 110
110
-
 111
111
-
 112
112
-
 113
113
-
 114
114
-
 115
115
-
 116
116
-
 117
117
-
 118
118
-
 119
119
-
 120
120
-
 121
121
-
 122
122
-
 123
123
-
 124
124
-
 125
125
-
 126
126
-
 127
127
-
 128
128
-
 129
129
-
 130
130
-
 131
131
-
 132
132


CHAUVIN ARNOUX CA 6161 MULTITESTER Guida Rapida
- Categoria
- Tester di rete via cavo
- Tipo
- Guida Rapida
- Questo manuale è adatto anche per
in altre lingue
Documenti correlati
Altri documenti
-
Multimetrix DMM54 MULTIMETER Manuale utente
-
PeakTech P 1095 Manuale del proprietario
-
Greenlee GT-220, GT-540 Electrical Testers (Europe) Manuale utente
-
Megger TPT320 Manuale utente
-
-
BEHA AMPROBE Beha-Amprobe AM-520-EUR Digital Multimeter Manuale utente
-
Amprobe PM51A Pocket Multimeter Manuale utente