
DGB
F
NL
SDKFIN
N
IEP
GARDENA
®
4030 Art. 1283
6030 Art. 1284
D Gebrauchsanweisung
Bewässerungssteuerung
GB Operating Instructions
Watering Controller
F Mode d’emploi
Programmateur
NL Gebruiksaanwijzing
Besproeiingscomputer
S Bruksanvisning
Kontrollpanel
DK Brugsanvisning
Vandingskontrol-system
FIN Brugsanvisning
Kastelunohjauslaite
N Brugsanvisning
Vanningstimer kontrollenhet
I Istruzioni per l’uso
Centralina
E Manual de instrucciones
Programación de riego
P Instruções de utilização
Comando de rega

15
GB
Proper use
Contents
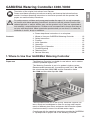
GARDENA Watering Controller 4030 / 6030
Translation of the original instructions from German.
Please read these operating instructions carefully and observe the information they
contain. Use these operating instructions to familiarise yourself with the product, the
proper use and the safety instructions.
A
For safety reasons, children and young people under the age of 16, as well as people
not familiar with these operating instructions, should not use this product. Persons with
reduced physical or mental abilities may use the product only if they are supervised or
instructed by a responsible person. Children must be supervised to ensure that they do
not play with the product. Never operate the product when you are tired, ill or under the
influence of alcohol, drugs or medicine.
v Please keep these instructions in a safe place.
1. Where to Use your GARDENA Watering Controller . . . . . . . . . . 15
2. Safety Instructions
. . . . . . . . . . . . . . . . . . . . . . . . . . . . . . . . . . . . . . . . . . . . . 16
3. Function
. . . . . . . . . . . . . . . . . . . . . . . . . . . . . . . . . . . . . . . . . . . . . . . . . . . . . . . 16
4. Initial Operation
. . . . . . . . . . . . . . . . . . . . . . . . . . . . . . . . . . . . . . . . . . . . . . . . 17
5. Operation
. . . . . . . . . . . . . . . . . . . . . . . . . . . . . . . . . . . . . . . . . . . . . . . . . . . . . . 19
6. Putting Out of Operation
. . . . . . . . . . . . . . . . . . . . . . . . . . . . . . . . . . . . . . 25
7. Trouble-Shooting
. . . . . . . . . . . . . . . . . . . . . . . . . . . . . . . . . . . . . . . . . . . . . . 25
8. Technical Data
. . . . . . . . . . . . . . . . . . . . . . . . . . . . . . . . . . . . . . . . . . . . . . . . . 26
9. Service / Warranty
. . . . . . . . . . . . . . . . . . . . . . . . . . . . . . . . . . . . . . . . . . . . . 26
1. Where to Use Your GARDENA Watering Controller
The Watering Controller is suitable for use indoors and in outdoor
locations protected against rain.
This Watering Controller is part of a garden irrigation system.
Recommended accessories: the watering valve (24V) Art. 1278,
the valve boxes Art. 1254 / 1255 and the connection cable
Art. 1280 and the cable clips Art. 1282.
These products allow you to set up fully automatic irrigation sys-
tems, which can be designed to cater for varying water require-
ments of different plant areas and ensure that the entire system
functions correctly in case of insufficient water supply.
Compliance with the operating instructions provided by GARDENA
is a prerequisite for proper use of the Watering Controller.

16
GB
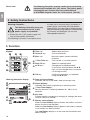
3. Function
1
Time key: Selects date and time.
2
Channel key: Calls the channels.
3
Man. key: Manually opens / closes individual
channels.
4
% Run-Time key: Calls up the % run-time function.
5
Rain Off key: Selects a watering break.
6
▲-▼ keys: Changes data already entered.
(If you press and hold down the ▲-▼
keys you can change data in the quick
run-through mode.)
7
OK key: Confirms the settings you selected
using the ▲-▼ keys.
8
Date and time display:
Indicates the day of the week, date and current time.
9
Status display:
Indicates the current programming or watering status.
0
% Run-Time display:
Sets the duration of watering between 10
-
200% for all
channels.
A
Key lock:
Protects against unintentional changing of settings (the reset
function cannot be locked).
B
Battery status display:
When the Low Battery display flashes, the battery is almost
empty and has to be replaced.
When the Low Battery display appears, the battery is empty
or no battery has been inserted.
The Low Battery display is re-set once the new battery has
been inserted.
The Watering Controller must be used only for controlling
commercially available 24 V (AC) valves. The electric power
consumption per channel must not exceed 600 mA
(a GARDENA Irrigation Valve Art. 1278 requires 150 mA).
Please note
2. Safety Instructions
Watering Controller:
The Watering Controller must only
be operated with the 24-V (AC)
power supply unit provided.
v Protect the 24-V (AC) power supply unit
from moisture when connected.
The Watering Controller is not splash proof.
In order not to lose any data in the event of
power failure, an alkaline 9 V block battery
(type 6LR61) must be used for buffering data.
We recommend using batteries manufactured
by Duracell and Energizer (do not use
rechargeable batteries).
Keypad:
Watering Controller display:
7
1 2
3
4
5
6
8
9
B
F
E
0
A
G
C
D

17
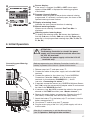
GB
Connecting your Watering
Controller:
8
9
B
F
E
0
A
G
C
D
C
Sensor display:
If the sensor is inserted, the DRY or WET status report
appears. When WET is displayed the watering programs
are disabled.
D
Program / channel display:
Indicates which program of the particular channel is being
programmed. If a channel is currently open, the frame of the
opened watering channel flashes.
E
Display of watering times:
Indicates the start time and duration of watering.
F
Manual watering display:
When manual watering is selected, Run Time Man. is
displayed.
G
Watering cycles / watering days:
To display the watering cycles (24 h every day, 2nd every
2nd day, 3rd every 3rd day, Odd every odd day Even every
even day) or the programmed watering days (Mo, Tu, We, Th,
Fr, Sa, Su).
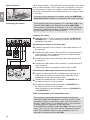
4. Initial Operation
ATTENTION !
A
The Watering Controller is ruined if the power
supply unit is connected to terminals other than
the 24 V AC terminals!
V Connect the power supply unit to the 24 V AC
terminals only!
Before programming your Watering Controller, install a 9-V
battery to prevent loss of data if a power failure occurs.
1. Release snap lock
1
and open cover
2
.
2. Connect the cable of the power supply unit to the 24 V AC
terminals.
3. Connect the cables for the valves (e.g. 7-wire GARDENA
Connection Cable Art. 1280 for up to 6 valves) to the
terminals for the channels (CHANNELS 1…) and C
(see also
“Connecting the valves”
).
4. If required, connect the sensor (e.g. GARDENA Moisture Sensor
Art. 1188) using the accompanying adapter cable
z
S
and connect
the latter to the SENSOR terminals.
5. If necessary (e.g. Art. 1273) connect the cable for the master
channel to the PUMP terminals (see
“Master channel”
).
6. Remove the empty battery as necessary: Depress the clip
z
L
(the battery is released) and remove the empty battery.
7. Attach the battery
3
to the battery clip
4
and insert it into the
battery compartment
5
.
8. Close cover
2
and let snap lock
1
engage.
9. Plug the mains plug of the 24 V (AC) power supply unit into a
mains socket.
After this it is necessary to set the date and time
(see 5. Operation “Setting the date and time”).
1
2
5
3
z
S
z
L
4

18
GB
Master Channel:
Connecting the valves:
The master channel is a channel that can be operated at the same
time as other channels. This is important, for example, if you want
to use a pump to supply your irrigation system with water and if
the pump should always be activated each time an irrigation valve
is activated.
The pump can be operated, for example, using the GARDENA
Pump Control Art. 1273 that is connected to the master channel.
The example shows the connection of 2 valves Art. 1278 in the
Valve Box Art. 1255 to the Watering Controller 4030 / 6030.
As the output of the Watering Controller is 24 V AC (alternating
current) for switching the valves, it is does not matter which of
the two cables of a valve is inserted into C.
Labelling the valves:
1
Label the valves (1
-
6), so that the channels (CHANNELS 1,
CHANNELS 2, …) of the Watering Controller can be clearly
assigned to the valves.
Connecting the valves to the Valve Box:
2
Connect one cable of the valve V1 to the cable terminal 1 of
the valve box.
3
Connect the other cable of the valve V1 to a cable terminal C
of the valve box (All 4 cable terminals C are interconnected
and equivalent to one another).
4
Connect one cable of the valve V2 to the cable terminal 2 of
the valve box.
5
Connect the other cable of the valve V2 to a cable terminal C
of the valve box.
Other valves can be connected similarly to
V1
and
V2
.
Connecting the Watering Controller to the Valve Box:
6
Connect a cable terminal C of the Watering Controller to a
cable terminal C of the valve box. Both cable clips C are
connected to each other and equivalent.
7
Connect the cable terminal of channel 1 CHANNELS 1 to
the cable terminal 1 of the valve box.
8
Connect the cable terminal of channel 2 CHANNELS 2 to
the cable terminal 2 of the valve box.
Other channels can be connected similarly to
CHANNELS 1
and
CHANNELS 2
.
Cable cross-section of the connection cable:
The maximum permissible distance between the Watering
Controller and the valve depends on the cross-section of the
connection cable. For a distance of 30 m, the cross section is
0.5 mm
2
and 0.75 mm
2
for a distance of 45 m. No more than
3 valves must be in operation at the same time.
The GARDENA connection cable Art. 1280 is 0.5 mm
2
in size
and is 15 m long. Up to 6 valves can be connected using this
cable. The connection cable can be connected so that it is
watertight using the cable clip Art. 1282.

19
GB
The two screws (not supplied) for attaching the Watering
Controller have to be screwed into place 80 mm apart and the
screw head diameter must not exceed 8 mm.
1. Screw the screws
6
into the wall 80 mm apart.
2. Attach the Watering Controller.
3. Release snap lock
1
and open cover
2
(see
“Connecting
your Watering Controller”
) and mark hole for screw
6
of the
elongated hole
7
.
4. Screw the screw
6
into the elongated hole
7
for fixation.
5. Close cover
2
and let snap lock
1
engage.
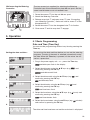
5. Operation
5.1 Basic Programming
Date and Time (Time Key)
You can end the programming mode at any time by pressing the
Time key.
You must set the date and time before you can set the watering
programs. The day of the week is selected automatically using
the date. When the Time key is pressed, all the valves are clo-
sed as a precaution.
1. Plug in the power supply unit – or – press the Time key.
YEAR
and date-year flash in the display.
2. Select the date-year using the ▲-▼ keys (e.g.
2010
) and
confirm by pressing the OK key.
MONTH
and date-month flash.
3. Select the date-month using the ▲-▼ keys (e.g.
05
) and
confirm by pressing the OK key.
Day
and date-day flash.
4. Select the date-day using the ▲-▼ keys (e.g.
23
) and
confirm by pressing the OK key.
TIME
and time-hours flash.
5. Select the time-hours using the ▲-▼ keys (e.g.
12
hours) and
confirm by pressing the OK key.
TIME
and time-minutes flash.
6. Select the time-minutes using the ▲-▼ keys (e.g.
30
minutes)
and confirm by pressing the OK key.
The date and time have been set and the main level is displayed.
Wall-mounting the Watering
Controller:
Setting the date and time:
1.
2.
3.
4.
5.
6.
6
6
7
6

20
GB
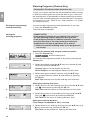
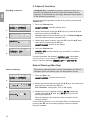
Watering Programs (Channel Key)
Prerequisite: The date and time have been set.
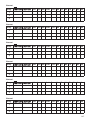
To give you a better overview, we recommend that before starting
to enter the watering data you enter the data for your valves into
the watering plan in the appendix of these operating instructions.
You can save 3 watering programs for each channel (a maximum
of 3 programs x 4 (Art. 1283) / 6 (Art. 1284) channels = 12 (1283) /
18 (1284) programs).
You can exit the programming mode prematurely at any time.
v Press the Channel key twice.
The main level is displayed.
PLEASE NOTE !
If two programs overlap on one channel, this results in
the total watering duration being less than planned.
If two programs overlap on different channels, the water
pressure may drop to an extent such that watering is
inadequate or the pop-up sprinklers fail to extend.
V Make sure that the watering times of the programs do
not overlap.
Selecting the channel and program memory location:
1. Press the Channel key.
SELECT CHANNEL
and the channel flash.
You can end the programming mode at any time by pressing the
Channel key.
2. Select the channel using the ▲-▼ keys (e.g. channel 2) and
confirm by pressing the OK key.
Channel
appears on the display (e.g.
2
) and
Select Program
and the program memory location flash.
3. Select the program memory location using the ▲-▼ keys
(e.g. program memory location 3) and confirm by pressing
the OK key.
Start Time
and the hours for the watering start time flash.
Setting the watering start time:
4. Select the hours for the watering start time using the ▲-▼ keys
(e.g.
16
) and confirm by pressing the OK key.
Start Time
and the minutes for the watering start time flash.
5. Select the minutes for the watering start time using the ▲-▼
keys (e.g. 30
) and confirm by pressing the OK key.
Run Time
and the hours for watering duration flash.
Setting the watering duration:
(This always corresponds to 100% run-time)
6. Select the hours for watering duration using the ▲-▼ keys (e.g.
1
hour) and confirm by pressing the OK key.
Run Time
and the minutes for watering duration flash.
Setting the
watering programs:
1.
2.
3.
4.
5.
6.
Ending the programming
mode prematurely:

21
GB
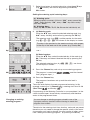
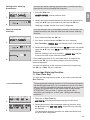
7. Select the minutes for watering duration using the ▲-▼ keys
(e.g.
20
minutes) and confirm by pressing the OK key.
24h
flashes.
Setting the watering cycle / watering days:
(a) Watering cycle:
Watering options are every 24 hours “24h”, every second day
“2nd”, every third day “3rd”, every “Odd” day odd or every
even day “Even”.
(b) Watering days:
Every day Mo, Tu, We, Th, Fr, Sa, Su can be individually set.
8. (a) Watering cycle:
Using the ▲-▼ keys, select the desired watering cycle (e.g.
2nd = every 2nd day) and confirm by pressing the OK key.
The watering cycle (e.g.
2nd
) and the preview for the week
(e.g.
Su , Tu , Th , Sa )
are shown on the display in frames.
The days in the preview for the week are always with respect
to the day of the week set in the system (e.g. Sunday Su).
– or –
(b) Watering days:
Using the ▲-▼ keys, select the desired day of the week (e.g.
Mo = Monday) and select / deselect the day by pressing the
OK key.
The selected watering days (e.g.
Mo , We , Fr
) are shown
on the display in frames.
9. Press the Channel key and set up more watering programs.
The program is saved and
SELECT CHANNEL
and the channel
flash (program step 1.).
10. Press the Channel key.
The programs have been set up and the main level is
displayed.
The main level displays the next programmed watering. In this
example: watering on 2 (Channel 2 ), watering start time 16:30
(Start Time
16 : 30
) on Monday (Mo ).
Programming of the Watering Controller is now completed, i.e. the
valves installed open / close entirely automatically and therefore
water at the programmed times.
You can change an existing program stored in one of the
3 program memory locations without having to create the
program from scratch.
The data for the watering start time, duration, and cycle are preset;
therefore you only need to change the specific values of the wate-
ring program you want to change. You can transfer all other values
from “Setting the watering programs” by pressing the OK key.
8a)
8b)
10.
Changing an existing
watering program:
7.

22
GB
5.2 Special Functions
If Program Off is selected as program memory location for a
channel, the respective channel is blocked and the watering
programs of the channel are no longer executed. The programs
of the channel are retained.
You can end the programming mode at any time by pressing the
Channel key.
1. Press the Channel key.
SELECT CHANNEL
and the channel flash.
2. Select the channel using the ▲-▼ keys (e.g. channel 2) and
confirm by pressing the OK key.
Channel
appears on the display (e.g.
2
) and
Select Program
and the program memory location flash.
3. Select the program memory location Off using the ▲-▼ keys
and confirm by pressing the OK key.
Select CHANNEL
flashes in the display.
4. Press the Channel key.
CHANNEL OFF
and the channel (e.g. channel
2
) is shown in
the display.
If several channels are blocked,
Channels off
is displayed.
If the run time % is not equal to 100, the display alternates
every 3 seconds between
Channel off
and
Run Time %
.
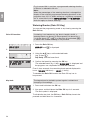
Manual Watering (Man Key)
The manual watering duration can be set between 0 to 59 min.
Channels which are already open are displayed in frames.
1. Press the Man. key.
SELECT CHANNEL
and the channel flash.
2. Select the channel desired using the ▲-▼ keys (e.g. channel 4)
and confirm by pressing the OK key.
Run Time Man.
and minutes flash in the display.
3. Select the manual watering duration (
00:30
minutes are
preset) using the ▲-▼ keys (e.g. 00:15
) and confirm by
pressing the OK key.
Manual watering starts and the frame around the active
channel flashes.
If the watering duration is not confirmed within 10 seconds by
pressing the OK key, the watering begins with the watering
duration selected.
Blocking a channel:
1.
2.
3.
4.
Manual watering:
1.
2.
3.

23
GB
You can exit active watering (programmed or started manually)
prematurely without changing the programs.
1. Press the Man. key.
SELECT CHANNEL
and the channel flash.
2. Select the active channel desired (in the frame e.g. channel 4)
using the ▲-▼ keys and confirm by pressing the OK key.
Watering is ended and the main level is displayed.
If all the channels are to be enabled manually, the channels are
opened manually one after the other with the manual watering
duration.
1. Press and hold down the OK key.
2. Also press and hold down the Man. key for 3 seconds.
Run Time Man.,
MANUAL ALL
and minutes flash in the display.
3. Select the manual watering duration (
00:30
minutes are preset)
using the ▲-▼ keys (e.g.
00:15
) and confirm by pressing the
OK key.
Manual watering starts with channel 1,
MANUAL ALL
and the
frame around the active channel flashes.
If the watering duration is not confirmed within 10 seconds by
pressing the OK key, the watering begins with the watering
duration displayed.
You can exit watering all the channels prematurely by pressing
the OK key + Man. key for 3 seconds.
Percentage Watering Duration
(% Run-Time Key)
You can end the programming mode at any time by pressing the
Run-Time key.
The programmed watering durations of all the watering programs
can be changed centrally in 10 % increments from 10 % to 200 %,
without having to change the individual programs (e.g. if you wish
to water your garden less in the autumn than in the summer).
ATTENTION ! If the run-time % figures are above 100 %,
programs may overlap as a result (see
“Setting the watering
programs”).
1. Press the % Run-Time key.
Run TimE %
and the percentage watering duration flash.
2. Select the figure for the percentage watering duration using
the ▲-▼ keys (e.g.
Run Time 60 %
) and confirm by pressing
the OK key.
The percentage watering duration has been transferred and
the main level is displayed.
Ending active watering
prematurely:
1.
2.
Water all channels
manually:
1.
3.
% run-time-function:
1.
2.

24
GB
Rain Off function:
1.
2.
3.
Key lock:
E.g. In case of 60% run-time, a programmed watering duration
of 60 min. is reduced to 36 min.
Note:
When the percentage of the watering duration is changed the
display of the originally programmed watering durations in the
programs stays as it is. When setting up / modifying a program,
this is automatically set to
100 % Run-Time
. The
% Run-Time
does not apply to manual watering.
Watering Breaks (Rain Off Key)
You can end the programming mode at any time by pressing the
Rain Off key.
If watering is not necessary, e.g. due to lengthy rainfall, a
watering break can be set. All the programs can be set for a
1 to 9-day break ( 1 to 9 ) or they can all be blocked (Off ),
in which case manual watering is still possible.
1. Press the Rain Off key.
Rain Off
and
Off
is displayed.
2. Using the ▲-▼ keys, set the desired break
(e.g. 3 days 3 ).
Day Delay
and the frame flash.
3. Confirm the break by pressing the OK key.
The selected break (e.g. 3 days
3 Days Off
) is displayed and
the programs are suspended for the break selected.
From 2 days onwards, the remaining break period displayed in
hours (
48h off
(48 hours) …
1h off
(1 hour)).
To deselect the Rain Off function the Rain Off key has to
be pressed.
The keypad can be locked to protect against unintentional
changing of the settings.
1. Press and hold down the OK key.
2. Also press and hold down the Rain Off key for 3 seconds.
The lock symbol is displayed.
To disable the key lock, the OK key + Rain Off key have to be
pressed and held down for 3 seconds.

25
GB
Wintering / Storage:
Important:
Disposal:
(in accordance with
Directive 2012/ 19 /EU)
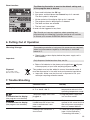
6. Putting Out of Operation
The watering controller is frost-proof. No measures are required
when frost commences. Legibility of the display is restricted
below 0 °C.
v Check battery status display before the power supply unit is
disconnected.
Only dispose of batteries when they are flat.
v Return flat batteries to the place you bought them or
dispose
of them properly at your local recycling/disposal centre.
The product must not be added to normal household waste. It
must be disposed of in line with local environmental regulations.
v Important: Make sure that the unit is disposed of via your
municipal recycling collection centre.
7. Trouble-Shooting
Fault Possible Cause Remedy
No display External temperature below v Wait until the external air
0 °C or above +60 °C. temperature returns to the
operating temperature range.
AC OFF
The power supply unit is not v Plug the power supply unit
is indicated on the display plugged in. into a mains socket.
(the programs are retained)
Overload
The power supply is over- v Only so many valves may be
is indicated on the display loaded because valves from opened at the same time that
(the programs are retained). other manufacturers have the total power consumption
been used. does not exceed 800 mA.
Cabling of the valves has a v Cable the valves properly
short circuit. (see 4. Initial Operation
“Connecting the valves”
).
The Watering Controller is reset to the default setting and
all the program data is deleted.
1. Press and hold down the OK key.
2. Also press and hold down the Channel key for 3 seconds.
The lock symbol is displayed.
• All the symbols of the display light up for 2 seconds.
• The program data for all programs is deleted.
• The date and time are retained.
• The key lock is cancelled.
A reset can be triggered at any time.
Tip: Should you have any questions about operating and
programming your Watering Controller, please do not hesitate
to contact your nearest GARDENA Service Centre.
Reset function:

26
GB
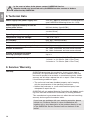
Warranty
9. Service / Warranty
GARDENA guarantees this product for 2 years (from date of
purchase). This guarantee covers all serious defects of the unit
that can be proved to be material or manufacturing faults. Under
warranty we will either replace the unit or repair it free of charge
if the following conditions apply:
• The unit must have been handled properly and in keeping
with the requirements of the operating instructions.
• Neither the purchaser or a non-authorised third party have
attempted to repair the unit.
GARDENA will not replace Watering Controllers with defects result-
ing from incorrect installation of the battery or leaking batteries.
This manufacturer’s guarantee does not affect the user’s existing
warranty claims against the dealer/seller.
If you have any problems with your watering controller, please
contact our Customer Service or return the defective unit
together with a short description of the problem directly to one
of the GARDENA Service Centres listed on the back of this
leaflet.
A
In the event of other faults please contact GARDENA Service.
Repairs should only be carried out by GARDENA service centres or dealers
authorised by GARDENA.
8. Technical Data
Power supply from power supply unit: 24 V (AC) /800 mA (sufficient for 5 simultaneously
open GARDENA Watering Valves Art. 1278)
Power supply for memory in case of
mains power failure: 9V block battery (type 6LR61)
Life of the battery: At least 1 year (to retain data if there is
a mains failure)
Operating temperature range: From 0 °C to + 60 °C
Temperature range for storage:
–
20 °C to + 70 °C
Air humidity: max. 95 % relative humidity
Soil moisture/rain sensor connection: GARDENA-specific
Program saved when replacing battery: Yes (if power supply unit connected)
Number of channels: Art. 1283: 4 channels and one master channel
Art. 1284: 6 channels and one master channel
Number of program-controlled
watering cycles per channel: Up to 3
Watering duration per program: 1 minute to 24 min. (10 % Run-Time)
1 minute to 3 h 59 min. (100 % Run-Time)
2 minutes to 7 h 58 min. (200 % Run-Time)

137
Channel
Prog.
START TIME
RUN TIME
24 h 2nd 3rd Odd Even Mo Tu We Th Fr Sa Su
1
2
3
Channel
Prog.
START TIME
RUN TIME
24 h 2nd 3rd Odd Even Mo Tu We Th Fr Sa Su
1
2
3
Channel
Prog.
START TIME
RUN TIME
24 h 2nd 3rd Odd Even Mo Tu We Th Fr Sa Su
1
2
3
Channel
Prog.
START TIME
RUN TIME
24 h 2nd 3rd Odd Even Mo Tu We Th Fr Sa Su
1
2
3
Channel
Prog.
START TIME
RUN TIME
24 h 2nd 3rd Odd Even Mo Tu We Th Fr Sa Su
1
2
3
Channel
Prog.
START TIME
RUN TIME
24 h 2nd 3rd Odd Even Mo Tu We Th Fr Sa Su
1
2
3

138
D
Produkthaftung
Wir weisen ausdrücklich darauf hin, dass wir nach dem Produkthaftungsgesetz nicht für durch unsere Geräte
hervorgerufene Schäden einzustehen haben, sofern diese durch unsachgemäße Reparatur verursacht oder bei
einem Teileaustausch nicht unsere Original GARDENA Teile oder von uns freigegebene Teile verwendet werden
und die Reparatur nicht vom GARDENA Service oder dem autorisierten Fachmann durchgeführt wird.
Entsprechendes gilt für Ergänzungsteile und Zubehör.
GB
Product Liability
We expressly point out that, in accordance with the product liability law, we are not liable for any damage caused
by our units if it is due to improper repair or if parts exchanged are not original GARDENA parts or parts approved
by us, and, if the repairs were not carried out by a GARDENA Service Centre or an authorised specialist.
The same applies to spare parts and accessories.
F
Responsabilité
Nous vous signalons expressément que GARDENA n’est pas responsable des dommages causés par ses appa-
reils, dans la mesure où ces dommages seraient causés suite à une réparation non conforme, dans la mesure
où, lors d’un échange de pièces, les pièces d’origine GARDENA n’auraient pas été utilisées, ou si la réparation
n’a pas été effectuée par le Service Après-Vente GARDENA ou l’un des Centres SAV agréés GARDENA. Ceci
est également valable pour tout ajout de pièces et d’accessoires autres que ceux préconisés par GARDENA.
NL
Productaansprakelijkheid
Wij wijzen er nadrukkelijk op, dat wij op grond van de wet aansprakelijkheid voor producten niet aansprakelijk zijn
voor schade ontstaan door onze apparaten, indien deze door onvakkundige reparatie veroorzaakt zijn, of er bij
het uitwisselen van onderdelen geen gebruik gemaakt werd van onze originele GARDENA onderdelen of door
ons vrijgegeven onderdelen en de reparatie niet door de GARDENA technische dienst of de bevoegde vakman
uitgevoerd werd. Ditzelfde geldt voor extra-onderdelen en accessoires.
S
Produktansvar
Tillverkaren är inte ansvarig för skada som orsakats av produkten om skadan beror på att produkten har repare-
rats felaktigt eller om, vid reparation eller utbyte, andra än Original GARDENA reservdelar har använts. Samma
sak gäller för kompletteringsdelar och tillbehör.
DK
Produktansvar
Vi gør udtrykkeligt opmærksom på at i henhold til produktansvarsloven er vi ikke ansvarlige for skader forårsaget
af vores udstyr, hvis det skyldes uautoriserede reparationer eller hvis dele er skiftet ud og der ikke er anvendt
originale GARDENA dele eller dele godkendt af os, eller hvis reparationerne ikke er udført af GARDENA-service
eller en autoriseret fagmand. Det samme gælder for ekstra udstyr og tilbehør.
FIN
Tuotevastuu
Korostamme nimenomaan, että tuotevastuulain nojalla emme ole vastuussa laitteistamme johtuneista vahingoista,
mikäli nämä ovat aiheutuneet epäasianmukaisesta korjauksesta tai osia vaihdettaessa ei ole käytetty alkuperäisiä
GARDENA- varaosia tai hyväksymiämme osia ja korjauksen on suorittanut muu kuin GARDENA -huoltokeskus tai
valtuuttamamme ammattihenkilö. Tämä pätee myös lisäosiin ja lisävarusteisiin.
I
Responsabilità del prodotto
Si rende espressamente noto che, conformemente alla legislazione sulla responsabilità del prodotto, non si
risponde di danni causati da nostri articoli se originati da riparazioni eseguite non correttamente o da sostituzioni
di parti effettuate con materiale non originale GARDENA o comunque da noi non approvato e, in ogni caso,
qualora l’intervento non venga eseguito da un centro assistenza GARDENA o da personale specializzato auto-
rizzato. Lo stesso vale per le parti complementari e gli accessori.
E
Responsabilidad de productos
Advertimos que conforme a la ley de responsabilidad de productos no nos responsabilizamos de daños causados
por nuestros aparatos, siempre y cuando dichos daños hayan sido originados por arreglos o reparaciones indebi-
das, por recambios con piezas que no sean piezas originales GARDENA o bien piezas autorizadas por nosotros,
así como en aquellos casos en que la reparación no haya sido efectuada por un Servicio Técnico GARDENA o
por un técnico autorizado. Lo mismo es aplicable para las piezas complementarias y accesorios.
P
Responsabilidade sobre o produto
Queremos salientar que segundo a lei da responsabilidade do fabricante, nós não nos responsabilizaremos por
danos causados pelo nosso equipamento, quando estes ocorram em decorrência de reparações inadequadas ou
da substituição de peças por peças não originais da GARDENA, ou peças não autorizadas. A responsabilidade
tornar-se-à nula também depois de reparações realizadas por oficinas não autorizadas pela GARDENA. Esta
restrição valerá também para peças adicionais e acessórios.

139
D
EG-Konformitätserklärung
Der Unterzeichnete Husqvarna AB, 561 82 Huskvarna, Sweden bestätigt, dass die
nachfolgend bezeichneten Geräte in der von uns in Verkehr gebrachten Ausführung
die Anforderungen der harmonisierten EU-Richtlinien, EU-Sicherheitsstandards
und produktspezifischen Standards erfüllen. Bei einer nicht mit uns abgestimmten
Änderung der Geräte verliert diese Erklärung ihre Gültigkeit.
GB
EU Declaration of Conformity
The undersigned Husqvarna AB, 561 82 Huskvarna, Sweden, hereby certifies that,
when leaving our factory, the units indicated below are in accordance with the
harmonised EU guidelines, EU standards of safety and product specific standards.
This certificate becomes void if the units are modified without our approval.
F
Certificat de conformité aux directives européennes
Le constructeur, soussigné : Husqvarna AB, 561 82 Huskvarna, Sweden, déclare
qu’à la sortie de ses usines le matériel neuf désigné ci-dessous était conforme
aux prescriptions des directives européennes énoncées ci-après et conforme aux
règles de sécurité et autres règles qui lui sont applicables dans le cadre de l’Union
européenne. Toute modification portée sur ce produit sans l’accord express de
Husqvarna supprime la validité de ce certificat.
NL
EU-overeenstemmingsverklaring
Ondergetekende Husqvarna AB, 561 82 Huskvarna, Sweden, bevestigt, dat het
volgende genoemde apparaat in de door ons in de handel gebrachte uitvoering
voldoet aan de eis van, en in overeenstemming is met de EU-richtlijnen, de
EU-veiligheidsstandaard en de voor het product specifieke standaard. Bij een niet
met ons afgestemde verandering aan het apparaat verliest deze verklaring haar
geldigheid.
S
EU Tillverkarintyg
Undertecknad firma Husqvarna AB, 561 82 Huskvarna, Sweden, intygar härmed
att nedan nämnda produkter överensstämmer med EU:s direktiv, EU : s säkerhets-
standard och produktspecifikation. Detta intyg upphör att gälla om produkten änd-
ras utan vårt tillstånd.
DK
EU Overensstemmelse certificat
Undertegnede Husqvarna AB, 561 82 Huskvarna, Sweden bekræfter hermed, at
enheder listet herunder, ved afsendelse fra fabrikken, er i overensstemmelse med
harmoniserede EU retningslinier, EU sikkerhedsstandarder og produkt-specifikati-
onsstandarder. Dette certifikat træder ud af kraft hvis enhederne er ændret uden
vor god kendelse.
FIN
EY-vaatimustenmukaisuusvakuutus
Allekirjoittanut Husqvarna AB, 561 82 Huskvarna, Sweden vakuuttaa, että allamai-
nitut laitteet täyttävät tehtaaltamme lähtiessään yhdenmukaistettujen EY-direktiivien,
EY-turvallisuusstandardien ja tuotekohtaisten standardien vaatimukset. Laitteisiin
tehdyt muutokset, joista ei ole sovittu kanssamme, johtavat tämän vakuutuksen
raukeamiseen.
I
Dichiarazione di conformità alle norme UE
La sottoscritta Husqvarna AB, 561 82 Huskvarna, Sweden, certifica che il prodotto
qui di seguito indicato, nei modelli da noi commercializzati, è conforme alle direttive
armonizzate UE nonché agli standard di sicurezza e agli standard specifici di prodot-
to. Qualunque modifica apportata al prodotto senza nostra specifica autorizzazione
invalida la presente dichiarazione.
E
Declaración de conformidad de la UE
El que subscribe Husqvarna AB, 561 82 Huskvarna, Sweden, declara que la pre-
sente mercancía, objeto de la presente declaración, cumple con todas las normas
de la UE, en lo que a normas técnicas, de homologación y de seguridad se refiere.
En caso de realizar cualquier modificación en la presente mercancía sin nuestra
previa autorización, esta declaración pierde su validez.
P
Certificado de conformidade da UE
Os abaixo mencionados Husqvarna AB, 561 82 Huskvarna, Sweden, por este meio
certificam que ao sair da fábrica o aparelho abaixo mencionado está de acordo
com as directrizes harmonizadas da UE, padrões de segurança e de produtos
específicos. Este certificado ficará nulo se a unidade for modificada sem a nossa
aprovação.
Bezeichnung des Gerätes: Bewässerungssteuerung
Description of the unit: Watering Controller
Désignation du matériel : Programmateur
Omschrijving van het apparaat: Besproeiingscomputer
Produktbeskrivning: Vandingskontrol-system
Beskrivelse af enhederne: Watering Controller
Laitteiden nimitys: Watering Controller
Descrizione del prodotto: Centralina
Descripción de la mercancía: Programación de riego
Descrição do aparelho: Comando de rega
Typ: Art.-Nr.: Type: Varenr. :
Type: Art. No.: Tyypit: Art.-n:o. :
Type : Référence : Modello : Art. :
Typ: Art. nr.: Tipo: Art. Nº:
Typ: Art.nr. : Tipo: Art. Nº:
4030 1283 6030 1284
EU-Richtlinien: EU Retningslinier :
EU directives: EY-direktiivit:
Directives européennes : Direttive UE:
EU-richtlijnen: Normativa UE:
EU direktiv: Directrizes da UE:
Harmonisierte EN:
Hinterlegte Dokumentation: GARDENA Technische Dokumentation
M. Kugler 89079 Ulm
Deposited Documentation: GARDENA Technical Documentation
M. Kugler 89079 Ulm
Documentation déposée : Documentation technique GARDENA
M. Kugler 89079 Ulm
Anbringungsjahr der CE-Kennzeichnung:
Year of CE marking :
Date d’apposition du marquage CE :
Installatiejaar van de CE-aanduiding:
CE-Märkningsår :
CE-Mærkningsår :
2010
CE-merkin kiinnitysvuosi:
Anno di rilascio della certificazione CE:
Colocación del distintivo CE:
Ano de marcação pela CE:
Ulm, den 11.11.2014 Der Bevollmächtigte
Ulm, 11.11.2014 Authorised representative
Fait à Ulm, le 11.11.2014 Représentant légal
Ulm, 11-11-2014 Gemachtigde
Ulm, 2014.11.11. Behörig Firmatecknare
Ulm, 11.11.2014 Teknisk direktør
Ulmissa, 11.11.2014 Valtuutettu edustaja
Ulm, 11.11.2014 Rappresentante autorizzato
Ulm, 11.11.2014 Representante autorizado
Ulm, 11.11.2014 Representante autorizado
Reinhard Pompe
(Vice President)
2004/108/EC
2011/65/EC
2006/95/EC
EN 60730-1
EN 60730-2-8
EN 61558-2-6

140
Deutschland / Germany
GARDENA GmbH
Central Service
Hans
-
Lorenser
-
Straße 40
D
-
89079 Ulm
Produktfragen:
(+49) 731 490
-
123
Reparaturen:
(+49) 731 490
-
290
service
@gardena.com
Albania
COBALT Sh.p.k.
Rr. Siri Kodra
1000 Tirana
Argentina
Husqvarna Argentina S.A.
Av.del Libertador 5954
–
Piso 11
–
Torre B
(C1428ARP) Buenos Aires
Phone: (+54) 11 5194 5000
info.gardena
@
ar.husqvarna.com
Armenia
Garden Land Ltd.
61 Tigran Mets
0005 Yerevan
Australia
Husqvarna Australia Pty. Ltd.
Locked Bag 5
Central Coast BC
NSW 2252
Phone: (+61) (0) 2 4352 7400
customer.service
@
husqvarna.com.au
Austria / Österreich
Husqvarna Austria GmbH
Consumer Products
Industriezeile 36
4010 Linz
Tel.: (+43) 732 77 01 01
-
90
consumer.service
@
husqvarna.at
Azerbaijan
Firm Progress
a. Aliyev Str. 26A
1052 Baku
Belgium
GARDENA Belgium NV/SA
Sterrebeekstraat 163
1930 Zaventem
Phone: (+32) 2 7 20 92 12
Mail: info
@gardena.be
Bosnia / Herzegovina
SILK TRADE d.o.o.
Industrijska zona Bukva bb
74260 Tešanj
Brazil
Husqvarna do Brasil Ltda
Av. Francisco Matarazzo,
1400
–
19º andar
São Paulo
–
SP
CEP: 05001
-
903
Tel: 0800
-
112252
marketing.br.husqvarna
@
husqvarna.com.br
Bulgaria
Хускварна България ЕООД
Бул. „Андрей Ляпчев” Nº 72
1799 София
Тел.: (+ 359) 02/9753076
www.husqvarna.bg
Canada / USA
GARDENA Canada Ltd.
100 Summerlea Road
Brampton, Ontario L6T 4X3
Phone: (+1) 905792 93 30
info
@gardenacanada.com
Chile
Maquinarias Agroforestales
Ltda. (Maga Ltda.)
Santiago, Chile
Avda. Chesterton
# 8355 comuna Las Condes
Phone: (+56) 2 202 4417
Dalton
@maga.cl
Zipcode: 7560330
Temuco, Chile
Avda. Valparaíso # 01466
Phone: (+56) 45 222 126
Zipcode: 4780441
China
Husqvarna (China) Machinery
Manufacturing Co., Ltd.
No. 1355, Jia Xin Rd.,
Ma Lu Zhen, Jia Ding Dist.,
Shanghai
201801
Phone: (+86) 21 59159629
Domestic Sales
www.gardena.com.cn
Colombia
Husqvarna Colombia S.A.
Calle 18 No. 68 D
-
31, zona
Industrial de Montevideo
Bogotá, Cundinamarca
Tel. 571 2922700 ext. 105
jairo.salazar
@
husqvarna.com.co
Costa Rica
Compania Exim
Euroiberoamericana S.A.
Los Colegios, Moravia,
200 metros al Sur del Colegio
Saint Francis
–
San José
Phone: (+506) 297 68 83
exim_euro
@racsa.co.cr
Croatia
SILK ADRIA d.o.o.
Josipa Lončara 3
10090 Zagreb
Phone: (+385) 1 3794 580
silk.adria
@zg.t
-
com.hr
Cyprus
Med Marketing
17 Digeni Akrita Ave
P.O. Box 27017
1641 Nicosia
Czech Republic
Husqvarna Česko s.r.o.
Türkova 2319 /5b
149 00 Praha 4 – Chodov
Bezplatná infolinka:
800 100 425
servis
@cz.husqvarna.com
Denmark
GARDENA / Husqvarna
Consumer Outdoor Products
Salgsafdelning Danmark
Box 9003
S
-
200 39 Malmö
info
@gardena.dk
Dominican Republic
BOSQUESA, S.R.L
Carretera Santiago Licey
Km. 5 ½
Esquina Copal II.
Santiago
Dominican Republic
Phone: (+809) 736
-
0333
joserbosquesa
@claro.net.do
Ecuador
Husqvarna Ecuador S.A.
Arupos E1
-
181 y 10 de
Agosto
Quito, Pichincha
Tel. (+593) 22800739
francisco.jacome
@
husqvarna.com.ec
Estonia
Husqvarna Eesti OÜ
Consumer Outdoor Products
Kesk tee 10, Aaviku küla
Rae vald
Harju maakond
75305 Estonia
kontakt.etj
@husqvarna.ee
Finland
Oy Husqvarna Ab
Consumer Outdoor Products
Lautatarhankatu 8 B / PL 3
00581 HELSINKI
info
@gardena.fi
France
Husqvarna France
9/11 Allée des pierres mayettes
92635 Gennevilliers Cedex
France
http://www.gardena.com/fr
N° AZUR : 0 810 00 78 23
(Prix d’un appel local)
Georgia
ALD Group
Beliashvili 8
1159 Tleilisi
Great Britain
Husqvarna UK Ltd
Preston Road
Aycliffe Industrial Park
Newton Aycliffe
County Durham
DL5 6UP
info.gardena@
husqvarna.co.uk
Greece
Π.ΠΑΠΑΔΟΠΟΥΛΟΣ ΑΕΒΕ
Λεωφ. Αθηνών 92
Αθήνα
Τ.Κ.104 42
Ελλάδα
Τηλ. (+30) 210 51 93100
info@papadopoulos.com.gr
Hungary
Husqvarna Magyarország Kft.
Ezred u. 1
-
3
1044 Budapest
Telefon: (+36) 1 251
-
4161
vevoszolgalat.husqvarna@
husqvarna.hu
Iceland
Ó. Johnson & Kaaber
Tunguhalsi 1
110 Reykjavik
ooj@ojk.is
Ireland
Husqvarna UK Ltd
Preston Road
Aycliffe Industrial Park
Newton Aycliffe
County Durham
DL5 6UP
info.gardena@
husqvarna.co.uk
Italy
Husqvarna Italia S.p.A.
Via Como 72
23868 VALMADRERA (LC)
Phone: (+39) 0341.203.111
info@gardenaitalia.it
Japan
KAKUICHI Co. Ltd.
Sumitomo Realty &
Development Kojimachi
BLDG., 8F
5
-
1 Nibanncyo
Chiyoda
-
ku
Tokyo 102
-
0084
Phone: (+81) 33 264 4721
m_ishihara@kaku
-
ichi.co.jp
Kazakhstan
LAMED Ltd.
155/1, Tazhibayevoi Str.
050060 Almaty
IP Schmidt
Abayavenue 3B
110 005 Kostanay
Korea
Kyung Jin Trading CO.,LTD.
107-4, SunDuk Bld.,
YangJae-dong,
Seocho-gu,
Seoul, (zipcode: 137-891)
Phone: (+82) (0)2 574-6300
Kyrgyzstan
Alye Maki
av. Moladaya Guardir J 3
720014
Bishkek
Latvia
Husqvarna Latvija
Consumer Outdoor Products
Bākūžu iela 6
LV-1024 Rīga
info
@husqvarna.lv
Lithuania
UAB Husqvarna Lietuva
Consumer Outdoor Products
Ateities pl. 77C
LT
-
52104 Kaunas
centras@husqvarna.lt
Luxembourg
Magasins Jules Neuberg
39, rue Jacques Stas
Luxembourg
-
Gasperich 2549
Case Postale No. 12
Luxembourg 2010
Phone: (+352) 40 14 01
api
@neuberg.lu
Mexico
AFOSA
Av. Lopez Mateos Sur # 5019
Col. La Calma 45070
Zapopan, Jalisco
Mexico
Phone: (+52) 33 3818
-
3434
icornejo
@afosa.com.mx
Moldova
Convel S.R.L.
290A Muncesti Str.
2002 Chisinau
Netherlands
GARDENA Nederland B.V.
Postbus 50176
1305 AD ALMERE
Phone: (+31) 36 521 00 00
info
@gardena.nl
Neth. Antilles
Jonka Enterprises N.V.
Sta. Rosa Weg 196
P.O. Box 8200
Curaçao
Phone: (+599) 9 767 66 55
pgm
@jonka.com
New Zealand
Husqvarna New Zealand Ltd.
PO Box 76
-
437
Manukau City 2241
Phone: (+64) (0) 9 9202410
support.nz
@husqvarna.co.nz
Norway
GARDENA
Husqvarna Consumer
Outdoor Products
Salgskontor Norge
Kleverveien 6
1540 Vestby
info
@gardena.no
Peru
Husqvarna Perú S.A.
Jr. Ramón Cárcamo 710
Lima 1
Te l : (+51) 1 3320 400 ext. 416
juan.remuzgo
@
husqvarna.com
Poland
Husqvarna
Poland Spółka z o.o.
ul. Wysockiego 15 b
03
-
371 Warszawa
Phone: (+48) 22 330 96 00
gardena
@husqvarna.com.pl
Portugal
Husqvarna Portugal , SA
Lagoa
-
Albarraque
2635
-
595 Rio de Mouro
Tel.: (+351) 21 922 85 30
Fax : (+351) 21 922 85 36
info
@gardena.pt
Romania
Madex International Srl
Soseaua Odaii 117
-
123,
RO 013603
Bucure
ş
ti, S1
Phone: (+40) 21 352.76.03
madex
@ines.ro
Russia / Россия
ООО „Хускварна“
141400, Московская обл.,
г. Химки,
улица Ленинградская,
владение 39, стр.6
Бизнес Центр
„Химки Бизнес Парк“,
помещение ОВ02_04
Serbia
Domel d.o.o.
Autoput za Novi Sad bb
11273 Belgrade
Phone: (+381) 118488812
miroslav.jejina
@domel.rs
Singapore
Hy
-
Ray PRIVATE LIMITED
40 Jalan Pemimpin
#02
-
08 Tat Ann Building
Singapore 577185
Phone: (+65) 6253 2277
shiying
@hyray.com.sg
Slovak Republic
Husqvarna Česko s.r.o.
Türkova 2319 /5b
149 00 Praha 4 – Chodov
Bezplatná infolinka:
800 154 044
servis
@sk.husqvarna.com
Slovenia
Husqvarna Austria GmbH
Consumer Products
Industriezeile 36
4010 Linz
Tel.: (+43) 732 77 01 01
-
90
consumer.service
@
husqvarna.at
South Africa
Husqvarna
South Africa (Pty) Ltd
Postnet Suite 250
Private Bag X6,
Cascades, 3202
South Africa
Phone: (+27) 33 846 9700
info
@gardena.co.za
Spain
Husqvarna España S.A.
C/ Basauri, nº 6
La Florida
28023 Madrid
Phone: (+34) 91 708 05 00
atencioncliente
@gardena.es
Suriname
Agrofix n.v.
Verlengde Hogestraat #22
Phone: (+597) 472426
agrofix
@sr.net
Pobox : 2006
Paramaribo
Suriname
–
South America
Sweden
Husqvarna AB
S
-
561 82 Huskvarna
info
@gardena.se
Switzerland / Schweiz
Husqvarna Schweiz AG
Consumer Products
Industriestrasse 10
5506 Mägenwil
Phone: (+41) (0) 62 887 37 90
info
@gardena.ch
Turkey
GARDENA Dost Diş Ticaret
Mümessillik A.
Ş
.
Sanayi Çad. Adil Sokak
No: 1/ B Kartal
34873 Istanbul
Phone: (+90) 216 38 93 939
info
@gardena
-
dost.com.tr
Ukraine / Україна
ТОВ «Хусварна Україна»
вул. Васильківська, 34,
офіс 204
-
г
03022, Київ
Тел. (+38) 044 498 39 02
info
@gardena.ua
Uruguay
FELI SA
Entre Ríos 1083 CP 11800
Montevideo
–
Uruguay
Tel: (+598) 22 03 18 44
info
@felisa.com.uy
Venezuela
C
orporación Casa y Jardín C.A.
Av. Caroní, Edif. Trezmen, PB.
Colinas de Bello Monte.
1050 Caracas.
Tlf: (+58) 212 992 33 22
info
@casayjardin.net.ve
1283
-
20.960.03 / 0315
©
GARDENA
Manufacturing GmbH
D-89070 Ulm
http://www.gardena.com
-
 1
1
-
 2
2
-
 3
3
-
 4
4
-
 5
5
-
 6
6
-
 7
7
-
 8
8
-
 9
9
-
 10
10
-
 11
11
-
 12
12
-
 13
13
-
 14
14
-
 15
15
-
 16
16
-
 17
17


in altre lingue
- English: Gardena 1283 User manual
Documenti correlati
-
Gardena Watering Controller Manuale utente
-
Gardena 1874 Manuale utente
-
-
-
-
-
-
-
-