Zoom G3Xn Manuale utente
- Categoria
- Accessori per chitarra
- Tipo
- Manuale utente

Thank you very much for purchasing the ZOOM .
Please read this manual carefully to learn about all the functions of the
so that you will be able to use it fully.
Keep this manual in a convenient place for reference when necessary.
Usage and safety precautions …………… 2
Introduction ………………………………… 3
Terms used in this manual ………………… 3
Part names ………………………………… 4
Turning the power on ……………………… 6
Display information ………………………… 7
Adjusting effects …………………………… 8
Using patches ……………………………… 16
Adjusting the master level ………………… 22
Changing various settings ………………… 23
Using the tuner ……………………………… 28
Using rhythms ……………………………… 34
Using the looper …………………………… 36
Using the pedal ……………………………… 41
Using the tap tempo function …………… 44
Restoring default settings and patches …… 46
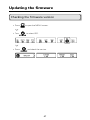
Updating the rmware ……………………… 47
Troubleshooting …………………………… 49
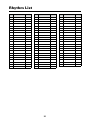
Rhythm List ………………………………… 50
Specications ……………………………… 51
OPERATION MANUAL
Contents
© 2016 ZOOM CORPORATION
Copying or reproduction of this Operation Manual in part or in whole without permission is prohibited.

2
Usage and safety precautions
In this manual, symbols are used to highlight warnings
and cautions that you must read to prevent accidents. The
meanings of these symbols are as follows:
Interference with other electrical equipment
In consideration of safety, the has been
designed to minimize the emission of electromagnetic radiation
from the device and to minimize external electromagnetic
interference. However, equipment that is very susceptible to
interference or that emits powerful electromagnetic waves could
result in interference if placed nearby. If this occurs, place the
and the other device farther apart.
With any type of electronic device that uses digital control,
including the
, electromagnetic interference
could cause malfunction, corrupt or destroy data and result in
other unexpected trouble. Always use caution.
Cleaning
Use a soft cloth to clean the panels of the unit if they become
dirty. If necessary, use a damp cloth that has been wrung out
well. Never use abrasive cleansers, wax or solvents, including
alcohol, benzene and paint thinner.
Malfunction
If the unit becomes broken or malfunctions, immediately
disconnect the AC adapter, turn the power OFF and disconnect
other cables. Contact the store where you bought the unit or
ZOOM service with the following information: product model,
serial number and specific symptoms of failure or malfunction,
along with your name, address and telephone number.
Copyrights
• Windows
®
, Windows 7
®
Windows 8.1
®
and Windows
®
10 are
trademarks or registered trademarks of Microsoft
®
.
• Macintosh
®
and Mac OS
®
are trademarks or registered
trademarks of Apple Inc.
• Allothertrademarks, productnamesand companynames
mentioned in this documentation are the property of their
respective owners.
Note: All trademarks and registered trademarks mentioned in this
manual are for identification purposes only and are not intended
to infringe on the copyrights of their respective owners.
Safety Precautions Usage Precautions
Warning
Precautions
Something that could cause serious injury
or death.
Something that could cause injury or
damage to the equipment.
Warning
Caution
Other symbols
Prohibited actions
Required (mandatory) actions
AC adapter handling
When disconnecting the AC adapter from an outlet, always pull the
body of the adapter itself.
During lightning storms or when not using the unit, disconnect the
power plug from the AC outlet.
Alterations
Never open the case or attempt to modify the product.
Operation using an AC adapter
Use only a ZOOM AD-16 AC adapter with this unit.
Do not do anything that could exceed the ratings of outlets and
other electrical wiring equipment.
Product handling
Do not drop, bump or apply excessive force to the unit.
Be careful not to allow foreign objects or liquids to enter the unit.
Operating environment
Do not use in extremely high or low temperatures.
Do not use near heaters, stoves and other heat sources.
Do not use in very high humidity or near splashing water.
Do not use in places with excessive vibrations.
Do not use in places with excessive dust or sand.
Connecting cables with input and output
jacks
Always turn the power OFF for all equipment before connecting any
cables.
Always disconnect all connection cables and the AC adapter before
moving the unit.
Volume
Do not use the product at a loud volume for a long period of time.
Declaration of Conformity
For EU Countries
FCC regulation warning (for U.S.A.)
Note: This equipment has been tested and found to comply with
the limits for a Class B digital device, pursuant to Part 15 of the FCC
Rules. These limits are designed to provide reasonable protection
against harmful interference in a residential installation. This
equipment generates, uses and can radiate radio frequency energy
and, if not installed and used in accordance with the instructions,
may cause harmful interference to radio communications. However,
there is no guarantee that interference will not occur in a particular
installation. If this equipment does cause harmful interference to
radio or television reception, which can be determined by turning
the equipment off and on, the user is encouraged to try to correct
the interference by one or more of the following measures:
•Reorientorrelocatethereceivingantenna.
•Increasetheseparationbetweentheequipmentandreceiver.
•
Connect the equipment into an outlet on a circuit different from
that to which the receiver is connected.
•Consultthedealeroranexperiencedradio/TVtechnicianforhelp.

3
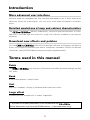
Introduction
More advanced user interface
We have made the stompbox-style user interface developed for our G series even more
advanced. Using the three displays, you can easily check effect parameters and effect
chains.
Detailed emulations of amp and cabinet characteristics
The delivers studio-quality sound with precise emulations of circuit
operations and tube amp characteristics along with cabinets modeled using impulse
responses.
Download new effects and patches
Our free Effects/PatchManagersoftware forWindows andMacOS
allows you to regularly download new effects and patches created by ZOOM. For detailed
information,seetheZOOMwebsite(http://www.zoom.co.jp/downloads/).
Terms used in this manual
Patch
The canstoreupto150patcheswitheffectparametersettingsandON/
OFF states.
Bank
A set of three patches is called a "bank".
Unit
Each "Unit" combines a Display, 4 parameter knobs and a foot switch.
Large effect
An effect that uses multiple units is called a "large effect".
* A printed list of effect parameters is not included with the
.
Please download a copy from the ZOOM website.
¦
http://www.zoom.co.jp/

4
5
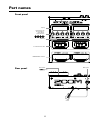
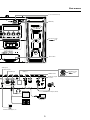
Part names
Front panel
Rear panel
Display
Parameter knobs
(In explanations,
these will be
shown like this:
)
TYPE keys
Footswitches FS1–FS3
BANK/SCROLL switches
MENU key
Expression pedal
( only)
Control knob/enter key
Mode switch
DC 9V AC adapter
connector
CONTROL IN jack
( only)
Dedicated AC adapter (AD-16)
POWER switch
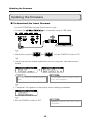
Computer
USB portPHONES jack
OUTPUT jacks
AUX IN jack
INPUT jack
Pedal switch
( only)
Headphones
Guitar amp
Monitor speakers
Guitar
Portable music player, etc.

4
5
Display
Parameter knobs
(In explanations,
these will be
shown like this:
)
TYPE keys
Footswitches FS1–FS3
BANK/SCROLL switches
MENU key
Expression pedal
( only)
Control knob/enter key
Mode switch
DC 9V AC adapter
connector
CONTROL IN jack
( only)
Dedicated AC adapter (AD-16)
POWER switch
Computer
USB port
PHONES jack
OUTPUT jacks
AUX IN jackINPUT jack
Pedal switch
( only)
Headphones
Guitar amp
Monitor speakers
Guitar
Portable music player, etc.
Part names

6
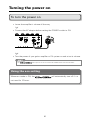
Turning the power on
To turn the power on
• Lowertheamplier'svolumealltheway.
• ConnecttheACadapterbeforesettingthePOWERswitchtoON.
• TurnthepowerofyourguitaramplierorPAsystemonandraiseitsvolume.
HINT
The starts up in the mode used when the POWER switch was last turned OFF.
Using the eco setting
When eco mode is ON, the will automatically turn off if it is
not used for 10 hours.

7
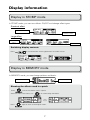
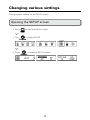
Display information
Display in STOMP mode
InSTOMPmode,youcanturneffectsON/OFFandchangeeffecttypes.
Standard effect
Parameter names
Parameter values
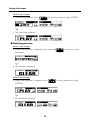
Large effect
Parameter
names
Parameter values
Switching display contents
Press to switch between showing parameters and effect names.
Display in MEMORY mode
In MEMORY mode, you can change patches and banks.
Patch number Patch name
Showing the effects used in a patch
Press to show the effects used in a patch.
When the effects are shown, turn
to scroll through the effects.
Press again to return to the original screen.

8
9
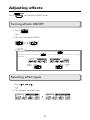
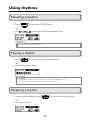
Adjusting effects
Press to change to STOMP mode.
Turning effects ON/OFF
• Press .
• ThisturnsthateffectON/OFF.
[OFF] [ON]
NOTE
Some large effects have SOLO or other special functions assigned to .
The parameter function assigned to is shown on the Display with white letters on a dark
background.
Ordinary
ON/OFF
SOLOON/
OFF
Selecting effect types
• Press .
• Thischangestheeffecttype.

9
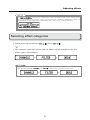
NOTE
The allows you to combine up to 7 effects in whatever order you like. If limits on the
processing capabilityor thenumberofunitsusedare exceeded,a "PROCESSOVERFLOW" warningwill
appear and effects will be bypassed. To end bypassing, delete some effects or change their types.
Selecting effect categories
• Whilepressingandholding , press .
• Thecategorynamewillappearandtheeffectwillbechangedtotherst
effect type in the category.
Æ
Æ
…
HINT
While pressing and holding , press to change effect categories in reverse order.
…
Å
Å
Adjusting effects

10
11
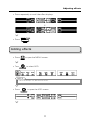
Adjusting parameters
• Turn , , and .
HINT
• Parameteradjustmentsaresavedautomatically.
• WhenAUTOSAVEissettoOFF,aparametersavingscreenwillappearwhenyoutrytochangepatches.
(
¦
P19)
NOTE
Set Time, Rate and other effect parameters to musical notes to sync them to the tempo. (
¦
P44)
Scrolling effect displays
• Use and to scroll the screen.
• Press or .
Adjusting effects

10
11
• Pressrepeatedlytoscrolltheeffectdisplays.
È
• Press .
Adding effects
• Press to open the MENU screen.
• Turn to select ADD.
NOTE
If 7 effects are already in use, ADD will not be shown.
• Press to open the ADD screen.
Adjusting effects

12
13
• Turn to select where the effect will be added.
• Press to conrm where the effect is added.
• AcablewillbeaddedtotheDisplay.
• Press to select the effect type.
Adjusting effects

12
13
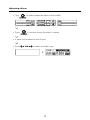
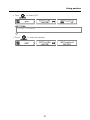
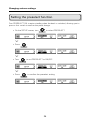
Deleting effects
• Press to open the MENU screen.
• Turn to select DELETE.
• Press to open the DELETE screen.
• Turn to select the effect to delete.
• Press .
• Press to delete the effect.
HINT
Turn to cancel deletion.
Adjusting effects

14
15
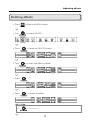
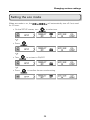
• Press .
Changing the effect order
• Press to open the MENU screen.
• Turn to select CHAIN.
• Press to open the CHAIN screen.
• Turn to select the effect to swap.
• Press to conrm the effect to swap.
Adjusting effects

14
15
• Turn to swap with the next effect in the chain.
• Press .
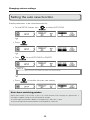
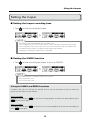
Using amp effects
The amp effects in the can provide optimal sounds when
combined with cabinet effects.
Change the MIC parameter of the cabinet effect according to the device
connected.
For guitar amp output :
MIC parameter OFF
For output from headphones or
monitor speakers :
MIC parameter ON
Adjusting effects

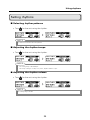
16
17
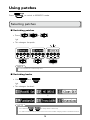
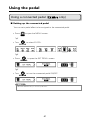
Press to switch to MEMORY mode.
Selecting patches
■ Switching patches
• Press , or .
• Thischangesthepatch.
NOTE
The selected patch has a white background.
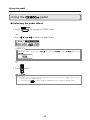
■ Switching banks
• Use and .
• Thischangesthebank.
È
NOTE
• Pressandhold , to change banks continuously.
• SeeP24forinformationaboutthepreselectfunctionthatenableschangingtobankswithdistantnumbers.
Using patches

17
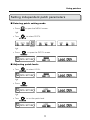
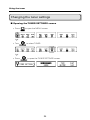
Setting independent patch parameters
■ Entering patch setting mode
• Press to open the MENU screen.
• Turn to select PATCH.
• Press to open the PATCH screen.
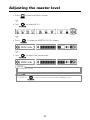
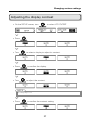
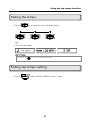
■ Adjusting patch levels
• Turn toselectLEVEL.
• Press .
• Turn to set the patch level.
Using patches

18
19
NOTE
The setting range is 0–120.
• Press to conrm the patch level.
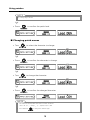
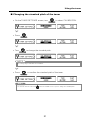
■ Changing patch names
• Turn to select the character to change.
• Press to conrm the character to change.
• Turn to change the character.
• Press to conrm the changed character.
NOTE
• Thecharactersandsymbolsthatcanbeusedareasfollows.
!#$%&'()+,-.;=@[]^_`{}~,(space)A–Z,a–z,0–9
• Pressandhold
to change the character type.
Using patches

18
19
■ Ending patch setting mode
• Press .
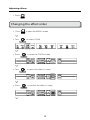
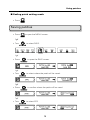
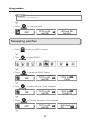
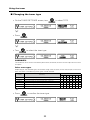
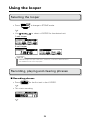
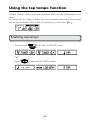
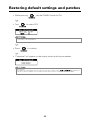
Saving patches
• Press to open the MENU screen.
• Turn toselectSAVE.
• Press toopentheSAVEscreen.
• Turn to select where the patch will be saved.
• Press to conrm where the patch will be saved.
• Turn to select YES.
Using patches

20
21
HINT
Select NO to cancel saving the patch.
• Press to save the patch.
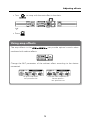
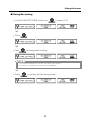
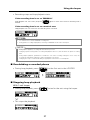
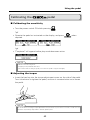
Swapping patches
• Press to open the MENU screen.
• Turn to select SWAP.
• Press to open the SWAP screen.
• Turn to select the patch to be swapped.
• Press to conrm the patch to be swapped.
Using patches
La pagina si sta caricando...
La pagina si sta caricando...
La pagina si sta caricando...
La pagina si sta caricando...
La pagina si sta caricando...
La pagina si sta caricando...
La pagina si sta caricando...
La pagina si sta caricando...
La pagina si sta caricando...
La pagina si sta caricando...
La pagina si sta caricando...
La pagina si sta caricando...
La pagina si sta caricando...
La pagina si sta caricando...
La pagina si sta caricando...
La pagina si sta caricando...
La pagina si sta caricando...
La pagina si sta caricando...
La pagina si sta caricando...
La pagina si sta caricando...
La pagina si sta caricando...
La pagina si sta caricando...
La pagina si sta caricando...
La pagina si sta caricando...
La pagina si sta caricando...
La pagina si sta caricando...
La pagina si sta caricando...
La pagina si sta caricando...
La pagina si sta caricando...
La pagina si sta caricando...
La pagina si sta caricando...
La pagina si sta caricando...
-
 1
1
-
 2
2
-
 3
3
-
 4
4
-
 5
5
-
 6
6
-
 7
7
-
 8
8
-
 9
9
-
 10
10
-
 11
11
-
 12
12
-
 13
13
-
 14
14
-
 15
15
-
 16
16
-
 17
17
-
 18
18
-
 19
19
-
 20
20
-
 21
21
-
 22
22
-
 23
23
-
 24
24
-
 25
25
-
 26
26
-
 27
27
-
 28
28
-
 29
29
-
 30
30
-
 31
31
-
 32
32
-
 33
33
-
 34
34
-
 35
35
-
 36
36
-
 37
37
-
 38
38
-
 39
39
-
 40
40
-
 41
41
-
 42
42
-
 43
43
-
 44
44
-
 45
45
-
 46
46
-
 47
47
-
 48
48
-
 49
49
-
 50
50
-
 51
51
-
 52
52


Zoom G3Xn Manuale utente
- Categoria
- Accessori per chitarra
- Tipo
- Manuale utente
in altre lingue
- English: Zoom G3Xn User manual
Documenti correlati
Altri documenti
-
Boss RC-3 Loop Station Manuale del proprietario
-
Yamaha PSR-SX900 Manuale utente
-
Yamaha PSR-A5000 Manuale utente
-
Yamaha CVP-805 Manuale utente
-
-
-
Boss ME-70 Manuale del proprietario
-
-
Roland CUBE-80X Manuale del proprietario