
U
SER MANUAL (GB) .....................P 01
BEDIENUNGSANLEITUNG (DE) ...P 12
MANUALE ISTRUZIONI (IT) ...........P 23
NÁVOD K OBSLUZE (CZ) ..............P
34

- 1 -
INSTRUCTIONS FOR SAFE USE
This appliance should only be used for domestic cleaning,
as described in this user guide. Please ensure that this guide
is fully understood before operating the appliance.
Do not leave the appliance plugged in. Always switch o
and remove the plug from the socket after use, or before
cleaning the appliance or any maintenance task.
This appliance can be used by children aged from 8 years
and above and persons with reduced physical, sensory or
mental capabilities or lack of experience and knowledge if
they have been given supervision or instruction concerning
use of the appliance in a safe way and understand the
hazards involved. Children shall not play with the appliance.
Cleaning and user maintenance shall not be made by
children without supervision.
If the power cord is damaged stop using the appliance
immediately. To avoid a safety hazard, an authorised Hoover
service engineer must replace the power cord.
Keep hands, feet, loose clothing and hair away from
rotating brushes.
Use only attachments, consumables or spares
recommended or supplied by Hoover.
Static electricity: some carpets can cause a small build up
of static electricity. Any static discharge is not hazardous to
health.
Do not use your appliance out of doors.
Do not pick up hard or sharp objects, matches, hot ashes,
cigarette ends or other similar items.
Do not spray with or pick up ammable liquids, cleaning
uids, aerosols or their vapours.
Do not run over the power cord when using your appliance
or remove the plug by pulling on the power cord.
Do not continue to use your appliance if it appears faulty.
Hoover service: To ensure the continued safe and ecient
operation of this appliance we recommend that any servicing
or repairs are only carried out by an authorised Hoover
service engineer.
Do not stand on or wrap the cord around arms or legs when
using your appliance.
Do not use the appliance to clean animals or people.
Do not position the appliance above you when cleaning the
stairs.
Do not touch the plug or appliance with wet hands.
For UK and Ireland only: This appliance has a 13 Amp mains
plug. If you need to change the fuse in the mains plug, use
a 13Amp ASTA (BS1362) fuse.
INSTRUCTIONS FOR SAFE USE
GB

- 2 -
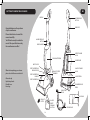
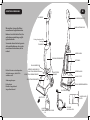
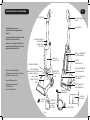
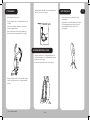
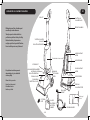
GETTING TO KNOW YOUR CLEANER
Congratulations on the purchase
of your new Hoover.
Please take the time to read this
manual carefully.
You’ll then be ready to make the
most of the special features only
the new Hoover can oer!
When rst unpacking your cleaner
please check all items are included:
Cleaner body
Upholstery brush
Flexible hose
Hose bag
HANDLE RELEASE
BUTTON
CARRY HANDLE
INLET COVER
DIRTY WATER TANK
RELEASE LEVER
DIRTY WATER TANK
HANDLE
DIRTY WATER TANK
CLEAN WATER TANK
WATER RELEASE
BUTTON
CORD CLIP
UPPER STORAGE
HOOK
POWER CORD
LOWER STORAGE
HOOK
ON/OFF PEDAL
CLEANER RELEASE
PEDAL
UPHOLSTERY
BRUSH
HOSE BAG
FLEXIBLE HOSE
HOOVER
CARPET
CLEANING
SOLUTION
EXHAUST
FILTER
EXHAUST FILTER
CHAMBER
HANDLE
GB

1
3
2
4
- 3 -
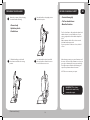
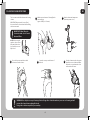
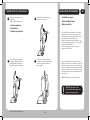
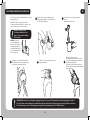
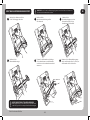
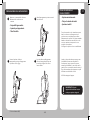
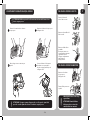
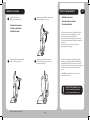
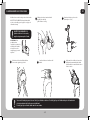
PREPARING YOUR CLEANER
Remove the contents of the packaging.
You should find the following:
Raise the handle to the upright position
until it locks in place.
Test for colourfastness - Wet a white absorbent cloth
with the solution. In a small, hidden area of your
carpet, gently rub the surface with the dampened
cloth.
Wait ten minutes and check for colour removal or
bleed with a white paper towel.
If your carpet has more than one colour, check all
colours.
When cleaning an entire room, move furniture out of
the area to be cleaned. If the furniture is too heavy to
move, place aluminium foil or wax paper under legs.
This will prevent wood finishes from staining your
carpet. Pin up furniture skirts and curtains.
NOTE: Do not over saturate your carpet.
To fold the handle press the handle
release button and fold to the storage
position.
Once the handle has been lowered lift
the carry handle to allow the cleaner to
be carried from room to room.
BEFORE CLEANING A CARPET
IMPORTANT: This cleaner
should not be used to dry
vacuum the carpet.
•Cleanerbody
•Upholsterybrush
•Flexiblehose
•Vacuumthoroughly.
•Testforcolourfastness
•Movethefurniture
(*Certain models only)
GB

4
5
1
2
3
- 4 -
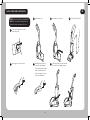
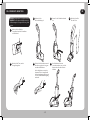
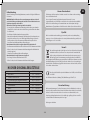
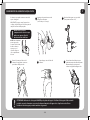
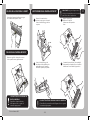
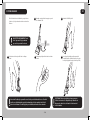
Add the required amount of cleaning fluid to
a measuring jug.
(approx. 40ml per 1L of water)
The clean water tank holds the water and cleaning
solution.
IMPORTANT: Always turn the cleaner off and
disconnect from the electrical outlet before filling
the clean water tank.
NOTE: Before using this
appliance, please ensure
dirty water tank release
lever and inlet cover are
fully locked.
Press the clean water tank release latch
and remove from the cleaner.
Open the screw cap on the bottom of
the tank.
Pour the solution into the clean water
thank. Do not exceed the max fill line.
Replace the cap and return the clean
water tank to the cleaner.
Mix the solution with warm water.
(Max. temperature - 40ºC)
IMPORTANT: When filling the
cleanwatertank,donotexceed
themaxfillline.
WARNING:UseonlyHoovercarpetcleaningsolution.Usingothersolutionbrandsmaycauseexcessfoamingandwill
prevent the cleaner from working effectively.
Using other solutions may affect your warranty
FILLING THE CLEAN WATER TANK
GB

1 2
54 3
- 5 -
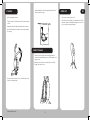
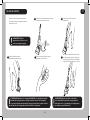
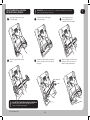
Unwrap the power cord and plug the
cleaner into the power supply.
Press the cleaner release pedal and recline
the cleaner.
Press the solution mix trigger to release
the solution.
For best results apply the solution on the
forward stroke (press trigger) and recover
the solution on the backward stroke (release
trigger).
Press the ON/OFF pedal.
CLEANING CARPETS
IMPORTANT: This cleaner
should not be used to dry
vacuum the carpet.
WARNING: Use only Hoover carpet cleaning solution. Using other solution
brandsmaycauseexcessfoamingandwillpreventthecleanerfromworking
effectively. Using other solutions may affect your warranty.
CAUTION: This product is intended for cleaning
purpose only. Do not use the main suction head or
upholstery brush to remove large spills.
Dry vacuum the carpet thoroughly before cleaning
your carpet.
Ensure the carpet has been checked for colour
fastness.
GB

1
2 3 4
5
6 7
- 6 -
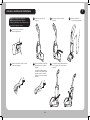
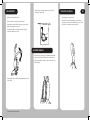
NOTE: Do not over saturate your upholstery.
NOTE: The clean water tank will need to be
lled with solution and water before use.
Lift the inlet cover
Take out the flexible hose and the
upholstery brush
Press trigger to release solution.
Pull upholstery brush back
over spill to pick up liquid.
For best results apply solution
on the forward stroke and
release the trigger to recover
on the back ward stroke.
Upholstery brush can only work with
the cleaner in the upright position
Insert the hose connector Press the ON/OFF pedal
USING THE UPHOLSTERY BRUSH
GB

- 7 -
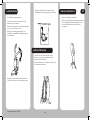
Before storing the cleaner:
Turn the cleaner off and disconnect from the electrical
socket.
Empty and rinse the dirty water tank. Allow to air dry.
Press the handle release button and lower the handle
for storage.
Put the flexible hose and the upholstery brush back
into the bag for storage.
Turn the cleaner off and remove the plug from the
electrical socket. Wind the power cord around the cord
storage hooks.
Rotate the storage hooks to quickly release the full
length of the power cord.
Do not run over the power cord.
Clip the power cord in the cord clip at the back of the
handle to avoid accidentally running the cleaner over
the cord and causing any damage.
Do not store the cleaner on a wood surface unless the
cleaner is completely dry.
STORAGE
CORD STORAGE
CORD CLIP
*Certain models only
GB

1
3
2
4
- 8 -
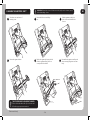
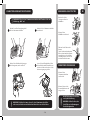
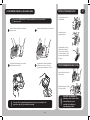
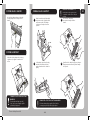
EMPTYING THE DIRTY WATER TANK
WARNING:DONOTexceedthemaxfilllineonthedirtywatertank.
WARNING: Always switch the cleaner off and unplug it from the
electrical socket before emptying the dirty water tank.
IMPORTANT: Clean the filters
after each use.
WARNING: Ensure both lter are
tted to the cleaner before use.
Press the dirty water tank release lever.
Turn the tank cap anti-clockwise to open.
Remove the dirty water tank from the
cleaner.
Press the exhaust filter
release latch.
Remove the exhaust filter
chamber.
Remove the dirty water
tank from the cleaner.
Take out the pre motor
filter, then clean it.
Remove the filter from the
chamber.
Rinse under hand warm
water to remove any
debris. Allow to completely
dry before returning to the
cleaner.
Empty the tank. Rinse the tank with clean
water and allow to dry before storing the
cleaner.
CLEANING THE EXHAUST FILTER
CLEANING THE PRE MOTOR FILTER
GB

1 2
3 4
- 9 -
Turn the cleaner upside down. Remove any
threads or debris from the brush bar.
Remove any threads or debris ensuring the
agitator can rotate freely.
Press the dirty water tank release
lever and remove the dirty water
tank. Unscrew 4 retaining screws on
the top surface.
Turn the cleaner over. Remove
the brushbar alignment brackets.
Replace the brush bar and attach to the
nozzle. Attach the alignment brackets and
assemble to the cleaner.
Unscrew 2 retaining screws located
on the underside of the detergent
nozzle. Remove the brushbar from
the nozzle.
CLEANING THE BRUSHBAR* CHANGING THE BRUSHBAR*
CLEANING THE AGITATOR*
THISFEATUREVARIESACCORDING
TO MODEL
Please check the underside of your
cleaner and follow the appropriate
instructions.
THISFEATUREVARIESACCORDINGTOMODEL
Please check the underside of your cleaner and
follow the appropriate instructions.
IMPORTANT: Switch the cleaner off and
remove the plug from the electricity
supply before dismantling cleaner
*Certain models only
GB

1 2 3
4 65
- 10 -
CHANGING THE AGITATOR / BELT*
IMPORTANT: Switch the cleaner off and remove the plug from the electricity supply
before dismantling cleaner.
THISFEATUREVARIESACCORDINGTOMODEL
Please check the underside of your cleaner and
follow the appropriate instructions.
Turn cleaner over and remove 7
retaining screws.
Remove the agitator brackets Replace the agitator by looping the belt
round the agitator making sure it sits
securely in the belt channel.
Reassemble the agitator assembly to the
cleaner ensuring the agitator can rotate
freely.
Remove the belt cover and safety
bar.
Slide the agitator assembly out
of the cleaner and check the belt
for wear.
*Certain models only
GB

- 11 -
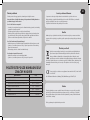
Troubleshooting
If your cleaner is not working properly run through the following checklist.
WARNING: To reduce the risk of personal injury, unplug the carpet washer
before performing maintenance/troubleshooting checks.
Why won’t the carpet washer turn on?
•Itmaynotbepluggedintotheelectricaloutletcorrectly:ensurethattheplugis
pushed in securely and switched on.
•Thepowerbuttonontheunithasn’tbeenfullydepressed.
•Ifunitcutsoutduringuse,disconnecttheunitfromthewallsocket,allowto
cool for one hour, clean the filter and empty the dirty water tank and check
hose, brushbar for blockages.
Why won’t the cleaner pick up solution/spills?
•Thedirtywatertankmaybefull.Emptythedirtywatertank.
•Ensurethedirtywatertankisfittedcorrectlyandthetankcapissecurelyfitted.
•Checkthebrushbarforblockages.
Why won’t the solution/clean water dispense?
•Thesolution/cleanwatertankmaybeempty.
•Ensuredirtywatertankisfittedsecurely.
Hoover Service
Should you require service at any time, please contact your local Hoover Service Office.
Hoover spares and Consumables Always replace parts with genuine Hoover spares. These
are available from your local Hoover dealer or direct from Hoover.
When ordering parts always quote your model number.
Quality
Hoover’sfactorieshavebeenindependentlyassessedforquality.Ourproductsaremade
using a quality system which meets the requirements of ISO 9001.
Your Guarantee
The guarantee conditions for this appliance are as defined by our representative in the
country in which it is sold. Details regarding these conditions can be obtained from
the dealer from whom the appliance was purchased. The bill of sale or receipt must be
produced when making any claim under the terms of this guarantee.
Subject to change without notice
Environment
The symbol on this appliance indicates that this appliance may not be
treated as household waste. Instead it must be handed over to the applicable
collection point for the recycling of electrical and electronic equipment.
Disposal must be carried out in accordance with local environmental
regulations for waste disposal. For more detailed information about treatment, recovery
and recycling of this appliance, please contact your local city office, your household and
waste disposal service or the shop where you purchased the appliance.
This product complies with the European Directives 2006/95/EC, 2004/108/EC
and 2011/65/EC.
HOOVER Limited Pentrebach, Merthyr Tydfil, Mid Glamorgan CF48 4TU, UK
USEONLYHOOVERSPARES
SPARE PARTS CODE
AGITATOR Y30 35601321
FLEXIBLE HOSE D144 35601409
UPHOLSTERY TOOL AND BRISTLES INSERT MFT4 35601410
FILTER& BRISTLES INSERT U70 35601411
BELT V35 35601322
BRUSH F4 35601324
CLEANJET SOLUTION 35601351
GB

- 12 -
HINWEISE FÜR DIE SICHERE BENUTZUNG
Dieses Gerät ist nur zum Gebrauch im Haushalt und nicht
für gewerbliche Zwecke bestimmt. Das Gerät ausschließlich
gemäß den Angaben in dieser Bedienungsanleitung
verwenden. Vor dem Gebrauch des Gerätes muss die
vorliegende Bedienungsanleitung vollständig gelesen und
verstanden worden sein.
Ziehen Sie den Netzstecker nach Gebrauch aus der
Steckdose. Vor der Reinigung oder Wartung das Gerät stets
ausschalten, den Netzstecker aus der Steckdose ziehen und
abkühlen lassen.
Dieses Gerät darf von Kindern ab 8 Jahren sowie körperlich,
geistig oder sensorisch behinderten Personen bzw. Personen
ohne Erfahrung und Kenntnisse im Gebrauch nur unter
Aufsicht oder unter Anleitung für die sichere Benutzung
und den damit verbundenen Gefahren benutzt werden.
Kinder sollten nicht unbeaufsichtigt mit dem Gerät spielen.
Reinigungs- und Wartungsarbeiten dürfen von Kindern nur
unter Aufsicht ausgeführt werden.
Ist das Netzkabel beschädigt, darf das Gerät NICHT mehr
benutzt werden. Im Falle eines Defektes, darf das Netzkabel
nur durch einen autorisierten Hoover-Kundendiensttechniker
ausgetauscht werden.
Hände, Füße, lose Kleidung und Haare von den rotierenden
Bürsten fernhalten.
Verwenden Sie nur Zubehör, Verbrauchsmaterial oder
Ersatzteile, die von Hoover empfohlen oder geliefert werden.
Statische Auadung: Manche Teppichböden können die
Bildung statischer Elektrizität verursachen. die jedoch sehr
gering und bei Entladung nicht gesundheitsschädlich ist.
Das Gerät darf nicht im Freien verwendet werden.
Vermeiden Sie es, harte oder scharfe Gegenstände,
Streichhölzer, heiße Asche, Zigarettenkippen oder Ähnliches
aufzusaugen.
Niemals entzündliche Flüssigkeiten, Reinigungsmittel,
Aerosole oder deren Dämpfe auf das Gerät sprühen oder damit
aufsaugen.
Während des Saugens nicht über das Netzkabel fahren. Nicht
am Kabel ziehen, um den Gerätestecker aus der Steckdose
zuziehen.
Stellen Sie die Verwendung des Gerätes ein, wenn ein Defekt
am Gerät vermutet wird.
Hoover-Wartung: Um auf Dauer den sicheren und ezienten
Betrieb dieses Geräts zu gewährleisten, empfehlen wir,
Wartungs- und Reparaturarbeiten ausschließlich von einem
zugelassenen Hoover-Kundendiensttechniker durchführen zu
lassen.
Treten Sie sich beim Gebrauch des Gerätes nicht auf das
Netzkabel und wickeln es sich nicht um Arme oder Beine.
Benutzen Sie das Gerät nicht zur Reinigung von Menschen
oder Tieren.
Positionieren Sie das Gerät bei der Reinigung von Treppen
nicht oberhalb Ihres Standortes.
Den Netzstecker oder das Gerät niemals mit nassen Händen
berühren.
Nur für UK und Irland: Das Gerät hat einen 13 A Netzstecker.
Falls Sie die Sicherung im Hauptstromanschluss ersetzen
müssen, verwenden Sie eine 13 A ASTA (BS1362) Sicherung.
HINWEISE FÜR DIE SICHERE BENUTZUNG
DE

- 13 -
GERÄTEBESCHREIBUNG
Wir möchten Sie zum Kauf Ihres
neuen Hoover beglückwünschen.
Nehmen Sie sich bitte die Zeit, die-
ses Bedienungsanleitung sorgfäl-
tig durchzulesen.
Sie werden danach in der Lage sein
die Sonderfunktionen, die nur der
neue Hoover bieten kann, voll zu
nutzen!
Prüfen Sie beim ersten Auspacken
des Staubsaugers, ob alle Teile
enthalten sind:
Staubsaugerkorpus
Polsterbürste
Flexibler Saugschlauch
Saugschlauchbeutel
Entriegelungsknopf für
Handgri
TRAGEGRIFF
EINLASSABDECKUNG
ENTRIEGELUNGSHEBEL FÜR
SCHMUTZWASSERBEHÄLTER
SCHMUTZWASSERBEHÄLTERGRIFF
SCHMUTZWASSERBEHÄLTER
FRISCHWASSERBEHÄLTER
WASSERFREIGABETASTE
KABELHALTERUNGSCLIP
OBERER HAKEN
NETZKABEL
UNTERER HAKEN
EIN-/AUS-TASTE
STAUBSAUGERFREIGABEPEDAL
POLSTERBÜRSTE
SAUGSCHLAUCH-
BEUTEL
FLEXIBLER
SAUGSCHLAUCH
HOOVER
TEPPICHREINIGUNGSLÖSUNG
ABLUFTFILTER
ABLUFTFILTER-
KAMMER
HANDGRIFF
DE

1
3
2
4
- 14 -
VORBEREITUNGDESSTAUBSAUGERS
Nehmen Sie den Inhalt aus der
Verpackung.
Folgendes sollte enthalten sein:
Handgriff in die aufrechte Position
anheben bis er einrastet.
Test auf Farbechtheit - Befeuchten Sie ein weißes
saugfähiges Tuch mit der Lösung. Reiben Sie die
Teppichoberfläche mit dem befeuchteten Tuch in
einem kleinen unsichtbaren Bereich ein.
Warten Sie zehn Minuten und überprüfen Sie mit
einem weißen Papierhandtuch, ob sich Farbe gelöst
hat oder der Bereich abfärbt.
Im Fall, dass Ihr Teppich mehrere Farben hat,
überprüfen Sie alle Farben.
Wenn Sie das ganze Zimmer reinigen, rücken Sie
die Möbel aus dem zu reinigenden Bereich. Falls die
Möbel zu schwer sind, um sie zu umzustellen, legen
Sie Alufolie oder Wachspapier unter die Beine/Füße.
Dadurch wird verhindert, dass das Holz Ihren Teppich
verschmutzt. Hängen Sie Möbelverkleidungen und
Vorhänge hoch.
HINWEIS: Durchtränken Sie nicht Ihren Teppich.
Zum Umklappen des Handgriffs
den Entriegelungsknopf für den
Handgriff drücken und ihn in die
Aufbewahrungsposition klappen.
Sie können das Gerät, nachdem der
Handgriff nach unten geklappt wurde,
mit dem Tragegriff von Zimmer zu
Zimmer tragen.
BEVORSIEEINENTEPPICHREINIGEN
WICHTIG: Das Gerät sollte
nicht zum Trockensaugen das
Teppichs benutzt werden.
•Staubsaugerkorpus
•Polsterbürste
•FlexiblerSaugschlauch
•Gründlichabsaugen.
•AufFarbechtheittesten
•Möbelumstellen
(*Nur bei bestimmten Modellen)
DE

4
5
1
2
3
- 15 -
Gießen Sie die entsprechende Menge der
Reinigungsüsssigkeit in einen Dosierbecher.
(ca. 40 ml pro Liter Wasser)
Der Frischwasserbehälter enthält das Wasser und die
Reinigungslösung.
WICHTIG: Schalten Sie immer, bevor Sie den
Frischwasserbehälter auffüllen, das Gerät aus und
ziehen den Netzstecker aus der Steckdose.
HINWEIS: Stellen Sie
vor der Benutzung des
Gerätes sicher, dass der
Entriegelungshebel des
Schmutzwasserbehälters
und der Einfüllverschluss
fest verriegelt sind.
Entriegeln Sie den Frischwasserbehälter
durch Drücken auf den Schnappverschluss
und nehmen Sie ihn vom Gerät ab.
Öffnen Sie den Schraubverschluss unten
am Wasserbehälter.
Gießen Sie die Lösung in den
Frischwasserbehälter. Achten Sie darauf,
dass Sie ihn nicht weiter als bis zum Strich
Max. Füllstand aufzufüllen.
Schrauben Sie den Verschluss wieder fest
und befestigen Sie den Frischwasserbehälter
wieder am Gerät.
Vermischen Sie die Lösung mit warmem
Wasser.
(Maximaltemperatur: 40 °C)
WICHTIG: Füllen Sie den
Frischwasserbehälter nicht
weiteralsbiszumStrichMax.
Füllstand auf.
WARNUNG:BenutzenSienurTeppichreinigungslösungvonHoover.DieVerwendungvonReinigungsmittelnanderer
Hersteller kann zur übermäßigen Schaumbildung führen und hindert das Reinigungsgerät daran, effektiv zu arbeiten.
DieVerwendungvonanderenReinigungslösungenkannAuswirkungenaufIhreGarantiehaben.
FRISCHWASSERBEHÄLTER AUFFÜLLEN
DE

1 2
54 3
- 16 -
Wickeln Sie das Netzkabel ab und stecken
den Stecker in eine Steckdose.
Drücken Sie auf das
Staubsaugerfreigabepedal und neigen Sie
den Staubsauger nach hinten.
Zur Ausgabe der Lösung drücken Sie auf
die Lösungsmischtaste.
Um beste Ergebnisse zu erzielen, benutzen Sie
die Lösung während der Vorwärtsbewegung
(Taste drücken und gedrückt halten) und
saugen Sie sie bei der Rückwärtsbewegung
wieder auf (Taste loslassen).
Drücken Sie auf die Ein-/Aus-Taste.
TEPPICHE REINIGEN
WICHTIG: Das Gerät sollte
nicht zum Trockensaugen das
Teppichs benutzt werden.
WARNUNG:BenutzenSienurTeppichreinigungslösungvonHoover.
DieVerwendungvonReinigungsmittelnandererHerstellerkannzur
übermäßigen Schaumbildung führen und hindert das Reinigungsgerät
daran,effektivzuarbeiten.DieVerwendungvonanderenReinigungsmitteln
kann Auswirkungen auf Ihre Garantie haben.
ACHTUNG: Dieses Produkt ist nur für
Reinigungszwecke gedacht. Entfernen Sie
größereverschütteteMengennichtmitdem
Hauptsaugkopf oder der Polsterbürste.
Saugen Sie den Teppich gründlich trocken ab, bevor
Sie ihn reinigen.
Vergewissern Sie sich, dass der Teppich vorher auf
Farbechtheit überprüft wurde.
DE

1
2 3 4
5
6 7
- 17 -
HINWEIS: Durchtränken Sie nicht Ihre Polster.
HINWEIS: Der Frischwasserbehälter muss vor
der Benutzung mit Lösung und Wasser gefüllt
werden.
Nehmen Sie die
Einlassabdeckung ab
Nehmen Sie den flexiblen
Saugschlauch und die Polsterbürste
aus dem Beutel
Drücken Sie die Taste, um die
Lösung freizugeben.
Ziehen Sie die Polsterbürste zu sich
über die ausgegebene Lösung, um
sie wieder aufzunehmen.
Um beste Ergebnisse zu erzielen,
benutzen Sie die Lösung während
der Vorwärtsbewegung und saugen
Sie sie bei der Rückwärtsbewegung
wieder auf.
Die Polsterbürste kann nur
verwendet werden, wenn sich das
Gerät in der aufrechten Position
befindet.
Setzen Sie den Schlauchverbinder
ein
Drücken Sie auf die
Ein-/Aus-Taste
POLSTERBÜRSTE BENUTZEN
DE

- 18 -
Vor der Aufbewahrung des Gerätes:
Schalten Sie das Gerät aus und ziehen Sie den
Netzstecker aus der Steckdose.
Entleeren und spülen Sie den Schmutzwasserbehälter
aus. Lassen Sie die Tanks trocknen.
Drücken Sie den Entriegelungsknopf für den
Handgriff, um den Griff für die Aufbewahrung nach
unten zu klappen.
Stecken Sie den flexiblen Saugschlauch und die
Polsterbürste für die Lagerung wieder in den Beutel.
Schalten Sie das Gerät aus und ziehen Sie den
Netzstecker aus der Steckdose. Wickeln Sie das
Netzkabel um die Kabelhaken.
Drehen Sie die Haken, um schnell die gesamte Länge
des Netzkabels abzuwickeln.
Fahren Sie nicht über das Netzkabel.
Drücken Sie das Netzkabel in den Kabelhalterungsclip
auf der Handgriffrückseite um zu verhindern, dass
Sie unabsichtlich über das Kabel fahren und es
beschädigen.
Bewahren Sie das Gerät nicht auf einer hölzernen
Oberfläche auf, außer es ist komplett abgetrocknet.
AUFBEWAHRUNG
KABELAUFWICKLUNG
KABELHALTERUNGSCLIP
*Nur bei bestimmten Modellen
DE

1
3
2
4
- 19 -
SCHMUTZWASSERBEHÄLTER ENTLEEREN
WARNUNG: Füllen Sie den Schmutzwasserbehälter NICHT weiter als bis zur
Markierung „MAX“ auf.
WARNUNG: Schalten Sie immer, bevor Sie den Schmutzwasserbehälter
entleeren, das Gerät aus und ziehen den Netzstecker aus der Steckdose.
WICHTIG: Reinigen Sie die Filter
nach jeder Benutzung.
WARNUNG: Stellen Sie sicher, dass
beide Filter vor der Benutzung am
Gerät befestigt wurden.
Drücken Sie auf den Entriegelungshebel
für den Schmutzwasserbehälter.
Drehen Sie den Behälterdeckel entgegen
den Uhrzeigersinn, um ihn zu öffnen.
Nehmen Sie den Schmutzwasserbehälter
vom Gerät ab.
Drücken Sie auf den
Schnappverschluss des
Abluftfilters.
Nehmen Sie den
Abluftfilter vom Gerät ab.
Nehmen Sie den
Schmutzwasserbehälter
vom Gerät ab.
Nehmen Sie danach den
Vormotorfilter heraus und
reinigen Sie ihn.
Entfernen Sie den Filter von der
Kammer.
Spülen Sie ihn unter handwarmem
Wasser ab, um sämtlichen Schmutz
zu entfernen. Lassen Sie den Filter
vollständig trocknen, bevor Sie ihn
wieder in das Gerät einsetzen.
Leeren Sie den Auffangbehälter. Spülen
Sie den Behälter mit frischem Wasser aus
und lassen Sie ihn trocken, bevor Sie das
Gerät zur Lagerung weg stellen.
REINIGEN DES ABLUFTFILTERS
VORMOTORFILTERREINIGEN
DE
La pagina si sta caricando...
La pagina si sta caricando...
La pagina si sta caricando...
La pagina si sta caricando...
La pagina si sta caricando...
La pagina si sta caricando...
La pagina si sta caricando...
La pagina si sta caricando...
La pagina si sta caricando...
La pagina si sta caricando...
La pagina si sta caricando...
La pagina si sta caricando...
La pagina si sta caricando...
La pagina si sta caricando...
La pagina si sta caricando...
La pagina si sta caricando...
La pagina si sta caricando...
La pagina si sta caricando...
La pagina si sta caricando...
La pagina si sta caricando...
La pagina si sta caricando...
La pagina si sta caricando...
La pagina si sta caricando...
La pagina si sta caricando...
La pagina si sta caricando...
La pagina si sta caricando...
-
 1
1
-
 2
2
-
 3
3
-
 4
4
-
 5
5
-
 6
6
-
 7
7
-
 8
8
-
 9
9
-
 10
10
-
 11
11
-
 12
12
-
 13
13
-
 14
14
-
 15
15
-
 16
16
-
 17
17
-
 18
18
-
 19
19
-
 20
20
-
 21
21
-
 22
22
-
 23
23
-
 24
24
-
 25
25
-
 26
26
-
 27
27
-
 28
28
-
 29
29
-
 30
30
-
 31
31
-
 32
32
-
 33
33
-
 34
34
-
 35
35
-
 36
36
-
 37
37
-
 38
38
-
 39
39
-
 40
40
-
 41
41
-
 42
42
-
 43
43
-
 44
44
-
 45
45
-
 46
46


Documenti correlati
-
Hoover FH51102 Manuale del proprietario
-
-
-
-
-
-
-
-
-