
Item: 975251
975268
975275
VACUUM PACKAGING MACHINES
PAKOWARKI PRÓŻNIOWE KOMOROWE
You should read this user manual carefully before
using the appliance
Bevor Sie das Gerät in Betrieb nehmen, sollten
Sie diese Gebrauchsanweisung aufmerksam lesen
Alvorens de apparatuur in gebruik te nemen dient
u deze gebruiksaanwijzing aandachtig te lezen
Przed uruchomieniem urządzenia należy koniecznie
dokładnie przeczytać niniejszą instrukcję obsługi
Lisez attentivement ce mode d’emploi avant d’utiliser
l’appareil .
Prima di utilizzare l’apparecchio in funzione leggere
attentamente le istruzioni per l’uso.
Citii cu atenie prezentul manual de utilizare înainte
de folosirea aparatului
User manual
Gebrauchsanweisung
Gebruiksaanwijzing
Instrukcja obsługi
Mode d’emploi
Istruzioni per l’utente
Instruciunile utilizatorului

2
EN
Keep this manual with the appliance.
Diese Gebrauchsanweisung bitte beim Gerät aufbewahren.
Bewaar deze handleiding bij het apparaat.
Zachowaj instrukcję urządzenia.
Gardez ces instructions avec cet appareil.
Conservate le istruzioni insieme all’apparecchio.
Păstrai manualul de utilizare alături de aparat.
.
For indoor use only.
Nur zur Verwendung im Innenbereich.
Alleen voor gebruik binnenshuis.
Do użytku wewnątrz pomieszczeń.
Pour l’usage à l’intérieur seulement.
Destinato solo all’uso domestico.
Numai pentru uz casnic.
.
INDEX
1. SAFETY WARNINGS ....................................................................................3
2. TECHNICAL PARAMETERS ........................................................................4
3. PREPARATION BEFORE USE .....................................................................6
4. VACUUM PACKING PROCESS DESCRIPTION .....................................7
5. FAQ ADDITIONAL INFORMATION .....................................................9

3
EN
Dear Customer,
Thank you for purchasing this Hendi appliance. Please read this manual carefully before connecting the
appliance in order to prevent damage due to incorrect use. Read the safety regulations in particular very
carefully.
1. SAFETY WARNINGS
• Incorrect operation and use may cause serious
damage and injury.
• The appliance may be used only for intended
purpose.
• The manufacturer declines any liability for dam-
age caused by improper handling and incorrect
use of the appliance.
• While operating, please secure the appliance and
the power cable plug against contact with water
or other liquids. Should the machine accidentally
fall into water, disconnect the plug from the socket
and have the machine inspected by a profession-
al. Failure to comply with this manual may cause
a threat to life.
• Never try to open the casing of the appliance
yourself.
• Do not insert any objects in the casing of the
appliance.
• Do not touch the power cable plug with damp
hands.
• Regularly inspect the condition of the plug and
cable. If any damage to the plug or cable is iden-
tied, have it repaired in a specialised repair
centre.
• Should the machine be dropped or otherwise
damaged, have it checked and repaired, if neces-
sary, in a specialised repair centre before using
it again.
• Never try to repair the appliance yourself - this
may cause a threat to life.
• Protect the power cable from any contact with
sharp or hot objects and open re. If you want
to disconnect the appliance, always reach for the
plug, never pull the cable.
• Secure the cable (or extension) so nobody can
accidentally disconnect it from the socket or trip
over it.
• Keep the working machine under control during
use.
• Children are not aware of threats that electric
equipment may cause. Never let children use
electric equipment.
• When not use and always before cleaning, dis-
connect the machine from the mains by remov-
ing the plug from the socket.
• Note! If the power cable plug is connected to the
socket, the machine is live.
• Turn the machine o before unplugging.
• Never move the device by pulling on the power
cable.
• Never use accessories other than supplied with
the appliance.
• The device may be connected only to a socket of
intensity and frequency compliant with data pre-
sented on data plate.
• Avoid overloading.
• After operation turn o the equipment by unplug-
ging it from the mains.
• Before lling or cleaning always remove the plug
from the socket.
• Electric installation must comply with national
and local regulations.
• The appliance must not be used but persons (in-
cluding children) with physical, sensory of men-
tal impairments or lacking the proper knowledge
and experience.

4
EN
Special safety regulations
• Never move the device by pulling on the power
cable.
• Never use any extra cleaning agents than those
delivered with the machine.
• If the oil level drops below minimum, re hazard
may occur. Therefore, proper oil amount must be
provided in the container.
• Never use old oil as it increases re hazard.
• The level of oil in the container must not exceed
the MAX level marked on the side wall of the
container.
Preparations before using for the rst time
• Before use, check if the machine is not damaged.
In case of any damage immediately contact your
supplier and DO NOT use the machine.
• Remove all the packing material and protection
lm (if applicable).
• Clean the machine using lukewarm water and
soft cloth.
• Unless recommended otherwise, place the ma-
chine
on a at and stable oor.
• Provide enough space around the machine to as-
sure
proper ventilation.
• Position the appliance in such a way that the plug
is accessible at all times.
NOTE: before turning the packaging machine on, make sure that the pump is lled with oil. Any and all failures
resulting from seizure of the pump shall not be covered by warranty (information on how to ll the pump with oil
is included in the manual).
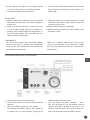
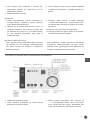
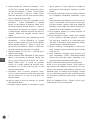
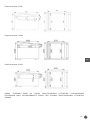
2. TECHNICAL PARAMETERS
Code 975251 975268 975275
External dimensions 330x480x(H)360 mm 370x480x(H)435 mm 425x560x(H)460 mm
Chamber dimensions 280x385x(H)80/130 mm 320x370x(H)135/185 mm 370x450x(H)170/220 mm
Sealing bar length 260 mm 300 mm 350 mm
Pump eciency 10 m³/h 10 m³/h 20 m³/h
Weight 36 kg 38 kg 62 kg
Power 370 W 370 W 900 W
Voltage 230 V 230 V 230 V

5
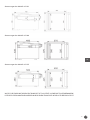
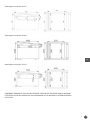
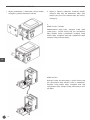
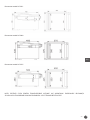
EN
Dimensions of model: 975251
Dimensions of model: 975268
Dimensions of model: 975275
NOTE: KEEP THE BOX FOR ANY FUTURE TRANSPORT OF THE MACHINE! POTENTIAL COMPLAINTS
WILL BE CONSIDERED ONLY IF THE MACHINE HAS BEEN TRANSPORTED IN THE BOX.

6
EN
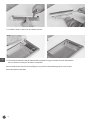
3. PREPARATION BEFORE USE
1.
Take the machine out of the wooden box by remov-
ing
the upper and one of the side walls.
2. Remove consumables from the machine’s
chamber. Pour oil into the oil dispenser (if the
pump is empty or oil level is too low)
3.
HENDI 975251 and 975268
Remove back panel, remove the screw under the
panel and drain the used oil (afterwards insert the
screw back in position), remove the screw of oil ll-
er, pour the oil from oil container (afterwards insert
the screw back in position).
HENDI 975275
Remove the oil drain screw and drain the used
oil (afterwards insert the screw back in position),
remove the screw of oil ller, pour the oil from oil
container (afterwards insert the screw back in po-
sition).

7
EN
4.
If the machine was kept in a cold place (below
5°C), leave it for approx. 1 hour before starting.
5. Connect the power cable to the mains.
6. Set the on/o switch (blue switch at the back of
the machine) to ON position (switch raised - ma-
chine is ON).
INSTALLATION
7. Before starting the machine up, please read the
information on operation and safety included in
the manual.
8. Make sure that the oil level is at least at 1/2 or
1/3 of window height. When the appliance is
working, the oil level should not drop below 1/3
of the window height. Do not overll the ma-
chine as the oil may overow.
9. Place the machine in a vertical position in a well
ventilated and well lit room, without access of
any toxic gases or dust.
10. Make sure the machine is grounded.
11. Before turning the power on always check if the
top cover is open.
CONSUMABLES
• Oil - oil for the vacuum pump should be replaced
at least once every 6 months. We recommend
Victor Vacuum Oil available for purchase from the
manufacturer or distributor.
• Teon bar - Replace when burnt. Failure to do
so may cause damage to the sealing bar. Teon
bars may be purchased from the manufacturer
or distributor.
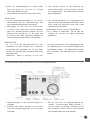
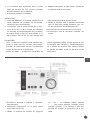
4. VACUUM PACKING PROCESS DESCRIPTION
1. Connect the machine to power source.
2. Flip the blue switch at the back of the machine
upwards.
3.
Turn the machine using the “ON” button - “- -”
will
light up on TIME(S) display. (for a dozen or
so seconds up to a few minutes). Changing of
settings will be impossible then.
4.
Press SET button (parameter selection) - “VACU-
UM”
LED will light up. Set the desired vacuum
value
by pressing “+” button to increase or “-” to
decrease vacuum level. Time range is 0-99 sec-
onds. The result will shown on TIME(S) display.

8
EN
5. Press SET button again (change to another
parameter) - “SEALING” LED will light up to
indicate sealing time. Set the desired value by
pressing “+” to increase or ”-” to decrease seal-
ing time. Time range is 0-3.5 seconds. Sealing
time should be gradually increased.
6. Press SET button again (change to another
parameter) - “COOLING” LED will light up to
indicate cooling level. Set the desired value by
pressing “+” to increase or ”-” to decrease cool-
ing time. Time range is 0-9.9 seconds.
7. Press SET button again - parameter LEDs will
switch o.
8. Press SEALING TEMP button repeatedly to set
the sealing power. Each press will switch on bag
sealing power LEDs (HIGH, MIDDLE, LOW). De-
pending on bag thickness, proper sealing power
will be used. The thicker the bag, the higher the
power.
9. Insert the bag in machine’s chamber. Make sure
that the whole length of the bag is placed on the
sealing bar and that the bag is not folded along
the seam.
10. Press the bag onto the sealing bar using a met-
al clamp.
11. Close the upper cover of the machine and hold
for a while. The machine will start working au-
tomatically. The cover will be sealed shut.
12.
During operation the chamber will generate vacu-
um
which will prevent accidental opening of the
cover.
All processes are carried out in the state of vac-
uum, the display and timer show the current
process (time remaining to generate full vacu-
um, sealing time and then cooling time). During
operation “WORKING” LEDs will switch on.
13. After completion the cover will automatically be
raised and “Ed” message will be displayed.
14. After completion of the cycle, the chamber is
lled with air, the cover opens automatically
and “Ed” is displayed. The cover will not open
automatically if a locking clamp is used. Unlock
the clamp to open the cover.
15. To continue working at the same parameters,
close the machine’s cover after inserting anoth-
er bag.
16. After completion of work turn the machine o
with the “OFF” switch, ip the blue switch at the
back of the machine downwards and disconnect
power cable from the mains.
NOTE: never obstruct air ow vent in the chamber.
NOTE: In an emergency press “STOP” to stop the
vacuum packaging process. The chamber will be
lled with air thus completing the process, the cov-
er will open after the process is completed. The
cover will not open automatically if a locking clamp
is used. Unlock the clamp to open the cover.
NOTE: in models 975251, 975268, 975275 the
GAS” parameter/function is not active.
NOTE
• Do not turn the machine on without any bag
inside. Doing so will accelerate the wear of the
heating element.
• Turn the machine o and disconnect the power
cable if the machine will not be used for some
time.
• The vacuum gauge/meter reading may be dier-
ent in dierent areas. At high altitudes, the data
in vacuum meter goes down.
• Do not use vacuum bags that emit poisonous va-
pours while sealing – use dedicated Victor Vac-
uum Bags.
• The machine must be transported in a horizontal
position.
• The transport must proceed strictly according to
the instructing marks on the shipping case.
• The machine should be stored in dry, ventilated
place and room temperature.
• Please be careful during the automatic opening
of the acrylic cover to avoid being hit.
• Please do not try to make any repairs without
consulting professional service rst.
• Please use spare parts delivered with the ma-
chine or recommended by the manufacturer.

9
EN
5. FAQ – ADDITIONAL INFORMATION
Question: How much longer will my products last?
Answer: Typically shelf life of vacuum packed prod-
ucts may be extended three to ve times. It depends,
however, on the type of product, earlier handling,
storage temperature, conditions before and after
packing etc.
Question: What are the advantages of vacuum
packaging my products?
Answer: There are many advantages of vacuum
packing, e.g. longer shelf life, no changes to the
product, no weight loss resulting from evaporation,
easy labelling (date, weight, best before date, pur-
pose), considerable reduction of aerobic bacteria,
easier storage and control of products, reduced
costs thanks to longer storage, possibility of stor-
ing large quantities, excellent appearance of the
vacuum packed product, better protection against
contamination, easier transport of the product,
better appreciation of product quality by customers
and consumers.
Question: How does sealing temperature aect
the sealing of bag?
Answer: Setting sealing temperature (HIGH, MID-
DLE,
LOW) is related to the sealing function, there-
fore if the sealing level is low (1-2 seconds), then
temperature should be set at middle/high level
and if the sealing parameter is high (more than 3-4
seconds), then the temperature setting should be
middle/low. In each case please test the setting on
a bag.
Question: How to select proper vacuum time for
a specic bag and product size?
Answer: The smaller the product is, the longer vacu-
um
generation time should be set.
Usually 30 seconds is enough to properly pack a 300
g
product in a small bag (16/23 cm). Moreover, it
is not always necessary to generate high vacuum,
if you want to pack a product without generating
high vacuum, a dozen or so or even a few seconds
of vacuum time will suce. You should always test
your settings and repack the product if necessary.
Question: Can I vacuum–pack liquids/sauces?
Answer: Yes, you can vacuum-pack liquids and sauces.
Question: Can I crop the bag to adjust it to a small
product?
Answer: Yes, you can cut o the open edge of the
bag with scissors or a knife.
Question: If I vacuum package my food products,
will I still need to refrigerate them?
Answer: Yes, vacuum packaging is not a substitute
to refrigeration.
Question: Do I need to heat the machine up before
turning it on?
Answer: In temperature of 18-24°C,
the machine needs max. 3 min after switching on
to be ready for work. If the ambient temperature is
below 18°C, we recommend starting the machine
up 7 minutes after it has been turned on and set-
ting the sealing time at 0 seconds to properly dis-
tribute oil.
Question: What products can be vacuum-packed?
Answer: You can vacuum pack products that are
resistant to vacuum, i.e. any food products, metal
elements, clothing, money etc.
Question: What type of bags should I use for vac-
uum-packing?
Answer: We recommend Victor Vacuum Bags
which are dedicated for our machines. Please con-
tact your distributor or our company.
Question: How often should I replace or replenish
oil?
Answer: Oil should be replaced, i.e. drained after
it turns dark brown (dirty) colour or at least once
every 6 months. Before starting the machine, it is
necessary to ll half of container with oil and then
keep this level by replenishing oil (please check oil
level every month). Oil is delivered with the ma-
chine. We recommend Victor Vacuum Oil.

10
EN
Question: How often do I need to replace the seal-
ing bar?
Answer: The sealing bar should be replaced after
approx. 180 hours of sealing bags, i.e. approx. after
sealing 200,000 bags, assuming that the sealing
operation was correct (the bag was placed with its
open edge on the bar, the machine was not used
without any bag and the sealing time was not very
long). A worn bar changes its colour to black or
has visible gaps. Spare parts are delivered with the
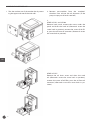
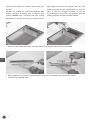
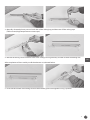
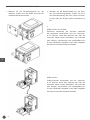
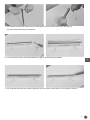
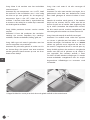
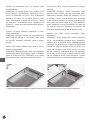
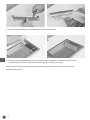
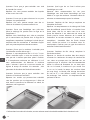
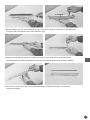
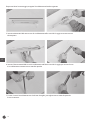
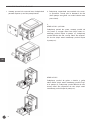
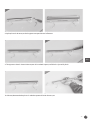
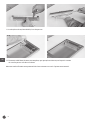
packing machine. Picture instruction below.
1. Disconnect the cable from the pin, then pick the entire sealing bar from the vacuum chamber.
2. Remove the pressing stick from the sealing bar using a cross screwdriver, then remove the stainless
steel base (gas chamber base).

11
EN
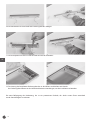
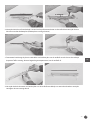
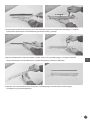
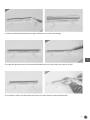
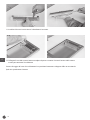
3. Manually dismantle plastic parts on both sides of the sealing bag and then tear o the sealing tape
(Teon-coated, high temperature resistant tape).
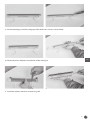
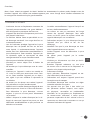
4. Remove the forcing screws from both sides of the sealing bar using Allen key and then remove the heating wire.
After completion of the assembly install the elements as indicated below.
5. Insert one end of the new heating wire into the fastener groove and tighten it using a spanner.

12
EN
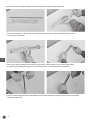
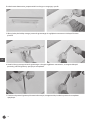
6. Insert the other end of the heating wire into the other fastener groove and tighten the remaining part of
the wire
using a special tool.
7. Fasten the heating wire using an Allen key, then cut the remaining wire using a special tool.
8. Stick the sealing tape of proper length to the heating wire.

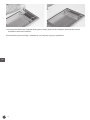
13
EN
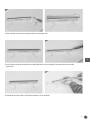
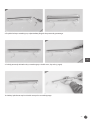
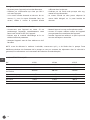
9. Cut the remaining part of the sealing tape o at both ends so that it can be folded.
10. Mount the plastic elements on both ends of the sealing bar.
11. Install the stainless steel base and pressing stick.

14
EN
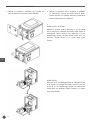
12. Connect the cable of the complete sealing bar to the pin, then put the sealing bar back into the vacuum
chamber to nish the installation.
The new heating wire mounting is patented by our company. Copying is prohibited.

15
EN

16
DE
INHALTSVERZEICHNIS
1. SICHERHEITSHINWEISE .............................................................................................................17
2. TECHNISCHE PARAMETER ....................................................................................................... 18
3. VORGEHENSWEISE VOR DER INSTALLATION ................................................................... 20
4.
FUNKTIONSANLEITUNG FÜR DEN PROZESS DER VAKUUMVERPACKUNG
................. 21
5. FAQ NÜTZLICHE ZUSATZINFORMATIONEN ..................................................................23

17
DE
Sehr geehrte Kundin, sehr geehrter Kunde,
wir danken Ihnen für den Kauf des Gerätes Hendi. Machen Sie sich bitte mit dieser Anleitung noch vor der
Inbetriebnahme des Gerätes vertraut, um Schäden durch die unsachgemäße Bedienung zu vermeiden. Den
Sicherheitsregeln ist besondere Aufmerksamkeit zu widmen.
1. SICHERHEITSHINWEISE
• Die unsachgemäße Bedienung und falsche Nut-
zung kann einen ernsthaften Schaden an der An-
lage oder eine Personenverletzung hervorrufen.
• Die Anlage darf ausschließlich nur zu dem Zweck
verwendet werden, für den sie projektiert wurde.
• Der Hersteller haftet nicht für Schäden, die durch
falsche Bedienung und unsachgemäße Nutzung
der Anlage hervorgerufen wurden.
• Während der Nutzung ist die Anlage zu sichern
und den Stecker der Stromversorgungsleitung
vor dem Kontakt mit Wasser oder anderen Flüs-
sigkeiten zu schützen. In dem Fall, wenn die An-
lage durch Unachtsamkeit ins Wasser gefallen
ist, muss man sofort den Stecker aus der Netz-
steckdose ziehen und danach die Anlage von
einem Spezialisten kontrollieren zu lassen. Die
Nichteinhaltung dieser Anleitung kann Lebens-
gefahr hervorrufen.
• Önen Sie niemals selbstständig das Gehäuse
des Gerätes.
• Keine Gegenstände in das Gehäuse des Gerätes
stecken.
• Berühren sie den Stecker der Stromversor-
gungsleitung nicht mit feuchten Händen.
• Der Zustand des Steckers und der Stromver-
sorgungsleitung ist regelmäßig zu kontrollieren.
Werden Beschädigungen am Stecker oder der
Leitung entdeckt, dann ist eine Spezialwerkstatt
mit der Reparatur zu beauftragen.
• In dem Fall, wenn das Gerät gefallen ist oder
auf andere Art und Weise beschädigt wird, muss
man vor der weiteren Nutzung immer eine Kont-
rolle in Auftrag geben und eventuell eine Spezial-
werkstatt mit der Reparatur beauftragen.
• Reparieren Sie nie von selbst das Verpackungsge-
rät
- das kann Lebensgefahr herbeiführen.
• Schützen Sie die Stromversorgungsleitung vor
scharfen oder heißen Gegenständen bzw. vor of-
fenem
Feuer. Wenn Sie das Gerät von der Netz-
steckdose trennen wollen, dann immer am Ste-
cker ziehen, niemals an der Leitung.
• Schützen Sie auch das Kabel (oder die Verlänge-
rungsleitung), damit niemand aus Versehen sie
aus der Netzsteckdose zieht bzw. darüber fällt.
• Kontrollieren Sie die Funktion der Anlage wäh-
rend ihrer Nutzung.
• Die Kinder sind sich der Gefahr nicht bewußt,
welche durch die Nutzung von Elektrogeräten
hervorgerufen werden kann. Deshalb darf Kin-
dern der Umgang mit Elektrogeräten nicht er-
laubt werden.
• Wenn das Verpackungsgerät nicht genutzt wird
bzw. immer vor dem Reinigen, ist es von der
Stromversorgungsquelle zu trennen und der Ste-
cker aus der Netzsteckdose zu ziehen.
• Hinweis! Wenn der Stecker der Stromversor-
gungsleitung an die Netzsteckdose angeschlos-
sen ist, dann steht das Gerät die ganze Zeit unter
Spannung.
• Erst das Verpackungsgerät ausschalten und
dann den Stecker aus der Netzsteckdose ziehen.
• Das Gerät niemals an der Stromversorgungslei-
tung ziehen.
• Verwenden Sie kein anderes Zubehör, als mitge-
liefert wurde.
• Das Verpackungsgerät darf ausschließlich nur
an solche Steckdosen angeschlossen werden,
deren Stromstärke und Frequenz mit den Anga-
ben auf dem Typenschild übereinstimmen.
• Überlastungen vermeiden.
• Nach dem Gebrauch ist das Gerät auszuschal-
ten, in dem der Stecker aus der Netzsteckdose
gezogen wird.
• Vor dem Auüllen oder Reinigen muss man im-
mer den Stecker aus der Netzsteckdose ziehen.
• Die Elektroanlage muss den nationalen und lo-
kalen Vorschriften entsprechen.
• Das Verpackungsgerät dürfen keine Personen
benutzen (auch Kinder nicht), bei denen ver-
minderte körperliche, sensorische und geistige
Fähigkeiten festgestellt wurden oder bei denen
entsprechendes Wissen und Erfahrung fehlt.

18
DE
Besondere Sicherheitsvorschriften
• Niemals das Gerät an der Stromversorgungslei-
tung ziehen.
• Verwenden Sie keine zusätzlichen Mittel, als die-
jenigen, die zusammen mit dem Gerät geliefert
wurden.
• Wenn der Ölstand unter das Minimum fällt, be-
steht Feuergefahr. Deshalb muss man immer für
eine ausreichende Menge Öl im Behälter sorgen.
• Es darf kein altes Öl verwendet werden, weil da-
durch ebenso die Feuergefahr besteht.
• Der Ölstand im Behälter darf niemals die Kenn-
zeichnung MAX, die sich an der Seitenwand des
Behälters bendet, überschreiten.
Vorbereitung vor dem ersten Gebrauch
• Es ist zu prüfen, ob das Gerät nicht beschädigt
ist.
• Bei irgendwelchen Beschädigungen muss
man sich sofort mit ihrem Hersteller in Verbin-
dung setzen und das Verpackungsgerät NICHT
benutzen.
• Nehmen Sie die gesamte Verpackung und die
Schutzfolie ab (insofern es zutrit).
• Das Gerät ist mit lauwarmen Wasser und wei-
chem Lappen zu reinigen.
• Falls nicht anders empfohlen wurde, ist das Ge-
rät auf einen achen und stabilen Untergrund zu
stellen.
• Weiterhin ist ausreichend Raum um das Gerät
herum abzusichern, um die Belüftung der Anla-
ge zu ermöglichen.
• Stellen Sie das Verpackungsgerät so auf, damit
Sie immer einen guten Zugri auf den Stecker
haben.
HINWEIS: Vor dem Einschalten der Stromversorgung für das Verpackungsgerät muss man sich davon
überzeugen, dass sich in der Pumpe genügend Öl bendet. Sämtliche Havarien, die sich aus einem sog.
„Festfressen” der Pumpe ergeben, werden nicht als Garantiereparatur behandelt (Informationen zum
Auüllen der Pumpe mit Öl sind in der Anleitung).
2. TECHNISCHE PARAMETER
Code 975251 975268 975275
Außenabmessungen 330x480x(H)360 mm 370x480x(H)435 mm 425x560x(H)460 mm
Abmessungen der Kammer
280x385x(H)80/130 mm 320x370x(H)135/185 mm 370x450x(H)170/220 mm
Länge der Schweißleiste 260 mm 300 mm 350 mm
Pumpenleistung 10 m³/h 10 m³/h 20 m³/h
Gewicht 36 kg 38 kg 62 kg
Leistung 370 W 370 W 900 W
Spannung 230 V 230 V 230 V

19
DE
Abmessungen des Modells: 975251
Abmessungen des Modells: 975268
Abmessungen des Modells: 975275
WICHTIG! BEI EINEM NOTWENDIGEN TRANSPORT IST DAS GERÄT IN EINER KISTE AUFZUBEWAHREN!
POTENTIELLE REKLAMATIONEN WERDEN NUR BEI EINEM TRANSPORT IN DER KISTE BERÜCKSICHTIGT.

20
DE
3. VORGEHENSWEISE VOR DER INSTALLATION
1. Nehmen Sie das Verpackungsgerät aus der
Holzkiste, indem man die obere und eine der
seitlichen Wände abschraubt.
2. Nehmen Sie die Betriebsstoe aus der Kam-
mer des Verpackungsgerätes. Gießen Sie Öl in
die Dosiereinrichtung des Öles (wenn die Pum-
pe leer oder der Ölstand nicht ausreichend ist)
ein.
3.
HENDI 975251 und 975268
Rückwand abnehmen, die Schraube unterhalb
der Rückwand abschrauben und das verbrauch-
te Öl ablassen (nach dem Ablassen des Öles die
Schraube wieder zurück eindrehen), die Schraube
vom Öleinlass abschrauben und anschließend das
Öl vom Ölbehälter eingießen (nach dem Eingießen
des Öles die Schraube wieder eindrehen).
HENDI 975275
Ölablassschraube abschrauben und das verbrauch-
te
Öl ablassen (nach dem Ablassen des Öles die
Schraube wieder zurück eindrehen), die Schraube
vom Öleinlass abschrauben und anschließend das
Öl vom Ölbehälter eingießen (nach dem Eingießen
des Öles die Schraube wieder eindrehen).
La pagina si sta caricando...
La pagina si sta caricando...
La pagina si sta caricando...
La pagina si sta caricando...
La pagina si sta caricando...
La pagina si sta caricando...
La pagina si sta caricando...
La pagina si sta caricando...
La pagina si sta caricando...
La pagina si sta caricando...
La pagina si sta caricando...
La pagina si sta caricando...
La pagina si sta caricando...
La pagina si sta caricando...
La pagina si sta caricando...
La pagina si sta caricando...
La pagina si sta caricando...
La pagina si sta caricando...
La pagina si sta caricando...
La pagina si sta caricando...
La pagina si sta caricando...
La pagina si sta caricando...
La pagina si sta caricando...
La pagina si sta caricando...
La pagina si sta caricando...
La pagina si sta caricando...
La pagina si sta caricando...
La pagina si sta caricando...
La pagina si sta caricando...
La pagina si sta caricando...
La pagina si sta caricando...
La pagina si sta caricando...
La pagina si sta caricando...
La pagina si sta caricando...
La pagina si sta caricando...
La pagina si sta caricando...
La pagina si sta caricando...
La pagina si sta caricando...
La pagina si sta caricando...
La pagina si sta caricando...
La pagina si sta caricando...
La pagina si sta caricando...
La pagina si sta caricando...
La pagina si sta caricando...
La pagina si sta caricando...
La pagina si sta caricando...
La pagina si sta caricando...
La pagina si sta caricando...
La pagina si sta caricando...
La pagina si sta caricando...
La pagina si sta caricando...
La pagina si sta caricando...
La pagina si sta caricando...
La pagina si sta caricando...
La pagina si sta caricando...
La pagina si sta caricando...
La pagina si sta caricando...
La pagina si sta caricando...
La pagina si sta caricando...
La pagina si sta caricando...
La pagina si sta caricando...
La pagina si sta caricando...
La pagina si sta caricando...
La pagina si sta caricando...
La pagina si sta caricando...
La pagina si sta caricando...
La pagina si sta caricando...
La pagina si sta caricando...
La pagina si sta caricando...
La pagina si sta caricando...
La pagina si sta caricando...
La pagina si sta caricando...
La pagina si sta caricando...
La pagina si sta caricando...
La pagina si sta caricando...
La pagina si sta caricando...
La pagina si sta caricando...
La pagina si sta caricando...
La pagina si sta caricando...
La pagina si sta caricando...
La pagina si sta caricando...
La pagina si sta caricando...
La pagina si sta caricando...
La pagina si sta caricando...
La pagina si sta caricando...
La pagina si sta caricando...
La pagina si sta caricando...
La pagina si sta caricando...
La pagina si sta caricando...
La pagina si sta caricando...
La pagina si sta caricando...
La pagina si sta caricando...
La pagina si sta caricando...
La pagina si sta caricando...
La pagina si sta caricando...
La pagina si sta caricando...
-
 1
1
-
 2
2
-
 3
3
-
 4
4
-
 5
5
-
 6
6
-
 7
7
-
 8
8
-
 9
9
-
 10
10
-
 11
11
-
 12
12
-
 13
13
-
 14
14
-
 15
15
-
 16
16
-
 17
17
-
 18
18
-
 19
19
-
 20
20
-
 21
21
-
 22
22
-
 23
23
-
 24
24
-
 25
25
-
 26
26
-
 27
27
-
 28
28
-
 29
29
-
 30
30
-
 31
31
-
 32
32
-
 33
33
-
 34
34
-
 35
35
-
 36
36
-
 37
37
-
 38
38
-
 39
39
-
 40
40
-
 41
41
-
 42
42
-
 43
43
-
 44
44
-
 45
45
-
 46
46
-
 47
47
-
 48
48
-
 49
49
-
 50
50
-
 51
51
-
 52
52
-
 53
53
-
 54
54
-
 55
55
-
 56
56
-
 57
57
-
 58
58
-
 59
59
-
 60
60
-
 61
61
-
 62
62
-
 63
63
-
 64
64
-
 65
65
-
 66
66
-
 67
67
-
 68
68
-
 69
69
-
 70
70
-
 71
71
-
 72
72
-
 73
73
-
 74
74
-
 75
75
-
 76
76
-
 77
77
-
 78
78
-
 79
79
-
 80
80
-
 81
81
-
 82
82
-
 83
83
-
 84
84
-
 85
85
-
 86
86
-
 87
87
-
 88
88
-
 89
89
-
 90
90
-
 91
91
-
 92
92
-
 93
93
-
 94
94
-
 95
95
-
 96
96
-
 97
97
-
 98
98
-
 99
99
-
 100
100
-
 101
101
-
 102
102
-
 103
103
-
 104
104
-
 105
105
-
 106
106
-
 107
107
-
 108
108
-
 109
109
-
 110
110
-
 111
111
-
 112
112
-
 113
113
-
 114
114
-
 115
115
-
 116
116


Hendi 975268 Manuale utente
- Tipo
- Manuale utente
in altre lingue
- français: Hendi 975268 Manuel utilisateur
- Deutsch: Hendi 975268 Benutzerhandbuch
- Nederlands: Hendi 975268 Handleiding
- polski: Hendi 975268 Instrukcja obsługi
- română: Hendi 975268 Manual de utilizare
