
HEATING ELEMENT
MANUAL
TERMA VEO SMART WI-FI
www.termasmart.com
ESEN IT PL

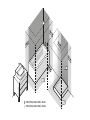
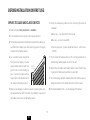
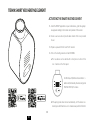
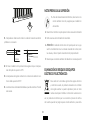
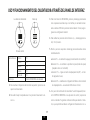
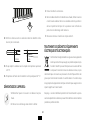
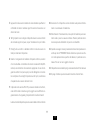
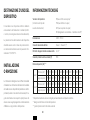
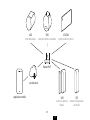
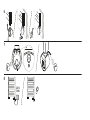
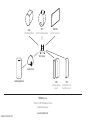
ZONE | ZÓNA | ZONA | STREFA | ЗОНА 1
ZONE | ZÓNA | ZONA | STREFA | ЗОНА 2
2
2
1
1

600 mm

4
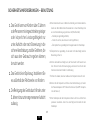
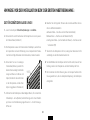
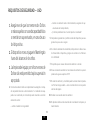
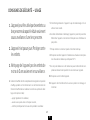
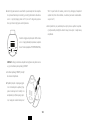
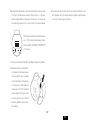
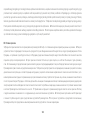
1. Electric heater is not a toy. Children under
the age of 3 should not be allowed within
close proximity of the device without the
supervision of an adult.
Children aged 3 to 8 should only be allowed
to operate the heater when it has been
properly installed and connected. The child
must be under adult supervision or have
been trained to safely operate the device
while understanding the risks.
ELECTRIC RADIATOR
GUIDE TO SAFE INSTALLATION AND USE
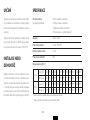
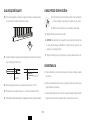
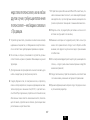
2. To ensure the safety of very small children,
install the electric dryer so that the lowest
tube is at least 600 mm above the floor.
3. Do not install the heater under an electrical
socket point.
4. Your electric heater should be filled with
a carefully measured amount of liquid. In the
case of loss of heating medium, or in any other
case which demands its supplementation,
contact your supplier.

5
EN
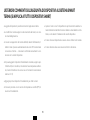
5. Thedeviceshouldonlybeinstalledbyaqualiedinstallerinaccordance
withtheapplicableregulaonsregardingsafetyandallotherregulaons.
6. Allinstallaonstowhichthedeviceisconnectedshouldcomplywith
regulaonsapplicableinthecountryofinstallaonanduse.
7. Extensionleadsorelectricplugadaptersshouldnotbeusedinorder
tosupplypowertotheheater.
8. Theelectricinstallaontowhichtheheaterisconnectedshouldhave
therightcurrentdierenalandovercurrentrelay(R.C.D.)of30mA.
Withthepermanentinstallaon(cableconneconwithoutplug)itis
alsomandatorytohaveanomni-polecut-outfordisconnecngthede-
viceonallpoles,bypointsofcontactwiththeclearanceof3mm.
9. ThedeviceversionlabelledPBorMScanbeinstalledinbathroomsin
zone1,asdenedbyapplicablelaw,subjecttoanyaddionalregula-
onsconcerningelectricalinstallaonsinwetareas.Otherversionsof
thedevicecanbeinstalledinZone2orbeyond.
10. Ensurethattheheaterhasbeeninstalledonawallinaccordancewith
itsinstallaonmanual.
11. Note:Somepartsoftheradiatorcanbeveryhotandcancauseburns.Pay
specialaenontothepresenceofchildrenorpeoplewithdisabilies.
12. Whendryingfabrics,payaenontothepermissibletemperaturefor
them.ATTENTION!Detergentresiduesmaypermanentlystainthera-
diatorsurface,inparcularthechromeplang.Suchcasesarenotsub-
jecttocomplaint.
13. Thedeviceisrecommendedforusesolelyasdescribedinthemanual.
14. Pleaseforwardthisinstruconmanualtotheenduser.

6
1. Fingandconneconoftheheangelementshouldonlybeperformed
byaqualiedinstaller.
2. Connecttheunittoasoundelectricalinstallaon(seetherangson
theheater).
3. Switchingontheheangelementintheopenairtotestthedeviceis
permiedforamaximumof3seconds.
4. Nevertestaheangelementthatisalreadyinstalled.Donotturnthe
heangelementoninanemptyradiator!
5. Ensurethatthepowercorddoesnottouchthehotpartsoftheheat-
ingelementorradiator.
6. Beforeinstallingorremovingthedevice,makesureitisdisconnected
fromthepowersource.
7. Donotopenthedevice—anyinterferencewithinternalcomponents
willinvalidatethewarranty.
ELECTRIC HEATING ELEMENT
SAFETY REQUIREMENTS — INSTALLATION
8. Theheangelement’spoweroutputshouldnotexceedtheradiators
poweroutputfortheparameters75/65/20°C.
9. Thepressureintheradiatormustnotexceed1MPa(10bar).Ensure
thatanaircushionispreservedinelectricradiators.Incentralheang
systems,leaveonevalveopentopreventpressurebuildupduetothe
thermalexpansionoftheliquid.
10. FingandInstallaonofthedevicemustbecarriedoutinaccordance
withalllocalregulaonsforelectricalsafety,includinginstallaonwithin
permissiblelocaonsonly.Observebathroomelectricalzoneregulaons.
11. Thedeviceisintendedforhomeuseonly.

7
EN
1. Ensure that minors aged 8 and above or
those with a physical or mental disability
are supervised if operating the device.
2. The device is not a toy. Keep it out of the
reach of children.
3. Cleaning of the equipment by children un-
der 8 years of age is only permitted under
appropriate supervision.
SAFETY REQUIREMENTS — USE
4. Theheangelementmustbefullysubmergedintheheangliquiddur-
ingitsoperaon.Whenoperangtheheangelementinaradiatorcon-
nectedtoacentralheangsystem(dualfuelversion):
—bleedtheradiatorregularly,
—makesure,thatonevalveisalwaysopen,
—periodicallychecktheliquidlevelintheradiator.
5. Regularlycheckthedevicefordamagetoensureitissafetouse.
6. Ifthepowercordisdamagedthedeviceshouldnotbeused.Unplug
thedeviceandcontactthemanufacturerordistributor.
7. Donotallowoodingintotheheangelementcasing.
8. Donotusetheheangelementinheangsystemswherethewater
temperatureexceeds82°C(classIonly).
9. Theheangelementandradiatorcanheatuptohightemperatures.Please
becauous—avoiddirectcontactwiththehotpartsoftheequipment.
10. Donotopentheheangelementcasing.
11. Thedevicemustbedisconnectedfromthemainsduringcleaningand
maintenance.

8
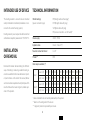
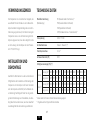
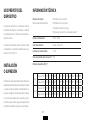
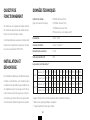
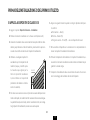
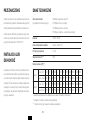
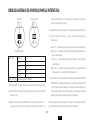
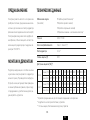
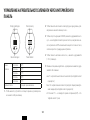
TECHNICAL INFORMATION
Model markings PB(Straightcablewithoutplug)*
(powerconnecontype) PW(Straightcablewithplug)
SW(Spiralcablewithplug)
MS(screwconnecon+on/oswitch)*
Power supply 230V/50Hz
Appliance class ClassI/ClassII(**)
G1/2"
IP code*** IPx5
ClassI power[W] 120 200 300 400 —600 800 1000 1200 1500 1800 2000
length[mm] 325 285 310 345 —375 485 575 670 860 1025 1130
Class II power[W] 100 200 300 400 500 600 800 1000 1200 1500 1800 2000
length[mm] 165 220 260 350 350 465 600 670 670 670 670 670
*deviceintendedtobeconnectedpermanentlytothesystem
**detailsontheranglabelofthedevice
***degreeofproteconprovidedbyenclosure
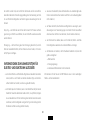
INTENDED USE OF DEVICE
Theheangelementisanelectricdeviceintended
solelyforinstallaoninradiators(standaloneorcon-
nectedtothecentralheangsystem).
Heangelementpoweroutputshouldbematched
withradiatoroutputforparametersof75/65/20°C.
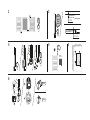
INSTALLATION
OR REMOVAL
Detailedinformaondemonstrangthedierent
waysofinstallingorremovingaradiatorheangel-
ementisavailablefromthemanufacturerorimport-
er(seefootnotesattheendofthemanual).Below
welistsomebasicrequirementsandprincipleswhich
mustbefollowedtoensurelongterm,reliableoper-
aonoftheproduct.

9
EN
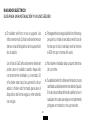
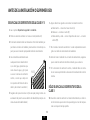
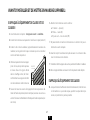
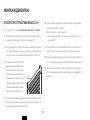
BEFORE INSTALLATION OR FIRST USE:
APPLIES TO CLASS I AND CLASS II DEVICES
1. Readthechapter:Safety requirements — Installaon.
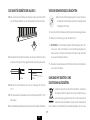
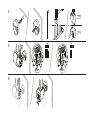
2. Fittheheangelementusingthecorrectspanner(size24).
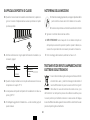
3. Theheangelementmustbeinstalledattheboomoftheradiator,per-
pendiculartotheradiatorpipes,whilepreservingspacefortheproper
circulaonoftheheangmedium.
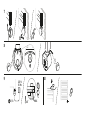
4. Useasuitableheatingmediumfor
llingtheelectricradiator,i.e.(water,
specialproductsbasedonwaterand
glycolforuseincentralheangsys-
tems,oroilwhichcomplieswiththe
requirementsofthemanufacturerof
theradiatorandheangelement).
5. Makesureanadequateaircushionispresenttoprotectagainstexces-
sivepressurebuildupwithintheelectriconlyradiator(orleaveoneof
theradiatorvalvesopenincentralheangsystem).
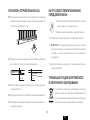
6. Followthesubsequentguidelineswhenconnectingtheelectrical
installaon:
a.Brownwire—liveconnecontothecircuit(L)
Bluewire—connecttoneutral(N)
c.Yellow&greenwire—(tylkowurządzeniachklasyI)—earthconnec-
on(PE)
7. Donotswitchtheheangelementonifitisnotfullyimmersedinra-
diatorheangmedium(appliesalsototherstuse)!
8. Beforellingtheradiatorwithheangmedium,ensurethattheheat-
ingelementisedproperlyandthatitiswaterght.
9. Incentralheanginstallaonradiatormustbeedwiththevalvesen-
ablingdisconneconoftheradiatorfromtherestofthesystem.
10. Fordetailedinstallaonhints—seethelastpagesofthismanual.
8% (20°C)

10
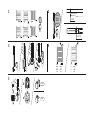
APPLIES TO CLASS I DEVICES ONLY
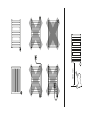
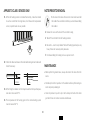
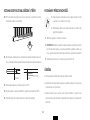
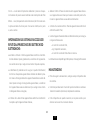
11. Whentheheangelementisinstalledhorizontally,itmustberotated
tosuchanextentthatthesingletube,whichhousesthetemperature
sensor,isposionedaslowaspossible.
150°
12. Checkthedistancesbetweentheindividualheangelementtubesand
bendifnecessary.
2-3 mm
5 mm
13. Whenllingtheradiatorwithhotliquidinsurethattheliquidtempera-
turedoesnotexceed65°C.
14. Thetemperatureoftheheangagentinthecentralheangsystem
mustnotexceed82°C.
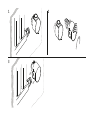
NOTES PRIOR TO REMOVAL
1. Disconnectthedevicefromelectriccircuitandensurethat
theradiatorhascooleddownbeforeyoustartdisassembling
theradiator.
2. Releasethescrewatthebackofthecontrollercasing.
3. Takeothecontrollerfromtheheangelement.
4. Becareful—electriconlyradiatorlledwithheangliquidmaybevery
heavy.Ensureallnecessarysafetymeasures.
5. Fordisassemblingtheheangroduseaspannerno24.
MAINTENANCE
•Beforeperformingmaintenance,alwaysdisconnectthedevicefromthe
mains.
•Periodicallychecktheliquidlevelintheradiatorandkeeptheheangele-
mentcompletelysubmerged.
•Cleantheproductonlywhendryorwithadampclothandaliledeter-
gentwhichdoesnotcontainsolventsandabrasives.

11
EN
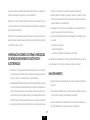
TREATMENT OF ELECTRICAL AND ELECTRONIC
EQUIPMENT WASTE:
Pursuanttotheregulaonsinforceforusedelectricandelectron-
icequipment,productsmarkedwiththesymbolofseparatecol-
leconcannotbeplacedwithothermunicipalwaste.Duetothe
contentofharmfulsubstances,electronicproductsnotsubjected
totheselecvesorngprocessmaybedangeroustothenaturalenvironment
andtohumanhealth.Thecorrectseparatecolleconofusedelectricaland
electronicequipmentpreventsnegaveimpactsontheenvironment.
INFORMATION CONCERNING THE WASTE
COLLECTION SYSTEM FOR ELECTRICAL AND
ELECTRONIC EQUIPMENT IS AS FOLLOWS:
• Adistributoracceptsandcollectselectricalandelectronicequipmentwaste
fromhouseholdsfreeofcharge,providedthattheequipmentisofthe
sametypeandperformsthesamefunconsastheequipmentpurchased,
•acollecngoperatorhavetherighttorefusetoacceptthewasteequip-
mentifitposesathreattothehealthorlifeofindividualsreceivingthe
equipmentduetocontaminaon,
•theuserofequipmentintendedforhouseholdsmayhandovertheused
equipmentto:
—adistributor,
—awasteprocessingplant,
—collecngmunicipalwasteinthecommune.
Furtherinformaoncanbefoundonthegovernmentwebsite:
www.hse.gov.uk/waste/waste-electrical.htm

12
USER MANUAL
TERMA SMART WI-FI SYSTEM AND DEVICES
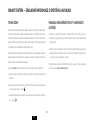
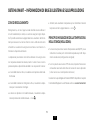
DESCRIPTION OF THE SMART SYSTEM
TermaSmartWi-Fiisanintelligentheangsystem,allelementsofwhich
communicateusingWi-Fitechnology.Inaddiontothestandardopera-
on,i.e.maintainingthesetairtemperatureintherooms,theusercancon-
trolthesystemusingtheTermaSMARTmobileapplicaon.Thankstothis
applicaon,itispossibletoprogramseven-dayschedules,iniateanear-
lystartmode,anddividetheheatedareaintoheangzones(severalother
funconsarealsoincluded).
NOTE:Fortheinialset-upandregistraonofthedevices,arouterwithInter-
netaccessisrequired(providedbythesystemuser).AWi-Firouterisresponsi-
blefordeliveringawirelesssignaltoeachofthesystemcomponents.Further
informaoncanbefoundinthechapter—SMARTSystem—informaonabout
thesystemandapplicaon,aswellasonthewebsite
Eachofthedevicescanfunconindependently,however,therecommend-
edstructureofthesystemconsistsofheangzones,e.g.individualrooms
inthehouse,whichmayincludeone(asamaximum)VTStemperaturesen-
sorperroomandanynumberofothertypesofdevicesandsensors.Ter-
maSMARTWi-Fiheangdeviceswillfunconatanopmumlevelwhen
connectedpermanentlytoalocalWi-FinetworkwithInternetaccess.The
deviceswillalsofunconwithoutaccesstotheInternet,orevenwithout
aWi-Ficonnecon,butinthiscasethepreviouslyloadedschedulewillbe
implemented,andmanyofthedevicefunconswillremainunavailable.

13
EN
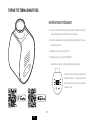
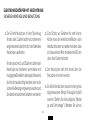
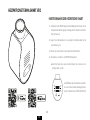
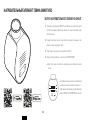
TERMA SMART VEO HEATING ELEMENT
ACTIVATING THE SMART HEATING ELEMENT
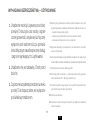
1. InstalltheSMARTapplicaononyourmobiledevice,granttheappropri-
ateapprovalsrelangtothelocaonandoperaonofthescanner.
2. Createauseraccountandprovidebasicdetailsofthenewlycreated
ʻhouse’.
3. PrepareapasswordforthelocalWi-Finetwork.
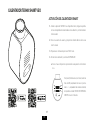
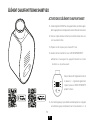
4. TurnontheheangelementandstartPAIRING:
a.Thenewdevicecanbestartedwithashortpressoneitherofthe
+orbuttonsonthefrontpanel.
All LED strips will ash three mes and the + / −
buons will ash steadily, the device will go into
PAIRING MODE for 5 minutes.
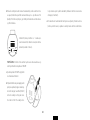
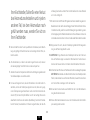
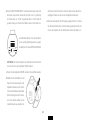
Ifthepairingmodedoesnotstartautomacally,orifthedeviceisre-
started,pressbothbuons+ and simultaneouslyandholdthemfor

14
approx.15seconds(theenredisplayashesevery5seconds,aer
thethirdash,releasethebuons.
All LED strips will ash 3 mes and the + / − but-
tons will start ashing steadily, the device will go
into PAIRING MODE for 5 minutes.).
NOTE: fromnowon,thedevicebroadcastsitsnetworkaddress(sig-
nal)andisseenbytheSMARTapplicaon.
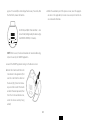
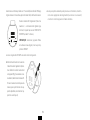
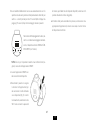
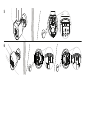
c.LaunchtheSMARTapplicaonandgototheDevicesscreen.
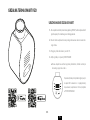
d.Selectthe+buonandfollowthe
instruconsintheapplicaon(rst
scanthecodefromthesckeron
thedevice(Fig.3)orenteritmanu-
ally,selectthelocalWi-Finetwork
andentertherouterpassword,then
fromthelistofavailabledevices,
selectthedevicecurrentlybeing
added).
e. Whentheautomacpartoftheprocessisover,selecttheappropri-
atezoneintheapplicaon(orcreateanewone)andenterthede-
vicenameandotherdata.

15
EN
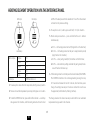
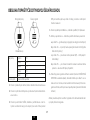
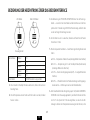
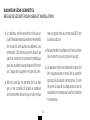
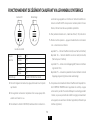
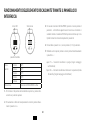
HEATING ELEMENT OPERATION VIA THE INTERFACE PANEL
LED strips
control keys
Red stripe
Whitestripes 5stripes 26°C
4strips 24°C
3strips 21°C
2strips 18°C
1strip 15°C
Redstripe DRYERfunconison
1. Towakeupthedevicefromthesleepmode,brieypressanybuon.
2. Toraiseorlowerthetemperaturebyonestep,brieypress+orbutton.
3. TostarttheDRYERfuncon,pressandholdthe+buon—aredstripe
willappearontheinterface,andtheheangelementwillstarttoheat
at80%oftheratedpowerfortheduraonof1hour.Thentheelement
willreturntotheprevioussengs.
4. To swap the + and ,buons,pressandhold(>10s)the+buon.
5. Modesandspecialacons—pressandholdboth+ and buons
simultaneously:
a.for5s—theheangelementturnso(singleashontheinterface);
for10s—theheangelementwillbeputtosleep(stand-bymode)
(singleashontheinterface);
c.for15s—enterpairingmode(AP)allinterfacewillash3mes;
d.for25s—restorefactorysengsandstartthepairingmode,thede-
vicewillashasitdidatset-up;
6. Iftheheangelement’scontrollerpanelhasbeenblocked(thePAREN-
TALCONTROLfunconinthecontrolapplicaon),pressingthe+key
for5secondswillreleasethelockfor1minute,whichwillallowyouto
changethesengsmanuallyonthedevicewithouttheneedtouse
theapplicaon(conrmaonbyashinginterface).
Thechangemadeonthedevicemanuallyisvalidunlthenextautomac
temperaturechangesavedintheschedule.

16
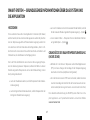
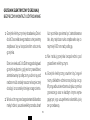
ADDITIONAL COMMENTS ON ADDING DEVICES TO THE TERMA SMART SYSTEM
(APPLIES TO ALL SMART DEVICES)
•Addingdevicesispossibleonlyviathemobileapplicaon.
•Systemchangesaresentlocallybytherouter,andtothecloudserviceby
theapplicaon.
•InsomeAndroidsystemoverlays,duringpairing,thephonetriestoauto-
macallyswitchtotherememberedWi-FinetworkwithInternetaccess
—youmustmanuallyconrmtheconneconwiththedevice’snetwork.
•Aeraddingtheheangdevicestothesystem,they-
(theydonotheatup,despitethelowambienttemperature,thein-
terfacebarsarenotlit,andtheremotecommunicaonintervalis1h).
•Heangdevicesshouldbeaddedrst,followedbythesensors.
•Therecanbeonlyonetemperatureandhumiditysensor(VTS)inonehe-
angzone.
•Theoponofʻcombineintoaset’isavailableonlyfortheheangelement
andthethermostacheadinstalledinthesamecentralheangradiator,
andonlyduringtheinstallaonoftheseconddevice.
•Thenameofeachdevicemustbeuniquewithinthesystem.
•Thenameofthezonemustbeuniquewithinthesystem.

17
EN
SMART SYSTEM — BASIC INFORMATION ABOUT THE SYSTEM AND THE
APPLICATION
HEATING ZONES
Intheapplicaon,anewlycreatedʻhouse’shouldbedividedintoheang
zones(e.g.rooms)towhichindividualdevicesareassigned.Itispossibleto
selectascheduleandviewtelemetrydataforeachzone.Thelistofallzones
isvisibletotheuserintheZonestab.Theviewofasinglezonecontains
asetofaconsandinformaonavailabletotheuser.
Thetemperaturepresentedinthecenterofthescreenofasinglezoneisthe
currentmeasuredtemperature,whilethevalueattheboomisthesettem-
peraturethatdependsonthemodeinwhichthesystemiscurrentlyoperang:
•iftheVacaonmodeisacve,theVacaonmodetemperatureisdisplayed
•iftheSmartLocaonisacve,thetemperaturefortheSmartLocaonis
displayed
•ifatleastonedeviceisinthemanualmode,thetemperaturesetforthe
manualmodeisdisplayed—the icon
•otherwise,thetemperatureforagivenmeintervalwillbedisplayedac-
cordingtotheschedule—icon
PRINCIPLES OF MEASURING THE TEMPERATURE
IN THE ROOM (IN THE ZONE):
•Ifthereisatemperatureandhumiditysensor(VTS)inazone,itsindica-
onsarethebasisforthetemperaturecontrolforalldevicesinagiven
zone(recommendedconguraon);
•IfthereisnoVTSsensorinthezone,thedeviceswilloperatebasedon
theaverageofthesensorreadingsofeachdevice(oronesensorifone
deviceisinthezone).
AmoredetaileddescriponoftheSMARTSystemcanbefoundon

18
1. Elektrický radiátor není na hraní. Děti do 3
let bez řádného dohledu by neměly být v
bezprostřední blízkosti topení.
Děti ve věku od 3 do 8 let mohou topné
zařízení ovládat pouze tehdy, je-li správně
nainstalováno a připojeno a děti jsou pod
dohledem nebo byly poučeny a pochopily
rizika, která existují.
2. Aby byly chráněny před nebezpečím velmi
malé děti, měl by být instalován elektrický
sušák na oblečení nebo ručníky tak, aby
ELEKTRICKÝ RADIÁTOR S TOPNOU TYČÍ
BEZPEČNÁ INSTALACE A POUŽITÍ
nejnižší trubka byla nejméně 600 mm nad
podlahou.
3. Radiátor neinstalujte přímo pod elektrickou
zásuvku.
4. Elektrický radiátor by měl být naplněn přesně
naměřeným množstvím kapaliny. V případě
ztráty topného média a jakéhokoli jiného
faktoru vyžadujícího jeho doplnění se obraťte
na prodávajícího.

19
CZ
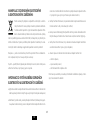
5. Zařízeníbymělinstalovatpouzekvalikovanýtopenářaelektrikářvsou-
ladusevšemiplatnýmibezpečnostnímipředpisyajinýmipředpisy.
6. Všechnazařízení,kekterýmjezařízenípřipojeno,bymělasplňovatpří-
slušnépředpisyplatnévtétooblas.
7. Knapájenítopnétyčenesmíbýtpoužíványprodlužovacíkabelynebo
adaptéryelektrickézásuvky.
8. Musíbýtzajištěno,abyobvodvelektrickéinstalaci,kekteréjetopné
tělesopřipojeno,mělvhodnýjisčajisčzbytkovéhoproudu(R.C.D.)
scitlivos30mA.Přitrvalémpřipojenízařízeníksí(verze,kteréne-
majínapájecíkabelsezástrčkou)jetaképovinnývypínač,kterýumož-
ňujeodpojitzařízenínavšechpólechpomocíkontaktůsmezerou3mm.
9. ZařízeníveverzioznačenéPBneboMSlzeinstalovatvkoupelněvzóně
1,denovanépříslušnýmipředpisy,sesamostatnýmipředpisytýkajícími
seimplementaceelektrickéinstalacevmokrýchprostorách.Dalšíver-
zezařízenílzenainstalovatdozóny2nebomimoněj.
10. Ujistětese,žejeradiátornainstalovánnastěněpodlepokynůprojeho
instalaci.
11. Pozor!Některéčásradiátorumohoubýtvelmihorkéamohouzpůso-
bitpopáleniny.Zvláštnípozornostbymělabýtvěnovánapřítomnos
děneboosobsezdravotnímposžením.
12. Přisušenítkaninbystemělivěnovatpozornostteplotě,kterájeproně
přijatelná.POZNÁMKA!Zbytkyčiscíchprostředkůmohoutrvalepo-
skvrnitpovrchradiátoru,zejménapochromovanýgalvanickýpovlak.Ta-
kovépřípadynepodléhajízáruce.
13. Přístrojpoužívejtepouzekurčenémuúčelu,jakjepopsánovnávoduk
použi.
14. Tentoinformačnímateriálbymělbýtposkytnutkoncovémuuživateli
radiátoru.

20
1. Instalacitopnétyčemůžeprovéstpouzeřemeslníkspříslušnoukvalikací.
2. Připojtezařízenípouzekesprávněprovedenéelektrickéinstalaci(viz
nálepkastříbrnánazadnístranětyče).
3. Jepovolenokrátcezapnouttopnoutyčnaotevřenémvzduchupodobu
nedelšínež3sekundy.
4. Rozhodněnezapínejtetopnoutyčvprázdnémradiátorubeztopného
média!
5. Dbejtenato,abynapájecíkabelnepřišeldostykushorkýmiprvkyra-
diátorunebotopnétyče.
6. Běhemmontáženebodemontáženesmíbýtzařízenípodnapěm.
7. Nezasahujtedovnitřkuzařízení.
8. Výkontopnétyčenesmíbýtvětšínežvýkonradiátoruproparametry
75/65/20°C.
TOPNÁ TYČ
BEZPEČNOSTNÍ POŽADAVKY — INSTALACE
9. Tlakvradiátorunesmípřekročit10atm.Velektrickémradiátorupone-
chejtevolnývzduchovýpolštářproroztažnostmédiaavradiátorupři-
pojenémksystémuústředníhovytápěníponechteotevřený1venl,
abysezabránilozvýšenítlakuvdůsledkutepelnéroztažnoskapaliny.
10. Zařízeníinstalujtevsouladusevšemimístnímipředpisytýkajícímise
bezpečnostníchpožadavkůelektrickýchzařízení,včetněpřípustného
umístěníavzdálenosodzdrojůvody.
11. Zařízeníjeurčenoprodomácípouži.
La pagina si sta caricando...
La pagina si sta caricando...
La pagina si sta caricando...
La pagina si sta caricando...
La pagina si sta caricando...
La pagina si sta caricando...
La pagina si sta caricando...
La pagina si sta caricando...
La pagina si sta caricando...
La pagina si sta caricando...
La pagina si sta caricando...
La pagina si sta caricando...
La pagina si sta caricando...
La pagina si sta caricando...
La pagina si sta caricando...
La pagina si sta caricando...
La pagina si sta caricando...
La pagina si sta caricando...
La pagina si sta caricando...
La pagina si sta caricando...
La pagina si sta caricando...
La pagina si sta caricando...
La pagina si sta caricando...
La pagina si sta caricando...
La pagina si sta caricando...
La pagina si sta caricando...
La pagina si sta caricando...
La pagina si sta caricando...
La pagina si sta caricando...
La pagina si sta caricando...
La pagina si sta caricando...
La pagina si sta caricando...
La pagina si sta caricando...
La pagina si sta caricando...
La pagina si sta caricando...
La pagina si sta caricando...
La pagina si sta caricando...
La pagina si sta caricando...
La pagina si sta caricando...
La pagina si sta caricando...
La pagina si sta caricando...
La pagina si sta caricando...
La pagina si sta caricando...
La pagina si sta caricando...
La pagina si sta caricando...
La pagina si sta caricando...
La pagina si sta caricando...
La pagina si sta caricando...
La pagina si sta caricando...
La pagina si sta caricando...
La pagina si sta caricando...
La pagina si sta caricando...
La pagina si sta caricando...
La pagina si sta caricando...
La pagina si sta caricando...
La pagina si sta caricando...
La pagina si sta caricando...
La pagina si sta caricando...
La pagina si sta caricando...
La pagina si sta caricando...
La pagina si sta caricando...
La pagina si sta caricando...
La pagina si sta caricando...
La pagina si sta caricando...
La pagina si sta caricando...
La pagina si sta caricando...
La pagina si sta caricando...
La pagina si sta caricando...
La pagina si sta caricando...
La pagina si sta caricando...
La pagina si sta caricando...
La pagina si sta caricando...
La pagina si sta caricando...
La pagina si sta caricando...
La pagina si sta caricando...
La pagina si sta caricando...
La pagina si sta caricando...
La pagina si sta caricando...
La pagina si sta caricando...
La pagina si sta caricando...
La pagina si sta caricando...
La pagina si sta caricando...
La pagina si sta caricando...
La pagina si sta caricando...
La pagina si sta caricando...
La pagina si sta caricando...
La pagina si sta caricando...
La pagina si sta caricando...
La pagina si sta caricando...
La pagina si sta caricando...
La pagina si sta caricando...
La pagina si sta caricando...
La pagina si sta caricando...
La pagina si sta caricando...
La pagina si sta caricando...
La pagina si sta caricando...
La pagina si sta caricando...
La pagina si sta caricando...
La pagina si sta caricando...
La pagina si sta caricando...
La pagina si sta caricando...
La pagina si sta caricando...
La pagina si sta caricando...
La pagina si sta caricando...
La pagina si sta caricando...
La pagina si sta caricando...
La pagina si sta caricando...
La pagina si sta caricando...
La pagina si sta caricando...
La pagina si sta caricando...
La pagina si sta caricando...
La pagina si sta caricando...
La pagina si sta caricando...
La pagina si sta caricando...
La pagina si sta caricando...
La pagina si sta caricando...
-
 1
1
-
 2
2
-
 3
3
-
 4
4
-
 5
5
-
 6
6
-
 7
7
-
 8
8
-
 9
9
-
 10
10
-
 11
11
-
 12
12
-
 13
13
-
 14
14
-
 15
15
-
 16
16
-
 17
17
-
 18
18
-
 19
19
-
 20
20
-
 21
21
-
 22
22
-
 23
23
-
 24
24
-
 25
25
-
 26
26
-
 27
27
-
 28
28
-
 29
29
-
 30
30
-
 31
31
-
 32
32
-
 33
33
-
 34
34
-
 35
35
-
 36
36
-
 37
37
-
 38
38
-
 39
39
-
 40
40
-
 41
41
-
 42
42
-
 43
43
-
 44
44
-
 45
45
-
 46
46
-
 47
47
-
 48
48
-
 49
49
-
 50
50
-
 51
51
-
 52
52
-
 53
53
-
 54
54
-
 55
55
-
 56
56
-
 57
57
-
 58
58
-
 59
59
-
 60
60
-
 61
61
-
 62
62
-
 63
63
-
 64
64
-
 65
65
-
 66
66
-
 67
67
-
 68
68
-
 69
69
-
 70
70
-
 71
71
-
 72
72
-
 73
73
-
 74
74
-
 75
75
-
 76
76
-
 77
77
-
 78
78
-
 79
79
-
 80
80
-
 81
81
-
 82
82
-
 83
83
-
 84
84
-
 85
85
-
 86
86
-
 87
87
-
 88
88
-
 89
89
-
 90
90
-
 91
91
-
 92
92
-
 93
93
-
 94
94
-
 95
95
-
 96
96
-
 97
97
-
 98
98
-
 99
99
-
 100
100
-
 101
101
-
 102
102
-
 103
103
-
 104
104
-
 105
105
-
 106
106
-
 107
107
-
 108
108
-
 109
109
-
 110
110
-
 111
111
-
 112
112
-
 113
113
-
 114
114
-
 115
115
-
 116
116
-
 117
117
-
 118
118
-
 119
119
-
 120
120
-
 121
121
-
 122
122
-
 123
123
-
 124
124
-
 125
125
-
 126
126
-
 127
127
-
 128
128
-
 129
129
-
 130
130
-
 131
131
-
 132
132
-
 133
133
-
 134
134
-
 135
135
-
 136
136


in altre lingue
- français: Terma grzałki VEO Mode d'emploi
- español: Terma grzałki VEO Guía del usuario
- Deutsch: Terma grzałki VEO Benutzerhandbuch
- slovenčina: Terma grzałki VEO Užívateľská príručka
- polski: Terma grzałki VEO instrukcja
Documenti correlati


Altri documenti
-
screwfix 1000W Manuale utente
-
Blumfeldt 10045383 Manuale del proprietario
-
Kermi 6911519 Use And Installation Instructions
-
-
Vasco EVE10 Radiator Manuale utente
-
 VOGEL&NOOT DELLA WAVE Assembly And Operating Manual
-
Clatronic RA 2802 Manuale del proprietario
-
Clatronic RA 2725 Manuale del proprietario
-
 NEO TOOLS 90-093 Manuale del proprietario

