Viscount Legend ’70s Manuale del proprietario
- Categoria
- Strumenti musicali
- Tipo
- Manuale del proprietario

Edition: 1.4
User Manual - EN
Manuale Utente - IT


EN - 1
Table of contents
Legend ‘70s – User Manual
TABLE OF CONTENTS
IMPORTANT NOTES ............................................................................................................................................................. 2
Product Care ......................................................................................................................................................................... 2
Notes about this manual ....................................................................................................................................................... 2
INTRODUCTION ..................................................................................................................................................................... 3
Main features ........................................................................................................................................................................ 3
FRONT PANEL ....................................................................................................................................................................... 5
General description ............................................................................................................................................................... 5
Installing modules ................................................................................................................................................................. 6
Main panel ............................................................................................................................................................................ 8
Common controls ................................................................................................................................................................ 11
E.PIANO module ................................................................................................................................................................ 11
A.PIANO module ................................................................................................................................................................ 12
CLAVI module ..................................................................................................................................................................... 13
SOUND COLLECTION module .......................................................................................................................................... 14
EXTERNAL module ............................................................................................................................................................ 15
REAR PANEL ........................................................................................................................................................................ 17
SWITCHING ON AND BASIC FUNCTIONS ...................................................................................................................... 19
Connecting to audio devices ............................................................................................................................................... 19
Connecting to MIDI devices ................................................................................................................................................ 20
Using a computer ................................................................................................................................................................ 21
Using a portable audio player ............................................................................................................................................. 23
Connecting pedals .............................................................................................................................................................. 23
Using sounds ...................................................................................................................................................................... 24
Using effects ....................................................................................................................................................................... 25
PROGRAM MODE ............................................................................................................................................................... 26
What is a Program .............................................................................................................................................................. 26
Selecting a Program ........................................................................................................................................................... 27
Saving a Program ............................................................................................................................................................... 28
MODIFYING A PROGRAM .................................................................................................................................................. 29
COMMON Section .............................................................................................................................................................. 30
KEY RANGE section........................................................................................................................................................... 31
EFFECTS section ............................................................................................................................................................... 33
REVERB section ................................................................................................................................................................. 42
E.PIANO section ................................................................................................................................................................. 43
A.PIANO section ................................................................................................................................................................. 44
CLAVI section ..................................................................................................................................................................... 46
SOUND COLLECTION section ........................................................................................................................................... 47
EXTERNAL section............................................................................................................................................................. 48
SONG MODE ........................................................................................................................................................................ 50
What is a Song ................................................................................................................................................................... 50
Song selection .................................................................................................................................................................... 50
Saving a Song .................................................................................................................................................................... 51
MODIFYING A SONG OR LIST .......................................................................................................................................... 52
PARTS function .................................................................................................................................................................. 52
ORDER function ................................................................................................................................................................. 53
COPY/PASTE function ....................................................................................................................................................... 53
LISTS function .................................................................................................................................................................... 54
SYSTEM MENU .................................................................................................................................................................... 55
KEYBOARD section............................................................................................................................................................ 56
EQUALIZER section ........................................................................................................................................................... 56
MIDI section ........................................................................................................................................................................ 57
PEDAL SETUP section ....................................................................................................................................................... 58
PREFERENCES section ..................................................................................................................................................... 59
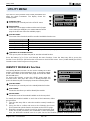
UTILITY MENU ..................................................................................................................................................................... 60
IDENTIFY MODULES function ........................................................................................................................................... 60
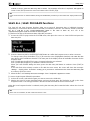
SAVE ALL / SAVE PROGRAMS functions ......................................................................................................................... 61
LOAD ALL / LOAD PROGRAMS functions ......................................................................................................................... 62
FACTORY RESET function ................................................................................................................................................ 62
RELEASE/UPDATE function .............................................................................................................................................. 63
APPENDIX ............................................................................................................................................................................. 64
Quick functions ................................................................................................................................................................... 64
Error messages .................................................................................................................................................................. 64
Panic function ..................................................................................................................................................................... 66
Troubleshooting .................................................................................................................................................................. 66
List of effect presets ............................................................................................................................................................ 66
List of Sound Collection sounds .......................................................................................................................................... 67
MIDI Informations ........................................................................................................................................................... MIDI - 1

EN - 2
Legend „70s – User Manual
Important notes
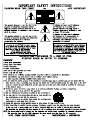
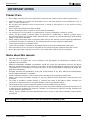
IMPORTANT NOTES
Product Care
Do not apply excessive force to the instrument's structures and controls (knobs, buttons, keyboard etc...).
Whenever possible, do not place the instrument close to units that generate strong interference, such as
radio - TV sets, monitors, etc ...
Do not place the instrument close to heat sources, in damp or dusty places or in the vicinity of strong
magnetic fields.
Do not expose the instrument to direct sunlight.
Never insert foreign bodies or liquids of any kind into the instrument.
For cleaning use only a soft brush or compressed air; never use detergents, solvents or alcohol.
Always use good quality screened cables for connection to amplification or diffusion systems. When
disconnecting cables from sockets, always take hold of the connector and not the cable itself; when winding
cables do not knot or twist them.
Before making connections make sure that the other units you are about to connect (especially amplification
and diffusion systems) are switched off. This will prevent noisy or even dangerous signal peaks.
Connect the net cable to an earthed socket.
Check that the voltage corresponds to the voltage shown on the serial number plate of the organ.
If the instrument is to be out of use for long periods, disconnect the power cable from the power socket.
Do not place the power cord near heat sources. Do not bend the cable too much, or damage it.
Notes about this manual
Keep this manual with care.
This manual is an integral part of the instrument. The descriptions and illustrations contained in this
publication are not binding.
While the instrument‟s essential characteristics remain the same, the manufacturer reserves the right to
make any modifications to parts, details or accessories considered appropriate to improve the product or for
requirements of a constructional or commercial nature, at any time and without undertaking to update this
publication immediately.
All rights reserved; the reproduction of any part of this manual, in any form, without the manufacturer‟s
specific written permission, is forbidden.
All the trademarks referred to in this manual are the property of the respective manufacturers.
Please read all the information carefully, so that you obtain the best performance and will from your
instrument.
The codes or numbers in square brackets ([ ]) indicate the names of the buttons, sliders, trimmers and
connectors on the instrument. For example, [ON/OFF] refers to the ON/OFF button.
The illustrations are purely for information purposes and may differ from your product.
The instructions provided in this manual only concern the instrument's operating system version that was up
to date when the document was released. Therefore, such instructions might not describe faithfully your
current operating system release.
Please, visit the website www.viscountinstruments.com to check for the newest operating system release
and manual.
This user manual is updated to version 1.04 of the instrument's operating system.

EN - 3
Legend ‘70s – User Manual
Introduction
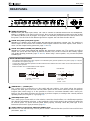
INTRODUCTION
Main features
Legend „70s has been designed to resemble to the 'legendary' electric pianos of the 70's, while simulating all the
typical sounds of the music scene of that decade. Beside being a vintage instrument, Lenged '70s also offers all
the features of a modern stage piano and easily adapts to the needs of the musician in different situations and
environments.
However, Legend „70s is not just a revamp of famous and classical instruments. For the first time in the world of
stage pianos, Legend '70s introduces the concept of modularity and scalability, offering the musician, unlike all
other digital pianos on the market, the opportunity to choose the configuration that best suits your needs, in the
times and ways you want.
Vintage Piano Feeling
Legend „70s has the typical vintage look from the past decades, making it stand out immediately on the stage.
The vintagestyle, with its black and glossy finish, combined with the aluminium decorative elementes, is a tribute
to the most iconic electric piano, the protagonist on the stage of the early '70s.
Furthermore, the broad flat surface of the instrument can be used to fit other devices, such as a keyboard, a
tablet, a laptop or all of them. This particular shape was designed during the project stage and represent an
extra feature that responds to the need of the musician, making Legend „70s even more competitive. However,
this does not increase the weight or compromise the portability of the instrument.
The optional adjustable keyboard stand comes with aluminium legs, and completes the vintage looks that even
the most nostalgic musicians will appreciate.
The power of the stage piano
Legend „70s looks like a vintage electric piano, but has all the features of a modern stage piano. It contains a
wide array of sounds, such as acoustic and electric piano, strings, pads, bass guitars, guitars, brass, organs,
choir, and many others, all thanks to the sound generation models installed in the instrument. Sounds can be
assigned to different areas of the keyboard, according to the set range for each sound or, more simply, to the
Lower and Upper sections of the keyboard by using the Split function. This, together with a complex chain of
effects of the highest quality, allows the musician to recreate any sound.
Legend „70s offers all the typical stage piano features, such as general and section transposition, fine tuning,
several velocity curves to choose from and velocity options. The instrument also has advanced Master-
keyboard functions, to control external devices connected through the MIDI and USB ports.
The wide range of adjustable panel controls allow a quick access to all the main functions while playing. The
pitch bend and modulation wheels can be used for a memorable performance.
The flexibility of a modular piano
Legend „70s is the first instrument ever to use the concept of modular piano. The musician can now choose the
sound generation models as they wish, allowing for a greater flexibility.
The instrument has a wide front panel with one main section and somemobile sections that can be installed in
their dedicated slots, also called “modules”. Thanks to the instrument's accurate design, the musician can
access the single slots easily and quickly, installing their favourite module in the preferred slot and changing the
setup at will.
These modules are equipped with state-of-the-art sound generation technology and a dedicated interface to
offer the best performance for every sound family. Each module allows easy access to the main controls, placed
ergonomically for a quick sound configuration.
High-quality sounds and effects
The sounds of the Legend „70s have been developed by studying the physics and functioning of the original
instrument, in order to simulate it as closely as possible. The electric piano sounds are the top achievement of
the physical modeling technology, the Viscount PM (Physical Modeling). It consists of mathematical models
that represent the physics at work behind the instrument: how it was originally built and how it generates sound.
Other sound families, such as acoustic pianos, brass, strings, organs, bass, etc. use the Viscount HDS (High

EN - 4
Legend „70s – User Manual
Definition Sampling) technology. It is a system that employs the best multi-sampling techniques to recreate the
sound wave in real time, according to the pitch and velocity of each note. At the same time, high-quality filters
applied to the audio samples create a rich authentic a realistic sound.
Beside the excellent sounds, Legend „70s also features a whole section of effects desigend specifically for this
instrument. There are classical effects such as tremolo, vibrato, chorus, flanger, phaser, wah, and the more
common effects such as reverb, delay, equalizer, compression and a wide range of amplifiers. All effects were
designed to recreate the sound of the legendary hits from the '70s.
Keyboard and velocity curve
All models are equipped with a high quality hammer action keyboard that reproduces faithfully the velocity
sensitivity of the original electric pianos. Each key has three sensors that detect its movement with high
precision.
The Artisit-W model was developed for the most demanding musicians. It features a graduated hammer
adjustment: hammers are heavier in the lower section of the keyboard and they get gradually lighter as they
move up the keyboard. Furthermore, the Artist-W keys are made of real wood, just like acoustic pianos.
The wood for this keyboard is carefully selected and seasoned to avoid flaws and bending and deformations
through time.
The keyboard sensitivity to the touch can be customised by selecting one of the available velocity curves.
The sounds can play throughout the keyboard or be assigned to a specific area of the keyboard in order to play
different sounds with the left and right hand.
High connectivity
The instrument is equipped with four analog line outputs and one analog audio input. It features a USB Audio /
MIDI interface which, with a single USB cable, allows you to receive and then reproduce the audio source of the
connected device or a virtual instrument controlled by Legend '70s. The instrument is also equipped with the
usual 5 pin DIN connectors to connect external MIDI devices.
Up to six pedals can be connected to the instrument: one to select the Programs, one working as Sustain pedal
and four more pedals that can be assigned to different functions. A USB flash drive can be used to save and
load programs and settings, and also to update the operating system. The USB connector can also be used to
charge different devices like smartphones and tablets.
Editing Software
A dedicated editing software was designed to set all the Legend „70s parameters quickly and easily. The most
demanding users can also use the software to modify parameters that cannot be adjusted through the main
panel, for an extra fine tuning of sounds and effects. The customised settings can be saved and loaded at will.
The software runs on Windows, Mac Os and iOs, and can be downloaded for free from the Viscount website
www.viscountinstruments.com.

EN - 5
Legend ‘70s – User Manual
Front panel
FRONT PANEL
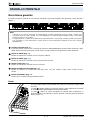
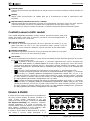
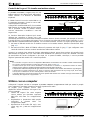
General description
The front panel consists of a main section and additional modules ad described on page 3.
Main section (page 8).
This section contains all the main volume and equalizer controls of the instruments, effects controls,
Program and Song selection controls, together with all the general parameters and settings.
E.PIANO module (page 11).
This module selects and controls the electric piano sounds.
A.PIANO module (page 12).
This module selects and controls the acoustic piano sounds.
CLAVI module (page 13).
This module selects and controls the Clavinet sounds.
SOUND COLLECTION module (page 14).
This module selects and controls pad, strings, choir, brass, keyboard, organ, bass and other sounds.
EXTERNAL module (page 15).
This module controls external MIDI devices.
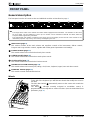
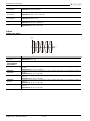
Wheels
To the left of the keyboard you will find two wheels that modify the sound in
real time.
The Pitch Bend wheel automatically returns to the centre and controls the
sound pitch.
The wheel , although normally assigned to modulation control, is
programmable and assignable to various functions (see the Mod.Wheel Dest
parameter, page 30).
NB
The image above refers to the Artist-W and Artist models equipped with all modules. The modules are the same
for each model. The only difference is that up to 5 models can be installed on Artist-W and Artist, while the
Compact model supports only 4 modules.
The arrangement and number of modules in the image and on the display screens shown in the manual are for
information purposes only as they can be freely rearranged by the user.
1
2
3
4
5
6
1
2
4
5
1
2
1
1
3
6
1
2

EN - 6
Legend „70s – User Manual
Front panel
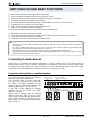
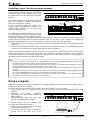
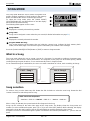
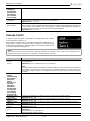
Headphones connector
On the left side of the instrument, under the keyboard, you will find a
1/4" jack connector to plug in your headphones.
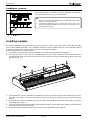
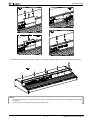
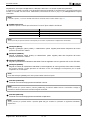
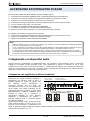
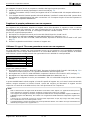
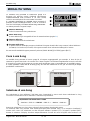
Installing modules
As already mentioned, the Legend „70s front panel consists of a main section that comes already been installed
and of other additional modules. If no additional module has been installed, this part of the instrument will be
covered by empty panels. These are the slots for the placement of modules
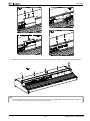
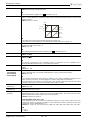
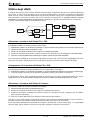
Follow this procedure to install a module:
1. First make sure that the instrument is switched off, and that the power cable is plugged off.
2. Unscrew the screw on the cover bar, located between the top of the instrument and the front panel, then
remove the bar. Keep the screw ready at hand, as they will be necessary to fasten the bar at the end of the
procedure (Fig. A).
3. Unscrew the two screws located in the slot where you wish to install the module, then remove the slot cover.
Keep the screw ready at hand, as they will be necessary to fasten the module at the end of the procedure
(Fig. B).
4. Connect the flat-cable to connector (1) on the slot and connector (2) on the module. The cable can be found
in the module box (Fig. C).
5. Place the module on the front panel by first inserting the teeth on the bottom of the module inside the tracks
on the lower part of the panel (Fig. D).
6. Fasten the module to the front panel by using the screws described at point 3 (Fig. E).
NB
Keep in mind that using headphones at a sufficiently high volume
level may cause hearing loss.
Connecting headphones does not affect the signal sent to the
AUDIO OUT MAIN [L/MONO], [R] and AUX [1], [2] outputs of the
rear panel (see page 17).

EN - 7
Legend ‘70s – User Manual
Front panel
7. Fasten the bar to the top of the instrument and to the front panel by using the screws described at point 2.
NB
Each time you change the position of the modules, please use the Identify Modules function described on page 60.
It is not possible to install two or more modules of the same type.

EN - 8
Legend „70s – User Manual
Front panel
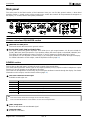
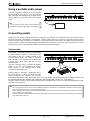
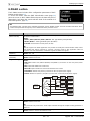
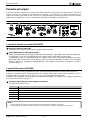
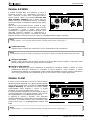
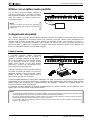
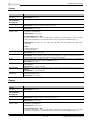
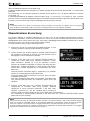
Main panel
The main panel is the fixed section of the instrument. Here you can find the general volume, a three-band
equalizer section, a reverb section, effect controls and a section that controls all the parameters that appear on
the display, i.e. sounds, effects and system parameters.
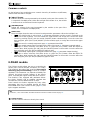
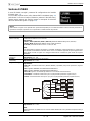
Volume control and EQUALIZER section
[MASTER VOLUME] knob.
This knob controls the instrument's general volume.
EQUALIZER [LOW], [MID] and [HIGH] slider.
This slider controls the general equalizer. Each slider has a gain range between -12 dB and +12 dB for
[LOW], [MID] and [HIGH] frequencies. The equalizer affects the stereo signal on the MAIN [L/MONO] and
[R] outputs and the headphones output. The AUX [1] and [2] outputs are unaffected by this control.
The equalizer can be adjusted in several ways by accessing the dedicated controls through the display.
For further information on this subject, read the Equalizer Section (page 56).
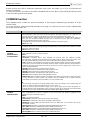
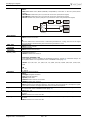
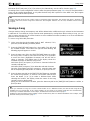
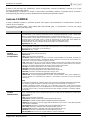
REVERB section
This section on the main panel includes the main controls of the reverb effect.
The reverb effect affects the stereo signal on the MAIN [L/MONO] and [R] outputs and the headphones output.
The AUX [1] and [2] outputs are unaffected by this effect.
The reverb can be adjusted in several ways by accessing the dedicated controls through the display. For further
information on this subject, read the Reverb section (page 42).
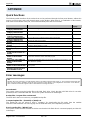
This knob selects the reverb style.
Available reverb styles are:
Reverb
Description
Room
Simulates the reverb of a room.
Hall
Simulates the acoustics of a concert hall.
Stage
Simulates the acoustics of a concert stage.
Plate
Simulates the reverb created by a metal plate, which was very common in the '70s.
Spring
Simulates the reverb created by a spring mechanism, as used in the amplifiers during the ‟70s.
Tape
Simulates the reverb produced by a tape recorder and a reverb chamber
[DRY / WET] knob.
Balances the direct and reverberated signal.
[REV ON] button.
Reverb On / Off switch.
1
2
3
NB
Press this knob to select the reverb type of the selected category.
Press and hold the knob for a short while to access the reverb parameters.
4
5
1
2
3
4
5
6
8
7
9
10
11
19
14
16
12
15
17
18
20
13

EN - 9
Legend ‘70s – User Manual
Front panel
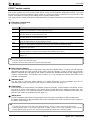
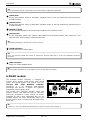
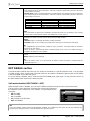
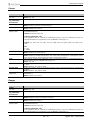
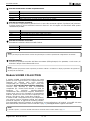
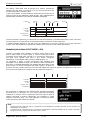
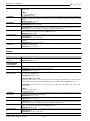
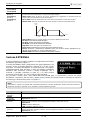
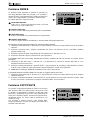
EFFECT section controls
This section includes the main controls of the effects. There are two available, independent effects. They have
the same set of controls but different values. When one of the two effects is selected, the control Leds of this
section are updated according to the settings of the currently selected effect.
The display shows several parameters to adjust the effect. For further information read the Effects section (page
33).
Effect type selection knob.
Available effect types:
Effect
Description
Tremolo
Tremolo or vibrato effect. Rotate the [AMOUNT] knob to adjust the effect depth. Rotate the [RATE] knob
or press the [TAP] button to set the modulation speed.
Chorus
Chorus effect. Rotate the [AMOUNT] knob to adjust the effect amount. Rotate the [RATE] knob or press
the [TAP] button to set the modulation speed.
Flanger
Flanger effect. Rotate the [AMOUNT] knob to adjust the effect amount. Rotate the [RATE] knob or press
the [TAP] button to set the modulation speed.
Phaser
Phaser effect. Rotate the [AMOUNT] knob to adjust the effect feedback. Rotate the [RATE] knob or
press the [TAP] button to set the modulation speed.
Wah
Wah-wah effect. Rotate the [AMOUNT] knob to adjust the filter's resonance. The [RATE] and the [TAP]
button can adjust different parameters according to the currently selected Wah effect.
Amp
Amplifier effect. Rotate the [AMOUNT] knob to adjust the distortion. Rotate the [RATE] knob to set the
output level of the effect.
Delay
Delay effect. Rotate the [AMOUNT] knob to adjust the effect amount. Rotate the [RATE] knob or press
the [TAP] button to set the time span between the repetitions of the signal.
Others
Various effects (equalizers, compressors, etc..). For further information read the Effects section
(page 33).
Effect selection buttons.
As described in the introduction to this section, there are two available effects. To select one and adjust its
parameters through the panel controls in this section, press the buttons [1] and [2]. When one of the two
effects is selected, the Led lights of this section‟s controls are updated according to the settings of the
currently selected effect. The blinking Led of button [1] or [2] indicates that though that effect is not
selected, it is still active.
[AMOUNT] knob.
Use this knob to adjust the effect intensity. For further information on the parameters that can be
controlled by this knob, read point 6 in this section or the Effects section (page 33).
[TAP] button.
Press this button to set the tempo or modulation frequency manually. Tap the tempo on the button at least
four times to set the value manually. The [RATE] knob Led will blink at the speed calculated from your
tapping (see point 10). For further information on the parameters that can be controlled by this knob, read
point 6 in this section or the Effects section (page 33).
[RATE] knob.
Set the modulation speed for the selected effect. The Led on this control blinks at the selected speed.
For further information on the parameters that can be controlled by this knob, read point 6 in this section or
the Effects section (page 33).
6
NB
Press this knob to select the effect type.
Press the knob for a short while to access the effect parameters.
7
8
9
10
NB
The light of the [RATE] knob is switched off when the effect is inactive, or when using specific effect types.
When the Rotary effect is selected, the light blinks at either a slow or fast speed, depending on the currently
selected Rotary speed (Slow or Fast). The led does not blink when the Rotary is in Brake position.

EN - 10
Legend „70s – User Manual
Front panel
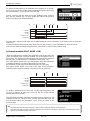
[FX ON] button.
Press this button to switch on / off the selected effect.
Leds for the effect settings FX1 and FX2 (page 33, parameter Effects Config).
[PAR]: the effects FX1 and FX2 are in parallel.
[SER]: effects FX1 and FX2 have a serial link (FX1 output enters FX2 input).
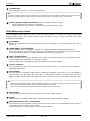
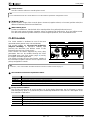
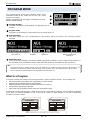
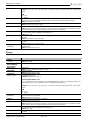
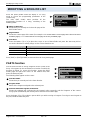
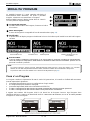
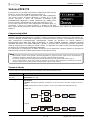
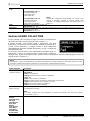
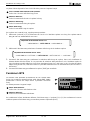
PROGRAM section controls
The PROGRAM section allows the user to save and recall programs, to access the Song mode and the
keyboard Split function. This section includes menus that allow access to all the instrument and system
configuration parameters.
[SET] buttons.
Buttons for immediate selection of four Programs of your choice (page 27) or of the four parts of the Song
(page 50).
[SONG MODE] / [SYSTEM] button.
Press this button once to recall the Song mode. For further information read Song Mode (page 50).
Press this button for a short while to access the SYSTEM menu on the display, which includes all the
instrument's general settings. For further information read Menu System (page 55).
[EDIT] / [STORE] button.
Press this button once to access the EDIT menu for the current mode (either Song or Program). Use this
menu to adjust all the parameters of a Program or Song.
Press the button for a short while to access the Program or Song save function.
[<] and [>] buttons.
Use this buttons to select the Program bank from the main screen, or to move the cursor up/left or
down/right respectively.
[SPLIT] button.
Push this button to activate the Split function. It divides the keyboard in two parts, so as to play different
sounds with the left and right hand (see page 30, Split Mode parameter). The Split Point marks the
division between the two parts of the keyboard. It can be set by the user (see parameter Split Point, page
30).
[EXIT] button.
Press this button to quit the current video page or to refuse a system request.
Display.
OLED monochrome display, 128x64 pixel. The display shows all the instrument's settings.
Data entry dial and access / confirm button.
Use this dial to select a Program or Song, to move the cursor on menus, to set parameter values, to select
a character to write Program or Song names.
Press the dial to access video pages or confirm system requests.
11
NB
To assign a module output to the selected effect, press the [FX ON] and the [ON/OFF] buttons simultaneously on that
module. The pairing between module and effect is indicated by the [FX 1] and [FX 2] Leds on each module.
12
13
14
15
16
17
NB
While pressing the [SPLIT] button, push the [ON/OFF] button on a module to assign that module to the Lower or
Upper part of the keyboard (press again to switch between the two sections).
Press a key on the keyboard while pushing the [SPLIT] button to set the Split Point.
18
19
20

EN - 11
Legend ‘70s – User Manual
Front panel
5
6
7
8
9
10
4
1
3
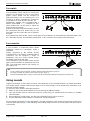
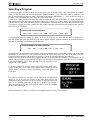
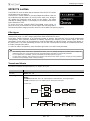
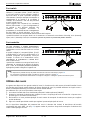
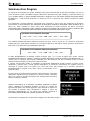
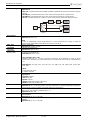
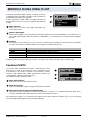
Common controls
On the left part of any module there are controls shared by all modules: On/Off button,
volume knob and status Led lights.
[ON/OFF] button.
Switches on/off the sound generated by the module (or the part of the module, if it
is comprised of multiple parts). When the Led light of this button is on, the module
is active and can receive data from the keyboard.
[VOLUME] knob.
Adjusts the volume of the sound generated by the module (or the part of the
module, if it is comprised of multiple parts).
Status Leds.
These Led lights show the status of several sound generation parameters. When the Led light is on:
[ ]: the Split function is active (page 30, parameter Split Mode) and the sound is assigned to the
Lower part of the keyboard. You can activate the Split function and assign the sound to the lower
section by pushing [SPLIT] and the module [ON/OFF] button simultaneously. Once the sound has
been assigned, press [SPLIT] and [ON/OFF] (on the module) again, to assign the sound to the Upper
section.
[ ]: the sound is currently transposed (page 44, parameter Note Shift).
[ ]: the module output signal is assigned to the effect FX1 (page 43, parameter Output Routing).
To assign an effect, select the FX1 effect (to do so, press the [FX 1] button under the EFFECTS
section) then, while pressing [FX ON], push the [ON/OFF] button on the module. Once the effect has
been assigned, press [FX ON] and [ON/OFF] again to undo.
[ ]: the module output signal is assigned to effect FX2 (page 43, parameter Output Routing).
To assign an effect, select the FX2 effect (to do so, press the [FX 2] button under the EFFECTS
section) then, while pressing [FX ON], push the [ON/OFF] button on the module. Once the effect has
been assigned, press [FX ON] and [ON/OFF] again to undo.
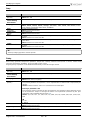
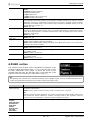
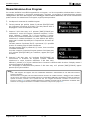
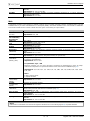
E.PIANO module
The E.Piano module allows the user to customise the
electric piano sounds (Rhodes, Wurlitezer and CP80).
This module is the state of the art of the Viscount PM
technology (Physical Modeling). Thanks to complex
algorithms, the instrument can reproduce faithfully the
dynamic and physic-acoustic features of the electric
piano, recreating the original sound with all its nuances.
The module is also equipped with dedicated effects:
the classic Tremolo, and an Amplifier simulator that
recreates the sound of different kinds of amps.
Panel controls are further expanded by many other
parameters that can be modified through the EDIT
PROGRAM menu (see E.Piano section, page 43) and
by the Legend ‟70s Editor
Sound selector
Use this control to select an electric piano sound.
Position
Description
Rhod 1, Rhod 2, Rhod 3, Rhod 4, Rhod 5
Rhodes electric piano simulator.
Wurli 1, Wurli 2
Wurlitzer electric piano simulator.
E.Grand
Electric grand piano CP-80 simulator.
1
2
3
NB
Controls 1, 2 and 3 are further described under the Common controls section at page 11.
4
1
2
3
2

EN - 12
Legend „70s – User Manual
Front panel
[BASS] knob.
Set the gain (positive value) or attenuation (negative values) of the low frequencies generated by the
E.PIANO module.
[TREBLE] knob.
Set the gain (positive value) or attenuation (negative values) of the high frequencies generated by the
E.PIANO module.
[INTENSITY] knob.
Set the modulation depth for the Tremolo effect applied to the E.PIANO module.
[SPEED] knob.
Set the modulation speed of the Tremolo effect applied to the E.PIANO module. This control has a Led
light that blinks at the frequency set through the knob.
[TREM ON] button.
On/Off switch of the Tremolo effect
[AMP ON] button.
Switch on / off the Amplifier effect.
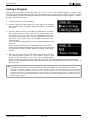
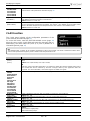
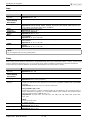
A.PIANO module
The A.PIANO module comprises a collection of
acoustic piano sounds: grand pianos, baby grand
pianos and upright pianos. This module uses the
Viscount HDS (High Definition Sampling)
technology. It is an advanced multi-sampling
technology that ensures a faithful and authentic
reproduction of the original sounds.
The module also comprises dynamic range and
brilliance controls, that adjust the sound in real time,
during the performance. Panel controls are further
expanded by many other parameters that can be
modified through the EDIT PROGRAM menu (see
A.Piano section, page 44) and through the Legend ‟70s
Editor App.
NB
Press and hold the knob for a short while to access the module configuration parameters.
5
6
7
8
NB
The [SPEED] knob light is off when the Tremolo is inactive.
9
NB
Press and hold the [TREM ON] button to activate the Tremolo effect and to access the modulation waveform
parameter.
10
NB
Press the [AMP ON] button for a short while to access the Amp effect parameters.
NB
Controls 1, 2 and 3 are further described under the Common controls section at page 11.
1
2
3
4
5
6

EN - 13
Legend ‘70s – User Manual
Front panel
Sound selector
Use this control to select an acoustic piano sound.
[DYNAMIC] knob.
Set the dynamic range of the acoustic piano: decrease (negative values) or increase (positive value) the
difference between pianissimo and fortissimo.
[BRILLIANCE] knob.
Set the sound brilliance. Set the knob in its central position for a perfectly balanced sound.
Turn the knob counter-clockwise (negative values) to dampen high frequencies, for a less brilliant sound.
Turn the knob clockwise (positive values) to increase high frequencies, for a more brilliant sound.
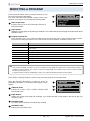
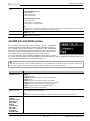
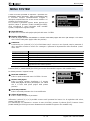
CLAVI module
The CLAVI module is dedicated to one of the most
renowned electric pianos of the ‟70: the Clavinet.
This module applies the Viscount PM technology
(Physical Modeling) to reproduce faithfully and
precisely the distinctive and brilliant sound of this
instrument, the top icon of funky music.
Panel controls are further expanded by many other
parameters that can be modified through the EDIT
PROGRAM menu (see Clavi section, page 46) and by
the Legend ‟70s Editor application.
The module includes the two most famous models of
this instrument, together with the classic equalizer and
pickup configuration controls.
These buttons activate the equalization filters.
Button
Description
[BRILLIANT]
High-pass filter that increases brilliance.
[TREBLE]
A Band-pass filter that enhances high frequencies.
[MEDIUM]
A low-pass filter, with a cutoff frequency in the middle range.
[SOFT]
A low-pass filter that generates a softer and darker sound.
Pickup selection buttons.
The led light indicates the D and B positions. As in the original instrument, the [A B] button is used to
select the pickup, while [C D] selects the phase relationship between the two. Here is a description of the
four available combinations:
Combination
Description
C A
Lower pickup only, full sound
C B
Upper pickup only, for a thinner, percussive sound.
D B
Both pickups, for a richer sound.
D A
Both pickups but with opposite phase, for a thin, nasal sound.
4
NB
Press and hold the knob for a short while to access the module's parameter configuration screen
5
6
NB
Controls 1, 2 and 3 are further described under the Common controls section at page 11.
4
5
1
2
3
4
5
6
7

EN - 14
Legend „70s – User Manual
Front panel
Model selection buttons.
Select one of the two Clavinet models.
Button
Description
[Clavi 1]
Clavinet D6 simulator.
[Clavi 2]
Clavinet E7 simulator.
[MUTE] button.
Select the maximum position of the attenuation felt (Sliding Damper) that, when the Led light is on,
decreases the decay time of the sound.
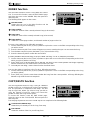
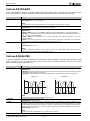
SOUND COLLECTION module
The SOUND COLLECTION module includes a wide
array of different sounds, reproducing the most
commonly used instruments that all musicians need.
Thanks to the Viscount HDS (High Definition
Sampling) technology, each instrument has been
accurately sampled with several different dynamics, in
order to better recreate the variety in dynamics and
tone of the original instruments. The sampled
instruments are therefore realistic and rich in definition.
These sounds are divided into 8 groups: Pad, Strings,
Choir, Brass, Keys, Organ, Bass and Others.
The module is comprised of two different parts. Each
can be recalled with the respective selection button.
Panel controls are further expanded by many other
parameters that can be modified through the EDIT PROGRAM menu (see Sound Collection section at page 47)
and through the Legend '70s Editor application.
Sound category selector.
Use this control to select the sound category, that can then be recalled through the knob described at
point 6.
Position
Description
Pad
Synth Pad
Strings
Acoustic and synthesized bowed instruments.
Choir
Choirs
Brass
Acoustic or synthesized brass instruments.
Keys
Acoustic and electronic pianos, synths, accordions.
Organ
Electric, electromechanic and pipe organs.
Bass
Acoustic, electric and synthesized bass.
Others
Various kinds of instruments.
6
NB
Press and hold one of these buttons for a short while to access the module configuration parameters.
7
NB
Press the button for a short while to activate the Mute. The display will show the decay time control.
NB
Controls 1, 2 and 3 are further described under the Common controls section at page 11.
4
NB
Press and hold the knob for a short while to access the module configuration parameters.
1
2
4
3
8
5
6
7

EN - 15
Legend ‘70s – User Manual
Front panel
Part selection buttons.
As described in the introduction, this module is comprised of two different parts. To select a part, so as to
access its main parameters through the panel controls, press button [1] or [2]. When a part is selected, the
controls‟ led lights and the adjustable parameters are set according to the currently selected part.
Sound selector
Use this control to recall a sound belonging to the sound group (selected by the knob described at point
4). The display shows the digit corresponding to the selected sound (point 7) while the name of the sound
appears on the main panel display.
Sound display
Displays the sound selected through the knob described at point 6.
Generation parameter knobs.
These three knobs control three sound generation parameters. The parameter controlled by each knob
depends on the currently selected sound. For further information on the adjustable parameters see page 47.
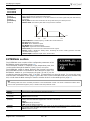
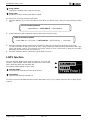
EXTERNAL module
The EXTERNAL module allows real-time control of
external MIDI devices connected to the instrument
through the MIDI or USB [TO HOST] connectors. Like
the sound generation modules, it can be activated /
deactivated and assigned to keyboard parts.
This module allows an easy access to the advanced
master keyboard functions of the instrument.
The module is comprised of two different, independent
parts, that can be recalled by pressing two buttons on
the panel. These two parts can both be active at the
same time and can be combined in layer or split modes.
Panel controls are further expanded by many other
parameters that can be modified through the EDIT
PROGRAM menu (see External section, page 48) and
through the Legend ‟70s Editor App.
Whether the module is present or not, all master keyboard functions of the instrument are still available, since
the External function is an integral part of Legend '70s. Without the dedicated module, all the functions
connected to the control of external devices can be accessed through the EDIT PROGRAM menu.
MIDI parameter knob.
Use this knob to select a MIDI parameter, so as to send it out or adjust it through the knob at point 6.
Parameter
Description
Port
MIDI message transmission port
Channel
MIDI message transmission channel
LSB Bank
Bank Select LSB message transmission
MSB Bank
Bank Select MSB message transmission
Prg Change
Program Change message transmission
Ctrl 1 CC
Control Change 1 assigned to the [CTRL 1] knob
Ctrl 2 CC
Control Change 2 assigned to the [CTRL 2] knob
Ctrl 3 CC
Control Change 3 assigned to the [CTRL 3] knob
5
NB
A blinking light on buttons [1] or [2] indicates that the part, though not currently selected, is active.
6
7
8
NOTE
Further information on the controls described at points 1, 2 and 3 can be found on page 11. The Led lights described at
point 3 are not available, since this module is not a sound generation module and, as such, it does not have [FX1] or
[FX2].
4
1
2
3
4
5
6
7
8

EN - 16
Legend „70s – User Manual
Front panel
Part selection buttons
These buttons select one of the two module parts. When one of the two parts is selected, the module
controls are updated according to the selected part. The blinking light of buttons [1] or [2] indicates that the
part, though not currently selected, is active.
Value display.
Displays the value controlled by the knob described at point 7.
Value control knob.
This knob controls the MIDI parameter selected through the knob described at point 1.
Control Change transmission knob.
Use this knob to transmit the Control Change message, assigned through the control described at point 1.
NB
Press and hold the knob for a short while to access the module configuration parameters.
5
6
7
8

EN - 17
Legend ‘70s – User Manual
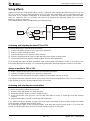
Rear panel
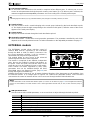
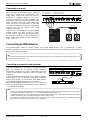
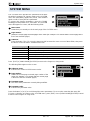
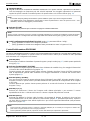
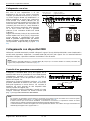
REAR PANEL
[AUDIO IN] mini jack.
Standard mini jack audio input, stereo, 1/8”. Use to connect to external devices such as smartphones,
tablets or computers. The signal on this input is then sent to the headphones output and to the AUDIO
OUT MAIN [L/MONO] and [R] outputs. This signal is not affected by the [MASTER VOLUME] knob on the
front panel. Use this knob to mix different signals from Legend „70s and external audio devices.
AUDIO OUT [AUX 1] and [AUX 2] jacks.
Standard 1/4” auxiliary mono audio outputs that transmit the signal from Legend „70s. The modules or
effects output can be routed to the auxiliaries audio outputs instead of the main outputs, either stereo o
mono (see the Output Routing parameter, page 33 and 43).
AUDIO OUT [MAIN L/MONO] and [MAIN R] jacks.
Standard 1/4” mono audio outputs that transmit the signal from Legend „70s. The modules and effects
outputs are sent to the main outputs by default. However, they can be re-routed to the auxiliary outputs
(see Output Routing parameter, page 33 and 43). When using a mono speaker, only connect the [MAIN
L/MONO] jack.
[PROGRAM + / -] PEDAL jack.
Use a stereo jack to connect this to a foot switch with two switches. One switch selects the previous
Program, the other goes to the next. The two-switch pedal can be used to select the next and previous
Program (also inside Songs). It is also possible to connect a one-button footswitch with a mono jack.
Doing so, the foot switch will select only the next or previous Program, according to the currently selected
operating mode (see Program +/- Type, page 59).
[SUSTAIN] PEDAL jack.
Use a mono jack to connect this to a foot switch to control the Sustain effect; use a Half-Damper pedal to
play with the half-pedaling technique, or the Studiologic SLP3-D triple pedal to play with three pedals like
an acoustic piano. To ensure that the pedal works properly, manually select the pedal type on the
instrument (see Sustain Type parameter, page 58).
[FOOT SWITCH 1] and [FOOT SWITCH 2] PEDAL jacks.
Connect to a foot switch through a mono jack to control a selected function (see FS1 Dest and FS2 Dest
parameters, page 30).
1
2
3
NOTES ON THE AUDIO OUTPUTS
- The signal on the AUDIO OUT AUX outputs is not affected by the general equalizer (see point 2, page 8
) or by the
Reverb effect (see point 3 page 8).
- Connect the cables while the speakers and the instrument are switched off. Then switch on the instrument first and
eventually the speakers.
- Balanced cables are recommended for audio outputs.
4
5
6
1
2
3
4
5
6
7
8
9
10
11
12
13
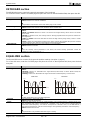
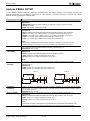
BALANCEDUNBALANCED
1: GND
2: TIP - HOT
3: RING - COLD
SLEEVE - 1: GND/COLD
2: TIP - HOT
SLEEVE -
11
22
11
22
33

EN - 18
Legend „70s – User Manual
Rear panel
[FOOT CONTROLLER 1] and [FOOT CONTROLLER 2] PEDAL jack.
Connect to a foot controller to control a selected function (see FC1 Dest and FC2 Dest parameters, page
28).
MIDI [OUT] port.
This connector sends the MIDI data generated by Legend „70s. Connect it to the MIDI input connector of
the receiving device.
MIDI [IN] port.
This connector receives MIDI data from an external unit that can play and control Legend „70s. Connect
this port to the MIDI output of the transmitting device (e.g. keyboard, master controller, sequencer).
USB [TO HOST] port.
Use this port to connect a tablet or a computer via USB cable. Use this port to send and receive USB
MIDI data, connect with the Legend „70s Editor application and receive USB Audio stereo signal, that can
be played through the outputs AUDIO OUT MAIN [L/MONO] and [R].
USB [TO DEVICE] port.
Use this port to connect a USB flash drive. The USB drive can be used to save and load settings and
programs, and to update the operating system.
[POWER] switch.
On / off switch.
[MAINS AC-IN] connector.
Use this connector to plug the power cable included with the instrument.
7
NOTES ABOUT PEDALS
- When using Foot switch pedals, the polarity must be set manually (see Sustain Polarity, FS1 Polarity, FS2 Polarity
and Progr +/- Polarity, page 58).
- When using foot controller pedals, the user must select the correct pedal type (see FC1 Type and FC2 Type
parameters, page 58).
- For further information on connecting and using pedals, see Pedal connection, page 23.
8
9
NB
For further information on Legend „70s MIDI interface refer to the MIDI Informations section, page MIDI - 1.
10
NB
Use USB cables type A/B.
Legend '70s can receive audio signal via USB cable on two channels (1 stereo channel) with a sampling frequency
of 44.1 kHz.
Computers running Microsoft Windows as operating system need a USB driver. This driver is automatically
installed when connecting the instrument to the computer for the first time. Follow the instructions on the computer
to complete the installation.
11
NB
Only use flash drives using the FAT o FAT32 file system (no NTFS or other).
This connector can also be used to charge various devices such as tablets or smartphones. The charge function
can be activated on the display through the USB to Device parameter, described on page 59.
12
13
La pagina sta caricando ...
La pagina sta caricando ...
La pagina sta caricando ...
La pagina sta caricando ...
La pagina sta caricando ...
La pagina sta caricando ...
La pagina sta caricando ...
La pagina sta caricando ...
La pagina sta caricando ...
La pagina sta caricando ...
La pagina sta caricando ...
La pagina sta caricando ...
La pagina sta caricando ...
La pagina sta caricando ...
La pagina sta caricando ...
La pagina sta caricando ...
La pagina sta caricando ...
La pagina sta caricando ...
La pagina sta caricando ...
La pagina sta caricando ...
La pagina sta caricando ...
La pagina sta caricando ...
La pagina sta caricando ...
La pagina sta caricando ...
La pagina sta caricando ...
La pagina sta caricando ...
La pagina sta caricando ...
La pagina sta caricando ...
La pagina sta caricando ...
La pagina sta caricando ...
La pagina sta caricando ...
La pagina sta caricando ...
La pagina sta caricando ...
La pagina sta caricando ...
La pagina sta caricando ...
La pagina sta caricando ...
La pagina sta caricando ...
La pagina sta caricando ...
La pagina sta caricando ...
La pagina sta caricando ...
La pagina sta caricando ...
La pagina sta caricando ...
La pagina sta caricando ...
La pagina sta caricando ...
La pagina sta caricando ...
La pagina sta caricando ...
La pagina sta caricando ...
La pagina sta caricando ...
La pagina sta caricando ...
La pagina sta caricando ...
La pagina sta caricando ...
La pagina sta caricando ...
La pagina sta caricando ...
La pagina sta caricando ...
La pagina sta caricando ...
La pagina sta caricando ...
La pagina sta caricando ...
La pagina sta caricando ...
La pagina sta caricando ...
La pagina sta caricando ...
La pagina sta caricando ...
La pagina sta caricando ...
La pagina sta caricando ...
La pagina sta caricando ...
La pagina sta caricando ...
La pagina sta caricando ...
La pagina sta caricando ...
La pagina sta caricando ...
La pagina sta caricando ...
La pagina sta caricando ...
La pagina sta caricando ...
La pagina sta caricando ...
La pagina sta caricando ...
La pagina sta caricando ...
La pagina sta caricando ...
La pagina sta caricando ...
La pagina sta caricando ...
La pagina sta caricando ...
La pagina sta caricando ...
La pagina sta caricando ...
La pagina sta caricando ...
La pagina sta caricando ...
La pagina sta caricando ...
La pagina sta caricando ...
La pagina sta caricando ...
La pagina sta caricando ...
La pagina sta caricando ...
La pagina sta caricando ...
La pagina sta caricando ...
La pagina sta caricando ...
La pagina sta caricando ...
La pagina sta caricando ...
La pagina sta caricando ...
La pagina sta caricando ...
La pagina sta caricando ...
La pagina sta caricando ...
La pagina sta caricando ...
La pagina sta caricando ...
La pagina sta caricando ...
La pagina sta caricando ...
La pagina sta caricando ...
La pagina sta caricando ...
La pagina sta caricando ...
La pagina sta caricando ...
La pagina sta caricando ...
La pagina sta caricando ...
La pagina sta caricando ...
La pagina sta caricando ...
La pagina sta caricando ...
La pagina sta caricando ...
La pagina sta caricando ...
La pagina sta caricando ...
La pagina sta caricando ...
La pagina sta caricando ...
La pagina sta caricando ...
La pagina sta caricando ...
La pagina sta caricando ...
La pagina sta caricando ...
La pagina sta caricando ...
La pagina sta caricando ...
La pagina sta caricando ...
La pagina sta caricando ...
La pagina sta caricando ...
La pagina sta caricando ...
La pagina sta caricando ...
La pagina sta caricando ...
La pagina sta caricando ...
La pagina sta caricando ...
-
 1
1
-
 2
2
-
 3
3
-
 4
4
-
 5
5
-
 6
6
-
 7
7
-
 8
8
-
 9
9
-
 10
10
-
 11
11
-
 12
12
-
 13
13
-
 14
14
-
 15
15
-
 16
16
-
 17
17
-
 18
18
-
 19
19
-
 20
20
-
 21
21
-
 22
22
-
 23
23
-
 24
24
-
 25
25
-
 26
26
-
 27
27
-
 28
28
-
 29
29
-
 30
30
-
 31
31
-
 32
32
-
 33
33
-
 34
34
-
 35
35
-
 36
36
-
 37
37
-
 38
38
-
 39
39
-
 40
40
-
 41
41
-
 42
42
-
 43
43
-
 44
44
-
 45
45
-
 46
46
-
 47
47
-
 48
48
-
 49
49
-
 50
50
-
 51
51
-
 52
52
-
 53
53
-
 54
54
-
 55
55
-
 56
56
-
 57
57
-
 58
58
-
 59
59
-
 60
60
-
 61
61
-
 62
62
-
 63
63
-
 64
64
-
 65
65
-
 66
66
-
 67
67
-
 68
68
-
 69
69
-
 70
70
-
 71
71
-
 72
72
-
 73
73
-
 74
74
-
 75
75
-
 76
76
-
 77
77
-
 78
78
-
 79
79
-
 80
80
-
 81
81
-
 82
82
-
 83
83
-
 84
84
-
 85
85
-
 86
86
-
 87
87
-
 88
88
-
 89
89
-
 90
90
-
 91
91
-
 92
92
-
 93
93
-
 94
94
-
 95
95
-
 96
96
-
 97
97
-
 98
98
-
 99
99
-
 100
100
-
 101
101
-
 102
102
-
 103
103
-
 104
104
-
 105
105
-
 106
106
-
 107
107
-
 108
108
-
 109
109
-
 110
110
-
 111
111
-
 112
112
-
 113
113
-
 114
114
-
 115
115
-
 116
116
-
 117
117
-
 118
118
-
 119
119
-
 120
120
-
 121
121
-
 122
122
-
 123
123
-
 124
124
-
 125
125
-
 126
126
-
 127
127
-
 128
128
-
 129
129
-
 130
130
-
 131
131
-
 132
132
-
 133
133
-
 134
134
-
 135
135
-
 136
136
-
 137
137
-
 138
138
-
 139
139
-
 140
140
-
 141
141
-
 142
142
-
 143
143
-
 144
144
-
 145
145
-
 146
146
-
 147
147
-
 148
148


Viscount Legend ’70s Manuale del proprietario
- Categoria
- Strumenti musicali
- Tipo
- Manuale del proprietario
in altre lingue
- English: Viscount Legend ’70s Owner's manual
Documenti correlati
-
Viscount Legend Editor Manuale del proprietario
-
Viscount LEGEND LIVE Manuale del proprietario
-
-
-
Viscount Legend Exp Manuale del proprietario
-
Viscount Physis Piano K4 Manuale del proprietario
-
-
-
Viscount Legend Soul 261 Manuale del proprietario
-
Altri documenti
-
Orla CDP 1 Manuale del proprietario
-
Alesis X Guitar Manuale del proprietario
-
Studiologic numaconcert Istruzioni per l'uso
-
-
Studiologic acuna88 specificazione
-
-
-
Yamaha AR-1500LIVE Manuale del proprietario
-
Yamaha CP88 Manuale del proprietario
-
Korg SV-1 Black Guida utente