
1
1 2
3
EN
AeroScout S RTF
A
B
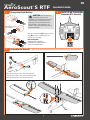
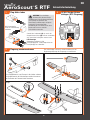
Quickstart Guide
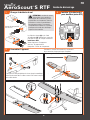
Charge the Flight Battery
Assemble the Aircraft
Install (4) AA Transmitter
Batteries (RTFAircraft)
CAUTION: See the aircraft
instruction manual for a
complete list of charging instructions
and warnings. All instructions and
warnings must be followed exactly.
Mishandling of LiPo batteries can
result in a re, personal injury and/or
property damage.
Refer to the aircraft instruction manual for complete step-by-step instructions.
Landing Gear Horizontal Tail
Wing
Slide the main gear in the slots until they lock.
Insert the nose gear in the collar and tighten the
screw against the at-spot on the gear wire.
USB power source,
not included
Both the charge lead (A) and the balance
lead (B) must be connected for the
charge cycle to begin.
LED Indications
Flashing purple: Charging
Solid green: Charging complete
Solid red: Charging error

2
7
10
9
11
8
64
EN
5
B
B
A
A
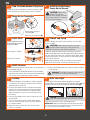
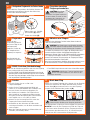
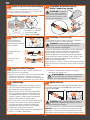
After Your Flight
Do not approach the aircraft until the propeller has stopped
spinning. When you are done ying, disconnect the battery (A) and
remove it from the aircraft, then power off the transmitter (B).
Install the Flight Battery
Power On the Aircraft
Power On the Transmitter
Roll
Pitch
Flight Mode
Landing
PANIC Function
Set the ight mode switch to
Beginner Mode (position 0)
for the initial ights.
Aircraft pitch is limited.
Aircraft roll is limited.
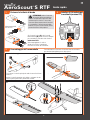
Takeoff and Flying
With the throttle stick at the lowest position, set the motor
switch to “ARM”.
CAUTION: Always keep hands away from the
propeller. When armed, the motor will turn the
propeller in response to any throttle movement.
Position the model to take off into the wind. Slowly increase the
throttle. Small rudder inputs may be required for heading correction.
Trim the aircraft for hands-free, straight and level ight. When
properly trimmed, the aircraft will climb at full throttle without
the use of the elevator.
While ying in beginner mode, if you begin to lose control,
release the control sticks and the aircraft will self-level.
Set the motor switch to
“DISARM” (A).
Power the transmitter on (B).
CAUTION: Always keep
hands away from the
propeller. When armed, the motor
will turn the propeller in response
to any throttle movement.
Find a Suitable Outdoor Flying Area
Consult local laws and ordinances before choosing a ying
location. Never y over other people, roads or structures.
CAUTION: Always keep hands, hair and loose clothing
away from the propeller when disconnecting the battery.
Inspect the airframe for loose or damaged parts.
IMPORTANT: When nished ying, never keep the aircraft in
the sun. Do not store the aircraft in a hot, enclosed area such
as a car. Doing so can damage the foam.
1. Reduce the throttle to around 50% to slow the airspeed.
2. Turn the aircraft into the wind and line the aircraft up
with the runway center line.
3. Decrease the throttle further and begin descending
towards the runway, keeping the wings level during
approach. Try to have the aircraft at approximately
10ft (3m) altitude as it passes over the threshold of
the runway.
4. Decrease the throttle fully as the aircraft passes over
the threshold.
5. Just as the aircraft is about to touch down, gently
pull back on the elevator to raise the nose and are
for a gentle landing.
6. When the aircraft comes to a stop, set the motor
switch to “DISARM”.
If you become disoriented or the aircraft is in an unknown or
uncomfortable attitude:
1. Press and hold the Bind/PANIC button on the transmitter
and release the control sticks. The aircraft will immediately
pull out of a dive and roll wings upright and level.
2. Release the PANIC button and continue a gentle climb to
a safe altitude.
WARNING: The PANIC recovery function will not
avoid obstacles in the aircraft ight path.

3
1 2
3
DE
AeroScout S RTF
A
B
Schnellstartanleitung
Flug-Akku laden
Flugzeug zusammenbauen
(4) AA-Sender-Akkus
einlegen (RTF-Flugzeug)
ACHTUNG: Eine vollständige
Au istung der Ladeanweisungen
und Warnungen ist der Bedienungsanleitung
des Flugzeugs zu entnehmen. Alle
Anweisungen und Warnungen sind genau
zu befolgen. Eine unsachgemäße
Handhabung der LiPo-Akkus können einen
Brand sowie Personen- und/oder
Sachschäden verursachen.
Eine vollständige Schritt-für-Schritt-Anleitung ist der
Bedienungsanleitung des Flugzeugs zu entnehmen.
Fahrwerk Höhenleitwerk
Flügel
Das Hauptgetriebe bis zum Einrasten in die Schlitze schieben.
Das Bugfahrwerk in die Hülse einfügen und die Schraube an
der Flachstelle des Fahrwerk-Kabels festziehen.
USB-Stromquelle,
nicht im Lieferumfang
enthalten
Sowohl das Ladekabel (A) als auch der
Ausgleichsanschluss (B) müssen verbunden
sein, damit der Ladezyklus starten kann.
LED-Anzeige
Violettfarben blinkend: Lädt
Durchgängig grün: Laden abgeschlossen
Durchgängig rot: Ladefehler

4
7
10
9
11
8
64
DE
5
B
B
A
A
Nach dem Flug
Nähern Sie sich dem Flugzeug nicht, solange sich der Propeller
noch dreht. Sobald Sie das Fliegen beendet haben, trennen
Sie den Akku (A) und entfernen Sie ihn aus dem Flugzeug.
Schalten Sie anschließend den Sender ab (B).
Flugakku einsetzen
Flugzeug einschalten
Sender einschalten
Flugmodus
Landen
Abheben und Fliegen
Geeigneten Flugbereich im Freien fi nden
ACHTUNG: Beim Abklemmen des Akkus Hände,
Haare und lose Kleidung vom Propeller fernhalten.
Den Flugzeugrahmen auf gelockerte oder beschädigte Teile untersuchen.
WICHTIG: Lassen Sie das Flugzeug nach Ende des Flugs nie
in der Sonne stehen. Bewahren Sie das Flugzeug niemals an
einem warmen, geschlossenen Ort (z. B. in einem Auto) auf.
Dadurch kann der Schaumstoff beschädigt werden.
Roll (Wankwinkel)
Pitch (Steigwinkel)
PANIC-Funktion (Notrückholung)
Setzen Sie den
Flugmodusschalter für
Ihre ersten Flüge in den
Anfängermodus
(Beginner, Position 0).
Der Steigwinkel des
Flugzeugs ist begrenzt.
Der Wankwinkel des
Flugzeugs ist begrenzt.
Gashebel in der niedrigsten Position halten, Motorschalter auf
„ARM“ (Einschalten) stellen.
ACHTUNG: Die Hände immer vom Propeller fernhalten.
Der Motor reagiert im eingeschalteten Zustand auf eine
Bewegung des Gashebels mit einer Drehung des Propellers.
Das Modell so positionieren, dass gegen den Wind gestartet wird.
Gaszufuhr langsam erhöhen. Geringfügige Bewegungen des
Ruderhebels sind ggf. nötig, um die Flugrichtung leicht zu korrigieren.
Das Flugzeug für handfreie, Geradeaus- und Horizontal üge
trimmen. Bei korrekter Trimmung steigt das Flugzeug bei Vollgas
ohne die Verwendung des Höhenruders.
Wenn Sie im Anfängermodus allmählich die Kontrolle verlieren, lassen
Sie die Steuerhebel los, und das Flugzeug begradigt sich selbst.
Motorschalter auf „DISARM“
(Ausschalten) (A) stellen.
Sender einschalten (B).
ACHTUNG: Die Hände
immer vom Propeller
fernhalten. Der Motor reagiert im
eingeschalteten Zustand auf eine
Bewegung des Gashebels mit
einer Drehung des Propellers.
Vor der Wahl des Flugstandorts die örtlichen Gesetze und
Verordnungen konsultieren. Niemals über Menschen,
Straßen oder Gebäuden iegen.
1. Drosseln Sie das Gas um ca. 50 % der
Luftgeschwindigkeit.
2. Drehen Sie das Flugzeug gegen den Wind und
richten Sie es auf die Mittellinie der Landebahn aus.
3. Drosseln Sie das Gas weiter und beginnen Sie
den Sink ug zur Landebahn. Die Flügel müssen
dabei waagrecht zur Landebahn gehalten werden.
Versuchen Sie bei Überquerung der Pistenschwelle
eine Flughöhe von ca. 3 m (10 ft) zu haben.
4. Nehmen Sie das Gas komplett zurück, wenn das
Flugzeug die Pistenschwelle überquert.
5. Unmittelbar vor dem Aufsetzen das Höhenruder
vorsichtig zurückziehen, um die Nase anzuheben und
sanft zu landen.
6. Wenn das Flugzeug gestoppt hat, Motorschalter auf
„DISARM“ (Ausschalten) stellen.
Wenn Sie die Orientierung verlieren oder sich das Flugzeug
in einer unübersichtlichen Position be ndet:
1. Den Bind-/PANIC-Knopf (Binden/Notrückholung) am Sender
gedrückt halten und die Steuerhebel loslassen. Das Flugzeug
wird den Flug sofort abfangen und die Flügel in eine aufrechte
und ausgerichtete Flugstellung bringen.
2. Den PANIC-Knopf loslassen und in eine sichere Höhe steigen.
WARNUNG: Mithilfe der Funktion Notrückholung
lassen sich keine Hindernisse auf dem Kurs des
Flugzeugs vermeiden.

5
1 2
3
FR
AeroScout S RTF
A
B
Guide de démarrage
Charger la batterie de vol
Assembler l’appareil
ATTENTION: consultez le manuel
d’instructions pour connaître la
liste complète des instructions et mises
en garde liées au chargement. Toutes les
instructions et mises en garde doivent
être strictement suivies. La mauvaise
manipulation des batteries Li-Po pourrait
provoquer un incendie, des dommages
corporels et/ou matériels.
Consultez le manuel d’instructions pour obtenir
des instructions étape par étape complètes.
Aile
Source électrique USB
non incluse
Le câble de charge (A) et le câble
d’équilibrage (B) doivent être connectés
pour que le cycle de charge commence.
Indicateurs DEL
Violet clignotant: Chargement
Vert xe: Charge terminé
Rouge xe: Erreur de chargement
Installez (4) batteries AA
pour émetteur (avion RTF)
Train d’atterrissage Empennage horizontal
Faites glisser le train principal dans les fentes jusqu’au verrouillage.
Insérez le train avant dans le collier et serrez la vis contre le méplat
sur le câble du train.

6
7
10
9
11
8
64
FR
5
B
B
A
A
Ne vous approchez pas de l’avion avant l’arrêt des hélices. Une fois
le vol terminé, débranchez la batterie (A), retirez-la de l’avion, et
éteignez l’émetteur (B).
Mettre l’émetteur en marche
Tangage
Mode de vol
ATTENTION: n’approchez
pas les mains de l’hélice.
Lorsqu’il est armé, le moteur fait
tourner l’hélice en réponse à tout
mouvement d’accélération.
Trouver un espace de vol extérieur adéquat
Consultez les lois et ordonnances locales avant de
choisir un espace de vol. Ne volez jamais au-dessus de
personnes, routes ou infrastructures.
ATTENTION: veillez à toujours maintenir vos mains, vos
cheveux et tout vêtement ample à distance de l’hélice
lorsque vous débranchez la batterie.
Véri ez l’absence de pièces de l’appareil desserrées ou endommagées.
IMPORTANT: lorsque vous avez ni de voler, ne laissez jamais votre
appareil dans le soleil. Ne stockez pas votre appareil dans un endroit
chaud et fermé comme une voiture. Au risque d’endommager la mousse.
Après votre vol
Installation de la batterie de vol
Mettre l’appareil en marche
Roulis
Atterrissage
Fonction PANIC (Panique)
Placez le commutateur
de mode de vol en mode
Beginner (Débutant, position0)
pour les vols initiaux.
Le tangage de l’avion
est limité.
Le roulis de l’avion
est limité.
Décollage et atterrissage
Avec la manette des gaz en position la plus basse, con gurez le
commutateur du moteur sur «ARM» (Activation).
ATTENTION: n’approchez pas les mains de l’hélice.
Lorsqu’il est armé, le moteur fait tourner l’hélice en
réponse à tout mouvement d’accélération.
Positionnez l’appareil pour un décollage face au vent. Augmentez
lentement les gaz. De légers mouvements de la gouverne de
direction peuvent s’avérer nécessaires pour corriger le cap.
Procédez aux réglages de compensation (trim) de l’appareil pour
les vols à mains libres, droits et à niveau. L’avion s’élèvera, à plein
régime, s’il est correctement réglé, sans qu’il soit nécessaire
d’utiliser la gouverne de profondeur.
Si vous commencez à perdre le contrôle en mode Beginner (Débutant),
relâchez les manches de commande, et l’avion se mettra à niveau par
lui-même.
Con gurez le commutateur
du moteur sur «DISARM»
(Désactivation) (A).
Allumez l’émetteur (B).
1. Réduisez les gaz à 50% environ pour baisser la vitesse.
2. Faites virer l’appareil contre le vent et alignez-le avec la
ligne centrale de la piste d’atterrissage.
3. Réduisez encore les gaz et commencez à descendre
vers la piste d’atterrissage tout en maintenant les ailes
à l’horizontale pendant l’approche. Essayez de faire en
sorte que l’appareil se trouve à environ 3m (10pieds)
d’altitude lorsqu’il dépasse le seuil de la piste.
4. Diminuez entièrement les gaz lorsque l’appareil dépasse le seuil.
5. Au moment où l’appareil est sur le point de toucher la
piste, tirez doucement le manche de la gouverne de
profondeur vers l’arrière pour lever le nez et arrondir
l’appareil pour un atterrissage en douceur.
6. Lorsque l’appareil s’arrête, con gurez le commutateur du
moteur sur «DISARM» (Désactivation).
Si vous êtes désorienté ou que l’appareil est dans une
altitude inconnue ou inconfortable:
1. Appuyez sur et maintenez enfoncé le bouton Bind/PANIC
(Affectation/Panique) sur l’émetteur et relâchez les
manettes de commande. L’appareil sort immédiatement
du plongeon, remet ses ailes droites et se met à niveau.
2. Relâchez le bouton PANIC (Panique) et atteignez
doucement une altitude sûre.
AVERTISSEMENT: La fonction de récupération
de panique (PANIC) ne permet pas d’éviter des
obstacles sur la trajectoire de vol de l’appareil.

7
1 2
3
IT
AeroScout S RTF
A
B
Guida rapida
Caricare la batteria di bordo
Installare (4) AA batterie per
trasmittente (versione RTF)
ATTENZIONE: vedere il manuale
di istruzioni dell’aeromodello per
l’elenco completo delle istruzioni e delle
avvertenze per la ricarica. È necessario
osservare rigorosamente tutte le istruzioni
e le avvertenze. L’utilizzo improprio delle
batterie Li-Po può causare incendi, lesioni
personali e/o danni alle proprietà.
Fare riferimento al manuale di istruzioni dell’aeromodello
per istruzioni dettagliate passo dopo passo.
Ala
Far scorrere il carrello principale nelle fessure nché non
si blocca.
Inserire il carrello anteriore nel collare e stringere la vite
contro il punto piatto sulla gamba del carrello.
Alimentatore USB,
non incluso
Sia il cavo di carica (A) che il cavo di
bilanciamento (B) devono essere collegati
per consentire l’avvio del ciclo di carica.
Indicazioni LED
Viola lampeggiante: In carica
Verde sso: Carica completato
Rosso sso: Errore del caricatore
Assemblaggio dell’aeromodello
Carrello di atterraggio Piano di coda orizzontale

8
7
10
9
11
8
64
IT
©2019 Horizon Hobby, LLC.
HobbyZone, the HobbyZone logo, AeroScout and the Horizon Hobby logo are registered trademarks of Horizon Hobby, LLC.
US 9,056,667. US 10,078,329. US 8,672,726. D774,933.
Created 03/19 61347EN HBZ3800, HBZ3850
5
B
B
A
A
Dopo il volo
Non avvicinarsi all’aeromodello prima che l’elica abbia smesso di
girare. Terminata la sessione di volo, scollegare la batteria (A) e
rimuoverla dall’aeromodello, quindi spegnere la trasmittente (B).
Accendere la trasmittente
Rollio
Beccheggio
Modalità di volo
Atterraggio
Per primi voli, impostare
l’interruttore della modalità
di volo su Principiante
(posizione 0).
Decollo e volo
Impostare l’interruttore del
motore su “DISARM” (A).
Accendere la trasmittente (B).
ATTENZIONE: tenere
sempre le mani lontano dalle
eliche. Quando armato, il motore farà
girare l’elica in risposta a qualunque
movimento della manetta.
Individuare un’area all’aperto
idonea per il volo
Consultare le leggi e le normative locali prima di scegliere
un luogo dove far volare l’aeromodello. Non sorvolare mai
altre persone, strade o strutture.
ATTENZIONE: tenere sempre mani, capelli e indumenti
non aderenti lontani dell’elica quando si scollega la batteria.
Effettuare un’ispezione dell’aeromodello per veri care la presenza di
parti allentate o danneggiate.
IMPORTANTE: al termine del volo, non lasciare l’aeromodello al
sole. Non lasciare l’aeromodello in un luogo chiuso e caldo, come
un’auto al sole. Farlo può provocare danni al materiale espanso.
Installare la batteria di bordo
Accendere l’aeromodello
Funzione ANTIPANICO
Il beccheggio
dell’aeromodello è limitato.
Il rollio dell’aeromodello è
limitato.
Con lo stick del motore nella posizione inferiore, impostare
l’interruttore del motore su “ARM”.
ATTENZIONE: tenere sempre le mani lontano dalle eliche.
Quando armato, il motore farà girare l’elica in risposta a
qualunque movimento della manetta.
Posizionare il modello per il decollo contro vento. Accelerare
lentamente. Lievi applicazioni del timone possono essere necessarie
per la correzione della prua.
Regolare il trim in modo da assicurare un volo a mani libere, diritto
e livellato. Se il trimmaggio è stato accurato, l’aeromodello prenderà
quota a piena manetta senza dover usare l’elevatore.
Nel volo in modalità principiante, se si inizia a perdere il controllo,
rilasciare gli stick di comando per indurre l’aereo a tornare
automaticamente in volo livellato.
1. Ridurre la potenza del motore a circa il 50% per
rallentare.
2. Girare l’aereo controvento e allinearlo con il centro
della pista.
3. Continuare a ridurre la potenza del motore e iniziare
a scendere verso la pista, tenendo le ali a livello
durante l’avvicinamento. Cercare di far sì che l’aereo
si trovi a circa 3 metri (10 piedi) di quota quando
oltrepassa la soglia della pista.
4. Togliere completamente la manetta quando
l’aeromodello oltrepassa la soglia.
5. Quando l’aereo sta per toccare terra, tirare
leggermente il comando dell’elevatore per ottenere
una richiamata e alzare il muso dell’aeromodello per
farlo planare dolcemente.
6. Quando l’aeromodello si ferma, impostare
l’interruttore del motore su “DISARM”.
Se si perde l’orientamento oppure se l’aeromodello assume
un assetto non noto o scomodo:
1. Premere e tenere premuto il tasto Bind/PANIC
della trasmettente e rilasciare gli stick di controllo.
L’aeromodello uscirà immediatamente dalla picchiata e
allineerà le ali in verticale in volo livellato.
2. Rilasciare il pulsante PANIC e continuare con una leggera
salita no a raggiungere un’altitudine sicura.
AVVERTENZA: la funzione di recupero antipanico
non è in grado di evitare eventuali ostacoli lungo
la direzione di volo dell’aeromodello.
-
 1
1
-
 2
2
-
 3
3
-
 4
4
-
 5
5
-
 6
6
-
 7
7
-
 8
8


HobbyZone AeroScout S RTF Guida utente
- Categoria
- Giocattoli
- Tipo
- Guida utente
in altre lingue
- English: HobbyZone AeroScout S RTF User guide
- français: HobbyZone AeroScout S RTF Mode d'emploi
- Deutsch: HobbyZone AeroScout S RTF Benutzerhandbuch
Documenti correlati
Altri documenti
-
E-flite EFL3750 Guida utente
-
E-flite EFL01150 Manuale del proprietario
-
-
ParkZone PKZU1100 Manuale del proprietario
-
Blade OZONE RTF BLH9700 Manuale utente
-
-
E-flite Carbon-Z Cub Manuale utente
-