
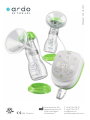
ardo alyssa
electric breastpump
Instructions for use | Gebrauchsanweisung | Mode d'emploi |
Istruzioni per l’uso | Gebruiksaanwijzing | Instrucciones de uso |
Instruções de utilização

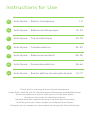
Instructions for Use
en Ardo Alyssa – Electric breastpump 1 – 11
de Ardo Alyssa – Elektrische Milchpumpe 12 – 22
fr Ardo Alyssa – Tire-lait électrique 23 – 33
it Ardo Alyssa – Tiralatte elettrico 34 – 44
nl Ardo Alyssa – Elektrische borstkolf 45 – 55
es Ardo Alyssa – Sacaleches eléctrico 56 – 66
pt Ardo Alyssa – Bomba elétrica de extração de leite 67 – 77
Thank you for choosing the Ardo Alyssa breastpump.
Vielen Dank, dass Sie sich für die Ardo Alyssa Milchpumpe entschieden haben.
Nous vous remercions d’avoir opté pour le tire-lait Ardo Alyssa.
Grazie per aver scelto il tiralatte Ardo Alyssa.
Hartelijk dank dat u gekozen hebt voor de Ardo Alyssa borstkolf.
Muchas gracias por haber elegido el sacaleches Ardo Alyssa.
Obrigado por ter optado por uma bomba de extração de leite Ardo Alyssa.

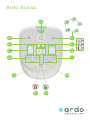
Ardo Alyssa
FG
C
H
D
I
E
LK
A
B
M
J
H

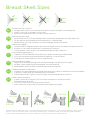
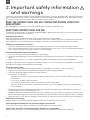
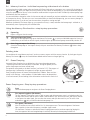
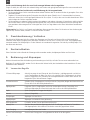
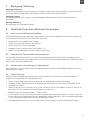
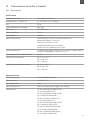
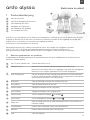
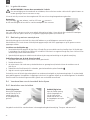
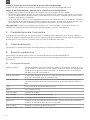
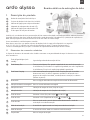
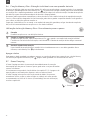
Breast Shell Sizes
= Ø size
en
The breast shell size is correct if:
• the nipple moves freely in the funnel and can follow the rhythmic movements of the breastpump.
• no part, or very little, of the areola is in the funnel.
• the milk flows and the breast feels uniformly soft after expression.
de
Die Brustglocke passt wenn:
• die Brustwarze sich frei im Trichter bewegt und den rhythmischen Bewegungen der Pumpe folgen kann.
• sich kein oder nur wenig Gewebe des Brustwarzenhofes im Trichter befindet.
• die Muttermilch fliesst und sich die Brust nach dem Abpumpen überall weich anfühlt.
fr
La téterelle est adaptée :
• lorsque le mamelon se déplace librement dans l’entonnoir et peut suivre les mouvements rythmiques du tire-lait.
• lorsque le tissu de l’aréole ne pénètre pas ou quasiment pas l’entonnoir.
• si le lait maternel s’écoule et que le sein semble détendu partout après l’expression.
it
La misura della coppa va bene se:
• il capezzolo si muove liberamente nell’imbuto e può seguire i movimenti ritmici della pompa.
• solo se nessuna parte o poca parte dell'areola del capezzolo si trova nell’imbuto.
• il latte defluisce e dopo l’estrazione il seno è morbido al tatto.
nl
De borstschelp past wanneer:
• de tepel vrij in de trechter beweegt en de ritmische bewegingen van de borstkolf kan volgen.
• zich geen of maar weinig weefsel van de tepelhof in de trechter bevindt.
• de moedermelk stroomt en de borst na het afkolven overal zacht aanvoelt.
es
El embudo para pecho es adecuado si...
• los pezones se mueven libremente en el embudo al extraer la leche y siguen los movimientos rítmicos del sacaleches.
• si hay poco o ningún tejido de la areola del pezón en el embudo.
• la leche materna fluye y el pecho se siente suave por todas partes después de la extracción.
pt
A copa está bem colocada se:
• o mamilo se deslocar livremente no funil e conseguir acompanhar os movimentos rítmicos
da bomba de extração de leite.
• se, no funil, houver pouco ou nenhum tecido da auréola.
• o leite materno fluir e o peito ficar uniformemente macio depois da extração.
Not all breastshell sizes included in Ardo Alyssa. | Nicht alle Brustglockengrössen in Ardo Alyssa enthalten. | Toutes les tailles de téterelle ne sont pas incluses dans
Ardo Alyssa. | Non tutte le misure delle coppe sono incluse nella scatola di Ardo Alyssa. | Bij Ardo Alyssa worden niet alle maten borstschelpen meegeleverd. |
No todas los tamaños del embudo para pecho se incluyen con Ardo Alyssa. | Ardo Alyssa não contém todos os tamanhos de copa.
Ø 36 mmØ 31 mmØ 26 mm
Ø 26 mm
Ø 28 mm
Ø 22 mm
Ø 18 mm

1
en
b
a
c
e
f
d
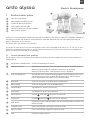
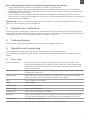
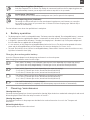
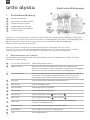
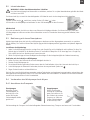
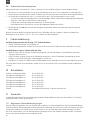
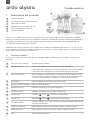
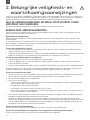
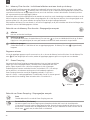
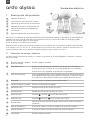
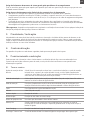
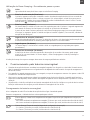
ardo alyssa Electric Breastpump
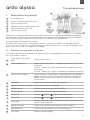
1. Product description
aArdo Alyssa breastpump
bArdo pumpset (included accessory)
cConnection opening for pumpset
dPower adapter with USB cable
eConnection opening for USB power adapter
fBottle stand for pumpset
Ardo Alyssa is a vacuum pump to collect breast milk and is intended for use at home. It expresses in two phases (stimulation
and expression modes) that imitate the sucking behaviour of the baby. With Ardo Alyssa you can express milk from one
breast or both breasts at the same time.
The German text is the reference for the contents.
Instructions for the accessories: Only use Ardo pumpsets. Breast shells are available in the sizes ø 18 / 22 / 26 / 28 / 31 and
36 mm (see accompanying instructions for use for ‘Pumpsets and accessories’). Which breast shell sizes are included with
delivery of your Alyssa is indicated on the packaging.
1.1 Control elements and symbols
The illustrations of the control elements and symbols are located on the fold-out page of the cover. The active elements or
symbols light up.
AOn/Off button (standby button) Switches the breastpump on and off
BMemory Plus button Tap the Memory Plus button: Saves the expression history of a pumping session.
Memory Plus button lights up: Sequence is saved but is not displayed.
Memory Plus button flashes: Saved expression history is displayed.
CPower Pumping button Automatically starts the Power Pumping program (interval pumping over an hour).
The different segments light up green (during expressing) or white (during the
pauses) depending on the progress of the interval pumping.
DBluetooth® Shows the connection to the breastpump via Bluetooth®
EBattery display Shows the charge level of the rechargeable battery
FVacuum display Step indicator for vacuum (suction level)
GCycle display Step indicator for cycle (suction frequency)
HVacuum buttons Increase or decrease the vacuum (suction level)
ICycle buttons Increase or decrease the cycle (suction frequency)
JMode button Displays the current mode and enables manual switching between stimulation and
expression modes
KStimulation mode Upper semicircle lights up orange in stimulation mode
LExpression mode Lower semicircle lights up green in expression mode
MTimer Displays the expressing time

2
en
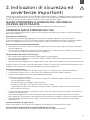
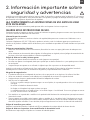
2. Important safety information
and warnings
Ardo Alyssa is an electrically operated, safe and reliable medical device. It has been developed and is manufactured accord-
ing to CE guidelines and the relevant safety standards. For your safety and to prevent damage to the device and to avoid the
risk of electric shock, injury or fire, please follow the safety instructions below.
READ THE INSTRUCTIONS FOR USE COMPLETELY BEFORE USING THIS
BREASTPUMP.
Not following these instructions for use may lead to damage to the device or personal injury.
KEEP THESE INSTRUCTIONS FOR USE.
For help with the initial setup or if something unexpected happens, please contact the point of sale or the customer service
team at the manufacturer Ardo medical AG.
Information for the user
Report any difficulties, problems and safety issues to the manufacturer or the distributor.
According to Regulation (EU) 2017/745 on medical devices, any serious incidents that occur in connection with the product
must be reported to the manufacturer and the competent authorities of the Member State in which the user resides.
Risk due to contamination / infection
• To prevent contamination of your breast milk, thoroughly wash your hands with soap and water before each use.
• Only use original Ardo pumpsets. If parts from other manufacturers are used, there is a risk of microbial contamination of
parts as well as the breast milk because the parts are not compatible.
Risk of health problems and serious injuries
• Do not use this device while driving a car (even as a passenger).
• Do not use this breastpump if you are overtired and may fall asleep during use, because this may lead to irritation of the
nipples.
• Make sure that this device is not used unsupervised by children or by people with reduced mental capabilities.
Ardo Alyssa may only be used for the purposes described in Section 3. For all uses apart from the intended use, all warranty
and liability claims against the manufacturer are excluded.
Risk of an electric shock
• The Ardo Alyssa breastpump with the power adapter is only suitable for use indoors. Do not use outdoors.
• Only use this breastpump with the supplied Ardo original USB cable and power adapter.
• Ensure that the power adapter can always be easily accessed.
• Ardo Alyssa is not waterproof.
- The device must therefore not be immersed in water or other liquids nor used or stored in locations where it could
fall into water.
- Do not use in the bath or when showering.
- Do not clean in the dishwasher, under running water or by immersing in water.
- The pump unit must not be used if it has fallen into water or is wet. If this happens, contact your service partner or
the manufacturer!
• This breastpump must not be opened or modified in any way without the permission of the manufacturer. It does not
contain any parts that are maintained by the user.
• Handle this device with care and avoid all shocks, blows or vibrations (e.g. do not allow it to drop onto the floor). If this
device is nevertheless exposed to one of the mechanical effects described above, carefully inspect the device for damage
before the next use. If the device is damaged, contact the point of sale or the customer service team at Ardo medical AG.
Risk of fire or toxic vapors
Keep the pump unit, USB cable with power adapter and accessories away from sources of heat.
Risk of damage to the device or an unwanted change in the vacuum
Do not insert or suck up any objects or liquids into the tube connector port of the device.
Risk of injury due to the vacuum generated by the device or strangulation
Make sure that the device is not used unsupervised by children or by people with reduced mental capabilities.

3
en
Risk of incorrect mode of operation and reduction of the performance characteristics
• Using this device near other devices or stacked with other devices should be avoided.
• Portable and mobile RF communication equipment (radio devices including their accessories such as antenna cables
and external antennas) should not be used at a distance less than 30 cm (or 12 inches) from the parts and cords of the
device labeled by the manufacturer.
• The use of accessories, power adapters and cords other than those defined or provided by the manufacturer of this
device may result in increased electromagnetic noise emissions or a reduced electromagnetic immunity for the device and
lead to a faulty mode of operation.
Cyber security: The device is protected from piracy and unauthorised use. If you have any evidence that the cyber security
protection has been violated, contact the manufacturer.
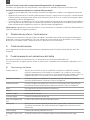
3. Intended use / Indication
The Ardo Alyssa electric breastpump is used to express and collect breast milk from lactating or, to be more precise, breast-
feeding women by generating a defined vacuum at the breast. It can be used for single or double pumping. The breastpump
is intended for use indoors. The Ardo Alyssa breastpump is intended for a single user.
4. Contraindication
This device must not be used during pregnancy because expressing can trigger contractions.
5. Operation and expressing
You can find more information about operating and using Ardo Alyssa at www.ardomedical.com.
If you need additional help, please contact the point of sale, customer service representatives or a lactation consultant or
midwife.
5.1 Terms used
2-phase breastpump Ardo Alyssa expresses in two phases: the stimulation and the expression modes, which
imitate the sucking behaviour of the baby. This means a rapid cycle (suction frequency) with
low vacuum (suction level) to stimulate the let-down reflex and a high vacuum with a slow
cycle for efficient suction.
Stimulation mode A rapid cycle (suction frequency) and low vacuum (suction level) start the breast milk flowing
or trigger the let-down reflex.
Expression mode Slower cycle (suction frequency) and high comfortable vacuum (suction level) for efficient
expressing of breast milk once the let-down reflex has been triggered.
Cycles Suction frequency / suction speed
Vacuum Suction strength
Single pumping Expressing from one breast
Double pumping Expressing from both breasts
Let-down reflex A reflex that starts the breast milk flowing.
Memory Plus Saves the personal expression history including settings and time in stimulation and expres-
sion mode. When the breastpump is next switched on, the saved expression history starts.
Power Pumping Interval pumping over one hour
‘Vacuum Seal’ technology Closed pump system with hygiene barrier in the breast shell itself.

4
en
5.2 Start-up
WARNING: Risk due to contamination / infection
To prevent contamination of your breast milk, thoroughly wash your hands with soap and water before each use.
You can operate the Ardo Alyssa with either the USB cable that is included or the integrated rechargeable battery.
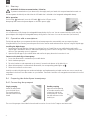
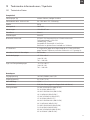
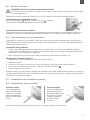
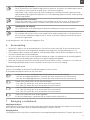
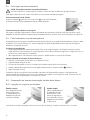
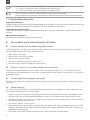
Mains operation
Push the flap a backwards, insert the USB cable b into the USB port on the
breastpump and connect the power adapter to the mains power supply.
Battery operation
It is not necessary to fully charge the rechargeable battery before the first use. You can connect Ardo Alyssa with the USB
power adapter and charge the rechargeable battery during the first five hours of use at the same time (see Section 6).
5.3 Operation with a smartphone
The MyArdo app allows you to operate the Ardo Alyssa breastpump and to automatically save your expressing data.
Using the Memory Plus function, personal expression histories can be saved and accessed at any time using the MyArdo app.
Installing the MyArdo app
1. Download the MyArdo app free of charge from the App Store or Google Play on your mobile device and install it.
MyArdo app is available for both iOS and Android operating systems. Check in the App Store / Google Play Store if the
version of your operating system is supported.
2. Open the MyArdo app on your mobile device and confirm the query about the instructions for use.
Connect to the Ardo Alyssa breastpump
1. Ensure that Bluetooth® is activated on your mobile device.
2. Switch the breastpump on.
3. The serial number or code requested on the screen is located on the bottom of the Ardo Alyssa.
4. When the breastpump is connected with Bluetooth®, the corresponding symbol lights up .
5. Follow the instructions on the screen.
Ardo Alyssa and the MyArdo app use modern technologies and implementation principles and do not store or transmit any
usage data in the cloud. Your data remains on your handset. The wireless interface uses encrypted communication for control
commands.
5.4 Preparing the Ardo Alyssa breastpump
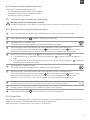
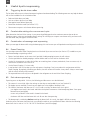
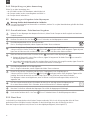
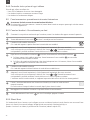
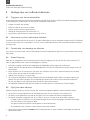
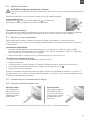
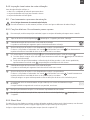
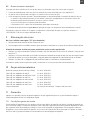
5.4.1 Connecting the pumpset
Single pumping
Attach the tube connec-
tor to the Ardo Alyssa.
The second opening of
the tube connector stays
closed.
Double pumping
Open the second opening
of the tube connector and
connect the tube of the
second pumpset. Connect
the tube connector to the
Ardo Alyssa.
The use of the pumpset is described in the enclosed instructions for use for the ‘Pumpsets and accessories’.
b
a

5
en
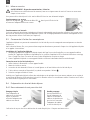
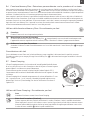
5.4.2 Visual inspection before each use
Every time you use the breastpump, check that …
… the USB cable and the power adapter are undamaged.
… the pumpset is clean, correctly assembled and intact.
… the pumpset is correctly connected.
5.5 Operation and procedure for expressing
Warning: Risk due to contamination / infection
To prevent contamination of your breast milk, thoroughly wash your hands with soap and water before each use.
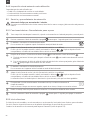
5.5.1 Basic functions – step-by-step procedure
1Find a comfortable position for expressing, hold the pumpset on the breast shell and centre the nipple.
2Gently tap the On/Off button for about 2 seconds to start expressing.
3The breastpump is in stimulation mode.
This can be seen by the upper segment of the mode button that lights up orange.
4Adjust the vacuum (suction level) and the cycle (suction frequency) to what is comfortable for you.
The vacuum and the cycle can be increased using the button or decreased using the button. By slowly
tapping the corresponding button, the intensity of the vacuum or cycle is changed by one step or one bar.
5After two minutes, the stimulation mode switches automatically to the expression mode .
a) If the breast milk starts to flow earlier, slowly tap the mode button to manually switch to the expression
mode.
b) If the let-down reflex could not be triggered after the preset two minutes, tap the mode button to extend the
stimulation phase by another two minutes.
6The breastpump is in expression mode.
This can be seen by the lower segment of the mode button that lights up green.
7Adjust the vacuum (suction level) and the cycle (suction frequency) to what is comfortable for you.
The vacuum and the cycle can be increased using the button or decreased using the button. By slowly
tapping the corresponding button, the intensity of the vacuum or cycle is changed by one step or one bar.
Expressing is most successful if you select the vacuum and cycle settings that are comfortable for you.
8The timer starts automatically when Ardo Alyssa is switched on and continuously shows the expressing time.
Up to one minute the time is shown in seconds and from one minute it is shown in minutes.
9Massage the breast while expressing. This increases the volume of milk expressed.
10 Gently tap the On/Off button for about 2 seconds to switch off the breastpump.
5.5.2 Silent Start
If the Ardo Alyssa is switched on and is not connected to a pumpset, it runs very quietly but does not pump. This silent start
enables you to connect to the MyArdo app without the Ardo Alyssa being active.
When the pumpset is inserted, you can start to express (see Section 5.5).

6
en
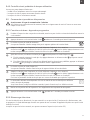
5.6 Memory function – Individual expressing at the touch of a button
You have found your ideal settings when your breast milk flows freely and you can express most successfully. Activating the
memory button saves your expression history. When you next switch the breastpump on, you can automatically express
using the saved expression history in the stimulation mode and then in expression mode. The Ardo Alyssa breastpump stops
automatically after the saved time.
You can nevertheless change the values for the vacuum and cycle manually at any time and define a new time for the length
of the expression history. This takes you out of save mode. When you have finished expressing, you can save any changes to
the expression history. If you do not save the new values, the previous settings are kept.
Whenever the Memory Plus button lights up, your expression history is saved, and when the breastpump is switched on, it
automatically starts to pump with your individual data.
Using the Memory Plus function – step-by-step procedure
1Expressing
Express using your favorite settings.
2Saving an expression history
When you are finished expressing, tap on the Memory Plus button to save your individual expression history. As
confirmation, you will hear an acoustic signal, the button lights up and the breastpump automatically switches off.
3Accessing your expression history
Switch the breastpump on. You express directly with your saved data. The Memory Plus button flashes slowly
throughout.
Deleting data
You can delete the saved data at any time if you do not want to express with the memory function. By slowly pressing the
Memory Plus button once, the saved data are deleted and the button no longer lights up.
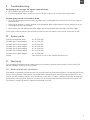
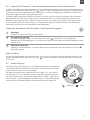
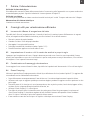
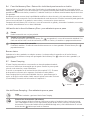
5.7 Power Pumping
Automatic Power Pumping is a pre-defined one-hour interval pumping program
– expressing three times with two pauses in between. During the pauses you can
remove the pumpset and move around freely.
The operation corresponds to the basic functions (see Section 5.5.1). The progress of
the expressing is indicated by the segments that light up green and white.
Power Pumping imitates the natural sucking behaviour of babies. There are times –
usually in the evenings – when newborns or older babies want to be breastfed at
10-minute intervals (cluster feeding). More information can be found in Section 8.4.
Power Pumping use – Step-by-step procedure
Start
Switch the breastpump on and press the Power Pumping button.
First expressing phase (20 minutes)
The first segment of the button starts to light up green and the breastpump starts in stimulation mode. You
can adjust the vacuum and the cycle to what is comfortable for you. After two minutes, Ardo Alyssa switches
to the expression mode. Again, you can select the vacuum and cycle that work for you. The color of the
mode button tells you which mode the breastpump is in.
First pause (10 minutes)
After 20 minutes a tone sounds and the first 10 minute pause starts. The second segment of the button
lights up white. At the end of the pause, a reminder signal sounds.
You then have 5 minutes to activate the Power Pumping button and to continue expressing (during this
time, the segments flash and a regular beep is emitted). Otherwise, the breastpump switches off.
= Expressing = Pause

7
en
Second expressing phase (10 minutes)
Ardo Alyssa expresses for 10 minutes. The settings for vacuum and cycle from the first expressing phase are
used automatically. However, you can adjust these values at any time to suit your needs.
Second pause (10 minutes)
After 10 minutes a tone sounds and the second pause starts (see first pause for the sequence).
Third expressing phase (10 minutes)
The settings for vacuum and cycle from the second expressing phase are used. However, you can adjust
these values at any time to suit your needs. After 10 minutes the Power Pumping stops and Ardo Alyssa
switches off automatically.
The time indicator counts down the specified time in each phase.
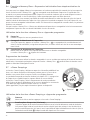
6 Battery operation
• The breastpump has a built-in rechargeable battery. The battery cannot be replaced. The rechargeable battery is automat-
ically charged when the supplied power adapter is connected to the mains power. The charging time is about 2 hours.
• If the device is operated while the battery is charging, the charging time is extended. Only use the power adapter and
the USB cable that are supplied with the breastpump.
• It is not necessary to fully charge the rechargeable battery before the first use. The device can be operated with mains
power and the rechargeable battery will be charged at the same time during the first 5 hours of use.
• Air travel: The Ardo Alyssa has a lithium ion rechargeable battery. Please check if there are national restrictions on carry-
ing lithium ion batteries when flying.
Charging the rechargeable battery
Insert the USB power adapter into the breastpump and connect it to the mains power.
When charging, the indicator moves from left to right.
3 bars (white): The battery is fully recharged. Expressing time (varies depending on the expressing settings):
- up to 8 times with a fully charged battery (15 minutes per session, vacuum level 6 and cycle level 6)
- up to 4 times with a fully charged battery (15 minutes per session, vacuum level 8 and cycle level 8)
2 bars (white): Expressing time (varies depending on the expressing settings):
- 2 to 4 times (15 minutes per session, vacuum level 6 and cycle level 6)
- 2 to 3 times (15 minutes per session, vacuum level 8 and cycle level 8)
1 bar (white): Expressing time (varies depending on the expressing settings):
- 1 to 2 times (15 minutes per session, vacuum level 6 and cycle level 6)
- 0 to 1 times (15 minutes per session, vacuum level 8 and cycle level 8)
1 bar (red): The breastpump must be recharged.
If the rechargeable battery is completely flat, the breastpump stops and switches off automatically.
7 Cleaning / maintenance
Cleaning Ardo Alyssa
Disconnect the breastpump from the mains power before cleaning. Wipe the device as needed with a damp cloth and normal
dishwashing liquid. Please follow the safety instructions in Section 2.
Cleaning the pumpset
The cleaning instructions for the pumpset are described in the enclosed instructions for use for the “Pumpsets and
accessories”.
Maintaining Ardo Alyssa
The breastpump does not have to be serviced.

8
en
8 Useful tips for expressing
8.1 Triggeringthelet-downreex
The let-down reflex may occur later when expressing than when breastfeeding. The following measures may help the breast
milk to flow in addition to the stimulation mode:
• Relax and think about your baby.
• Look at a video or photo of your baby.
• Massage the breast before expressing.
• Extend the stimulation mode (see Section 5.5.1).
• Place a warm compress on the breast before expressing.
8.2 Comfortable settings for vacuum and cycle
What determines the level of the vacuum is your personal well-being and not the maximum vacuum that can be set.
Therefore, express using your comfortable vacuum setting. This will help you to express more breast milk, your breast milk
will flow better and your nipples will remain intact.
8.3 Combination of massage and expressing
When you massage the breast while using the breastpump, this can increase your milk production and improve the milk flow.
8.4 Power Pumping
Use the unique automatic Power Pumping function of the Ardo Alyssa over one hour (see Section 5.7) in addition to your
usual breastfeeding or expressing routine.
• Express from both breasts at the same time if possible. Double pumping increases the milk volume.
• Use the special bra for double pumping or take an old bra and cut out a hole for the breast shells.
• Use the 10 minute pauses to relax, drink a little, eat something, have a shower, read a book, listen to some music, do
small chores around the house and so on.
• Use the Power Pumping 1–2 times a day.
• It may be that in the first few days you can only express a few drops. Don’t worry about this and persevere with the
Power Pumping. By regularly stimulating your breasts, the milk volume will increase. It may take 3–4 days or even longer
until the volume of breast milk increases.
• The expressed breast milk only has to be placed in the refrigerator at the end of the Power Pumping.
8.5 Pain when expressing
Expressing must not be painful. If it hurts, the following possible reasons must be eliminated:
• The vacuum is set too high. Adjust the settings so that they are comfortable for you (see Section 8.2).
• The nipples are not centered. Ensure that your nipples are in the middle of the breast shell.
• The funnel of the breast shell does not fit. It is too small or too big. The breast shell size is right if:
- your nipples move freely in the funnel and follow the rhythmic movements of the breastpump (about 3 mm space
between funnel and nipple).
- none or only a little bit of the areola is located in the funnel.
- the breast milk flows and the breast feels soft all over after the expressing.
• The breastpump is switched on before attaching the breast shell. As a result, the nipple is difficult to centre.
Order the correct size breast shell from Ardo, your specialist retailer or your qualified consultant. Ardo has the following
breast shell sizes in stock: ø 18 / 22 / 26 / 28 / 31 and 36 mm (see fold-out page).

9
en
9 Troubleshooting
On the display the message “EE” appears (electronic error)
• Switch the breastpump off and on again.
• If the message appears again, contact your point of sale, your retailer or the customer service team at Ardo.
The breastpump suction is too weak or absent
• Ensure that the pumpset has been correctly assembled and is not damaged (see instructions for use for the ‘Pumpsets
and accessories’).
• Check that the pumpset is correctly attached to the breastpump. When single pumping (using one pumpset), close the
second opening of the tube connector.
• Check whether the USB cable and the power adapter are correctly attached and connected to the power supply.
If these steps still do not help you, please contact your point of sale, your retailer or the customer service team at Ardo.
10 Spare parts
Ardo Alyssa breastpump (body) Art. no. 63.00.450
USB cable with EU power adapter Art. no. 63.00.541
USB cable with UK power adapter Art. no. 63.00.542
USB cable with US power adapter Art. no. 63.00.543
USB cable with AU power adapter Art. no. 63.00.544
USB cable with CN power adapter Art. no. 63.00.545
USB cable with KR power adapter Art. no. 63.00.546
Pumpset See instructions for use for the ‘Pumpsets and accessories’
11 Warranty
There are legally prescribed minimum warranty periods from the date of purchase that are specific for each country. The
warranty coverage is limited to the first purchaser.
11.1 General terms and conditions
Ardo medical AG guarantees that their products are free from material and manufacturing defects. The warranty period starts
from the date of purchase. Faulty materials are replaced free of charge during the warranty period, provided that the war-
ranty has not been voided by improper use or interventions on the device. In order to safeguard the warranty coverage and
ensure perfect functioning of the device, the instructions for use must be followed and only Ardo accessories may be used.
The warranty is voided if the device is opened or manipulated in any way.

10
en
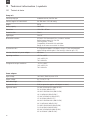
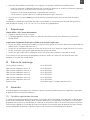
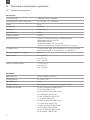
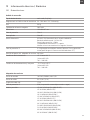
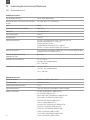
12 Technical information / symbols
12.1 Technical data
Pump unit
Vacuum pump type moderate vacuum, low flow rate
Vacuum range at 0–2000 MAMSL 30–330 mbar / 23–248 mmHg
Weight 320 g
Battery capacity 2600 mAh
Dimensions 128 × 94 × 67 mm
Protection class Class II
Applied part Class BF
Bluetooth® interface IEEE 802.15.4 Bluetooth® Class II wireless interface
Radiofrequency band: 2.4 GHz ISM
Transmit power: +3 dBm
Compatibility: Bluetooth® 4.0 and higher
Range: in the same room within 10 metres
IP protection class IP 22 (protected against solid objects of up to 12 mm and protected
against falling water droplets if the housing is tilted at up to 15°)
Life time of device incl. power adapter 400 hours
Operating conditions +5°C to +40°C
10% to 93% RH
700–1060 hPa
Storage and transport conditions -10°C to +60°C
10% to 93% RH
700–1060 hPa
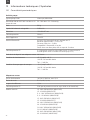
Power adapter
Input voltage 100–240 V, 50/60 Hz, max. 0.5 A
Output voltage 5 V / 2.0 A (*2.1 A)
Max. cable length 1.5 m
IP protection class IPX0 (no protection against solid objects or water)
Approved models EU: MKC-0502000VEUU (#99.05.025)
EU: XY-0030A (#99.05.025)*
UK: MKC-0502000VUKU (#99.05.026)
UK: XY-0030AUK (#99.05.026)*
US: MKC-0502000VU (#99.05.027)
US: XY-0030A (#99.05.027)*
AU: MKC-0502000VAUU (#99.05.028)
AU: XY-0030AAU (#99.05.028)*
CN: MKC-0502000XXX (#99.05.029)
CN: XY-0030ACN (#99.05.029)*
KR: MKC-0502000XXX (#99.05.030)
KR: XY-0030AKC (#99.05.030)*

11
en
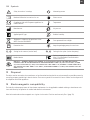
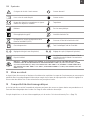
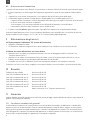
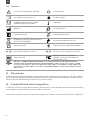
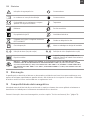
12.2 Symbols
Safety instructions / warnings Alternating current
Read and follow the instructions for use Direct current
012
3
Compliance with valid European regulations for
medical devices Temperature
Manufacturer Air pressure
Applied part BF type Relative humidity
The device is subject to the provisions of the
WEEE Directive 2002/96/EC Store protected from sunlight
Protection class Keep the packaging away from moisture
Vacuum
Setting for the vacuum (suction level) Cycles Setting for the cycles (suction frequency)
Medical device
Device corresponds to the requirements
(Part 15) of the Federal Communications
Commission (FCC)
E358823
MEDICAL — GENERAL MEDICAL EQUIPMENT AS TO ELECTRICAL SHOCK, FIRE AND MECHANICAL
HAZARDS ONLY IN ACCORDANCE WITH ANSI/AAMI ES60601-1:2005 / ( R ) 2012 and A1:2012, C1:2009
( R ) 2012 and A2:2010 ( R ) 2012, CSA CAN/CSA-C22.2 NO. 60601-1:14, IEC 60601-1-6:2010/ AMD1:2013,
CSA CAN/CSA-C22.2 NO. 60601-1-6:11 AMD 1, ANSI/AAMI HA60601-1-11:2015, CSA CAN/CSA-C22.2 NO.
60601-1-11:15
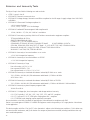
13 Disposal
The device can be returned to the manufacturer or be dismantled and recycled in an environmentally responsible manner by
a recycling company specialising in electric devices. There are no special or increased risk factors. Waste must be disposed of
in compliance with local regulations.
14 Electromagnetic compatibility
The Ardo Alyssa breastpump meets all the relevant requirements for the applicable standards relating to interference emis-
sions and immunity for operation in medical and domestic environments.
More information about electromagnetic tests is given in the section ‘Emission and Immunity Tests’ (page 78).

12
de
b
a
c
e
f
d
ardo alyssa Elektrische Milchpumpe
1. Produktbeschreibung
aArdo Alyssa Milchpumpe
bArdo Pumpset (enthaltenes Zubehör)
cAnschlussöffnung für Pumpset
dUSB-Netzadapter mit USB-Kabel
eAnschlussöffnung USB-Netzadapter
fStandfuss Pumpset
Ardo Alyssa ist eine Vakuumpumpe zum Gewinnen von Muttermilch und für den persönlichen Gebrauch in häuslicher Um-
gebung bestimmt. Sie pumpt in zwei Phasen ab (Stimulations- und Abpumpmodus) und imitiert so das Saugverhalten Ihres
Babys. Mit Ardo Alyssa können Sie von einer Brust sowie auch von beiden Brüsten gleichzeitig abpumpen.
Der deutsche Text ist die Referenz für den Inhalt.
Hinweis zum Zubehör: Verwenden Sie ausschliesslich Ardo Pumpsets. Brustglocken sind in den Grössen
ø 18 / 22 / 26 / 28 / 31 und 36 mm (siehe beiliegende Gebrauchsanweisung "Pumpsets and accessories") erhältlich.
Welche Brustglockengrössen im Lieferumfang Ihrer Alyssa enthalten sind, sehen Sie auf der Verpackung.
1.1 Bedienelemente und Symbole
Die Abbildungen zu den Bedienelementen und Symbolen befinden sich auf der Klappseite des Umschlags. Die aktiven
Elemente bzw. Symbole leuchten.
AEin / Aus Taste (Stand by Taste) Schaltet Milchpumpe ein und aus
BMemory Plus Taste Memory Plus Taste berühren: Speichert den Verlauf einer Abpumpsession.
Memory Plus Taste leuchtet: Verlauf ist gespeichert, wird aber nicht wiedergegeben.
Memory Plus Taste blinkt: Gespeicherter Verlauf wird wiedergegeben.
CPower Pumping Taste Startet das automatische Power Pumping Programm (Intervallpumpen während
einer Stunde). Die verschiedenen Segmente leuchten je nach Fortschritt des
Intervallpumpens grün (während Abpumpen) oder weiss (während Pausen).
DBluetooth® Zeigt die Verbindung der Milchpumpe über Bluetooth® an
EAkku Anzeige Zeigt den Akkuladezustand
FVakuum Anzeige Stufenanzeige Vakuum (Saugstärke)
GZyklus Anzeige Stufenanzeige Zyklus (Saugfrequenz)
HVakuum Tasten Vakuum (Saugstärke) erhöhen oder vermindern
IZyklus Tasten Zyklus (Saugfrequenz) erhöhen oder vermindern
JModus Taste Zeigt aktuellen Modus an und ermöglicht manuellen Wechsel zwischen
Stimulations- und Abpumpmodus
KStimulationsmodus Oberer Halbkreis leuchtet orange im Stimulationsmodus
LAbpumpmodus Unterer Halbkreis leuchtet grün im Abpumpmodus
MTimer Zeigt die Abpumpzeit an

13
de
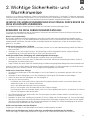
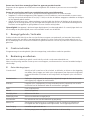
2. Wichtige Sicherheits- und
Warnhinweise
Ardo Alyssa ist ein elektrisch betriebenes, sicheres und zuverlässiges Medizinprodukt. Es wird nach CE-Richtlinien und gemäss
Sicherheitsnormen entwickelt und produziert. Zu Ihrer Sicherheit sowie zur Vermeidung von Schäden am Gerät und der Gefahr
von Stromschlägen, Verletzungen oder Feuer beachten Sie bitte die folgenden Sicherheitsbestimmungen.
LESEN SIE DIE GEBRAUCHSANWEISUNG VOLLSTÄNDIG DURCH BEVOR SIE
DIESE MILCHPUMPE VERWENDEN.
Die Nichtbeachtung dieser Anweisung kann zu Schäden am Gerät oder Personenverletzungen führen.
BEWAHREN SIE DIESE GEBRAUCHSANWEISUNG AUF.
Für Hilfe bei der Inbetriebnahme oder bei unerwarteten Vorkommnissen kontaktieren Sie bitte die Verkaufsstelle oder den
Kundendienst des Herstellers Ardo medical AG.
Hinweis an die Anwenderin
Beschwerden, Probleme und Sicherheitsbedenken sollten dem Hersteller oder seinem Vertriebspartner gemeldet werden.
Der Verordnung (EU) 2017/745 über Medizinprodukte entsprechend sind im Zusammenhang mit dem Produkt aufgetretene
schwerwiegende Vorfälle dem Hersteller und der zuständigen Behörde des Mitgliedstaats, in dem die Anwenderin nieder-
gelassen ist, zu melden.
Gefahr durch Kontamination / Infektion
• Um eine Verunreinigung Ihrer Muttermilch zu verhindern, waschen Sie vor jeder Inbetriebnahme gründlich die Hände mit
Wasser und Seife.
• Verwenden Sie nur Ardo Original-Pumpsets. Bei Verwendung von Nicht-Originalteilen besteht aufgrund fehlender
Kompatibilität das Risiko einer Verkeimung von Teilen sowie der Muttermilch.
Gefahr gesundheitlicher Schädigung und schwerwiegenden Verletzungen
• Verwenden Sie dieses Gerät nicht während dem Autofahren (auch nicht als Beifahrerin).
• Verwenden Sie dieses Gerät nicht, wenn Sie übermüdet sind und evtl. während der Anwendung einschlafen, da dies zu
Reizungen der Brustwarzen führen kann.
• Sorgen Sie dafür, dass dieses Gerät nicht unbeaufsichtigt von Kindern oder geistig beeinträchtigten Menschen verwendet wird.
Ardo Alyssa darf nur für die in Kapitel 3 genannten Zwecke verwendet werden. Für alle Anwendungen ausserhalb der Zweck-
bestimmung erlöschen sämtliche Garantie- und Haftungsansprüche gegenüber dem Hersteller.
Gefahr eines elektrischen Schlages
• Die Ardo Alyssa Milchpumpe mit dem Netzadapter ist nur für den Gebrauch im Innenbereich geeignet. Nicht im Freien
verwenden.
• Verwenden Sie diese Milchpumpe nur mit dem mitgelieferten Ardo Original USB Netzkabel und Netzadapter.
• Achten Sie darauf, dass der Netzadapter stets frei zugänglich ist.
• Ardo Alyssa ist nicht wasserdicht.
- Deshalb darf das Gerät weder in Wasser oder andere Flüssigkeiten getaucht werden, noch an Orten benutzt oder
aufbewahrt werden, wo es ins Wasser fallen könnte.
- Nicht in der Badewanne oder beim Duschen verwenden.
- Nicht im Geschirrspüler unter fliessendem Wasser oder im Wasser reinigen.
- Die Pumpeinheit darf nicht verwendet werden, wenn sie ins Wasser gefallen oder feucht ist. Kontaktieren Sie in diesem
Fall Ihren Servicepartner oder den Hersteller!
• Diese Milchpumpe darf nicht geöffnet oder ohne Zustimmung des Herstellers verändert werden. Sie enthält keine vom
Benutzer zu wartende Teile.
• Behandeln Sie dieses Gerät sorgfältig und vermeiden Sie Stösse, Schläge oder Erschütterungen (z. B. Sturz auf den Boden).
Falls dieses Gerät dennoch einer der beschriebenen mechanischen Einwirkungen ausgesetzt war, führen Sie eine sorgfälti-
ge Prüfung auf Beschädigungen vor der nächsten Anwendung durch. Wenden Sie sich bei Beschädigung an die Verkaufs-
stelle oder an den Kundendienst der Ardo medical AG.
Gefahr von Brand oder toxischen Dämpfen
Pumpeinheit, USB-Kabel mit USB-Netzadapter und Zubehör von Wärmequellen fernhalten.
Gefahr einer Beschädigung des Gerätes oder einer unerwünschten Veränderung des Vakuums
Führen oder saugen Sie keine Gegenstände oder Flüssigkeiten in die Schlauchanschlussbuchse des Gerätes ein.

14
de
Gefahr von Verletzung durch das vom Gerät erzeugte Vakuum oder Strangulation
Sorgen Sie dafür, dass das Gerät nicht unbeaufsichtigt von Kindern oder geistig beeinträchtigten Personen verwendet wird.
Gefahr der fehlerhaften Betriebsweise und Minderung der Leistungsmerkmale
• Die Verwendung dieses Geräts unmittelbar neben anderen Geräten oder mit anderen Geräten in gestapelter Form sollte
vermieden werden.
• Tragbare HF-Kommunikationsgeräte (Funkgeräte einschliesslich deren Zubehör wie z. B. Antennenkabel und externe
Antennen) sollten nicht in einem geringeren Abstand als 30 cm (bzw. 12 Inch) zu den vom Hersteller bezeichneten Teilen
und Leitungen des Gerätes verwendet werden.
• Die Verwendung von anderem Zubehör, anderen Netzadaptern und anderen Leitungen als jenem/jenen, welches/welche
der Hersteller dieses Geräts festgelegt oder bereitgestellt hat, kann erhöhte elektromagnetische Störaussendung oder
eine geminderte elektromagnetische Störfestigkeit des Geräts zur Folge haben und zu einer fehlerhaften Betriebsweise
führen.
Cybersecurity: Das Gerät ist vor Piraterie und unbefugter Nutzung geschützt. Wenn Sie Hinweise auf eine Verletzung des
Cybersecurity-Schutzes haben, wenden Sie sich bitte an den Hersteller.
3. Zweckbestimmung / Indikation
Die elektrische Milchpumpe Ardo Alyssa dient dem Abpumpen und Sammeln von Muttermilch von laktierenden bzw.
stillenden Frauen durch Erzeugung eines definierten Unterdrucks an ihrer Brust. Sie kann zum Einzel- und Doppelpumpen
verwendet werden. Die Milchpumpe ist für den Gebrauch im Innenbereich vorgesehen. Die Ardo Alyssa Milchpumpe ist für
eine Benutzerin bestimmt.
4. Kontraindikation
Dieses Gerät darf nicht während der Schwangerschaft verwendet werden, da Abpumpen Wehen auslösen kann.
5. Bedienung und Abpumpen
Weitere Informationen über die Bedienung und Anwendung von Ardo Alyssa finden Sie unter www.ardomedical.com.
Benötigen Sie zusätzliche Hilfe, wenden Sie sich bitte an die Verkaufsstelle, den Kundendienst oder kontaktieren Sie eine
Stillberaterin oder Hebamme.
5.1 VerwendeteBegrie
2-Phasen Milchpumpe Ardo Alyssa pumpt in zwei Phasen ab: dem Stimulations- und Abpumpmodus und imitiert
so das Saugverhalten des Babys. Das heisst, ein schneller Zyklus (Saugfrequenz) mit tiefem
Vakuum (Saugstärke) zum Stimulieren des Milchspendereflexes und ein hohes Vakuum mit
langsamem Zyklus beim effizienten Saugen.
Stimulationsmodus Schneller Zyklus (Saugfrequenz) und tiefes Vakuum (Saugstärke) bringen die Muttermilch zum
Fliessen bzw. lösen den Milchspendereflex aus.
Abpumpmodus Langsamer Zyklus (Saugfrequenz) und hohes komfortables Vakuum (Saugstärke) zum
effizienten Abpumpen der Muttermilch nach dem Auslösen des Milchspendereflexes.
Cycles Zyklus (Saugfrequenz/Sauggeschwindigkeit)
Vacuum Vakuum (Saugstärke)
Einzelpumpen Abpumpen von einer Brust
Doppelpumpen Abpumpen von beiden Brüsten gleichzeitig
Milchspendereflex Ein Reflex, der das Fliessen der Muttermilch auslöst.
Memory Plus Speichert den persönlichen Abpumpverlauf inkl. Einstellungen und Dauer im Stimulations-
und Abpumpmodus. Beim nächsten Einschalten startet der gespeicherte Verlauf.
Power Pumping Intervallpumpen über eine Stunde
Vacuum Seal Technologie Geschlossenes Pumpsystem mit Hygienebarriere direkt in der Brustglocke.

15
de
5.2 Inbetriebnahme
WARNUNG: Gefahr durch Kontamination / Infektion
Um eine Verunreinigung Ihrer Muttermilch zu verhindern, waschen Sie vor jeder Inbetriebnahme gründlich die Hände
mit Wasser und Seife.
Sie können Ardo Alyssa sowohl mit dem beiliegendem USB-Kabel als auch mit dem integrierten Akku betreiben.
Netzbetrieb
Schieben Sie die Lasche a nach hinten, stecken Sie das USB-Kabel b in den
USB-Anschluss der Milchpumpe und verbinden Sie den USB-Netzadapter mit dem Stromnetz.
Akkubetrieb
Es ist nicht erforderlich, den Akku vor dem ersten Gebrauch vollständig aufzuladen. Sie können Ardo Alyssa über den
USB-Netzadapter anschliessen und den Akku während der ersten fünf Stunden der Benutzung parallel aufladen (siehe
Kapitel 6).
5.3 Bedienung mit einem Smartphone
MyArdo App erlaubt Ihnen, die Ardo Alyssa Milchpumpe zu bedienen und Ihre Abpumpdaten automatisch zu speichern.
Mit der Memory Plus Funktion können über MyArdo App persönliche Abpumpverläufe gespeichert und jederzeit abgerufen
werden.
Installieren der MyArdo App
1. Laden Sie die MyArdo App kostenlos von App Store oder Google Play auf Ihr Mobilgerät und installieren Sie diese. Die
MyArdo App ist erhältlich für die Betriebssysteme iOS und Android. Überprüfen Sie in Ihrem App Store / Google Play
Store, ob die Version Ihres Betriebssystems unterstützt wird.
2. Öffnen Sie MyArdo App auf Ihrem Mobilgerät und bestätigen Sie die Anfrage bezüglich der Gebrauchsanweisung.
Verbinden mit der Ardo Alyssa Milchpumpe
1. Stellen Sie sicher, dass Bluetooth® auf ihrem Mobilgerät aktiviert ist.
2. Schalten Sie die Milchpumpe ein.
3. Die auf dem Bildschirm geforderte Seriennummer oder der Code befinden sich auf der Unterseite der Ardo Alyssa.
4. Ist die Milchpumpe mit Bluetooth® verbunden, leuchtet das entsprechende Symbol auf .
5. Folgen Sie den Hinweisen auf dem Bildschirm.
Die Ardo Alyssa und die MyArdo App verwenden moderne Technologien und Implementierungsprinzipien und speichern oder
übertragen keine Nutzungsdaten in die Cloud. Ihre Daten bleiben auf Ihrem Mobilteil. Die drahtlose Schnittstelle verwendet
verschlüsselte Kommunikation für die Steuerbefehle.
5.4 Vorbereiten der Milchpumpe Ardo Alyssa
5.4.1 Anschluss des Pumpsets
Einzelpumpen
Befestigen Sie den
Schlauchadapter an
der Ardo Alyssa. Die
zweite Öffnung des
Schlauchadapters bleibt
geschlossen.
Doppelpumpen
Öffnen Sie die zweite
Öffnung des Schlauchad-
apters und schliessen Sie
den Schlauch des zweiten
Pumpsets an. Schliessen
Sie den Schlauchadapter
an die Ardo Alyssa an.
Die Verwendung des Pumpsets wird in der beiliegenden Gebrauchsanweisung "Pumpsets and accessories" beschrieben.
b
a

16
de
5.4.2 Sichtprüfung vor jeder Anwendung
Prüfen Sie vor jeder Anwendung, dass...
... das USB-Kabel und der USB-Netzadapter unbeschädigt sind.
... das Pumpset sauber, korrekt zusammengebaut und intakt ist.
... das Pumpset korrekt verbunden ist.
5.5 Bedienung und Vorgehen beim Abpumpen
Warnung: Gefahr durch Kontamination / Infektion
Um eine Verunreinigung Ihrer Muttermilch zu verhindern, waschen Sie vor jeder Inbetriebnahme gründlich die Hände
mit Wasser und Seife.
5.5.1 Grundfunktionen – Schrittweises Vorgehen
1Nehmen Sie zum Abpumpen eine bequeme Position ein, halten Sie das Pumpset an der Brustglocke und zentrieren
Sie die Brustwarze.
2Berühren Sie sanft die Ein / Aus Taste für ca. 2 Sekunden, um das Abpumpen zu starten.
3Die Milchpumpe befindet sich im Stimulationsmodus.
Dies ist am orange leuchtenden, oberen Segment der Modus Taste zu erkennen.
4Passen Sie das Vakuum (Saugstärke) und den Zyklus (Saugfrequenz) Ihren Empfindungen an.
Vakuum und Zyklus können mit der Taste erhöht oder verringert werden. Durch langsames Tippen der jewei-
ligen Taste wird die Intensität von Vakuum oder Zyklus um eine Stufe bzw. einen Balken verändert.
5Nach zwei Minuten wechselt der Stimulationsmodus automatisch in den Abpumpmodus .
a) Beginnt die Muttermilch schon früher zu fliessen, tippen Sie langsam auf die Modus Taste , um manuell in
den Abpumpmodus zu wechseln.
b) Konnte der Milchspendereflex nach den voreingestellten zwei Minuten nicht ausgelöst werden, tippen Sie auf die
Modus Taste , um die Stimulation um weitere zwei Minuten zu verlängern.
6Die Milchpumpe befindet sich im Abpumpmodus.
Dies ist am grün leuchtenden, unteren Segment der Modus Taste zu erkennen.
7Passen Sie das Vakuum (Saugstärke) und den Zyklus (Saugfrequenz) Ihren Empfindungen an.
Vakuum und Zyklus können mit der Taste erhöht oder verringert werden. Durch langsames Tippen auf die
jeweilige Taste wird die Intensität von Vakuum oder Zyklus um eine Stufe bzw. einen Balken verändert.
Das Abpumpen ist dann am erfolgreichsten, wenn Sie Vakuum- und Zykluseinstellungen wählen, welche für Sie
angenehm sind.
8Der Timer startet automatisch beim Einschalten der Ardo Alyssa und zeigt laufend die Abpumpzeit an.
Bis zu einer Minute wird die Zeit in Sekunden, ab einer Minute wird sie in Minuten angezeigt.
9Massieren Sie die Brust während dem Abpumpen. Dies erhöht die abgepumpte Milchmenge.
10 Durch sanftes Berühren der Ein / Aus Taste für ca. 2 Sekunden können Sie die Milchpumpe ausschalten.
5.5.2 Silent Start
Ist die Ardo Alyssa eingeschaltet und mit keinem Pumpset verbunden, läuft sie sehr leise, pumpt aber nicht ab. Dieser
geräuscharme Start ermöglicht Ihnen das Verbinden mit der MyArdo App ohne, dass die Ardo Alyssa aktiv ist.
Wenn das Pumpset eingesteckt wird, können Sie mit dem Abpumpen beginnen (siehe Kapitel 5.5).
La pagina si sta caricando...
La pagina si sta caricando...
La pagina si sta caricando...
La pagina si sta caricando...
La pagina si sta caricando...
La pagina si sta caricando...
La pagina si sta caricando...
La pagina si sta caricando...
La pagina si sta caricando...
La pagina si sta caricando...
La pagina si sta caricando...
La pagina si sta caricando...
La pagina si sta caricando...
La pagina si sta caricando...
La pagina si sta caricando...
La pagina si sta caricando...
La pagina si sta caricando...
La pagina si sta caricando...
La pagina si sta caricando...
La pagina si sta caricando...
La pagina si sta caricando...
La pagina si sta caricando...
La pagina si sta caricando...
La pagina si sta caricando...
La pagina si sta caricando...
La pagina si sta caricando...
La pagina si sta caricando...
La pagina si sta caricando...
La pagina si sta caricando...
La pagina si sta caricando...
La pagina si sta caricando...
La pagina si sta caricando...
La pagina si sta caricando...
La pagina si sta caricando...
La pagina si sta caricando...
La pagina si sta caricando...
La pagina si sta caricando...
La pagina si sta caricando...
La pagina si sta caricando...
La pagina si sta caricando...
La pagina si sta caricando...
La pagina si sta caricando...
La pagina si sta caricando...
La pagina si sta caricando...
La pagina si sta caricando...
La pagina si sta caricando...
La pagina si sta caricando...
La pagina si sta caricando...
La pagina si sta caricando...
La pagina si sta caricando...
La pagina si sta caricando...
La pagina si sta caricando...
La pagina si sta caricando...
La pagina si sta caricando...
La pagina si sta caricando...
La pagina si sta caricando...
La pagina si sta caricando...
La pagina si sta caricando...
La pagina si sta caricando...
La pagina si sta caricando...
La pagina si sta caricando...
La pagina si sta caricando...
La pagina si sta caricando...
La pagina si sta caricando...
La pagina si sta caricando...
La pagina si sta caricando...
-
 1
1
-
 2
2
-
 3
3
-
 4
4
-
 5
5
-
 6
6
-
 7
7
-
 8
8
-
 9
9
-
 10
10
-
 11
11
-
 12
12
-
 13
13
-
 14
14
-
 15
15
-
 16
16
-
 17
17
-
 18
18
-
 19
19
-
 20
20
-
 21
21
-
 22
22
-
 23
23
-
 24
24
-
 25
25
-
 26
26
-
 27
27
-
 28
28
-
 29
29
-
 30
30
-
 31
31
-
 32
32
-
 33
33
-
 34
34
-
 35
35
-
 36
36
-
 37
37
-
 38
38
-
 39
39
-
 40
40
-
 41
41
-
 42
42
-
 43
43
-
 44
44
-
 45
45
-
 46
46
-
 47
47
-
 48
48
-
 49
49
-
 50
50
-
 51
51
-
 52
52
-
 53
53
-
 54
54
-
 55
55
-
 56
56
-
 57
57
-
 58
58
-
 59
59
-
 60
60
-
 61
61
-
 62
62
-
 63
63
-
 64
64
-
 65
65
-
 66
66
-
 67
67
-
 68
68
-
 69
69
-
 70
70
-
 71
71
-
 72
72
-
 73
73
-
 74
74
-
 75
75
-
 76
76
-
 77
77
-
 78
78
-
 79
79
-
 80
80
-
 81
81
-
 82
82
-
 83
83
-
 84
84
-
 85
85
-
 86
86


in altre lingue
- français: Ardo 9904.364 Manuel utilisateur
- español: Ardo 9904.364 Manual de usuario
- Deutsch: Ardo 9904.364 Benutzerhandbuch
- Nederlands: Ardo 9904.364 Handleiding
- português: Ardo 9904.364 Manual do usuário
Documenti correlati
Altri documenti
-
Medela Symphony Instructions For Use Manual
-
Medela Swing Instructions For Use Manual
-
-
-
Medela Pump In Style Advanced Instructions For Use Manual
-
-
mothercare Medela Swing 2-Phase Expression Single Electric Breast Pump_065436 Guida utente
-
Medela PersonalFit PLUS Breast Shield Manuale utente