Ardo AMARYLL Manuale utente

Tipo
Manuale utente
Instructions for use | Gebrauchsanweisung | Mode d’emploi |
Istruzioni per l’uso | Instrucciones de uso | Indicões de
utilização | Gebruiksaanwijzing | Bruksanvisning | Käyttöohje |
Bruksanvisning | Brugsanvisning | Инструкция по эксплуатации |
Instrukcja obsługi | Οδηγίες χρήσης | Kullanım Kılavuzu |
| 사용 설명서 | 使用说明
ardo amaryll
manual breastpump
3
Languages Page
Bruksanvisning Amaryll handbröstpump 25–27
sv
Gebrauchsanweisung Amaryll Handmilchpumpe 7–9
de
Käyttöohje Käsikäyttöinen Amaryll-rintapumppu 28–30
Mode d’emploi Tire-lait manuel Amaryll 10–12
fr
Istruzioni per l’uso Tiralatte manuale Amaryll 13–15
it
Instrucciones de uso Sacaleches manual Amaryll 16–18
es
Indicações de utilização Bomba de extração de leite manual Amaryll 19–21
pt
Kullanım Kılavuzu Amaryll Manuel Süt Pompası 46–48
tr
  49–51
ar
nl Gebruiksaanwijzing Amaryll handkolf 22–24
Instructions for use Amaryll manual breastpump 4–6
en
Bruksanvisning Amaryll håndpumpe 31–33
no
Brugsanvisning Amaryll håndbrystpumpe 34–36
da
Инструкция по
эксплуатации
ru
Οδηγίες χρήσης Χειροκίνητο θήλαστρο Amaryll 43–45
el
사용 설명서 애머리II 수동유축기 52–54
ko
使用说明 爱瑞手动吸乳器 55–57
zh
pl Instrukcja obsługi Laktator ręczny Amaryll 40–42
Ручной молокоотсос Amaryll 37–39
4
en
a
b
c
d
e
f
g
h
i
j
k
n
m
l
2
1
3
4
3.1
3.2
3.3
1. Package contents
Amaryll manual breastpump:
a.) Lever
b.) Casing cover
c.+d.) Membrane pot with membrane con rod
e.) 26 mm breast shell
f.) 1 lip valve (+ 1 spare)
g.) 150 ml bottle
h.) Bottle stand
i.) Cap
j.) Cap liner
k.) Cleaning brush
l.) 31 mm breast shell
m.) 28 mm breast shell insert
n.) 26 mm Optiflow massage insert
Amaryll Start: from a to j
Amaryll Kombikit: from a to d
2. Indications
The Amaryll manual breastpump is used for
expressing, collecting and storing breast milk.
3. Instructions for use
3.1 Assembly
1. Assemble according to the illustration
2. Place the membrane pot securely over the
groove of the membrane con rod. Check that
the smooth side of the membrane pot faces
outwards.
3. Put on the casing cover in the desired position:
3.1 Standard position
3.2 Lever position left side
3.3 Lever position right side
The mark on the casing cover must lie on top
of the mark on the breast shell. Then rotate the
casing cover clockwise.
4. The lever is mounted on the membrane con
rod and by means of light pressure down-
wards clicks into the casing cover.
5
en
4. Storage of breast milk
Recommended storage time at room temperature: 3–4 hours at 16–29°C (60–85°F); in the refrigerator:
3 days at ≤4°C (39°F); in freezing compartment with door: 6 months to 1 year at <-17°C (0°F)
3.2 Expressing milk
Wash your hands, sit down comfortably and relax.
Place the casing cover in the desired position and tighten it.
Centre the nipple so that when pumping it moves freely in the breast shell/breast shell insert and
pump by activating the lever.
Adjusting the suction intensity (vacuum): The further you press the lever, the greater the suction
intensity. 1
Adjusting the speed interval: The faster you move the lever up and down, the higher the pumping
frequency. 2
Our recommendation: Begin at a high speed interval and at low suction intensity in order to stimulate
the milk ejection reflex. Once the milk is flowing, reduce the speed interval and increase the suction
intensity
Optiflow
28 mm breast shell insert
31 mm
3.3 Choice of breast shell and
Optiflow massage insert
If your nipple rubs uncomfortably on the inner side
of the funnel, use a larger breast shell/breast shell
insert. If the areola is also sucked into the funnel, use
a smaller breast shell. The Optiflow massage insert
can only be used with the 31 mm breast shell.
21
6
en
5. Cleaning / sterilising
At home: After each use, wash with washing up liquid and rinse well. Wash disassembled once a day in
the dishwasher and cover. Do not use a brush to clean the valve. The lever, casing cover and bottle stand
may also be washed in the dishwasher, but this is not required.
This product can be washed and re-used 40 times.
In hospitals: Disassemble and sterilise at 121°C (250°F) for 20 minutes / 134°C (273°F) for 5 minutes.
The lever, casing cover and bottle stand can, but need not, be sterilised. Can be disinfected by wiping.
6. Possible problems and troubleshooting
Weak or no vacuum:
Ensure that the Amaryll manual breastpump has been correctly assembled and is not damaged.
Check whether the lip valve is cracked or stuck together.
Make sure that the casing cover seals well.
Pain when pumping:
Ensure that the nipple is in the middle of the breast shell.
Check that the breast shell size fits your nipples.
If problems continue seek professional help.
7. Contraindications
None known.
Safety regulations: Only use after cleaning or sterilisation. After cleaning check for any damage.
8. General information
Materials: Polypropylene (PP) / silicone Humidity limitation: 20–95%
Temperature limit: Operation -10°C (14°F) to +40°C
(104°F) / Transport -20°C (-4°F) to +50°C (122°F)
Atmospheric pressure limitation:
900–1060 hPa
Disposal: Can be safely disposed of in compliance with
local regulations. Keep away from sunlight
Fragile, handle with care Keep dry
Preferably store Optiflow in a dark place (silicone).
7
de
a
b
c
d
e
f
g
h
i
j
k
n
m
l
2
1
3
4
3.1
3.2
3.3
1. Verpackungsinhalt
Amaryll Handmilchpumpe:
a.) Hebel
b.) Mantel
c.+d.) Topfmembrane mit Membranstift
e.) Brustglocke 26 mm
f.) 1 Lippenventil (+ 1 Ersatz)
g.) Flasche 150 ml
h.) Standfuss
i.) Deckel
j.) Deckeleinlage
k.) Reinigungsbürste
l.) Brustglocke 31 mm
m.) Brustglockeneinsatz 28 mm
n.) Optiflow Massageeinsatz 26 mm
Amaryll Start: von a bis j
Amaryll Kombikit: von a bis d
2. Indikation
Die Amaryll Handmilchpumpe dient zum Abpumpen, Auffangen und Aufbewahren von Muttermilch.
3. Anwendung
3.1 Zusammensetzen
1. Gemäss Abbildung zusammensetzen
2. Die Topfmembrane umschliesst die Rille des
Membranstifts. Prüfen, ob die glatte Seite der
Topfmembrane nach aussen zeigt.
3. Den Mantel in der gewünschten Position
aufsetzen:
3.1 Standard Position
3.2 Hebelposition linke Seite
3.3 Hebelposition rechte Seite
Die Markierung des Mantels muss auf die
Markierung der Brustglocke passen. Danach den
Mantel im Uhrzeigersinn drehen.
4. Der Hebel wird in den Membranstift einge-
hängt und durch leichten Druck nach unten
in den Mantel eingeklickt.
8
de
4. Aufbewahren von Muttermilch
Empfohlene Aufbewahrungsdauer bei Zimmertemperatur: 3–4 Std. bei 16–29 °C (60–85 °F); im
Kühlschrank: 3 Tage bei ≤4 °C (39 °F); im Tiefkühlfach: 6 Monate bis 1 Jahr bei <–17 °C (0 °F)
3.2 Abpumpen
Waschen Sie sich die Hände und setzen Sie sich bequem und entspannt hin.
Setzen Sie den Mantel in der gewünschten Position auf und drehen Sie ihn fest.
Zentrieren Sie die Brustwarze so, dass sie sich beim Pumpen frei in der Brustglocke / im Brustglocken-
einsatz bewegt und pumpen Sie durch Betätigen des Hebels.
Einstellung der Saugstärke (Vakuum): Je mehr Sie den Hebel durchdrücken, desto höher ist die Saug-
stärke. 1
Einstellung des Intervalls: Je schneller Sie den Hebel betätigen, desto höher ist die Pumpfrequenz. 2
Unsere Empfehlung: Am Anfang hohes Intervall und niedrige Saugstärke, um den Milchfluss zu stimu-
lieren. Nachdem die Milch fliesst, das Intervall verlangsamen und die Saugstärke erhöhen.
Optiflow
Brustglockeneinsatz 28 mm
31 mm
3.3 Brustglockenwahl und Optiflow
Massageeinsatz
Sollte Ihre Brustwarze unangenehm an der Trichter-
innenseite reiben, verwenden Sie eine grössere Brust-
glocke / einen grösseren Brustglockeneinsatz. Wird
auch der Brustwarzenhof in den Trichter gesogen,
benützen Sie eine kleinere Brustglocke. Der Optiflow
Massageeinsatz ist ausschliesslich mit der 31 mm
Brustglocke verwendbar.
21
9
de
5. Reinigung / Sterilisation
Zu Hause: Nach jedem Gebrauch mit Geschirrspülmittel waschen und gut klarspülen. Einmal täglich in
zerlegtem Zustand in die Geschirrspülmaschine geben und zudecken. Ventil nicht mit Bürste reinigen.
Hebel, Mantel und Standfuss dürfen, müssen aber nicht mit in die Geschirrspülmaschine gelegt werden.
Das Produkt darf 40-mal gereinigt werden.
Im Klinikbereich: Sterilisation bei 121 °C (250 °F) = 20 Min. / 134 °C (273 °F) = 5 Min. in zerlegtem
Zustand. Hebel, Mantel und Standfuss dürfen, müssen aber nicht sterilisiert werden. Wischdesinfektion
möglich.
6. Mögliche Probleme und Lösungsvorschläge
Kein oder schwaches Vakuum:
Stellen Sie sicher, dass die Amaryll Handmilchpumpe richtig zusammengesetzt und nicht beschädigt ist.
Kontrollieren Sie, ob das Lippenventil einen Riss hat oder verklebt ist.
Prüfen Sie, ob der Mantel gut abdichtet.
Schmerzen beim Pumpen:
Stellen Sie sicher, dass sich die Brustwarze in der Mitte der Brustglocke befindet.
Prüfen Sie, ob die Brustglockengrösse zu Ihren Brustwarzen passt.
Kontaktieren Sie eine Fachperson.
7. Anwenderrisiko
Es sind keine Kontraindikationen bekannt.
Sicherheitsbestimmungen: Nur im gereinigten bzw. sterilisierten Zustand verwenden. Nach dem
Reinigen auf Beschädigung prüfen.
8. Allgemeine Information
Materialien: Polypropylen (PP) / Silikon Luftfeuchtigkeitsbegrenzung:
20–95 %
Temperaturgrenzwerte: Betrieb –10 °C (14 °F) bis +40
°C (104 °F) / Transport –20 °C (–4 °F) bis +50 °C
Luftdruckbegrenzung:
900–1060 hPa
Entsorgung: bedenkenlos gemäss lokalen Vorschriften. Vor Sonnenlicht schützen
Zerbrechlich, mit Sorgfalt handhaben Trocken aufbewahren
Optiflow vorzugsweise lichtgeschützt aufbewahren (Silikon)
10
fr
a
b
c
d
e
f
g
h
i
j
k
n
m
l
2
1
3
4
3.1
3.2
3.3
1. Contenu de l’emballage
Tire-lait manuel Amaryll:
a.) Levier
b.) Gaine
c+d.) Membrane et sa tige
e.) Téterelle 26 mm
f.) 1 valve (+ 1 de rechange)
g.) Biberon 150 ml
h.) Socle
i.) Capuchon du biberon
j.) Disque de couvercle
k.) Goupillon
l.) Téterelle 31 mm
m.) Embout de téterelle 28 mm
n.) Coussin masseur Optiflow 26 mm
Amaryll Start: a-j
Amaryll Kombikit: a-d
2. Indication
Ce tire-lait permet de tirer, collecter et conserver
le lait maternel.
3. Utilisation
3.1 Assemblage
1. Assembler comme indiqué par le schéma.
2. La membrane entoure complètement la
rainure de la tige. Vérifier que la face lisse de
la membrane est bien tournée vers l’extérieur.
3. Placer la gaine dans la position souhaitée :
3.1 Position standard
3.2 Position gauche du levier
3.3 Position droite du levier
Le repère de la gaine doit correspondre avec le
repère de la téterelle. Tourner ensuite la gaine
dans le sens des aiguilles d’une montre.
4. Le levier est ensuite accroché à la tige de la
membrane puis enclenché dans la gaine en
exerçant une légère pression vers le bas.
11
fr
4. Conservation du lait maternel
Durée de conservation recommandée à température ambiante : 3-4 heures à 16-29 °C (60-85 °F) ; au
réfrigérateur : 3 jours à ≤ 4 °C (39 °F) ; au compartiment de congélation du réfrigérateur : 6 mois à 1 an
à < -17 °C (0 °F).
3.2 Tirage du lait
Lavez-vous les mains, installez-vous confortablement et détendez-vous.
Placez le couvercle dans la position souhaitée et vissez-le.
Placez le mamelon bien au centre de la téterelle de manière à ce qu’il puisse se déplacer librement
dans la téterelle/l’embout de téterelle, puis commencez l’aspiration en enfonçant le levier.
Réglage de la puissance d’aspiration (par le vide) : plus vous enfoncez le levier, plus la puissance
d’aspiration est importante. 1
Réglage de la cadence d’aspiration : plus vous actionnez le levier rapidement, plus la fréquence
d’aspiration sera élevée. 2
Notre conseil : commencez par une cadence élevée et une puissance d’aspiration faible pour stimuler
la montée de lait. Une fois que le lait s’écoule, ralentissez la cadence et augmentez la puissance
d’aspiration.
Optiflow
Embout de téterelle 28 mm
31 mm
3.3 Choix de la téterelle et
du coussin masseur Optiflow
Si votre mamelon frotte contre l’intérieur de
l’ entonnoir, utilisez une téterelle/un embout de
téterelle de plus grande taille. Si l’aréole du sein est
aspirée dans l’entonnoir avec le mamelon, utilisez
une téterelle de plus petite taille. Le coussin masseur
Optiflow s’utilise exclusivement avec la téterelle de
31 mm de diamètre.
21
12
fr
5. Nettoyage/stérilisation
A domicile: laver après chaque usage à l’aide de liquide vaisselle et bien rincer. Placer une fois par jour au
lave-vaisselle à l’état démonté et recouvrir. Ne pas nettoyer la valve avec une brosse. Le levier, la gaine et
le socle peuvent mais ne doivent pas obligatoirement être lavés au lave-vaisselle.
Le produit peut être nettoyé à 40 reprises.
En milieu hospitalier : stérilisation du tire-lait démonté à 121 °C (250 °F) pendant 20 minutes / à 134 °C
(273 °F) pendant 5 minutes. Le levier, le couvercle et le socle peuvent, mais ne doivent pas nécessaire-
ment être stérilisés.
6. Problèmes possibles et solutions proposées
Pas ou trop peu d’aspiration :
Assurez-vous que le tire-lait manuel Amaryll est assemblé correctement et n’est pas endommagé.
Vérifiez que la valve n’est pas fissurée ou collée.
Assurez-vous que le couvercle est bien emboité.
Douleurs à l’aspiration :
Assurez-vous que le mamelon est bien centré dans la téterelle.
Vérifiez que la taille de la téterelle est adaptée à vos mamelons.
Demandez conseil à un spécialiste.
7. Contre-indications
Aucune connue à ce jour.
Consignes de sécurité : utiliser le tire-lait uniquement après nettoyage et stérilisation. Après le nettoy-
age, vérifier qu’il n’est pas endommagé.
8. Informations générales
Matériaux : polypropylène (PP) / silicone Limite d’humidité relative :
20-95 %
Limites de température: en fonctionnement de -10 °C (14 °F) à
+40 °C (104 °F) / transport de -20 °C (-4 °F) à +50 °C (122 °F)
Limite de pression atmosphérique :
900-1060 hPa
Élimination : sans risque pour l’environnement, à
effectuer conformément à la législation locale.
Conserver à l’abri de la lumière
du soleil
Fragile, manipuler avec soin Conserver au sec
Conserver le coussin Optiflow de préférence à l’abri de la lumière (silicone)
13
it
a
b
c
d
e
f
g
h
i
j
k
n
m
l
2
1
3
4
3.1
3.2
3.3
1. Contenuto della confezione
Tiralatte manuale Amaryll:
a.) Leva
b.) Rivestimento
c+d.) Membrana del vaso con perno
a membrana
e.) Coppa da 26 mm
f.) 1 valvola a labbro (+ 1 ricambio)
g.) Biberon da 150 ml
h.) Piede di appoggio
i.) Coperchio
j.) Inserto per coperchio
k.) Spazzola di pulizia
l.) Coppa da 31 mm
m.) Inserto della coppa da 28 mm
n.) Inserto di massaggio Optiflow da 26 mm
Amaryll Start: dalla lettera a alla j
Amaryll Kombikit: dalla lettera a alla d
2. Indicazioni
Il tiralatte manuale Amaryll è destinato all’estrazione, alla raccolta e alla conservazione del latte materno.
3. Utilizzo
3.1 Assemblaggio
1. Assemblare come illustrato nella figura
2. La membrana del vaso racchiude in modo
fisso la scanalatura del perno a membrana.
Verificare che il lato liscio della membrana
del vaso sia rivolto verso l’esterno.
3. Ruotare il rivestimento fino alla posizione
desiderata:
3.1 Posizione standard
3.2 Posizione della leva lato sinistro
3.3 Posizione della leva lato destro
Il segno presente sul rivestimento deve coincidere
con il segno sulla coppa. Ruotare quindi il rivestimento
in senso orario.
4. Agganciare la leva al perno della membrana e
incastrarla nel rivestimento esercitando una lieve
pressione verso il basso.
14
it
4. Conservazione del latte materno
Durata di conservazione raccomandata a temperatura ambiente: 3-4 ore a 16-29 °C (60-85 °F);
in frigorifero: 3 giorni a ≤4 °C (39 °F); in congelatore: 6 mesi - 1 anno a <-17 °C (0 °F)
3.2 Estrazione
Lavare le mani e sedersi in una posizione comoda e rilassante.
Avvitare saldamente il rivestimento fino alla posizione desiderata.
Centrare il capezzolo in modo da consentirne il movimento all’interno della coppa/dell’inserto della
coppa e procedere all’estrazione utilizzando la leva.
Regolazione della forza di aspirazione (sotto vuoto): la forza di aspirazione è proporzionale alla
pressione esercitata sulla leva. 1
Regolazione dell’intervallo: la frequenza di estrazione è proporzionale alla velocità di azionamento
della leva. 2
Suggerimento: inizialmente, tenere un elevato intervallo e una bassa forza di aspirazione, in modo da
stimolare il flusso del latte. Una volta iniziato il flusso del latte, ridurre l’intervallo e aumentare la forza
di aspirazione.
Optiflow
Inserto della coppa da 28 mm
31 mm
3.3 Scelta della coppa e
inserto di massaggio Optiflow
Se il capezzolo sfrega fastidiosamente sul lato interno
della coppa, utilizzare una coppa/un inserto della
coppa di dimensioni maggiori.
Se nella coppa viene aspirata anche l’areola
del capezzolo, utilizzare una coppa più piccola.
L’inserto di massaggio Optiflow può essere utilizzato
esclusivamente con la coppa da 31 mm.
21
15
it
5. Pulizia / Sterilizzazione
A casa: Dopo ogni uso, lavare con detersivo per stoviglie e risciacquare bene. Una volta al giorno, inserire
il prodotto smontato in lavastoviglie e coprire. Non pulire la valvola con una spazzola. È possibile, ma non
obbligatorio, lavare la leva, il rivestimento e la base in lavastoviglie.
Il prodotto può essere lavato 40 volte.
In strutture ospedaliere: sterilizzazione del tiralatte smontato a 121 °C (250 °F) = 20 min. / a 134 °C
(273 °F) = 5 min. Leva, rivestimento e piede di appoggio possono, ma non devono necessariamente,
essere sterilizzati. È possibile la disinfezione per strofinamento.
6. Possibili problemi e proposte di soluzione
Vuoto assente o debole:
Accertarsi che il tiralatte manuale Amaryll sia assemblato correttamente e non sia danneggiato.
Controllare che la valvola a labbro sia integra e non bloccata.
Controllare che il rivestimento sia ben sigillato.
Dolore al momento dell’estrazione:
Accertarsi che il capezzolo si trovi al centro della coppa.
Verificare che le dimensioni della coppa siano adatte ai capezzoli.
Rivolgersi a uno specialista.
7. Controindicazioni
Non note.
Avvertenze di sicurezza: utilizzare il tiralatte solo se pulito e/o sterilizzato. Dopo la pulizia, controllare
che non sia danneggiato.
8. Informazioni generali
Materiali: Polipropilene (PP) / silicone Limite di umidità: 20-95%
Limiti di temperatura: uso da -10 °C (14 °F) a +40 °C
(104 °F) / trasporto da -20 °C (-4 °F) a +50 °C (122 °F)
Limite di pressione atmosferica:
900-1060 hPa
Smaltimento: sicuro, secondo le disposizioni
locali vigenti. Conservare al riparo dalla luce solare
Fragile, maneggiare con cura Conservare a secco
Conservare Optiflow possibilmente al riparo dalla luce (silicone)
16
es
1. Contenido del embalaje
Sacaleches manual Amaryll:
a.) Palanca
b.) Cubierta
c.+d.) Membrana del recipiente con clavija de
membrana
e.) Embudo para pecho 26 mm
f.) 1 válvula de labios (+ 1 repuesto)
g.) Botella 150 ml
h.) Plataforma para botellas
i.) Tapa
j.) Tapa de seguridad
k.) Cepillo de limpieza
l.) Embudo para pecho 31 mm
m.) Adaptador de embudo para pecho 28 mm
n.) Accesorio de masaje Optiflow 26 mm
Amaryll Start: desde la a hasta la j
Amaryll Kombikit: desde la a hasta la d
2. Indicación
El sacaleches manual Amaryll está previsto para extraer, recoger y almacenar la leche materna.
3. Modo de uso
3.1 Montaje
1. Montar según la imagen
2. La membrana del recipiente rodea el surco
de la clavija de membrana. Comprobar que
el lado liso de la membrana del recipiente
queda hacia fuera.
3. Colocar la cubierta en la posición deseada:
3.1 posición estándar
3.2 posición de la palanca, lado izquierdo
3.3 posición de la palanca, lado derecho
La marca de la cubierta debe coincidir con la del
embudo para pecho. Después, girar la cubierta
en el sentido de las agujas del reloj.
4. La palanca se monta en la clavija de mem-
brana y se engancha en la cubierta ejerciendo
una ligera presión hacia abajo.
a
b
c
d
e
f
g
h
i
j
k
n
m
l
2
1
3
4
3.1
3.2
3.3
17
es
4. Almacenamiento de la leche materna
Tiempo de almacenamiento recomendado a temperatura ambiente: 3-4 h a 16-29 °C (60-85 °F);
en el frigorífico: 3 días a ≤4 °C (39 °F); en el congelador: de 6 meses a 1 año a <-17 °C (0 °F)
3.2 Extracción
Lávese las manos y siéntese en una postura cómoda y relajada.
Coloque la cubierta en la posición deseada y gírela para apretarla.
Centre el pezón de modo que al bombear se mueva libremente en el embudo para pecho / en el
adaptador de embudo, y extraiga la leche accionando la palanca.
Ajuste de la potencia de succión (vacío): cuanto más presione la palanca, mayor será la potencia de
succión. 1
Ajuste del intervalo: cuanto más rápidamente accione la palanca, mayor es la frecuencia de extracción. 2
Nuestra recomendación: comenzar con un intervalo alto y una potencia de succión baja para estimular
el flujo de leche. Cuando la leche fluya, acortar el intervalo y aumentar la potencia de succión.
Optiflow
Adaptador de embudo 28 mm
31 mm
3.3 Selección del embudo para pecho y
accesorio de masaje Optiflow
Si tiene molestias porque el pezón roza con la parte
interna del embudo, use un embudo para pecho /
un adaptador de embudo de mayor tamaño. Si el
embudo succiona también la areola del pezón, utilice
un embudo para pecho más pequeño. El accesorio de
masaje Optiflow debe utilizarse exclusivamente con
el embudo para pecho 31 mm.
21
18
es
5. Limpieza / esterilización
En casa: Después de cada uso, lavar con lavavajillas y aclarar bien. Una vez al día, introducirlo desmonta-
do en el lavavajillas y taparlo. No limpiar la válvula con un cepillo. La palanca, la cubierta y la plataforma
para botellas se pueden introducir en el lavavajillas, aunque no es obligatorio.
El producto se puede limpiar 40 veces.
En el hospital: esterilización a 121 °C (250 °F) = 20 m / 134 °C (273 °F) = 5 m desmontado. La palanca,
la cubierta y la plataforma para botellas se pueden esterilizar, pero no es imprescindible. También es
posible la desinfección mediante frotado.
6. Posibles problemas y soluciones propuestas
Vacío inexistente o insuficiente:
Asegúrese de que el sacaleches manual Amaryll está montado correctamente y no está deteriorado.
Compruebe si la válvula de labios tiene una grieta o está pegada.
Compruebe si la cubierta cierra herméticamente.
Dolor durante la extracción:
Asegúrese de que el pezón está en el centro del embudo para pecho.
Compruebe que el tamaño del embudo para pecho sea el adecuado para su pezón.
Consulte con un profesional.
7. Riesgo para las usuarias
No se conoce ninguna contraindicación.
Normas de seguridad: Utilizar el sacaleches solo cuando esté limpio o esterilizado. Tras la limpieza,
comprobar que no presente daños.
8. Información general
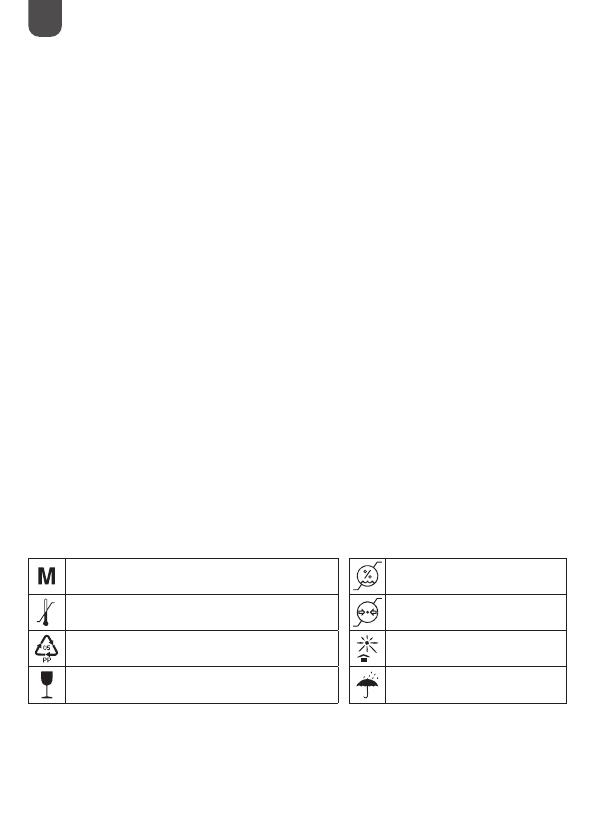
Materiales: polipropileno (PP) / silicona Limitación de humedad del aire:
20-95 %
Valores límite de temperatura: funcionamiento -10 °C (14 °F) a
+40 °C (104 °F) / transporte -20 °C (-4 °F) a +50 °C (122 °F)
Limitación de presión atmosférica:
900-1060 hPa
Eliminación: sin problemas según las disposiciones locales. Proteger de la luz solar
Frágil, manipular con cuidado Almacenar en un lugar seco
Conservar Optiflow preferentemente protegido de la luz (silicona)
19
pt
a
b
c
d
e
f
g
h
i
j
k
n
m
l
2
1
3
4
3.1
3.2
3.3
1. Conteúdo da embalagem
da bomba de extração de leite manual
Amaryll:
a.) Alavanca
b.) Tampa
c.+d.) Membrana em forma de cuba com
cavilha da membrana
e.) Copa da bomba de extração de leite 26 mm
f.) 1 válvula de lábios (+ 1 sobressalente)
g.) Biberão 150 ml
h.) Pé de suporte
i.) Tampa do biberão
j.) Disco vedante
k.) Escova de limpeza
l.) Copa da bomba de extração de leite 31 mm
m.) Adaptador para a copa da bomba de
extração de leite 28 mm
n.) Adaptador massajador Optiflow 26 mm
Amaryll Start: de «a» até «j»
Amaryll Kombikit: de «a» até «d»
2. Indicações
A bomba de extração de leite manual Amaryll serve
para extrair, recolher e guardar leite materno.
3. Utilização
3.1 Montagem
1. Montar conforme a figura.
2. A membrana em forma de cuba envolve a
ranhura da cavilha da membrana. Verificar
se o lado liso está virado para fora.
3. Colocar a tampa na posição desejada:
3.1 Posição normal
3.2 Posição da alavanca lado esquerdo
3.3 Posição da alavanca lado direito
A marca da tampa tem de se ajustar à marca da copa
da bomba de extração de leite. Depois, rodar a tampa
no sentido dos ponteiros do relógio.
4. A alavanca é pendurada na cavilha da membrana e
mediante leve pressão encaixa-se na tampa.
20
pt
4. Conservação do leite materno
Duração de conservação recomendada à temperatura ambiente: 3–4 h a 16–29 °C (60–85 °F);
no frigorífico: 3 dias a ≤4 °C (39 °F); no congelador: 6 meses a 1 ano a <–17 °C (0 °F)
3.2 Extração
Lavar as mãos e sente-se numa posição confortável e descontraída.
Colocar a tampa na posição desejada e rodá-la para a fixar.
Posicionar o mamilo no centro de modo que possa alterar livremente a posição na copa/adaptador
para copa da bomba de extração de leite e extrair o leite acionando a alavanca.
Ajuste da força de sucção (vácuo): Quanto mais pressionar a alavanca, maior será a força de sucção. 1
Ajuste do intervalo: Quanto mais depressa acionar a alavanca, maior é a frequência de extração. 2
A nossa recomendação: No início, escolher um intervalo maior e uma baixa força de sucção para
estimular o fluxo do leite. Depois de o leite fluir, diminuir o intervalo e aumentar a força de sucção.
Optiflow
Adaptador para a copa da bom-
ba de extração de leite 28 mm
31 mm
3.3 Escolha da copa da bomba de extração de
leite e do adaptador massajador Optiflow
Se o seu mamilo friccionar desagradavelmente do
lado interior do funil, utilizar uma copa/adaptador
de copa maior. Se a auréola for sugada pelo funil,
utilizar uma copa da bomba de extração de leite
mais pequena. O adaptador massajador Optiflow
destina-se a ser exclusivamente utilizado com a copa
da bomba de extração de leite 31 mm.
21
  • Page 1 1
  • Page 2 2
  • Page 3 3
  • Page 4 4
  • Page 5 5
  • Page 6 6
  • Page 7 7
  • Page 8 8
  • Page 9 9
  • Page 10 10
  • Page 11 11
  • Page 12 12
  • Page 13 13
  • Page 14 14
  • Page 15 15
  • Page 16 16
  • Page 17 17
  • Page 18 18
  • Page 19 19
  • Page 20 20
  • Page 21 21
  • Page 22 22
  • Page 23 23
  • Page 24 24
  • Page 25 25
  • Page 26 26
  • Page 27 27
  • Page 28 28
  • Page 29 29
  • Page 30 30
  • Page 31 31
  • Page 32 32
  • Page 33 33
  • Page 34 34
  • Page 35 35
  • Page 36 36
  • Page 37 37
  • Page 38 38
  • Page 39 39
  • Page 40 40
  • Page 41 41
  • Page 42 42
  • Page 43 43
  • Page 44 44
  • Page 45 45
  • Page 46 46
  • Page 47 47
  • Page 48 48
  • Page 49 49
  • Page 50 50
  • Page 51 51
  • Page 52 52
  • Page 53 53
  • Page 54 54
  • Page 55 55
  • Page 56 56
  • Page 57 57
  • Page 58 58
  • Page 59 59
  • Page 60 60

Ardo AMARYLL Manuale utente

Tipo
Manuale utente