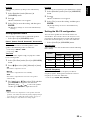
Yamaha DVD-S1800 Manuale del proprietario
- Categoria
- Lettori DVD
- Tipo
- Manuale del proprietario

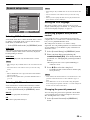
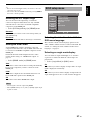
DVD AUDIO/VIDEO SA-CD PLAYER
LECTEUR DVD AUDIO/VIDEO SA-CD
DVD-S1800
G
HDMI AUDIO DIRECT
STANDBY
ON

ii En
CAUTION
Use of controls or adjustments or performance of
procedures other than those specified herein may result
in hazardous radiation exposure.
AVERTISSEMENT
L’utilisation de commandes et l’emploi de réglages ou
de méthodes autres que ceux décrits ci-dessous,
peuvent entraîner une exposition à un rayonnement
dangereux.
VORSICHT
Die Verwendung von Bedienelementen oder die
Einstellung bzw. die Ausführung von anderen als in
dieser Anleitung beschriebenen Vorgängen kann zu
Gefährdung durch gefährliche Strahlung führen.
OBSERVERA
Användning av reglage eller justeringar eller utförande
av åtgärder på annat sätt än så som beskrivs häri kan
resultera i farlig strålning.
ATTENZIONE
L’uso di controlli, regolazioni, operazioni o procedure
non specificati in questo manuale possono risultare in
esposizione a radiazioni pericolose.
PRECAUCIÓN
El uso de los controles, los ajustes o los procedimientos
que no se especifican enste manual pueden causar una
exposición peligrosa a la radiación.
LET OP
Gebruik van bedieningsorganen, instellingen of
procedures anders dan beschreven in dit document kan
leiden tot blootstelling aan gevaarlijke stralen.
OSTRZEŻENIE
Używanie regulatorów i nastawień w inny sposób lub
wykonywanie procedur innych niż tutaj podane może
być przyczyną niebezpiecznego promieniowania.
CAUTION
VISIBLE AND INVISIBLE LASER RADIATION WHEN
OPEN. AVOID EXPOSURE TO BEAM.
ADVARSEL
SYNLIG OG USYNLIG LASERSTRÅLING VED ÅBNING.
UNDGÅ UDSÆTTELSE FOR STRÅLING.
ADVARSEL
SYNLIG OG USYNLIG LASERSTRÅLING NÅR DEKSEL
ÅPNES. UNNGÅ EKSPONERING FOR STRÅLEN.
VARNING
SYNLIG OCH OSYNLIG LASERSTRÅLNING NÄR
DENNA DEL ÄR ÖPPNAD. BETRAKTA EJ STRÅLEN.
VARO!
AVATTAESSA OLET ALTTIINA NÄKYVÄLLE JA
NÄKYMÄTTÖMÄLLE LASER SÄ TEILYLLE. ÄLÄ
KATSO SÄTEESEEN.
VORSICHT
SICHTBARE UND UNSICHTBARE LASERSTRAHLUNG
WENN ABDECKUNG GEÖFFNET. NICHT DEM STRAHL
AUSSETSEN.
DANGER
VISIBLE AND INVISIBLE LASER RADIATION WHEN
OPEN. AVOID DIRECT EXPOSURE TO BEAM.
ATTE NTIO N
RAYONNEMENT LASER VISIBLE ET INVISIBLE EN
CAS D’OUVERTURE. EXPOSITION DANGEREUSE AU
FAISCEAU.
OSTRZEŻENIE
WIDZIALNE I NIEWIDZIALNE PROMIENIOWANIE
LASEROWE PO OTWARCIU. UNIKAĆ NARAŻENIA NA
WIĄZKĘ LASEROWĄ.
CAUTION-
VISIBLE AND INVISIBLE
LASER RADIATION WHEN OPEN. DO NOT
STARE INTO BEAM OR VIEW DIRECTLY
WITH OPTICAL INSTRUMENTS.

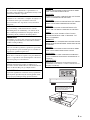
CAUTION: READ THIS BEFORE OPERATING THIS UNIT.
iii En
1 To assure the finest performance, please read this manual
carefully. Keep it in a safe place for future reference.
2 Install this unit in a well ventilated, cool, dry, clean place
— away from direct sunlight, heat sources, vibration,
dust, moisture, or cold. In a cabinet, allow about 2.5 cm
(1 inch) of free space all around this unit for adequate
ventilation.
3 Locate this unit away from other electrical appliances,
motors, or transformers to avoid humming sounds.
4 Do not expose this unit to sudden temperature changes
from cold to hot, nor locate this unit in an environment
with high humidity (i.e., a room with a humidifier) to
prevent condensation inside this unit, which may cause an
electrical shock, fire, damage to this unit, and/or personal
injury.
5 Avoid installing this unit in a location where foreign
objects may fall onto this unit or where this unit may be
exposed to liquid dripping or splashing. On the top of this
unit, do not place:
– Other components, as they may cause damage and/
or discoloration on the surface of this unit.
– Burning objects (i.e., candles), as they may cause
fire, damage to this unit, and/or personal injury.
– Containers with liquid in them, as they may fall,
spilling the liquid and causing an electrical shock to
the user and/or damage to this unit.
6 Do not cover this unit with a newspaper, tablecloth,
curtain, etc. in order not to obstruct heat radiation. If the
temperature inside this unit rises, it may cause fire,
damage to this unit, and/or personal injury.
7 Do not plug in this unit to a wall outlet until all
connections are complete.
8 Do not operate this unit upside-down. It may overheat,
possibly causing damage.
9 Do not use excessive force on switches, knobs and/or
cords.
10 When disconnecting the power cord from the wall outlet,
grasp the plug; do not pull the cord.
11 Do not clean this unit with chemical solvents; this might
damage the finish. Use a clean, dry cloth.
12 Use only the voltage specified on this unit. Using this unit
with a higher voltage than specified is dangerous and may
cause fire, damage to this unit, and/or personal injury.
Yamaha will not be held responsible for any damage
resulting from use of this unit with a voltage other than as
specified.
13 Do not attempt to modify or fix this unit. Contact
qualified Yamaha service personnel when any service is
needed. The cabinet should never be opened for any
reason.
14 When not planning to use this unit for long periods of
time (i.e., vacation), disconnect the AC power plug from
the wall outlet.
15 Be sure to read the “TROUBLESHOOTING” section on
common operating errors before concluding that this unit
is faulty.
16 Before moving this unit, press STANDBY/ON to set the
unit in standby mode, then disconnect the AC power plug
from the wall outlet.
17 Install this unit near the AC outlet and where the AC
power plug can be reached easily.
18 The batteries shall not be exposed to excessive heat such
as sunshine, fire or the like.
LASER SAFETY
This unit employs a laser. Due to possible eye injury, only a
qualified service person should remove the cover or attempt
to service this device.
DANGER
This unit emits visible laser radiation when open. Avoid direct
eye exposure to beam.
When this unit is plugged into a wall outlet, do not place your
eyes close to the opening of the disc tray and other openings
or look inside.
CAUTION: READ THIS BEFORE OPERATING THIS UNIT.
The unit is not disconnected from the AC power source as
long as it is connected to the wall outlet, even if this unit
itself is turned off. This state is called the standby mode. In
this state, this unit is designed to consume a very small
quantity of power.
WARNING
TO REDUCE THE RISK OF FIRE OR ELECTRIC
SHOCK, DO NOT EXPOSE THIS UNIT TO RAIN OR
MOISTURE.
This symbol mark is according to the EU
directive 2002/96/EC.
This symbol mark means that electrical
and electronic equipment, at their end-of-
life, should be disposed of separately from
your household waste.
Please act according to your local rules
and do not dispose of your old products
with your normal household waste.

1 En
English
Playable disc formats ................................... 3
DVD region codes .............................................. 3
Patent information ........................................ 4
Cleaning discs .............................................. 4
Supplied accessories ................................... 4
Front panel .................................................... 5
Front panel display ....................................... 6
Rear panel ..................................................... 7
Remote control ............................................. 8
General notes on connections .................. 10
Audio connections ..................................... 10
Connecting a stereo amplifier ........................... 10
Connecting an AV receiver with 6ch/
multi-channel input ....................................... 10
Video connections ...................................... 11
HDMI connection ........................................ 12
Connecting the power cable ...................... 14
Step 1: Inserting batteries into
the remote control ................................... 15
Using the remote control .................................. 15
Step 2: Turning on the power .................... 15
Step 3: Setting a TV type ............................ 16
Step 4: Setting a language preference ..... 17
Setting the OSD (On-Screen Display)
language ........................................................ 17
Setting the audio, subtitle and
disc menu languages ..................................... 17
Basic operation ........................................... 18
Pausing playback ............................................... 18
Selecting a track/chapter ................................... 18
Searching backward/forward ............................ 19
Repeat playback .......................................... 19
Repeating playback ........................................... 19
Repeating a section
(except DVD-Audio/MP3/WMA/JPEG) ...... 19
Random playback
(except DVD/SA-CD) ................................ 19
Program playback (CD) .............................. 20
Disc menu operation
(DVD/VCD/SVCD) ..................................... 20
Using the DVD menu ........................................ 20
Using the Video CD playback control (PBC)
menu (VCD/SVCD) ...................................... 21
On-screen display (OSD) menu
(DVD/VCD/SVCD/SA-CD) ........................ 21
Using the OSD menu
(DVD/VCD/SVCD/CD) ............................... 21
Displaying text information (SA-CD) ............... 22
Picture Setting menu
(DVD/VCD/SVCD) ..................................... 22
Adjusting picture settings .................................. 22
Zooming pictures
(DVD-Video/VCD/SVCD/DivX
®
/JPEG) .... 23
Viewing angles (DVD-Video) ...................... 23
Audio and Subtitle languages
(DVD-Video/VCD) ..................................... 24
Selecting an audio language .............................. 24
Selecting a subtitle language
(DVD-Video) ................................................ 24
DivX
®
external subtitle files ....................... 24
Changing pages (DVD-Audio) .................... 24
Group/File selection (DVD-Audio/DivX
®
/
MP3/WMA/Kodak picture CD) ................. 25
Selecting a group (DVD-Audio) ....................... 25
Selecting a file in a folder
(DivX
®
/MP3/WMA/Kodak picture CD) ...... 25
Bonus group playback
(DVD-Audio) ............................................. 25
Changing the playback area
and layer (SA-CD) .................................... 25
Multimedia file playback
(MP3/WMA/DivX
®
/JPEG) ......................... 26
Displaying the thumbnail screen (JPEG) .......... 26
Rotating pictures (JPEG) ................................... 26
CONTENTS
INTRODUCTION 3
FUNCTIONAL OVERVIEW 5
CONNECTIONS 10
GETTING STARTED 15
DISC OPERATION 18
Continued

2 En
CONTENTS
Menu overview ............................................ 27
Setup menu operation ................................ 28
General setup menu ................................... 29
Selecting DVD-Audio mode ............................. 29
Selecting SA-CD mode ..................................... 29
Setting the OSD language ................................. 29
Restricting playback with parental control ....... 29
Changing the parental password ....................... 29
Setting the screen saver ..................................... 30
Setting the auto power function ........................ 30
Setting the sleep timer ....................................... 30
Resetting the system ......................................... 30
Displaying the DivX
®
VOD
registration code ............................................ 30
Audio setup menu ...................................... 31
Setting the analog output .................................. 31
Setting the digital output ................................... 31
Setting the LPCM output .................................. 31
Setting the night listening mode ....................... 31
Speaker setup menu ................................... 32
Setting speaker sizes ......................................... 32
Setting speaker distances .................................. 32
Setting speaker levels ........................................ 33
Setting the SA-CD configuration ...................... 33
Video setup menu ....................................... 34
Setting the TV display ...................................... 34
Setting the TV type ........................................... 34
Selecting the wide screen format ...................... 34
Selecting the black level
(U.S.A. and Canada models only) ................ 35
Selecting the closed caption
(U.S.A. and Canada models only) ................ 35
Setting the still mode ........................................ 35
Selecting the scan function ............................... 35
Switching the SCART video out
(U.K., Europe, and Russia models only) ...... 36
HDMI setup menu ....................................... 36
Setting the HDMI video .................................... 36
Selecting the DVI output range ........................ 37
Setting the HDMI audio .................................... 37
DISC setup menu ........................................ 37
Selecting the default audio/subtitle/
DVD menu language .................................... 37
Selecting an angle mark display ....................... 37
Selecting the PBC (playback control)
function ......................................................... 38
Setting the duration for a slide show ................ 38
SETUP MENU 27 LANGUAGE CODE LIST 39
TROUBLESHOOTING 40
GLOSSARY 42
SPECIFICATIONS 44

3 En
INTRODUCTION
English
Thank you for purchasing this unit. This Owner’s Manual
explains the basic operation of this unit.
• Illustrations in this manual are based on the U.K.,
Europe, and Russia models unless otherwise specified.
• Notes contain important information about safety and
operating instructions.
• y indicates a tip for your operation.
• This manual is printed prior to production. Design and
specifications are subject to change in part as a result of
improvements, etc. In case of differences between the
manual and the product, the product has priority.
• This unit is designed for use with the following discs:
DVD-Video, DVD-Audio, DVD-R, DVD-RW,
DVD+R, DVD+RW, DVD+R DL, Video CD,
Super Video CD, Super Audio CD (SA-CD), Audio CD,
CD-R and CD-RW.
• This unit can play:
– MP3, WMA (except copyright-protected WMA) and
picture (Kodak, JPEG) files recorded on CD-R(W)/
DVD-R(W)/DVD+R(W)
– JPEG/ISO 9660 format
– Maximum 14 character display
–DivX
®
disc on CD-R(W)/DVD-R(W)/DVD+R(W)
– Official DivX
®
Certified product
– Plays all versions of DivX
®
video (including
DivX
®
6) with standard playback of DivX
®
media
files
• CD-R(W), DVD-R(W) and DVD+R(W) cannot be played
unless finalized.
• Copyright-protected WMA files cannot be played with this
unit.
• This unit supports JPEG files of 2848 x 2136 pixels in size.
• Some discs cannot be played depending on the recording
conditions, such as the PC environment and application
software. The characteristics and condition of some discs;
materials, scratches, curvature, etc., may result in playback
failure.
• Be sure to use only CD-R(W), DVD-R(W) and DVD+R(W)
discs made by reliable manufacturers.
• Do not use any non-standard shaped discs (heart-shaped, etc.).
• Do not use discs with tape, seals, or paste on their surface.
Doing so may damage this unit.
• Do not use discs affixed with labels printed by a commercially
available label printer.
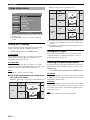
DVD region codes
This unit is designed to support the region management
system. Check the regional code number on the DVD disc
package. If the number does not match the region code of
this unit (see the table below or the back of this unit), this
unit may be unable to play the disc.
INTRODUCTION
Playable disc formats
Notes
Destination
Region code
of this unit
Playable discs
U.S.A.
Canada
U.K.
Europe
Asia
Korea
Russia
1
1
ALL
2
2
ALL
3
3
ALL
5
5
ALL

4 En
INTRODUCTION
–
Manufactured under license from Dolby Laboratories.
“Dolby” and the double-D symbol are trademarks of
Dolby Laboratories.
“DTS” and “DTS Digital Surround” are registered
trademarks of DTS, Inc.
DivX, DivX Certified, and associated logos are
trademarks of DivX, Inc. and are used under license.
“DCDi” is a trademark of Faroudja, a division of Genesis
Microchip, Inc.
“HDMI”, the “HDMI” logo and “High Definition
Multimedia Interface” are trademarks or registered
trademark of HDMI Licensing LLC.
• When a disc becomes dirty, clean it with a cleaning
cloth. Wipe the disc from the center out. Do not wipe in
a circular motion.
• Do not use solvents such as benzine, thinner,
commercially available cleaners, or antistatic spray
intended for analog records.
Check your package to make sure it contains the following
items:
Patent information
This product incorporates copyright protection
technology that is protected by method claims of
certain U.S. patents and other intellectual property
rights owned by Macrovision Corporation and other
rights owners. Use of this copyright protection
technology must be authorized by Macrovision
Corporation, and is intended for home and other limited
viewing uses only unless otherwise authorized by
Macrovision Corporation. Reverse engineering or
disassembly is prohibited.
Cleaning discs
Supplied accessories
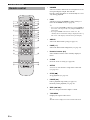
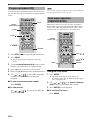
HDMI
POWER
DIMMER
MULTI 2CH
RANDOM
AUDIO DIRECT STANDBY
GROUP PAGE
PROG
REPEAT
SUBTITLE
SETUP
AUDIO ZO OM
ANGLE
PAUSE
STOP
SKIP
PLAY
A B
SLOW SEARCH
ENTERCLEAR
ON SCREENTOP MENU
MENU RETURN
ENTER
Audio pin cable
Batteries (x2)
(AAA, R03, UM-4)
Remote
control
Power cable
Video pin cable

5 En
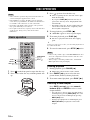
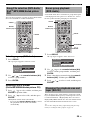
FUNCTIONAL OVERVIEW
English
1 Disc tray
Load a disc in the disc tray.
2 STANDBY/ON
Turns on this unit or sets it to the standby mode.
3 HDMI indicator
Lights up green when an HDMI component is
recognized by this unit and the HDMI mode is set to
on.
Lights up orange when no HDMI component is
recognized by this unit while the HDMI mode is set to
on.
4 AUDIO DIRECT indicator
Lights up when you select the AUDIO DIRECT mode
by pressing AUDIO DIRECT on the remote control.
5 Front panel display
Displays playback information or settings.
6
Opens or closes the disc tray.
7 b/w
Searches backward.*
Moves to the previous chapter or track.
8 f/a
Searches forward.*
Moves to the next chapter or track.
9 p/e
Starts or pauses playback.
0 s
Stops playback.
* Press and hold the button for about two seconds.
FUNCTIONAL OVERVIEW
Front panel
HDMI AUDIO DIRECT
STANDBY
ON
3
6 7 8 092 4 5
1

6 En
FUNCTIONAL OVERVIEW
1 P.SCAN indicator
Lights up when the progressive scan function is
activated.
2 Playback mode indicators
Display the icon for the selected playback mode.
3 Decoder indicators
Display the icon for the selected internal decoder.
4 MULTI indicator
Lights up when playing the multi-channel audio
source.
5 D.MIX indicator (DVD-Audio only)
Lights up when playing the disc that allows down
mixing of the multi-channel audio source.
6 Disc indicators
Display the icon for the disc type.
7 Information display
Displays various information such as a title/chapter/
track number or elapsed playing time.
y
You can adjust the brightness of the front panel display using
DIMMER on the remote control.
Front panel display
MP3 JPEG
SVCD WMA
DVD AUDIO
SA-CD
DivX
P.SCAN TITLE GROUP CHP/ TRK MULTI D.MIX PROG. RANDOM ALL AD
B
252134
6
7

7 En
FUNCTIONAL OVERVIEW
English
1 AUDIO OUT (6ch discrete) jacks
Connect to the 6ch input jacks of your AV receiver.
2 DIGITAL (COAXIAL) jack
Connect to the coaxial input jack of your AV receiver.
3 REMOTE CONTROL (IN/OUT) connectors
Use in custom installations to transmit remote control
signals via cable connections.
4 REMOTE CONTROL (RS-232C) terminal
(U.S.A., Canada, U.K., Europe, and Russia
models only)
Use as an expansion terminal for commercial use.
Consult your dealer for details.
5 AV terminal
(U.K., Europe, and Russia models only)
Connect to SCART input terminal of your TV.
6 VIDEO OUT (VIDEO) jack
Connect to the composite video input jack of your AV
receiver.
7 MAINS
Connect the supplied power cable.
8 AUDIO OUT (MIXED 2CH) jacks
Connect to the audio input jacks of your AV receiver or
stereo system.
9 DIGITAL (OPTICAL) jack
Connect to the optical input jack of your AV receiver.
0 HDMI jack
Connect to the HDMI input jack of your HDMI
component.
q VIDEO OUT (S VIDEO) jack
Connect to the S-video input jack of your AV receiver.
w VIDEO OUT (COMPONENT) jacks
Connect to the component input jacks of your AV
receiver.
■ Remote control connectors and RS-232C terminal
The REMOTE CONTROL (IN/OUT) connectors and the REMOTE CONTROL (RS-232C) terminal are used in
custom installation. Keep the RS-232C switch set to OFF and do not connect any cables to these connectors during
normal use.
Caution: Do not touch the inner pins of the jacks on the rear panel of this unit. Electrostatic discharge
may cause permanent damage to this unit.
Rear panel
MIXED 2CH
L
R
L
R
AUDIO OUT DIGITAL REMOTE CONTROL VIDEO OUT
FRONT
COAXIAL
OPTICAL
RS 232C
HDMI
S VIDEO
P
R / CR
PB / CB
Y
VIDEO
MAINS
IN
OUT
SUBWOOFER
CENTER
SURROUND
COMPONENT
ON
OFF
AV
89 0qw
25 6 7134
(U.K., Europe, and Russia models)

8 En
FUNCTIONAL OVERVIEW
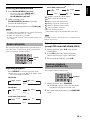
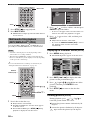
1 DIMMER
Selects from three different levels of brightness for the
front panel display: bright, dim and auto.
For auto setting, brightness is automatically set to low
only during playback.
2 HDMI
Switches between the HDMI resolution settings or
turns off the HDMI mode (see page 36).
y
• You can select the HDMI resolution by pressing HDMI on
the remote control repeatedly or by using the HDMI Video
setup menu.
• If you press HDMI on the remote control once, the
currently selected resolution setting is displayed in the top
left corner of the display and in the front panel display.
3 GROUP
Selects the DVD-Audio group (see page 25).
4 PAGE (+/–)
Selects the DVD-Audio still picture (see page 24).
5 Numeric buttons (0-9)
Select numbered items in the currently displayed
menu.
6 CLEAR
Clear the mode or setting (see page 20).
7 SETUP
Accesses or exits from the setup menu of this unit
(see page 28).
8 STOP (
7
)
Stops playback (see page 18).
9 PAUSE (
8
)
Pauses playback temporarily (see page 18).
Frame-by-frame playback (see page 18).
0 SKIP (
l22 / 33l)
Moves to the previous/next chapter or track.
q TOP MENU
Displays the top-level disc menu.
y
The title menu is displayed for discs with the title menu.
Remote control
HDMI
POWER
DIMMER
MULTI 2CH
RANDOM
AUDIO DIRECT STANDBY
GROUP PAGE
PROG
REPEAT
SUBTITLE
SETUP
AUDIO ZOOM
ANGLE
PAUSE
STOP
SKIP
PLAY
A B
SLOW SEARCH
ENTERCLEAR
ON SCREENTOP MENU
MENU RETURN
ENTER
1
2
3
4
5
6
7
8
9
0
q
w
e
r
t
y
u
i
o
p
a
s
d
f
g
h
j
k
l
;

9 En
FUNCTIONAL OVERVIEW
English
w Cursors ( / / /
)
Selects an item in the currently displayed menu.
ENTER
Confirms the menu selection.
e MENU
Accesses the menu of a disc (see page 20).
r SUBTITLE
Selects the subtitle language (see page 24).
t AUDIO
Selects the audio language or format (see page 24).
y POWER (
l
)
Turns on this unit (see page 15).
u STANDBY ( )
Sets this unit to the standby mode (see page 15).
i AUDIO DIRECT
Turns off the video output during audio disc playback
in order to improve audio quality. Press again to turn on
the video output. This function is not available when an
HDMI component is recognized by this unit.
In the AUDIO DIRECT mode, the front panel display
goes out. Once this unit is turned off, the AUDIO
DIRECT mode is cleared (only when an SA-CD disc is
played back, the mode is cleared if the disc tray is
opened/closed).
o MULTI
/ 2CH
Selects a sound mode: Stereo or Multi-channel.
Changes the SA-CD playback area (see page 25).
p PROG
Accesses the program setup menu to program disc
tracks or exit from its menu (see page 20).
a RANDOM
Plays tracks in random order (see page 19).
s REPEAT
Repeats the chapter, track, title, group or disc
(see page 19).
d A-B
Repeats a specific segment (see page 19).
f ENTER
Confirms the menu selection.
g SLOW
/ SEARCH (22 / 33)
Searches backward or forward (see page 19).
h PLAY (
3
)
Starts playback (see page 18).
j ON SCREEN
Accesses or exit from the on-screen display (OSD)
menu of this unit (see page 21).
Press twice during playback to access the Picture
Setting menu (see page 22).
k RETURN
Returns to the previous setup menu.
l ZOOM
Enlarges the video image (see page 23).
; ANGLE
Selects the DVD camera angle (see page 23).
y
Two ENTER buttons (w and f) act in the same way.

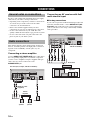
CONNECTIONS
10 En
Be sure to turn off this unit and unplug the power supply
cable, before you make or change connections.
• Depending on the component you want to connect, there
are various ways to make connections. Possible
connections are described below.
• Refer to the manuals supplied with your other
components as necessary to make the best connections.
• Do not connect this unit via your VCR. The video
quality could be distorted by the copy protection system.
• Do not connect the audio out jack of this unit to the
phono in jack of your audio system.
This unit has digital coaxial, digital optical, analog 6ch
discrete, and analog mixed 2ch output jacks. Connection
depends on the availability of audio jacks on your
component.
Connecting a stereo amplifier
Connect AUDIO OUT (MIXED 2CH) jacks of this unit to
the corresponding input jacks of your audio component
(such as a stereo amplifier) using the supplied audio pin
cable. You can connect a subwoofer to the
SUBWOOFER jack.
Connecting an AV receiver with 6ch/
multi-channel input
■ Analog connections
If you want to reproduce multi-channel Super Audio CD
(SA-CD) and DVD-Audio, connect AUDIO OUT (6ch
discrete) jacks of this unit to the corresponding input
jacks of your AV receiver using commercially available
audio pin cables.
CONNECTIONS
General notes on connections
Audio connections
REMOTE CONTROL
RS 232C
IN
OUT ON
OFF
AUDIO OUT
SUBWOOFER
CENTER
SURROUND
DIGITAL
COAXIAL
OPTICAL
MIXED 2CH FRONT
L
R
L
R
AV
HDMI
RL
CD / DVD
This unit (U.K., Europe, and Russia models)
Stereo
amplifier
Left
speaker
Right
speaker
Subwoofer
Audio pin cable
(supplied)
MIXED 2CH
REMOTE CONTROL
RS 232C
IN
OUT ON
OFF
AUDIO OUT
FRONT SUBWOOFER
CENTER
SURROUND
DIGITAL
COAXIAL
OPTICAL
L
R
L
R
AV
HDMI
RL
FRONT
RL
SURROUND
CENTER
SUBWOOFER
This unit (U.K., Europe,
and Russia models)
AV receiver
Speakers

11 En
CONNECTIONS
English
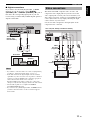
■ Digital connections
If you want to use the Dolby Digital, DTS, or MPEG
function on your AV receiver, connect DIGITAL
(OPTICAL) <A> or DIGITAL (COAXIAL) <B> jack of
this unit to the corresponding input jacks of your AV
receiver using a commercially available digital optical or
digital coaxial cable.
• If you make a connection with <A> or <B>, set [Digital Out]
to [All] (see “Setting the digital output” on page 31).
• If the audio format of the digital output does not match the
capabilities of your receiver, the receiver produces a distorted
sound or no sound at all. Make sure to select the appropriate
audio format from the menu screen on the disc.
Pressing AUDIO on the remote control once or more may
change not only the audio languages but also the audio format.
• SA-CD audio signals are not output from DIGITAL
(COAXIAL/OPTICAL) jacks.
• If you want to enjoy Dolby Digital, DTS, and MPEG formats,
you must connect this unit to an AV receiver that supports
these formats.
This unit has SCART, composite video, S-video, and
component video output jacks. If your AV receiver has
video output jacks, connect your receiver and then your
TV so that you can use one TV for several different video
sources (LD, VCR, etc.) by simply switching the input
source selector on your receiver.
Use the one that corresponds to the input jacks on the
component to be connected.
Notes
MIXED 2CH
REMOTE CONTROL
RS 232C
IN
OUT ON
OFF
AUDIO OUT
FRONT SUBWOOFER
CENTER
SURROUND
DIGITAL
COAXIAL
OPTICAL
L
R
L
R
AV
HDMI
COAXIAL
IN
OPTICAL
IN
<B><A>
This unit (U.K.,
Europe, and
Russia models)
AV receiver
Speakers
Video connections
O
NTROL VIDEO OUT
S VIDEO
P
B / CB
Y
P
R / CR
VIDEO
COMPONENT
AV
HDMI
RS 232C
S-VIDEO
IN
VIDEO
IN
<B> <C> <D><A>
VIDEO
OUT
VIDEO
IN
S VIDEO
OUT
COMPONENT
VIDEO OUT
COMPONENT
VIDEO IN
S VIDEO
IN
PR/CR YPB/CB
COMPONENT VIDEO IN
This unit (U.K., Europe, and Russia models)
Video
pin cable
(supplied)
AV
receiver
TV

12 En
CONNECTIONS
■ Composite video jack <A>
Connect VIDEO OUT (VIDEO) jack of this unit to the
video input jack of your AV receiver, and then to that of
your TV using the supplied video pin cable.
■ S-video jack <B>
S-video connections achieve a clearer picture than
composite video connections by transmitting video signals
on separate wires for luminance (Y) and chrominance (C).
Connect VIDEO OUT (S VIDEO) jack of this unit to
S-video input jack of your AV receiver, and then to that of
your TV using a commercially available S-video cable.
■ Component video jacks <C>
Component video connections achieve higher fidelity
color reproduction than S-video connections by
transmitting video signals on separate wires for luminance
(Y: green) and chrominance (P
B: blue, PR: red). Connect
VIDEO OUT (COMPONENT) jacks of this unit to the
component input jacks of your AV receiver, and then to
those of your TV using a commercially available
component cable. Observe the color of each jack when
you make connections.
If your receiver does not have component output jacks,
you can achieve a better video image by connecting the
component output jacks of this unit directly to the
component input jacks of your TV.
■ SCART terminal <D>
(U.K., Europe, and Russia models only)
If your TV has only a terminal for video input, you can
connect the TV directly to this unit.
Connect AV terminal of this unit to SCART input terminal
of your TV using a commercially available SCART cable.
• Ensure that the “TV” indication on SCART cable is connected
to the TV set and “DVD” indication on SCART cable is
connected to this unit.
• S-video signal is not output at AV terminal. See page 36 for
SCART video setting.
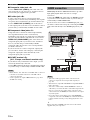
HDMI (High-Definition Multimedia Interface) provides
high quality digital audio and video on a single
connection.
Connect the HDMI jack of this unit to an HDMI input jack
of your AV receiver, and then to that of your TV using a
commercially available HDMI cable.
If your receiver does not have an HDMI input jack, you
can achieve a better video image by connecting the HDMI
jack of this unit directly to the HDMI input jack of your
TV.
• You need to make appropriate audio connections if the
connected component does not input audio signals (see
page 10).
• This unit is not compatible with HDCP-incompatible HDMI or
DVI components.
• You need a commercially available HDMI/DVI conversion
cable when you connect this unit to other DVI components. In
this case, you need to use another audio connection to this
connection because the HDMI jack of this unit does not output
any audio signals.
• Do not disconnect or turn off the power of the HDMI/DVI
component connected to the HDMI jack of this unit while data
is being transferred. Doing so may disrupt playback or cause
noise.
y
When connecting an HDMI component, refer to the manual
supplied with your component.
Notes
HDMI connection
Notes
MIXED 2CH
REMOTE CONTROL
RS 232C
IN
OUT ON
OFF
AUDIO OUT
FRONT SUBWOOFER
CENTER
SURROUND
DIGITAL
COAXIAL
OPTICAL
L
R
L
R
AV
HDMI
HDMI
IN
This unit (U.K., Europe, and
Russia models)
AV receiver
Speakers
HDMI OUT
HDMI IN
TV

13 En
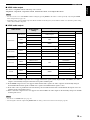
CONNECTIONS
English
■ HDMI video output
This unit is compatible with the following video formats:
480p/60 Hz, 576p/50 Hz, 720p/50 Hz, 60 Hz, 1080i/50 Hz, 60 Hz, and 1080p/50 Hz, 60 Hz.
• You need to select one of the HDMI resolution settings by pressing HDMI on the remote control repeatedly or by using the HDMI
Video setup menu (see page 36).
• Depending on the connected DVI component, black and white in the image may not be distinct. In this case, adjust the picture setting
of the connected DVI component.
■ HDMI audio output
*1:If the connected HDMI component does not support bitstream signals (Dolby Digital, DTS, and MPEG), the audio
output is automatically changed from bitstream signals to PCM signals.
*2:If the HDMI component does not support multi-channel audio signals, the audio output is automatically changed
from PCM multi-channel signals to PCM stereo signals and 48 kHz/16 bits signals or less.
*3:If the audio source is prohibited from downmixing, the front L/R channel audio and 48 kHz/16-bit signals or less are
output instead of downmixed stereo.
*4:If the connected component does not support more than 48 kHz, the audio output is automatically changed to 48 kHz/
16-bit signals or less.
• You need to set HDMI Audio (see page 37).
• SA-CD signals cannot be output using HDMI. Make an analog connection to listen to SA-CD (see page 10).
Notes
Audio format
Analog output
setting
HDMI Audio
Auto*
1
PCM Off
DVD-Video
Dolby Digital
Multi-channel
Dolby Digital
PCM multi*
2
Off
Stereo PCM 2ch
DTS
Multi-channel
DTS
PCM multi*
2
Stereo PCM 2ch
MPEG
Multi-channel
MPEG
PCM multi*
2
Stereo PCM 2ch
PCM 2ch*
4
Multi-channel/Stereo PCM 2ch PCM 2ch
DVD-Audio
Multi
Multi-channel PCM (PPCM) multi*
2,3
PCM (PPCM) multi*
2,3
Stereo PCM (PPCM) 2ch*
3
PCM (PPCM) 2ch*
3
2ch*
4
Multi-channel/Stereo PCM (PPCM) 2ch PCM (PPCM) 2ch
CD/MP3/
WMA/DivX
®
2ch Multi-channel/Stereo PCM 2ch PCM 2ch
DTS-CD
Multi
Multi-channel
DTS
PCM multi*
2
Stereo PCM 2ch
2ch Multi-channel/Stereo PCM 2ch
VCD 2ch Multi-channel/Stereo PCM 2ch PCM 2ch
SVCD
Multi
Multi-channel
MPEG
PCM multi*
2
Stereo PCM 2ch
2ch Multi-channel/Stereo PCM 2ch
SA-CD Multi/2ch Multi-channel/Stereo – – –
Notes

14 En
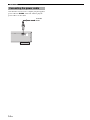
CONNECTIONS
After all other connections are complete, plug the supplied
power cable into MAINS of this unit and then plug the
power cable to an AC outlet.
Connecting the power cable
MAINS
To an AC
outlet

15 En
GETTING STARTED
English
y
If the settings you have made are inappropriate, you can always reset all options and your personal settings to the initial factory settings.
For details, see “Resetting the system” on page 30.
1 Press the part and slide the battery
compartment cover off.
2 Insert the two supplied batteries (AAA, R03,
UM-4), following the indications (+/–) on the
inside of the compartment.
3 Slide the cover back until it snaps into place.
• Insert batteries correctly according to the polarity markings
(+/–). The batteries inserted in the opposite direction may leak.
• Replace the exhausted batteries immediately with new ones to
prevent a leakage.
• Remove the batteries from the compartment if the remote
control is not used for more than a month.
• If the batteries have leaked, dispose of them immediately.
Avoid touching the leaked material or letting it come into
contact with clothing, etc. Clean the battery compartment
thoroughly before installing new batteries.
• Do not use old batteries together with new ones.
• Do not use different types of batteries (such as alkaline and
manganese batteries) together. Read the packaging carefully as
these different types of batteries may have the same shape and
color.
• Dispose of the batteries correctly in accordance with your local
regulations.
Using the remote control
Use the remote control within 6 m (20 ft approx.) of this
unit and point it toward the remote control sensor.
• Do not spill water or other liquids on the remote control.
• Do not drop the remote control.
• Do not leave or store the remote control in the following types
of conditions:
– places of high humidity, such as near a bath
– places of high temperature, such as near a heater or stove
– places of extremely low temperature
– dusty places
1 Make sure that the power cable is connected to
an AC outlet.
2 Turn on your TV and AV receiver.
3 Select the appropriate input source of the AV
receiver connected to this unit. Refer to the
manual supplied with your AV receiver for
details.
4 Press STANDBY/ON on the front panel or
POWER (
l
) on the remote control to turn on
this unit.
➜ The front panel display lights up.
5 Set the TV to the correct Video IN channel (e.g.,
EXT1/2, AV1/2, AUDIO/VIDEO, etc. Refer to
the manual supplied with your TV for details).
➜ The default screen appears on the TV.
GETTING STARTED
Step 1: Inserting batteries into
the remote control
Notes
1
3
2
Notes
Step 2: Turning on the power
within 6m
(20 ft approx.)

16 En
GETTING STARTED
This unit is compatible with both NTSC and PAL video
formats. Select the color system that matches your TV.
y
• Press RETURN to display the previous menu.
• Press SETUP to exit from the setup menu.
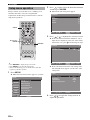
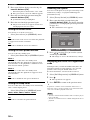
1 Press SETUP.
➜ The setup menu appears.
2 Press / repeatedly to select [VIDEO],
and then press ENTER.
➜ [VIDEO] menu appears.
3 Press / repeatedly to highlight [TV
Type].
4 Press / to select one of the options below.
PAL
Select this if the connected TV is a PAL system TV. It will
change video signals of NTSC discs and output them in
PAL format.
NTSC
Select this if the connected TV is an NTSC system TV. It
will change video signals of PAL discs and output them in
NTSC format.
MULTI
Select this if the connected TV is compatible with both
NTSC and PAL formats (such as a multi-system TV). The
output format will be in accordance with the video signals
of the disc.
• Before changing the current TV Standard setting, ensure that
your TV supports the selected TV type system.
• If you play an NTSC-formatted disc with the [PAL] setting or a
PAL-formatted disc with the [NTSC] setting, the video quality
may deteriorate.
• When [TV Type] is set to [MULTI], this unit may change the
HDMI resolution unwantedly. In this case, try the [NTSC] or
[PAL] setting.
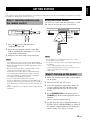
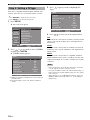
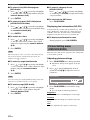
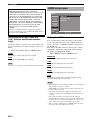
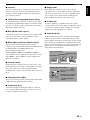
Step 3: Setting a TV type
1/2
SETUP
GENERAL
AUDIO
SPEAKER
VIDEO
HDMI
DISC
DVD-Audio mode
SA-CD mode
OSD Language
Parental Rating
Parental Password
Screen Saver
Auto Power Off
Sleep Timer
Select : Enter
Move :
Return
1/1
VIDEO
TV Display
TV Type
Wide Screen Format
Black Level*1
Closed Caption*1
Still Mode
Component
Scart Video Out*2
Select : Enter
Move :
16:9
PAL
Off
Off
Off
Field
Interlaced
RGB
Return
*1: [Black Level] and [Closed Caption] are only for U.S.A. and
Canada models.
*2: [Scart Video Out] is only for U.K., Europe, and Russia
models.
Notes
1/1
VIDEO
TV Display
TV Type
Wide Screen Format
Black Level*1
Closed Caption*1
Still Mode
Component
Scart Video Out*2
Select : Enter
Move :
Return
16:9
PAL
Off
Off
Off
Field
Interlaced
RGB

17 En
GETTING STARTED
English
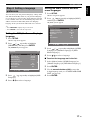
You can select your own preferred language settings. This
unit will automatically switch to your preferred language
for you whenever you load a disc. If the language selected
is not available on the disc, the default language of the disc
will be used instead. The OSD (On-Screen Display)
language in the system menu will remain once selected.
y
• Press RETURN to display the previous menu.
• Press SETUP to exit from the setup menu.
Setting the OSD (On-Screen Display)
language
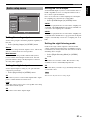
1 Press SETUP.
➜ The setup menu appears.
2 Press / repeatedly to highlight
[GENERAL], and then press ENTER.
➜ [GENERAL] menu appears.
3 Press / repeatedly to highlight [OSD
Language].
4 Press / to select a language.
Setting the audio, subtitle and disc
menu languages
1 Press SETUP.
➜ The setup menu appears.
2 Press / repeatedly to highlight [DISC],
and then press ENTER.
➜ [DISC] menu appears.
3 Press / repeatedly to highlight [AUDIO
Language] or [Subtitle Language] or [DVD
Menu Language].
4 Press / to select a language.
■ To select the language not in the list:
1 Select [Others] under [AUDIO Language] or
[Subtitle Language] or [DVD Menu Language].
2 Press ENTER.
3 Use the numeric buttons (0-9) to enter the
4-digit language code (see “LANGUAGE CODE
LIST” on page 39).
4 Press ENTER.
Step 4: Setting a language
preference
1/2
GENERAL
DVD-Audio mode
SA-CD mode
OSD Language
Parental Rating
Parental Password
Screen Saver
Auto Power Off
Sleep Timer
Select : Enter
Move :
DVD-Audio
SA-CD
English
Level 8
- - - -
On
Mode 1
Off
Return
1/1
DISC
AUDIO Language
Subtitle Language
DVD Menu Language
Angle Mark
PBC
Time Interval
Select : Enter
Move :
Return
English
Off
English
On
Off
3 sec
La pagina si sta caricando...
La pagina si sta caricando...
La pagina si sta caricando...
La pagina si sta caricando...
La pagina si sta caricando...
La pagina si sta caricando...
La pagina si sta caricando...
La pagina si sta caricando...
La pagina si sta caricando...
La pagina si sta caricando...
La pagina si sta caricando...
La pagina si sta caricando...
La pagina si sta caricando...
La pagina si sta caricando...
La pagina si sta caricando...
La pagina si sta caricando...
La pagina si sta caricando...
La pagina si sta caricando...
La pagina si sta caricando...
La pagina si sta caricando...
La pagina si sta caricando...
La pagina si sta caricando...
La pagina si sta caricando...
La pagina si sta caricando...
La pagina si sta caricando...
La pagina si sta caricando...
La pagina si sta caricando...
La pagina si sta caricando...
-
 1
1
-
 2
2
-
 3
3
-
 4
4
-
 5
5
-
 6
6
-
 7
7
-
 8
8
-
 9
9
-
 10
10
-
 11
11
-
 12
12
-
 13
13
-
 14
14
-
 15
15
-
 16
16
-
 17
17
-
 18
18
-
 19
19
-
 20
20
-
 21
21
-
 22
22
-
 23
23
-
 24
24
-
 25
25
-
 26
26
-
 27
27
-
 28
28
-
 29
29
-
 30
30
-
 31
31
-
 32
32
-
 33
33
-
 34
34
-
 35
35
-
 36
36
-
 37
37
-
 38
38
-
 39
39
-
 40
40
-
 41
41
-
 42
42
-
 43
43
-
 44
44
-
 45
45
-
 46
46
-
 47
47
-
 48
48


Yamaha DVD-S1800 Manuale del proprietario
- Categoria
- Lettori DVD
- Tipo
- Manuale del proprietario
in altre lingue
- English: Yamaha DVD-S1800 Owner's manual
- français: Yamaha DVD-S1800 Le manuel du propriétaire
- Deutsch: Yamaha DVD-S1800 Bedienungsanleitung
- Nederlands: Yamaha DVD-S1800 de handleiding
- dansk: Yamaha DVD-S1800 Brugervejledning
- svenska: Yamaha DVD-S1800 Bruksanvisning
- Türkçe: Yamaha DVD-S1800 El kitabı
- română: Yamaha DVD-S1800 Manualul proprietarului
Documenti correlati
-
Yamaha S663 Manuale del proprietario
-
-
Yamaha CDX-397MK2 Manuale del proprietario
-
-
-
-
-
-
-
Yamaha DVD-S2700 Manuale del proprietario
Altri documenti
-
Denon DVD-1910 Manuale utente
-
Tristar DV-1823 Manuale utente
-
Samsung HT-E330 Manuale utente
-
LG DN190E3H Manuale utente
-
LG DN190E2H Manuale utente
-
-
Kenwood KDV-S250P Manuale utente
-
-
Sapphire Mini-Projector 101 Manuale utente