Eufy T2100 Series Manuale del proprietario
- Tipo
- Manuale del proprietario

Cleaning
Owner’s Manual
RoboVac
www.eufylife.com
For FAQs and more information, please visit:
T2108/T2109/T2110 51005001162 V04
Bedienungsanleitung l Manual del propietario
Manuel d'utilisation l Guida di Utilizzo l Handleiding

01
English
English 01
Deutsch 29
Español 58
Français 86
Italiano 114
Nederlands 143
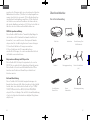
Thank you for purchasing RoboVac. Read all instructions before using
this product, and keep it properly for future reference.
Table of Contents
02 Important Safety Instructions
07 About Your RoboVac
What's in the Box
RoboVac Anatomy
LED Indication
12 Using Your RoboVac
Important Tips Before Use
Preparation
Charge Your RoboVac
Start / Stop Cleaning
Select a Cleaning Mode
Set Time and Scheduled Cleaning
20 Cleaning and Maintenance
Clean the Dust Collector and Filters
Clean the Rolling Brush
Clean the Side Brushes
Replace the Side Brushes
Clean the Bumper, Sensors and Charging Pins
Clean the Swivel Wheel
25 Troubleshooting
27 Specifications
28 Customer Service

02 03
English English
Important Safety Instructions
To reduce the risk of injury or damage, read these safety
instructions carefully and keep them at hand when setting up,
using, and maintaining this device.
WARNING SYMBOLS USED
This is the safety alert symbol. This symbol alerts
you to potential hazards that could result in
property damage and/or serious bodily harm or
death.
WARNING – To reduce the risk of fire or injury:
• For household use only.
• Use only as described in this manual. Only use attachments
recommended by the manufacturer.
• Do not unplug the device by pulling on cord. To unplug, grasp
the plug, not the cord.
• Do not handle the plug or the device with wet hands.
• Keep hair, loose clothing, fingers, and all parts of your body
away from open and moving parts.
• Use extra care when cleaning on stairs.
• Do not use to pick up flammable or combustible liquids, such as
gasoline, or use in areas where they may be present.
• Do not use the device on wet surfaces.
• Do not use without the dust collector and/or filters in place.
• Prevent unintentional starting by ensuring the switch is in the
off-position before picking up or carrying the device.
• Under extreme conditions, liquid may eject from the battery;
if this occurs, avoid all contact. If contact accidentally occurs,
thoroughly wash with water and soap. If the liquid makes
contact with your eyes, seek medical help immediately. Liquid
from the battery may cause irritation or burns.
• Do not expose the device to fire or excessive temperatures.
Exposure to fire or temperatures above 130°C / 265°F may
cause explosion.
• Follow the charging instructions in this manual and do not
charge the battery pack or appliance outside of the temperature
• range specified. Charging improperly or at temperatures outside
of the specified range may damage the battery and increase the
risk of fire.
• Have servicing performed by a qualified repair person using
only identical replacement parts. This will ensure that the safety
of the product is maintained.
• Do not modify or attempt to repair the device except as
indicated in the instructions for use and care.
• The plug must be removed from the socket-outlet before
cleaning or maintaining the device.
• The device contains a battery that is only replaceable by a
skilled professional.
• The device must be disconnected from the supply mains when
removing the battery.
• Do not use a battery pack or appliance that is damaged
or modified. Damaged or modified batteries may exhibit
unpredictable behavior resulting in fire, explosion or risk of
injury.
• The device can be used by children aged from 8 years and
above and persons with reduced physical, sensory or mental
capabilities or lack of experience and knowledge if they have
been given supervision or instruction concerning use of the
device in a safe way and understand the hazards involved.
• Children should be supervised to ensure they do not play with
the device.
• Cleaning and maintenance shall not be performed by children
without adult supervision.
• For the purposes of recharging the battery, only use the
detachable power supply unit (US: GSCU0600S019V12E
EU: GSCV0600S019V12E UK: GSCB0600S019V12E AU:
GSCS0600S019V12E) provided with the device.
• The battery must be removed before the device is disposed of.
To remove the battery from the device, unscrew the battery
cover on the bottom using a screwdriver.
• The used battery should be placed in a sealed plastic bag and
disposed of safely according to local environmental regulations.
• The external flexible cable or cord of the power supply unit
cannot be replaced; if the cord is damaged, the power supply
unit shall be disposed of.
• The device is for indoor use only.

04 05
English English
• The device is not a toy. Do not sit or stand on the device.
Small children and pets should be supervised when the
device is operating.
• Clean with a cloth dampened with water only.
• Do not use the device to pick up anything that is burning or
smoking.
• Do not use the device to clean up spills of bleach, paint,
chemicals, or anything wet.
• Before using the device, pick up objects like clothing and
loose paper. Lift up cords for blinds or curtains, and move
power cords and fragile objects out of the way. If the device
passes over a power cord and drags it, an object could be
pulled off a table or shelf.
• If the room to be cleaned has a balcony, a physical barrier
should be used to prevent access to the balcony and to
ensure safe operation.
• Do not place anything on top of the device.
• Be aware that the device moves around on its own. Take
care when walking in the area where the device is operating
to avoid stepping on it.
• Do not operate the device in areas with exposed electrical
outlets on the floor.
• Do not expose the electronics of the device, its battery, or
the integrated Charging Base. There are no user-serviceable
parts inside.
• Do not use the device on an unfinished, unsealed, waxed
or rough floor. It may result in damage to the floor and the
device. Use only on hard floor surfaces or low-pile carpet.
• The device has been designed to be used on floors without
scratching them. We still recommend that you test the
device on a small area of the room to be cleaned to ensure
no scratches are made before cleaning the whole room.
SAVE THESE INSTRUCTIONS
Notice
This symbol on the device or its packaging indicates:
Do not dispose of electrical appliances as unsorted
municipal waste; use separate collection facilities.
Contact your local authority for information regarding
the collection systems available. If electrical appliances
are disposed of in landfills or dumps, hazardous
substances can leak into the groundwater and get
into the food chain, damaging your health and well-
being. When replacing old appliances with new ones,
the retailer is legally obliged to take back your old
appliance for disposal at least free of charge.
FCC Statement
This device complies with Part 15 of the FCC Rules. Operation
is subject to the following two conditions: (1) This device may
not cause harmful interference, and (2) this device must accept
any interference received, including interference that may cause
undesired operation.
Warning: Changes or modifications not expressly approved
by the party responsible for compliance could void the user's
authority to operate the equipment.
Note: This equipment has been tested and found to comply
with the limits for a Class B digital device, pursuant to Part
15 of the FCC Rules. These limits are designed to provide
reasonable protection against harmful interference in a residential
installation.
This equipment generates, uses, and can radiate radio
frequency energy and, if not installed and used in accordance
with the instructions, may cause harmful interference to
radio communications. However, there is no guarantee that
interference will not occur in a particular installation. If this
equipment does cause harmful interference to radio or television
reception, which can be determined by turning the equipment off
and on, the user is encouraged to try to correct the interference
by one or more of the following measures: (1) Reorient or relocate
the receiving antenna. (2) Increase the separation between the
equipment and receiver. (3) Connect the equipment into an
outlet on a circuit different from that to which the receiver is
connected. (4) Consult the dealer or an experienced radio / TV

06 07
English English
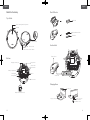
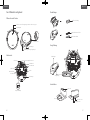
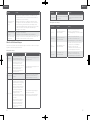
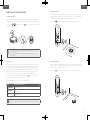
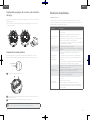
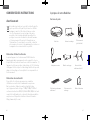
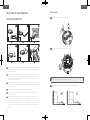
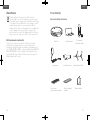
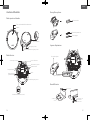
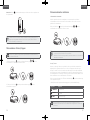
About Your RoboVac
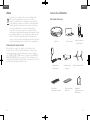
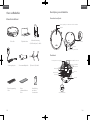
What's in the Box
RoboVac
Power Adapter
Additional
High-Performance
Filter
Additional
Foam Filter
Owner’s Manual &
Other Documents
Cleaning Tool Side Brushes (x4)
Charging Base Remote Control
(AAA Battery x2)
technician for help.
The following importer is the responsible party (for FCC matters
only).
Company Name: POWER MOBILE LIFE, LLC
Address: 400 108th Ave NE Ste 400, Bellevue, WA 98004-5541
Telephone: +1 (800) 988 7973
ISED Compliance Statement
This device contains licence-exempt transmitter(s)/receiver(s) that comply with
Innovation, Science and Economic Development Canada's licence-exempt RSS(s).
Operation is subject to the following two conditions:
1. This device may not cause interference.
2. This device must accept any interference, including interference that may
cause undesired operation of the device.
EU Declaration of Conformity
Hereby, Anker Innovations Limited declares that the product type T2108/T2109/
T2110 is in compliance with Directives 2014/35/EU & 2014/30/EU.
The full text of the EU declaration of conformity is available at the following
internet address:
https://www.eufylife.com/
Anker Innovations Limited
Room 1318-19, Hollywood Plaza, 610 Nathan Road, Mongkok, Kowloon, Hong
Kong
GB Declaration of Conformity
Hereby, Anker Innovations Limited declares that the product type T2108/T2109/
T2110 is in compliance with Electrical Equipment (Safety) Regulations 2016 &
Electromagnetic Compatibility Regulations 2016 & The Restriction of the Use of
Certain Hazardous Substances in Electrical and Electronic Equipment Regulations
2012 & The Ecodesign for Energy-Related Products Regulations 2010.
The full text of the GB declaration of conformity is available at the following
internet address:
https://www.eufylife.com/

08 09
English English
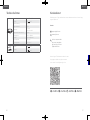
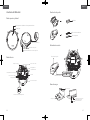
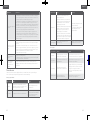
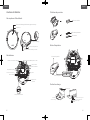
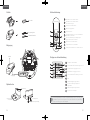
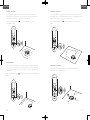
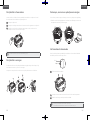
RoboVac Anatomy
Top & Side
Auto cleaning Start/Stop button
Bumper
Dust collector release button
Infrared sensor
Dust collector
Bottom
OFF ON
Drop sensors
Swivel wheel
Side brushes
Wheels
Rolling brush
Brush guard
Battery compartment
Charging contact pins
Dust collector
Main power switch (On/Off)
Dust Collector
Pre-filter
High-performance filter
Foam filter
Suction Inlet
Dust collector
Suction inlet
Charging Base
Status light
Power cord storage
compartment
Power socket
Charging contact pins

10 11
English English
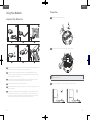
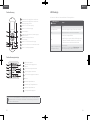
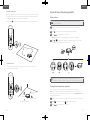
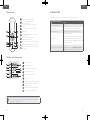
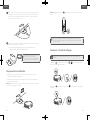
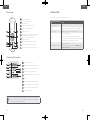
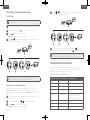
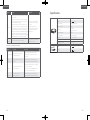
Remote Control
1
2
3
5
4
6
7
8
9
10
Start Auto cleaning
Start Auto cleaning
Stop cleaning
Start Spot cleaning
Start Edge cleaning
Adjust time
Adjust suction power level in Auto/Single Room
Cleaning mode
Control cleaning direction manually
Adjust the hour and minute
Start Single Room cleaning
Return RoboVac to Charging Base
Schedule Auto cleaning start time
Remote Control Display
6
1
2
3
4
5
7
8
9
10
Returning to Charging Base
Auto cleaning mode selected
Spot cleaning mode selected
Edge cleaning mode selected
Single Room cleaning mode selected
Clock
Standard suction power enabled
BoostIQ™ dynamic suction power enabled
Max suction power enabled
Scheduled cleaning time
Install 2 AAA batteries before using the remote control for the first time. Make sure
the positive and negative ends are facing the correct polarity direction as marked in
the battery compartment.
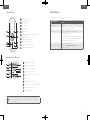
LED Indication
You can see the status of RoboVac from the LED indicator.
(Status Light) Status
Breathing orange Charging
Solid blue Standby / Cleaning / Fully charged
Solid orange Low power and returning to Charging Base
O
• RoboVac is off.
• To conserve power, the light automatically turns off
when RoboVac is not docked to the Charging Base
and has been inactive for 1 minute.
Flashing / Solid red + Beeping
RoboVac has an error.
Refer to the “Troubleshooting>Error Tone” section in this
manual for solutions.

12 13
English English
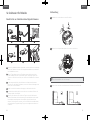
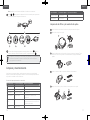
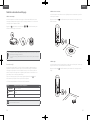
Using Your RoboVac
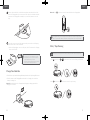
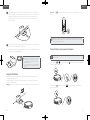
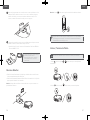
Important Tips Before Use
abc
de
f
a
Remove power cords and small objects from the floor that may entangle RoboVac. Use
the provided cable ties to organize your wires and power cords.
b
Fold tasseled edges of area rugs underneath to prevent tangling RoboVac. Avoid
cleaning very dark-colored high-pile rugs or rugs thicker than 1.02 in/26 mm as they
may cause RoboVac to malfunction.
c
We strongly recommend placing physical barriers in front of fireplaces and certain
areas (i.e. air vents) that may cause damage to RoboVac if entered.
d
Keep RoboVac away from wet areas during cleaning.
e
RoboVac may climb on top of objects less than 0.63 in/16 mm in height. Remove these
objects if possible.
f
Anti-drop sensors prevent RoboVac from tumbling down stairs and steep drops. They
may work less effectively if dirty or used on reflective/very dark-colored floors. It is
recommended to place physical barriers to block off areas where RoboVac may fall,
such as stairs covered by carpets or the rounded edges of wood floors.
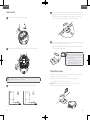
Preparation
Install the side brushes before use.
Turn on the main power switch on the bottom of RoboVac.
Remove the sticker next to the power switch, and the foam blocks beside the
bumper before use.
Place the Charging Base on a hard, level surface and against a wall.

14 15
English English
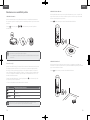
Remove objects within 3 ft/1 m of the left and right side and within 6 ft/2 m of the
front of the Charging Base. If you cannot remove the objects, check whether RoboVac
can return to the Charging Base normally; if not, contact eufy customer service for
help..
Connect the round connector of the adapter into the power socket on the Charging
Base and the other end into a wall outlet.
• When the Charging Base connects to AC power, the LED indicator on the Charging
Base is SOLID WHITE.
- Install the Charging Base in a location that RoboVac
can easily access. It is recommended to place the
Charging Base against a wall, and on a hard-level
surface rather than on rugs or carpets.
- Always keep the Charging Base plugged in, otherwise
RoboVac will not automatically return to it.
Charge Your RoboVac
• RoboVac has a pre-installed rechargeable battery that has to be fully charged before use.
• RoboVac returns to the Charging Base at the end of a cleaning cycle or when its
battery is running low.
Method 1: Attach RoboVac to the Charging Base by aligning its charging pins with the
charging pins on the base.
Method 2: Press on the remote control to return RoboVac to the Charging Base.
Turn off the main power switch if RoboVac will not be used for a long period of
time. To preserve the battery’s lifespan, recharge at least once every 6 months.
Start / Stop Cleaning
Make sure the main power switch on the bottom of RoboVac is turned on before use.
1. Press on RoboVac or / on the remote control to start cleaning in Auto Mode.
2. Press on RoboVac or on the remote control to stop cleaning.

16 17
English English
Select a Cleaning Mode
1. Auto cleaning
RoboVac optimizes its cleaning path by selecting different cleaning modes automatically
until cleaning is complete. This is the most commonly used cleaning mode.
Press on RoboVac or / on the remote control to start cleaning in Auto Mode.
- RoboVac will return to the Charging Base automatically when the battery level becomes
low or when RoboVac finishes cleaning.
- By default, RoboVac starts in Auto cleaning mode when it is turned on.
BoostIQ™ Feature
When the BoostIQ™ feature is enabled, RoboVac will automatically increase the suction
power if it detects stronger power is needed to ensure the best clean. BoostIQ™ is ideal for
cleaning thicker carpets and hard-to-sweep messes, which will reduce the total cleaning
time, but increase the noise level. If the vacuuming noise caused by BoostIQ™ disturbs
you, you can disable this feature. This feature only works in Auto and Single Room cleaning
modes.
In Auto or Single Room cleaning mode, press on the remote control repeatedly to adjust
the suction power level.
• The corresponding icon is displayed on the remote control.
Icon Suction Power Level
Standard
Standard power
BoostIQ
Automatically switches between Standard and Enhanced power (default)
Max
Maximum power
When RoboVac starts cleaning in Auto or Single Room mode the next time, it will
clean according to the suction power level you previously selected.
1. Spot cleaning
RoboVac intensively cleans a specific area in a spiral, useful if there is a concentrated area
of dust or debris. In Spot mode, RoboVac will stop cleaning after 2 minutes.
Press on the remote control to start cleaning in Spot mode.
2. Edge cleaning
RoboVac reduces its speed when it detects a wall and then follows the wall to ensure the
edge is cleaned thoroughly. In Edge mode, RoboVac will clean for 20 minutes and return to
the Charging Base.
Press on the remote control to start cleaning in Edge mode.

18 19
English English
3. Single Room cleaning
RoboVac intensively cleans one single room and stops after 30 minutes. Select this mode
only when one specific room needs to be cleaned. Make sure to confine RoboVac to the
room by closing the door.
Press on the remote control to start cleaning in Single Room Mode.
4. Manual cleaning
You can direct RoboVac to clean a particular area by using the directional buttons on the
remote control.
Move backward
Turn right
Move forward
Turn left
Set Time and Scheduled Cleaning
Set Time
Make sure the time is set correctly to your local time before setting a scheduled cleaning.
Make sure the main power switch on the bottom of RoboVac is turned on.
Press on the remote control. The time will blink on the display.
Press to set the “hour” and “minute”.
Note: Make sure AM/PM is set correctly.
Press or to save the setting. RoboVac will BEEP ONCE to indicate the time has
been set.
ON
BEEP
To ensure the time is set successfully, make sure RoboVac is turned on. You will hear
a beep when the time has been set.
Set a Scheduled Cleaning
You can schedule RoboVac to start cleaning at a specified time.
Note: Before setting a scheduled cleaning, make sure the time has been set correctly to
your local time; refer to the previous section “Set Time” for how to set the time.
Make sure the main power switch on the bottom of RoboVac is turned on.
Press on the remote control. will blink on the display.
Press to set the “hour” and “minute”.
Note: Make sure AM/PM is set correctly.

20 21
English English
Press or to save the setting. RoboVac will BEEP ONCE to indicate the
schedule has been set.
1
4
ON
BEEP
To cancel a previously scheduled cleaning, press and hold for 3 seconds until
RoboVac beeps twice and disappears.
To ensure the schedule is set successfully, make sure RoboVac is turned on. You
will hear a beep when the schedule has been set.
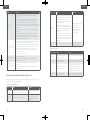
Cleaning and Maintenance
For optimal performance, follow the instructions below to clean and maintain RoboVac
regularly. The cleaning/replacement frequency will depend on your usage habits of
RoboVac.
Recommended cleaning/replacement frequency:
RoboVac Part Cleaning Frequency Replacement Frequency
Dust Collector After each use -
Filters Once every week Every 2 months
Rolling Brush Once every week Every 6-12 months
Side Brushes Once every month Every 3-6 months (or when visibly worn)
Brush Guard Once every month Every 3-6 months (or when the silicone
rubber strip on the brush guard becomes
visibly worn)
Sensors Once every month -
Charging Pins Once every month -
Swivel Wheel Once every month -
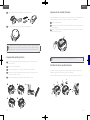
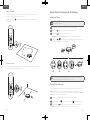
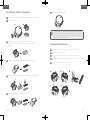
Clean the Dust Collector and Filters
Press the dust collector release button to pull the dust collector out.
Open and empty the dust collector.
2
1
Remove the pre-filter by pulling the hooks as shown. Be careful not to pull the hook
with too much force as it may damage the pre-filter.
Carefully remove the foam filter and high-performance filter.
Clean the dust collector and filters with a vacuum cleaner or a cleaning brush.
Put the filters and pre-filter back together in the dust collector.

22 23
English English
Push the dust collector back into the main unit.
- You can wash the dust collector, pre-filter and foam filter with water. Be sure to
wash them with care and air-dry them thoroughly before reassembling.
- Do not wash the high-performance filter with water, as it may damage the filter
and reduce the suction power.
.
Clean the Rolling Brush
Pull on the release tabs to unlock the brush guard as shown.
Lift the rolling brush to remove.
Clean the rolling brush with the provided cleaning tool or a vacuum cleaner.
Reinstall the rolling brush by inserting the fixed protruding end first and then clicking
into place.
Press down to snap the brush guard into place.
1
4
2
5
3
Clean the Side Brushes
Foreign substances, such as hair, can easily get tangled in the side brushes, and dirt may
adhere to them. Be sure to clean them regularly.
Remove the side brushes.
Carefully unwind and pull off any hair or string that is wrapped between the main unit
and the side brushes.
Use a cloth dampened with warm water to remove dust from the brushes or to gently
reshape them.
Only use the side brushes when they are completely dry.
T
Replace the Side Brushes
The side brushes may become bent or damaged after being used for a period of time.
Follow the instructions below to replace them.
Pull off the old side brushes and snap the new ones into place until you hear a click.
Click

24 25
English English
Clean the Bumper, Sensors and Charging Pins
To maintain the best performance, clean the bumper, sensors and charging pins regularly.
• Dust off the bumper, sensors and charging contact pins using a cloth or cleaning brush.
Clean the Swivel Wheel
Hair or dust particles can easily get entangled in the swivel wheel. Be sure to clean the
swivel wheel periodically and as needed.
Wheel
Axle
Pull out the swivel wheel.
Clean any hair or debris wrapped around the wheel or entangled inside the wheel
cavity.
Reinstall the wheel and push in until it clicks into place.
- You can clean the swivel wheel with water.
- Use the swivel wheel only when it is completely dry.
Troubleshooting
Frequently asked questions
The solutions below are for general questions. If your problem persists, visit
www.eufylife.com or contact [email protected] for help.
Problems Solutions
RoboVac cannot
be activated.
• Make sure the main power switch is in the ON position.
• Make sure the battery is fully charged.
• Replace the batteries (2 AAA) in the remote control.
• Make sure the remote control is within range (16 ft/5 m) of RoboVac.
• If you still have trouble, turn o the main power switch and then
turn it back on.
The remote control
does not work.
• Replace the batteries in the remote control.
• Make sure RoboVac is turned on and fully charged.
RoboVac
stops working
suddenly.
• Check if RoboVac is trapped or stuck on an obstacle.
• Check if the battery level is too low.
• Check the “Error Tones” section to find the solution.
• If you still have trouble, turn o the main power switch, wait for 2
seconds, and then turn it back on.
You cannot
schedule
cleanings.
• Make sure the main power switch on the bottom of RoboVac is turned on.
• Make sure the time, time of day (AM/PM), and the scheduled
time have been set correctly.
• Check if RoboVac’s power is too low to start cleaning.
Suction power is
weak.
• Check if any obstructions are blocking the suction inlet.
• Empty the dust collector.
• Clean the filters with a vacuum cleaner or a cleaning brush.
• Check if the filters are wet due to water or other liquid on the floor.
Air-dry the filters completely before use.
RoboVac cannot
be charged.
• Check if the indicator on the Charging Base lights up. If not,
contact the eufy service center to repair or replace the Charging Base
• Check if the indicator on RoboVac is solid red and there is no beep
during charging. If yes, it indicates the battery has failed. Reinstall
the battery, then turn RoboVac on and o. If the problem persists,
contact the eufy service center to repair or replace the battery..
• Dust o the charging contact pins with a dry cloth.
• Check if you can hear a beep when RoboVac is docked onto the
Charging Base. If not, contact the eufy service center to repair or
replace the Charging Base.
RoboVac cannot
return to the
Charging Base
.
• Remove objects within 3 ft/1 m to the left and right side and
within 6 ft/2 m of the front of the Charging Base.
• Check if the indicator on RoboVac is solid red and there is no beep
during charging. If yes, it indicates the battery has failed. Reinstall
the battery, then turn RoboVac on and o. If the problem persists,
contact the eufy service center to repair or replace the battery.
• When RoboVac is in the vicinity of the Charging Base, it will return
more quickly. However, if the Charging Base is located far away,
RoboVac will need more time to return. Please be patient as it
works its way back.
• Clean the charging contact pins.

26 27
English English
Problems Solutions
The rolling brush
does not rotate.
• Clean the rolling brush.
• Check if the rolling brush and brush guard have been installed properly.
RoboVac’s
movements or
travel path are
abnormal.
• Clean the sensors carefully with a dry cloth.
• Restart RoboVac by turning the power switch o and on.
Error Tones
When RoboVac is in trouble, it will emit a series of short or long beeps and the red indicator
on RoboVac will be solid or flashing.
Flashing red indicator light
Error Tone Cause Solution
One beep RoboVac is stuck and one of the
wheels is not making contact
with the floor (hanging in mid-air). Restart cleaning in a new location.
Two beeps RoboVac’s bumper is stuck. Tap RoboVac’s bumper several times to
dislodge any debris that may be trapped
underneath.
Three beeps
RoboVac can get stuck in the
following scenarios:
• When RoboVac does not have
enough power to reverse when
on the edge of a staircase that is
covered by a rug.
• When RoboVac tries to
reverse due to exposure to
strong sunshine, but cannot
reverse due to physical
barriers in the way.
• When RoboVac reverses
due to exposure to strong
sunshine, but continues to be
exposed to strong sunshine
after reversing for 3 seconds.
• Clean the drop sensors gently with
a dry cloth.
• Place RoboVac in a new location.
• Use a physical barrier to block o
the problem area.
Four beeps RoboVac’s power level is too low. Manually charge RoboVac for at least
5 hours.
Solid red indicator light
Error Tone Cause Solution
One beep RoboVac’s left/right wheel
is stuck. Turn o RoboVac and remove any hair or
debris from the left/right wheel.
Two beeps RoboVac’s side brush is
stuck. Turn o RoboVac and remove any hair or
debris from the side brush.
Error Tone Cause Solution
Three beeps RoboVac’s suction fan is
stuck.
• Turn o RoboVac, then remove and
empty the dust collector.
• Make sure the suction inlet is not
blocked by any hair or debris.
Four beeps RoboVac’s rolling brush is
stuck. Turn o RoboVac and remove any hair or
debris from the rolling brush.
Specifications
Input 19 V 0.6 A
Battery Voltage DC 14.4 V
Power Consumption 25 W
Battery Type DC 14.4 V
Li-ion 2600 mAh
Dust Collector Capacity
0.6 L
Cleaning Time Max. 100 mins
Charging Time 300 - 360 mins
Charging Temperature 5°C - 40°C
Storage Temperature -20°C - 60°C
Input 19 V 0.6 A
Output 19 V 0.6 A

29
Deutsch
28
English
Customer Service
For tutorial videos, FAQs, manuals, and more information,
please visit: http://support.eufylife.com.
Contact Us
(US/CA) +1 (800) 994 3056
(UK) +44 (0) 1604 936200
(DE) +49 (0) 69 9579 7960
(日本) 03 4455 7823
www.eufylife.com
For more support phone numbers, please visit:
http://support.eufylife.com/s/phonecontactus
Or scan the QR code below:
Anker Innovations Limited
Room 1318-19, Hollywood Plaza, 610 Nathan Road, Mongkok, Kowloon, Hong Kong
Vielen Dank, dass Sie sich für einen RoboVac entschieden haben. Bitte lesen
Sie sich die Bedienungsanleitung vor der ersten Verwendung durch und heben
Sie die Anweisungen für eine spätere Bezugnahme auf.
Inhaltsverzeichnis
30 Wichtige Sicherheitshinweise
33 Hinweis
35 Über Ihren RoboVac
Das ist im Lieferumfang
So ist RoboVac aufgebaut
LED-Anzeige
40 So funktioniert Ihr RoboVac
Beachten Sie vor Inbetriebnahme folgende Hinweise
Vorbereitung
So laden Sie Ihren RoboVac auf
Reinigungsvorgang starten / stoppen
Reinigungsmodus auswählen
Reinigungszeitplan einstellen
48 Reinigung und Instandhaltung
So reinigen Sie den Staubbehälter und Filter
So reinigen Sie die Rollbürste
So reinigen Sie die Seitenbürsten
So ersetzen Sie die Seitenbürsten
Reinigen von Stoßfänger, Sensoren und Ladekontaktstiften
So reinigen Sie das Drehrad
53 Fehlerbehebung
56 Technische Daten
57 Kundendienst

30 31
Deutsch Deutsch
Wichtige Sicherheitshinweise
Um das Risiko von Verletzungen oder Schäden zu vermeiden,
lesen und befolgen Sie die Sicherheitshinweise bei der
Einrichtung, Verwendung und Wartung dieses Geräts.
SICHERHEITSSYMBOLE
Dies ist das Sicherheitswarnsymbol. Dieses Symbol
warnt vor möglichen Gefahren, die Sachschäden
und / oder eine schwere Körperverletzung oder Tod
herbeiführen könnten.
WARNUNG – Zur Verringerung des Risikos von Bränden,
Stromschlägen oder Verletzungen:
• Nur für den Haushaltsgebrauch bestimmt.
• Nur wie in diesem Handbuch beschrieben verwenden. Nur das
vom Hersteller zugelassene Zubehör verwenden.
• Das Gerät nicht am Kabel aus der Steckdose ziehen, sondern
am Stecker anfassen.
• Stecker oder Gerät nicht mit nassen Händen anfassen.
• Haare, lose Kleidung, Finger und alle Körperteile von offenen
und beweglichen Teilen fernhalten.
• Bei der Reinigung von Treppen besonders vorsichtig sein.
• Das Gerät nicht verwenden, um brennbare oder entzündliche
Flüssigkeiten wie Benzin aufzusaugen, und nicht in Bereichen
einsetzen, in denen solche Flüssigkeiten vorhanden sein können.
• Das Gerät nicht auf nassen Oberflächen verwenden.
• Nicht ohne Staubbehälter und/oder Filter verwenden.
• Um unbeabsichtigtes Starten zu vermeiden, achten Sie darauf,
dass sich der Schalter in der Aus-Stellung befindet, bevor Sie
das Gerät in die Hand nehmen oder tragen.
• Unter extremen Bedingungen kann Flüssigkeit aus dem Akku
herausspritzen. In diesem Fall jeden Kontakt vermeiden. Bei
versehentlichem Kontakt betroffene Stelle gründlich mit Wasser
und Seife waschen. Wenn die Flüssigkeit in die Augen gelangt,
sofort ärztliche Hilfe aufsuchen. Aus dem Akku austretende
Flüssigkeit kann Reizungen oder Verbrennungen verursachen.
• Das Gerät keinem Feuer und keinen hohen Temperaturen
aussetzen. Die Einwirkung von Feuer oder Temperaturen über
130°C kann zu Explosionen führen.
• Die Ladeanweisungen in diesem Handbuch befolgen und den
Akkupack oder das Gerät nicht außerhalb des angegebenen
Temperaturbereichs aufladen. Unsachgemäßes Laden oder
Temperaturen außerhalb des angegebenen Bereichs können
den Akku beschädigen und die Brandgefahr erhöhen.
• Lassen Sie Wartungsarbeiten nur von einem qualifizierten
Techniker und nur mit identischen Ersatzteilen durchführen.
Dadurch wird die fortgesetzte Sicherheit des Produkts
gewährleistet.
• Modifizieren oder versuchen Sie nicht, das Gerät zu reparieren,
außer wie in der Gebrauchs- und Pflegeanleitung angegeben.
• Vor der Reinigung oder Wartung des Gerätes muss der Stecker
aus der Steckdose gezogen werden.
• Das Gerät enthält einen Akku, der nur von Fachleuten
gewechselt werden kann.
• Das Gerät muss beim Entfernen des Akkus vom Netzstrom
getrennt sein.
• Keine beschädigten oder modifizierten Akkus oder Geräte
verwenden. Beschädigte oder modifizierte Akkus können zu
unvorhersehbarem Verhalten mit der Gefahr von Bränden,
Explosionen oder Verletzungen führen.
• Das Gerät kann von Kindern ab 8 Jahren sowie von Personen
mit physischen, sensorischen, psychischen oder geistigen
Beeinträchtigungen verwendet werden, sofern sie angemessene
Überwachung oder Einweisung in die sichere Verwendung des
Geräts erhalten und die damit einhergehenden Risiken richtig
einordnen können.
• Kinder sollten beaufsichtigt werden, um sicherzustellen, dass
sie nicht mit diesem Gerät spielen.
• Reinigung und Wartung dürfen nicht von Kindern ohne Aufsicht
von Erwachsenen durchgeführt werden.
• Verwenden Sie zum Aufladen des Akkus nur das im
Lieferumfang des Geräts enthaltene abnehmbare Netzteil
(US : GSCU0600S019V12E EU: GSCV0600S019V12E GB:
GSCB0600S019V12E AU : GSCS0600S019V12E).
• Der Akku muss entfernt werden, bevor das Gerät entsorgt wird.
Um den Akku aus dem Gerät zu entfernen, schrauben Sie die
Akkuabdeckung an der Unterseite mit einem Schraubendreher
ab.
• Der gebrauchte Akku muss in einem versiegelten Plastikbeutel
aufbewahrt und gemäß den örtlichen Umweltvorschriften
entsorgt werden.
• Das externe flexible Kabel oder Netzkabel des Netzteils kann
nicht ausgetauscht werden. Wenn das Kabel beschädigt ist,

32 33
Deutsch Deutsch
muss das Netzteil entsorgt werden.
• Das Gerät darf ausschließlich in Innenbereichen verwendet
werden.
• Das Gerät ist kein Spielzeug. Setzen oder stellen Sie sich nicht
auf das Gerät. Kleine Kinder und Haustiere sollten beaufsichtigt
werden, wenn das Gerät in Betrieb ist.
• Verwenden Sie zur Reinigung nur ein mit ein wenig Wasser
angefeuchtetes Tuch.
• Saugen Sie mit diesem Gerät keine brennenden oder
rauchenden Objekte auf.
• Verwenden Sie das Gerät nicht zum Aufsaugen von
verschütteten Bleichmitteln, Farben, Chemikalien oder
Flüssigkeiten.
• Heben Sie vor Verwendung des Geräts Objekte wie Kleidung
und loses Papier vom Boden auf. Binden Sie Jalousien- oder
Vorhangkordeln hoch, und entfernen Sie Netzkabel und
zerbrechliche Gegenstände vom Boden. Wenn das Gerät über
ein Netzkabel rollt und es mitzieht, können die entsprechenden
Elektroartikel von Tischen oder Regalen gerissen werden.
• In Räumen mit Balkon sollte eine physische Barriere verwendet
werden, um den Zugang zum Balkon zu verhindern und einen
sicheren Betrieb zu gewährleisten.
• Stellen Sie keine Gegenstände auf das Gerät.
• Beachten Sie, dass sich das Gerät eigenständig bewegt. Gehen
Sie beim Betreten des Bereichs, in dem das Gerät betrieben
wird, vorsichtig vor, damit Sie nicht versehentlich auf das Gerät
treten.
• Betreiben das Gerät nicht in Bereichen mit frei liegenden
Bodensteckdosen.
• Legen Sie die Elektronik des Geräts, den Akku oder die
integrierten Ladestation nicht frei. Keine Teile im Inneren des
Geräts können durch den Benutzer gewartet werden.
• Verwenden Sie das Gerät nicht auf Rohbeton oder auf
unversiegeltem, gewachstem oder rauem Bodenbelag.
Andernfalls kann es zu Schäden am Boden und am Gerät
kommen. Verwenden Sie das Gerät nur auf Hartbelägen oder
Kurzflorteppichen.
• Das Gerät wurde für die kratzerfreie Verwendung auf Böden
entwickelt. Dennoch empfehlen wir, das Gerät in einem kleinen
Bereich des zu reinigenden Raums zu testen, um vor dem
Reinigen des ganzen Raums sicherzustellen, dass keine Kratzer
entstehen.
DIESE ANWEISUNGEN AUFBEWAHREN
Hinweis
Dieses Symbol bedeutet, dass das Produkt nicht mit
dem Hausmüll entsorgt werden darf, sondern bei einer
geeigneten Sammelstelle für das Recycling abgegeben
werden muss. Die ordnungsgemäße Entsorgung
und das Recycling tragen dazu bei, die natürlichen
Ressourcen, die Gesundheit und die Umwelt zu
schützen. Weitere Informationen zur Entsorgung und
zum Recycling dieses Produkts erhalten Sie von Ihrer
zuständigen Kommune, Ihrem Entsorgungsdienst oder
dem Geschäft, in dem Sie dieses Produkt gekauft haben
FCC-Erklärung
Dieses Gerät erfüllt Teil 15 der FCC-Vorschriften. Für den Betrieb
gelten zwei Voraussetzungen: (1) Dieses Gerät darf keine
Störungen verursachen, und (2) dieses Gerät muss Störungen
tolerieren, auch Störungen mit unerwünschten Auswirkungen auf
den Betrieb.
Warnung: Veränderungen oder Modifikationen, die nicht
ausdrücklich von der für die Erfüllung der Bedingungen
verantwortlichen Partei genehmigt wurden, können dazu führen,
dass der Benutzer die Berechtigung zum Betrieb des Geräts
verliert.
Hinweis: Die Prüfung dieses Geräts hat ergeben, dass es die
Grenzwerte für ein digitales Gerät der Klasse B gemäß Teil
15 der FCC-Vorschriften erfüllt. Diese Grenzwerte sollen in
Wohngebieten einen angemessenen Schutz vor gefährlichen
Störungen gewährleisten
Dieses Gerät erzeugt und verwendet Hochfrequenzenergie und
kann diese abstrahlen. Wenn es nicht gemäß den Anweisungen
installiert und verwendet wird, kann es schädliche Störungen der
Funkkommunikation verursachen. Es kann jedoch nicht garantiert
werden, dass in bestimmten Gebieten nicht doch Störungen
auftreten können.Wenn dieses Gerät schädliche Störungen des
Radio- oder Fernsehempfangs verursacht, was sich durch Ein-
und Ausschalten des Geräts überprüfen lässt, sollte der Benutzer

34 35
Deutsch Deutsch
versuchen, die Störungen durch eine oder mehrere der folgenden
Maßnahmen zu beheben: (1) Richten Sie die Empfangsantenne
neu aus oder stellen Sie sie neu auf. (2) Den Abstand zwischen
dem Gerät und dem Empfänger vergrößern. (3) Das Gerät mit
der Steckdose eines anderen Stromkreises als dem verbinden,
mit dem der Empfänger verbunden ist. (4) Holen Sie den Rat des
Händlers oder eines erfahrenen Rundfunktechnikers ein.
ISED-Entsprechenserklärung
Dieses Gerät enthält lizenzfreie Transmitter/Empfänger, die
den lizenzfreien RSS-Standards der kanadischen Behörde
Innovation, Science and Economic Development Canada
entsprechen. Für den Betrieb gelten zwei Voraussetzungen:
1. Dieses Gerät darf keine Störungen verursachen.
2. Dieses Gerät muss alle Störungen akzeptieren,
einschließlich Störungen, die einen unerwünschten Betrieb
des Geräts verursachen können.
Entsprechenserklärung zur HF-Exposition
Dieses Gerät erfüllt die Expositionsgrenzwerte, die von der
FCC/IC für eine unkontrollierte Umgebung festgelegt wurden.
Dieses Gerät sollte mit einem Mindestabstand von 20 cm
zwischen dem Strahler und Ihrem Körper installiert und
betrieben werden.
Konformitätserklärung
Dieses Produkt erfüllt die Funkstörungsanforderungen der
Europäischen Gemeinschaft. Anker Innovations Limited erklärt
hiermit, dass dieses funktechnische Gerät des Typs T2108/
T2110/T2109 der Richtlinie 2014/35/EU & 2014/30/EU
entspricht. Der vollständige Text der EU-Konformitätserklärung
ist unter der folgenden Internetadresse verfügbar: https://www.
eufylife.com/.
Über Ihren RoboVac
Das ist im Lieferumfang
RoboVac
Netzteil
Hocheffizienter
Ersatz-Filter
Ersatz
Schaumfilter
Bedienungsanleitung
Reinigungswerkzeug Ersatz Seitenbürsten
(×4)
Ladestation
Fernbedienung (Zwei
AAA-Batterien)

36 37
Deutsch Deutsch
So ist RoboVac aufgebaut
Oberseite und Seiten
Schalter, um eine Reinigung zu starten oder zu stoppen
Stoßdämpfer
Staubfänger Entriegelungsknopf
Infrarotsensor
Staubfänger
Unterseite
OFF ON
Fallsensoren
Schwenkrad
Seitenbürsten
Räder
Rollbürste
Bürstenschutz
Akku-Fach
Ladestifte
Staubfänger
Hauptschaltknopf
Staubfänger
Filterabdeckung
High-Performance Filter
Schaumstofffilter
Saugöffnung
Staubfänger
Saugöffnung
Ladestation
Status Licht
Stromkabel-Fach
Steckdose
Ladestifte
La pagina si sta caricando...
La pagina si sta caricando...
La pagina si sta caricando...
La pagina si sta caricando...
La pagina si sta caricando...
La pagina si sta caricando...
La pagina si sta caricando...
La pagina si sta caricando...
La pagina si sta caricando...
La pagina si sta caricando...
La pagina si sta caricando...
La pagina si sta caricando...
La pagina si sta caricando...
La pagina si sta caricando...
La pagina si sta caricando...
La pagina si sta caricando...
La pagina si sta caricando...
La pagina si sta caricando...
La pagina si sta caricando...
La pagina si sta caricando...
La pagina si sta caricando...
La pagina si sta caricando...
La pagina si sta caricando...
La pagina si sta caricando...
La pagina si sta caricando...
La pagina si sta caricando...
La pagina si sta caricando...
La pagina si sta caricando...
La pagina si sta caricando...
La pagina si sta caricando...
La pagina si sta caricando...
La pagina si sta caricando...
La pagina si sta caricando...
La pagina si sta caricando...
La pagina si sta caricando...
La pagina si sta caricando...
La pagina si sta caricando...
La pagina si sta caricando...
La pagina si sta caricando...
La pagina si sta caricando...
La pagina si sta caricando...
La pagina si sta caricando...
La pagina si sta caricando...
La pagina si sta caricando...
La pagina si sta caricando...
La pagina si sta caricando...
La pagina si sta caricando...
La pagina si sta caricando...
La pagina si sta caricando...
La pagina si sta caricando...
La pagina si sta caricando...
La pagina si sta caricando...
La pagina si sta caricando...
La pagina si sta caricando...
La pagina si sta caricando...
La pagina si sta caricando...
La pagina si sta caricando...
La pagina si sta caricando...
La pagina si sta caricando...
La pagina si sta caricando...
La pagina si sta caricando...
La pagina si sta caricando...
La pagina si sta caricando...
La pagina si sta caricando...
La pagina si sta caricando...
La pagina si sta caricando...
La pagina si sta caricando...
-
 1
1
-
 2
2
-
 3
3
-
 4
4
-
 5
5
-
 6
6
-
 7
7
-
 8
8
-
 9
9
-
 10
10
-
 11
11
-
 12
12
-
 13
13
-
 14
14
-
 15
15
-
 16
16
-
 17
17
-
 18
18
-
 19
19
-
 20
20
-
 21
21
-
 22
22
-
 23
23
-
 24
24
-
 25
25
-
 26
26
-
 27
27
-
 28
28
-
 29
29
-
 30
30
-
 31
31
-
 32
32
-
 33
33
-
 34
34
-
 35
35
-
 36
36
-
 37
37
-
 38
38
-
 39
39
-
 40
40
-
 41
41
-
 42
42
-
 43
43
-
 44
44
-
 45
45
-
 46
46
-
 47
47
-
 48
48
-
 49
49
-
 50
50
-
 51
51
-
 52
52
-
 53
53
-
 54
54
-
 55
55
-
 56
56
-
 57
57
-
 58
58
-
 59
59
-
 60
60
-
 61
61
-
 62
62
-
 63
63
-
 64
64
-
 65
65
-
 66
66
-
 67
67
-
 68
68
-
 69
69
-
 70
70
-
 71
71
-
 72
72
-
 73
73
-
 74
74
-
 75
75
-
 76
76
-
 77
77
-
 78
78
-
 79
79
-
 80
80
-
 81
81
-
 82
82
-
 83
83
-
 84
84
-
 85
85
-
 86
86
-
 87
87


Eufy T2100 Series Manuale del proprietario
- Tipo
- Manuale del proprietario
in altre lingue
- français: Eufy T2100 Series Le manuel du propriétaire
- español: Eufy T2100 Series El manual del propietario
- Deutsch: Eufy T2100 Series Bedienungsanleitung
- Nederlands: Eufy T2100 Series de handleiding
Documenti correlati
Altri documenti
-
Moneual ME685 Series Manuale utente
-
Moneual ME670 Series Manuale utente
-
Taurus 948893 Automatic Vacuum Cleaner Manuale utente
-
ECOVACS N79WBUNDLE Manuale del proprietario
-
Rowenta RR7675WH X-PLORER ANIMAL Manuale del proprietario
-
ECOVACS Deebot 500 (DC3G) Manuale utente
-
Samsung SR8855 Manuale utente
-
Rowenta RR6875WH Manuale del proprietario
-
eufy Security SoloCam L20 Guida utente
-
Anker T8420S Guida utente