Derbi ATLANTIS 50 4T Manuale del proprietario
- Categoria
- Motociclette
- Tipo
- Manuale del proprietario
La pagina si sta caricando...
La pagina si sta caricando...

3
DERBI - NACIONAL MOTOR, S.A.
Sociedad Unipersonal desidera rin-
graziare la fiducia che Lei ha posto
nella scelta del modello scooter
ATLANTIS 50/1100 c.c. 4T.
In questo manuale si specificano i
dettagli principali per la cura del Suo
scooter / motocicletta e così ottene-
re il miglior funzionamento e mag-
giore durata con un costo minimo.
Abbia cura del Suo scooter / motoci-
cletta: la qualità DERBI si occuperà
del resto, con pezzi originali e una
rete nazionale di oltre quattromila
agenti ed officine autorizzate, siamo
certi che Lei avrà piena soddisfazio-
ne nell’uso del veicolo.
Di fronte a qualsiasi problema, rivol-
gasi al rappresentante più vicino.
Benvenuto a DERBI.
Benvenuto a DERBI
DERBI-NACIONAL MOTOR, S.A.,
Sociedad Unipersonal, wishes to
thank you for the confidence you
have shown us in your purchase of
an ATLANTIS 50/100 cc 4-stroke
scooter.
In this manual we indicate the princi-
pal details of how to care for your
moped or motor scooter, so that you
will be able to operate it at its best
and extend its lifetime, at minimum
cost. Take care of your moped or
scooter, and DERBI Quality will take
care of the rest, with original spare
parts and a network of more than 40
thousand Agents and authorised
workshops throughout the country,
and we are sure that you will derive
total satisfaction from the use of
your vehicle.
If you experience any problem, plea-
se consult the closest DERBI repre-
sentative.
Welcome to DERBI
DERBI - NACIONAL MOTOR, S.A.,
Einmanngesellschaft, möchte Ihnen
für das Vertrauen danken, dass Sie
uns durch den Erwerb des
Motorrollers Modell ATLANTIS.
50/100 ccm 4T unserer Marke
entgegengebracht haben.
Das vorliegende Handbuch enthält
die wichtigsten Informationen über
die Funktionen und Wartung Ihres
Motorrollers und soll dazu beitragen,
dass Ihnen bester Fahrbetrieb und
lange Lebensdauer zu niedrigsten
Kosten gewährleistet werden.
Pflegen Sie Ihren Motorroller,
DERBI übernimmt den Rest. Wir
halten sämtliche Originalersatzteile
bereit und bieten Ihnen in Spanien
ein Netz von über viertausend
Vertragshändlern und –werkstätten,
die sicherstellen, dass Sie viel
Freude mit Ihrem Fahrzeug haben
werden. Bei Auftreten jeglichen
Problems wenden Sie sich bitte an
Ihren Vertragshändler.
Willkomen bei DERBI
igd
La pagina si sta caricando...

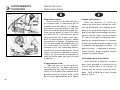
Il manuale
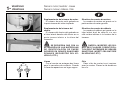
Le istruzioni di questo manuale sono
state preparate principalmente per offrir-
Le una guida dall’uso semplice e chia-
ro; sono inoltre indicate le piccole opera-
zioni di manutenzione e i controlli perio-
dici a cui deve sottoporre il veicolo pres-
so i concessionari o nei Centri d’Assis-
tenza Autorizzati Derbi. Il manuale con-
tiene inoltre le istruzioni per realizzare
delle riparazioni semplici. Per le opera-
zioni che non sono descritte esplicita-
mente nella presente pubblicazione si è
fatto così hanno bisogno di attrezzature
particolari e/o conoscenze tecniche spe-
cifiche per la loro realizzazione. Le con-
sigliamo quindi di rivolgersi ai conces-
sionari o ai distributori Derbi.
The Manual
The instructions in this Manual have
been prepared principally in order to
provide you with a simple clearly usable
guide; minor maintenance operations
are also shown, together with the regu-
lar check-ups which your vehicle should
have at Concessionaires or Authorised
DERBI Service Centres. In addition, the
manual contains instructions to enable
you to carry out a few simple repairs.
Operations which are not explicitly des-
cribed in the present document require
special equipment and/or specialist
technical knowledge to carry out, and
we therefore recommend that you take
them to DERBI Concessionaires or dis-
tributors.
Das Handbuch
Mit diesem Handbuch sollen Ihnen leicht
verständliche und auf einfache Weise in
die Praxis umzusetzende Hinweise
gegeben werden. So finden Sie zum
Beispiel Angaben über kleinere
Wartungsarbeiten und regelmäßige
Revisionen, die von den
Vertragshändlern oder –werkstätten
Derbi vorzunehmen sind. Außerdem
finden Sie in dem Handbuch einige
Hinweise, wie Sie kleinere Reparaturen
selber durchführen können. Die in
dieser Anleitung nicht erwähnten
Arbeiten erfordern Spezialausrüstung
und/oder Fachkenntnisse. Wir
empfehlen Ihnen deshalb, sich in diesen
Fällen mit Vertragshändlern oder
–werkstätten von Derbi in Verbindung
zu setzen.
Il manuale • The Manual
Das Handbuch
5
La pagina si sta caricando...

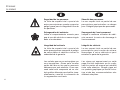
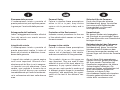
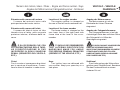
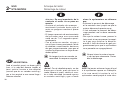
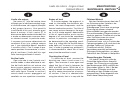
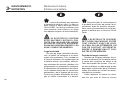
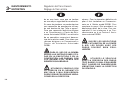
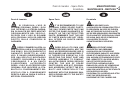
Sicurezza delle persone
L’inadempienza totale o parziale di
queste prescrizioni può implicare perico-
lo grave per l’incolumità delle persone.
Salvaguardia dell’ambiente
Indica l’atteggiamento corretto affinché
l’uso del veicolo non arrechi nessun
danno alla natura.
Integrità del veicolo
L’inadempienza totale o parziale di
queste prescrizioni implica il rischio di
danni seri al veicolo e addirittura la sca-
denza della garanzia.
I segnali che vedete su questa pagina
sono assai importanti. Servono a evi-
denziare parti del libro in cui è necessa-
rio fermarsi con più attenzione. Come
vedete, ogni segnale è formato da un
simbolo grafico diverso per rendere
immediatamente più facile ed evidenzia-
re la collocazione dei temi nelle diverse
aree.
Personal Safety
Failure to observe these prescriptions
either in full or in part, may involve
serious risk to personal safety and to
others.
Protection of the Environment
Indicates correct procedures for the use
of the vehicle which causes no harm to
the environment.
Damage to the vehicle
Failure to observe these prescriptions
either in full or in part, may involve
serious risk of damage to the vehicle,
and even cancellation of the guarantee.
The symbols shown on this page are
very important. They are used to draw
attention to parts of this book where it is
necessary to pay special attention. As
you can see, each symbol is made up of
a different graphic image for immediate
recognition, and emphasise the organi-
sation of the text in the different sec-
tions.
Sicherheit für die Personen
Durch die völlige oder teilweise
Nichtbeachtung dieser Vorschriften
kann eine ernste Gefährdung der
Unversehrtheit von Personen
hervorgerufen werden.
Umweltschutz
Mit diesem Zeichen wird angegeben,
wie Sie durch ein umsichtiges Fahren
mit Ihrem Motorroller zum Umweltschutz
beitragen können.
Betriebssicherheit des Fahrzeugs
Durch die völlige oder teilweise
Nichtbeachtung dieser Vorschriften
können schwere Schäden an dem
Fahrzeug hervorgerufen werden und
können sogar zum Verlust der Garantie
führen.
Die auf dieser Seite angegebenen
Zeichen sind von größter Wichtigkeit.
Mit ihnen werden Textstellen des
Handbuches angegeben, die höhere
Aufmerksamkeit verlangen. Die
einzelnen Zeichen unterscheiden sich
durch verschiedene graphische
Symbole, mit denen in den
verschiedenen Kapiteln die einzelnen
Hinweise gekennzeichnet und als
solche leicht zu erkennen sind.
7
igd
La pagina si sta caricando...

9
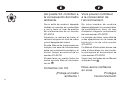
Così può Lei contribuire
alla conservazione del
medio ambiente.
Dal suo modo di guidare dipende
pure il consumo di combustibile e,
quindi, il livello di emissione di con-
taminanti del suo scooter ATLANTIS
Inoltre, il modo in cui tratta il veicolo
influisce sul livello di rumore e nel
proprio logoramento.
In questo Manuale di Istruzioni si
allegano una serie di informazioni
sulla guida ecologica e contempora-
neamente economica del suo scoo-
ter ATLANTIS
Voglia tener presente tutti i testi di
questo Manuale contrassegnati con
un
❀
Contiamo su di Lei.
Protegga il
medio ambiente!
This is how you can con-
tribute to preserving the
environment.
The way you ride determines your
fuel consumption and therefore how
much your scooter ATLANTIS pollu-
tes the atmosphere.
In the same way, the way you
treat your moped affects its noise
level and wear and tear on the scoo-
ter ATLANTIS
In the Owner’s instruction handbo-
ok you will find a series of points of
information on how to ride in an eco-
logically sound manner, which will
also be the most economic way to
ride your scooter ATLANTIS
Please pay attention to all the
points marked with a flower
❀
in
this handbook.
We are counting on you!
Protect the
environment!
So können Sie zum
Umweltschutz beitragen
Von Ihrem Fahrstil hängt der
Kraftstoffverbrauch ab und bestimmt
somit die Abgasemission Ihres
Motorrollers ATLANTIS.
Gleichermaßen hat Ihre Fahrweise
auch Auswirkungen sowohl auf den von
dem Motorroller verursachten
Lärmpegel als auch hinsichtlich des
Verschleißes.
Das vorliegende Handbuch enthält
eine Reihe von Informationen über
umweltfreundlichen und gleichzeitig
kostengünstigen Betrieb Ihres
Motorrollers ATLANTIS.
Beachten Sie in diesem Handbuch
bitte alle mit
❀
gekennzeichneten
Textstellen.
Wir rechnen auf Sie.
Schonen die
die Umwelt!
igd
La pagina si sta caricando...
La pagina si sta caricando...
La pagina si sta caricando...
La pagina si sta caricando...
La pagina si sta caricando...
La pagina si sta caricando...
La pagina si sta caricando...

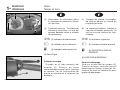
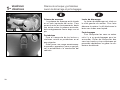
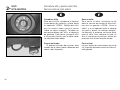
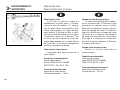
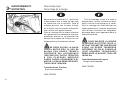
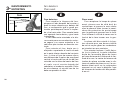
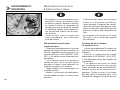
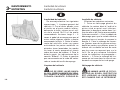
Situazione del numero del motore
Il numero del motore è inciso nella
parte posteriore del carter sinistro.
Situazione del numero del telaio
Il numero del telaio è inciso sul tubo
laterale vicino al telaio, nella sua parte
posteriore inferiore, all’altezza della tra-
versa.
55
È DA RICORDARSI CHE CON
LA CONTRAFFAZIONE DELLE TARG-
HE D’IDENTIFICAZIONE SI PUÒ
INCORRERE IN GRAVI SANZIONI
PENALI (SEQUESTRO DEL VEICOLO,
ECC.).
Chiavi
Con lo scooter si consegnano due chiavi
per la serratura d’accensione. Conser-
vare le chiavi di ricambio in sede sicura.
Location of the engine number
The engine number is stamped on
the rear of the left hand crankcase half.
Location of the frame number
The frame number is stamped on the
rear lower face of the right hand side
frame tube at the level of the cross-
member.
55
IT SHOULD BE REMEMBERED
THAT ALTERING IDENTIFICATION
MARKS MAY MAKE YOU LIABLE
FOR SERIOUS CRIMINAL PENALTIES
(SEIZURE OF THE VEHICLE, ETC.).
Keys
Two ignition keys are delivered with
your scooter. Keep your spare key in a
safe place.
Angabe der Motornummer
Die Motornummer ist auf der
Rückseite der linken Ölwanne
eingraviert.
Angabe der Fahrgestellnummer
Die Fahrgestellnummer ist auf der
rückwärtigen Seite des seitlichen Rohrs
des Fahrgestells in Höhe des
Querträgers eingraviert.
55
ES WIRD DARAUF HINGEWIESEN,
DASS DIE VERÄNDERUNG DER
IDENTIFIKATIONSNUMMERN SCHWERE
STRAFSANKTIONEN ZUR FOLGEN
HABEN KÖNNEN (BESCHLAGNAHME
DES FAHRZEUGS ETC.)
Schlüssel
Zum Lieferumfang des Motorrollers
gehören zwei Zündschlüssel. Bewahren
Sie den Ersatzschlüssel an einem
sicheren Ort auf.
17
Numero del motore, telaio - Chiavi • Engine and frame number - Keys
Angabe der Motornummer, Fahrgestellnummer - Schlüssel
igd
VEICOLO - VEHICLE
-1
FAHRZEUG
La pagina si sta caricando...

19
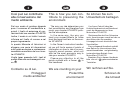
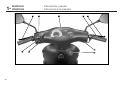
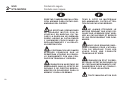
Strumenti e comandi • Instruments and controls
Instrumente und Bedienungselemente
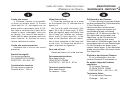
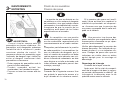
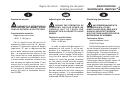
1.- Tablier
2.- Mando freno
delantero
3.- Mando de gas
4.- Pulsador de
arranque
5.- Cerradura
contacto
6.- Mando freno
trasero
7.- Conmutador
intermitentes
8.- Pulsador claxon
9.- Conmutador luces
1.- Tablier
2.- Commande frein
avant
3.- Commande du
gaz
4.- Poussoir
démarrage
5.- Serrure de
contacto
6.- Commande frein
arrière
7.- Commutateur
clignotants
8.- Poussoir klaxon
9.- Commutateur
lampes
1 - Cruscotto
2 - Comando freno
anteriore
3 - Comando
dell’acceleratore
4 - Pulsante
d’accensione
5 - Serratura
d’accensione
6 - Comando freno
posteriore
7 - Commutatore
indicatori
direzione
8 - Pulsante
avvisatore
acustico
9 - Commutatore luci
1.- Instrument panel
2.- Front brake lever
3.- Throttle twist grip
4.- Starter button
5.- Ignition switch
6.- Rear brake lever
7.- Indicator switch
8.- Horn button
9.- Light switch
1.- Cockpit
2.- Bremse, vorne
3.- Gas
4.- Anlassertaste
5.- Zündschloss
6.- Bremse, hinten
7.- Schalter
Richtungsblinker
8.- Hupe
9.- Lichtschalter
ef
i
g
d
VEICOLO - VEHICLE
-1
FAHRZEUG
La pagina si sta caricando...

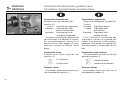
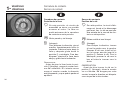
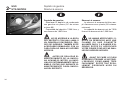
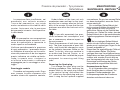
(1) Velocimetro. Il velocimetro indica la
velocità di marcia in chilometri per
ora.
(2) Contachilometri. Totalità dei chilo-
metri percorsi . La cifra dell’estre-
mo destro indica gli ettometri.
) (3) Spia indicatori direzione.
- (4) Indicatore luce abbagliante
& (5) Indicatore scorta benzina.
(6) Orologio digitale
Pulsante accensione
È situato sul lato destro del manubrio
(2). Premerlo in modo continuato finché
il motore si accenda. Vedi le istruzioni di
avviamento nella sezione di avviamento.
(1) Speedometer. The speedometer
displays the road speed of the vehi-
cle in kilometres per hour.
(2) Odometer. Total number of kilome-
tres run. The figure on the extreme
right displays the number of units of
one hundred metres.
) (3) Indicator switch.
- (4) High beam indicator.
& (5) Fuel indicator.
(6) Digital clock
Starter button
Located on the right-hand side of the
handlebar (2). Press and hold down until
the engine starts. See the starting ins-
tructions in the section on Starting the
vehicle.
(1) Tachometer. Der Tachometer zeigt
die Fahrzeuggeschwindigkeit in
Kilometern pro Stunde an.
(2) Kilometerzähler. Zeigt die
zurückgelegten Gesamtkilometer
an. Mit der Ziffer rechts außen
werden die Hektometer
angegeben.
) (3) Fahrtrichtungsanzeiger
- (4) Fernlichtanzeige
& (5) Benzinreserveanzeige
(6) Digital clock
Anlassertaste
Sie ist auf der rechten Seite des
Lenkers (2) angeordnet. Sie ist so lange
zu drücken, bis der Motor anspringt.
Siehe Anleitungen über die
Inbetriebsetzung im Kapitel Anlasser.
Cruscotto • Instrument Panel
Armaturenbrett
21
igd
VEICOLO - VEHICLE
-1
FAHRZEUG
La pagina si sta caricando...

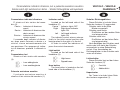
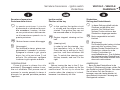
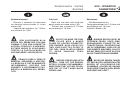
Commutatore indicatori direzione
È situato sul lato sinistro del manu-
brio (2).
Centro - Indicatori di direzione
spenti
Destra - Indicatori di direzione lato
destro accesi
Sinistra - Indicatori di direzione lato
sinistro accesi
Il comando degli indicatori di direzio-
ne, dopo averlo azionato a destra o a
sinistra, ritorna automaticamente alla
sua posizione. Per spegnere gli indica-
tori di direzione, premere il comando in
giù.
Commutatore luci
Situato sul lato sinistro del manubrio
(3).
-
- Luce abbagliante
.
- Luce anabbagliante
Pulsante avvisatore acustico
Il pulsante avvisatore acustico è
situato sul lato sinistro del manubrio (1).
Indicator switch
Located on the left-hand side of the
handlebar (2)
Centre - Indicator lights OFF
Right - Right-hand indicator
lights ON
Left - Left-hand indicator
lights ON
The indicator control returns automa-
tically to the initial central position after
being pushed to the right or to the left.
In order to switch the indicators off,
press the control downwards.
Light switch
Located on the left-hand side of the
handlebar (3).
-
- High beam
.
- Dipped beam
Horn button
The horn button is located on the left-
hand side of the handlebar (1).
Schalter Richtungsblinker
Dieser Schalter ist auf der linken
Seite des Lenkers (2) angeordnet.
Schalter steht in der Mitte
Blinker ausgestellt
Schalter nach rechts
Die Blinker auf der rechten Seite
sind eingeschaltet
Schalter nach links
Die Blinker auf der linken Seite
sind eingeschaltet
Nach Betätigen des Schalters nach
rechts oder links kehrt der Schalter
automatisch in seine Ruhestellung
zurück. Zum Ausschalten der
Richtungsblinker ist der Schalter nach
unten zu drücken.
Lichtschalter
Dieser Schalter liegt auf der linken
Seite des Lenkers (3).
-
- Fernlicht
.
- Abblendlicht
Hupentaster
Der Taster ist auf der linken Seite
des Lenkers angeordnet (1).
Commutatore indicatori direzione, luci e pulsante avvisatore acustico
Indicator switch, light switch and horn button • Schalter Richtungsblinker und Hupentaster
23
igd
VEICOLO - VEHICLE
-1
FAHRZEUG
La pagina si sta caricando...

Comando freno anteriore
È situato sul lato destro del manubrio
(1). Avere speciale cura nel suo uso e
cercare di evitare sempre il bloccaggio
della ruota.
Comando dell’acceleratore
È situato sul lato destro del manubrio
(2). Quando si gira la manopola verso
l’interno si provoca l’apertura della val-
vola del carburatore.
Comando freno posteriore
È situato sul lato sinistro del manu-
brio (3). È da usarsi preferibilmente
quando si desideri ridurre o fermare
completamene la velocità del veicolo.
Bisogna combinare l’uso del freno
posteriore con quello anteriore, a secon-
da delle necessità: in questo modo si
otterranno delle frenate più efficaci.
Front brake lever
Located on the right-hand side of the
handlebar (1). Pay special attention
when using the front brake to avoid loc-
king the wheel.
Throttle twist grip
Located on the right-hand side of the
handlebar (2). Rotating the twist grip
towards you opens the carburettor throt-
tle valve.
Rear brake lever
Located on the left-hand side of the
handlebar (3). This brake should be
used for preference when it is desired to
reduce speed or to stop the vehicle
completely.
Use the rear brake and the front
brake together in combination as neces-
sary, and in this way you will achieve
more efficient braking.
Griff für Bremse vorne
Der Bremsgriff ist auf der rechten
Seite des Lenkers angeordnet (1).
Achten Sie bei Betätigen der Bremse
besonders darauf, dass nicht eine
Blockierung des Rades ausgelöst wird.
Gasgriff
Der Gasgriff ist auf der rechten Seite
des Lenkers angeordnet (2). Bei Drehen
des Griffs in Fahrerrichtung öffnet sich
das Vergaserventil.
Griff für Bremse hinten
Der Bremsgriff ist auf der linken Seite
des Lenkers angeordnet (3). In erster
Linie ist er dann zu betätigen, wenn die
Geschwindigkeit des Fahrzeugs
vermindert oder dieses zum völligen
Stillstand gebracht werden soll.
Beim Bremsvorgang sollten beide
Bremsen gleichzeitig angezogen
werden, da auf diese Weise ein
effektiveres Bremsen erzielt wird.
25
Comando freno e acceleratore • Brake levers, throttle twist grip
Griffe für Bremse vorne und hinten und für Gas
igd
VEICOLO - VEHICLE
-1
FAHRZEUG
La pagina si sta caricando...

Serratura d’accensione
Posizione della chiave
! In questa posizione il circuito
d’accensione si chiude ed è possi-
bile accendere il motore. La chia-
ve non potrà estrarsi dalla serratu-
ra d’accensione quando sia in
questa posizione.
# Motore fermo e senza bloccaggio
$ (bloccaggio)
Per bloccare lo sterzo, girare com-
pletamente il manubrio a sinistra.
Spingere la chiave in giù, girarla
dopo fino alla posizione
$ ed
estrarla. Per sbloccare, spingere
la chiave in giù e girarla a destra.
OSSERVAZIONE
Prima di girare la chiave fino alla
posizione
$ (bloccaggio) mettere lo sco-
oter sul cavalletto. Non provare mai di
muovere lo scooter quando lo sterzo è
bloccato Lei perché potrebbe perdere
l’equilibrio.
Ignition switch
Position of the key
! In this position the ignition circuit
is closed and the engine can be
started. The ignition key can not
be removed when in this position.
# Engine stopped, steering not loc-
ked.
$ (steering lock)
In order to lock the steering , turn
the handlebar fully to the left.
Press the key in and turn to the
$
position, and then withdraw the
key. To unlock the steering, press
the key inwards, and turn it to the
right.
NOTE:
Before turning the key to the
$ (loc-
ked) position, put the scooter up on the
centre-stand. Do not try to move the
scooter when the steering is locked,
because it could easily fall over.
Zündschloss
Stellung des Zündschlüssels
! In dieser Stellung schließt sich der
Zündkreis und der Motor wird
gestartet. Der Schlüssel kann
in dieser Position nicht aus dem
Zündschloss abgezogen werden.
# Motor ausgeschaltet und nicht
blockiert
$ (Blockierung)
Zur Blockierung des Lenkers ist dieser
ganz nach links zu ziehen. Dann
drücken Sie den Zündschlüssel ins
Zündschloss, drehen ihn in die
Position
$ und ziehen ihn
anschließend heraus. Zum Aufheben
der Verriegelung den Zündschlüssel
einführen, nach unten drücken und ihn
dann nach rechts drehen.
ANMERKUNG:
Bevor Sie den Zündschlüssel in die
Position
$ (Blockierung) bringen, stellen Sie
den Scooter auf seinen Ständer. Versuchen
Sie auf keinen Fall, den Scooter zu
bewegen, wenn der Lenker blockiert ist,
denn dadurch könnte das Fahrzeug sein
Gleichgewicht verlieren.
Serratura d’accensione • Ignition switch
Zündschloss
27
igd
VEICOLO - VEHICLE
-1
FAHRZEUG
La pagina si sta caricando...

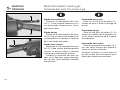
Leva d’avviamento
La leva d’avviamento è situata sul
lato sinistro del motore. Per avviare il
motore basta agire sulla leva azionan-
dola energicamente in giù con il piede.
Portasacchi
Per il trasporto di sacchi e simili esis-
te un portasacchi in cui appenderli.
Evitare di metterci un carico troppo
pesante o voluminoso per non nuocere
la stabilità o la guida del veicolo.
Kick start pedal
The kick start pedal is located on the
left-hand side of the engine. To start the
engine, it is only necessary to operate
the pedal by kicking down hard with the
foot.
Bag Carrier Hook
For carrying shopping bags and simi-
lar objects, there is a bag-carrier hook
where they can be hung.
Avoid loading the hook with objects
which are excessively heavy or bulky, in
order to avoid having a negative effect
on the stability or driving characteristics
of the vehicle.
Kickstarter
Der Kickstarter liegt auf der linken
Seite des Motors. Um den Motor in
Betrieb zu setzen, ist dieser Hebel
lediglich mit dem Fuß kräftig nach unten
zu treten.
Taschenhalter
Zum Transport von Taschen oder
ähnlichen Gepäckstücken ist ein
Taschenhalter vorgesehen, in den diese
eingehängt werden können.
Es sollten jedoch keine zu schweren
oder voluminösen Gegenstände
transportiert werden, von denen das
Gleichgewicht des Fahrzeugs und die
Fahrweise ungünstig beeinflusst werden
könnten.
Leva d’avviamento, Portasacchi
Kick start pedal, Bag Carrier Hook • Kickstarter, Taschenhalter
29
igd
VEICOLO - VEHICLE
-1
FAHRZEUG
La pagina si sta caricando...
La pagina si sta caricando...
La pagina si sta caricando...

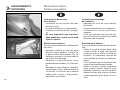
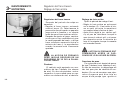
Serratura sella
Per aprire la sella, introdurre la chia-
ve nella serratura d’accensione e girarla
a sinistra “OPEN”. Sotto la sella c’è un
ampio vano per l’elmetto (ci entra un
elmetto integrale). Sotto la sella c’è
anche il serbatoio della benzina. Per
chiudere, ripristinare la sella e spingerla
in giù dalla sua parte posteriore.
Ponte antifurto
Il ponte antifurto dello scooter è situa-
to nella parte inferiore anteriore del
telaio, lato sinistro.
Saddle lock
To open the saddle, insert the key
into the ignition lock and turn to the left
to the “OPEN” position. Underneath the
saddle there is ample space for your
helmet (there is room for a full-face hel-
met). The fuel tank are also located
under the saddle. To close the saddle,
return the saddle to its initial position
and press down on the rear part.
Anti-theft shackle
The scooter has an anti-theft shackle
located underneath the lower front part
of the frame on the left-hand side.
Sitzbankschloss und tankverschluss
Um die Sitzbank hochzuklappen,
stecken Sie den Schlüssel in das
Zündschloss und drehen ihn nach links
bis in die Stellung „OPEN“. Unter der
Sitzbank befindet sich eine geräumige
Box für den Helm (ein ganzer Helm
passt in dieses Fach). Gleichermaßen
ist unter dem Sitz der Kraftstofftank.
Zum Schließen der Sitzbank bringen Sie
diese wieder in ihre ursprüngliche
Position und drücken dann deren
hinteren Teil nach unten.
Vorrichtung zur Diebstahlsicherung
Die Vorrichtung zur
Diebstahlsicherung des Scooters liegt
vorne links im unteren Teil des
Fahrgestells.
Serratura sella, Ponte antifurto • Saddle lock, Anti-theft shackle
Sitzbankschloss und tankverschluss, Vorrichtung zur Diebstahlsicherung
33
igd
USO - OPERATION
-2
FAHRBETRIEB
La pagina si sta caricando...
La pagina si sta caricando...
La pagina si sta caricando...

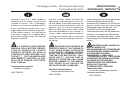
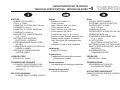
Rodaggio
55
DURANTE I PRIMI 1.000 km
NON UTILIZZARE IL VEICOLO
OLTRE L’80% DELLA VELOCITÀ
MAX. PREVISTA. EVITARE DI APRI-
RE COMPLETAMENTE L’ACCELERA-
TORE E DI MANTENERE A LUNGO
UNA VELOCITÀ COSTANTE. DOPO I
PRIMI 1.000 km, AUMENTARE PRO-
GRESSIVAMENTE LA VELOCITÀ,
DOVE SIA PERMESSO DI FARLO,
FINO A RAGGIUNGERE IL MASSIMO
RENDIMENTO.
Istruzioni per l’avviamento del moto-
re (con accensione elettrica)
- Avere sempre la precauzione di azio-
nare i comandi per l’avviamento del
motore con lo scooter sul cavalletto
centrale.
- Azionare la chiave di contatto nella
posizione della destra
!.
- Mantenere la manopola d’accelerazio-
ne al minimo.
È molto importante,
altrimenti il motore non si accende.
37
igd
USO - OPERATION
-2
FAHRBETRIEB
Running In
55
DURING THE FIRST 1,000 KM.
THE VEHICLE SHOULD NOT BE RUN
AT MORE THAN 80% OF THE MAXI-
MUM SPEED AVAILABLE. AVOID
OPENING THE THROTTLE FULLY OR
KEEPING THE SAME SPEED FOR
TOO LONG. AFTER THE FIRST 1,000
KM. INCREASE YOUR MAXIMUM
SPEED GRADUALLY, ONLY WHERE
LEGALLY PERMITTED, UNTIL YOU
REACH THE FULL PERFORMANCE
OF YOUR MACHINE.
Instructions for starting the engine
(with electric start)
- Always take care to operate the con-
trols for starting engine with your scoo-
ter up on the central stand.
- Insert the ignition and turn to the right
hand position,
!.
- Rotate the throttle twist grip fully clo-
sed.
- Apply the front or rear brake.
This is
very important, since the engine
will not start without the brake
applied.
Einlaufen des Motors
55
BEI DEN ERSTEN 1.000 KM SOLLTE
DAS FAHRZEUG NICHT MIT MEHR ALS
60% DER VORGESEHENEN
HÖCHSTGESCHWINDIGKEIT GEFAHREN
WERDEN. VERMEIDEN SIE, MIT VOLLGAS
UND ÜBER LÄNGERE ZEIT MIT EINER
GLEICHBLEIBENDEN GESCHWINDIGKEIT
ZU FAHREN. NACH DEN ERSTEN 1.000 KM
KANN DIE GESCHWINDIGKEIT
SCHRITTWEISE ERHÖHT UND – WO
ERLAUBT – MIT
HÖCHSTGESCHWINDIGKEIT GEFAHREN
WERDEN.
Hinweise zum Starten des Motors (mit
Elektrostarter)
- Beachten Sie immer die
Vorsichtsmaßnahmen und betätigen Sie die
Elemente zum Starten des Motors nur, wenn
der Scooter auf seinem Mittelständer steht.
- Drehen Sie den Zündschlüssel nach rechts in
die Position
!.
- Der Gasgriff ist in seine niedrigste Position zu
drehen.
- Den Griff für die Bremse hinten oder vorne
betätigen. Dieser Punkt ist sehr wichtig, da
Rodaggio • Running In
Einlaufen des Motors
La pagina si sta caricando...

- Azionare il pulsante di accensione e
mantenerlo premuto finché il motore
non resti acceso al primo tentativo.
- Di solito il tempo necessario di aziona-
mento del pulsante per ottenere
l’avviamento è di 1 a 2 secondi
approssimativamente.
- Con il motore avviato, senza il gas e
con il freno posteriore premuto, rimuo-
vere il cavalletto dopodiché basta
accelerare progressivamente affinché
lo scooter Le possa dare un viaggio di
vero piacere.
1
Non tenere il motore avviato
senza bisogno di farlo. Partire
subito.
00
Avviso! Qualora il cavalletto sia alzato,
non accelerare al massimo perché, se
la ruota posteriore toccasse il suolo, lo
scooter partirebbe ad alta velocità
(ricordare che è un variatore centrifugo
e che accelerare al massimo è equiva-
lente a una marcia lunga e massima
velocità).
39
USO - OPERATION
-2
FAHRBETRIEB
igd
- Press the starter button and keep it
pressed until the engine starts at the
first attempt.
- The time you will need to keep the
starter button pressed before the engi-
ne starts is usually approximately 1 or
2 seconds.
- When the engine starts, run at idle,
with the throttle at minimum and the
rear brake applied, and take the scoo-
ter off the centre stand: then slowly
apply the throttle and let your scooter
take you on a ride of pure pleasure.
1
Do not leave the engine running
unnecessarily. Start when you
mean to move off.
00
Warning! When the vehicle is up on the
centre stand, do not apply full throttle: if
the rear wheel touches the ground, the
scooter will move off at full speed
(remember that the vehicle is fitted with
a centrifugal variable speed drive, and
full throttle means top gear and full
speed).
der Motor sonst nicht anspringt.
- Die Starttaste
so lange drücken, bis der
Motor beim ersten Versuch gleich anspringt.
- Bis der Motor anspringt, muss die Starttaste
normalerweise ca. 1 bis 2 Sekunden gedrückt
werden.
- Bei laufendem Motor, ohne Gasgeben und
mit ausgelöster Hinterradbremse den
Mittelständer hochklappen. Anschließend
brauchen Sie nur zunehmend Gas zu geben,
damit das Fahren mit Ihrem Scooter für Sie
zu einem wirklichen Genuss wird.
1
Vermeiden Sie unnötiges Laufenlassen
des Motors. Fahren Sie gleich nach
dem Starten los.
00
Achtung! Geben Sie niemals Vollgas, solange
das Fahrzeug auf dem Ständer steht. Da das
Hinterrad auf dem Boden steht, würde der
Scooter mit voller Geschwindigkeit losfahren
(bedenken Sie, dass es sich hier um ein
Zentrifugalgetriebe handelt und Vollgas einem
hohen Gang und Höchstgeschwindigkeit
gleichkommt.)
Avviamento del motore • Starting the engine
Starten des motors
La pagina si sta caricando...

Istruzioni per l’avviamento del moto-
re (con pedale)
- Avere sempre l’accorgimento di azio-
nare i comandi dell’avviamento del
motore con lo scooter sul cavalletto
centrale.
- Azionare la chiave di accensione nella
posizione della destra
!.
- Mantenere la manopola d’accelerazio-
ne al minimo.
- Contemporaneamente all’operazione
descritta, agire con il piede sul pedale
d’avviamento, situato sul lato sinistro
del motore.
- Quando si avvii il motore in clima
molto freddo, mantenere lo scooter
durante alcuni secondi senza accele-
rare al massimo, finché il motore non
sia caldo.
- Con il motore avviato, senza accelera-
re e con il freno posteriore premuto,
rimuovere il cavalletto dopodiché
basta accelerare progressivamente
affinché lo scooter Le possa dare un
viaggio di vero piacere.
1
Non tenere il motore avviato
senza bisogno di farlo. Partire
subito.
41
Instructions for starting the engine
(with kick-start)
- Always take care to operate the con-
trols for starting engine with your scoo-
ter up on the central stand.
- Insert the ignition and turn to the right
hand position,
!.
- Rotate the throttle twist grip fully clo-
sed.
- Simultaneously with the previous ope-
ration, use your foot to kick the kick-
start pedal down. This is located on
the left-hand side of the engine.
- When starting the engine in very cold
weather, keep the engine running wit-
hout opening the throttle for a few
seconds to allow the engine to warm
up.
- When the engine starts, run at idle,
with the throttle at minimum and the
rear brake applied, and take the scoo-
ter off the centre stand: then slowly
apply the throttle and let your scooter
take you on a ride of pure pleasure.
1
Do not leave the engine running
unnecessarily. Start when you
mean to move off.
Hinweise zum Starten des Motors (mit
Kickstarter)
-
Halten Sie immer alle Vorsichtsmaßnahmen
ein und betätigen Sie die Elemente zum
Starten des Motors nur, wenn der Scooter auf
seinem Mittelständer steht.
-
Drehen Sie den Zündschlüssel nach rechts in
die Position
!
-
Der Gasgriff ist in seine niedrigste Position zu
drehen.
-
Während Sie wie in den vorstehenden
Punkten beschrieben vorgehen, betätigen Sie
den Kickstarter, der sich auf der linken Seite
des Motors befindet.
-
Lassen Sie bei kaltem Wetter den Motor nach
dem Starten einige Sekunden laufen, ohne
dabei Vollgas zu geben, damit sich der Motor
erwärmen kann.
-
Bei laufendem Motor, ohne Gasgeben und
mit ausgelöster Hinterradbremse den
Mittelständer hochklappen. Anschließend
brauchen Sie nur zunehmend Gas zu geben,
damit die Fahrt mit Ihrem Scooter für Sie zu
einem wirklichen Genuss wird.
1
Vermeiden Sie unnötiges Laufenlassen
des Motors. Fahren Sie gleich nach
dem Starten los.
igd
USO - OPERATION
-2
FAHRBETRIEB
Avviamento del motore • Starting the engine
Starten des motors
La pagina si sta caricando...

00
Avviso! Qualora il cavalletto sia
alzato, non accelerare al massimo per-
ché, se la ruota posteriore toccasse il
suolo, lo scooter partirebbe ad alta velo-
cità (ricordare che è un variatore centri-
fugo e che accelerare al massimo è
equivalente a una marcia lunga e mas-
sima velocità).
55
QUALSIASI SOFISTICAZIONE
PUÒ ARRECARE GRAVI DANNI AL
MOTORE.
00
DOVUTO AL FATTO CHE IL
CARBURATORE È MUNITO DI UNA
POMPA DI ACCELERAZIONE, SI
CONSIGLIA DI NON INSISTERCI
MENTRE IL MOTORE SIA SPENTO,
PER EVITARE DI FARLO AFFOGARE,
SOPRATTUTTO IN AMBIENTI CALDI.
00
NON EFFETTUARE QUESTE
OPERAZIONI IN LOCALI CHIUSI
PERCHÉ I GAS DI SCAPPAMENTO
SONO TOSSICI.
43
00
Warning! When the vehicle is
up on the centre stand, do not apply full
throttle: if the rear wheel touches the
ground, the scooter will move off at full
speed (remember that the vehicle is fit-
ted with a centrifugal variable speed
drive, and full throttle means top gear
and full speed.
55
DO NOT MODIFY THE ENGINE:
DOING SO CAN CAUSE SERIOUS
DAMAGE TO THE ENGINE.
00
BECAUSE THE CARBURET-
TOR IS FITTED WITH AN ACCELERA-
TOR PUMP, WE RECOMMEND THAT
YOU SHOULD NOT OPERATE IT
WITH THE ENGINE STOPPED:
DOING SO WILL FLOOD THE CAR-
BURETTOR, PARTICULARLY IN HOT
CLIMATES.
00
DO NOT PERFORM THESE
OPERATIONS IN CLOSED PREMI-
SES: EXHAUST GASES ARE TOXIC
00
Achtung! Geben Sie niemals
Vollgas, solange das Fahrzeug auf dem
Ständer steht. Da das Hinterrad auf dem
Boden steht, würde der Scooter mit voller
Geschwindigkeit losfahren (bedenken Sie,
dass es sich hier um ein Zentrifugalgetriebe
handelt und Vollgas einem hohen Gang und
Höchstgeschwindigkeit gleichkommt.
55
DURCH JEGLICHE AM MOTOR
VORGENOMMENE VERÄNDERUNG
KÖNNEN SCHWERE SCHÄDEN
HERVORGERUFEN WERDEN.
00
DA DER VERGASER MIT EINER
BESCHLEUNIGUNGSPUMPE
AUSGESTATTET IST, EMPFIEHLT ES SICH,
DIESEN BEI AUSGESTELLTEM MOTOR
NICHT ZU BETÄTIGEN, UM SOMIT ZU
VERMEIDEN, DASS DER MOTOR
ABSÄUFT; INSBESONDERE TRIFFT
DIESES FÜR GEBIETE MIT WARMEM
KLIMA ZU:
00
DIESE OPERATIONEN SIND NICHT
IN GESCHLOSSENEN RÄUMEN
igd
USO - OPERATION
-2
FAHRBETRIEB
Avviamento del motore • Starting the engine
Starten des motors
La pagina si sta caricando...

00
È IMPORTANTE CHE L’AV-
VIAMENTO CON IL PEDALE DI
AVVIAMENTO SIA FATTO CON IL
VEICOLO SUL CAVALLETTO.
Istruzioni per una guida corretta
La tecnica della corretta guida è
l’arte che permette di ottenere la massi-
ma efficienza del veicolo senza forzarne
la meccanica.
La nostra esperienza ci permette di
consigliarLe:
Attenzione!
1
Evitare le forti accelerazioni. Se si
preme l’acceleratore con cura,
non soltanto si può ridurre marca-
tamente il consumo di combustibi-
le, ma si diminuisce l’inquinamen-
to e il logoramento.
- Ricordare sempre che si guida uno
scooter con variatore centrifugo. Qua-
lora si accelera, il variatore, dotato di
un funzionamento progressivo, ha
bisogno che la forza centrifuga agisca
sui suoi meccanismi e sceglie il rap-
porto da Lei desiderato.
45
00
IT IS IMPORTANT TO KEEP
THE SCOOTER ON ITS CENTRE
STAND WHEN STARTING WITH THE
KICK-START PEDAL
Instructions for correct driving
The technique of good riding is an art
by which you achieve the highest possi-
ble performance from the vehicle wit-
hout forcing the mechanism.
From our experience, we can recom-
mend:
Caution!
1
Avoid sharp acceleration; by ope-
ning the throttle with care you not
only reduce fuel consumption
considerably, but also you reduce
pollution and wear and tear.
- Always remember that you are riding
a scooter with a centrifugal variable
speed drive. When you apply the
throttle, the variable speed drive ope-
rates progressively, and causes the
centrifugal force to operate on its
DURCHZUFÜHREN, DA DIE ABGASE
GIFTIG SIND.
00
ES IST UNBEDINGT ZU
BEACHTEN, DASS DER KICKSTARTER
NUR BETÄTIGT WERDEN DARF, WENN
DAS FAHRZEUG AUF SEINEM
MITTELSTÄNDER STEHT.
Hinweise für eine korrekte Fahrweise
Die Technik einer guten Fahrweise liegt in
der Kunst, dem Fahrzeug höchste Leistung
abzufordern, ohne dass dabei dessen
Mechanik Schaden leidet.
Aufgrund unserer Erfahrung sind wir in der
Lage, Ihnen hierzu einige Ratschläge zu
geben.
Vorsicht!
1
Vermeiden Sie plötzliche
Beschleunigungen. Durch ein
behutsames Gasgeben erzielen Sie
nicht nur einen geringeren
Benzinverbrauch, sondern Sie leisten
auch Ihren Beitrag zu einer geringeren
Luftverschmutzung und beugen
zusätzlich dem Fahrzeugverschleiß
vor.
igd
USO - OPERATION
-2
FAHRBETRIEB
Guida • Riding
Fahrweise
La pagina si sta caricando...

- Quando si vada in salita, sebbene si
mantenga la manopola dell’accelera-
tore al massimo, il variatore centrifugo
sceglierà automaticamente il rapporto
corretto.
- Quando esegua discese prolungate si
ricordi di accelerare ogni tanto e così
lubrificare il motore.
1
Guidare sempre il motore in quel
punto (3/4 del gas) in cui si può
dare sempre un po’ di più. Si ris-
parmia combustibile, si riducono i
rumori e si allunga la vita dello
scooter.
- Quando si frena, togliere il gas.
- Frenare con soavità, avendo cura del
terreno che si calpesta. Sull’asfalto
secco cominciare la frenata con il
freno anteriore e finirla con entrambi.
Sul terreno bagnato, con sabbia o
ghiaietto, non usare mai il freno ante-
riore e mantenere una maggiore dis-
tanza per potere fermare lo scooter.
- Nell’avviamento, dare gas in modo
soave e progressivo.
1
Fermare il motore nelle situazioni
favorevoli del traffico.
47
mechanism, and to choose the gear
ratio you want.
- When climbing up hills, even if you
keep the throttle wide open, the centri-
fugal drive will select the appropriate
ratio automatically.
- When going down long hills, remem-
ber to open the throttle from time to
time, in order to lubricate the engine.
1
Always run the engine with the
throttle in such a position that the
engine can give a little more than
you are asking (3/4 throttle). This
way you will save fuel, keep the
noise down, and extend the life of
your scooter.
- When braking, close the throttle.
- Brake smoothly, keeping an eye on
the surface you are riding on. On dry
asphalt, start braking with the front
brake and brake to a standstill using
both brakes. On a wet surface, or
where there is sand or gravel, never
use the front brake, and also give
yourself a longer distance to stop the
scooter.
- When starting, open the throttle smo-
othly and gradually.
-
Vergessen Sie nicht, dass Sie einen Scooter
mit Zentrifugalgetriebe fahren. Beim
Gasgeben muss das progressiv arbeitende
Getriebe von der Zentrifugalkraft in dem von
Ihnen gewünschten Maße aktiviert werden.
-
Wenn Sie auf ansteigenden Strecken Vollgas
geben, arbeitet das Zentrifugalgetriebe
dennoch nur im angemessenen
Übersetzungsverhältnis.
-
Wenn Sie auf Strecken mit Gefälle fahren,
denken Sie daran, hin und wieder Gas zu
geben, damit der Motor mit Öl versorgt wird.
1
Halten Sie den Motor immer auf einer
Geschwindigkeit (3/4 Gas), die noch
etwas zu steigern ist. Auf diese Weise
sparen Sie Kraftstoff, senken den
Lärmpegel und verlängern außerdem
die Lebensdauer Ihres Scooters.
-
Nehmen Sie beim Bremsen das Gas weg.
-
Bremsen Sie sanft und achten Sie auf den
Untergrund, auf dem Sie fahren. Auf
trockenem Asphalt beginnen Sie den
Bremsvorgang bitte mit der
Vorderradbremse, um ihn danach mit beiden
Bremsen abzuschließen. Auf nassem
Untergrund, auf Sand und Kies ist in keinem
Fall die Vorderradbremse zu benutzen und
ein längerer Bremsweg für Ihren Scooter
einzukalkulieren.
-
Geben Sie beim Starten sanft und
schrittweise Gas.
igd
USO - OPERATION
-2
FAHRBETRIEB
Guida • Riding
Fahrweise
La pagina si sta caricando...

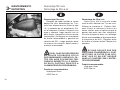
Arresto del motore
Togliere gas, girare dopo la chiave
d’accensione e, in posizione
# motore
fermo senza bloccaggio, rimuovere la
chiave.
Trasmissione automatica
Per assicurare la massima facilità e
piacere durante la guida, il veicolo è
munito di una trasmissione automatica
con regolatore e frizione centrifuga. Il
sistema è concepito per fornire i migliori
rendimenti sia per l’accelerazione che
per il consumo, sia in piano che in sali-
ta, grazie a una regolazione che si ha
sia in funzione del regime del motore
che della coppia trasmessa. Nel caso di
arresto durante una salita (semaforo,
coda, ecc.), usare il freno soltanto per
mantenere il veicolo fermo, lasciando il
motore al minimo. Usare il motore per
mantenere fermo il veicolo può provoca-
re il surriscaldamento della frizione.
Questo inconveniente è dovuto all’attrito
dei rulli della frizione sulla campana. È
perciò conveniente evitare di verificare
le condizioni di slittamento prolungato
della frizione con il relativo riscalda-
1
Stop the engine when traffic con-
ditions require.
Stopping the engine
close the throttle, then turn the igni-
tion key. when the ignition key reaches
the # position (engine stopped, stee-
ring lock off), you can remove the key.
Automatic transmission
In order to ensure the greatest sim-
plicity and driving fun with your scooter,
the vehicle is fitted with an automatic
transmission with a speed governor,
and a centrifugal clutch. The system is
designed to give maximum performance
both in acceleration and in consumption
whether on the flat or climbing, thanks
to its regulator which works in response
to the engine speed in rpm and to the
torque delivered. When stopped on a
hill (traffic lights, traffic jams, etc.) only
use the brake to keep the vehicle stop-
ped, leaving the engine running at a
minimum. Using the engine to keep the
vehicle at a standstill can cause the
clutch to over-heat. This problem is cau-
sed by the friction of the clutch weights
against the clutch hub. It is therefore
1
Stellen Sie den Motor ab, wenn eine
entsprechende Verkehrssituation dieses
erforderlich macht.
Fahrbetrieb
Das gas wegnehmen und anschliessend den
zÜndschlÜssel drehen. in der position
#
ist
der motor ausgeschaltet und der lenker nicht
blockiert. den zÜndschlÜssel abziehen.
Automatikgetriebe
Das Fahrzeug ist mit einem automatischen
Getriebe und einem Zentrifugalregler und einer
Zentrifugalkupplung ausgestattet und läßt sich
dadurch ausgesprochen leicht fahren und
bereitet somit viel Freude beim Fahren. Das
Motorsystem ist mit dem Ziel konzipiert
worden, dank der Übersetzung in Funktion des
Motorlaufs als auch des übertragenen
Drehmoments beste Leistung hinsichtlich der
Beschleunigung und dem Kraftstoffverbrauch
sowohl auf ebenen als auch auf ansteigenden
Strecken zu erbringen. Wenn auf
ansteigenden Strecken gehalten werden muss
(Ampel, Stau etc.) , sollte das Fahrzeug
lediglich mittels der Bremse im Stillstand
gehalten werden; der Motor sollte dabei mit
geringster Leistung laufen. Den Motor als
Bremse für das Fahrzeug einzusetzen, kann
zur Erhitzung der Kupplung führen. Dieser
igd
49
USO - OPERATION
-2
FAHRBETRIEB
Arresto del motore • Stopping the engine
Ausschalten des motors
La pagina si sta caricando...

51
USO - OPERATION
-2
FAHRBETRIEB
igd
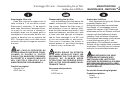
mento (per esempio, oltre a quella già
indicata, la marcia in salita con carico
totale in pendii o salite in rampe supe-
riori al 25%, ecc.). A tale scopo si consi-
glia di:
1. Non insistere in queste condizioni
di uso.
2 Lasciare raffreddare la frizione con
il motore al minimo durante alcuni
minuti.
Scappamento catalitico
00
QUALSIASI TIPO DI MODIFI-
CA DELLO SCAPPAMENTO PUÒ
ARRECARE GRAVI DISFUNZIONI AL
MOTORE.
00
DOVUTO ALLE ELEVATE TEM-
PERATURE CHE POSSONO RAG-
GIUNGERSI NEL CATALIZZATORE,
AVERE CURA QUANDO SI PAR-
CHEGGIA IL VEICOLO, IN MODO
CHE LO SCAPPAMENTO NON TOC-
CHI NESSUN MATERIALE INFIAM-
MABILE. AVERE ANCHE PARTICO-
recommended to avoid provoking condi-
tions which cause continuous sliding of
the clutch weights leading to overhea-
ting of the clutch (for example, apart
from the conditions indicated above,
running uphill under full load, or starting
off on slopes of greater than 25%, etc. ).
To this end it is recommended:
1. Do not operate the scooter conti-
nuously in such conditions.
2. Allow the clutch and engine to
cool down to their minimum value
for a few minutes.
Exhaust catalyser
00
ANY TYPE OF MODIFICA-
TION TO THE EXHAUST SYSTEM
MAY CAUSE SERIOUS MALFUNC-
TION IN THE ENGINE.
00
IN VIEW OF THE EXTREMELY
HIGH TEMPERATURES THAT MAY
BE REACHED IN THE CATALYSER
BE CAREFUL WHEN PARKING THE
SCOOTER THAT THE EXHAUST PIPE
IS NOT LEFT IN CONTACT WITH ANY
Nachteil wird durch die Reibung der
Kupplungsmasse auf der Glocke
hervorgerufen. Aus diesem Grund sollte
vermieden werden, ein länger anhaltendes
Rutschen der Kupplung und die damit
zusammenhängende Erhitzung derselben
auszuprobieren (z.B., zusätzlich zu dem
vorgenannten Fall, bei ansteigenden Strecken
mit voller Belastung oder bei Anfahren auf
Strecken mit einer Steigung von über 25%
etc.). In diesem Zusammenhang wird
Folgendes empfohlen: 1. Eine Weiterfahrt
unter diesen Bedingungen ist abzubrechen. 2.
Man muss die Kupplung einige Minuten lang
bei geringster Motordrehzahl abkühlen lassen.
Katalysator
00
DURCH JEGLICHE AN DER
AUSPUFFANLAGE VORGENOMMENEN
VERÄNDERUNGEN KÖNNEN SCHWERE
MOTORSCHÄDEN HERVORGERUFEN
WERDEN.
00
DA SICH DER KATALYSATOR
STARK ERHITZEN KANN, IST BEIM
ABSTELLEN DES FAHRZEUGS DARAUF ZU
ACHTEN, DASS DAS AUSPUFFROHR
NICHT MIT LEICHT BRENNBAREM
MATERIAL IN BERÜHRUNG KOMMT.
Trasmissione automatica - Scappamento catalitico
Automatic transmission - Exhaust catalyser • Automatikgetriebe - Katalysator
La pagina si sta caricando...
La pagina si sta caricando...
La pagina si sta caricando...
La pagina si sta caricando...
La pagina si sta caricando...
La pagina si sta caricando...
La pagina si sta caricando...
La pagina si sta caricando...
La pagina si sta caricando...
La pagina si sta caricando...
La pagina si sta caricando...
La pagina si sta caricando...
La pagina si sta caricando...
La pagina si sta caricando...
La pagina si sta caricando...
La pagina si sta caricando...
La pagina si sta caricando...
La pagina si sta caricando...
La pagina si sta caricando...
La pagina si sta caricando...
La pagina si sta caricando...
La pagina si sta caricando...
La pagina si sta caricando...
La pagina si sta caricando...
La pagina si sta caricando...
La pagina si sta caricando...
La pagina si sta caricando...
La pagina si sta caricando...
La pagina si sta caricando...
La pagina si sta caricando...
La pagina si sta caricando...
La pagina si sta caricando...
La pagina si sta caricando...
La pagina si sta caricando...
La pagina si sta caricando...
La pagina si sta caricando...
La pagina si sta caricando...
La pagina si sta caricando...
La pagina si sta caricando...
La pagina si sta caricando...
La pagina si sta caricando...
La pagina si sta caricando...
La pagina si sta caricando...
La pagina si sta caricando...
La pagina si sta caricando...
La pagina si sta caricando...
La pagina si sta caricando...
La pagina si sta caricando...
La pagina si sta caricando...
La pagina si sta caricando...
La pagina si sta caricando...
La pagina si sta caricando...
La pagina si sta caricando...
La pagina si sta caricando...
La pagina si sta caricando...
La pagina si sta caricando...
La pagina si sta caricando...
La pagina si sta caricando...
La pagina si sta caricando...
La pagina si sta caricando...
La pagina si sta caricando...
La pagina si sta caricando...
La pagina si sta caricando...
La pagina si sta caricando...
La pagina si sta caricando...
La pagina si sta caricando...
La pagina si sta caricando...
La pagina si sta caricando...
La pagina si sta caricando...
La pagina si sta caricando...
La pagina si sta caricando...
La pagina si sta caricando...
La pagina si sta caricando...
La pagina si sta caricando...
La pagina si sta caricando...
La pagina si sta caricando...
La pagina si sta caricando...
La pagina si sta caricando...
La pagina si sta caricando...
La pagina si sta caricando...
La pagina si sta caricando...
La pagina si sta caricando...
La pagina si sta caricando...
La pagina si sta caricando...
La pagina si sta caricando...
La pagina si sta caricando...
La pagina si sta caricando...
La pagina si sta caricando...
La pagina si sta caricando...
La pagina si sta caricando...
La pagina si sta caricando...
La pagina si sta caricando...
La pagina si sta caricando...
-
 1
1
-
 2
2
-
 3
3
-
 4
4
-
 5
5
-
 6
6
-
 7
7
-
 8
8
-
 9
9
-
 10
10
-
 11
11
-
 12
12
-
 13
13
-
 14
14
-
 15
15
-
 16
16
-
 17
17
-
 18
18
-
 19
19
-
 20
20
-
 21
21
-
 22
22
-
 23
23
-
 24
24
-
 25
25
-
 26
26
-
 27
27
-
 28
28
-
 29
29
-
 30
30
-
 31
31
-
 32
32
-
 33
33
-
 34
34
-
 35
35
-
 36
36
-
 37
37
-
 38
38
-
 39
39
-
 40
40
-
 41
41
-
 42
42
-
 43
43
-
 44
44
-
 45
45
-
 46
46
-
 47
47
-
 48
48
-
 49
49
-
 50
50
-
 51
51
-
 52
52
-
 53
53
-
 54
54
-
 55
55
-
 56
56
-
 57
57
-
 58
58
-
 59
59
-
 60
60
-
 61
61
-
 62
62
-
 63
63
-
 64
64
-
 65
65
-
 66
66
-
 67
67
-
 68
68
-
 69
69
-
 70
70
-
 71
71
-
 72
72
-
 73
73
-
 74
74
-
 75
75
-
 76
76
-
 77
77
-
 78
78
-
 79
79
-
 80
80
-
 81
81
-
 82
82
-
 83
83
-
 84
84
-
 85
85
-
 86
86
-
 87
87
-
 88
88
-
 89
89
-
 90
90
-
 91
91
-
 92
92
-
 93
93
-
 94
94
-
 95
95
-
 96
96
-
 97
97
-
 98
98
-
 99
99
-
 100
100
-
 101
101
-
 102
102
-
 103
103
-
 104
104
-
 105
105
-
 106
106
-
 107
107
-
 108
108
-
 109
109
-
 110
110
-
 111
111
-
 112
112
-
 113
113
-
 114
114
-
 115
115
-
 116
116
-
 117
117
-
 118
118
-
 119
119
-
 120
120
-
 121
121
-
 122
122
-
 123
123
-
 124
124
-
 125
125
-
 126
126
-
 127
127
-
 128
128
-
 129
129
-
 130
130
-
 131
131
-
 132
132
-
 133
133
-
 134
134
-
 135
135
-
 136
136
-
 137
137
-
 138
138
-
 139
139
-
 140
140
-
 141
141
-
 142
142
-
 143
143
-
 144
144


Derbi ATLANTIS 50 4T Manuale del proprietario
- Categoria
- Motociclette
- Tipo
- Manuale del proprietario
in altre lingue
Documenti correlati
-
Derbi MULHACEN 659 Manuale del proprietario
-
-
-
-
-
-
-
-
-
Altri documenti
-
 Micro Mobility Sparrow XL Manuale del proprietario
-
 Yadea ELITS YDX1 Istruzioni per l'uso
-
 Micro Mobility Micro Merlin frein tambour Manuale utente
-
Ducati CITY-CROSS-EX Manuale utente
-
Peugeot e-kick Operating Instructions Manual
-
iconBIT Kick Scooter TT v2 Manuale utente
-
-
AGPtek A-MTI Manuale del proprietario
-
 fun pro 53039570 Manuale del proprietario
-
Archos Citee Power Manuale del proprietario


