Panasonic DX1000 Istruzioni per l'uso
- Categoria
- Multifunzionali
- Tipo
- Istruzioni per l'uso

DX-1000
DX-1000
User’s Guide
Facsimile
Facsimile
User’s Guide
General
Printed in Japan
DZSD000850-0
Matsushita Graphic Communication Systems, Inc.
CORPORATE OVERSEAS SALES AND
OPERATION MANAGEMENT DEPARTMENT
2-3-8 Shimomeguro, Meguro-ku, Tokyo, Japan 153-8687
English
DX-1000

213
456
9
0
87
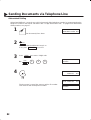
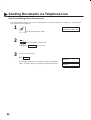
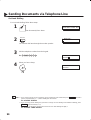
The document is
stored in memory.
Then, your machine
starts dialling.
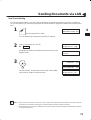
Set the documents
face down.
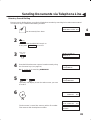
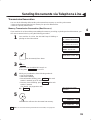
The document is
stored in memory.
Then, your machine
starts dialling.
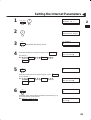
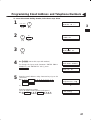
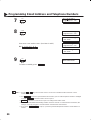
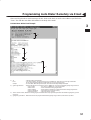
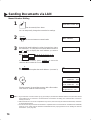
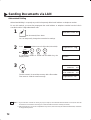
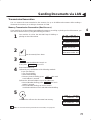
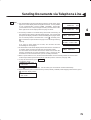
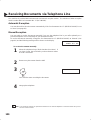
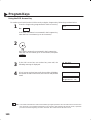
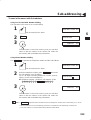
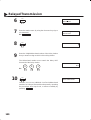
Enter the telephone number.
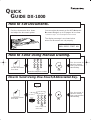
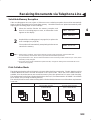
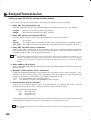
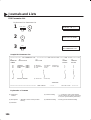
How to Set Documents.
How to Send Using Manual Dialling.
How to Send Using One-Touch/Abbreviated Key.
QUICK
GUIDE DX-1000
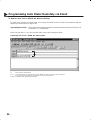
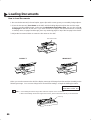
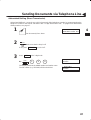
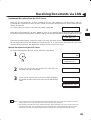
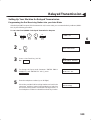
Set the documents face down
and adjust the document guides.
You can set the documents on the ADF (Automatic
Document Feeder) up to 50 pages* at one time.
The display message is as shown below
when the documents are set properly.
* : (Based on 75 g/m
2
(0.12 mm) weight A4 size document)
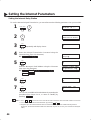
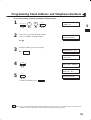
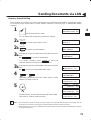
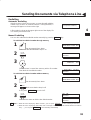
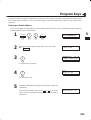
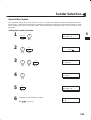
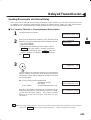
Enter a 3-digit code
(000 to 999).
01
or
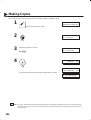
Set the documents
face down.
ENTER STATION(S)
THEN PRESS START 00%
START
SPACE
ABBR
START
213
456
9
0
87

DZSD000851-0
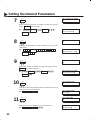
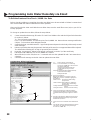
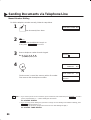
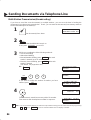
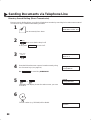
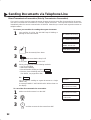
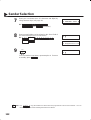
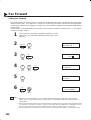
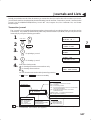
Set the documents
face down.
The lamp goes off.
Your machine
starts dialling
the number.
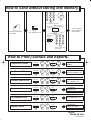
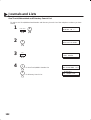
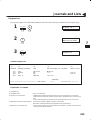
How to Send without storing into memory.
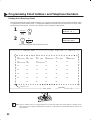
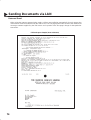
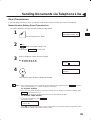
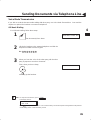
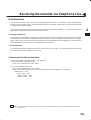
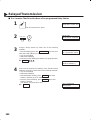
* PRINTING *
DIRECTORY SHEET
* PRINTING *
JOURNAL
* PRINTING *
ONE–TOUCH/ABBR.LIST
* PRINTING *
DIR. SEARCH LIST
* PRINTING *
PROGRAM LIST
* PRINTING *
FAX PARAMETER LIST
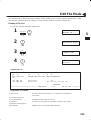
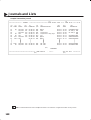
Transaction Journal
One-Touch/ABBR List
Directory Search List
Program List
Fax Parameter List
Directory Sheet
QUICK
GUIDE DX-1000
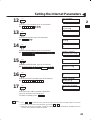
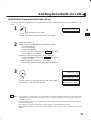
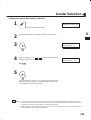
How to Print Journals and Reports.
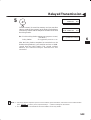
MEMORY
or
Enter the telephone number.
or
01
SPACE
ABBR
START
213
456
9
0
87
213
456
9
0
87
1
3
4
FUNCTION
6 2
SET
FUNCTION
6
SET
FUNCTION
6 2
SET
2
FUNCTION
6
SET
FUNCTION
6
SET
FUNCTION
6
SET
1
7
1
Enter a 3-digit code
(000 to 999).

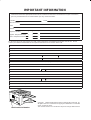
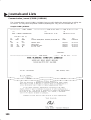
IMPORTANT INFORMATION
When requesting information, supplies or service, always refer to the model and serial number of your machine. The
model and serial number plate (Main Name Plate) is located on the machine as shown below. For your convenience,
space is provided below to record information you may need in the future.
Model No. Serial
Date of Purchase
Dealer
Address
Telephone Number ( ) –
Supplies Telephone Number ( ) –
Service Telephone Number ( ) –
For the total system to work properly via LAN, certain information and additional parameters must be set. Please
contact your network administrator for the required information and connection to the LAN.
User Information
Company Name:
Address:
Dept.:
City: State: Zip Code:
Tel. No.: Fax No.:
Internet Fax Parameters (See pages 40 to 44)
IP Address:
Subnet Mask:
SMTP Server Name: or SMTP Server IP Address:
Default Router IP Address:
Email Address:
DNS Server IP Address:
POP Server Name: or POP Server IP Address:
POP User Name:
POP Password:
(for security, do not write it in – but keep it in a safe place)
Host Name:
Model and Serial Number
Copyright 1999 by Matsushita Graphic Communication Systems, Inc.
All rights reserved. Unauthorized copying and distribution is a violation
of law. Printed in Japan.
The contents of this User’s Guide are subject to change without notice.

1
Table of Contents
1 GETTING TO KNOW YOUR MACHINE
Safety Information 5. . . . . . . . . . . . . . . . . . . . . . . . . . . . . . . . . . . . . . . . . . . . . . . . . .
Introduction 7. . . . . . . . . . . . . . . . . . . . . . . . . . . . . . . . . . . . . . . . . . . . . . . . . . . . . . . .
Function Key 8. . . . . . . . . . . . . . . . . . . . . . . . . . . . . . . . . . . . . . . . . . . . . . . . . . . . . .
External View 9. . . . . . . . . . . . . . . . . . . . . . . . . . . . . . . . . . . . . . . . . . . . . . . . . . . . . .
Control Panel 10. . . . . . . . . . . . . . . . . . . . . . . . . . . . . . . . . . . . . . . . . . . . . . . . . . . . . .
Pre Installation Information 12. . . . . . . . . . . . . . . . . . . . . . . . . . . . . . . . . . . . . . . . .
Setup as SMTP mail server 13
Setup as POP3 Client 14
Internet Communication Features 17. . . . . . . . . . . . . . . . . . . . . . . . . . . . . . . . . . .
Internet Fax Transmission 17
Internet Mail Reception 17
Inbound Routing 18
Fax Forward 19
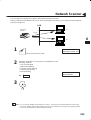
Network Scanner 19
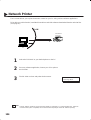
Network Printer 20
Relayed Transmission 21
Important Information 22. . . . . . . . . . . . . . . . . . . . . . . . . . . . . . . . . . . . . . . . . . . . . .
Differences between Internet Fax and Regular Fax 22
Transmitted Document Confirmation 22
DX-1000 Cannot Make a Phone Call via LAN 22
Transmission Resolution 22
Internet Mail Reception 22
Sending Document Size via LAN 23
Sending a Document to a PC via LAN 23
Internet Relayed Transmission 23
2 INSTALLING YOUR MACHINE
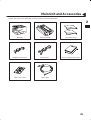
Main Unit and Accessories 25. . . . . . . . . . . . . . . . . . . . . . . . . . . . . . . . . . . . . . . . . .
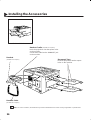
Installing the Accessories 26. . . . . . . . . . . . . . . . . . . . . . . . . . . . . . . . . . . . . . . . . .
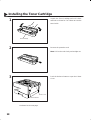
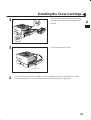
Installing the Toner Cartridge 28. . . . . . . . . . . . . . . . . . . . . . . . . . . . . . . . . . . . . . .
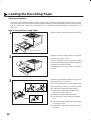
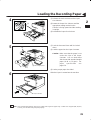
Loading the Recording Paper 30. . . . . . . . . . . . . . . . . . . . . . . . . . . . . . . . . . . . . . .
Paper Specifications 30
How to Load the Recording Paper 30
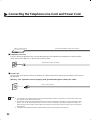
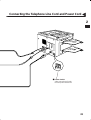
Connecting the Telephone Line Cord and Power Cord 32. . . . . . . . . . . . . . . .
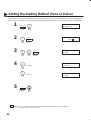
Setting the Dialling Method (Tone or Pulse) 34. . . . . . . . . . . . . . . . . . . . . . . . . .
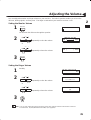
Adjusting the Volume 35. . . . . . . . . . . . . . . . . . . . . . . . . . . . . . . . . . . . . . . . . . . . . . .
Setting the Monitor Volume 35
Setting the Ringer Volume 35
User Parameters 36. . . . . . . . . . . . . . . . . . . . . . . . . . . . . . . . . . . . . . . . . . . . . . . . . . .
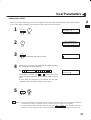
Setting the Date and Time 36
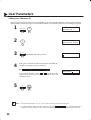
Setting Your LOGO 37
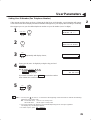
Setting Your Character ID 38
Setting Your ID Number (Fax Telephone Number) 39
Setting the Internet Parameters 40. . . . . . . . . . . . . . . . . . . . . . . . . . . . . . . . . . . . .
Setting the parameters for the LAN Interface 40
Setting the Internet Relay Station 44

2
3 PROGRAMMING YOUR MACHINE
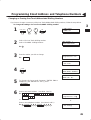
Programming Email Address and Telephone Numbers 45. . . . . . . . . . . . . . . .
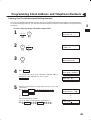
Entering One-Touch/Abbreviated Dialling Numbers 45
Changing or Erasing One-Touch/Abbreviated Dialling Numbers 49
Printing Out a Directory Sheet 52
Programming Auto Dialer Remotely via Email 53. . . . . . . . . . . . . . . . . . . . . . . .
Using a PC to Update the Auto Dialer Remotely 53
To Program One-Touch / ABBR. No. for the First Time 54
To Retrieve One-Touch / ABBR. No. Data for Backup 56
To Edit the Retrieved One-Touch / ABBR. No. Data 58
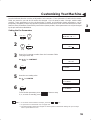
Customizing Your Machine 59. . . . . . . . . . . . . . . . . . . . . . . . . . . . . . . . . . . . . . . . . .
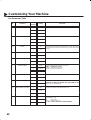
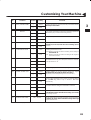
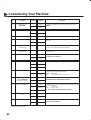
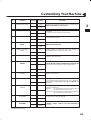
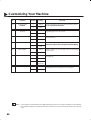
Setting the Fax Parameters 59
Fax Parameter Table 60
4 BASIC OPERATIONS
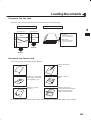
Loading Documents 65. . . . . . . . . . . . . . . . . . . . . . . . . . . . . . . . . . . . . . . . . . . . . . . .
Documents You Can Send 65
Documents You Cannot Send 65
How to Load Documents 66
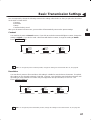
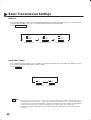
Basic Transmission Settings 67. . . . . . . . . . . . . . . . . . . . . . . . . . . . . . . . . . . . . . . .
Contrast 67
Resolution 67
Halftone 68
Verification Stamp 68
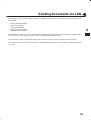
Sending Documents via LAN 69. . . . . . . . . . . . . . . . . . . . . . . . . . . . . . . . . . . . . . . .
Manual Number Dialling 70
One-Touch Dialling 71
Abbreviated Dialling 72
Directory Search Dialling 73
Returned Email 74
Multi-Station Transmission (Broadcasting) 75. . . . . . . . . . . . . . . . . . . . . . . . . . . . . . .
Using a Mailing List 76
Transmission Reservation 77. . . . . . . . . . . . . . . . . . . . . . . . . . . . . . . . . . . . . . . . . . . . . .
Memory Transmission Reservation (Dual Access) 77
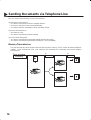
Sending Documents via Telephone Line 78. . . . . . . . . . . . . . . . . . . . . . . . . . . . .
Memory Transmission 78. . . . . . . . . . . . . . . . . . . . . . . . . . . . . . . . . . . . . . . . . . . . . . . . . .
Manual Number Dialling 80
One-Touch Dialling 81
Abbreviated Dialling 82
Directory Search Dialling 83
Multi-Station Transmission (Broadcasting) 84. . . . . . . . . . . . . . . . . . . . . . . . . . . . . . .
Direct Transmission 85. . . . . . . . . . . . . . . . . . . . . . . . . . . . . . . . . . . . . . . . . . . . . . . . . . . .
Manual Number Dialling (Direct Transmission) 85
One-Touch Dialling (Direct Transmission) 86
Abbreviated Dialling (Direct Transmission) 87
Directory Search Dialling (Direct Transmission) 88
Voice Mode Transmission 89. . . . . . . . . . . . . . . . . . . . . . . . . . . . . . . . . . . . . . . . . . . . . . .
Off-Hook Dialling 89
On-Hook Dialling 90
Transmission Reservation 91. . . . . . . . . . . . . . . . . . . . . . . . . . . . . . . . . . . . . . . . . . . . . .
Memory Transmission Reservation (Dual Access) 91
Direct Transmission Reservation (Priority Transmission Reservation) 92

3
Redialling 93. . . . . . . . . . . . . . . . . . . . . . . . . . . . . . . . . . . . . . . . . . . . . . . . . . . . . . . . . . . . . .
Automatic Redialling 93
Manual Redialling 93
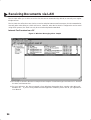
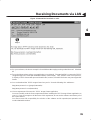
Receiving Documents via LAN 94. . . . . . . . . . . . . . . . . . . . . . . . . . . . . . . . . . . . . .
Internet Fax Received on a PC 94
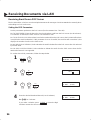
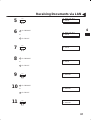
Receiving Email from a POP Server 96. . . . . . . . . . . . . . . . . . . . . . . . . . . . . . . . . . . . . .
Setting the POP Parameters 96
Unattended Reception from the POP Server 99
Manual Reception from the POP Server 99
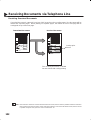
Receiving Documents via Telephone Line 100. . . . . . . . . . . . . . . . . . . . . . . . . . . .
Automatic Reception 100. . . . . . . . . . . . . . . . . . . . . . . . . . . . . . . . . . . . . . . . . . . . . . . . . . .
Manual Reception 100. . . . . . . . . . . . . . . . . . . . . . . . . . . . . . . . . . . . . . . . . . . . . . . . . . . . . .
Print Reduction 101. . . . . . . . . . . . . . . . . . . . . . . . . . . . . . . . . . . . . . . . . . . . . . . . . . . . . . . .
Selecting the Print Reduction Mode 101
Receiving Oversized Documents 102
Substitute Memory Reception 103. . . . . . . . . . . . . . . . . . . . . . . . . . . . . . . . . . . . . . . . . . .
Print Collation Mode 103. . . . . . . . . . . . . . . . . . . . . . . . . . . . . . . . . . . . . . . . . . . . . . . . . . . .
Making Copies 104. . . . . . . . . . . . . . . . . . . . . . . . . . . . . . . . . . . . . . . . . . . . . . . . . . . . .
5 ADVANCED FEATURES
Program Keys 105. . . . . . . . . . . . . . . . . . . . . . . . . . . . . . . . . . . . . . . . . . . . . . . . . . . . . .
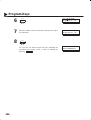
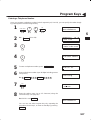
Entering an Email Address 105
Entering a Telephone Number 107
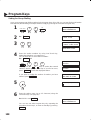
Setting for Group Dialling 108
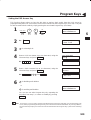
Setting the POP Access Key 109
Using the POP Access Key 110
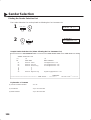
Sender Selection 111. . . . . . . . . . . . . . . . . . . . . . . . . . . . . . . . . . . . . . . . . . . . . . . . . . .
General Description 111. . . . . . . . . . . . . . . . . . . . . . . . . . . . . . . . . . . . . . . . . . . . . . . . . . . .
Setting the Sender Selection 111
Sending Document with Sender Selection 113
Printing the Sender Selection List 114
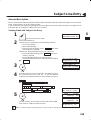
Subject Line Entry 115. . . . . . . . . . . . . . . . . . . . . . . . . . . . . . . . . . . . . . . . . . . . . . . . . .
General Description 115. . . . . . . . . . . . . . . . . . . . . . . . . . . . . . . . . . . . . . . . . . . . . . . . . . . .
Sending Email with Subject Line Entry 115
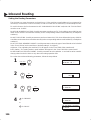
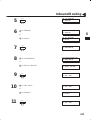
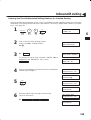
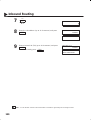
Inbound Routing 116. . . . . . . . . . . . . . . . . . . . . . . . . . . . . . . . . . . . . . . . . . . . . . . . . . .
Setting the Routing Parameters 116
Entering One-Touch/Abbreviated Dialling Numbers for Inbound Routing 119
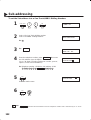
Sub-addressing 121. . . . . . . . . . . . . . . . . . . . . . . . . . . . . . . . . . . . . . . . . . . . . . . . . . . .
General Description 121. . . . . . . . . . . . . . . . . . . . . . . . . . . . . . . . . . . . . . . . . . . . . . . . . . . .
To set the Sub-address into a One-Touch/ABBR. Dialling Numbers 122
To send a Document with Sub-address 123
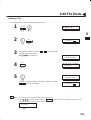
Fax Forward 124. . . . . . . . . . . . . . . . . . . . . . . . . . . . . . . . . . . . . . . . . . . . . . . . . . . . . . .
Setting Fax Forward 124
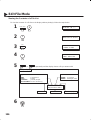
Edit File Mode 125. . . . . . . . . . . . . . . . . . . . . . . . . . . . . . . . . . . . . . . . . . . . . . . . . . . . . .
Printing a File List 125
Viewing the Contents of a File List 126
Deleting a File 127
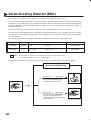
Distinctive Ring Detector (DRD) 128. . . . . . . . . . . . . . . . . . . . . . . . . . . . . . . . . . . . .
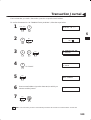
Transaction Journal 129. . . . . . . . . . . . . . . . . . . . . . . . . . . . . . . . . . . . . . . . . . . . . . . .
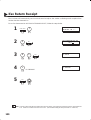
Ifax Return Receipt 130. . . . . . . . . . . . . . . . . . . . . . . . . . . . . . . . . . . . . . . . . . . . . . . . .
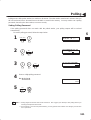
Polling 131. . . . . . . . . . . . . . . . . . . . . . . . . . . . . . . . . . . . . . . . . . . . . . . . . . . . . . . . . . . .
Setting Polling Password 131
To Poll Documents from Another Station 132

4
6 NETWORK FEATURES
Network Scanner 133. . . . . . . . . . . . . . . . . . . . . . . . . . . . . . . . . . . . . . . . . . . . . . . . . . .
Network Printer 134. . . . . . . . . . . . . . . . . . . . . . . . . . . . . . . . . . . . . . . . . . . . . . . . . . . .
Relayed Transmission 135. . . . . . . . . . . . . . . . . . . . . . . . . . . . . . . . . . . . . . . . . . . . . .
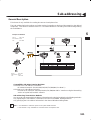
General Description 135. . . . . . . . . . . . . . . . . . . . . . . . . . . . . . . . . . . . . . . . . . . . . . . . . . . .
Relay Network 136
Setting up your DX-1000 as an Internet Relay Station 138
Setting Up Your Machine for Relayed Transmission 139. . . . . . . . . . . . . . . . . . . . . . .
Programming the End Receiving Station into your Auto Dialer 139
Sending Documents via Internet Relay 141. . . . . . . . . . . . . . . . . . . . . . . . . . . . . . . . . . .
To a Location That Has a Pre-programmed Relay Station 141
To a Location That Does Not Have a Pre-programmed Relay Station 142
Sending Text Document(s) from a PC to a G3 fax machine 144. . . . . . . . . . . . . . . .
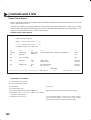
Printouts and Reports 145
7 PRINT OUT JOURNALS AND LISTS
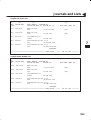
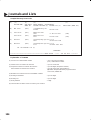
Journals and Lists 147. . . . . . . . . . . . . . . . . . . . . . . . . . . . . . . . . . . . . . . . . . . . . . . . .
Transaction Journal 147
Communication Journal (COMM. JOURNAL) 150
One-Touch/Abbreviated and Directory Search List 152
Program List 155
FAX Parameter List 156
Power Failure Report 158
8 PROBLEM SOLVING
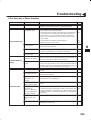
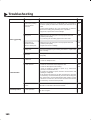
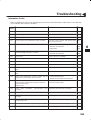
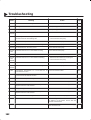
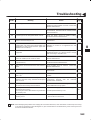
Troubleshooting 159. . . . . . . . . . . . . . . . . . . . . . . . . . . . . . . . . . . . . . . . . . . . . . . . . . . .
If You Have Any of These Problem 159
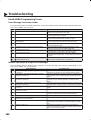
Information Codes 161
Email ABBR Programming Errors 164. . . . . . . . . . . . . . . . . . . . . . . . . . . . . . . . . . . . . . .
Error Message Sent to the Sender 164
Internet FAX Return Receipt Errors Messages 164
Clearing a Recording Paper Jam 165
Clearing a Document Jam 166
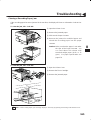
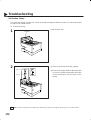
Cleaning the Document Scanning Area 167
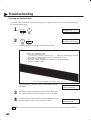
Cleaning the Printer Roller 168
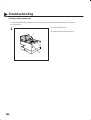
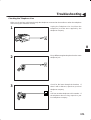
Adjusting the Automatic Document Feeder (ADF) 169
Verification Stamp 170
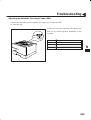
Checking the Telephone Line 171
9 APPENDIX
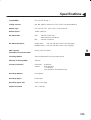
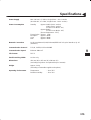
Specifications 173. . . . . . . . . . . . . . . . . . . . . . . . . . . . . . . . . . . . . . . . . . . . . . . . . . . . . .
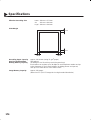
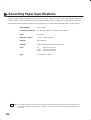
Recording Paper Specifications 176. . . . . . . . . . . . . . . . . . . . . . . . . . . . . . . . . . . . .
Options and Supplies 177. . . . . . . . . . . . . . . . . . . . . . . . . . . . . . . . . . . . . . . . . . . . . . .
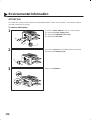
Environmental Information 178. . . . . . . . . . . . . . . . . . . . . . . . . . . . . . . . . . . . . . . . . .
ATTENTION 178. . . . . . . . . . . . . . . . . . . . . . . . . . . . . . . . . . . . . . . . . . . . . . . . . . . . . . . . . . . .
To remove the battery 178
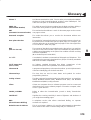
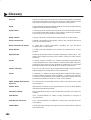
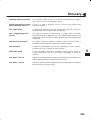
Glossary 179. . . . . . . . . . . . . . . . . . . . . . . . . . . . . . . . . . . . . . . . . . . . . . . . . . . . . . . . . . .
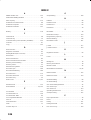
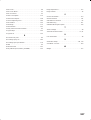
INDEX 193. . . . . . . . . . . . . . . . . . . . . . . . . . . . . . . . . . . . . . . . . . . . . . . . . . . . . . . . . . . . .

5
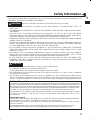
Safety Information
This product complies with the requirements of EC Council Directives 73/23/EEC amended by 93/68/EEC, and
89/336/EEC amended by 92/31/EEC and 93/68/EEC.
WARNING
!
denotes a potential hazard that could result in serious injury or death.
• TO PREVENT FIRE OR SHOCK, DO NOT EXPOSE THIS PRODUCT TO RAIN OR ANY TYPE OF
MOISTURE.
• TO MINIMIZE THE POSSIBILITY OF SHOCK OR DAMAGE TO THE MACHINE, IT MUST BE PROPERLY
GROUNDED.
• THIS PRODUCT CONTAINS HAZARDOUS RADIATION. IF YOU DO NOT FOLLOW THESE
INSTRUCTIONS OR USE CONTROLS, MAKE ADJUSTMENTS OR PROCEDURES OTHER THAN THOSE
SPECIFIED HEREIN, YOU MAY EXPOSE YOURSELF TO HAZARDOUS RADIATION.
• WHEN YOU OPERATE THIS EQUIPMENT, THE SOCKET-OUTLET SHOULD BE NEAR THE EQUIPMENT
AND BE EASILY ACCESSIBLE.
• MAKE SURE THAT THE MACHINE IS INSTALLED IN A SPACIOUS OR WELL-VENTILATED ROOM SO
AS NOT TO INCREASE THE AMOUNT OF OZONE IN THE AIR. SINCE OZONE IS HEAVIER THAN AIR,
IT IS RECOMMENDED THAT AIR AT FLOOR LEVEL BE VENTILATED.
• PLUG POWER SUPPLY CORD INTO ORDINARY AC OUTLET BEFORE CONNECTING TELEPHONE
LINE CORD. DISCONNECT TELEPHONE LINE CORD BEFORE UNPLUGGING POWER SUPPLY CORD
FROM AC OUTLET.
• DISCONNECT THE EQUIPMENT IMMEDIATELY SHOULD IT EVER SUFFER PHYSICAL DAMAGE
WHICH RESULTS IN THE INTERNAL PARTS BECOMING ACCESSIBLE IN NORMAL USE. IN THIS
INSTANCE USERS SHOULD HAVE THE EQUIPMENT REPAIRED OR DISPOSE OF.
• IF THE POWER SUPPLY CORD AND/OR TELEPHONE LINE CORD OF THIS EQUIPMENT ARE
DAMAGED, THEY MUST BE REPLACED BY THE SPECIAL CORDS SUPPLIED BY AN AUTHORIZED
PANASONIC SERVICE CENTRE.
CAUTION
!
1 When you know that a thunderstorm is coming, we recommend that you:
(1) Unplug the telephone line cord from the phone jack.
(2) Turn off the power and unplug the power supply cord from AC outlet.
2 This equipment may not necessarily provide for the effective hand-over of a call to or from a telephone
connected to the same line.
3 The operation of this equipment on the same line as telephones or other equipment with audible warning
devices or automatic ring detectors will give rise to bell tinkle or noise and may cause false tripping of the ring
detector. Should such problem occur, the user is not to contact telecom (telephone company) faults service.
For New Zealand Users
The grant of a Telepermit for any item of terminal equipment indicates only that Telecom has accepted that
the item complies with minimum conditions for connection to its network. It indicates noendorsement of
the product by Telecom, nor does it provide any sort of warranty. Above all, it provides no assurance that
any item will work correctly in all respects with another item of Telepermitted equipment of a different make
or model, nor does it imply that any product is compatible with all of Telecom’s network services.
This equipment is not capable, under all operating conditions, of correct operation at the higher speeds
for which it is designed. Telecom will accept no responsibility should difficulties arise in such
circumstances.
IMPORTANT NOTICE
Under power failure conditions, this telephone may not operate. Please ensure that a separate telephone,
not dependent on local power, is available for emergency use in emergencies.
This equipment should not be used under any circumstances which may constitute a nuisance to other
Telecom customers.
This equipment shall not be set to make automatic calls to the Telecom ’111’ Emergency Service.
Not all telephones will respond to incoming ringing when connected to the extension socket.
02001000001
02001070001

6
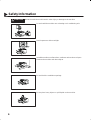
Safety Information
CAUTION
!
denotes hazards that could result in minor injury or damage to the machine.
Do not install the machine near a heating or air conditioning unit.
Avoid exposure to direct sunlight.
Install the machine on a flat surface, and leave at least 10 cm of space
between the machine and other objects.
Do not block the ventilation openings.
Do not place heavy objects or spill liquids on the machine.
02001000002
02001070003

7
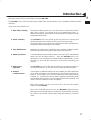
Introduction
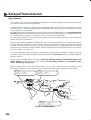
Thank you very much for purchasing the Panafax DX-1000.
The DX-1000 is one of the most advanced models in the Panafax family of G3 compatible, desktop facsimile
machines.
Some of its many features are
1. Plain Paper Printing Plain paper printing means you can easily write on received documents
with a pen or pencil. Documents do not curl, making filing easier. In
addition, plain paper does not fade, making it ideal for long term storage
of important documents.
2. Quick Scanning The DX-1000 Quick Scan speeds up the fax process by scanning and
storing documents into memory in about 2.8 seconds per page.
This means that you no longer have to wait around until a transmission is
completed before retrieving your documents.
3. Easy Maintenance Maintenance requires only changing a toner cartridge, making it quicker
and easier than with other types of plain paper fax machines.
4. Memory Function A standard image memory feature allows you to store up to standard 350
pages into the document memory. After the DX-1000 stores your
documents, it can send them to selected station(s) automatically. You do
not have to wait until the transmission ends before retrieving your
originals.
5. Dual Access
Operation
The DX-1000 can reserve the next transmission even during reception or
memory transmission. It can also receive during document storage.
6. Internet
Communication
Connected to an Ethernet LAN (local area network), the DX-1000 allows
you to send documents over the Internet to a remote Internet fax or a PC
terminal. It also allows you to receive and print an email transmitted by
a remote PC. Furthermore, the DX-1000 is capable of performing email
and fax forwarding functions. Execute relayed transmission requests, and
can be used as a network scanner and printer.
With a little practice, anyone can learn how to use the most popular
features of the DX-1000.
This User’s Guide will help you to use your DX-1000 quickly and easily.
Although we recommend that you review each section briefly, it will only
be necessary to read the sections that contain the feature(s) you will be
using.
01001000001
01001030001
01001990001
01001990015
01001990003
01001990016
01001990005
01001990027
01001990011

8
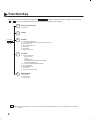
Function Key
Any function can be started by first pressing FUNCTION and then enter the function number, or by pressing
or scroll key repeatedly until the desired function appears on the display.
Relayed Transmission
(See Note)
Polling
Printout
1 = Journal (Print/View)
2 = One-Touch/Abbreviated /Directory Search List
3 = Program List
4 = Fax Parameter List
5 = Not used
6 = Not used
7 = Directory Sheet
Set Mode
1 = User Parameters
• Date & Time
• Logo
• Character ID
• ID Number (Fax Telephone Number)
• Internet Parameters
2 = One-Touch/Abbreviated Numbers
3 = Program Keys
4 = Fax Parameters
5 = Not used
6 = Cleaning Printer Roller
Edit File Mode
1 = File List
2 = Not Used
3 = Delete File
FUNCTION
2
3
6
7
9
If the Fax Parameter is not preset to a Valid position that enables its use, the display will not show the
function.
01004000001
01004030001
01004060011
Note:
01004070001

9
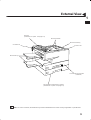
External View
Handset
[Available as an option. See page 177]
Control Panel
Printer Cover
Recording Paper Cassette
(Standard)
250 sheets Recording Paper Cassette
[Available as an option. See page 177]
Document Sub Tray
Document Trays
Document Guides
For some countries, the handset may not be available because of the country’s regulation or specification.
01002000001
01002090001
Note:
01002070001

10
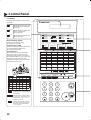
Control Panel
111009
1513
31
LCD Display
Indicates date and time, or the current
operation.
One-Touch Keys (01-32)
Used for One-Touch Dialling.
(See pages 81 and 86)
Program Keys (P1-P8)
Used to record long dialling procedures
or Group Dialling Number keys.
(See pages 105 to 109)
Character Keys
The One-Touch Keys and Program
Keys also serve as character and
symbol input keys which are used to
record Email address, your LOGO and
station name. The character key
template is printed on the panel under
the directory sheet cover.
-
RESOLUTION
Panasonic
213
456
9
0
87
TONE
START
STOP
COPY
ON LINE
DARKER
LIGHTER
400 dpi
FINE
TONER
FAST
QUALITY
ALARM
CONTRAST HALFTONE STAMP
MEMORY FUNCTION
INTERNET
PAUSE
REDIAL
ABBR
SUB-ADDR
FLASH CLEAR SET MONITOR
13 14 15 16 17 18
19 20 21 22 23 24
25 26 27 28 29 30
31 32 P1 P2 P3 P4
P5 P6 P7 P8
+VOL
ON LINE
Blinks when the machine is
transmitting a document or
receiving.
Blinks when the remaining
toner is getting low.
(See page 28)
Blinks when trouble occurs.
(See page 165)
TONER
ALARM
01 02 03 04 05 06
07 08 09 10 11 12
07
P8
23
P2
P132
29282726
222120
1716
14
P6
P3 P4
30
24
18
12
P5
19
P7
06
0504
030201
25
08
DIRECTORY
SEARCH
SPACE SYMBOLS
CAPS
ABCDEF
GHI JKL
MNOPQR
STUVWX
YZ@. -_
ÅÄÖÜèé
Æ
mnopq r
stuvwx
yz@.-_
abcdef
ghi jkl
Used to insert a space while
entering LOGO, character ID and
station name.
Used to enter a symbol (+ & ( ) ’
, : ) for LOGO, character ID and
station name. Use or to
select the symbols.
Used to switch between upper
and lower character set. Upper
characters are unavailable for
”è”, ”é” and ”Æ”.
SPACE
SYMBOLS
CAPS
01003000001
01003990019

11
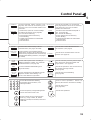
Control Panel
Used to cancel operations. When it is
pressed, the machine will return to standby.
Used to make copies.
(See page 104)
Used to start operations.
Used for Manual Number Dialling,
programming phone numbers, and
selecting functions.
Used to temporarily change Dialling Mode
to Tone when Pulse mode is set.
Used to confirm current communication
modes (e.g. Page number, ID, Dialed
Telephone number, File number) when unit
is ON LINE.
Used to enter a pause when recording or
dialling a telephone number, or to redial the
last dialed number. (See page 93)
Used to start Abbreviated Dialling (See
pages 82 and 87)
Used to separate the Sub-address from the
telephone number when dialling, or to
access some features of your PBX.
Used to set Normal, Lighter, or Darker. (See
page 67) Also serves as an arrow key (<) to
move the cursor over recorded numbers and
characters.
Provides OFF, QUALITY or FAST settings
for halftone documents. (See page 68)
Also used for the following
•Search station name for Directory
Search Dialling.
•Confirm entered station for multi-station
communication.
•Select functions.
CONTRAST
HALFTONE
Used to set Standard, Fine and 400 dpi.
(See page 67) Also serves as an arrow key
(>) to move the cursor over recorded
numbers and characters.
Used to turn the verification stamp ON or
OFF. (See page 68)
Also used for the following
•Search station name for Directory
Search Dialling.
•Confirm entered station for multi-station
communication.
•Select functions.
RESOLUTION
STAMP
Used to start or select the function and
sub-functions. (See page 8)
Used to select communications over the
Internet. (See page 70)
MEMORY Used to select either memory or direct
communication. (See pages 78 to 88)
FUNCTION
INTERNET
Used to erase the previously entered input.
Also used to turn down the monitor and
ringer volume. (See page 35)
Used to set operations. Also used to turn up
the monitor and ringer volume.
(See page 35)
Used to start On-Hook Dialling.
(See page 90)
PAUSE
REDIAL
MONITOR
CLEAR
SET
— VOL
+VOL
STOP
COPY
TONE
213
456
9
0
87
TONE
TONE
and
START
ABBR
SUB-ADDR
FLASH
DIRECTORY
SEARCH
Used to perform search dialling directly.
Allows quick-sending a fax by searching for a
station name programmed in One-Touch keys
or Abbreviated dialling numbers. (See pages
73 and 83
01003000002
01003990020

12
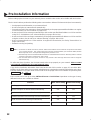
Pre Installation Information
Before setting up the DX-1000 on your network, please read this entire section to be familiar with its functions.
The DX-1000 is able to perform the following when connected to a 10Base-T Ethernet LAN (local area network):
• Send paper-based information as an Internet Email.
• Receive and print an Internet Email automatically.
• Forward received G3 fax message or Email automatically to the preprogrammed Email address or regular
G3 fax machine (see “Fax Forward” on pages 124).
• Route received G3 fax message automatically to the sender-specified Email address or G3 fax machine
using ITU-T SUB-Address (see “Inbound Routing” on pages 116 to 120).
• Route received G3 fax messages automatically to the preprogrammed Email address or G3 fax machine
using the sender’s fax ID code (see “Inbound Routing” on pages 116 to 120).
• Relay an Internet Email to a G3 fax machine via regular fax transmission (see “Relay Transmission” on
pages 135 to 146).
• Network scanning and printing.
1. To function as SMTP mail server, the DX-1000’s email address must include its unique Host name within
your company domain. This unique Host name must be registered within your network’s DNS (Domain
Name System) server. Example
2. Automatically refers to immediate SMTP transfer or immediate POP3 retrieval. Manually refers to manual
retrieval of mail when configured as POP3 client.
3. The DX-1000 will receive, print, forward or relay emails in text message format and TIFF-F image file
attachment only.
To utilize the above functions, the DX-1000 needs to be set up properly on your network.
Please contact
your network administrator for actual network setup
.
Copy the Pre-installation Information form found at the end of this section on page 15, record the MAC
Address on the form and ask your network administrator to complete the remaining information on the form.
The MAC Address of your DX-1000 can be found on the 2nd page of the Fax Parameter List printout (press
FUNCTION 6 4 SET ).
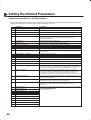
The DX-1000 can be set up as either SMTP mail server or POP3 client. Dependent on the type of setup,
different functions are available as follows.
Function SMTP Server Setup POP3 Client Setup
Sending paper-based information as an Internet Email Yes Yes
Receive and print an Internet Email automatically Yes Yes
Receive and print an Internet Email manually No Yes
Forward received G3 fax message or Email automatically Yes Yes
Route received G3 fax message automatically Yes Yes
Relay an Internet Email to G3 fax machine Yes No
01007000001
Note:
01007990001

13
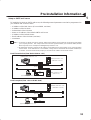
Pre Installation Information
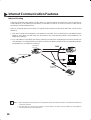
Setup as SMTP mail server
To install the DX-1000 as SMTP mail server, the following network parameters need to be programmed on
your network and on the DX-1000.
• IP Address of the DNS Server (if not available, see Note)
• IP Address of the DX-1000
• Subnet Mask of the DX-1000
• Name or IP Address of the Default SMTP mail server
• IP Address of the Default Router
• Email Address of the DX-1000 (see Note)
• Host Name
1. To function as SMTP mail server, the DX-1000’s email address must include its unique Host name within
your company domain. This unique Host name must be registered within your network’s DNS (Domain
Name System) server. Example:
2. By default the machine requires the IP Address of the DNS Server and prompts you to enter the SMTP
Server Name. If the DNS Server is not available, change the Fax Parameter No. 94 (DNS SERVER) to
”1:Invalid”. Then the machine will prompt you to enter the IP Address of the SMTP Server.
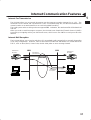
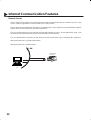
Email Transmission (from the DX-1000 to a PC)
Panafax UF-770
Panasonic
LTR
SMTP01.panasonic.com
(SMTP Mail Server)
POP02.panasonic.com
(POP Server)
(Router)
SMTP
POP3
Email reception (from a PC to the DX-1000)
Panafax UF-770
Panasonic
LTR
SMTP01.panasonic.com
(SMTP Mail Server)
(Router)
SMTP
01007000002
Note:
01007990002
01007990003
#@multitude

14
Pre Installation Information
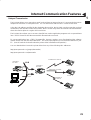
Setup as POP3 Client
To install the DX-1000 as POP3 Client, the following network parameters need to be programmed on your
network.
• IP Address of the DNS Server (if not available, see Note)
• IP Address of the DX-1000
• Subnet Mask of the DX-1000
• Name or IP Address of the Default SMTP mail server
• IP Address of the Default Router
• POP Server Name or IP Address
• POP User Account Name
• POP Password
• Email Address of the DX-1000 (see Note)
1. The email address format can be the same as your regular email address. If your email address is
, the DX-1000’s email address can be
.
2. By default the machine requires the IP Address of the DNS Server and prompts you to enter the SMTP and
POP Server Names. If the DNS Server is not available, change the Fax Parameter No. 94 (DNS SERVER)
to ”1:Invalid”. Then the machine will prompt you to enter the IP Address of the SMTP and POP Servers.
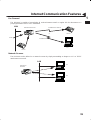
Email transmission (from the DX-1000 to a PC)
Panafax UF-770
Panasonic
LTR
SMTP01.panasonic.com
(SMTP Mail Server)
POP02.panasonic.com
(POP Server)
(Router)
SMTP
POP3
Email reception (from a PC to the DX-1000)
Panafax UF-770
Panasonic
LTR
SMTP01.panasonic.com
(SMTP Mail Server)
POP02.panasonic.com
(POP Server)
(Router)
SMTP
POP3
01007000001
Note:
01007990004
01007990003
#@multitude

15
Pre Installation Information
For the total system to work properly via LAN, certain information and additional parameters must be set. Please
contact your network administrator for the required information and connection to the LAN.
User Information
Company Name
Address
Dept.
City State Zip Code
Tel. No. Fax No.
Internet Fax Parameters (See page 40 to 44)
(1) IP Address:
(2) Subnet Mask:
(3) *SMTP Server Name: or *SMTP Server IP Address:
(4) Default Router IP Address:
(5) Email Address:
(6) DNS Server IP Address:
(7) POP Server Name: or *POP Server IP Address:
(8) POP User Name:
(9) POP Password:
(10) Host Name:
(11) Default Subject:
(12) Default Domain:
(13) Remote Password:
(14) Relay XMT Password:
(15) Manager’s Email Address:
(16) Acceptable Domain Name(s) for Relay Transmission:
1. 6.
2. 7.
3. 8.
4. 9.
5. 10.
1. Items in Bold, depict information obtained from you Network Administrator.
2. By default the machine requires the IP Address of the DNS Server and prompts you to enter the SMTP and
POP Server Names (items 3 and 7 above). If the DNS Server is not available, change the Fax Parameter
No. 94 (DNS SERVER) to ”1:Invalid”. Then the machine will prompt you to enter the IP Address of the SMTP
and POP Servers.
3. If required, the MAC Address of the DX-1000 can be obtained from the 2nd page of the Fax Parameter List
printout, by pressing
FUNCTION 6 4 SET
.
01007000002
01007030004
01007110001
Note:
01007070001
01007070002
01007070003

16
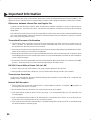
Pre Installation Information
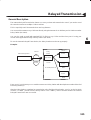
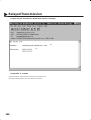
Explanation of Contents
MAC Address
MAC Address from the 2nd page of the Fax Parameter List printout (press
[FUNCTION][6][4][SET]).
(1) IP Address The Internet Protocol (IP) address assigned to your machine.
(2) Subnet Mask The Subnet Mask number.
(3) SMTP Server Name or SMTP Server
IP Address
The SMTP Server Name (up to 60 characters). The SMTP Server IP
Address.
(4) Default Router IP Address The Default Router’s IP Address.
(5) Email Address The email address assigned to your machine. (Up to 60 characters)
(6) DNS Server IP Address The IP address of the DNS Server.
(7) POP Server Name or POP Server IP
Address
The POP Server Name. (Up to 60 characters) The POP Server IP
Address.
(8) POP User Name POP User Name. (Up to 40 characters)
(9) POP Password POP Password. (Up to 10 characters)
(10) Host Name The name assigned to your DX-1000. (Up to 60 characters)
(11) Default Subject The information to be added to the Subject Line for all outgoing emails.
(Up to 40 characters)
(12) Default Domain Specify the Domain Name (up to 50 characters) to be added to frequently
used or incomplete outgoing email addresses (i.e. @yourcompany.com)
(13) Remote Password Enter a security password (up to 10 characters) to allow Remote
Programming of your auto dialer via email.
(14) Relay XMT Password Enter a password to provide network security to your Relay Station (for G3
relay purposes). Up to 60 characters.
(15) Manager’s Email Address Enter you Department Manager’s email address for notification of all
Internet relayed transmissions for supervision and cost control purposes.
(Up to 60 characters)
(16) Domain Name (01 to 10) Enter up to 10 Domain Names that are authorized to access your Internet
Fax for Relayed Transmission Request. (Up to 30 characters)
All IP Addresses consist of 4 parts separated by dots (i.e. 165.113.245.2)
01007000001
01007110002
Note:
01007070004
La pagina sta caricando ...
La pagina sta caricando ...
La pagina sta caricando ...
La pagina sta caricando ...
La pagina sta caricando ...
La pagina sta caricando ...
La pagina sta caricando ...
La pagina sta caricando ...
La pagina sta caricando ...
La pagina sta caricando ...
La pagina sta caricando ...
La pagina sta caricando ...
La pagina sta caricando ...
La pagina sta caricando ...
La pagina sta caricando ...
La pagina sta caricando ...
La pagina sta caricando ...
La pagina sta caricando ...
La pagina sta caricando ...
La pagina sta caricando ...
La pagina sta caricando ...
La pagina sta caricando ...
La pagina sta caricando ...
La pagina sta caricando ...
La pagina sta caricando ...
La pagina sta caricando ...
La pagina sta caricando ...
La pagina sta caricando ...
La pagina sta caricando ...
La pagina sta caricando ...
La pagina sta caricando ...
La pagina sta caricando ...
La pagina sta caricando ...
La pagina sta caricando ...
La pagina sta caricando ...
La pagina sta caricando ...
La pagina sta caricando ...
La pagina sta caricando ...
La pagina sta caricando ...
La pagina sta caricando ...
La pagina sta caricando ...
La pagina sta caricando ...
La pagina sta caricando ...
La pagina sta caricando ...
La pagina sta caricando ...
La pagina sta caricando ...
La pagina sta caricando ...
La pagina sta caricando ...
La pagina sta caricando ...
La pagina sta caricando ...
La pagina sta caricando ...
La pagina sta caricando ...
La pagina sta caricando ...
La pagina sta caricando ...
La pagina sta caricando ...
La pagina sta caricando ...
La pagina sta caricando ...
La pagina sta caricando ...
La pagina sta caricando ...
La pagina sta caricando ...
La pagina sta caricando ...
La pagina sta caricando ...
La pagina sta caricando ...
La pagina sta caricando ...
La pagina sta caricando ...
La pagina sta caricando ...
La pagina sta caricando ...
La pagina sta caricando ...
La pagina sta caricando ...
La pagina sta caricando ...
La pagina sta caricando ...
La pagina sta caricando ...
La pagina sta caricando ...
La pagina sta caricando ...
La pagina sta caricando ...
La pagina sta caricando ...
La pagina sta caricando ...
La pagina sta caricando ...
La pagina sta caricando ...
La pagina sta caricando ...
La pagina sta caricando ...
La pagina sta caricando ...
La pagina sta caricando ...
La pagina sta caricando ...
La pagina sta caricando ...
La pagina sta caricando ...
La pagina sta caricando ...
La pagina sta caricando ...
La pagina sta caricando ...
La pagina sta caricando ...
La pagina sta caricando ...
La pagina sta caricando ...
La pagina sta caricando ...
La pagina sta caricando ...
La pagina sta caricando ...
La pagina sta caricando ...
La pagina sta caricando ...
La pagina sta caricando ...
La pagina sta caricando ...
La pagina sta caricando ...
La pagina sta caricando ...
La pagina sta caricando ...
La pagina sta caricando ...
La pagina sta caricando ...
La pagina sta caricando ...
La pagina sta caricando ...
La pagina sta caricando ...
La pagina sta caricando ...
La pagina sta caricando ...
La pagina sta caricando ...
La pagina sta caricando ...
La pagina sta caricando ...
La pagina sta caricando ...
La pagina sta caricando ...
La pagina sta caricando ...
La pagina sta caricando ...
La pagina sta caricando ...
La pagina sta caricando ...
La pagina sta caricando ...
La pagina sta caricando ...
La pagina sta caricando ...
La pagina sta caricando ...
La pagina sta caricando ...
La pagina sta caricando ...
La pagina sta caricando ...
La pagina sta caricando ...
La pagina sta caricando ...
La pagina sta caricando ...
La pagina sta caricando ...
La pagina sta caricando ...
La pagina sta caricando ...
La pagina sta caricando ...
La pagina sta caricando ...
La pagina sta caricando ...
La pagina sta caricando ...
La pagina sta caricando ...
La pagina sta caricando ...
La pagina sta caricando ...
La pagina sta caricando ...
La pagina sta caricando ...
La pagina sta caricando ...
La pagina sta caricando ...
La pagina sta caricando ...
La pagina sta caricando ...
La pagina sta caricando ...
La pagina sta caricando ...
La pagina sta caricando ...
La pagina sta caricando ...
La pagina sta caricando ...
La pagina sta caricando ...
La pagina sta caricando ...
La pagina sta caricando ...
La pagina sta caricando ...
La pagina sta caricando ...
La pagina sta caricando ...
La pagina sta caricando ...
La pagina sta caricando ...
La pagina sta caricando ...
La pagina sta caricando ...
La pagina sta caricando ...
La pagina sta caricando ...
La pagina sta caricando ...
La pagina sta caricando ...
La pagina sta caricando ...
La pagina sta caricando ...
La pagina sta caricando ...
La pagina sta caricando ...
La pagina sta caricando ...
La pagina sta caricando ...
La pagina sta caricando ...
La pagina sta caricando ...
La pagina sta caricando ...
La pagina sta caricando ...
-
 1
1
-
 2
2
-
 3
3
-
 4
4
-
 5
5
-
 6
6
-
 7
7
-
 8
8
-
 9
9
-
 10
10
-
 11
11
-
 12
12
-
 13
13
-
 14
14
-
 15
15
-
 16
16
-
 17
17
-
 18
18
-
 19
19
-
 20
20
-
 21
21
-
 22
22
-
 23
23
-
 24
24
-
 25
25
-
 26
26
-
 27
27
-
 28
28
-
 29
29
-
 30
30
-
 31
31
-
 32
32
-
 33
33
-
 34
34
-
 35
35
-
 36
36
-
 37
37
-
 38
38
-
 39
39
-
 40
40
-
 41
41
-
 42
42
-
 43
43
-
 44
44
-
 45
45
-
 46
46
-
 47
47
-
 48
48
-
 49
49
-
 50
50
-
 51
51
-
 52
52
-
 53
53
-
 54
54
-
 55
55
-
 56
56
-
 57
57
-
 58
58
-
 59
59
-
 60
60
-
 61
61
-
 62
62
-
 63
63
-
 64
64
-
 65
65
-
 66
66
-
 67
67
-
 68
68
-
 69
69
-
 70
70
-
 71
71
-
 72
72
-
 73
73
-
 74
74
-
 75
75
-
 76
76
-
 77
77
-
 78
78
-
 79
79
-
 80
80
-
 81
81
-
 82
82
-
 83
83
-
 84
84
-
 85
85
-
 86
86
-
 87
87
-
 88
88
-
 89
89
-
 90
90
-
 91
91
-
 92
92
-
 93
93
-
 94
94
-
 95
95
-
 96
96
-
 97
97
-
 98
98
-
 99
99
-
 100
100
-
 101
101
-
 102
102
-
 103
103
-
 104
104
-
 105
105
-
 106
106
-
 107
107
-
 108
108
-
 109
109
-
 110
110
-
 111
111
-
 112
112
-
 113
113
-
 114
114
-
 115
115
-
 116
116
-
 117
117
-
 118
118
-
 119
119
-
 120
120
-
 121
121
-
 122
122
-
 123
123
-
 124
124
-
 125
125
-
 126
126
-
 127
127
-
 128
128
-
 129
129
-
 130
130
-
 131
131
-
 132
132
-
 133
133
-
 134
134
-
 135
135
-
 136
136
-
 137
137
-
 138
138
-
 139
139
-
 140
140
-
 141
141
-
 142
142
-
 143
143
-
 144
144
-
 145
145
-
 146
146
-
 147
147
-
 148
148
-
 149
149
-
 150
150
-
 151
151
-
 152
152
-
 153
153
-
 154
154
-
 155
155
-
 156
156
-
 157
157
-
 158
158
-
 159
159
-
 160
160
-
 161
161
-
 162
162
-
 163
163
-
 164
164
-
 165
165
-
 166
166
-
 167
167
-
 168
168
-
 169
169
-
 170
170
-
 171
171
-
 172
172
-
 173
173
-
 174
174
-
 175
175
-
 176
176
-
 177
177
-
 178
178
-
 179
179
-
 180
180
-
 181
181
-
 182
182
-
 183
183
-
 184
184
-
 185
185
-
 186
186
-
 187
187
-
 188
188
-
 189
189
-
 190
190
-
 191
191
-
 192
192
-
 193
193


Panasonic DX1000 Istruzioni per l'uso
- Categoria
- Multifunzionali
- Tipo
- Istruzioni per l'uso
in altre lingue
Documenti correlati
-
Panasonic UF4100 Istruzioni per l'uso
-
-
-
-
-
Panasonic Panafax UF-490 Manuale utente
-
-
Panasonic UFE1 Istruzioni per l'uso
-
Altri documenti
-
Olivetti Fax-Lab 101 Manuale del proprietario
-
-
Olivetti Fax-Lab 105 Manuale del proprietario
-
Olivetti Fax-Lab 120 Manuale del proprietario
-
Minolta Minoltafax 1300 Manuale utente
-
Xerox Pro 423 Guida utente
-
KYOCERA KM-C3232 Istruzioni per l'uso
-
KYOCERA KM-C3232 Istruzioni per l'uso
-
-
Avaya BayRS Version 13.10 (Japanese) Release Notes