La pagina si sta caricando...

Italiano Manuale di installazione
Il bordo sensibile è formato da un profilo in gomma con dopocorsa elastico di ammortamento urto superiore ai 30mm e da un
profilo in alluminio che fissato alla colonna o al cancello funge da supporto all’estruso in gomma.
Il funzionamento è garantito da due micro-switches. Il primo lavora su deformazione della gomma e del supporto inferiore, il
secondo come sicurezza nel caso in cui il cavetto di acciaio perdesse tensione.
1. DESCRIZIONE GENERALE
2. MONTAGGIO
3. TARATURA
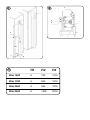
- Fissare la staffa “A” (fig.1) alla colonna, facendo riferimento alle quote riportate in tabella (fig.3).
- Collocare il bordo sensibile in posizione e fissarlo attraverso gli appositi fori “
B” e “C” (fig.1).
- Tarare il bordo sensibile (vedi paragrafo 3: “taratura”).
- Effettuare i collegamenti (vedi paragrafo 4: “collegamenti”).
- Inserire la calotta di copertura come come in fig.1.
Il bordo sensibile è predisposto per essere collegato a contatti normalmente chiusi di sicurezza in centrali di comando per
porte automatizzate. Questo dispositivo interverrà in base alle impostazioni della scheda a cui è collegato. Nelle centrali
“KING-gates” in particolare è possibile farlo intervenire durante la fase di chiusura (morsetto “PHO1”), la fase di apertura o
apertura-chiusura (morsetto “PHO2” impostabile con DIP “PHO2”) o bloccare tutte le manovre (morsetto “STOP”).
�
Nel caso vengano collegate più coste oppure siano presenti anche altri dispositivi di sicurezza nello stesso
contatto, questi vanno messi in serie.
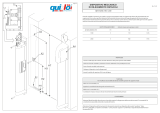
Per modificare la sensibilità del bordo sensibile bisogna:
- Sbloccare il controdado “
D” (fig.2).
- Regolare la sensibilità agendo sul tendicavo “
E” (fig.2).
- Ribloccare il controdado “
D” (fig.2).
�
In condizione di riposo nessuno dei due microinterruttori deve essere premuto.
4. DESCRIZIONE DEI COLLEGAMENTI (vedi particolare “F” in fig. 2)
English Instruction manual
The electromechanic safety edge is made of a rubber elastic after shock 30mm high edge and of an alluminium profile. The
alluminium profile, which is fixed to the post, offers support to the rubber.
The electromechanic safety edge has two microswitches which guarantee its working. The first one works on the distorsion of
the rubber and of the lower part of the “Slim”; the second one stops the automation if the steel thread release.
1. GENERAL DESCRIPTION
2. INSTALLATION
3. SENSITIVITY OF THE DEVICE
- Fix the support “A” (picture.1) on the post paying attention to the indication on the table (picture.1).
- Inser the extrusion in the support and fix in the hole predispositioned (“
B” e “C” of picture 1).
- Set the sensitivity of the device (see paragraph 3: “sensitivity of the device”).
- Connect the device (see paragraph 4: “connection”).
- Inserirt the cap as shown in the picture 1.
The safety edge is designed to be connected to normally closed contacts of safety in control units for automatic doors. This
device will intervene depending on the settings of the board which whom it is connected. In the “King-gates” control unit it can
intervene during the closing phase (terminal “PHO1”), during the opening phase or the opening-closing phase (terminal “PHO2”,
settable by “PHO2” DIP) or it can stop all the manoeuvres (terminal “STOP”).
�
In case of more than one safety edge or other safety device connected to the same terminal, they must be connected
in series.
In order to modify the sensitivity of the edge do the following operation:
- Unblock the nut “
D” (picture 2).
- Regulate the sensitivity of the device by hightering the screen “
E” (picture 2).
- Tighter the nut “
D” (picture 2).
�
In the off position do not press any microswitch.
4. CONNECTIONS (see part “F” in paragraph 2)
H1 H2 H3
Slim 1500 6 705 1416
Slim 1700 6 805 1616
Slim 2000 6 955 1916
Slim 2500 6 1205 2416
H1
H2
H3
A
B
D
E
F
1
3
2
La pagina si sta caricando...
La pagina si sta caricando...
-
 1
1
-
 2
2
-
 3
3
-
 4
4


in altre lingue
- English: KINGgates Slim Owner's manual
Documenti correlati

Altri documenti
-
 quiko QK-CSASC150 200 Manuale utente
-
Chamberlain LiftMaster CB202EV Manuale del proprietario
-
-
 RIB PRINCE 24V Manuale utente
-
-
 RIB AA21580 Manuale utente
-
-
 RIB Duke 180 Manuale utente
-
SEA SWING 2 Manuale del proprietario
-
Liebert 272014 Manuale utente


