
3-078-153-11 (1)
Network Function
Operating
Instructions
© 2002 Sony Corporation
Registration code (for a detailed explanation of this cord, see page 27.)

2
On trademarks
•ImageStation is the registered trademark of Sony Corporation.
•“Memory Stick” and are registered trademarks of Sony Corporation.
•The BLUETOOTH trademarks are owned by their proprietor and used by Sony
Corporation under license.
•America Online, AOL, and the AOL Triangle logo are registered trademarks of
America Online, Inc.
•NetFront by Access Co., Ltd. is adopted for the Internet function of this product.
NetFront is a registered trademark of Access Co., Ltd in Japan.
Copyright © 1996 – 2002 ACCESS CO., LTD.
•Portions of the supplied software are based partially on the work of the Independent
JPEG Group.
All other product names mentioned herein may be the trademarks or registered
trademarks of their respective companies. Furthermore, “TM” and “®” are not
mentioned in each case in this manual.
No compensation for your recordings
Any recording contents or downloaded files cannot be compensated for being lost due
to recording/playback malfunction or storage media problems.
Precautions
•Before using the network function, make sure to set the clock on the camcorder. For
details, refer to the operating instructions of the camcorder. If you use the network
function without setting the clock, you may not be able to send/receive email, or view
a web page.
•Do not remove the battery pack or disconnect the AC power adaptor while operating
in NETWORK mode. The setup for the NETWORK mode may be lost. Also, exit the
NETWORK mode when setting the POWER switch to (CHG) OFF or switching the
mode. These are to prevent the NETWORK mode setup from being lost.
•It is recommended that you make backup copies of your email messages and your
network preferences. These may be lost from time to time due to memory corruption.
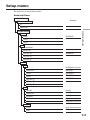
To save the network preferences, write them down on paper, or use “Setup memo,”
described (p. 117). Also, this data may be lost when the camcorder is repaired by
services.
•The network function with this product is available only in the U.S.
•The reset button cannot reset the network preferences.
Note on network operation when using the battery pack
When the remaining battery time is insufficient in NETWORK mode, use the AC power
adaptor or replace the battery pack with a fully charged battery pack. Before connecting
the AC power adaptor or replacing the battery pack, be sure to exit the NETWORK
mode.
Note
As shipping, your camcorder is configured for easy setup with “So-net” and “AOL”
services. Availability and features of these services are subject to change.

3
Introduction
Table of contents
Introduction
The network function on the camcorder...4
Basic operations in the NETWORK mode
..................................................................6
How to use the Network Menu.......... 6
How to use the stylus .......................... 7
How to input characters ...................... 8
Character input screen....................... 10
The available characters list .............. 11
Character input setting ...................... 16
Preparation
Using the NETWORK functions ..............17
Communicating with Bluetooth devices
................................................................18
Before communication ....................... 18
Registering a Bluetooth device ......... 19
Using your Modem Adaptor with
Bluetooth Function ...................... 19
Selecting other Bluetooth devices
from the list .................................. 25
Deleting a registered Bluetooth
device from the list ...................... 25
Customer registration ................................27
DI customer registration.................... 27
Online registration using your
computer....................................... 27
Online registration with your
camcorder ..................................... 27
Registering your Album on the Web.......30
Complete the album registration
separately...................................... 30
Setting the Internet connection.................31
Internet service provider ................... 31
Registering for “So-net” ............................32
Register for “So-net” separately ....... 32
Setting network preferences .....................33
Setting your provider preferences
for “So-net”................................... 33
Setting your provider preferences
for “AOL” ..................................... 37
Setting your provider preferences
for other providers ...................... 43
Setting other preferences ................... 49
Network Operation
Making your Album on the Web ............. 52
Uploading images to your Album on
the Web ......................................... 52
Viewing or editing your Album on
the Web ......................................... 59
Deleting images from your Album
on the Web.................................... 64
Finishing viewing or editing your
Album on the Web ...................... 64
Using email..................................................65
Sending email...................................... 65
Using the address book ..................... 76
Receiving email................................... 82
Deleting unnecessary received email
........................................................ 87
Viewing web pages ....................................89
Viewing web pages ............................ 89
How to use the menu bar on the
browser ......................................... 91
Storing the web page into a
“Memory Stick” – Page Memo
........................................................ 97
Shutting down the browser ............ 102
Additional Information
File storage destinations and file names
..............................................................103
Troubleshooting........................................104
Trouble accessing the Internet........ 104
Trouble with email ........................... 105
Trouble viewing web pages ............ 106
Troubles about the Album on the
Web.............................................. 107
Adjusting the LCD screen
(CALIBRATION) ....................... 108
Specifications.............................................109
Messages ....................................................110
General ............................................... 110
Album on the Web ........................... 111
Email................................................... 111
Browser .............................................. 112
Album error codes....................................113
Glossary .....................................................114
Setup memo...............................................117

4
Congratulations on your purchase of this Sony Handycam. Your Handycam can access
the Internet via a compatible communicating device, allowing you to do the following:
– Introduction –
The network function on the camcorder
Easy access to
the Internet
Sending/receiving
email
Showing your still images
and moving pictures on
the Web
Easy network
preferences (So-net)

5
Introduction
The network function on the camcorder
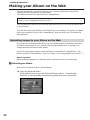
Showing your still images and moving pictures on the Web
You can upload still images and moving pictures to your Album on the Web and store
them on the Internet, and you can show them to your friends.
Sending/receiving email*
You can send or receive email anytime, and attach still images and moving pictures to
email messages.
Easy access to the Internet
You can view a web page via the Internet.
Easy network preferences (So-net)
Using the “So-net”option, you can easily set the required Internet and email
preferences. For detail on “So-net”, see “Using the recommended provider (So-net)”
(p. 31), or refer to the supplied flyer “Getting Online with your Sony Network
Handycam® camcorder”.
Set your camcorder’s clock setting before using the Network functions. (The default
setting is off.) If you do not set the clock setting, you cannot send and receive email or
view web pages.
You also have to set up your camcorder and the peripheral device, and complete
required registrations (DI customer registration, etc.).
For more information, refer to the supplied flyer “Getting Online with your Sony
Network Handycam® camcorder”.
(“DI” in “DI customer ID” stands for “Digital Imaging”.)
* As of October 2002, “AOL” does not support the receiving of email on this device. For
further clarification on this and other “AOL”-specific attributes, go to keyword:
Handycam on your computer.

6
This section describes basic control ways to operate your camcorder, those which are
used for network operations.
For details on how to hold your camcorder when operating in the NETWORK mode,
refer to the operating instructions supplied with your camcorder.
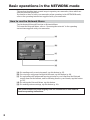
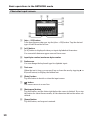
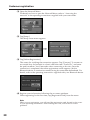
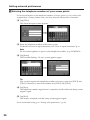
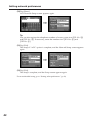
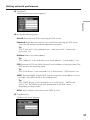
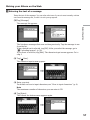
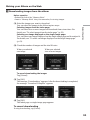
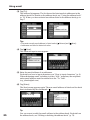
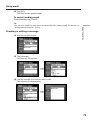
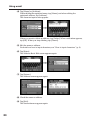
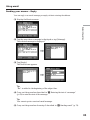
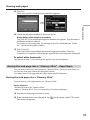
How to use the Network Menu
Tap the desired Network Function on Network Menu.
To access the Network Menu, refer to “Accessing the network” in the operating
instructions supplied with your camcorder.
[a]: For sending and/or receiving email, tap this button (p. 65).
[b]: For viewing a web page through the Internet, tap this button (p. 89).
[c]: For uploading still images and moving pictures to your Album on the Web and
storing them on the Internet, and for showing them to your friends, tap this button
(p. 52).
[d]: For exiting the Network Menu, tap this button.
[e]: For making various settings, tap this button (p. 20).
The actual screens may differ slightly from the illustrations in this network
function operating instructions.
Basic operations in the NETWORK mode
[a]
[b]
[c]
[d]
[e]

7
Introduction
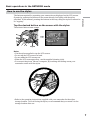
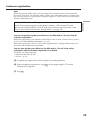
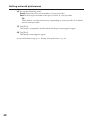
How to use the stylus
The buttons required for operating your camcorder are displayed on the LCD screen.
Operate by pressing the buttons on the screen directly but lightly with the stylus
provided. In this manual, pressing the buttons in this way using the stylus is referred to
as “tapping”.
Tap the desired button on the screen with the stylus.
The selected button turns orange.
,
Notes
•Use the stylus supplied to tap the LCD screen.
•Do not tap the LCD screen too hard.
•Do not make the LCD screen wet.
•When the LCD screen gets dirty, use the supplied cleaning cloth.
•You cannot drag icons, like on a computer, by touching and sliding across your
camcorder screen with the stylus.
•Refer to the operating instructions supplied with your camcorder for the stylus
storage location. To avoid losing the stylus, we recommend that you return it to the
storage location after use.
Basic operations in the NETWORK mode
stylus

8
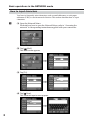
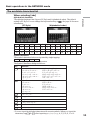
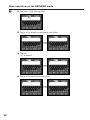
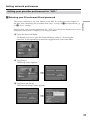
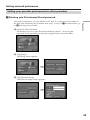
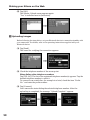
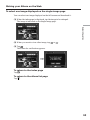
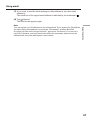
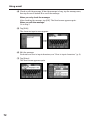
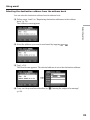
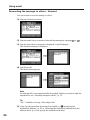
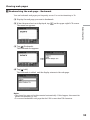
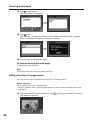
How to input characters
You have to frequently enter characters, such as email addresses, or web pages
addresses (URL), to use the network function. This section describes how to input
characters.
1
(1) Open the Network Menu.
For details on how to open the Network Menu, refer to “Accessing the
network” in the operating instructions supplied with your camcorder.
(2) Tap [
Mail].
The Send screen appears.
,
(3) Tap [To].
,
(4) Tap [ New].
The character input screen appears.
,
Basic operations in the NETWORK mode

9
Introduction
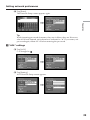
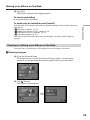
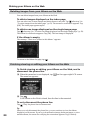
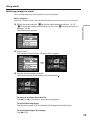
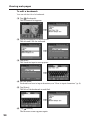
2 Selecting the character type
Tap [abcy123], then tap the desired character type.
abc: When inputting alphabetical characters.
123: When inputting numerical characters.
When you selected abc When you selected 123
3 Inputting characters
(1) Tap the character you want to input.
,
(2) After you input the characters, tap [Enter].
The Send screen appears again.
,
Basic operations in the NETWORK mode

10
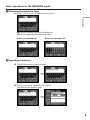
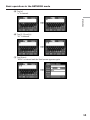
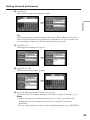
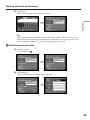
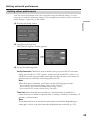
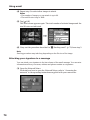
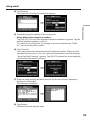
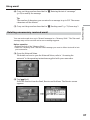
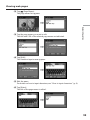
Basic operations in the NETWORK mode
1 [abcy123] button
A list box appears when you tap the [abcy123] button. Tap the desired
type of letter from the list box.
2 [a/A] button
[a/A] button is displayed when you input alphabetical characters.
You can switch between upper case and lower case.
3 Input byte number/maximum byte number
4 Preferences
You can change the keyboard type for alphabet input.
5 Text area
When the text is long, you can scroll up or down the area by tapping v or
V (scroll button) to display the hidden text.
6 [Enter] button
Tap this button to decide or close the input screen.
7
button
The cursor moves to a new line.
8 [Back space] button
Tap this button, and the letter right before the cursor is deleted. If you tap
the button for about three seconds, all the characters before the cursor are
deleted.
9 [Space] button
Tap this button, and a space is entered.
9
87
6
5
4
3
12
Character input screen

11
Introduction
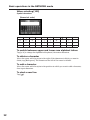
Symbol characters
The symbol characters below are inputted by single tapping:
The green keys input the symbol characters.
The symbol characters change as follows:
Basic operations in the NETWORK mode
The available characters list
When selecting [abc]
Alphabetical characters
The alphabet keyboard has 2 types (PC Style and Alphabetical order). The default
setting is PC Style. You can change the keyboard setting in . See page 16 for more
information.
(PC Style) (Alphabetical order)
Key Character
` ´ ˆ
* a: à t á t â t a t... A: À t Á t  t A t...
e: è t é t ê t e t... E: È t É t Ê t E t...
i: ì t í t î t i t... I: Ì t Í t Î t I t...
o: ò t ó t ô t o t... O: Ò t Ó t Ô t O t...
u: ù t ú t û t u t... U: Ù t Ú t Û t U t...
y:
´y
t y t... Y:
´
Y
t Y t...
¨ ˜
* a: ä t ã t a t... A: Ä t à t A t...
e: ë t e t... E: Ë t E t...
i: ï t i t... I: Ï t I t...
n: ñ t n t... N: Ñ t N t...
o: ö t õ t o t... O: Ö t Õ t O t...
u: ü t u t... U: Ü t U t...
y: ÿ t y t...
’ ”
’ t ” t ’ t ...
? ¿
? t ¿ t ? t ...
! ¡
! t ¡ t ! t ...
ç
Ç
ß
ç t Ç t ß t ç t...
. ,
. t , t . t ...
/ \
/ t \ t / t ...
abcdefghi jklm
nopqrs tuvwxy z
ABCDEFGHI J KLM
NOPQR S TUVWXY Z
* You can input the alphabet characters with accent symbols. When you input the
characters, tap
` ´ ˆ
or
¨ ˜
after inputting a, e, i, n, o, u, y, A, E, I, N, O, U or Y.
~ – _
@
:

12
Basic operations in the NETWORK mode
To switch between upper and lower case alphabet letters
Tap [a/A] to change the alphabetical keyboard, then enter characters.
To delete a character
Move the cursor with the stylus to the right of the character at which you want to
delete, tap [Back space]. The character at the left of the cursor is deleted.
To add a character
Move the cursor with the stylus to the position at which you want to add a character,
then input characters.
To start a new line
Tap [ ].
When selecting [123]
Symbol characters
(Numerical order)
123+()$
C
\%
456– []&ˆ | ˜
789/{}`”’ ,
*0#=<>. : ;_

13
Introduction
Basic operations in the NETWORK mode
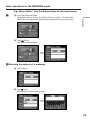
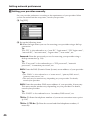
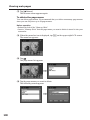
E.g., Enter “Hello” into the Subject item on the Send screen
1
(1) Open the Network Menu.
For details on how to open the Network Menu, refer to “Accessing the
network” in the operating instructions supplied with your camcorder.
(2) Tap [
Mail].
The Send screen appears.
,
2 Entering the subject of a message
(1) Tap [Subject].
(2) Tap [
New].
The character input screen appears.
,

14
Basic operations in the NETWORK mode
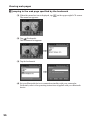
3
(1) Tap [abcy123], then tap [abc].
(2) Tap [a/A] to be able to enter upper-case letters.
,
(3) Tap [H].
“H” is entered.
,
(4) Tap [a/A] to enter lower-case letters.
,

15
Introduction
Basic operations in the NETWORK mode
(5) Tap [e].
“e” is entered.
,
(6) Tap [l], [l] and [o].
“llo” is entered.
,
(7) Tap [Enter].
“Hello” is entered and the Send screen appears again.
,

16
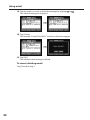
Basic operations in the NETWORK mode
Character input setting
Keyboard
You can change the display of the alphabet, PC arrangement keyboard or ABC
arrangement keyboard into a setup you want when you input characters.
1 Tap in the character input screen.
,
2 Tap the desired setting.
You can set as the following two displays when [abcy123] is set as [abc].
(PC Style is the default setting.)
– PC Style (PC arrangement keyboard)
– Alphabetical order (ABC arrangement keyboard)
To switch the setting, tap on the upper-right LCD screen.
Alphabetical orderPC Style

17
Preparation
There are three Network functions, namely Album on the Web, email, and browser. To
use the Album on the Web and So-net, you need to complete customer registration.
“So-net” is charged service. For more information, refer to the supplied flyer “Getting
Online with your Sony Network Handycam® camcorder”.
To fully use the function in the NETWORK mode, you have to complete the following
registrations and setup tasks via your camcorder:
1 Bluetooth device registration (p. 19)
2 DI customer registration (p. 27)
3 Album registration (p. 30)
4 So-net registration* (p. 32)
5 Network Setup (p. 33)
* So-net registration is not necessary to use other providers.
The above registrations can also be done on the web site using a computer. Access to
the following URL: “http://www.myimagecam.com/”
– Preparation –
Using the NETWORK functions

18
Communicating with Bluetooth devices
Before communication
What is the Bluetooth wireless technology?
The Bluetooth wireless technology allows communication between various Bluetooth
devices without using cables. Devices which can use this technology include PCs,
computer peripheral devices, PDAs, and mobile phones. This omnidirectional
communication system enables communication even if the Bluetooth device is in a bag
or having obstacles between the devices.
Also, the Bluetooth wireless technology has advanced security functions, such as
scrambled frequencies and data encryption.
Authentication
The authentication routine can block unspecified users’ access to this network. When
attempting communication with an unregistered Bluetooth device, the devices must
first be registered with each other by entering a common passkey to each device. When
connecting with a previously registered Bluetooth device, communication starts
without entering the passkey.
Tip on “Passkey”
The passkey is an identification number needed to allow two Bluetooth devices to
communicate with each other. The connection will be permitted after entering the
passkey. This “Passkey” is also referred to as a “Bluetooth passkey”, “PIN”, “Bluetooth
PIN”, etc.
Radio wave indication
indicates the radio wave status of the connected Bluetooth device. (Use this
indication as a guide.)

19
Preparation
Registering a Bluetooth device
To communicate with a Bluetooth device, you need to register it. Here we describe how
to register the Sony Modem Adaptor with Bluetooth Function. Once registration is
complete, you do not have to reregister the Bluetooth device as long as you do not
cancel registration. You can register up to three Bluetooth devices. Also, refer to the
operating instructions supplied with your Bluetooth device.
For more information about Bluetooth devices compatible with your camcorder, access
the following URL: “http://www.myimagecam.com/”
Using your Modem Adaptor with Bluetooth Function
Connecting your camcorder to a Bluetooth device by Bluetooth wireless technology and
communicating.
Notes
•When using Sony BTA-NW1/BTA-NW1A Modem Adaptor with Bluetooth Function,
place it at a location that has no obstacles between your camcorder and the device.
The distance between the devices must be within 10 m (33 feet).
•The connection may be interrupted depending on the communication conditions.
1 Preparing the Modem Adaptor with Bluetooth Function
Set the Modem Adaptor with Bluetooth Function to connection standby (BONDING).
For details, refer to the operating instructions supplied with your Modem Adaptor with
Bluetooth Function.
Communicating with Bluetooth devices
Modem Adaptor with Bluetooth
Function (not supplied)
your camcorder

20
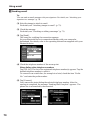
Communicating with Bluetooth devices
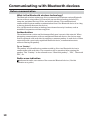
2 Specifying your Modem Adaptor with Bluetooth Function as the
connection device
(1) Open the Network Menu.
For details on how to open the Network Menu, refer to “Accessing the
network” in the operating instructions supplied with your camcorder.
(2) Tap [Setup].
The Setup screen appears.
,
(3) Tap [Bluetooth Setup].
The Bluetooth Setup screen appears.
,
La pagina sta caricando ...
La pagina sta caricando ...
La pagina sta caricando ...
La pagina sta caricando ...
La pagina sta caricando ...
La pagina sta caricando ...
La pagina sta caricando ...
La pagina sta caricando ...
La pagina sta caricando ...
La pagina sta caricando ...
La pagina sta caricando ...
La pagina sta caricando ...
La pagina sta caricando ...
La pagina sta caricando ...
La pagina sta caricando ...
La pagina sta caricando ...
La pagina sta caricando ...
La pagina sta caricando ...
La pagina sta caricando ...
La pagina sta caricando ...
La pagina sta caricando ...
La pagina sta caricando ...
La pagina sta caricando ...
La pagina sta caricando ...
La pagina sta caricando ...
La pagina sta caricando ...
La pagina sta caricando ...
La pagina sta caricando ...
La pagina sta caricando ...
La pagina sta caricando ...
La pagina sta caricando ...
La pagina sta caricando ...
La pagina sta caricando ...
La pagina sta caricando ...
La pagina sta caricando ...
La pagina sta caricando ...
La pagina sta caricando ...
La pagina sta caricando ...
La pagina sta caricando ...
La pagina sta caricando ...
La pagina sta caricando ...
La pagina sta caricando ...
La pagina sta caricando ...
La pagina sta caricando ...
La pagina sta caricando ...
La pagina sta caricando ...
La pagina sta caricando ...
La pagina sta caricando ...
La pagina sta caricando ...
La pagina sta caricando ...
La pagina sta caricando ...
La pagina sta caricando ...
La pagina sta caricando ...
La pagina sta caricando ...
La pagina sta caricando ...
La pagina sta caricando ...
La pagina sta caricando ...
La pagina sta caricando ...
La pagina sta caricando ...
La pagina sta caricando ...
La pagina sta caricando ...
La pagina sta caricando ...
La pagina sta caricando ...
La pagina sta caricando ...
La pagina sta caricando ...
La pagina sta caricando ...
La pagina sta caricando ...
La pagina sta caricando ...
La pagina sta caricando ...
La pagina sta caricando ...
La pagina sta caricando ...
La pagina sta caricando ...
La pagina sta caricando ...
La pagina sta caricando ...
La pagina sta caricando ...
La pagina sta caricando ...
La pagina sta caricando ...
La pagina sta caricando ...
La pagina sta caricando ...
La pagina sta caricando ...
La pagina sta caricando ...
La pagina sta caricando ...
La pagina sta caricando ...
La pagina sta caricando ...
La pagina sta caricando ...
La pagina sta caricando ...
La pagina sta caricando ...
La pagina sta caricando ...
La pagina sta caricando ...
La pagina sta caricando ...
La pagina sta caricando ...
La pagina sta caricando ...
La pagina sta caricando ...
La pagina sta caricando ...
La pagina sta caricando ...
La pagina sta caricando ...
La pagina sta caricando ...
La pagina sta caricando ...
La pagina sta caricando ...
La pagina sta caricando ...
La pagina sta caricando ...
La pagina sta caricando ...
La pagina sta caricando ...
La pagina sta caricando ...
La pagina sta caricando ...
La pagina sta caricando ...
La pagina sta caricando ...
La pagina sta caricando ...
La pagina sta caricando ...
La pagina sta caricando ...
La pagina sta caricando ...
La pagina sta caricando ...
-
 1
1
-
 2
2
-
 3
3
-
 4
4
-
 5
5
-
 6
6
-
 7
7
-
 8
8
-
 9
9
-
 10
10
-
 11
11
-
 12
12
-
 13
13
-
 14
14
-
 15
15
-
 16
16
-
 17
17
-
 18
18
-
 19
19
-
 20
20
-
 21
21
-
 22
22
-
 23
23
-
 24
24
-
 25
25
-
 26
26
-
 27
27
-
 28
28
-
 29
29
-
 30
30
-
 31
31
-
 32
32
-
 33
33
-
 34
34
-
 35
35
-
 36
36
-
 37
37
-
 38
38
-
 39
39
-
 40
40
-
 41
41
-
 42
42
-
 43
43
-
 44
44
-
 45
45
-
 46
46
-
 47
47
-
 48
48
-
 49
49
-
 50
50
-
 51
51
-
 52
52
-
 53
53
-
 54
54
-
 55
55
-
 56
56
-
 57
57
-
 58
58
-
 59
59
-
 60
60
-
 61
61
-
 62
62
-
 63
63
-
 64
64
-
 65
65
-
 66
66
-
 67
67
-
 68
68
-
 69
69
-
 70
70
-
 71
71
-
 72
72
-
 73
73
-
 74
74
-
 75
75
-
 76
76
-
 77
77
-
 78
78
-
 79
79
-
 80
80
-
 81
81
-
 82
82
-
 83
83
-
 84
84
-
 85
85
-
 86
86
-
 87
87
-
 88
88
-
 89
89
-
 90
90
-
 91
91
-
 92
92
-
 93
93
-
 94
94
-
 95
95
-
 96
96
-
 97
97
-
 98
98
-
 99
99
-
 100
100
-
 101
101
-
 102
102
-
 103
103
-
 104
104
-
 105
105
-
 106
106
-
 107
107
-
 108
108
-
 109
109
-
 110
110
-
 111
111
-
 112
112
-
 113
113
-
 114
114
-
 115
115
-
 116
116
-
 117
117
-
 118
118
-
 119
119
-
 120
120
-
 121
121
-
 122
122
-
 123
123
-
 124
124
-
 125
125
-
 126
126
-
 127
127
-
 128
128
-
 129
129
-
 130
130
-
 131
131
-
 132
132


in altre lingue
Documenti correlati
Altri documenti
-
Palm 700W Manuale utente
-
Palm Treo 700P Quick Reference Manual
-
Palm Treo 755p Telus Quick Start
-
-
Motorola MOTOMING A1600 Manuale utente
-
ZTE ZMax Champ LTE Manuale utente
-
ZTE KIS 3 EE Manuale utente
-
-
-
Panasonic DP-2000 Manuale utente