
CONTENTS
i
Learning the basics . . . . . . . . . . . . . . . . . . . . . . . . . . . 1
Palm
®
Treo™ 700w smartphone overview . . . . . . . . . . . . . . . . . . . . . 1
Turning your smartphone on/off . . . . . . . . . . . . . . . . . . . . . . . . . . . . . 3
Moving around the screen . . . . . . . . . . . . . . . . . . . . . . . . . . . . . . . . . 4
Using the keyboard . . . . . . . . . . . . . . . . . . . . . . . . . . . . . . . . . . . . . . 10
Opening and closing applications . . . . . . . . . . . . . . . . . . . . . . . . . . . 14
Using your Today screen . . . . . . . . . . . . . . . . . . . . . . . . . . . . . . . . . 15
Synchronizing contacts and other info . . . . . . . . . . . . . . . . . . . . . . . 16
Maximizing battery life . . . . . . . . . . . . . . . . . . . . . . . . . . . . . . . . . . . 17
Using your phone . . . . . . . . . . . . . . . . . . . . . . . . . . . . 19
Phone overview . . . . . . . . . . . . . . . . . . . . . . . . . . . . . . . . . . . . . . . . 19
Making calls . . . . . . . . . . . . . . . . . . . . . . . . . . . . . . . . . . . . . . . . . . . 22
Receiving calls . . . . . . . . . . . . . . . . . . . . . . . . . . . . . . . . . . . . . . . . . 26
Using voicemail . . . . . . . . . . . . . . . . . . . . . . . . . . . . . . . . . . . . . . . . 27
Managing active calls . . . . . . . . . . . . . . . . . . . . . . . . . . . . . . . . . . . . 28
Creating a speed dial button . . . . . . . . . . . . . . . . . . . . . . . . . . . . . . . 32
Using a phone headset . . . . . . . . . . . . . . . . . . . . . . . . . . . . . . . . . . . 34
Staying organized . . . . . . . . . . . . . . . . . . . . . . . . . . . 36
Contacts . . . . . . . . . . . . . . . . . . . . . . . . . . . . . . . . . . . . . . . . . . . . . . 36
Calendar . . . . . . . . . . . . . . . . . . . . . . . . . . . . . . . . . . . . . . . . . . . . . . 37
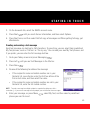
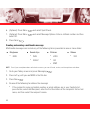
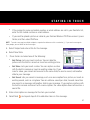
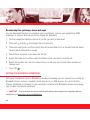
Staying in touch . . . . . . . . . . . . . . . . . . . . . . . . . . . . . 40
Messaging . . . . . . . . . . . . . . . . . . . . . . . . . . . . . . . . . . . . . . . . . . . . 40
Browsing the web . . . . . . . . . . . . . . . . . . . . . . . . . . . . . . . . . . . . . . . 54
Setting up a Bluetooth
®
connection . . . . . . . . . . . . . . . . . . . . . . . . . 56

ii
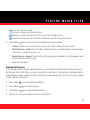
Playing media files . . . . . . . . . . . . . . . . . . . . . . . . . . 60
Pictures & Videos . . . . . . . . . . . . . . . . . . . . . . . . . . . . . . . . . . . . . . . 60
Windows Media Player Mobile . . . . . . . . . . . . . . . . . . . . . . . . . . . . . 63
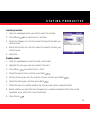
Staying productive . . . . . . . . . . . . . . . . . . . . . . . . . . . 66
Word Mobile . . . . . . . . . . . . . . . . . . . . . . . . . . . . . . . . . . . . . . . . . . . 66
PowerPoint Mobile . . . . . . . . . . . . . . . . . . . . . . . . . . . . . . . . . . . . . . 67
Excel Mobile . . . . . . . . . . . . . . . . . . . . . . . . . . . . . . . . . . . . . . . . . . . 68
Managing files and applications . . . . . . . . . . . . . . . . . . 70
Finding information . . . . . . . . . . . . . . . . . . . . . . . . . . . . . . . . . . . . . . 70
Installing applications . . . . . . . . . . . . . . . . . . . . . . . . . . . . . . . . . . . . 72
Setting synchronization options . . . . . . . . . . . . . . . . . . . . . . . . . . . . 73
Using expansion cards . . . . . . . . . . . . . . . . . . . . . . . . . . . . . . . . . . . 76
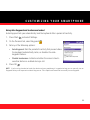
Customizing your smartphone . . . . . . . . . . . . . . . . . . . 78
Today screen settings . . . . . . . . . . . . . . . . . . . . . . . . . . . . . . . . . . . . 78
Sound settings . . . . . . . . . . . . . . . . . . . . . . . . . . . . . . . . . . . . . . . . . 79
Display and appearance settings . . . . . . . . . . . . . . . . . . . . . . . . . . . . 82
Application settings . . . . . . . . . . . . . . . . . . . . . . . . . . . . . . . . . . . . . 83
Locking your smartphone and info . . . . . . . . . . . . . . . . . . . . . . . . . . 84
System settings . . . . . . . . . . . . . . . . . . . . . . . . . . . . . . . . . . . . . . . . 86
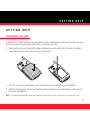
Getting help . . . . . . . . . . . . . . . . . . . . . . . . . . . . . . . 87
Performing a soft reset . . . . . . . . . . . . . . . . . . . . . . . . . . . . . . . . . . . 87
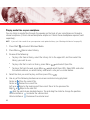
Where to learn more . . . . . . . . . . . . . . . . . . . . . . . . . . . . . . . . . . . . . 88
Regulatory Information . . . . . . . . . . . . . . . . . . . . . . . . 91

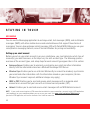
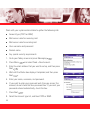
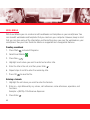
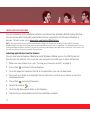
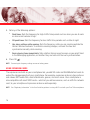
LEARNING THE BASICS
1
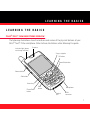
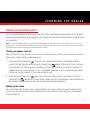
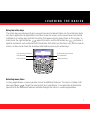
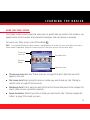
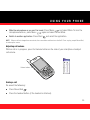
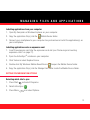
LEARNING THE BASICS
PALM
®
TREO™ 700W SMARTPHONE OVERVIEW
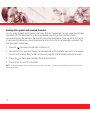
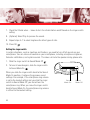
The following illustrations show the locations and names of the physical features of your
Palm
®
Treo™ 700w smartphone. Refer to these illustrations while following this guide.
Indicator light (phone
and charge indicator)
Multi-
connector
5-way navigator
Earpiece
Power/End button
Microphone
Headset
jack
Start
button
Phone/Send
button
Side button
OK button
Volume button
Action keys

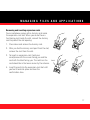
2
Ringer switch
Antenna
Infrared (IR) port
Stylus
Expansion card slot
Camera lens
(camera smart-
phone only)
Battery door release
Speaker
Self-portrait mirror

LEARNING THE BASICS
3
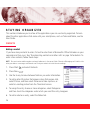
TURNING YOUR SMARTPHONE ON/OFF
You can use the organizer features of your Treo 700w smartphone independently of the wireless
features and applications. In other words, the screen and phone are designed to be turned off and
on separately.
NOTE To conserve battery power, the screen turns off automatically after one minute. If you want the screen to stay on
longer, you can adjust the shutoff setting. Press Start, select Settings, select the System tab, and then select Power. Select
the Advanced tab, and then increase the On battery power setting.
Turning your phone on and off
When you turn on your phone, it connects to a mobile network so that you can make and receive
phone calls and use other wireless services.
1. Press and hold Power/End to turn on your phone. When your smartphone locates a
signal, Verizon Wireless and the signal-strength icon appear at the top of the screen and
the indicator light flashes green, indicating you can use the phone and Internet features (if
supported by the local network). If you’re outside a coverage area, the indicator light flashes
amber and no bars appear in the signal-strength icon.
2. Press and hold Power/End again to turn off your phone. When your phone is off, the
phone-off icon appears at the top of the screen and your smartphone is not connected to
any mobile network. You can still use the organizer and other features.
Waking up the screen
To use the organizer features when your smartphone’s screen is off, you need to wake up the
screen. You can also turn off your smartphone’s screen without turning off your smartphone’s
wireless features.

4
1. Press Power/End to wake up the screen.
2. Briefly press Power/End to turn off the screen.
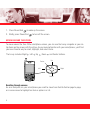
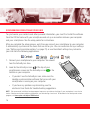
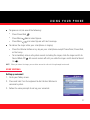
MOVING AROUND THE SCREEN
To move around the Treo 700w smartphone screen, you can use the 5-way navigator or you can
tap items on the screen with the stylus. As you become familiar with your smartphone, you’ll find
your own favorite way to scroll, highlight, and select items.
The 5-way includes Right , Left , Up , Down , and Center buttons.
Scrolling through screens
As on a computer, on your smartphone you scroll to move from field to field or page to page,
or in some cases to highlight an item or option in a list.
Up
Right
Left
Down
Center

LEARNING THE BASICS
5
There are several methods of scrolling:
■ Press the 5-way on the front of your smartphone. Press Right , Left , Up , or Down
to move to the next field, button, or action in that direction.
■ Press and hold Option while pressing Up or Down to
scroll one screen at a time. These keys work just like the
Page Up and Page Down keys on your computer keyboard.
■ Press and hold Option while pressing Left or Right to
jump to the top or bottom of the current document or entry.
■ When viewing a screen with tabs, such as when adding a
contact or customizing settings, press Down to scroll to
the tabs, and then press Left or Right to move between
tabs.
■ When inside a text field, press Right or Left to move to
the next character, and press Up or Down to move
between lines.
■ When inside a list, press and hold Up or Down to rapidly scroll through the list.
■ Tap an onscreen scroll arrow.
■ Tap and drag the slider of an onscreen scroll bar.
Scroll arrows
Scroll arrows

6
Closing screens
To accept the information you entered on a screen and to return to the previous screen, do one of
the following:
■ Press OK .
■ Use the stylus to tap or in the upper-right corner of the screen.
Highlighting and selecting items
On most screens, one item—a button, a list entry, or a check box—is highlighted by default. The
highlight identifies which item is affected by your next action. Use the 5-way to move the
highlight from one item to another before opening or selecting it.
The highlight can take one of two forms, depending on what is highlighted:
■ Border glow: This rectangular border highlights items such as an
onscreen button (for example OK, Dismiss, or Hide), a check box,
an option, or a web link.
■ Reverse type (light text on a dark background): This
highlights items such as a phone number, an email address,
text, or an item in a list.
After highlighting an item with the 5-way, you can select or
activate it by pressing Center or by tapping the item with the stylus.

LEARNING THE BASICS
7
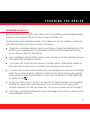
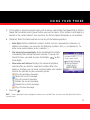
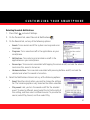
Using the action keys
The action keys are designed to give you quick access to relevant tasks, so the action key items
vary from application to application, and from screen to screen, and in some cases may not be
available at all. Action keys activate the items that appear directly above them on the screen. In
most cases the right action key opens the menu, and the left action key activates a
specific command, such as New or Edit. Remember that action key functions vary from screen to
screen, so be sure to check the onscreen label before pressing the action keys.
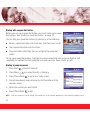
Selecting menu items
In many applications, a menu provides access to additional features. The menu is hidden until
you press Menu . To get the most out of your smartphone, it’s a good idea to familiarize
yourself with the additional features available through the menu in various applications.
Left action key
Right action key
Left action key activates
this command
Right action key activates
this command

8
1. Press Menu to display an application’s menu.
2. Press Up or Down to highlight a menu item.
3. If an arrow appears next to a menu item, press Center or Right
to display additional options for that item, and then press Up
or Down to highlight a menu item. To return to the main menu
without making a selection, press Left .
4. Press Center to select the menu item, or press Left or
Menu to close the menu and cancel your selection.
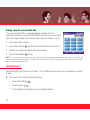
Selecting options in a shortcut menu
Most applications also provide access to context-sensitive, shortcut
menus—similar to the right-click menus on a computer. The
shortcut menu options vary based on the highlighted selection.
1. Highlight the item you want to open the shortcut menu for.
2. Press and hold Center to open the shortcut menu.
3. Press Up or Down to highlight a menu item.
4. Press Center to select the menu item or press Left to cancel
your selection.

LEARNING THE BASICS
9
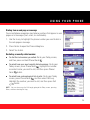
Selecting options in a list
Lists let you select from a range of options. You can identify whether
a list is available when you select the field. If a rectangle appears
around the field along with a downward-pointing arrow, a list is
available. Lists are different from the menus described earlier in this
section.
To select from a list, do any of the following:
■ Use the 5-way to highlight the field, and then press Center to
display the items in the list. Press Up or Down to highlight
the item you want, and then press Center to accept your
selection.
■ Use your stylus to tap the arrow, and then tap the item in the list.
■ To exit the list and cancel your selection, press Left .
NOTE When selecting fields you might not see the downward-pointing arrow until you
press Center. In fields where you see a downward-pointing arrow but no rectangle, you
must tap the arrow with the stylus to expand the field.

10
USING THE KEYBOARD
When using the keyboard, most people find it easiest to hold the smartphone with two hands and
to use the tips of both thumbs to press the keys.
Understanding the keyboard backlight
Your smartphone includes a keyboard backlight for low light conditions. The keyboard backlight
activates automatically when the screen turns on. It turns off automatically when the screen turns
off or when you are on a call or playing music in the background for longer than the time
specified in Backlight Settings. The backlight also turns off when an application’s power-saving
features turn it off.
Action key
Action key
Phone/Send
Start
Power/End
OK
Backspace
Option
Shift
Space
Return
Shift
Alt

LEARNING THE BASICS
11
Entering lowercase and uppercase letters
By default, the first letter of each sentence or field is capitalized and the remaining text you enter
is lowercase. To enter other uppercase letters, do one of the following:
■ Press Shift , and then enter a letter. You don’t need to press and hold Shift while entering
a letter.
■ Press Shift twice to turn on Caps Lock, and then enter a series of letters. When Caps Lock
is on, this symbol appears at the bottom of the screen: . To turn off Caps Lock, press Shift
again.
Entering numbers, punctuation, and symbols
Numbers, punctuation, and symbols appear above the letters on the keys. To enter these
characters, do one of the following:
■ Press Option , and then press the key of the desired character. You don’t need to hold
Option while pressing the key.
■ Press Option twice to turn on Option Lock, and then press the desired keys to enter a
series of characters. When Option Lock is on, this symbol appears at the bottom of the
screen: . To turn off Option Lock, press Option again.

12
Entering other symbols and accented characters
You can enter symbols and accented characters that don't appear on the keys using the alternate
characters list. The alternate characters are grouped according to their similarity to the
corresponding key. For example, the alternate characters available for the e key are é, è, ë, and ê.
If you press the wrong key, press Backspace to return to the full list of alternate characters. You
can then press another key.
1. Press Alt to display the alternate character list.
2. Narrow the list by pressing the key that corresponds to the character you want. For example,
to enter an é, press e. See the table on the next page for a list of corresponding characters.
3. Press Up or Down to highlight the desired character.
4. Press Center to insert the character.
NOTE If you don’t know which key to press to narrow the list in step 2, you can scroll through the list until you find the
character you want.

LEARNING THE BASICS
13
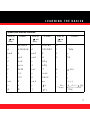
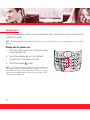
Symbols and accented characters
Press Alt
and
enter...
to select... Press Alt
and
enter...
to select... Press Alt
and
enter...
to select...
a á à ä â ã å æ o ó ò ö ô œ õ 0
°
A Á À Ä Â Ã Å Æ O Ó Ò Ö Ô Œ Õ 1
b or B ß p or P ¶ 2
c ç ¢ © r or R ® 3
C Ç ¢ © s ß Šs §
e é è ë ê S ß ŠS §
E É È Ë Ê t or T ™ $ £ ¥ ¢
i í ì ï î u ú ù ü û ! ¡
I Í Ì Ï Î U Ú Ù Ü Û ? ¿
l or L £ x or X x ¤ ; :-) :-( ;-)
n ñ y ÿ . , ' " @ + -
* / # ( or )
: & _ • % = ÷ ^ £ ¥
¢ [ ] { } < > « » © ®
°
~ \ Ø µ |
NÑ Y
Ÿ

14
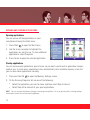
OPENING AND CLOSING APPLICATIONS
Opening applications
You can access all the applications on your
smartphone through the Start menu:
1. Press Start to open the Start menu.
2. Use the 5-way navigator to highlight the
application you want to use. To view additional
applications, select Programs.
3. Press Center to open the selected application.
Closing applications
You can have several applications open at once, so you don’t need to exit an application to open
another one. In most cases, applications close automatically when available memory is low, but
you can also close applications manually.
1. Press and hold OK to open the Memory Settings screen.
2. On the Running Programs tab, do one of the following:
■
Select the application you want to close, and then select Stop to close it.
■
Select Stop All to close all of your open applications.
NOTE You can also open the Memory Settings screen by pressing Option + OK, or by pressing Start, selecting Settings,
selecting the System tab, and then selecting Memory.

LEARNING THE BASICS
15
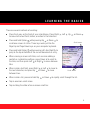
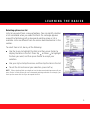
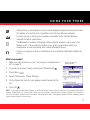
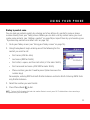
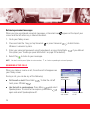
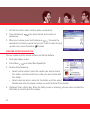
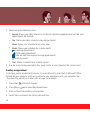
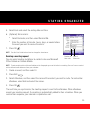
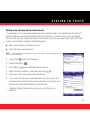
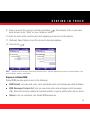
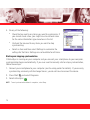
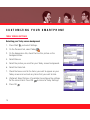
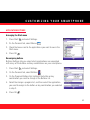
USING YOUR TODAY SCREEN
Your Today screen is your home base where you can quickly look up contacts, dial numbers, see
appointments and the number of unread email messages, and even display a web page.
To access your Today screen, press Phone/Send .
NOTE Pressing Phone/Send while a phone number is highlighted dials the number. To access your Today screen when a
phone number is highlighted, deselect the number and press Phone/Send, or press Start and select Today.
■ Title bar and status info: See “Phone overview” on page 19 to learn about the icons that
appear in this area.
■ Dial Lookup field: Begin typing the name or number you want to look up. See “Dialing by
contact name” on page 23 for more info.
■ Web Search field: Enter a word you want to find on the Internet and press Center to begin the
search (data services connection required).
■ Speed dial buttons: Select the picture or button you want to dial. See “Creating a speed dial
button” on page 32 to create your own.
Title bar and
status info
Dial Lookup field
Web Search field
Speed dial
buttons

16
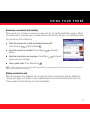
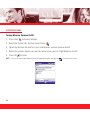
SYNCHRONIZING CONTACTS AND OTHER INFO
To synchronize your contacts and other personal information, you must first install the software
from the CD that came with your smartphone and set up a connection between your computer
and your smartphone. See the setup poster for instructions.
After you complete the setup process, each time you connect your smartphone to your computer
it automatically synchronizes the items that are set to sync. You can customize the sync settings
(see “Setting synchronization options” on page 73) or use the default settings to synchronize
your info from the following applications:
1. Connect your smartphone to your computer. You should
hear the ActiveSync
®
tone.
2. Look for the ActiveSync icon at the top of your
smartphone’s screen and the ActiveSync icon in the
taskbar on your computer.
■
If you don’t see the ActiveSync icon, make sure the
desktop synchronization software that came with your
smartphone is running on your computer.
■
If you have any problems synchronizing, see the
electronic User Guide for troubleshooting suggestions.
NOTE We recommend installing a backup program to preserve your data and settings if your smartphone is ever lost or
stolen. A backup and restore program also protects your data during a hard reset. To download a free backup and restore
program, visit www.palm.com/mytreo700wVerizon
.

LEARNING THE BASICS
17
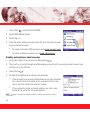
MAXIMIZING BATTERY LIFE
Battery life depends on individual usage. When used as a smartphone, your smartphone battery
provides up to 4.5 hours of talk time or up to 15 days of standby time.
You can increase your smartphone’s battery life by following a few easy guidelines. Remember
that battery life depends on how you use your smartphone.
■ Charge your smartphone whenever you’re at your desk, or charge it overnight each day. The
battery in your smartphone has a much longer useful life when it is topped off frequently,
versus charging it after it is fully drained.
■ Your smartphone’s wireless features (phone, email, messaging, and web) generally consume
more power than the organizer features.
■ If you spend a lot of time using the camera (if included), games, media players, eBooks, or
other applications, keep an eye on the battery icon and charge when necessary.
■ If you don’t plan to use the wireless features on your smartphone for a while, put it into Flight
mode. You can forward calls to a different number or let all calls be picked up by voicemail
(see the electronic User Guide for details). To see if your smartphone is in Flight Mode, tap
the phone-off icon .
■ As with any mobile phone, if you are in an area with no wireless coverage, your smartphone
searches for a signal, which consumes power. If you cannot move to an area of better
coverage, temporarily turn off your phone (see “Turning your phone on and off” on page 3).
■ Turn off your smartphone’s Bluetooth
®
wireless technology feature when you do not need to
make a Bluetooth connection.

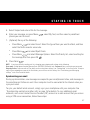
18
■ Turn down the screen brightness (see “Adjusting the brightness” on page 82).
■ Set your screen to turn off automatically after a shorter period of inactivity (see the User
Guide for details).
■ Keep your battery away from direct sunlight and other sources of heat. Temperatures over
120 degrees Farenheit (50 degrees Celsius) can permanently reduce the capacity and life
span of any lithium ion battery.
NOTE If the battery is fully drained, it may take a few moments for the indicator light to turn on while charging. Don’t worry;
your smartphone stores your info safely until you recharge the battery. To avoid draining the battery, charge and synchronize
every day, especially if you use your smartphone often.
La pagina sta caricando ...
La pagina sta caricando ...
La pagina sta caricando ...
La pagina sta caricando ...
La pagina sta caricando ...
La pagina sta caricando ...
La pagina sta caricando ...
La pagina sta caricando ...
La pagina sta caricando ...
La pagina sta caricando ...
La pagina sta caricando ...
La pagina sta caricando ...
La pagina sta caricando ...
La pagina sta caricando ...
La pagina sta caricando ...
La pagina sta caricando ...
La pagina sta caricando ...
La pagina sta caricando ...
La pagina sta caricando ...
La pagina sta caricando ...
La pagina sta caricando ...
La pagina sta caricando ...
La pagina sta caricando ...
La pagina sta caricando ...
La pagina sta caricando ...
La pagina sta caricando ...
La pagina sta caricando ...
La pagina sta caricando ...
La pagina sta caricando ...
La pagina sta caricando ...
La pagina sta caricando ...
La pagina sta caricando ...
La pagina sta caricando ...
La pagina sta caricando ...
La pagina sta caricando ...
La pagina sta caricando ...
La pagina sta caricando ...
La pagina sta caricando ...
La pagina sta caricando ...
La pagina sta caricando ...
La pagina sta caricando ...
La pagina sta caricando ...
La pagina sta caricando ...
La pagina sta caricando ...
La pagina sta caricando ...
La pagina sta caricando ...
La pagina sta caricando ...
La pagina sta caricando ...
La pagina sta caricando ...
La pagina sta caricando ...
La pagina sta caricando ...
La pagina sta caricando ...
La pagina sta caricando ...
La pagina sta caricando ...
La pagina sta caricando ...
La pagina sta caricando ...
La pagina sta caricando ...
La pagina sta caricando ...
La pagina sta caricando ...
La pagina sta caricando ...
La pagina sta caricando ...
La pagina sta caricando ...
La pagina sta caricando ...
La pagina sta caricando ...
La pagina sta caricando ...
La pagina sta caricando ...
La pagina sta caricando ...
La pagina sta caricando ...
La pagina sta caricando ...
La pagina sta caricando ...
La pagina sta caricando ...
La pagina sta caricando ...
La pagina sta caricando ...
La pagina sta caricando ...
La pagina sta caricando ...
La pagina sta caricando ...
-
 1
1
-
 2
2
-
 3
3
-
 4
4
-
 5
5
-
 6
6
-
 7
7
-
 8
8
-
 9
9
-
 10
10
-
 11
11
-
 12
12
-
 13
13
-
 14
14
-
 15
15
-
 16
16
-
 17
17
-
 18
18
-
 19
19
-
 20
20
-
 21
21
-
 22
22
-
 23
23
-
 24
24
-
 25
25
-
 26
26
-
 27
27
-
 28
28
-
 29
29
-
 30
30
-
 31
31
-
 32
32
-
 33
33
-
 34
34
-
 35
35
-
 36
36
-
 37
37
-
 38
38
-
 39
39
-
 40
40
-
 41
41
-
 42
42
-
 43
43
-
 44
44
-
 45
45
-
 46
46
-
 47
47
-
 48
48
-
 49
49
-
 50
50
-
 51
51
-
 52
52
-
 53
53
-
 54
54
-
 55
55
-
 56
56
-
 57
57
-
 58
58
-
 59
59
-
 60
60
-
 61
61
-
 62
62
-
 63
63
-
 64
64
-
 65
65
-
 66
66
-
 67
67
-
 68
68
-
 69
69
-
 70
70
-
 71
71
-
 72
72
-
 73
73
-
 74
74
-
 75
75
-
 76
76
-
 77
77
-
 78
78
-
 79
79
-
 80
80
-
 81
81
-
 82
82
-
 83
83
-
 84
84
-
 85
85
-
 86
86
-
 87
87
-
 88
88
-
 89
89
-
 90
90
-
 91
91
-
 92
92
-
 93
93
-
 94
94
-
 95
95
-
 96
96


in altre lingue
- English: Palm 700W User manual
Documenti correlati
-
Palm Treo 755p Telus Quick Start
-
Palm Treo 700P Quick Reference Manual
-
-
Palm TREO 600 Using Manual
-
-
AT&T Treo 680 Guida utente
-
-
-
-
Altri documenti
-
Motorola MOTOSURF A3100 Manuale utente
-
-
Handspring 600 Manuale utente
-
Sony DCR-TRV50 Manuale del proprietario
-
 Hott A505/HA09 Digital Media Player Guida utente
-
Sony DCR-IP220 Istruzioni per l'uso
-
Motorola MOTOMING A1600 Manuale utente
-
Terratec PROTECT MOBILE Quick Setup Gui Manuale del proprietario
-
Videotec DCZ Manuale utente
-
I.R.I.S. HCRZZA8PAIN400BL Scheda dati
