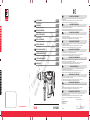
Sparky Group BP 540CE Original Instructions Manual
- Categoria
- Martelli perforatori
- Tipo
- Original Instructions Manual

www.sparkygroup.com
1206R01 142361© 2012 SPARKY
1010 W
BP 540CE
1 – 10
ROTARY HAMMER
Original instructions
22 – 32
MARTEAU PERFORATEUR
Notice originale
78 – 89
ЭЛЕКТРОННЫЙ ПЕРФОРАТОР
Оригинальная инструкция по эксплуатации
11 – 21
BOHRHAMMER
Originalbetriebsanleitung
Оригінальна інструкція з експлуатації
90 – 100
ЕЛЕКТРОННИЙ ПЕРФОРАТОР
67 – 77
Młot udarowo-obrotowy
Oryginalna instrukcja obsługi
56 – 66
MartELo PErFurador
Manual original
33 – 43
MARTELLO PERFORATORE
Istruzioni originali
44 – 55
MartILLo PErForador
Instrucciones de uso originales
Оригинална инструкция за използване
101 – 112
ПЕРФОРАТОР
20.06.2011
Manufacturer
SPARKY Power Tools GmbH
Leipziger Str. 20
10117 Berlin, GERMANY
Signature of authorized person
A. Ivanov
Technical director of SPARKY ELTOS AG
dECLaratIoN oF CoNForMIty
We declare under our sole responsibility that this product fulls all the relevant provisions of the following directives and the
harmonized standards:
2006/42/EC, 2004/108/EC, EN 60745-1, EN 60745-2-6, EN 55014-1, EN 55014-2, EN 61000-3-2, EN 61000-3-3.
Technical le is stored at SPARKY ELTOS AG, Koubrat Str. 9, 5500 Lovetch, Bulgaria.
KoNForMItÄtSErKLÄruNG
Hiermit versichern wir unsere persönliche Haftung, dass dieses Erzeugnis allen einschlägigen Bestimmungen folgender Richtlinien
und entsprechender harmonisierten Standards entspricht:
2006/42/EC, 2004/108/EC, EN 60745-1, EN 60745-2-6, EN 55014-1, EN 55014-2, EN 61000-3-2, EN 61000-3-3.
Die technischen Unterlagen werden bei SPARKY ELTOS AG, Kubrat Str.9, 5500 Lovetch, Bulgarien, aufbewahrt.
dECLaratIoN dE CoNForMItE
Nous déclarons sous notre responsabilité que ce produit satisfait à l’ensemble des dispositions pertinentes de la présente directives,
respectivement aux normes harmonisées:
2006/42/EC, 2004/108/EC, EN 60745-1, EN 60745-2-6, EN 55014-1, EN 55014-2, EN 61000-3-2, EN 61000-3-3.
Le dossier technique est conservé par SPARKY ELTOS AD, 9, rue Kubrat, Lovech, Bulgarie.
dICHIaraZIoNE dI CoNForMItÀ
Noi dichiariamo sotto la nostra personale responsabilità, che questo prodotto è in conformità a tutte le disposizioni pertinenti della
presente direttive e norme armonizzate:
2006/42/ЕС, 2004/108/EC, EN 60745-1, EN 60745-2-6, EN 55014-1, EN 55014-2, EN 61000-3-2, EN 61000-3-3.
Il fascicolo tecnico viene custodito presso la SPARKY ELTOS AD, 5500 Lovech, via Kubrat n. 9, Bulgaria.
dECLaraCIÓN dE CoNForMIdad
Declaramos bajo nuestra exclusiva responsabilidad que este producto está conforme con todas las disposiciones aplicables de la
presente directrices aplicables y las correspondientes normas armonizadas:
2006/42/EC, 2004/108/EC, EN 60745-1, EN 60745-2-6, EN 55014-1, EN 55014-2, EN 61000-3-2, EN 61000-3-3.
El expediente técnico está archivado en SPARKY ELTOS SA, C/ Kubrat, 9, 5500 Lovech, Bulgaria.
dECLa raÇÃo dE CoNForMIdadE
Declaramos assumindo a nossa responsabilidade pessoal que este produto está conforme com todas as disposições relevantes da
presente directrizes aplicáveis e respectivos estandartes harmonizados:
2006/42/EC, 2004/108/EC, EN 60745-1, EN 60745-2-6, EN 55014-1, EN 55014-2, EN 61000-3-2, EN 61000-3-3.
A documentação técnica guarda-se no SPARKY ELTOS AD, rua Kubrat 9, 5500, Lovech, Bulgária.
dEKLaraCJa ZGodNoŚCI
Niniejszym deklarujemy naszą osobistą odpowiedzialnością, że ten produkt spełnia wszystkie odpowiednie postanowienia
następujących dyrektyw i harmonizowanych standardów:
2006/42/EC, 2004/108/EC, EN 60745-1, EN 60745-2-6, EN 55014-1, EN 55014-2, EN 61000-3-2, EN 61000-3-3.
Teczka techniczna przechowywana jest w SPARKY ELTOS AG, Kubrat Str.9, 5500 Lovetch, Bułgaria.
ДЕКЛАРАЦИЯ О СООТВЕТСТВИИ
Мы заявляем со всей ответственностью, что данный продукт полностью соответствует всем соответствующим требованиям
действующих директив и гармонизированных стандартов:
2006/42/EC, 2004/108/EC, EN 60745-1, EN 60745-2-6, EN 55014-1, EN 55014-2, EN 61000-3-2, EN 61000-3-3.
Техническое досье хранится в СПАРКИ ЕЛТОС АД, ул. Кубрат №9, 5500 Ловеч, Болгария.
ДЕКЛАРАЦІЯ ПРО ВІДПОВІДНІСТЬ
Ми заявляємо під свою власну відповідальність, що даний продукт відповідає всім діючим вимогам директив і гармонізованих
стандартів:
2006/42/ЕС, 2004/108/EC, EN 60745-1, EN 60745-2-6, EN 55014-1, EN 55014-2, EN 61000-3-2, EN 61000-3-3.
Технічне досьє зберігається в СПАРКИ ЕЛТОС АД, ул. Кубрат № 9, 5500 Ловеч, Болгарія.
ДЕКЛАРАЦИЯ ЗА СЪОТВЕТСТВИЕ
Ние декларираме на своя лична отговорност, че това изделие отговаря на всички приложими изисквания на следните
директиви и хармонизирани стандарти:
2006/42/ЕС, 2004/108/EC, EN 60745-1, EN 60745-2-6, EN 55014-1, EN 55014-2, EN 61000-3-2, EN 61000-3-3.
Техническото досие се съхранява в СПАРКИ ЕЛТОС АД, ул. Кубрат №9, 5500 Ловеч, България.
BLACK PANTONE185
BLACK PANTONE185
Ташев-Галвинг ООД
www.tashev-galving.com

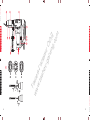
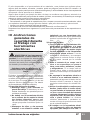
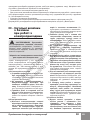
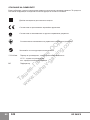
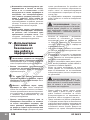
BА
7
8
10
9
1 2
11
6
4
3 5
12
6
BLACK PANTONE185
BLACK PANTONE185
Ташев-Галвинг ООД
www.tashev-galving.com

1
EN
I - Introduction
Your new SPARKY power tool will more than satisfy your expectations. It has been manufactured
under stringent SPARKY Quality Standards to meet superior performance criteria. You will nd your
new tool easy and safe to operate, and, with proper care, it will give you many years of dependable
service.
WARNING:
Carefully read through these Original Instructions before using your new SPARKY power tool.
Take special care to heed the Warnings. Your SPARKY power tool has many features that will
make your job faster and easier. Safety, performance, and dependability have been given top
priority in the development of this tool, making it easy to maintain and operate.
Do not dispose of electric tools together with household waste!
Waste electrical products should not be disposed of with household waste. Please recycle
where facilities exist. Check with your local authority or retailer for recycling advice.
ENVIRONMENTAL PROTECTION
The machine, accessories and packaging should be sorted for environmental-friendly
recycling.
The plastic components are labelled for categorised recycling.
UNPACKING
Due to modern mass production techniques, it is unlikely that your power tool is faulty or that a part is
missing. If you nd anything wrong, do not operate the tool until the parts have been replaced or the
fault has been rectied. Failure to do so could result in serious personal injury.
ASSEMBLY
The rotary hammer is packed fully assembled.
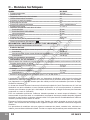
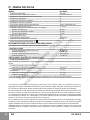
BP 540CE ● Original instructions
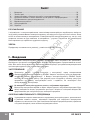
Contents
I - Introduction .....................................................................................................................1
II - Technical specications ..................................................................................................3
III - General power tool safety warnings ................................................................................4
IV - Rotary hammer safety warnings ......................................................................................5
V - Know your product ...................................................................................................... A/6
VI - Operation ........................................................................................................................6
VII - Maintenance ....................................................................................................................9
VIII - Warranty ........................................................................................................................10
Ташев-Галвинг ООД
www.tashev-galving.com

2
EN
BP 540CE
DESCRIPTION OF SYMBOLS
The rating plate on your power tool may show symbols. These represent important information about
the product or instructions on its use.
Double insulated for additional protection.
Conforms to the relevant European Directives.
Conforms to the requirements of Russian standards.
Conforms to the requirements of Ukrainian standards.
Refer to Original Instructions.
YYYY-Www Production period, where the variable symbols are:
YYYY- year of manufacture,
ww - calendar week number.
BP Rotary hammer.
Ташев-Галвинг ООД
www.tashev-galving.com

3
Original instructions
EN
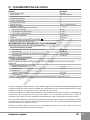
II - Technical specications
Model BP 540CE
▪ Power input 1010 W
▪ No load speed 200-325/350 min
-1
▪ Electronic speed pre-selection Yes
▪ Constant electronics Yes
▪ Reversing No
▪ Protective clutch Yes
▪ Max. impact rate 1900 – 3050/3300 min
-1
▪ Impact energy 4 – 9/11 J
▪ Capacity in concrete:
Twist drill bit 40 mm
Break through drill bit 55 mm
Core cutter 90 mm
▪ Chisel positions 24
▪ Tool holder SDS-max
▪ Weight (EPTA Procedure 01/2003) 6.0 kg
▪ Protection class (EN 60745-1)
II
NOISE AND VIBRATION INFORMATION
Measured values determined according to EN 60745.
▪ Noise emission
A-weighted sound pressure level L
pA
95.0 dB (A)
Uncertainty К
pA
3.0 dB (A)
A-weighted sound power level L
wA
106.0 dB (A)
Uncertainty К
wA
3.0 dB (A)
Wear hearing protection!
▪ Vibration emission *
Total vibration values (vector sum in the three axes) determined according to EN 60745:
Hammer drilling in concrete
Vibration emission value a
h,HD
13.5 m/s
2
Uncertainty К
HD
1.5 m/s
2
Chiselling
Vibration emission value a
h,CHeq
11.5 m/s
2
Uncertainty K
CHeq
1.5 m/s
2
* The vibration emission values are determined according to 6.2.7 EN 60745-1.
The vibration emission level given in this information sheet has been measured in accordance with
a standardised test given in EN 60745 and may be used to compare one tool with another. It may be
used for a preliminary assessment of exposure.
The declared vibration emission level represents the main applications of the tool. However if the tool
is used for different applications, with different accessories or poorly maintained, the vibration emis-
sion may differ. This may signicantly increase the exposure level over the total working period.
An estimation of the level of exposure to vibration should also take into account the times when the
tool is switched off or when it is running but not actually doing the job. This may signicantly reduce
the exposure level over the total working period.
Maintain the power tool and the accessories and keep your hands warm during operation to reduce
the harmful effect of vibrations.
Dust from material such as paint containing lead, some wood species, minerals and metal may be
harmful. Contact with or inhalation of the dust may cause allergic reactions and/or respiratory dis-
eases to the operator or bystanders.
Ташев-Галвинг ООД
www.tashev-galving.com

4
EN
BP 540CE
III - General power tool
safety warnings
WARNING! Read all safety warn-
ings and all instructions. Failure to follow
the warnings and instructions may result in
electric shock, re and/or serious injury.
Save all warnings and instructions for
future reference.
The term “power tool” in the warnings refers
to your mains-operated (corded) power tool or
battery-operated (cordless) power tool.
1) Work area safety
a) Keep work area clean and well lit. Clut-
tered or dark areas invite accidents.
b) Do not operate power tools in explosive
atmospheres, such as in the presence
Power tools create sparks which may ignite
the dust or fumes.
c) Keep children and bystanders away
while operating a power tool. Distrac-
tions can cause you to lose control.
2) Electrical safety
a) Power tool plugs must match the outlet.
Never modify the plug in any way. Do
not use any adapter plugs with earthed
(grounded) power tools. Unmodied
plugs and matching outlets will reduce risk
of electric shock.
b) Avoid body contact with earthed or
grounded surfaces, such as pipes, ra-
diators, ranges and refrigerators. There
is an increased risk of electric shock if your
body is earthed or grounded.
c) Do not expose power tools to rain or wet
conditions. Water entering a power tool
will increase the risk of electric shock.
d) Do not abuse the cord. Never use the
cord for carrying, pulling or unplugging
the power tool. Keep cord away from
heat, oil, sharp edges or moving parts.
Damaged or entangled cords increase the
risk of electric shock.
e) When operating a power tool outdoors,
use an extension cord suitable for out-
door use. Use of a cord suitable for out-
door use reduces the risk of electric shock.
f) If operating a power tool in a damp loca-
tion is unavoidable, use a residual current
device (RCD) protected supply. Use of an
RCD reduces the risk of electric shock.
3) Personal safety
a) Stay alert, watch what you are doing
and use common sense when operating
a power tool. Do not use a power tool
-
ence of drugs, alcohol or medication.
A moment of inattention while operating
power tools may result in serious personal
injury.
b)
Always wear eye protection. Protective
equipment such as dust mask, non-skid
safety shoes, hard hat, or hearing protec-
tion used for appropriate conditions will re-
duce personal injuries.
c) Prevent unintentional starting. Ensure
the switch is in the off-position before
connecting to power source and/or bat-
tery pack, picking up or carrying the
tool. Carrying power tools with your nger
on the switch or energising power tools that
have the switch on invites accidents.
d) Remove any adjusting key or wrench be-
fore turning the power tool on. A wrench
or a key left attached to a rotating part of the
power tool may result in personal injury.
e) Do not overreach. Keep proper footing
and balance at all times. This enables
better control of the power tool in unexpect-
ed situations.
f) Dress properly. Do not wear loose cloth-
ing or jewellery. Keep your hair, cloth-
Certain kinds of dust are classied as carcinogenic such as oak and beech dust especially in conjunc-
tion with additives for wood conditioning (chromate, wood preservative). Material containing asbestos
must only be treated by specialists.
▪ Where the use of a dust extraction device is possible it shall be used.
▪ To achieve a high level of dust collection, use vacuum cleaner for wood or for wood and/or minerals
together with this tool.
▪ The work place must be well ventilated.
▪ The use of a dust mask of lter class P2 is recommended.
Follow national requirements for the materials you want to work with.
Ташев-Галвинг ООД
www.tashev-galving.com

5
Original instructions
EN
ing and gloves away from moving parts.
Loose clothes, jewellery or long hair can be
caught in moving parts.
g) If devices are provided for the connec-
tion of dust extraction and collection fa-
cilities, ensure these are connected and
properly used. Use of dust collection can
reduce dust-related hazards.
4) Power tool use and care
a) Do not force the power tool. Use the cor-
rect power tool for your application. The
correct power tool will do the job better and
safer at the rate for which it was designed.
b) Do not use the power tool if the switch
does not turn it on and off. Any power tool
that cannot be controlled with the switch is
dangerous and must be repaired.
c) Disconnect the plug from the power
source and/or the battery pack from the
power tool before making any adjust-
ments, changing accessories, or stor-
ing power tools. Such preventive safety
measures reduce the risk of starting the
power tool accidentally.
d) Store idle power tools out of the reach
of children and do not allow persons
unfamiliar with the power tool or these
instructions to operate the power tool.
Power tools are dangerous in the hands of
untrained users.
e) Maintain power tools. Check for mis-
alignment or binding of moving parts,
breakage of parts and any other condi-
tion that may affect the power tool’s op-
eration. If damaged, have the power tool
repaired before use. Many accidents are
caused by poorly maintained power tools.
f) Keep cutting tools sharp and clean.
Properly maintained cutting tools with
sharp cutting edges are less likely to bind
and are easier to control.
g) Use the power tool, accessories and
tool bits etc. in accordance with these
instructions, taking into account the
working conditions and the work to be
performed. Use of the power tool for op-
erations different from those intended could
result in a hazardous situation.
5) Service
a) Have your power tool serviced by a
-
tical replacement parts. This will ensure
that the safety of the power tool is main-
tained.
IV - Rotary hammer
safety warnings
Wear ear protectors with rotary ham-
mers. Exposure to noise can cause hearing
loss.
▪ Use the auxiliary handle supplied with the
machine. Loss of control can cause personal
injury.
During operation provide eye protec-
-
ing particles. Wear goggles.
Take protective measures against inha-
lation of dust. Some materials can contain
toxic ingredients. Wear a dust mask and work
with dust/chip extraction when connectable.
▪ Hold the power tool by insulated gripping
surfaces only, when performing an op-
eration where the cutting accessory may
contact hidden wiring or its own cord. Cut-
ting accessory contacting a “live” wire may
make exposed metal parts of the power tool
“live” and could give the operator an electric
shock.
▪ Do not process materials containing asbes-
tos. Asbestos is considered carcinogenic.
WARNING: Before connecting a tool
to a power source ensure that the voltage
supply is the same as that specied on the
nameplate of the tool.
▪ A power source with a voltage greater than
that specied for the tool can result in serious
injury to the user, as well as damage to the
tool.
▪ If in doubt, do not plug in the tool.
▪ Using a power source with a voltage less than
the nameplate rating is harmful to the motor.
▪ Fully unwind cable drum extensions to avoid
potential overheating.
▪ When an extension cable is required, you
must ensure that it has the right ampere rating
for your power tool and it is in safe electrical
condition.
Ташев-Галвинг ООД
www.tashev-galving.com

6
EN
BP 540CE
WARNING: Always switch off and un-
plug the power tool prior to any adjustment,
servicing or maintenance.
▪ While operating the machine, always hold it
rmly with both hands and provide for a se-
cure stance. The power tool is guided more
securely with both hands.
▪ Prior to operation use suitable detectors to
determine if utility lines are hidden in the work
area or call the local utility company for as-
sistance. Contact with electric lines can lead
to re and electric shock. Damaging a gas line
can lead to explosion. Penetrating a water
line causes property damage or may cause
electric shock.
▪ Always keep the cord away from the working
area of the power tool.
▪ Never use the machine with a damaged ca-
ble. Do not touch the damaged cable and pull
the mains plug when the cable is damaged
while operating. Damaged cables increase
the risk of electric shock.
▪ Always be sure you have a rm footing. Be
sure no one is below when using the tool in
high locations.
▪ Use clamps or a vice to secure your work
whenever possible.
▪ Watch out for the initial torque reaction of the
machine or upon jamming the drill bit. Switch
the power tool immediately upon jamming the
drill bit. Watch out for high reactive torque
which may result in kick-back. The drill bit will
block if the power tool is overloaded or if the
bit jams into the material.
▪ Do not touch the drill bit or the processed part
during operation and immediately after that;
they may be extremely hot. You may get seri-
ous burns.
▪ Keep work area clean. Blends of materials are
particularly dangerous. Dust from light alloys
can burn or explode.
▪ Rags, cloths, cord, string and the like should
never be left around the work area.
▪ Always switch the machine off prior to leaving
it down.
▪ The tool must be used only for its prescribed
purpose. Any use other than those mentioned
in this Manual will be considered a case of
misuse. The user and not the manufacturer
shall be liable for any damage or injury result-
ing from such cases of misuse.
▪ To use this tool properly, you must observe
the safety regulations, the assembly instruc-
tions and the operating instructions found in
this Manual. All persons who use and service
the machine have to be acquainted with this
Manual and must be informed about its poten-
tial hazards. Children and frail people must not
use this tool. Children should be supervised
at all times if they are in the area in which the
tool is being used. It is also imperative that
you observe the accident prevention regula-
tions in force in your area. The same applies
for general rules of occupational health and
safety.
▪ The manufacturer shall not be liable for any
changes made to the tool nor for any damage
resulting from such changes.
▪ Power tools must not be used outdoors in
rainy weather, or in moist environment (after
rain) or in close vicinity with easily ammable
liquids and gases. The working place should
be well lit.
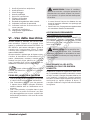
V - Know your product
Before using the power tool, familiarize your-
self with all the operating features and safety
requirements.
Use the tool and accessories only for the ap-
plications intended. All other applications are
expressly ruled out.
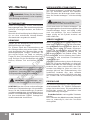
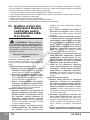
1. Protective ring
2. Locking socket
3. Screw
4. Depth gauge
5. Ventilation slots
6. Operation mode selector
7. ON/OFF switch
8. Regulator of rotation frequency
9. Mode indicator
10. Indicator for brush wear-out and overload
11. Ventilation slots
12. Auxiliary handle
VI - Operation
This power tool is supplied from single-phase
alternating current mains only. It is double insu-
lated according to EN 60745-1, IEC 60745 and
can be connected to grounded or not grounded
sockets. This power tool is radio suppressed in
compliance with EMC Directive 2004/108/EC.
This power tool is designed for impact drilling,
breaking and chiselling in brickwork, concrete
and rocks with high efciency.
Ташев-Галвинг ООД
www.tashev-galving.com

7
Original instructions
EN
This power tool is equipped with a
mechanism for reducing vibrations, decreasing
them by more than 50%.
PRIOR TO INITIAL OPERATION
▪ Make sure the power supply voltage corre-
sponds to the value indicated on the name
plate with technical data of the tool.
▪ Always check the position of ON/OFF switch.
The power tool must be connected to the
power supply socket only when this switch is
in OFF position. If the plug is connected to
a receptacle while the power switch is in the
ON position, the power tool will start operat-
ing immediately, which could cause a serious
accident.
▪ Make sure that the cord and the plug are in
order. If the replacement of the supply cord is
necessary, this has to be done by the manu-
facturer or his agent in order to avoid a safety
hazard.
WARNING: Always switch off and un-
plug the power tool prior to any adjustment,
servicing or maintenance.
▪ In case the work area is remote from the pow-
er source, use as short as practicable exten-
sion cord with proper cross-section.
▪ Check that the auxiliary handle is properly
mounted and reliably tightened.
SWITCHING ON - SWITCHING OFF
▪ Switching on: Push and hold down switch 7.
▪ Switching off: Release switch 7.
At low temperatures, demolishing with the pow-
er tool must begin only after it was operated for
about 3 minutes at no-load mode.
WARNING: Upon overloading the ma-
chine with 30% the red light-emitting diode 10
will glow. The machine must not be operated
conti nuously in this mode.
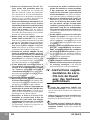
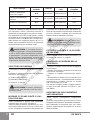
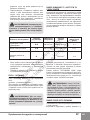
SELECTING THE SPEED, FREQUENCY
AND IMPACT ENERGY
Rotate the regulator 8 to choose a position
appropriate for the processed material. The
constant electronics maintain the speed, the
frequency and the impact energy constant, in-
dependently of the load, thus ensuring steady
operation mode. It is recommended to use the
operation modes listed in the table.
Rotate the regulator 8 from position A to position
F to increase the speed, the frequency and the
impact energy. The indicator 9 shall blink with
green light.
To choose High Power mode, rotate the regula-
tor 8 to position G. This mode is specied by in-
creased impact energy up to 11 J. The indicator
9 shall glow with constant green light.
WARNING: Using HIGH POWER
mode is recommen ded only when chiselling
(hammer mode), and for brief operation in
impact drilling mode. Continuous operation in
impact drilling mode shall result in operator’s
quick fatigue and increased wear-out of the
machine.
SELECTING THE OPERATION MODE
The switching of operation modes can be per-
formed when the machine is not operating.
Rotate the operation mode switch 6 in the direc-
tion marked on the switch to the desired position
to choose.
During each switching between operation modes
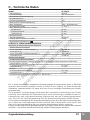
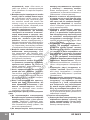
Application
Regulator
position
Rotation
speed
Impact rate
Single impact
energy
Render / Light construction
materials
A-B 200-225 min
-1
1900-2100 min
-1
4 J
Bricks / Chiselling tiles C-D 250-275 min
-1
2350-2600 min
-1
6-7 J
Drilling in concrete E-F 300-325 min
-1
2850-3050 min
-1
8-9 J
Chiselling concrete G 3300 min
-1
11 J
Ташев-Галвинг ООД
www.tashev-galving.com

8
EN
BP 540CE
turn the tool slightly by hand left wise and right
wise until it is locked.
(1) Impact drilling – for drilling masonry, con-
crete, etc.
(2) Changing the chisel position to x the chisel
in the desired angular position for demolition and
chiselling (see “Changing the chisel position”).
(3) Hammer mode – for chiselling and de-
molition.
WARNING: Turn the operation mode
selector switch only in the direction marked
on the switch.
INSERTING OF SDS-MAX TOOL
Clean and grease the shank of the accessory,
before placing it into the socket!
Keep the locking socket 2 in upper (front) posi-
tion while inserting the tool.
Place the tool into the spindle without effort.
Rotate the tool until the grooves coincide.
After the grooves have coincided, push the tool
down (until the xing mechanism produces an
audible “click”). Check the proper xing of the
tool by pulling it strongly outwards.
WARNING: For operating with
chisels switch 6 shall always be in “hammer”
position.
REMOVING THE SDS-MAX TOOL
Pull the locking clutch entirely back and take the
tool out.
CHANGING THE CHISEL POSITION
- Insert the tool in the socket as it is described
in point “Inserting the SDS-max tool”.
- Turn the operating mode switch 6 in position
“Changing the chisel position”.
- Turn the tool by hand to the desired position.
- Turn the operating mode switch 6 in position
“hammer”, and then turn the tool slightly by hand
left wise and right wise until it is locked.
Longer operation life of the rotary hammer and
higher efciency can be achieved only with well-
sharpened tools for demolition and chiselling.
AUXILIARY HANDLE
Always use the auxiliary handle.
Loosen the handle by turning it left wise. Turn
the handle in the most convenient for operation
position, and then tighten it well.
Do not carry the machine by a loose auxiliary
handle.
You can x the drilling depth through depth
gauge 4. The depth gauge 4 can be xed by
screw 3.
The auxiliary handle for these models is con-
nected to the body of the machine through vi-
bration dampers, protecting the operator and
reducing fatigue.
RECOMMENDATIONS FOR
OPERATION
Apply moderate pressure during operation (ap-
proximately 100-150 N)! Higher pressure will not
increase efciency when drilling and chiselling,
but it will lead to decreasing the operation life of
the machine.
Take the drill bit out of the opening from time to
time to remove dust.
Watch out for the stage of bit blunting and re-
place the bit when considerable decrease of ef-
ciency is observed.
ACCESSORIES
▪ SDS-max twist drill bits for concrete Ø12 to
Ø40 mm. We recommend operation with Ø24
to Ø32 drill bits, for the optimum operation the
machine is designed for.
▪ SDS-max break through drill bits for concrete
up to Ø55 mm
▪ SDS-max core cutters up to Ø90 mm
▪ SDS-max point chisels up to 600 mm long
▪ SDS-max at chisels up to 80 mm wide
▪ SDS-max groove chisel up to 32 mm wide
WARNING: We recommend using
these accessories or attachments when op-
erating your power tool. The use of any other
accessories or attachments might present a
risk of injury. Only use accessory or attach-
ment for its stated purpose. If you need any
assistance for more details regarding these
accessories, ask your local SPARKY service
centre.
VII - Maintenance
WARNING: Always ensure that the
tool is switched off and unplugged before
attempting to perform inspection or mainte-
nance.
Ташев-Галвинг ООД
www.tashev-galving.com

9
Original instructions
EN
GENERAL INSPECTION
Regularly inspect all fasteners and ensure they
are properly tightened. Should any of the screws
be loose, retighten it immediately to avoid haz-
ards.
If the replacement of the supply cord is neces-
sary, this has to be done by the manufacturer or
his agent in order to avoid a safety hazard.
CLEANING
For safe operation always keep the machine
and its ventilation slots clean.
Regularly check to see if any dust or foreign
matter has entered the ventilation slots and the
grills around the switches. Use a soft brush and/
or air jet to remove any accumulated dust. Wear
safety glasses to protect your eyes whilst clean-
ing.
Exterior plastic parts may be cleaned with a
damp cloth and mild detergent if necessary.
WARNING: Never use alcohol, petrol
or other cleaning agent. Never use caustic
agents to clean plastic parts.
WARNING: Water must never come
into contact with the tool.
IMPORTANT! To assure product safety and re-
liability, repairs, maintenance and adjustment
(including brush inspection and replacement)
should be performed by certied service centres
or other qualied service organisations, always
using genuine replacement parts.
BUILT-IN DUST PROTECTION
The protective ring 1 preserves the tool socket
from dirt during operation. While inserting the
tool, take care that you do not damage the pro-
tective ring.
WARNING: Replace a damaged pro-
tective ring immediately!
To replace the protective ring 1, pull back the
locking socket 2. Grasp the protective ring and
pull it strongly slantwise forward. Place a new
protective ring onto the spindle and press it
hard.
INDICATION “SERVICE MAINTE-
NANCE”
When the red light-emitting diode 10 begins to
blink while the machine operates normally, re-
placement of the brushes is needed. After ap-
proximately 8h operation, the brushes are worn
out completely and the safety switch actuates.
The machine halts and the red light-emitting di-
ode keeps blinking. Deliver the machine to an
authorised service for repla cement of brushes
and preventive main tenance.
If the machine does not operate before the
warning period of 8 hours is over, and the red
light-emitting diode 10 blinks, that probably
means the motor is damaged. In case there is
no light indication and the machine does not op-
erate, that means there is no power supply to
the machine or that the automatic switch or the
cord are faulty.
PREVENTIVE MAITENANCE
This power tool shall be submitted periodically
to SPARKY authorised service centre for pre-
ventive maintenance. Preventive checks will
boost the life of your power tool.
First check - after approximately 70 h ope-
ration.
The functioning of the machine shall be evalu-
ated and if necessary the machine shall be
checked.
Second check - after approximately 140 h
operation or upon the event of brushes wearing
out.
The machine shall be cleaned thoroughly and
checked. Ascertained or potential faults shall be
eliminated (brushes and O-ring sealings shall be
replaced).
Third check - after approximately 250 h oper-
ation or upon the event of brushes wearing out.
The machine shall be cleaned thoroughly and
checked. Ascertained or potential faults shall be
eliminated (brushes and O-ring sealings shall be
replaced).
Fourth check - after approximately 350 h
ope ration or upon the event of brushes wearing
out.
The machine shall be cleaned thoroughly and
checked. Ascertained or potential faults shall be
eliminated (brushes and O-ring sealing shall be
replaced).
Ташев-Галвинг ООД
www.tashev-galving.com

10
EN
BP 540CE
VIII - Warranty
The guarantee period for SPARKY power tools
is determined in the guarantee card.
Faults due to normal wear, overloading or im-
proper handling will be excluded from the guar-
antee.
Faults due to defective materials implemented
as well as defects in workmanship will be cor-
rected free of charge through replacement or
repair.
The complaints for defective SPARKY power
tools will be recognized if the machine is sent
back to the dealer or is presented to the author-
ised warranty service centre undismantled, in its
initial condition.
Notes
Carefully read through these Original Instruc-
tions before using this product..
The manufacturer reserves the right to make
changes and improvements to the products and
to alter specications without prior notice.
Specications may differ from country to coun-
try.
Ташев-Галвинг ООД
www.tashev-galving.com

11
DE
Originalbetriebsanleitung
Inhalt
I - Einführung ..................................................................................................................... 11
II - Technische Daten ...........................................................................................................13
III - Allgemeine Sicherheitshinweise für Elektrowerkzeuge ..................................................14
IV - Zusätzliche Sicherheitshinweise für Arbeiten mit Bohrhämmern ..................................16
V - Elemente des Elektrowerkzeuges .............................................................................. A/17
VI - Betriebshinweise ............................................................................................................17
VII - Wartung .........................................................................................................................20
VIII - Garantie ........................................................................................................................21
I - Einführung
Das von Ihnen erworbene Elektrowerkzeug wird Ihre Erwartungen übersteigen. Es ist gemäß den ho-
hen Qualitätsstandards von SPARKY hergestellt, die den strengen Anforderungen des Verbrauchers
entsprechen. Einfach in der Bedienung und ungefährlich bei richtiger Handhabung, wird dieses Gerät
bei bestimmungsgemäßem Gebrauch Ihnen lange Jahre zuverlässig dienen.
WARNUNG!
Lesen Sie die ganze Originalbetriebsanleitung aufmerksam durch, bevor Sie das neu erwor-
bene SPARKY - Elektrowerkzeug in Betrieb nehmen. Beachten Sie besonders die Texte, die mit
den Wörtern „Warnung“ beginnen. Ihr SPARKY - Elektrowerkzeug besitzt viele Eigenschaften,
die Ihre Arbeit erleichtern werden. Bei der Entwicklung dieses Elektrowerkzeuges ist höchste
Aufmerksamkeit der Sicherheit, den Betriebseigenschaften und der Zuverlässigkeit gewidmet
worden, die es einfach zur Wartung und Bedienung machen.
Keine elektrischen Geräte zusammen mit dem Hausmüll wegwerfen!
Die Abfälle von elektrischen Erzeugnissen sollen nicht zusammen mit dem Hausmüll
gesammelt werden. Für eine umweltgerechte Entsorgung geben Sie Ihren alten / defekten
Elektrogeräte bitte in der nächsten kommunalen Sammelstelle ab.
UMWELTSCHUTZ
Angesichts des Umweltschutzes sollen das Elektrowerkzeug, die Zubehörteile und die
Verpackung einer geeigneten Wiederverwertung zugeführt werden.
Zum sortenreinen Recycling sind die Teile, hergestellt aus Kunststoffen, entsprechend
gekennzeichnet.
AUSPACKEN
Überprüfen Sie unmittelbar nach dem Auspacken ob sämtliche Bestandteile und das beschriebene
Zubehör mitgeliefert wurden. Sollte dies nicht der Fall sein, wenden Sie sich bitte umgehend an Ihren
Fachhändler bei dem das Elektrowerkzeug gekauft wurde. Dies trifft auch dann zu, wenn Sie den
Eindruck haben mit dem Gerät ist etwas nicht in Ordnung. Eine Nichtbeachtung dieser Empfehlung
kann zu schweren Unfällen führen.
ZUSAMMENBAU
Der Bohrhammer wird in Verpackung und völlig zusammengebaut geliefert.
Ташев-Галвинг ООД
www.tashev-galving.com

12
DE
BP 540CE
BEDEUTUNG DER SYMBOLE
Auf dem Typenschild des Elektrowerkzeuges sind spezielle Symbole dargestellt. Sie stellen wichtige
Information über das Produkt oder Instruktionen für seine Nutzung dar.
Doppelte Isolierung für zusätzlichen Schutz.
Entspricht den einschlägigen Europäischen Richtlinien.
Entspricht den Anforderungen der russischen normativen Dokumente.
Entspricht den Anforderungen der ukrainischen normativen Dokumenten.
Lesen Sie die Originalbetriebsanleitung.
YYYY-Www Zeitabschnitt der Produktion, wobei die variablen Symbole sind:
YYYY - Kalenderjahr der Produktion,
ww - laufende Kalenderwoche.
BP Bohrhammer.
Ташев-Галвинг ООД
www.tashev-galving.com

13
DE
Originalbetriebsanleitung
II - Technische Daten
Modell BP 540CE
▪ Nennaufnahme 1010 W
▪ Leerlaufdrehzahl 200-325/350 min
-1
▪ Elektronische Drehzahlregelung ja
▪ Konstantelektronik ja
▪ Drehrichtungswechsel nein
▪ Mechanische Sicherheitskupplung ja
▪ Max. Schlagzahl 1900 – 3050/3300 min
-1
▪ Einzelschlag-Energie 4 – 9/11 J
▪ Max. Werkzeugdurchmesser in Beton:
Wndelbohrer 40 mm
Durchbruchbohrer 55 mm
Hohlbohrkrone 90 mm
▪ Meißelpositionen 24
▪ Werkzeugaufnahme SDS-max
▪ Gewicht (EPTA Verfahren 01/2003) 6.0 kg
▪ Schutzklasse (EN 60745-1)
II
GERÄUSCH- /VIBRATIONSINFORMATION
Messwerte ermittelt entsprechend EN 60745.
▪ Geräuschemissionswerte
Der A-bewertete Schalldruckpegel L
pA
95.0 dB (A)
Unsicherheit K
pA
3.0 dB (A)
Der A-bewertete Schalleistungspegel L
wA
106.0 dB (A)
Unsicherheit К
wA
3.0 dB (A)
Gehörschutz tragen!
▪ Schwingungsemissionswerte *
Schwingungsgesamtwerte (Vektorsumme dreier Richtungen) ermittelt entsprechend EN 60745:
Hammerbohren in Beton
Schwingungsemissionswert a
h,HD
13.5 m/s
2
Unsicherheit К
HD
1.5 m/s
2
Meißeln
Schwingungsemissionswert a
h,CHeq
11.5 m/s
2
Unsicherheit K
CHeq
1.5 m/s
2
* Vibrationsmesswerte ermittelt nach P. 6.2.7 EN 60745-1.
Der in diesen Anweisungen angegebene Schwingungspegel ist entsprechend einem in EN 60745
genormten Messverfahren gemessen worden und kann für den Vergleich von Elektrowerkzeugen
miteinander verwendet werden. Er eignet sich auch für eine vorläuge Einschätzung der Schwin-
gungsbelastung.
Der angegebene Schwingungspegel repräsentiert die hauptsächlichen Anwendungen des Elektro-
werkzeugs. Wenn allerdings das Elektrowerkzeug für andere Anwendungen, mit abweichenden Ein-
satzwerkzeugen oder ungenügender Wartung eingesetzt wird, kann der Schwingungspegel abwei-
chen. Dies kann die Schwingungsbelastung über den gesamten Arbeitszeitraum deutlich erhöhen.
Für eine genaue Abschätzung der Schwingungsbelastung sollten auch die Zeiten berücksichtigt wer-
den, in denen das Gerät abgeschaltet ist oder zwar läuft, aber nicht tatsächlich im Einsatz ist. Dies
kann die Schwingungsbelastung über den gesamten Arbeitszeitraum deutlich reduzieren.
Pegen Sie das Gerät und die Einsatzwerkzeuge mit Sorgfalt. Halten Sie Ihre Hände warm während
der Arbeit – dies wird die schädliche Einwirkung erhöhter Schwingungen reduzieren.
Ташев-Галвинг ООД
www.tashev-galving.com

14
DE
BP 540CE
III - Allgemeine
Sicherheitshinweise
für Elektrowerkzeuge
WARNUNG: Lesen Sie alle Sicher-
heitshinweise und Anweisungen. Versäum-
nisse bei der Einhaltung der Sicherheitshin-
weise und Anweisungen können elektrischen
Schlag, Brand und/oder schwere Verletzun-
gen verursachen.
Bewahren Sie alle Sicherheitshinweise
und Anweisungen für die Zukunft auf.
Der in den Sicherheitshinweisen verwendete Be-
griff „Elektrowerkzeug“ bezieht sich auf netzbe-
triebene Elektrowerkzeuge (mit Netzkabel) und
auf akkubetriebene Elektrowerkzeuge (ohne
Netzkabel).
1) Arbeitsplatzsicherheit
a) Halten Sie Ihren Arbeitsbereich sauber
und gut beleuchtet. Unordnung oder un-
beleuchtete Arbeitsbereiche können zu Un-
fällen führen.
b) Arbeiten Sie mit dem Elektrowerkzeug
nicht in explosionsgefährdeter Umge-
bung, in der sich brennbare Flüssigkei-
Elek-
trowerkzeuge erzeugen Funken, die den
Staub oder die Dämpfe entzünden können.
c) Halten Sie Kinder und andere Personen
während der Benutzung des Elektro-
werkzeugs fern. Bei Ablenkung können
Sie die Kontrolle über das Gerät verlieren.
2) Elektrische Sicherheit
a) Der Anschlussstecker des Elektro werk-
zeuges muss in die Steckdose passen.
Der Stecker darf in keiner Weise ver-
ändert werden. Verwenden Sie keine
Adapterstecker gemeinsam mit schutz-
geerdeten Elektrowerkzeugen. Unverän-
derte Stecker und passende Steckdosen
verringern das Risiko eines elektrischen
Schlages.
b) Vermeiden Sie Körperkontakt mit geer-
-
zungen, Herden und Kühlschränken. Es
besteht ein erhöhtes Risiko durch elektri-
schen Schlag, wenn Ihr Körper geerdet ist.
c) Halten Sie Elektrowerkzeuge von Re-
gen oder Nässe fern. Das Eindringen von
Wasser in ein Elektrowerkzeug erhöht das
Risiko eines elektrischen Schlages.
d) Zweckentfremden Sie das Kabel nicht,
um das Elektrowerkzeug zu tragen, auf-
zuhängen oder um den Stecker aus der
Steckdose zu ziehen. Halten Sie das Ka-
bel fern von Hitze, Öl, scharfen Kanten
oder sich bewegenden Geräteteilen. Be-
schädigte oder verwickelte Kabel erhöhen
das Risiko eines elektrischen Schlages.
e) Wenn Sie mit einem Elektrowerkzeug
im Freien arbeiten, verwenden Sie nur
Verlängerungskabel, die auch für den
Außenbereich geeignet sind. Die Anwen-
dung eines für den Außenbereich geeig-
neten Verlängerungskabels verringert das
Risiko eines elektrischen Schlages.
f) Wenn der Betrieb des Elektrowerkzeu-
ges in feuchter Umgebung nicht ver-
meidbar ist, verwenden Sie einen Fehler-
stromschutzschalter. Der Einsatz eines
Fehlerstromschutzschalters vermindert das
Risiko eines elektrischen Schlages.
3) Sicherheit von Personen
a) Seien Sie aufmerksam, achten Sie da-
rauf, was Sie tun, und gehen Sie mit
Vernunft an die Arbeit mit einem Elekt-
Stäube von Materialien wie bleihaltigem Anstrich, einigen Holzarten, Mineralien und Metall können
gesundheitsschädlich sein. Berühren oder Einatmen der Stäube können allergische Reaktionen und/
oder Atemwegserkrankungen des Benutzers oder in der Nähe bendlicher Personen hervorrufen.
Bestimmte Stäube wie Eichen- oder Buchenstaub gelten als krebserzeugend, besonders in Verbin-
dung mit Zusatzstoffen zur Holzbehandlung (Chromat, Holzschutzmittel). Asbesthaltiges Material darf
nur von Fachleuten bearbeitet werden.
▪ Benutzen Sie möglichst eine Staubabsaugung.
▪ Um bei der Arbeit mit diesem Elektrowerkzeug ein gutes Staubabfangen zu gewährleisten, benutzen
Sie einen Staubabsauger, der für Holzstaub oder für Holz- und mineralischen Staub bestimmt ist.
▪ Sorgen Sie für gute Belüftung des Arbeitsplatzes.
▪ Es wird empfohlen, eine Atemschutzmaske mit Filterklasse P2 zu tragen.
Beachten Sie in Ihrem Land gültige Vorschriften für die zu bearbeitenden Materialien.
Ташев-Галвинг ООД
www.tashev-galving.com

15
DE
Originalbetriebsanleitung
rowerkzeug. Benutzen Sie kein Elektro-
werkzeug, wenn Sie müde sind oder
oder Medikamenten stehen. Ein Moment
der Unachtsamkeit beim Gebrauch des
Elektrowerkzeuges kann zu ernsthaften
Verletzungen führen.
b) Tragen Sie persönliche Schutzausrüs-
tung und immer eine Schutz brille. Das
Tragen persönlicher Schutzausrüstung, wie
Staubmaske, rutschfeste Sicherheitsschu-
he, Schutzhelm oder Gehörschutz, je nach
Art und Einsatz des Elektrowerkzeuges,
verringert das Risiko von Verletzungen.
c) Vermeiden Sie eine unbeabsichtigte In-
betriebnahme. Vergewissern Sie sich,
dass das Elektrowerkzeug ausgeschal-
tet ist, bevor Sie es an die Stromversor-
gung und/oder den Akku anschließen,
es aufnehmen oder tragen. Wenn Sie
beim Tragen des Elektrowerkzeuges den
Finger am Schalter haben oder das Gerät
eingeschaltet an die Stromversorgung an-
schließen, kann dies zu Unfällen führen.
d) Entfernen Sie Einstellwerkzeuge oder
Schraubenschlüssel, bevor Sie das
Elektrowerkzeug einschalten. Ein Werk-
zeug oder Schlüssel, der sich in einem dre-
henden Geräteteil bendet, kann zu Verlet-
zungen führen.
e) Vermeiden Sie eine abnormale Körper-
haltung. Sorgen Sie für einen siche-
ren Stand und halten Sie jederzeit das
Gleichgewicht. Dadurch können Sie das
Elektrowerkzeug in unerwarteten Situatio-
nen besser kontrollieren.
f) Tragen Sie geeignete Kleidung. Tragen
Sie keine weite Kleidung oder Schmuck.
Halten Sie Haare, Kleidung und Hand-
schuhe fern von sich bewegenden Tei-
len. Lockere Kleidung, Schmuck oder lan-
ge Haare können von sich bewegenden
Teilen erfasst werden.
g) Wenn Staubabsaug- und -auffangeinrich-
tungen montiert werden können, verge-
wissern Sie sich, dass diese angeschlos-
sen sind und richtig ver wendet werden.
Verwendung einer Staub absaugung kann
Gefährdungen durch Staub verringern.
4) Verwendung und Behandlung des Elektro-
werkzeuges
a) Überlasten Sie das Gerät nicht. Ver-
wenden Sie für Ihre Arbeit das dafür
bestimmte Elektrowerkzeug. Mit dem
passenden Elektrowerkzeug arbeiten Sie
besser und sicherer im angegebenen Leis-
tungsbereich.
b) Benutzen Sie kein Elektrowerkzeug,
dessen Schalter defekt ist. Ein Elektro-
werkzeug, das sich nicht mehr ein- oder
ausschalten lässt, ist gefährlich und muss
repariert werden.
c) Ziehen Sie den Stecker aus der Steck-
dose und/oder entfernen Sie den Akku,
bevor Sie Geräteeinstellungen vorneh-
men, Zubehörteile wechseln oder das
Gerät weglegen. Diese Vorsichtsmaßnah-
me verhindert den unbeabsichtigten Start
des Elektrowerkzeuges.
d) Bewahren Sie unbenutzte Elektrowerk-
zeuge außerhalb der Reichweite von
Kindern auf. Lassen Sie Personen das
Gerät nicht benutzen, die mit diesem
nicht vertraut sind oder diese Anwei-
sungen nicht gelesen haben. Elektro-
werkzeuge sind gefährlich, wenn Sie von
unerfahrenen Personen benutzt werden.
e) -
falt. Kontrollieren Sie, ob bewegliche
Teile einwandfrei funktionieren und
nicht klemmen, ob Teile gebrochen oder
so beschädigt sind, dass die Funktion
des Elektrowerkzeuges beeinträchtigt
ist. Lassen Sie beschädigte Teile vor
dem Einsatz des Gerätes reparieren. Vie-
le Unfälle haben ihre Ursache in schlecht
gewarteten Elektrowerkzeugen.
f) Halten Sie Schneidwerkzeuge scharf
und sauber. Sorgfältig gepegte Schneid-
werkzeuge mit scharfen Schneidkanten
verklemmen sich weniger und sind leichter
zu führen.
g) Verwenden Sie Elektrowerkzeug, Zube-
hör, Einsatzwerkzeuge usw. entspre-
chend diesen Anweisungen. Berücksich-
tigen Sie dabei die Arbeitsbedingungen
und die auszuführende Tätigkeit. Der Ge-
brauch von Elektrowerkzeugen für ande re
als die vorgesehenen Anwendungen kann
zu gefährlichen Situationen führen.
5) Service
a) Lassen Sie Ihr Elektrowerkzeug nur von
Original-Ersatzteilen reparieren. Damit
wird sichergestellt, dass die Sicherheit des
Elektrowerkzeuges erhalten bleibt.
Ташев-Галвинг ООД
www.tashev-galving.com

16
DE
BP 540CE
IV – Zusätzliche
Sicherheitshinweise
für Arbeiten mit
Bohrhämmern
Gehörschutz tragen. Das intensive Ge-
räusch während der Arbeit kann Gehörschä-
den verursachen.
▪ Beim Arbeiten immer den Zusatzhand-
griff verwenden. Ein Kontrollverlust kann zu
schweren körperlichen Verletzungen führen.
Beim Arbeiten persönliche Schutzaus-
rüstung und immer eine Schutzbrille tragen.
Bei stauberzeugenden Arbeiten, Unfall-
verhütungsvorschriften beachten! Einige
Materialien können Giftstoffe enthalten. Tra-
gen Sie eine Staubmaske. Das Verwenden
von Staubabsaug- und Auffangeinrichtungen
verringert die Gefährdung durch Staub.
▪ Halten Sie das Gerät nur an den isolierten
-
ren, bei denen das Einsatzwerkzeug ver-
borgene Stromleitungen oder das eigene
Netzkabel treffen kann. Der Kontakt mit ei-
ner spannungsführenden Leitung kann auch
metallene Geräteteile unter Spannung setzen
und zu einem elektrischen Schlag führen.
▪ Asbestenthaltende Materialien nicht bearbei-
ten. Asbest gilt als krebserregend.
WARNUNG: Netzspannung beachten!
Vor Anschluss des elektrischen Geräts prü-
fen, ob die auf dem Typenschild angegebene
Spannung der Netzspannung entspricht.
▪ Höhere Netzspannung als die auf dem Leis-
tungsschild angegebene Spannung kann zu
schweren Verletzungen von Personen und zu
Schäden am Elektrowerkzeug führen.
▪ Sind Sie nicht sicher, stecken Sie nicht den
Anschlussstecker des elektrischen Gerätes in
die Steckdose ein.
▪ Netzspannung, die niedriger als die auf dem
Leistungsschild angegebene Spannung ist,
kann den Elektromotor beschädigen.
▪ Um eventuelle Überhitzung zu vermeiden,
Verlängerungskabel immer von der Kabel-
trommel abwickeln.
▪ Verwenden Sie nur Verlängerungskabel, die auch
für das Elektrowerkzeug zugelassen sind. Kon-
trollieren Sie Verlängerungskabel regelmässig
und ersetzen Sie sie, wenn sie beschädigt sind.
WARNUNG: Ziehen Sie den Stecker
aus der Steckdose, bevor Sie Geräteeinstel-
lungen oder Wartung vornehmen, Zubehörtei-
le wechseln oder das Gerät weglegen.
▪ Beim Arbeiten halten Sie das elektrische Ge-
rät mit beiden Händen fest. Sorgen Sie für
einen sicheren Stand und halten Sie jederzeit
das Gleichgewicht. Das Elektrowerkzeug wird
sicher geführt, wenn man es mit beiden Hän-
den festhält.
▪ Vorsicht vor verdeckt liegenden elektrischen
Leitungen, Gas- und Wasserrohren! Beim
Werkzeugkontakt mit verdeckt liegenden
elektrischen Leitungen besteht das Risiko
eines elektrischen Schlages. Die Beschädi-
gung von Gasrohren kann zu einer Explosion
führen. Das Durchbohren einer Wasserleitung
kann zu Vermögensschaden oder Verletzun-
gen durch elektrischen Schlag führen.
▪ Das Netzkabel ausserhalb des Arbeitsbe-
reichs des Bohrhammers führen.
▪ Überzeugen Sie sich von der Unversehrtheit
des Netzkabels und des Steckers. Ein be-
schädigtes Netzkabel nicht berühren und den
Stecker aus der Steckdose ziehen, wenn das
Kabel während der Arbeit beschädigt wird. Es
besteht das sonst Risiko eines elektrischen
Schlages.
▪ Sorgen Sie für einen sicheren Stand und
halten Sie jederzeit das Gleichgewicht. Falls
Sie mit dem Gerät auf einer Leiter arbeiten,
überzeugen Sie sich, dass darunter niemand
steht.
▪ Das zu bearbeitende Werkstück festspannen
oder entsprechend sichern.
▪ Beim Arbeiten das Elektrowerkzeug immer
fest mit beiden Händen halten. Bei Überlas-
tung wird das Arbeitswerkzeug festklemmen.
Klemmt das Arbeitswerkzeug fest, wird sein
Antrieb von der integrierten mechanischen
Sicherheitskupplung unterbrochen.
▪ Berühren Sie das Arbeitswerkzeug oder das
bearbeitete Werkstück nicht gleich nach der
Arbeit - es besteht die Gefahr vor Hautver-
brennung.
▪ Halten Sie Ihren Arbeitsbereich sauber und
aufgeräumt. Die Staubmischung von unter-
schiedlichen Materialien ist gefährlich. Der
Staub von Leichtmetallen kann brennen und
zu Explosion führen.
▪ Lassen Sie keine Laschen, Schnüre, Leitun-
Ташев-Галвинг ООД
www.tashev-galving.com

17
DE
Originalbetriebsanleitung
gen oder Draht usw. im Arbeitsbereich.
▪ Schalten Sie die Maschine aus, bevor Sie sie
weglegen.
▪ Verwenden Sie das elektrische Gerät entspre-
chend diesen Anweisungen und so, wie es für
diesen speziellen Gerätetyp vorgeschrieben
ist. Der Gebrauch von elektrischen Geräten
für andere als die vorgesehenen Anwendun-
gen kann zu gefährlichen Situationen führen.
Die Verantwortung für jede Beschädigung
oder Verletzung trägt in diesem Fall der Ver-
braucher und nicht der Hersteller.
▪ Um mit diesem elektrischen Gerät richtig um-
zugehen, müssen Sie die Sicherheitshinwei-
se und die hier angegebenen allgemeinen
Betriebsanleitungen berücksichtigen. Alle An-
wender sind mit dieser Betriebsanleitung und
den Sicherheitshinweisen bekanntzumachen.
Bewahren Sie unbenutzte elektrische Geräte
außerhalb der Reichweite von Kindern auf.
Lassen Sie Personen das elektrische Gerät
nicht benutzen, die mit diesem nicht vertraut
sind oder diese Anweisungen nicht gelesen
haben. Elektrische Geräte sind gefährlich,
wenn sie von unerfahrenen Personen benutzt
werden.
▪ Der Hersteller haftet nicht für jegliche eigen-
mächtige Veränderung am elektrischen Gerät
und für die daraus folgenden Schäden.
▪ Arbeiten Sie mit dem elektrischen Gerät nicht
im Freien und bei Regen, in explosionsge-
fährdeter Umgebung, in der sich brennbare
Flüssigkeiten, Gase oder Staube benden.
Der Arbeitsplatz muss gut beleuchtet sein.
V – Elemente des
Elektrowerkzeugs
Bevor Sie mit dem Elektrowerkzeug zu arbei-
ten beginnen, lernen Sie alle operative Beson-
derheiten und Sicherheitshinweise kennen.
Verwenden Sie das elektrische Gerät nur be-
stimmungsgemäß und unter Beachtung der
allgemeinen Sicherheits- und Unfallverhütungs-
vorschriften. Jede andere Verwendung ist aus-
drücklich verboten
1. Staubschutzkappe
2. Verriegelungshülse
3. Schraube
4. Anschlaglineal
5. Lüftungsschlitze
6. Betriebsartenumschalter
7. Ein-Aus-Schalter
8. Drehzahlregler
9. Betriebsarten-Anzeige
10. Bürstenverschleiß- und Überlast-Anzeige
11. Lüftungsschlitze
12. Zusatzhandgriff
VI - Betriebshinweise
Dieses elektrische Gerät wird nur mit Einpha-
senwechselspannung betrieben. Es ist doppelt
isoliert gemäß EN 60745-1 und IЕС 60745 und
darf an Steckdosen ohne Schutzklemmen ange-
schlossen werden. Die Funkstörungen entspre-
chen der Richtlinie über die elektromagnetische
Verträglichkeit 2004/108/ЕU.
Dieses Elektrowerkzeug ist zum hochprodukti-
ven Schlagbohren und Meisseln in Mauerwerk,
Beton und Gestein bestimmt.
Die integrierte Vibrationsdämpfung
reduziert die auftretenden Vibrationen um mehr
als 50%.
BEVOR SIE DAS GERÄT IN BETRIEB
SETZEN
▪ Prüfen Sie, ob die auf dem Leistungsschild
angegebene Spannung der Netzspannung
entspricht.
▪ Prüfen Sie die Position des Tippschalters. Das
elektrische Gerät darf an die Netzspannung
nur bei ausgeschaltetem Tippschalter ange-
schlossen werden. Wenn Sie das Gerät bei
eingeschaltetem Tippschalter an die Steckdo-
se anschließen, besteht die Voraussetzung
für einen Unfall.
▪ Stellen Sie sicher, dass die Anschlussleitung
und der Gerätestecker in gutem Zustand sind.
Kontrollieren Sie regelmäßig die Anschluss-
leitung des elektrischen Gerätes und lassen
Sie sie bei Beschädigung von qualiziertem
Fachpersonal oder von einer autorisierten
Vertrags-Kundendienstwerkstatt erneuern.
WARNUNG: Ziehen Sie den Stecker
aus der Steckdose, bevor Sie Geräteeinstel-
lungen und Wartung vornehmen, Zubehörtei-
le wechseln oder das Gerät weglegen.
▪ Wenn der Arbeitsbereich von der Steckdose
entfernt ist, verwenden Sie möglichst kürzere
Verlängerungskabel. Nur für den Aussenbe-
reich zugelassene und entsprechend gekenn-
zeichnete Verlängerungskabel verwenden.
▪ Prüfen Sie, ob der Zusatzhandgriff gut mon-
Ташев-Галвинг ООД
www.tashev-galving.com

18
DE
BP 540CE
tiert und festgezogen ist.
EIN- UND AUSSCHALTEN
▪ Einschalten: Schalter 7 drücken und gedrückt
halten.
▪ Ausschalten: Schalter 7 loslassen.
Bei niedrigen Temperaturen kann der Meißel-
betrieb erst nach ca. 3 Minuten Anlaufzeit be-
ginnen.
WARNUNG: Bei einer 30%-Überlas-
tung leuchtet die rote Anzeige 10 an. Das
Elektrowerkzeug andauernd in diesem Be-
trieb nicht arbeiten lassen.
DREHZAHL-/SCHLAGZAHL- UND
SCHLAGE NER GIEVORWAHL
Durch Drehen des Drehzahlreglers 8 wird eine
geeignete, materialgerechte Drehzahl, Schlag-
zahl und Schlagenergie gewählt. Die Konstant-
elektronik hält die Drehzahl, die Schlagzahl und
die Schlagenergie konstant, unabhängig von
der Belastung, was eine gleichmäßige Arbeits-
leistung gewährleistet. Die Angaben in der Ta-
belle sind empfehlenswert.
Durch Drehen des Drehzahlreglers 8 von A bis
F wird eine Erhöhung der Drehzahl, Schlagzahl
und Schlagenergie erzielt. Die Überlast-Anzeige
9 leuchtet mit einem ackernden grünen Licht.
Die Betriebsart HIGH POWER wird durch Dre-
hen des Drehzahlreglers 8 in Position G gewählt.
Diese Betriebsart zeichnet sich durch erhöhte
Schlage nergie bis 11 J aus. Die Überlast-Anzei-
ge 9 leuchtet ununterbrochen.
WARNUNG: Die Verwendung der
HIGH POWER-Betriebsart wird nur beim Mei-
ßeln und bei kurzzeitiger Arbeit im Hammer-
bohren-Betrieb empfohlen. Das langzeitige
Arbeiten im Hammerbohren-Betrieb führt zur
schnellen Müdigkeit des Bedieners und zum
erhöhten Verschleiß des Elektrowerkzeugs.
BETRIEBSARTENWAHL
Das Umschalten der Betriebsarten nur im Still-
stand durchführen.
Den Betriebsartenumschalter 6 in die angezeig-
te Richtung zur gewünschten Stellung drehen.
Nach jeder Umschaltung der Betriebsarten das
Werkzeug mit der Hand leicht nach links und
rechts drehen, bis es xiert wird.
(1) - Hammerbohren - zum Bohren in Mauer-
werk, Beton und andere Werkstoffe.
(2) - Meißelstellung verändern - zum Fixieren
des Meißels in der gewünschten Stellung beim
Meißeln (s. Abschnitt “Änderung der Meißel-
stellung”).
(3) - Meißeln - für Meißelarbeiten.
WARNUNG: Den Betriebsartenum-
schalter nur in die angezeigte Richtung dre-
hen.
Anwendungsbereich Stellrad Drehzahl Schlagzahl Einzelschlagenergie
Putz / Leichtbaustoffe A-B 200-225 min
-1
1900-2100 min
-1
4 J
Ziegelsteine/ Ablösen
von Fliesen
C-D 250-275 min
-1
2350-2600 min
-1
6-7 J
Bohren in Beton E-F 300-325 min
-1
2850-3050 min
-1
8-9 J
Meißeln in Beton G 3300 min
-1
11 J
Ташев-Галвинг ООД
www.tashev-galving.com
La pagina si sta caricando...
La pagina si sta caricando...
La pagina si sta caricando...
La pagina si sta caricando...
La pagina si sta caricando...
La pagina si sta caricando...
La pagina si sta caricando...
La pagina si sta caricando...
La pagina si sta caricando...
La pagina si sta caricando...
La pagina si sta caricando...
La pagina si sta caricando...
La pagina si sta caricando...
La pagina si sta caricando...
La pagina si sta caricando...
La pagina si sta caricando...
La pagina si sta caricando...
La pagina si sta caricando...
La pagina si sta caricando...
La pagina si sta caricando...
La pagina si sta caricando...
La pagina si sta caricando...
La pagina si sta caricando...
La pagina si sta caricando...
La pagina si sta caricando...
La pagina si sta caricando...
La pagina si sta caricando...
La pagina si sta caricando...
La pagina si sta caricando...
La pagina si sta caricando...
La pagina si sta caricando...
La pagina si sta caricando...
La pagina si sta caricando...
La pagina si sta caricando...
La pagina si sta caricando...
La pagina si sta caricando...
La pagina si sta caricando...
La pagina si sta caricando...
La pagina si sta caricando...
La pagina si sta caricando...
La pagina si sta caricando...
La pagina si sta caricando...
La pagina si sta caricando...
La pagina si sta caricando...
La pagina si sta caricando...
La pagina si sta caricando...
La pagina si sta caricando...
La pagina si sta caricando...
La pagina si sta caricando...
La pagina si sta caricando...
La pagina si sta caricando...
La pagina si sta caricando...
La pagina si sta caricando...
La pagina si sta caricando...
La pagina si sta caricando...
La pagina si sta caricando...
La pagina si sta caricando...
La pagina si sta caricando...
La pagina si sta caricando...
La pagina si sta caricando...
La pagina si sta caricando...
La pagina si sta caricando...
La pagina si sta caricando...
La pagina si sta caricando...
La pagina si sta caricando...
La pagina si sta caricando...
La pagina si sta caricando...
La pagina si sta caricando...
La pagina si sta caricando...
La pagina si sta caricando...
La pagina si sta caricando...
La pagina si sta caricando...
La pagina si sta caricando...
La pagina si sta caricando...
La pagina si sta caricando...
La pagina si sta caricando...
La pagina si sta caricando...
La pagina si sta caricando...
La pagina si sta caricando...
La pagina si sta caricando...
La pagina si sta caricando...
La pagina si sta caricando...
La pagina si sta caricando...
La pagina si sta caricando...
La pagina si sta caricando...
La pagina si sta caricando...
La pagina si sta caricando...
La pagina si sta caricando...
La pagina si sta caricando...
La pagina si sta caricando...
La pagina si sta caricando...
La pagina si sta caricando...
La pagina si sta caricando...
La pagina si sta caricando...
La pagina si sta caricando...
-
 1
1
-
 2
2
-
 3
3
-
 4
4
-
 5
5
-
 6
6
-
 7
7
-
 8
8
-
 9
9
-
 10
10
-
 11
11
-
 12
12
-
 13
13
-
 14
14
-
 15
15
-
 16
16
-
 17
17
-
 18
18
-
 19
19
-
 20
20
-
 21
21
-
 22
22
-
 23
23
-
 24
24
-
 25
25
-
 26
26
-
 27
27
-
 28
28
-
 29
29
-
 30
30
-
 31
31
-
 32
32
-
 33
33
-
 34
34
-
 35
35
-
 36
36
-
 37
37
-
 38
38
-
 39
39
-
 40
40
-
 41
41
-
 42
42
-
 43
43
-
 44
44
-
 45
45
-
 46
46
-
 47
47
-
 48
48
-
 49
49
-
 50
50
-
 51
51
-
 52
52
-
 53
53
-
 54
54
-
 55
55
-
 56
56
-
 57
57
-
 58
58
-
 59
59
-
 60
60
-
 61
61
-
 62
62
-
 63
63
-
 64
64
-
 65
65
-
 66
66
-
 67
67
-
 68
68
-
 69
69
-
 70
70
-
 71
71
-
 72
72
-
 73
73
-
 74
74
-
 75
75
-
 76
76
-
 77
77
-
 78
78
-
 79
79
-
 80
80
-
 81
81
-
 82
82
-
 83
83
-
 84
84
-
 85
85
-
 86
86
-
 87
87
-
 88
88
-
 89
89
-
 90
90
-
 91
91
-
 92
92
-
 93
93
-
 94
94
-
 95
95
-
 96
96
-
 97
97
-
 98
98
-
 99
99
-
 100
100
-
 101
101
-
 102
102
-
 103
103
-
 104
104
-
 105
105
-
 106
106
-
 107
107
-
 108
108
-
 109
109
-
 110
110
-
 111
111
-
 112
112
-
 113
113
-
 114
114
-
 115
115


Sparky Group BP 540CE Original Instructions Manual
- Categoria
- Martelli perforatori
- Tipo
- Original Instructions Manual
in altre lingue
- français: Sparky Group BP 540CE
- español: Sparky Group BP 540CE
- português: Sparky Group BP 540CE
- polski: Sparky Group BP 540CE
Documenti correlati
-
Sparky Group HeavyDuty BPR 260PQE Manuale utente
-
-
Sparky Group BP 330CE Manuale utente
-
-
-
Sparky Group BPR 240CE Manuale utente
-
-