
WWW.FERM.COM
Original instructions 05
Vertaling van de oorspronkelijke gebruiksaanwijzing 11
Traduction de la notice originale 18
Übersetzung der Originalbetriebsanleitung 25
Tłumaczenie instrukcji oryginalnej 33
Překlad püvodního návodu k používání 40
Preklad pôvodného návodu na použitie 47
Traduzione delle istruzioni originali 54
EN
NL
FR
DE
PL
CS
SK
IT
CTM1020

2
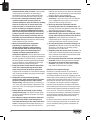
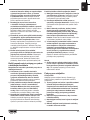
Fig. 1
Fig. 2
7
6
1
3
1
2
3
5
4A
4B
8

3
A B C
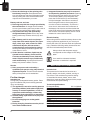
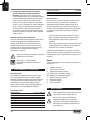
Fig. 3
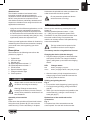
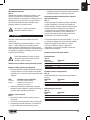
Fig. 5Fig. 4
Fig. 6

4
Fig. 8
Fig. 9
Fig. 7

5
EN
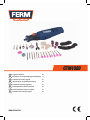
COMBITOOL
CTM1020
Thank you for buying this Ferm product.
By doing so you now have an excellent product,
delivered by one of Europe’s leading suppliers.
All products delivered to you by Ferm are
manufactured according to the highest standards
of performance and safety. As part of our
philosophy we also provide an excellent customer
service, backed by our comprehensive warranty.
We hope you will enjoy using this product for
many years to come.
1. SAFETY INSTRUCTIONS
Read the enclosed safety warnings,
the additional safety warnings and the
instructions. Failure to follow the safety
warnings and the instructions may result in
electric shock, fire and/or serious injury. Save the
safety warnings and the instructions for future
reference.
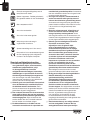
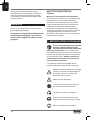
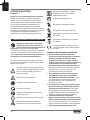
The following symbols are used in the user
manual or on the product:
Denotes risk of personal injury, loss of life
or damage to the tool in case of
nonobservance of the instructions in this
manual.
Risk of electric shock
Variable speed control
Indoor use only
Wear ear and eye protection
Wear a dust mask
Do not press the spindle lock button
while the motor is running.
Class II machine - Double insulation - You
don’t need any earthed plug.
Max temperature 40°C
Do not throw the battery into fire
Do not throw the battery into water
Do not dispose of the product in
unsuitable containers.
Separate collection for Li-ion battery.
The product is in accordance with the
applicable safety standards in the
European directives.
Specific safety instructions
a) This power tool is intended to function as a
grinder, sander, wire brush, polisher, carving
or cut-off tool. Read all safety warnings,
instructions, illustrations and specifications
provided with this power tool. Failure to
follow all instructions listed below may result in
electric shock, fire and/or serious injury.
c) Do not use accessories which are not
specifically designed and recommended
by the tool manufacturer. Just because the
accessory can be attached to your power tool,
it does not assure safe operation.
d) The rated speed of the grinding accessories
must be at least equal to the maximum
speed marked on the power tool. Grinding
accessories running faster than their rated
speed can break and fly apart.
e) The outside diameter and the thickness of
your accessory must be within the capacity
rating of your power tool. Incorrectly sized
accessories cannot be adequately controlled.
f) The arbour size of wheels, sanding drums
or any other accessory must properly fit
the spindle or collet of the power tool.
Accessories that do not match the mounting
hardware of the power tool will run out of
balance, vibrate excessively and can lead to
loss of control of the power tool.
g) Mandrel mounted wheels, sanding drums,
cutters or other accessories must be
fully

6
EN
inserted into the collet or chuck. If the mandrel
is insufficiently held and/or the overhang of
the wheel is too long, the mounted wheel may
become loose and be ejected at high velocity.
h) Do not use a damaged accessory. Before
each use inspect the accessory such as
abrasive wheels for chips and cracks, sanding
drum for cracks, tear or excess wear, wire
brush for loose or cracked wires. If power
tool or accessory is dropped, inspect for
damage or install an undamaged accessory.
After inspecting and installing an accessory,
position yourself and bystanders away from
the plane of the rotating accessory and run
the power tool at maximum no-load speed for
one minute.Damaged accessories will normally
break apart during this test time.
i) Wear personal protective equipment.
Depending on application, use face
shield, safety goggles or safety glasses.
As appropriate, wear dust mask, hearing
protectors, gloves and workshop apron
capable of stopping small abrasive or
workpiece fragments. The eye protection must
be capable of stopping flying debris generated by
various operations. The dust mask or respirator
must be capable of filtrating particles generated
by your operation. Prolonged exposure to high
intensity noise may cause hearing loss.
j) Keep bystanders a safe distance away from
work area. Anyone entering the work area
must wear personal protective equipment.
Fragments of workpiece or of a broken accessory
may fly away and cause injury beyond immediate
area of operation.
k) Hold power tool by insulated gripping
surfaces only, when performing an operation
where the cutting accessory may contact
hidden wiring. Cutting accessory contacting a
“live” wire may make exposed metal parts of the
power tool “live” and could give the operator an
electric shock.
l) Always hold the tool firmly in your hand(s)
during the start-up. The reaction torque of the
motor, as it accelerates to full speed, can cause
the tool to twist.
m) Use clamps to support workpiece whenever
practical. Never hold a small workpiece in
one hand and the tool in the other hand while
in use. Clamping a small workpiece allows you
to use your hand(s) to control the tool. Round
material such as dowel rods, pipes or tubing have
a tendency to roll while being cut, and may cause
the bit to bind or jump toward you.
n) Position the cord clear of the spinning
accessory. If you lose control, the cord may be
cut or snagged and your hand or arm may be
pulled into the spinning accessory.
o) Never lay the power tool down until the
accessory has come to a complete stop. The
spinning accessory may grab the surface and pull
the power tool out of your control.
p) After changing the bits or making any
adjustments, make sure the collet nut, chuck
or any other adjustment devices are securely
tightened. Loose adjustment devices can
unexpectedly shift, causing loss of control, loose
rotating components will be violently thrown.
q) Do not run the power tool while carrying it at
your side. Accidental contact with the spinning
accessory could snag your clothing, pulling
the accessory into your body.
r) Regularly clean the power tool’s air vents. The
motor’s fan will draw the dust inside the housing
and excessive accumulation of powdered metal
may cause electrical hazards.
s) Do not operate the power tool near flammable
materials. Sparks could ignite these materials.
t) Do not use accessories that require liquid
coolants. Using water or other liquid coolants
may result in electrocution or shock.
Kickback and related warnings
Kickback is a sudden reaction to a pinched or
snagged rotating wheel, sanding band, brush or
any other accessory. Pinching or snagging causes
rapid stalling of the rotating accessory which in turn
causes the uncontrolled power tool to be forced in
the direction opposite of the accessory’s rotation.
For example, if an abrasive wheel is snagged or
pinched by the workpiece, the edge of the wheel
that is entering into the pinch point can dig into the
surface of the material causing the wheel to climb
out or kick out. The wheel may either jump toward
or away from the operator, depending on direction
of the wheel’s movement at the point of pinching.
Abrasive wheels may also break under these
conditions.
Kickback is the result of power tool misuse and/or
incorrect operating procedures or conditions and
can be avoided by taking proper precautions as
given below.

7
EN
a) Maintain a firm grip on the power tool and
position your body and arm to allow you
to resist kickback forces. The operator can
control kickback forces, if proper precautions
are taken.
b) Use special care when working corners,
sharp edges etc. Avoid bouncing and
snagging the accessory. Corners, sharp
edges or bouncing have a tendency to snag the
rotating accessory and cause loss of control or
kickback.
c) Do not attach a toothed saw blade. Such
blades create frequent kickback and loss of
control.
d) Always feed the bit into the material in
the same direction as the cutting edge is
exiting from the material (which is the same
direction as the chips are thrown). Feeding
the tool in the wrong direction causes the
cutting edge of the bit to climb out of the work
and pull the tool in the direction of this feed.
e) When using rotary files, cut-off wheels,
high-speed cutters or tungsten carbide
cutters, always have the work securely
clamped. These wheels will grab if they
become slightly canted in the groove, and can
kickback. When a cut-off wheel grabs, the
wheel itself usually breaks. When a rotary file,
high-speed cutter or tungsten carbide cutter
grabs, it may jump from the groove and you
could lose control of the tool.
Additional safety instructions for
grinding and cutting-off operations
Safety warnings specific for grinding and
abrasive cutting-off operations:
a) Use only wheel types that are recommended
for your power tool and only for
recommended applications. For example:
do not grind with the side of a cut-off wheel.
Abrasive cut-off wheels are intended for
peripheral grinding, side forces applied to these
wheels may cause them to shatter.
b)
For threaded abrasive cones and plugs
use only undamaged wheel mandrels with
an unrelieved shoulder flange that are of
correct size and length. Proper mandrels will
reduce the possibility of breakage
.
c) Do not “jam” a cut-off wheel or apply
excessive pressure. Do not attempt to make
an excessive depth of cut. Overstressing the
wheel increases the loading and susceptibility to
twisting or snagging of the wheel in the cut and
the possibility of kickback or wheel breakage.
d) Do not position your hand in line with and
behind the rotating wheel. When the wheel,
at the point of operation, is moving away from
your hand, the possible kickback may propel the
spinning wheel and the power tool directly at
you.
e) When wheel is pinched, snagged or when
interrupting a cut for any reason, switch
off the power tool and hold the power tool
motionless until the wheel comes to a
complete stop. Never attempt to remove
the cut-off wheel from the cut while the
wheel is in motion otherwise kickback may
occur. Investigate and take corrective action
to eliminate the cause of wheel pinching or
snagging.
f) Do not restart the cutting operation in the
workpiece. Let the wheel reach full speed
and carefully re-enter the cut. The wheel may
bind, walk up or kickback if the power tool is
restarted in the workpiece.
g) Support panels or any oversized workpiece
to minimize the risk of wheel pinching and
kickback. Large workpieces tend to sag under
their own weight. Supports must be placed
under the workpiece near the line of cut and
near the edge of the workpiece on both sides of
the wheel.
h) Use extra caution when making a “pocket
cut” into existing walls or other blind areas.
The protruding wheel may cut gas or water
pipes, electrical wiring or objects that can
cause kickback.
Additional safety instructions for wire
brushing operations
Safety warnings specific for wire brushing
operations:
a) Be aware that wire bristles are thrown by
the brush even during ordinary operation.
Do not overstress the wires by applying
excessive load to the brush. The wire bristles
can easily penetrate light clothing and/or skin.
b) Allow brushes to run at operating speed
for at least one minute before using them.
During this time no one is to stand in front or
in line with the brush. Loose bristles or wires
will be discharged during the run-in time.

8
EN
c) Direct the discharge of the spinning wire
brush away from you. Small particles and
tiny wire fragments may be discharged at high
velocity during the use of these brushes and
may become imbedded in your skin.
Battery tool use and care
a) Recharge only with the charger specified by
the manufacturer. A charger that is suitable
for one type of battery pack may create a risk of
fire when used with another battery pack.
b) Use power tools only with specifically
designated battery packs. Use of any other
battery packs may create a risk of injury and
fire.
c) When battery pack is not in use, keep it
away from other metal objects, like paper
clips, coins, keys, nails, screws or other
small metal objects, that can make a
connection from one terminal to another.
Shorting the battery terminals together may
cause burns or a fire.
d) Under abusive conditions, liquid may be
ejected from the battery; avoid contact.
If contact accidentally occurs, flush with
water. If liquid contacts eyes, additionally
seek medical help. Liquid ejected from the
battery may cause irritation or burns.
Service
a) Have your power tool serviced by a
qualified repair person using only identical
replacement parts. This will ensure that the
safety of the power tool is maintained.
For the charger
Intended use
Charge only rechargeable battery packs. Other
types of batteries may burst causing personal
injury and damage.
a) The appliance is not to be used by persons
(including children) with reduced physical,
sensory or mental capabilities, or lack of
experience and knowledge, unless they
have been given supervision or instruction
b) Children being supervised not to play with
the appliance
c) Do not recharging non-rechargeable
batteries!
d) During charging, batteries must be placed
in the well ventilated area!
e) Integrated batteries may only be removed
for disposal by qualified personnel. Opening
the housing shell can destroy the power tool.
To remove the battery from the power tool,
press the On/Off switch (5) until the battery
is fully discharged. Unscrew the screws on
the housing and remove the housing shell
in order to remove the battery. To prevent a
short circuit, disconnect the connectors on
the battery one at a time and then isolate the
poles. Even when fully discharged, the battery
still contains a residual capacity, which can be
released in case of a short circuit.
Electrical safety
When using electric machines always observe the
safety regulations applicable in your country to
reduce the risk of fire, electric shock and personal
injury. Read the following safety instructions and
also the enclosed safety instructions.
Always check that the power supply
corresponds to the voltage on the rating
plate.
Your machine is double insulated,
therefore no earthwire is required.
2. MACHINE INFORMATION
Intended use
This power tool is intended to function as a
grinder, sander, wire brush, polisher, carving or
cut-off tool. This combitool is great for editing
of materials like wood, plastic, stone, shell
aluminium, brass and steel. Always use the proper
accessories and speed setting.
Technical specifications
Rechargeable Battery 8V Li-ion 900mAh
Charger CDA1111
Input of charger 100-240V~ 50/60Hz 0.2A
Output of charger 9.0V d.c. 0.5A
Battery charging time 2-3hours
Maximum disc diameter Ø35 mm
No load speed 5.000–25.000/min
Capacity of spring chuck 3.2 mm
Weight 0.26 kg
Lpa (Sound pressure level) 76+3 dB(A)
Lwa (Sound power level) 87+3 dB(A)
Vibration 2.35+1.5 m/s
2

9
EN
Vibration level
The vibration emission level stated in this
instruction manual has been measured in
accordance with a standardised test given in EN
60745; it may be used to compare one tool
with another and as a preliminary assessment of
exposure to vibration when using the tool for the
applications mentioned.
- using the tool for different applications, or with
different or poorly maintainted accessories,
may significantly increase the exposure level.
- the times when the tool is switched off or when
it is running but not actually doing the job, may
significantly reduce the exposure level.
Protect yourself against the effects of vibration by
maintaining the tool and its accessories, keeping
your hands warm, and organizing your work
patterns.
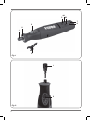
Description
The numbers in the following text refer to the
pictures on page 2-3
1. Collet chuck
2. LED work light
3. Spindle lock
4A. Speed adjustment button “+”
4B. Speed adjustment button “-“
5. On/off button
6. Speed indication lights
7. Charger indication light
8. Chuck spanner
3. ASSEMBLY
Always make sure the machine is turned
off before mounting an accessory.
Warning! Change accessories by
inserting an accessory into the collet (or
chuck) as far possible to minimize run out
and unbalance.
Assembly of accessories
Fig. 2
Press down the spindle lock (3) and hold it down.
Using the chuck spanner (8) you can undo the
collet chuck (1). Put the accessory in its place.
Hold down the spindle lock when you fasten the
collet chuck with the chuck spanner.
Do not press the spindle lock button
while the motor is running.
4. OPERATION
Switch on the machine by pressing the on/off
button (5).
With the speed adjustment button “+”(4A)
or “-“(4B) you can regulate the speed of the
Combitool. Do not put the machine down when
the motor is still running. Do not place the
machine on a dusty surface. Dust particles may
enter the mechanism.
Too high a load at a low speed of the
Combitool can burn out the engine.
The battery must be charged before first use.
Charging the device (with the charger)
• Plug the charger plug into an electrical outlet
and wait for a while. The charger indication
light (7) will lighten up and show the charging
status.
LED Charger status
Red Battery charging in progress
Green Battery charging finished, battery fully charged
• After the battery is fully charged remove the
charger plug from the outlet and remove the
small plug from the device.
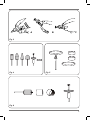
Holding and guiding the tool
Fig. 3
• For precision work (engraving): pencil grip (A)
• For rough work (grinding): paring knife hand
grip (B)
• When you need to keep the tool parallel to the
work surface (e.g. using a cut-off wheel): 2
hand golf grip (C)
Optimal use of the combi tool and its
accessories
Fig. 1
For optimal use of the accessories use the
correct speed. You can refer to the overview

10
EN
“Recommended speed setting” below to determine
the correct speed, based on the material being
worked on and the type of accessory being used.
This overview enables you to select both correct
accessory and the optimum speed.
The 5 speeds indication lights (6) are equal to
the numbers 1, 2, 3, 4 and 5 in the overview
“Recommended speed setting”.
Ultimately, the best way to determine the correct
speed for work on any material is to practice on a
piece of scrap.
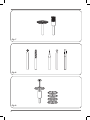
Recommended speed setting
Grinding stones
Fig. 4
Material Speed setting
Stone, shell 1-3
Steel 3-5
Aluminium, brass 2-4
Plastic 1-3
Felt wheels and tip
Fig. 5
The felt wheels or tip should be screwed on the
mandrel.
Material Speed setting
Steel 3-5
Aluminium, brass 2-4
Plastic 3-5
Sanding bands and disc
Fig. 6
Material Speed setting
Wood 4-5
Steel 1-3
Aluminium, brass 2-4
Plastic 1-3
Bristel brush
Fig. 7
Material Speed setting
Stone, shell 2-4
Aluminium, brass 2-4
High speed cutter, Diamond wheel point and
Drill
Fig. 8
Material Speed setting
Stone, shell 5
Steel 2-4
Aluminium, brass 4-5
Plastic 1-3
Abrasive disc
Fig. 9
Material Speed setting
Steel 3-5
Aluminium, brass 2-4
Plastic 1-3
5. MAINTENANCE
Make sure that the machine is not live
when carrying out maintenance work on
the motor.
Keep the ventilation slots of the machine clean to
prevent overheating of the engine. Regularly clean
the machine housing with a soft cloth, preferably
after each use. Keep the ventilation slots free from
dust and dirt. If the dirt does not come off use a
soft cloth moistened with soapy water. Never use
solvents such as petrol, alcohol, ammonia water,
etc. These solvents may damage the plastic parts.
Please clean the tool immediately after use.
ENVIRONMENT
Damaged and/or disposed of electrical
or electronic devices must be dropped
off at recycling stations intended for that
purpose.
Only for EC countries
Do not dispose of power tools into domestic
waste. According to the European Guideline
2012/19/EU for Waste Electrical and Electronic
Equipment and its implementation into national
right, power tools that are no longer usable must
be collected separately and disposed of in an
environmentally friendly way.

11
NL
WARRANTY
Read the warranty conditions on the separately
supplied warranty card.
The product and the user manual are subject
to change. Specifications can be changed
without further notice.
COMBITOOL
CTM1020
Hartelijk dank voor de aanschaf van dit Ferm
product.
Hiermee heeft u een uitstekend product
aangeschaft van één van de toonaangevende
Europese distributeurs.
Alle Ferm producten worden gefabriceerd volgens
de hoogste prestatie- en veiligheidsnormen. Deel
van onze filosofie is de uitstekende klantenservice
die wordt ondersteund door onze uitgebreide
garantie. Wij hopen dat u vele jaren naar
tevredenheid gebruik zult maken van dit product.
1. VEILIGHEIDSVOORSCHRIFTEN
Lees de bijgesloten veiligheids waar-
schuw ingen, de aanvullende
veiligheids waar schuwingen en de
instructies. Het niet opvolgen van de veiligheids-
waar schuw ingen kan elektrische schokken, brand
en/of ernstig letsel tot gevolg hebben. Bewaar de
veiligheids waarschuwingen en instructies als
naslagwerk voor later.
De volgende symbolen worden gebruikt in de
gebruikershandleiding of op het product:
Gevaar voor lichamelijk letsel, overlijden
of schade aan de machine wanneer de
instructies in deze handleiding niet
worden opgevolgd.
Gevaar voor elektrische schokken
Het toerental van de machine kan
elektronisch worden ingesteld.
Alleen binnenshuis gebruiken
Draag oog- en gehoorbescherming
Draag bij gebruik van deze machine een
stofmasker.

12
NL
Druk de asvergrendelingsknop niet in
terwijl de motor draait.
Klasse II apparaat - Dubbel geïsoleerd -
Een geaarde stekker is niet noodzakelijk.
Max. temperatuur 40°C
Accu niet verbranden
Accu niet in het water gooien
Werp het product niet weg in
ongeschikte containers.
Aparte inzameling van Li-ion-accu’s.
Het product is in overeenstemming met
de van toepassing zijnde veiligheids-
normen in de Europese richtlijnen.
Speciale veiligheidsinstructies
a) Dit elektrisch gereedschap is bedoeld
voor gebruik als slijper, schuurmachine,
staalborstel, polijstmachine, snijd
of afkortgereedschap. Lees alle
veiligheidswaarschuwingen, instructies,
afbeeldingen en specificaties die met dit
elektrisch gereedschap zijn meegeleverd.
Het niet navolgen van alle onderstaande
instructies kan resulteren in een elektrische
schok, brand en/of ernstig letsel.
c) Gebruik geen accessoires die niet speciaal
door de fabrikant zijn ontwikkeld en door
de fabrikant worden aanbevolen. Zelfs
als het accessoire op het gereedschap past
garandeert dit geen veilig gebruik.
d) Het nominale toerental van de accessoires
moet gelijk of hoger zijn aan het maximale
toerental dat op het elektrisch gereedschap
wordt aangegeven. Slijp accessoires die
sneller draaien dan hun nominale toerental
kunnen breken en uit elkaar vliegen.
e) De buitendiameter en de dikte van uw
accessoire moet binnen de capaciteit
van
uw elektrisch gereedschap vallen. Accessoires
met een verkeerde maat kunnen niet goed onder
controle worden gehouden.
f) Het asgat van schijven, schuurtrommels of
andere accessoires moet goed op de as of
hals van het elektrische gereedschap passen.
Accessoires die niet goed op het gereedschap
passen draaien uit balans, trillen hard en kunnen
u de controle over het gereedschap laten
verliezen.
g) Borstels, schuurtrommels, slijpschijven of
andere accessoires moeten volledig in de
kraag of spankop worden geduwd. Als de
stift niet goed vastzit en/of het accessoire te ver
uitsteekt, kan het geplaatste accessoire losgaan
en met hoge snelheid worden weggeslingerd.
h) Gebruik geen beschadigde accessoires.
Controleer accessoires zoals
slijpschijven voor elk gebruik altijd
eerst op beschadigingen en scheuren,
schuurtrommels op scheuren of slijtage,
draadborstels op losse of gebroken draden.
Als u het elektrische gereedschap of een
accessoire laat vallen, controleer deze dan
op schade of plaats een onbeschadigde
accessoire. Positioneer uzelf na het
inspecteren en plaatsen van een accessoire
zo dat u en omstanders niet op één
lijn met de draairichting staan van het
draaiende accessoire en laat het elektrische
gereedschap één minuut onbelast draaien.
Beschadigde accessoires zullen normaal
gesproken afbreken tijdens deze testperiode.
i) Draag persoonlijke beschermingsmiddelen.
Gebruik afhankelijk van de situatie
gezichtsbescherming, werkbril of
veiligheidsbril. Gebruik wanneer nodig
een stofmasker, gehoorbescherming,
handschoenen en een veiligheidsschort
die kleine stukken accessoire of werkstuk
kunnen stoppen. De veiligheidsbril moet kleine
stukken puin die door diverse werkzaamheden
worden veroorzaakt kunnen tegenhouden.
Het stof- of gasmasker moet geschikt zijn
voor het filteren van de deeltjes die door
uw werkzaamheden worden veroorzaakt.
Langdurige blootstelling aan harde geluiden kan
gehoorverlies veroorzaken.
j) Houd omstanders op een veilige afstand
van het werkgebied. Iedereen die het
werkgebied betreed moet persoonlijke

13
NL
beschermingsmiddelen dragen. Delen van
het werkstuk of een gebroken accessoire
kunnen wegvliegen en letsel veroorzaken
buiten het werkgebied.
k) Houd het elektrische gereedschap vast
aan de geïsoleerde oppervlakken wanneer
u werkzaamheden uitvoert waardoor het
accessoire in contact kan komen met
verborgen bedrading. Accessoires die
bedrading onder spanning raken kunnen
het gereedschap onder stroom zetten en de
gebruiker een elektrische schok geven.
l) Houd het gereedschap altijd stevig in
uw hand(en) tijdens het inschakelen.
De koppelreactie van de motor, als het
versnelt naar de maximale snelheid, kan het
gereedschap laten draaien.
m) Gebruik wanneer mogelijk klemmen om
het werkstuk te ondersteunen. Houd een
klein werkstuk nooit in één hand terwijl
u het gereedschap met de andere hand
gebruikt. Als u een klein werkstuk klemt kunt
u het gereedschap met uw hand(en) bedienen.
Ronde materialen zoals staven, buizen of
slangen kunnen tijdens het snijden wegrollen
en ervoor zorgen dat het accessoire vastbijt of
richting u springt.
n) Plaats het snoer uit de buurt van het
draaiende accessoire. Als u de controle
over het gereedschap verliest kan het snoer
beschadigen of worden gegrepen en kan uw
hand of arm in de richting van het draaiende
accessoire worden getrokken.
o) Leg het gereedschap nooit neer voordat
het accessoire helemaal tot stilstand is
gekomen. Het draaiende accessoire kan zich
vastbijten in het oppervlak en het gereedschap
uit uw handen trekken.
p) Controleer nadat u een accessoire
wisselt of aanpassingen maakt altijd of de
spanmoer, spankop en verstelmechanismen
goed vastzitten. Losse verstelmechanismen
kunnen onverwacht verschuiven, waardoor u
de controle kunt verliezen. Losse draaiende
componenten kunnen hard weg worden
geslingerd.
q) Zet het gereedschap nooit aan terwijl u het
naast uw lichaam houd. Onopzettelijk contact
met het draaiende accessoire kan uw kleding
grijpen, waardoor het accessoire in uw lichaam
kan snijden.
r) Reinig regelmatig de luchtopeningen van
het gereedschap. De ventilator van de motor
zuigt stof in de behuizing en opgehoopt
metaalpoeder kan een gevaarlijke elektrische
schok veroorzaken.
s) Gebruik het gereedschap nooit in de buurt
van ontvlambare materialen. Vonken kunnen
deze materialen ontsteken.
t) Gebruik geen accessoires die vloeibare
koelvloeistof nodig hebben. Het gebruik van
water of andere vloeistoffen kan elektrocutie of
een elektrische schok veroorzaken.
Terugslag en bijbehorende waarschuwingen
Terugslag is een plotselinge reactie op
een vastgelopen of vastgebeten slijpschijf,
schuurband, borstel of ander accessoire.
Vastlopen of vastbijten zorgt ervoor dat
het draaiende accessoire snel stopt met
draaien waardoor het gereedschap in de
tegenovergestelde richting van de draairichting
van het accessoire wordt geforceerd.
Bijvoorbeeld, als een slijpschijf vastloopt of zich
in het werkstuk vastbijt, zal de rand van de schijf
zich in het materiaal vastbijten en daarna naar
boven klimmen of uit het werkstuk schieten.
De schijf kan zowel van als naar de gebruiker
schieten, afhankelijk van de draairichting van de
schijf tijdens het vastlopen. Slijpschijven kunnen
ook breken.
Terugslag is het resultaat van verkeerde
handelingen en/of onjuist gebruik van het
gereedschap, of situaties die kunnen worden
voorkomen door onderstaande maatregelen tot
nemen.
a) Houd het elektrische gereedschap stevig
vast en positioneer uw lichaam en armen zo
dat u terugslag kunt weerstaan. De gebruiker
kan terugslag onder controle houden als de
juiste voorzorgsmaatregelen worden genomen.
b) Let extra goed op tijdens het werken aan
hoeken, scherpe randen etc. Voorkom
stuiteren en vastlopen van het accessoire.
Hoeken, scherpe randen of stuiteren hebben
de neigen het accessoire vast te laten lopen
waardoor u de controle kunt verliezen of er
terugslag optreed.
c) Bevestig nooit een getand zaagblad. Deze
zaagbladen veroorzaken regelmatig terugslag
of controleverlies.

14
NL
d)
Voer het accessoire altijd op dezelfde
manier in zoals deze uit het materiaal is
gekomen (dezelfde richting als het gruis dat
wordt weggeslingerd). Als het gereedschap
op de verkeerde manier wordt ingevoerd klimt
het accessoire uit het werkstuk en trekt het
gereedschap dezelfde kant op.
e)
Als u roterende vijlen, slijpschijven,
hogesnelheid schijven of hardmetalen
schijven gebruikt, klem het werkstuk dan
altijd goed vast. Deze accessoires lopen vast
als ze licht gekanteld worden in de zaagsnede
en kunnen terugslag veroorzaken. Als een
slijpschijf vastloopt, zal deze normaal gesproken
breken. Als een roterende vijl, hoge snelheid
slijpschijf of hardmetalen schijf vastloopt, kan
het uit de zaagsnede schieten waardoor u de
controle over het gereedschap kunt verliezen.
Extra veiligheidsinstructies voor
slijpen en afkorten
Veiligheidswaarschuwingen specifiek voor
slijpen en afkorten:
a) Gebruik alleen schijven die worden
aanbevolen voor uw elektrisch gereedschap
en voor de aanbevolen toepassingen.
Bijvoorbeeld: niet schuren met de zijkant
van een slijpschijf. Slijpschijven zijn bedoeld
voor slijpwerkzaamheden, als druk op de zijkant
wordt uitgeoefend kunnen ze breken.
b) Gebruik voor stiftfreezen en pluggen alleen
onbeschadigde stiften met een flens van
de juiste maat en lengte. De juiste stift
verminderd de kans dat de schijf breekt.
c) Forceer een slijpschijf nooit in het werkstuk
en druk er niet hard op. Probeer nooit
een extra diepe zaagsnede te maken.
Overbelasting van de schijf verhoogt de kans
op vastlopen of vasthaken in de zaagsnede en
verhoogt de kans op terugslag of het breken
van de schijf.
d) Plaats uw hand nooit op één lijn en achter
de draaiende schijf. Als de schijf tijdens
gebruik van uw hand af beweegt, kan
de terugslag de draaiende schijf en het
gereedschap richting u duwen.
e) Als de schijf vastloopt, vasthaakt of wanneer
u het slijpen moet onderbreken, schakel
het gereedschap dan uit en houd het
gereedschap vast tot het accessoire volledig
tot stilstand is gekomen. Probeer de schijf
nooit uit het werkstuk te halen als het nog
beweegt, anders kan er terugslag optreden.
Onderzoek waarom de schijf vastloopt en verhelp
de oorzaak zodat het niet meer kan gebeuren.
f) Start de werkzaamheden nooit in het
werkstuk. Laat de schijf eerst de maximale
snelheid bereiken en voer hem daarna
weer voorzichtig in de zaagsnede. De schijf
kan vastlopen, uit het werkstuk schieten, of
terugslag veroorzaken als het gereedschap in
het werkstuk wordt gestart.
g) Ondersteun panelen of grote werkstukken
om het risico op vastlopen en terugslag te
verkleinen. Grote werkstukken kunnen door
hun eigen gewicht inzakken. Steunen moeten
onder het werkstuk worden geplaatst bij de
zaagsnede en de rand van het werkstuk aan
beide kanten van de schijf.
h) Wees extra voorzichtig wanneer u een
zaagsnede maakt in muren of andere blinde
gebieden. De schijf kan gas- of waterleidingen,
elektrische bedrading of objecten die terugslag
veroorzaken raken.
Aanvullende veiligheidsinstructies voor
werkzaamheden met draadborstel
Waarschuwingen in verband met de veiligheid,
speciaal voor werkzaamheden met draadborstel:
a) Bedenk dat haren van de borstel worden
weggeslingerd, ook tijden normale
toepassing. Zet niet te veel kracht op de
draden, oefen niet te veel kracht uit op
de borstel. De haren van de borstel kunnen
gemakkelijk dunne kleding en/of de huid
binnendringen.
b) Laat borstels gedurende ten minste één
minuut op bedrijfssnelheid draaien voordat
u ze gebruikt. Gedurende deze tijd mag
niemand voor of op één lijn met de borstel
staan. Er zullen gedurende de inlooptijd
borstelharen worden weggeslingerd.
c) Richt de draadborstel van u af zodat losse
haren niet naar u toe worden geslingerd.
Kleine deeltjes en minuscule fragmenten van
haren kunnen tijdens het gebruik van deze
borstels op hoge snelheid worden weggeslingerd
en zij kunnen zich in uw huid vastzetten.
Gebruik en onderhoud accugereedschap
a) Uitsluitend herladen met de door de
fabrikant opgegeven acculader. Een

15
NL
acculader die voor een bepaald type accupack
geschikt is kan brandgevaar opleveren wanneer
deze wordt gebruikt met een ander accupack.
b) Gebruik powertools uitsluitend met speciaal
daarvoor bestemde accupacks. Het gebruik
van andere accupacks kan gevaar voor letsel
en brand opleveren.
c) Houd, wanneer u het accupack niet
gebruikt, dit uit de buurt van andere metalen
voorwerpen, zoals paperclips, muntstukken,
sleutels, spijkers, schroeven of andere
kleine metalen voorwerpen, die voor
verbinding kunnen zorgen tussen de twee
accupolen. Kortsluiting tussen de accupolen
kan brandplekken of brand veroorzaken.
d) Bij onjuist gebruik kan er vloeistof uit de
accu komen; vermijd het contact hiermee.
Spoel de plek met water in het geval dat u toch
per ongeluk ermee in aanraking komt. Roep
tevens medische hulp in wanneer de vloeistof
in contact komt met uw ogen. Vloeistof uit de
accu kan irritatie of brandwonden veroorzaken.
Service
a)
Laat de powertools onderhouden door een
erkende reparateur die uitsluitend gebruik
maakt van identieke vervangingsonderdelen.
Dit zorgt ervoor dat de veiligheid van de
powertool intact blijft.
Ten aanzien van de acculader
Bedoeld gebruik
Laad uitsluitend herlaadbare accupacks. Andere
typen accu’s kunnen exploderen, wat lichamelijk
letsel en schade kan veroorzaken.
a) Het apparaat dient niet te worden gebruikt
door personen (inclusief kinderen) met
verminderde fysieke, zintuiglijke of mentale
functies of personen zonder enige ervaring
en kennis, tenzij zij onder toezicht staan of
zijn geïnstrueerd
b) Laat kinderen onder toezicht niet met het
apparaat spelen
c) Laad niet-herlaadbare accu’s niet opnieuw
op!
d) Plaats de accu’s tijdens het opladen in een
goed geventileerde ruimte!
e) Geïntegreerde accu’s mogen alleen
voor het afvoeren door vakpersoneel
verwijderd worden. Door het openen van
de behuizingsschaal kan het elektrische
gereedschap vernietigd worden. Om de accu
uit het elektrische gereedschap te nemen,
drukt u zo lang op de aan-/uitschakelaar
(5) tot de accu volledig ontladen is. Draai
de schroeven er aan de behuizing uit en
haal de behuizingsschaal eraf om de accu
te verwijderen. Om een kortsluiting te
verhinderen, maakt u de aansluitingen aan de
accu afzonderlijk na elkaar los en isoleert u
daarna de polen. Ook bij volledige ontlading is
nog een restcapaciteit in de accu voorhanden
die bij kortsluiting vrij kan komen.
Elektrische veiligheid
Neem bij het gebruik van elektrische
machines altijd de plaatselijk geldende
veiligheidsvoorschriften in acht in verband met
brandgevaar, gevaar voor elektrische schokken
en lichamelijk letsel. Lees behalve onderstaande
instructies ook de veiligheids-voorschriften in
het apart bijgevoegde veiligheids-katern door.
Bewaar de instructies zorgvuldig!
Controleer altijd of uw netspanning
overeenkomt met de waarde op het
typeplaatje.
Klasse II apparaat - Dubbel geïsoleerd -
een geaarde stekker is niet noodzakelijk.
2. TECHNISCHE INFORMATIE
Bedoeld gebruik
Dit elektrisch gereedschap is bedoeld voor
gebruik als slijper, schuurmachine, staalborstel,
polijstmachine, snij- of afkortgereedschap. Dit
combigereedschap is zeer goed geschikt voor het
bewerken van materialen zoals hout, kunststof,
natuursteen, aluminium, koper en staal. Gebruik
altijd de juiste accessoires en instelling van de
snelheid.
Technische specificaties
Herlaadbare accu 8V Li-ion 900mAh
Lader CDA1111
Ingangsspanning 100-240V~ 50/60Hz 0.2A
Uitgangsspanning 9.0V d.c. 0.5A
Accu laadtijd 2-3hours
Maximale schijfdiameter Ø35 mm
Toerental, onbelast 5.000–25.000/min
Capaciteit, spantang 3.2 mm

16
NL
Gewicht 0.26 kg
Lpa (geluidsdruk) 76+3 dB(A)
Lwa (geluidsvermogen) 87+3 dB(A)
Vibratiewaarde 2.35+1.5 m/s
2
Trillingsniveau
Het trillingsemissieniveau, dat in deze gebruiks-
aanwijzing wordt vermeld, is gemeten in
overeenstemming met een gestandaardiseerde
test volgens EN 60745; deze mag worden
gebruikt om twee machines met elkaar te
vergelijken en als voorlopige beoordeling van
de blootstelling aan trilling bij gebruik van de
machine voor de vermelde toepassingen.
- gebruik van de machine voor andere
toepassingen, of met andere of slecht
onderhouden accessoires, kan het
blootstellingsniveau aanzienlijk verhogen.
- wanneer de machine is uitgeschakeld of
wanneer deze loopt maar geen werk verricht,
kan dit het blootstellingsniveau aanzienlijk
reduceren.
Bescherm uzelf tegen de gevolgen van trilling door
de machine en de accessoires te onderhouden,
uw handen warm te houden en uw werkwijze te
organiseren.
Beschrijving
De nummers in de tekst verwijzen naar de
illustraties op pagina 2-3
1. Spankop
2. LED-werklicht
3. Asvergrendeling
4A. Knop voor snelheidsregeling “+”
4B. Knop voor snelheidsregeling “-”
5. Aan/Uit-knop
6. Lampjes voor snelheidsaanduiding
7. Lampje voor laadaanduiding
8. Spankopsleutel
3. MONTAGE
Schakel vooral altijd eerst de machine uit
voordat u een accessoire monteert.
Waarschuwing! Plaats accessoire zo ver
mogelijk in de spantang of spankop,
zodat uitloop en onbalans tot een
minimum beperkt worden.
Montage van accessoires
Fig. 2
Druk de asvergrendeling (3) omlaag en houd die
omlaag gedrukt. Met de spankopsleutel (8) kunt
u de spankop (1) losmaken. Plaats het accessoire
in de kop. Houd de asvergrendeling omlaag
gedrukt wanneer u de spankop vastzet met de
spankopsleutel.
Druk de asvergrendelingsknop niet in
terwijl de motor draait.
4. BEDIENING
Schakel de machine in met een druk op de Aan/
Uit-knop (5).
Met de knop voor de snelheidsregeling “+”(4A)
of “-“(4B) kunt u de snelheid van het Combitool
regelen. Zet de machine pas weg wanneer de
motor volledig is uitgedraaid. Zet de machine
niet weg op een stoffige ondergrond. Stofdeeltjes
kunnen het mechaniek binnen dringen.
Een te hoge belasting bij een lage
snelheid van de Combitool kan de motor
laten verbranden.
De accu moet vóór het eerste gebruik volledig
worden opgeladen.
De accu laden (met de acculader)
• Steek de stekker van de acculader in
een stopcontact en wacht even. Het
ledcontrolelampje gaat branden en toont de
status van de lader.
Led Status van acculader
Rood Bezig met opladen van accu
Groen Opladen van de accu is beëindigd,
de accu is volledig opgeladen
• Verwijder nadat de accu volledig is opgeladen,
de stekker van de lader uit het stopcontact en
haal de kleine stekker uit het gereedschap weg.
Het gereedschap vasthouden en leiden
Afb. 3
• Voor precisiewerk (graveren): potloodgreep (A)
• Voor ruw werk (schuren): schilmesgreep (B)

17
NL
• Wanneer u het gereedschap parallel ten
opzichte van het werkoppervlak moeten
houden (bijv. wanneer u een snijwiel gebruikt):
golfgreep (C) met twee handen
Optimaal gebruik van het combigereedschap
en zijn accessoires
Afb. 1
Voor optimaal gebruik van de accessoires is het
belangrijk dat u de juiste snelheid toepast. U kunt
het overzicht “Aanbevolen snelheidsinstelling”
hieronder raadplegen voor de juiste snelheid,
op basis van het materiaal dat wordt bewerkt en
het type accessoire dat wordt gebruikt. Aan de
hand van het overzicht kunt u zowel het juiste
accessoire als de optimale snelheid selecteren.
De 5 indicatielampje (6) voor de snelheid zijn gelijk
aan de nummers 1, 2, 3, 4 en 5 in het overzich
“aanbevolen de instelling van de snelheid”.
Uiteindelijk is de beste manier om de juiste
snelheid voor het werk aan een materiaal te
bepalen uitproberen op een stukje afvalmateriaal.
Aanbevolen instelling van de snelheid
Slijpstenen
Fig. 4
Materiaal Snelheid
Steen, gips 1-3
Staal 3-5
Aluminium, messing 2-4
Kunststof 1-3
Vilten schijven en tips
Fig. 5
De vilten accesoires dienen op de bijgeleverde as
te worden gemonteerd.
Materiaal Snelheid
Staal 3-5
Aluminium, messing 2-4
Kunststof 3-5
Schuurbanden en -schijven
Fig. 6
Materiaal Snelheid
Hout 4-5
Staal 1-3
Aluminium, messing 2-4
Kunststof 1-3
Borstel
Fig. 7
Materiaal Snelheid
Steen, gips 2-4
Aluminium, messing 2-4
HSS freesje, graveerpunt en boortje
Fig. 8
Materiaal Snelheid
Steen, gips 5
Staal 2-4
Aluminium, messing 4-5
Kunststof 1-3
Doorslijpschijf
Fig. 9
Materiaal Snelheid
Staal 3-5
Aluminium, messing 2-4
Kunststof 1-3
5. ONDERHOUD
Zorg dat de machine niet onder spanning
staat wanneer onderhouds werk zaam
heden aan het mechaniek worden
uitgevoerd.
Reinig de machinebehuizing regelmatig met een
zachte doek, bij voorkeur iedere keer na gebruik.
Zorg dat de ventilatiesleuven vrij van stof en
vuil zijn. Gebruik bij hardnekkig vuil een zachte
doek bevochtigd met zeepwater. Gebruik geen
oplosmiddelen als benzine, alcohol, ammonia,
etc. Dergelijke stoffen beschadigen de kunststof
onderdelen.
MILIEU
Defecte en/of afgedankte elektrische of
elektronische gereedschappen dienen
ter verwerking te worden aangeboden
aan een daarvoor verantwoordelijke
instantie.
Uitsluitend voor EG-landen
Werp elektrisch gereedschap niet weg bij het
huisvuil. Volgens de Europese Richtlijn 2012/19/
EU voor Afgedankte Elektrische en Elektronische

18
FR
Apparatuur en de implementatie ervan in
nationaal recht moet niet langer te gebruiken
elektrisch gereedschap gescheiden worden
verzameld en op een milieuvriendelijke wijze
worden verwerkt.
GARANTIE
Lees voor de garantievoorwaarden de apart
bijgevoegde garantiekaart.
Het product en de gebruikershandleiding zijn
onderhevig aan wijzigingen. Specificaties
kunnen zonder opgaaf van redenen worden
gewijzigd.
MULTITOUR ÉLECTRIQUE
CTM1020
Merci pour votre achat de ce produit Ferm.
Vous disposez maintenant d’un excellent produit,
proposé par l’un des principaux fabricants
européens. Tous les produits que vous fournit
Ferm sont fabriqués selon les normes les plus
exigeantes en matière de performances et
de sécurité. Complété par notre garantie très
complète, l’excellence de notre service clientèle
forme également partie intégrante de notre
philosophie. Nous espérons que vous profiterez
longtemps de ce produit.
1. SPECIFICATIONS TECHNIQUES
En plus des avertissements de sécurité
suivants, veuillez également lire les
avertissements de sécurité additionnels
ainsi que les instructions. Le non-respect des
avertissements de sécurité et des instructions peut
entraîner une décharge électrique, un incendie et/
ou des blessures graves. Veuillez conserver les
avertissements de sécurité et les instructions
pour consultation ultérieure.
Les symboles suivants sont utilisés dans le
manuel d’utilisation ou apposés sur le produit:
Signale un risque de blessures, un danger
mortel ou un risque d’endommagement
de l’outil en cas de non-respect des
instructions de ce manuel.
Risque de choc électrique
Le nombre de rotations de la machine
peut être réglé électroniquement.
Utilisation à l’intérieur uniquement
Portez une protection auditive et des
accessoires de protection pour les yeux.
Portez un masque anti-poussière.

19
FR
N’appuyez pas sur le bouton de blocage
de l’axe lorsque le moteur fonctionne.
Machine de classe II - Double isolation -
Vous n’avez pas besoin de prise avec
mise à la terre.
Température max. 40°C
Ne jetez pas la batterie au feu
Ne jetez pas la batterie dans l’eau
Ne jetez pas le produit dans des
conteneurs qui ne sont pas prévus à cet
effet.
La batterie Li-ion fait l’objet d’une
collecte séparée.
Le produit est conforme aux normes de
sécurité en vigueur spécifiées dans les
directives européennes.
Consignes de securite speciales
a) Cet outil électrique a été conçu pour
le meulage, le ponçage, le brossage
métallique, le sculptage ou le tronçonnage.
Merci de lire tous les avertissements,
toutes les instructions, illustrations et
spécifications fournis avec cet outil
électrique. Le non-respect de toutes les
instructions mentionnées ci-dessous peut
conduire à des chocs électriques, des
incendies et/ou de graves blessures.
c) N’utilisez aucun accessoire qui ne soit pas
spécifiquement conçu et recommandé par
le fabricant de l’outil. Le fait que l’accessoire
puisse être installé sur votre outil électrique, ne
garantit pas la sûreté de son fonctionnement.
d) La vitesse nominale des accessoires
de meulage doit être au moins égale à
la vitesse maximum indiquée sur l’outil
électrique. Les accessoires de meulage
tournant plus vite que leur vitesse nominale
peuvent se briser et voler en éclat.
e) Le diamètre extérieur et l’épaisseur de
votre accessoire doivent correspondre à la
capacité nominale de votre outil électrique.
Des accessoires mal dimensionnés ne peuvent
être correctement contrôlés.
f) La taille de l’arbre ou du trou d’insertion
des disques, rouleaux à poncer et de tous
les autres accessoires doit parfaitement
correspondre à l’axe ou à la douille de
serrage de votre outil électrique. Les
accessoires mal adaptés au dispositif de
fixation de l’outil électrique tournent de façon
déséquilibrée, ils vibrent de façon excessive et
peuvent provoquer la perte de contrôle de l’outil.
g) Les disques, rouleaux de ponçage,
couteaux ou autres accessoires à monter
sur mandrin doivent être complètement
insérés dans la douille de serrage ou
dans le mandrin. Si le mandrin n’est pas
suffisamment tenu et/ ou si le surplomb du
disque est trop long, le disque installé peut se
détacher et être éjecté à grande vitesse.
h) N’utilisez pas d’accessoires endommagés.
Avant chaque utilisation, inspectez
l’accessoire, contrôlez par exemple,
l’absence de copeaux ou de fissures sur les
disques abrasifs, l’absence de fissures, de
déchirures ou de traces d’usure excessive
sur les rouleaux de ponçage et l’absence
de fils manquants ou brisés sur les brosses
métalliques. Si l’outil électrique ou son
accessoire chute, contrôlez l’absence de
dommages ou installez un accessoire en
parfait état. Après avoir inspecté et installé un
accessoire, éloignez-vous et les personnes
alentours du plan de l’accessoire rotatif et
faites tournez l’outil à sa puissance maximum
à vide pendant une minute. C’est généralement
durant ce délai de test que les accessoires
endommagés se brisent.
i)
Portez des équipements de protection
individuelle. En fonction de l’opération à
effectuer, utilisez un écran facial, ou des
lunettes de protection. Selon les cas, portez
un masque anti-poussières, des protections
auditives, des gants et un tablier d’atelier,
capables de stopper les petits fragments
abrasifs ou les débris de la pièce travaillée.
La protection oculaire doit être capable de
stopper les débris volants générés par les
diverses opérations. Le masque antipoussières

20
FR
ou le respirateur doit être capable de filtrer les
particules générées par votre intervention. Une
exposition prolongée à un bruit intense peut
provoquer la perte de l’ouïe.
j) Maintenez les personnes alentours à une
distance sûre de la zone de travail. Toute
personne pénétrant dans la zone de travail
doit porter des équipements de protection
individuelle. Les fragments provenant de
la pièce travaillée ou d’un accessoire brisé
peuvent voler et provoquer des blessures au
delà de la zone d’intervention immédiate.
k) Tenez l’outil électrique par ses surfaces de
préhension isolées lorsque vous réalisez
une opération pendant laquelle l’accessoire
de coupe peut entrer en contact avec des
fils cachés. Un accessoire de coupe entrant
en contact avec un fil sous tension peut mettre
les parties métalliques exposées de l’outil sous
tension et provoquer un choc électrique à
l’utilisateur.
l) Tenez toujours l’outil fermement dans votre/
vos main(s) au moment du démarrage. Le
couple de réaction du moteur, au moment de
l’accélération pour atteindre son plein régime,
peut provoquer la torsion de l’outil.
m) Utilisez autant que possible des pinces pour
soutenir la pièce à travailler. Ne tenez jamais
les petites pièces dans une main avec l’outil
en marche dans l’autre. La fixation des petites
pièces vous permet d’utiliser vos mains pour
contrôler l’outil. Les pièces rondes comme les
chevilles en bois, les tuyaux ou les tubes ont
tendance à rouler pendant leur découpe et
l’embout peut alors se coincer ou être dirigé
vers vous.
n) Éloignez le cordon de l’accessoire en
rotation. Si vous perdez le contrôle, le cordon
peut être sectionné ou arraché et entraîner
votre main ou votre bras vers l’accessoire en
rotation.
o) Ne posez jamais l’outil électrique avant que
l’ accessoire ne soit complètement arrêté.
L’accessoire en rotation pourrait toucher la
surface et l’outil deviendrait incontrôlable.
p) Après avoir changé d’embout ou procéder
à un réglage, assurez-vous que l’écrou de
serrage, le mandrin ou les autres dispositifs
de réglage sont correctement serrés. Des
dispositifs mal fixés peuvent brusquement se
décaler et provoquer une perte de contrôle
projetant violemment les composants en
rotation.
q) Ne mettez pas l’outil électrique en marche
alors que vous le tenez sur votre flanc.
Tout contact accidentel avec l’accessoire en
rotation pourrait accrocher vos vêtements et
attirer l’accessoire vers votre corps. Nettoyez
régulièrement les fentes d’aération de l’outil
électrique. Le ventilateur du moteur entraîne la
poussière à l’intérieur du corps de l’outil et une
accumulation excessive de poussière de métal
peut engendrer un risque électrique.
s) Ne faites pas fonctionner l’outil électrique
près de matières inflammables. Les étincelles
pourraient enflammer ces matières.
t) N’utilisez pas d’accessoires nécessitant
des fluides réfrigérants. L’utilisation d’eau ou
d’autre liquide de refroidissement peut conduire
à une électrocution ou à un choc électrique.
Rebonds et avertissements associés
Un rebond est une réaction soudaine au
pincement ou au coincement d’un disque en
rotation, d’une bande de ponçage, d’une brosse
ou de toute autre accessoire. Le pincement ou
le coincement provoquent le calage soudain de
l’accessoire en rotation, ce qui entraîne ensuite
l’outil incontrôlable dans une direction opposée
au sens de rotation de l’accessoire.
Par exemple, si un disque abrasif est accroché
ou pincé par une pièce, le bord du disque
entrant dans le point de pincement peut creuser
la surface de la matière et provoquer la sortie
ou le rebond du disque. Le disque peut alors
sauter dans la direction de l’utilisateur ou dans la
direction opposée, selon le sens de déplacement
du disque au moment du pincement. Les disques
abrasifs peuvent également éclater dans ces
circonstances.
Le rebond est le résultat d’une mauvaise
utilisation de l’outil électrique et/ou de procédures
ou de conditions de fonctionnement incorrectes
et il peut être évité en prenant les précautions
adéquates, indiquées ci-dessous.
a) Tenez l’outil fermement et placez votre
corps et votre bras de façon à vous
permettre de résister à la force d’un rebond.
L’utilisateur peut contrôler la force d’un rebond
en prenant les précautions nécessaires.
b) Soyez particulièrement vigilant lorsque
vous intervenez dans des coins, sur des
La pagina si sta caricando...
La pagina si sta caricando...
La pagina si sta caricando...
La pagina si sta caricando...
La pagina si sta caricando...
La pagina si sta caricando...
La pagina si sta caricando...
La pagina si sta caricando...
La pagina si sta caricando...
La pagina si sta caricando...
La pagina si sta caricando...
La pagina si sta caricando...
La pagina si sta caricando...
La pagina si sta caricando...
La pagina si sta caricando...
La pagina si sta caricando...
La pagina si sta caricando...
La pagina si sta caricando...
La pagina si sta caricando...
La pagina si sta caricando...
La pagina si sta caricando...
La pagina si sta caricando...
La pagina si sta caricando...
La pagina si sta caricando...
La pagina si sta caricando...
La pagina si sta caricando...
La pagina si sta caricando...
La pagina si sta caricando...
La pagina si sta caricando...
La pagina si sta caricando...
La pagina si sta caricando...
La pagina si sta caricando...
La pagina si sta caricando...
La pagina si sta caricando...
La pagina si sta caricando...
La pagina si sta caricando...
La pagina si sta caricando...
La pagina si sta caricando...
La pagina si sta caricando...
La pagina si sta caricando...
La pagina si sta caricando...
La pagina si sta caricando...
La pagina si sta caricando...
La pagina si sta caricando...
-
 1
1
-
 2
2
-
 3
3
-
 4
4
-
 5
5
-
 6
6
-
 7
7
-
 8
8
-
 9
9
-
 10
10
-
 11
11
-
 12
12
-
 13
13
-
 14
14
-
 15
15
-
 16
16
-
 17
17
-
 18
18
-
 19
19
-
 20
20
-
 21
21
-
 22
22
-
 23
23
-
 24
24
-
 25
25
-
 26
26
-
 27
27
-
 28
28
-
 29
29
-
 30
30
-
 31
31
-
 32
32
-
 33
33
-
 34
34
-
 35
35
-
 36
36
-
 37
37
-
 38
38
-
 39
39
-
 40
40
-
 41
41
-
 42
42
-
 43
43
-
 44
44
-
 45
45
-
 46
46
-
 47
47
-
 48
48
-
 49
49
-
 50
50
-
 51
51
-
 52
52
-
 53
53
-
 54
54
-
 55
55
-
 56
56
-
 57
57
-
 58
58
-
 59
59
-
 60
60
-
 61
61
-
 62
62
-
 63
63
-
 64
64


in altre lingue
- français: Ferm CTM1020 Manuel utilisateur
- Deutsch: Ferm CTM1020 Benutzerhandbuch
- Nederlands: Ferm CTM1020 Handleiding
- slovenčina: Ferm CTM1020 Používateľská príručka
- polski: Ferm CTM1020 Instrukcja obsługi
Documenti correlati
Altri documenti
-
Hitachi GP 2S2 Handling Instructions Manual
-
Vonroc CT503DC Manuale utente
-
-
Dremel 4200 specificazione
-
Dremel 3000 Operating/s Original Instructions Manual
-
-
-
Parkside PMGS 12 C3 Operation and Safety Notes
-
Makita DGA452 Manuale del proprietario
-
Metabo G 400 Istruzioni per l'uso