
Thank you for purchasing the Wireless Bridge BR-500AC
BR-500AC is the wireless bridge which can add a wireless feature to non-wireless devices
(10/100/1000BASE-T network devices). With 2.4GHz / 5GHz band support, non-wireless devices
can easily be connected to a wireless network. Enterprise security feature will ensure safe and
secure use of wireless communication at an oce, factory, etc. where a higher security is
required.
This Setup Guide explains how to setup and use BR-500AC in a wireless network.
Wireless Bridge BR-500AC
Setup Guide
Following items are bundled with BR-500AC.
Package Contents
Connect the AC adapter to BR-500AC, and the AC adapter's plug to an
electrical outlet.
Step2 Setup
* If the destination network is not displayed in the Wireless Network List,
click Detailed Conguration at the top of the page. In the page displayed,
enter the wireless settings of the network that you wish to connect
BR-500AC to, and click the Submit button. Refer to the HELP for details on
each setting.
Turn o the network device that you wish to use wirelessly and connect it to BR-500AC using the LAN cable. Connect the AC adapter to BR-500AC and the AC adapter's plug to
the electrical outlet.
Turn on the network device connected to BR-500AC.
Step3 Connect BR-500AC to the network device you wish to use wirelessly
Parts and Functions
* If the Web page is not displayed, enter "http://silex" in the address bar
of the Web browser and press the Enter key.
* To connect multiple network devices using an Ethernet HUB,
click Advanced and select Multi-Client Mode for Client Mode.
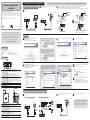
FRONT
TOP BOTTOM
POWER LED (Green/Red/Orange)
WLAN LED (Green/Red/Orange)
STATUS LED (Green)
MAC Address
Push switch
Link LED (Green/Orange)
LAN port
Power LED (Yellow)
Power connector
Starts BR-500AC in Conguration Mode:
Press and hold the push switch for 5 sec while BR-500AC is active.
Congures BR-500AC using Smart Wireless Setup:
Press and hold the push switch for 10 sec while BR-500AC is active.
Resets BR-500AC to factory default settings:
Press and hold the push switch while turning on BR-500AC. Release the
switch when the WLAN LED turns green and then to red.
ON (Green): Linked in wired LAN(1000BASE-T).
BLINK (Green): Receiving packets in wired LAN(1000BASE-T).
ON (Orange) : Linked in wired LAN(100BASE-TX/10BASE-T).
BLINK (Orange) : Receiving packets in wired LAN(100BASE-TX/10BASE-T).
OFF : Wired LAN is not connected.
Connect the LAN cable.
ON (Yellow) : Powered on
OFF : Powered o
Connect the AC adapter.
2
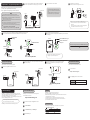
Step1 Start BR-500AC in Conguration Mode
Connect BR-500AC to the PC using the LAN cable that came with
BR-500AC.
1
PC
LAN cable
LAN cable
Click Easy Conguration at the top of the page.
Select the destination network from Wireless Network List and enter
the WEP Key or Shared Key for Network Key.
Click Submit when nished.
2
When the conrmation message is displayed, click Restart to restart
BR-500AC.
The conguration has now been completed.
3
To give a wireless feature to the same PC (the one you have been
using for conguration), please restart the PC.
To give a wireless feature to the other device, turn o both BR-500AC
and the PC, and remove BR-500AC from the PC. Refer to Step3 to
connect BR-500AC to the network device using a LAN cable.
4
1
2
3
1
* If wireless LAN is enabled on your PC, please disable it.
When the POWER LED turns green and the WLAN LED turns on or blinks, press and hold the push switch on the front of BR-500AC.
In 5 seconds, the WLAN LED and STATUS LED will start to blink green together. Release the push switch then.
BR-500AC will start running in the Conguration Mode and be ready to congure from the PC that has been connected to BR-500AC via a LAN cable.
3
Release the push switch
Push Switch
Conrm
these LEDs
are blinking
Push Switch
Keep holding
Sample connection in Single Client Mode Sample connection in Multi-Client Mode
* Some network devices require additional network settings.
In such cases, refer to the manual that came with the network
device.
* When turning on BR-500AC and network devices, be sure to
turn on BR-500AC rst. Do not press the push switch then.
Conguration Method 1 - Setup Using Conguration Mode
When your wireless router supports WPS (Wi-Fi Protected Setup), please start from Conguration Method 2 - Easy Conguration Using Smart Wireless Setup on the back.
* If the Web page is still not displayed after entering “http://silex”, you
need to check the IP address of the PC connected to BR-500AC.
If a static IP address is congured to the PC, enter the PC’s address
after adding 1 to its last digit and press Enter key.
BR-500AC
Printer
BR-500AC
BR-500AC
LAN cable
Electrical Outlet
(De) Die deutsche Version der Kongurationsanleitung können Sie von unserer Website herunterladen.
(Fr)
Il est possible de télécharger la version française de ce guide d’installation depuis notre page d’accueil.
(It) La versione italiana della guida all’installazione è scaricabile dalla nostra homepage.
(Es) Puede descargar la versión en español de la guía de conguración desde nuestra página principal.
(Pt) A versão em português do guia de instalação pode ser baixada de nossa página inicial.
Wireless Bridge BR-500AC
AC adapter
LAN cable
Setup Guide (this document)
GPL license notice (Distribution of source code
licensed under the open source software license)
URL : https://www.silextechnology.com/
WA106530XX
35
The Web browser is started and the password conguration
page of BR-500AC is displayed.
Enter the password to set for BR-500AC and click Submit.
Enter the login password you have congured and click Login. The Web page of BR-500AC is displayed.
36
* Recommended Web browsers: Microsoft Edge / Safari
* The login password conguration page is displayed only
when BR-500AC is congured for the rst time.
BR-500AC
BR-500AC BR-500AC
AC adaptor
Electrical Outlet
Conrm the LED
turns green or
blinks green
BR-500AC
Ethernet HUB
Printer
Surveillance camera
ON (Green): Powered on
OFF : Powered o
ON (Green): Running in Infrastructure mode.
BLINK(Green): Processing setup using the Smart Wireless Setup.
OFF : Wireless LAN is OFF.
* Blinks together with STATUS LED when running in Conguration Mode.
* Turns green and then to red during the initialization.
ON
(Green): AP is connected.
BLINK(Green): Transferring data.
OFF : AP is not connected.
* Blinks together with WLAN LED when running in Conguration Mode.
MAC Address of BR-500AC

Conguration Method 2 - Easy Conguration Using Smart Wireless Setup
How to reset BR-500AC to the factory default settings is explained.
Disconnect the AC plug of BR-500AC from the electrical outlet.
1
For wireless conguration using WPS, your wireless router must support WPS.
Make sure that your wireless router supports WPS and is turned on in your environment.
During this conguration, please temporarily move BR-500AC closer to your wireless router to
make it easier for both devices to communicate.
WPS may need to be enabled manually on your wireless router. For details, refer to the operation
manual that came with your wireless router.
If a security feature such as MAC Address ltering is enabled on your wireless router, disable it
temporarily so that BR-500AC can communicate with your wireless router.
If you plan to connect two or more network devices to BR-500AC using an Ethernet Hub, please go
back to Conguration Method 1 - Setup Using Conguration Mode.
The Client Mode can be congured only when BR-500AC is running in Conguration Mode.
Factory Default Conguration
BR-500AC allows you to congure its wireless settings easily using a push switch if
your wireless router supports WPS (Wi-Fi Protected Setup).
How to congure wireless settings using the push switch is explained.
- The name, position and shape of the WPS button will dier depending on your
wireless router. For details, refer to the operation manual that came with your
wireless router.
- Please use only one wireless router. If two or more routers are waiting for wireless
connections, BR-500AC will not be able to connect properly.
Press the WPS button on your wireless router.
Conrm that your wireless router is waiting for wireless connection.
Wireless Router
Press and hold the push switch at the front of BR-500AC. The WLAN LED and STATUS LED will start to blink green together.
In 5 seconds, the WLAN LED will continue to blink while the STATUS LED will turn o. Release the push switch then.
Release the push switch
Push Switch
Conrm the STATUS LED
is OFF
Conrm these LEDs
are blinking
Push Switch
Keep holding
- It may take a while to complete the wireless conguration
depending on your environment (up to 2 min).
BR-500AC will start to communicate with your wireless router.
When the wireless conguration is successfully completed, the WLAN LED turns green and the STATUS LED
turns or blinks green.
Connect the network device and BR-500AC using the LAN cable that came with BR-500AC.
Connect the AC adapter to BR-500AC and the AC adapter's plug to an electrical outlet.
2
33
While reconnecting the AC plug to the outlet, press and hold the push switch at the front of
BR-500AC. Keep holding it.
When the WLAN LED turns green and then to red, release the push switch. The factory
default conguration begins. After the factory default conguraton is completed,
BR-500AC will restart.
Conrm the STATUS LED turns
or blinks green
Conrm the WLAN LED turns green
AC adaptor
BR-500AC
Electrical Outlet
1
AC adaptor
BR-500AC
BR-500AC
Electrical Outlet
AC adaptor
Electrical Outlet
Push Switch
Push Switch
Release the push switch
Keep holding
Turn on the network device connected to BR-500AC.
* Some network devices require additional network settings.
In such cases, refer to the manual that came with the network
device.
* When turning on BR-500AC and network devices, be sure to
turn on BR-500AC rst. Do not press the push switch then.
2
3
Printer
LAN cable
RedGreen
3534
NOTE
Trademarks
- AMC Manager® is a registered trademark of Silex Technology.
- Wi-Fi Protected Setup(WPS) is a trademark of Wi-Fi Alliance.
- Windows and Microsoft Edge are trademarks or registered trademarks of Microsoft Corporation
in the United States and/or other countries.
- Safari is trademarks of Apple Inc., registered in the United States and other countries.
- Other company names and product names contained in this document are trademarks or
registered trademarks of their respective companies.
Customer Support Center
Silex Technology, Inc. will support you by e-mail and phone to solve your problems.
Customer Support Center information
Phone
+1-657-218-5199
+49-2154-88967-0
E-mail
USA
Europe
BR-500AC BR-500AC
BR-500AC
BR-500AC
*When wireless conguration has failed, the WLAN LED will ash rapidly.
Read the notes above and start from again.
2
Go to the Support page and download the User's Manual.
Product Name
BR-500AC
User's Manual
BR-500AC User’s Manual
How to Download User’s Manual
The User’s Manual can be downloaded from our website.
1
URL: https://www.silextechnology.com/
Access the website below:
How to Download AMC Manager®
What’s AMC Manager®?
- To use AMC Manager (non-free version), a license key needs to be purchased.
- Please contact Silex Technology to purchase a license key.
AMC Manager® is an integrated device management software that can monitor and
congure the Silex products remotely over an IP network. If AMC Manager® is used, the
operating status of BR-500AC units can be checked in a list view.
There are two versions of AMC Manager®; the one is AMC Manager Free (free version) and
the other one is AMC Manager (non-free version).
AMC Manager® can be downloaded from the Silex Technology’s website.
AMC Manager® can be downloaded from the Silex Technology’s website.
Access the URL below to download it.
https://www.silextechnology.com/
1
2
When the website is displayed, click Support from the top menu.
Click Software Download.
3
Download AMC Manager®.
In the
Software Download
page, click AMC Manager®.
4
-
 1
1
-
 2
2


Silex BR-500AC Guida utente
- Tipo
- Guida utente
- Questo manuale è adatto anche per
in altre lingue
- English: Silex BR-500AC User guide