Netgear WNCE3001-100NAS Manuale utente
- Categoria
- Router
- Tipo
- Manuale utente
Questo manuale è adatto anche per

350 East Plumeria Drive
San Jose, CA 95134
USA
November 2011
202-10876-01
v1.0
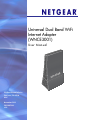
Universal Dual Band WiFi
Internet Adapter
(WNCE3001)
User Manual

2
Universal Dual Band WiFi Internet Adapter (WNCE3001)
© 2011 NETGEAR, Inc. All rights reserved
No part of this publication may be reproduced, transmitted, transcribed, stored in a retrieval system, or translated
into any language in any form or by any means without the written permission of NETGEAR, Inc.
Technical Support
Thank you for choosing NETGEAR. To register your product, get the latest product updates, get support online, or
for more information about the topics covered in this manual, visit the Support website at:
http://support.netgear.com
Phone (US & Canada only): 1-888-NETGEAR
Phone (Other Countries): Check the list of phone numbers at:
http://support.netgear.com/app/answers/detail/a_id/984
Trademarks
NETGEAR, the NETGEAR logo, and Connect with Innovation are trademarks and/or registered trademarks of
NETGEAR, Inc. and/or its subsidiaries in the United States and/or other countries. Information is subject to change
without notice. Other brand and product names are registered trademarks or trademarks of their respective
holders. © 2011 NETGEAR, Inc. All rights reserved.
Statement of Conditions
To improve internal design, operational function, and/or reliability, NETGEAR reserves the right to make changes
to the products described in this document without notice. NETGEAR does not assume any liability that may occur
due to the use, or application of, the product(s) or circuit layout(s) described herein.

3
Table of Contents
Chapter 1 Getting Started
Unpack Your Adapter. . . . . . . . . . . . . . . . . . . . . . . . . . . . . . . . . . . . . . . . . .4
Hardware Features. . . . . . . . . . . . . . . . . . . . . . . . . . . . . . . . . . . . . . . . . . . .5
Top Panel with LED . . . . . . . . . . . . . . . . . . . . . . . . . . . . . . . . . . . . . . . . .5
Rear Panel . . . . . . . . . . . . . . . . . . . . . . . . . . . . . . . . . . . . . . . . . . . . . . . .5
Power Connection Options. . . . . . . . . . . . . . . . . . . . . . . . . . . . . . . . . . . .6
Installation . . . . . . . . . . . . . . . . . . . . . . . . . . . . . . . . . . . . . . . . . . . . . . . . . .6
Prepare to Change Your Internet Adapter Settings . . . . . . . . . . . . . . . . . . .9
Use the Smart Wizard to Change the Setup . . . . . . . . . . . . . . . . . . . . . . .10
Chapter 2 Advanced Settings
Device Status Screen. . . . . . . . . . . . . . . . . . . . . . . . . . . . . . . . . . . . . . . . .12
Show Statistics. . . . . . . . . . . . . . . . . . . . . . . . . . . . . . . . . . . . . . . . . . . .14
DHCP Connection Status. . . . . . . . . . . . . . . . . . . . . . . . . . . . . . . . . . . .15
IP Address . . . . . . . . . . . . . . . . . . . . . . . . . . . . . . . . . . . . . . . . . . . . . . . . .15
Manage Your Configuration Settings . . . . . . . . . . . . . . . . . . . . . . . . . . . . .16
Back Up Settings . . . . . . . . . . . . . . . . . . . . . . . . . . . . . . . . . . . . . . . . . .16
Restore Settings. . . . . . . . . . . . . . . . . . . . . . . . . . . . . . . . . . . . . . . . . . .17
Erase the Settings . . . . . . . . . . . . . . . . . . . . . . . . . . . . . . . . . . . . . . . . .17
Upgrade the Firmware . . . . . . . . . . . . . . . . . . . . . . . . . . . . . . . . . . . . . . . .17
Advanced Wireless Settings. . . . . . . . . . . . . . . . . . . . . . . . . . . . . . . . . . . .18
Use Push 'N' Connect (WPS). . . . . . . . . . . . . . . . . . . . . . . . . . . . . . . . . . .19
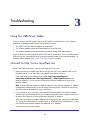
Chapter 3 Troubleshooting
Using the USB Power Cable . . . . . . . . . . . . . . . . . . . . . . . . . . . . . . . . . . .21
Connect to http://www.mywifiext.net. . . . . . . . . . . . . . . . . . . . . . . . . . . . . .21
Connect to Wireless Networks . . . . . . . . . . . . . . . . . . . . . . . . . . . . . . . . . .22
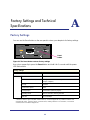
Appendix A Factory Settings and Technical Specifications
Factory Settings . . . . . . . . . . . . . . . . . . . . . . . . . . . . . . . . . . . . . . . . . . . . .23
Technical Specifications. . . . . . . . . . . . . . . . . . . . . . . . . . . . . . . . . . . . . . .24
Appendix B Notification of Compliance

4
1
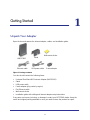
1. Getting Started
Unpack Your Adapter
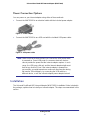
Open the box and remove the Internet adapter, cables, and installation guide.
WNCE3001
Ethernet cable USB power cable
Power adapter
Stand
Wall-mount sticker
Figure 1. Package contents
Your box should contain the following items:
• Universal Dual Band WiFi Internet Adapter (WNCE3001)
• Stand
• USB power cable
• Power adapter (plug varies by region)
• Flat Ethernet cable
• Wall-mount sticker
• Installation guide with cabling and Internet adapter setup instructions
If any parts are incorrect, missing, or damaged, contact your NETGEAR dealer. Keep the
carton and original packing materials in case you need to return the product for repair
.

Getting Started
5
Universal Dual Band WiFi Internet Adapter (WNCE3001)
Hardware Features
Top Panel with LED
The WNCE3001 has one LED, which indicates the power and wireless connection status.
Top panel LED status Activity
Off Unit is not powered on.
Solid red Link quality is poor, based on the link rate, or the USB does not
supply enough power.
Blinking red If the LED blinks red at the rate of 0.5 seconds on, 0.5 seconds
off, the firmware is corrupt.
Solid amber Link quality is fair, based on the link rate.
Blinking amber System is booting up, or has been reset. The LED starts to blink
amber after the Reset button has been pressed for more than 5
seconds. The LED also blinks amber during a firmware upgrade.
Solid green Unit is powered on, and the link quality is good, based on the link
rate.
Blinking green Boot-up is complete, but no wireless connection is established,
so no IP address is obtained.
Rear Panel
Ethernet port
Reset
button
WPS
button
USB port
Figure 2. Rear panel

Getting Started
6
Universal Dual Band WiFi Internet Adapter (WNCE3001)
Power Connection Options
You can power on your Internet adapter using either of these methods:
• Connect the WNCE3001 to an electrical outlet with the included power adapter.
Figure 3. Power adapter
• Connect the WNCE3001 to any USB port with the included USB power cable:
Figure 4. USB power cable
Note: Make sure that the device where you connect the USB power cable
is powered on. Some USB ports on consumer electronic devices
cannot provide the power that the Internet adapter requires. In such
cases, the LED turns solid red, and the Internet adapter might reset
itself or turn itself off. Even if the Internet adapter is powered on
successfully, you might experience continuous disconnection during
file transfer. If this happens, try connecting the USB cable to a
different device, or use the Internet adapter power adapter instead.
Installation
The Universal Dual Band WiFi Internet Adapter (WNCE3001) Installation Guide, included in
the package, explains how to install your Internet adapter. The steps are summarized in this
section.

Getting Started
7
Universal Dual Band WiFi Internet Adapter (WNCE3001)
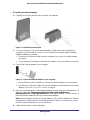
To install your Internet adapter:
1. Carefully peel off the protective film covering your adapter.
Figure 5. Peel off the protective film
2. You use a computer to set up the Internet adapter. During setup, make sure that your
computer is not connected to a router. You can restore the connection after the Internet
adapter installation is complete.
• Disconnect the Ethernet cable from your computer if you use it for a wired network
connection.
• If your computer is wirelessly connected to a network, stop your wireless connection.
3. Connect the Internet adapter to your computer.
Figure 6. Connect the Internet adapter to your computer
• Use an Ethernet cable (included) to connect the Internet adapter to your computer.
• Use either the USB power cable or the power adapter to provide power to the Internet
adapter. See Power Connection Options on page 6.
4. Open your Internet browser. It automatically displays the setup page. If the setup page is not
displayed, type either http://www.mywifiext.net, http://www.mywifiext.com,
http://mywifiext.net, or http://mywifiext.com as the browser address. You can use any of
these four browser addresses to log in to the Internet adapter.
Note: Internet Explorer records the browser address. If the Internet adapter's IP address
subsequently changes and you are still using Internet Explorer, you have to use one of
the other browser addresses to access the device.
5. Follow the instructions on the Setup page.

Getting Started
8
Universal Dual Band WiFi Internet Adapter (WNCE3001)
6. Disconnect the Ethernet and USB cables from your computer.
7. Connect the Internet adapter t
o your TV, XBox, or Blu-ray player.
If your device does not have a USB port, then use the power adapter cable that came
with your Internet adapter, and plug it into an electrical outlet. See Power Connection
Options on page 6.
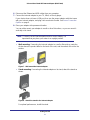
8. Place your adapter at its permanent location.
You can either mount your adapter to a wall or other flat surface, or you can mount it
vertically on its stand.
Note: To ensure correct heat dissipation and for router stability, it is
important that you place your router in an upright position.
• Wall mounting. If mounting the Internet adapter to a wall or flat surface, paste the
sticker above the product label on the back of the unit, and then attach the unit to the
surface.
Figure 7. Wall-mount the Internet adapter
• Stand mounting. If mounting the Internet adapter on its stand, attach the stand as
shown.
Figure 8. Attach the stand to the Internet adapter
For optimal performance, install the stand.

Getting Started
9
Universal Dual Band WiFi Internet Adapter (WNCE3001)
9. Congratulations! Your installation is complete. You can return your computer to its usual
setup and begin using the Internet adapter.
Prepare to Change Your Internet Adapter Settings
If you want to change the settings for the Internet adapter after installation, then you need to
connect it to a computer while you are making changes.
Note: If your Internet adapter is mounted on its stand, remove the stand
before disconnecting any cables.
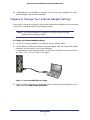
To change your Internet adapter settings:
1. Connect your Internet adapter to a computer with an Ethernet cable.
2. Connect either the USB power cable or the power adapter cable that came in the product
package t
o
the rear panel of your Internet adapter.
To supply power to your Internet adapter, use whichever method is more convenient for
you. See Power Connection Options on page 6.
Figure 9. Connect the WNCE3001 to a laptop
3. Launch an Internet browser such as Mozilla Firefox or Microsoft Internet Explorer. In the
address field, type http://www.mywifiext.net.

Getting Started
10
Universal Dual Band WiFi Internet Adapter (WNCE3001)
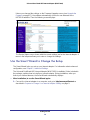
Unless you changed the settings on the Firmware Upgrade screen (see Upgrade the
Firmware on page 17), the software automatically checks for new firmware at the
NETGEAR website. Then the following screen displays:
The Device Status screen shows what the current settings are for the Internet adapter. A
menu in the left pane allows you to view or change the settings.
Use the Smart Wizard to Change the Setup
The Smart Wizard helps you set up your Internet adapter. For information about advanced
configuration, see Chapter 2, Advanced Settings.
The Universal Dual Band WiFi Internet Adapter (WNCE3001) Installation Guide, included in
the package, explains how to install your Internet adapter. During installation, when you
launch your Internet browser, the Smart Wizard automatically displays.
After installation, to use the Smart Wizard again:
1. Connect the Internet adapter to a computer, and go to http://www.mywifiext.net as
described in Prepare to Change Your Internet Adapter Settings on page 9.

Getting Started
11
Universal Dual Band WiFi Internet Adapter (WNCE3001)
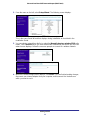
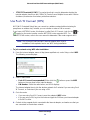
2. From the menu on the left, select Setup Wizard. The following screen displays:
This is the same Smart Wizard that displays during installation as described in the
Installation Guide.
3. You can select a network from the list, or select the Manually input my wireless SSID radio
button. Click Continue. When you have selected the network that you want to join, the next
wizard screen displays. Follow the onscreen prompts to connect to a wireless network:
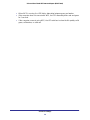
4. When the Review Settings screen displays, click Finish. If you are finished making changes,
disconnect your Internet adapter from your computer, and reconnect it to the device on
which you want to use it.

12
2
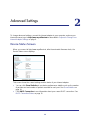
2. Advanced Settings
To change advanced settings, connect the Internet adapter to your computer, and use your
Internet browser to go to http://www.mywifiext.net as described in Prepare to Change Your
Internet Adapter Settings on page 9.
Device Status Screen
When you connect to http://www.mywifiext.net, after the automatic firmware check, the
Device Status screen displays:
This screen shows the current settings and the status of your Internet adapter.
• You can click Show Statistics to see device performance statistics such as the number
of packets sent and number of packets received for each port. See Show Statistics on
page 14.
• Click DHCP Connection to see information about your current DHCP connection. See
DHCP Connection Status on page 15.

Advanced Settings
13
Universal Dual Band WiFi Internet Adapter (WNCE3001)
The following table describes the fields in the Device Status screen.
Table 1. Device Status settings
Field Description
Device Status Hardware Version The hardware version of the Internet adapter.
Firmware Version The current firmware version of the Internet adapter.
If you upgrade the firmware, this field changes.
GUI Language Version The language version running on the Internet
adapter. If you upgrade the firmware, this field might
change.
Wireless Connection
Status
Wireless Connection The status of your wireless connection (connected or
disconnected).
Link Rate (Tx/Rx) The actual transmission (Tx) and receive (Rx) link
rate in the current wireless connection.
Name (SSID) Your Internet adapter is set up to connect to this
SSID, also called the wireless name.
Region The location of the Internet adapter.
Channel The wireless channel of the network.
Security Type The security setting for the wireless network.
LAN Port MAC Address The physical address of the Internet adapter, as
seen from the local area network (LAN).
IP Address The IP address of the Internet adapter. The default is
192.168.1.251.
DHCP Server Identifies the network DHCP server on the wireless
network.
Subnet Mask The IP subnet mask associated with the LAN IP
address of the Internet adapter. The default is
255.255.255.0.
Default Gateway The IP address of the wireless network gateway.
DNS Server The IP address of the Domain Name Server (DNS)
of the wireless network.

Advanced Settings
14
Universal Dual Band WiFi Internet Adapter (WNCE3001)
Show Statistics
On the Device Status screen, click Show Statistics:
Table 2. Show Statistics fields
Field Description
LAN or WLAN The statistics for the LAN (local), and wireless LAN (WLAN) ports. For each
port, the screen displays the following:
Status The link status of the port.
TxPkts The number of packets transmitted on this port since reset or the connection
was established.
RxPkts The number of packets received on this port since reset or the connection
was established.
Collisions The number of collisions on this port since reset or the connection was
established.
Tx B/s The current line utilization—percentage of current bandwidth used on this
port.
Rx B/s The average line utilization for this port.
Up Time The time elapsed since the last power cycle, reset, or when the connection
was established.
Poll Interval Specify the poll interval frequency. If you change this value, click Set
Interval so that your change takes effect.

Advanced Settings
15
Universal Dual Band WiFi Internet Adapter (WNCE3001)
DHCP Connection Status
On the Device Status screen, click DHCP Connection Status:
This screen shows the status of the Internet connection.
Table 3. Connection Status fields
Field Description
IP Address The IP address of the wireless network router.
Subnet Mask The subnet mask associated with the IP address.
Default Gateway The IP address of the gateway.
DHCP Server The IP address of the DHCP server.
DNS Server The IP address of the Domain Name Server (DNS).
Lease Obtained The date when the lease was obtained.
Lease Expires The date when the lease expires.
IP Address
From the Internet adapter menu at http://www.mywifiext.net, under Setup, select IP Address
Setup. The following screen displays:

Advanced Settings
16
Universal Dual Band WiFi Internet Adapter (WNCE3001)
This screen shows whether the Internet adapter is set to get its IP address dynamically from
the router (this is the most common setting), or is set with a static IP address.
• Get Dynamically From Router. The wireless network router assigns an IP address when
the Internet adapter connects to its wireless network. Most networks are set up so that the
router automatically does this.
• Use Static IP Address. Specify a static IP address. This is not usually necessary. If you
set this up, you should be technically experienced or have a technically experienced
person help you.
- IP Address. The static IP address.
- IP Subnet Mask: The subnet mask associated with the IP address.
- Gateway IP Address. The LAN IP address.
- Primary DNS. The primary Domain Name Server (DNS) address.
- Secondary DNS. The secondary Domain Name Server (DNS) address.
• Enable internal DHCP server after connecting to Wireless AP. Most users should
leave this check box unselected. In rare cases, some routers do not provide IP addresses
to equipment connected to the WNCE3001. Select this check box to have the
WNCE3001 assign IP addresses to the equipment instead.
Manage Your Configuration Settings
From the Internet adapter menu at http://www.mywifiext.net, under Maintenance, select
Backup Settings. The following screen displays:
The Backup and Restore options in the Backup Settings screen let you save and retrieve a
file containing your Internet adapter’s configuration settings. Once you have your Internet
adapter working correctly, you should back up the information to have it available if
something goes wrong. When you back up the settings, they are saved as a file on your
computer. You can restore the device’s settings from this file.
Back Up Settings
1. Click Back Up. Your browser extracts the configuration file from the Internet adapter.
2. If you do not have your browser set up to save downloaded files automatically, locate where
you want to save the file.
3. You can give the file a meaningful name at this time, such as internet_adapter.cfg.

Advanced Settings
17
Universal Dual Band WiFi Internet Adapter (WNCE3001)
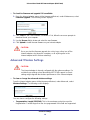
Restore Settings
1. On the Backup Settings screen, click Browse.
2. Locate and select the previously saved backup file.
3. Click Restore.
A screen displays letting you know that the device has been successfully restored to the
previous settings. The Internet adapter restarts. This takes about 1 minute.
CAUTION:
Do not try to go online, turn off the Internet adapter, shut down the
computer, or do anything else to the Internet adapter until it finishes
restarting!
4. Close the message window.
To restore your settings from a saved configuration file, enter the full path to the file on your
computer, or click Browse to browse to the file. When you have located it, click Restore to
send the file to the Internet adapter. The Internet adapter then reboots automatically.
Erase the Settings
Under some circumstances (for example, if you have lost track of the changes that you made
to the Internet adapter settings), you might want to erase the configuration. After an erase,
the Internet adapter returns to its factory settings (see Factory Settings on page 23).
To erase the configuration, click the Erase button in the Backup Settings screen.
CAUTION:
Do not try to go online, turn off the Internet adapter, shut down the
computer, or do anything else to the Internet adapter until it finishes
restarting!
Upgrade the Firmware
Unless you changed the settings in the Firmware Upgrade screen previously, the Internet
adapter is set up to check for new firmware automatically at login.
If you do not want to use the automatic firmware check, clear the Check for new version
upon Login check box.

Advanced Settings
18
Universal Dual Band WiFi Internet Adapter (WNCE3001)
To check for firmware and upgrade if it is available:
1. From the Internet adapter menu at http://www.mywifiext.net, under Maintenance, select
Firmware Upgrade. The following screen displays:
2. Click Check to see if new firmware is available. If it is, follow the onscreen prompts to
download it onto your computer.
3. Use the Browse field to locate and select the new firmware.
4. Click Upload to install the new firmware on your Internet adapter.
CAUTION:
Once you start the firmware upgrade, do not try to go online, turn off the
Internet adapter, shut down the computer, or do anything else to the
Internet adapter until it finishes restarting!
Advanced Wireless Settings
CAUTION:
The Internet adapter is already configured with the optimum settings. Do
not alter these settings unless directed by NETGEAR support. Incorrect
settings might degrade the wireless performance of the Internet adapter.
To view or change the advanced wireless settings:
From the Internet adapter menu at http://www.mywifiext.net, under Advanced, select
Wireless Settings. The following screen displays:
You can view or configure the following settings:
• Fragmentation Length (256-2346): This is the maximum packet size used for
fragmentation. Packets larger than the size programmed in this field are fragmented.

Advanced Settings
19
Universal Dual Band WiFi Internet Adapter (WNCE3001)
• CTS/RTS Threshold (1-2347): The packet size that is used to determine whether the
Internet adapter should use the CSMA/CA (Carrier Sense Multiple Access with Collision
Avoidance) mechanism for wireless packet transmission.
Use Push 'N' Connect (WPS)
WPS (Wi-Fi Protected Setup) lets you connect to a wireless network without entering its
passphrase or wireless key. Instead, you use a button or enter a PIN to connect.
If you have a NETGEAR router, this feature is called Push 'N' Connect. Look for the or
symbol on the router to make sure the NETGEAR router supports WPS. For
non-NETGEAR routers, refer to the user manual to determine if the router supports WPS.
Note: The Universal Dual Band WiFi Internet Adapter (WNCE3001)
Installation Guide explains how to use WPS during installation.
To join a network using WPS after installation:
1. From the Internet adapter menu at http://www.mywifiext.net, under Setup, select WPS.
The following screen displays:
2. Select a radio button.
• Push 'N' Connect (recommended). Either click the
button or press the WPS
button on the rear panel of the Internet adapter.
• PIN Number. Select the radio button, and a PIN displays.
The Internet adapter tries to join the wireless network for 2 minutes if you are using Push
'N' Connect, or 4 minutes if you are using a PIN.
3. Go to the router.
• If you are using Push 'N' Connect, press the adapter’s WPS button.
• If you are using a PIN, log in to the router and type the PIN from your Internet adapter
in its WPS screen.
4. Go back to the computer that is connected to the Internet adapter, and make sure that you
are connected to the wireless network.

Advanced Settings
20
Universal Dual Band WiFi Internet Adapter (WNCE3001)
• When WPS is running, the LED blinks, alternating between green and amber.
• If the computer does not connect with WPS, the LED alternately blinks red and green
for 5 seconds.
• If the computer connects using WPS, the LED switches to show the link quality: solid
green, solid amber, or solid red.
La pagina si sta caricando...
La pagina si sta caricando...
La pagina si sta caricando...
La pagina si sta caricando...
La pagina si sta caricando...
La pagina si sta caricando...
La pagina si sta caricando...
-
 1
1
-
 2
2
-
 3
3
-
 4
4
-
 5
5
-
 6
6
-
 7
7
-
 8
8
-
 9
9
-
 10
10
-
 11
11
-
 12
12
-
 13
13
-
 14
14
-
 15
15
-
 16
16
-
 17
17
-
 18
18
-
 19
19
-
 20
20
-
 21
21
-
 22
22
-
 23
23
-
 24
24
-
 25
25
-
 26
26
-
 27
27


Netgear WNCE3001-100NAS Manuale utente
- Categoria
- Router
- Tipo
- Manuale utente
- Questo manuale è adatto anche per
in altre lingue
- English: Netgear WNCE3001-100NAS User manual
Documenti correlati
-
Netgear Universal Dual Band WiFi Extender Manuale utente
-
Netgear WN2500RP Manuale utente
-
Netgear WN3000RP-100PAS Manuale utente
-
Netgear WNHDE111 Manuale utente
-
Netgear WG511TNA Manuale utente
-
-
-
-
Netgear A6200 Manuale utente
-