
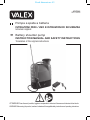
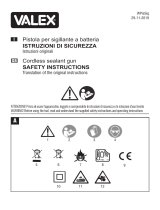
Pompa a spalla a batteria
ISTRUZIONI PER L’USO E ISTRUZIONI DI SICUREZZA
Istruzioni originali
Battery shoulder pump
INSTRUCTION MANUAL AND SAFETY INSTRUCTIONS
Translation of the original instructions
M372048
28.11.2019
Final dimension: A5
ATTENZIONE! Prima di usare il prodotto, leggete e comprendete le istruzioni di sicurezza e le istruzioni d’uso fornite
WARNING! Before using the product, read and understand the supplied safety instructions and operating instructions

- 2 -

- 3 -

- 4 -

- 5 -

- 6 -
i
AVVERTENZE DI SICUREZZA
Attenzione! leggere tutte le avvertenze e tutte
le istruzioni.
La mancata ottemperanza alle avvertenze e alle
istruzioni può nuocere alla salute e all’ambiente.
Utilizzate l’apparecchio nei modi descritti in
queste istruzioni. non utilizzatelo per scopi a cui
non è destinato.
Attenzione! la pompa è idonea per spruzzare
prodotti fitosanitari liquidi per agricoltura e
giardinaggio. È vietato l’utilizzo di pitture,
vernici, liquidi infiammabili, liquidi corrosivi,
liquidi pericolosi per la salute.
Queste istruzioni riportano le informazioni e
quanto ritenuto necessario per il buon uso, la
conoscenza e la normale manutenzione dell’ap-
parecchio. Esse non riportano le informazioni
sulle tecniche di uso dei prodotti per agricoltura
e giardinaggio; l’utilizzatore troverà maggiori
notizie su libri e pubblicazioni specifiche o par-
tecipando a corsi di specializzazione.
Conservare tutte le avvertenze e le istruzioni per
riferimenti futuri.
Non permettere l’uso dell’apparecchio a per-
sone inesperte o che non conoscano queste
istruzioni.
1)Per evitare rischi per l’uomo e per l’ambiente
seguire tutte le avvertenze e le istruzioni per l’uso.
2)Non contaminate altre colture o vegetazione,
alimenti e bevande, corsi d’acqua.
3)Tenete i bambini, estranei ed animali a distanza
durante il funzionamento dell’apparecchio.
4)Usate l’apparecchio in un luogo con un suffi-
ciente ricambio d’aria. non utilizzare all’interno
di una serra chiusa.
5)Non operate quando c’è vento e cercate di
posizionarvi in modo che l’aria non possa
soffiarvi contro le sostanze chimiche.
6)Usare i dispositivi di protezione individuale
(DPI, non inclusi con l’apparecchio). Indos-
sare sempre protezioni per gli occhi, per le vie
respiratorie ed il corpo. Le apparecchiature di
protezione quali occhiali, maschera, calzature
di sicurezza antiscivolo, tuta protettiva e
guanti riducono la possibilità di subire lesioni
personali.
7)Tenete i capelli lunghi raccolti in una cuffia.
8)Evitare il contatto del corpo con il liquido con-
tenuto nell’apparecchio; se necessario lavarsi
con abbondante acqua pulita.
9)In caso di dubbio sull’utilizzo dei prodotti fito-
sanitari affidatevi ad un tecnico specializzato
di comprovata esperienza.
10)Non distrarsi mai, controllare quello che si
sta facendo e usare il buon senso quando si
aziona l’apparecchio.
11)Non azionare l’apparecchio quando si è
stanchi o sotto l’influsso di droghe, alcol o
medicinali.
12)Non sbilanciarsi. mantenere sempre la po-
sizione e l’equilibrio appropriati. Non utilizzare
su veicoli in movimento o su scale.
13)Durante l’uso non mangiare, non bere, non
fumare.
14)In caso di ingestione del prodotto liquido
(non incluso) consultare subito un medico o
un centro antiveleni e mostrargli il contenitore
o l’etichetta del prodotto.
15)Non forzare l’apparecchio. Usare l’apparec-
chio adatto per l’operazione da eseguire.
17)Non riempire il serbatoio fino all’orlo, rimane-
re sotto al livello corrispondente alla capacità
nominale riportata sul serbatoio.
18)La pompa deve essere utilizzata solo con
prodotti fitosanitari autorizzati dalle autorità
e dai regolamenti locali / nazionali e con pro-
dotti fitosanitari adatti all’utilizzo con pompe a
pressione manuali.
19)Usare i prodotti chimici rispettando il dosag-
gio e le prescrizioni di sicurezza indicate dal
produttore e in caso di contatto accidentale
lavare immediatamente la parte contaminata
20)Non spruzzare prodotti tossici o nocivi su
persone o animali
21)I solventi o derivati del petrolio possono
essere utilizzati solamente con le pompe che
riportano in etichetta l’idoneità all’uso con
queste sostanze, cioè dotate di guarnizioni
specifiche.
22)Riporre la pompa al riparo dal sole e dal
gelo e lontano dalle fonti di calore, da alimenti,
mangimi e bevande.
23)Durante le operazioni di riempimento, svuo-
tamento, lavaggio, miscelazione, trasporto,
collocare la pompa sopra una superficie imper-
meabile in modo che un’eventuale fuoriuscita
di liquido possa essere recuperata, evitando di
contaminare l’ambiente.
25)Non utilizzare la pompa con liquidi ad una
temperatura maggiore di 40°C
26) Verificate periodicamente il tubo flessibile di
mandata, non schiacciate e non piegate il tubo.
27)L’utilizzatore è responsabile verso terzi di
eventuali incidenti o danni a persone o cose.

- 7 -
28)Riporre l’apparecchio fuori dalla portata
dei bambini e lontano da alimenti, mangimi
e bevande.
29)Dopo l’uso lavare mani e viso e, appena
possibile, fare una doccia saponata. Lavare
anche i vestiti e pulire o sostituire i dispositivi
di protezione.
30)Effettuare la manutenzione necessaria
dell’apparecchio, verificare la possibile usura o
la rottura delle parti e qualsiasi altra condizione
che possa influenzare il funzionamento.
31)Usare l’apparecchio in conformità con queste
istruzioni, tenendo conto delle condizioni di
lavorazione e dell’operazione da eseguire.
32)Non modificate l’apparecchio. Togliere, so-
stituire o aggiungere componenti non previsti
dalle istruzioni, è vietato ed annulla la garanzia.
Uso e precauzioni d’uso degli apparecchi a
batteria
a) Ricaricare soltanto con il caricabatterie
specificato dal costruttore. Un caricabat-
terie che è adeguato per un tipo di gruppo
di batterie può creare un rischio di incendio
quando viene utilizzato con altri gruppi di
batterie.
b) Usare apparecchi elettrici solo con i gruppi
di batterie specificatamente designati.
L’uso di qualsiasi altro gruppo di batterie può
creare il rischio di lesioni e incendi.
c) Quando il gruppo di batterie non è in uso,
tenerlo lontano da altri oggetti di metallo
quali graffette, monete, chiavi, viti, o
altri piccoli oggetti metallici che possono
creare un collegamento tra i due morsetti.
Cortocircuitare i morsetti della batteria può
provocare ustioni o incendi.
d) Se la batteria è in cattive condizioni, può
fuoriuscire del liquido; evitare ogni contat-
to. Se si verifica un contatto accidentale,
sciacquare immediatamente con acqua.
Se il liquido entra negli occhi, cercare
immediato aiuto medico. Il liquido fuoriu-
scito dalla batteria può provocare irritazioni
o ustioni.
e) Mantenete l’apparecchio e le batterie
lontano da fonti di calore e dal fuoco.
Non esporre a temperature superiori a
50°C. Alte temperature possono provocare
l’esplosione delle batterie.
Assistenza
a) Fare effettuare le operazioni di manuten-
zione sugli apparecchi elettrici da parte di
personale tecnico qualificato che utilizza
soltanto ricambi originali. Questo permette-
rà di mantenere la sicurezza dell’apparecchio
elettrico.
b) Non tentare di riparare l’apparecchio elet-
trico o di accedere ad organi interni. Inter-
venti effettuati da personale non qualificato
e non autorizzato dalla Ditta costruttrice può
generare seri pericoli ed annulla la garanzia.
c) Richiedete solo ricambi originali. L’utilizzo
di ricambi non originali può compromettere
la sicurezza dell’apparecchio elettrico.
AVVERTENZE DI SICUREZZA DELLA
BATTERIA E DEL CARICABATTERIA
a) Non smontare o lacerare l’involucro della
batteria. Non colpirla e non lasciarla ca-
dere a terra. Batterie danneggiate possono
provocare seri pericoli.
b) Non esporre la batteria al calore o al fuoco.
Non esporre alla luce solare diretta. Non
lasciarla all’interno di veicoli. Non esporre
a temperatura maggiore di 50°C. Pericolo
di esplosione.
c) Una batteria usata impropriamente può
provocare la fuoriuscita di vapori. Arieg-
giare il locale e consultare un medico in
caso di necessità.
d) Mettere le batterie e gli apparecchi elettri-
ci fuori dalla portata dei bambini. E’ buona
norma mantenere i bambini lontano dagli
apparecchi elettrici.
e) Non inserite alcun oggetto metallico nel
vano porta batteria. Non depositate la
batteria assieme ad alti oggetti metalli
(come la cassetta attrezzi) o assieme ad
altre batterie. Pericolo di generare un corto
circuito elettrico.
f) Utilizzare il caricabatterie in ambienti
chiusi al riparo dalla pioggia e dall’umidità.
Prevenite possibili folgorazioni elettriche.
g) Mantenete il caricabatterie sempre pulito.
Polvere e sporcizia impediscono la corretta
ricarica.
h) Prima di ogni impiego controllare il ca-
ricabatterie, il cavo e la spina. Non utiliz-
zatelo in caso di danni o guasti. Non aprire
mai il caricabatterie e ripararlo soltanto da
personale qualificato e soltanto con pezzi di
ricambio originali.
i) Non utilizzare il caricabatterie su basi fa-
cilmente infiammabili (come carta, tessuti,
legno ecc.) oppure in ambienti infiamma-

- 8 -
bili o esplodenti. Prevenite possibili incendi
a seguito di surriscaldamenti.
l) Ricaricate la batteria con temperatura
ambiente compresa tra 10°C e 35°C.
Temperature inferiori o superiori possono
danneggiare la batteria e non permettere la
normale ricarica.
m) Scollegate il caricabatterie dalla rete
rete elettrica quando non lo usate. Non
lasciate il caricabatterie acceso con la
batteria completamente carica. Prevenite
possibili incidenti.
n) È normale che il caricabatterie e la batte-
ria si riscaldino durante la fase di carica.
E’ però necessario lasciarli raffreddare
entrambi, fino a temperatura ambiente,
tra due ricariche consecutive. Temperature
elevate possono provocare guasti o esplo-
sione della batteria.
o) Sostituite le batterie che hanno terminato il
loro ciclo di utilizzo. Se la batteria si scarica
molto velocemente e/o i cicli di ricarica sono
molto corti, è il segnale che si sta esaurendo
e va pertanto sostituita.
p) Utilizzate esclusivamente batterie di
ricambio originali, del tipo e con caratte-
ristiche uguali a quella fornita con l’uten-
sile. L’uso di batterie di tipo o con voltaggio
diverso possono danneggiare l’utensile e
generare pericoli. Acquistate esclusivamente
ricambi originali.
q) Alcune batterie sono dotate di protezione
termica autoripristinante che inibisce
la ricarica nel caso si raggiungano
temperature troppo elevate; in questo
caso il caricabatterie emetterà una luce
lampeggiante rossa. Rimuovere la batteria
dal proprio alloggiamento per alcuni minuti
prima di reinserirla nel caricabatterie. La
carica riprenderà automaticamente quando
la temperatura sarà rientrata entro valori di
sicurezza.
r) La tensione di alimentazione del cari-
cabatterie deve corrispondere a quella
dichiarata sulla targa dati dello stesso. Non
utilizzate nessun altro tipo di alimentazione.
s) È consigliato l’uso di un apparecchio sal-
vavita sulla linea di alimentazione elettri-
ca. Consultate il vostro elettricista di fiducia.
t) Non danneggiare o calpestare il cavo
di alimentazione. Non trascinate il cari-
cabatterie tirando il cavo. Non tirate il
cavo per estrarre la spina dalla rete di
alimentazione.
u) Un eventuali cavo di prolunga deve avere
una sezione superiore a quella del cavo
del caricabatteria e dimensionato in base
alla sua lunghezza.
SIMBOLOGIA
Osservate con attenzione la simbologia e me-
morizzate il rispettivo significato. Una corretta
interpretazione dei simboli consente un uso
più sicuro.
1 Modello macchina.
2 Dati tecnici.
3 Numero di lotto e anno di fabbricazione della
macchina. Le prime 2 cifre indicano l’anno.
4 Marchi di certificazione.
5 Attenzione!.
6 Leggete con attenzione tutte le istruzioni
prima dell’uso.
7 Tenere le perzone a distanza di sicurezza
quando si spruzza.
8 Non spruzzare in direzione di persone o
animali.
9 Indossate occhiali a protezione degli occhi.
10 Indossate una tuta a protezione della pelle.
11 Indossate una maschera a protezione delle
vie respiratorie.
12 Indossate guanti a protezione delle mani.
13 Indossate stivali alti a protezione degli arti
inferiori.
14 Capacità del serbatoio.
15 Temperatura massima di utilizzo.
16 Non impiegare per spruzzare olii, solventi, o
derivati del petrolio.
17 Non utilizzare in caso di pioggia e in ambianti
umidi.
18 Pericolo di esplosione batterie. Mantenete
l’utensile e le batterie lontano da fonti di
calore e dal fuoco. Non esporre a tempe-
rature superiori a 45°C.
19 Mantenere lontano dal fuoco.
20 Solo per uso interno e in ambienti asciutti.
21 Doppio isolamento elettrico.
22 Fusibile di protezione (se presente).
23 Interruttore termico autoripristinabile (se
presente).
24 Caricabatteria con trasformatore di sicurezza
(se presente)
25 I rifiuti elettrici ed elettronici possono
contenere sostanze pericolose per l’am-
biente e per la salute umana; non devono
pertanto essere smaltiti con quelli domestici
ma mediante una raccolta separata

- 9 -
negli appositi centri di raccolta o riconsegnati
al venditore nel caso di acquisto di una
apparecchiatura nuova analoga. Lo smal-
timento abusivo dei rifiuti comporta l’appli-
cazione di sanzioni amministrative.
26 Le batterie incluse nell’apparecchio pos-
sono essere smaltite assieme ad esso. Non
gettate nel fuoco e non disperdete nell’am-
biente le batterie esauste ma consegnatele
agli appositi centri per il loro smaltimento.
Non smaltire assieme ai rifiuti domestici.
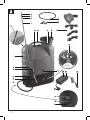
COMPONENTI (FIG. A)
1 Serbatoio
2 Filtro
3 Tappo di riempimento
4 Ugello in ottone
5 Lancia, parte mobile
6 Ghiera di blocco parte mobile
7 Lancia, parte fissa
8 Ghiera fissaggio lancia
9 Fermo per flusso sempre aperto
10 Leva di erogazione
11 Impugnatura
12 Tubo
13 Indicatore livello di carica batteria
14 Filtro interno
15 Impugnatura di trasporto
16 Cinghie a tracolla
17 Interruttore di accensione
18 Pomello di accensione e regolazione portata
19 Presa di ricarica
20 Caricabatteria
21 Led stato di carica
22 Connettore del caricabatteria
23 Spina di alimentazione caricabatteria
24 Ugelli accessori
25 Guarnizione del tappo di chiusura
26 Guarnizioni di ricambio
27 Supporto lancia
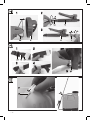
MONTAGGIO (FIG. C1-C2-C3)
Attenzione! Per il trasporto alcuni componenti
potrebbero essere forniti smontati e possono
trovarsi all’interno del serbatoio: verificate
ed estraeteli.
Estraete l’apparecchio i componenti e verificate
visivamente la loro perfetta integrità. Assemblate
i vari componenti e serrate bene tutti i raccordi.
Montaggio componenti (Fig.C1)
1 Inserite la guarnizione (25) all’interno del tappo (3)
2 Infilate il tubo (12) sull’impugnatura (11) e
avvitate la ghiera di fissaggio.
3 Fissate la lancia ( 7) all’impugnatura (11) e
avvitate la ghiera di fissaggio.
4 Se necessario, montate uno degli ugelli acces-
sori (24) svitando quello in ottone (4).
Montaggio della cinghia a tracolla (Fig.C2)
1 Inserite la cintura (19) attraverso la fessura del
gancio di supporto (27) e del fermo di blocco (28).
2 Completate l’inserimento seguendo le indica-
zioni delle foto 3,4,5.
3 Inserite il gancio di supporto (27) sulla sede
presente alla base del serbatoio.
Regolate la lunghezza delle cinghie a spalla in
base alla vostra corporatura.
Montaggio del supporto lancia (Fig.C3)
1 Infilare il supporto della lancia (27) sulla rotaia
(28) presente sul lato del serbatoio.
2 Per il trasporto e rimessaggio agganciare la
lancia al supporto.
MESSA IN SERVIZIO
Nel luogo d’uso o di ricarica dell’apparecchio è
opportuno considerare:
- che la zona non sia umida e sia al riparo dagli
agenti atmosferici.
- che attorno sia prevista un’ampia zona opera-
tiva libera da impedimenti.
- che bambini ed estranei siano tenuti a distanza.
- che vi sia una buona illuminazione.
- che sia utilizzata in vicinanza dell’interruttore
generale con Differenziale.
- che l’ambiente si ben areato
- che la temperatura ambiente sia compresa tra
10°C e 35°C.
- che l’ambiente non sia in atmosfera infiam-
mabile/esplosiva.
Se osservate delle anomalie di funzionamento
staccate l’alimentazione elettrica e consultate il
capitolo “Problemi, cause e rimedi”.
Quando non utilizzate il caricabatterie staccate
la spina dalla presa e riponetelo nel suo imballo.
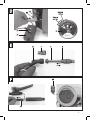
Carica della batteria (Fig.D)
! ATTENZIONE! Ricaricare la batteria subito
dopo l’acquisto e prima dell’uso.
! ATTENZIONE! Ricaricare soltanto batterie

- 10 -
compatibili, indicate dal costruttore.
1) Inserire il connettore del caricabattera (22)
nella presa di ricarica (19).
2) Inserite la spina del caricabatterie (23) in una
presa di corrente.
3) L’accensione della luce rossa di carica (21),
segnala l’inizio della carica della batteria. La
durata della carica per una batteria completa-
mente scarica è di circa 9 ore.
4) Alla fine della ricarica la luce led (21) passa
al colore verde.
5) A carica ultimata staccate la spina del cari-
cabatterie e scollegate il connettore (22) dalla
presa di ricarica (19).
Nota: Quando il caricabatterie è collegato alla
rete elettrica ma il connettore di ricarica è scol-
legato, si accende la luce verde (5) per segnalare
la presenza della rete.
Il livello di carica della batteria può essere
monitorato sul pannello indicatore (13) con
l’apparecchio acceso.
Importante!
Per mantenere efficiente la batteria, non
scaricarla completamente.
Eseguite una successiva ricarica completa:
- Dopo ogni utilizzo.
- Almeno ogni 4 mesi, anche in caso di inu-
tilizzo.
- Se durante il lavoro notate un calo evidente
delle prestazioni.
Rammentate sempre che la batteria dopo un cer-
to periodo è necessario sostituirla. I fattori che
influiscono sulla sua durata sono: numero dei
cicli di carica/scarica, stress da utilizzo gravoso,
tempo dalla sua fabbricazione, assenza di ma-
nutenzione, assenza di ricarica, permanenza a
temperature maggiori di 20°C.
A carica ultimata staccate il connettore (22) e
la spina del caricabatterie (23).
Se osservate delle anomalie di funzionamento
staccate l’alimentazione elettrica e consultate il
capitolo “Problemi, cause e rimedi”.
Quando non utilizzate il caricabatterie staccate
la spina dalla presa e riponetelo nel suo imballo.
ACCENSIONE E SPEGNIMENTO (FIG.A)
L’apparecchio può funzionare in due modalità:
- Funzionamento alla massima portata
- Funzionamento con portata regolabile
Funzionamento alla massima portata:
1 Portare l’interruttore di accensione (17) in
posizione (I)/ON.
2 Premere la leva di erogazione (10) per azionare
la pompa.
3 Rilasciando la leva di erogazione(10) la pompa
si spegne.
Funzionamento con portata regolabile:
1 Assicurarsi che l’interruttore di accensione
(17) si trovi in posizione (0) / OFF, spento.
2 Ruotare in senso orario il pomello di regola-
zione portata (18).
3 Premere la leva di erogazione (10) e regolare la
portata agendo sul pomello di regolazione (18).
4 Per spegnere l’apparecchio ruotare, com-
pletamente in senso antiorario il pomello di
regolazione (18).
Spegnimento:
Per spegnere l’apparecchio, posizionare l’inter-
ruttore di accensione (17) sullo (0)/OFF e ruotare
il pomello di regolazione (18) in senso antiorario
fino a udire il click di spegnimento.
ISTRUZIONI D’USO (FIG. A)
! ATTENZIONE! Prima di utilizzare l’appa-
recchio è necessario effettuare una carica
completa della batteria (vedere capitolo carica
della batteria).
Indossate sempre i dispositivi di protezione in-
dividuale (DPI) elencati nel cap. “Avvertenze di
sicurezza” e preparate a parte il prodotto liqui-
do (non incluso) da inserire dentro il serbatoio.
Attenzione! Osservate sempre le avvertenze del
prodotto in uso riguardanti i rischi per la salute
e per l’ambiente.
Nb: Al primo avvio provate la funzionalità della
pompa usando dell’acqua pulita.
Aprite il tappo del serbatoio e versate il prodotto
nel suo interno, senza superare la capacità no-
minale del serbatoio (vedere tabella dati tecnici);
chiudete bene il tappo ed asciugate l’apparecchio
da eventuali gocce.
Indossate l’apparecchio a spalla (come uno zai-
no), con una mano afferrate la lancia di spruzzo
nella zona della leva di azionamento.

- 11 -
Premete ora la leva della lancia per aprire il
rubinetto e spruzzare il liquido sulla vegetazione.
Regolate se necessario la portata della pompa
seguendo le istruzioni riportate sul paragrafo
precedente e agite sulla ghiera dell’ugello (4) per
regolare la nebulizzazione.
Durante l’uso mantenete la lancia rivolta in avanti
e mai contro voi stessi.
Evitate di spruzzate verso l’alto in modo che il
liquido nebulizzato non vi avvolga nella zona della
bocca e del naso.
Se osservate delle anomalie di funzionamento
consultate il capitolo “Problemi, cause e rimedi”.
Dopo l’uso, azionate la pompa con acqua pulita,
sciacquate, svuotate il serbatoio e spegnete
l’apparecchio.
Installare gli accessori (Fig.E)
La macchina è fornita con una serie di ugelli di
ricambio per applicazioni specifiche.
Per sostituire gli ugelli è sufficiente svitare
l’ugello principale in ottone (4) e avvitare quello
accessorio.
Regolazione lunghezza della lancia (Fig.E)
Svitare la ghiera di fissaggio (6), allungare la lan-
cia mobile (5) e bloccare alla lunghezza deside-
rata avvitando a fondo la ghiera di fissaggio (6).
TRASPORTO E RIMESSAGGIO
Per trasportare la pompa, agganciate la lancia
al supporto (27 Fig.A) con l’ugello rivolto verso
l’alto e sollevate la pompa usando la maniglia
(15 Fig.A).
Se la pompa viene veicolata con l’ausilio di un
mezzo di trasporto, assicuratevi che non si ribalti.
Prima del rimessaggio pulite accuratamente
la pompa seguendo le indicazioni del capitolo
“manutenzione e pulizia” e lasciatela asciugare
con il serbatoio aperto e capovolto.
Per il rimessaggio, utilizzate sempre il suo
imballo; questo lo preserverà da urti, polvere
e umidità che ne possono compromettere il
regolare funzionamento.
Riporre la pompa fuori dalla portata dei bambini,
lontano dalle fonti di calore, da alimenti, mangimi
o bevande e al riparo dal sole e dal gelo.
Attenzione! Prima del rimessaggio e almeno
ogni 4 mesi, eseguite una ricarica completa
della batteria.
MANUTENZIONE E PULIZIA (FIG.F)
! ATTENZIONE! Prima di ogni controllo o
manutenzione spegnete l’apparecchio e scol-
legate il caricabatteria.
La durata e il costo d’esercizio dipendono anche
da una costante e scrupolosa manutenzione.
Pulite regolarmente ed abbiate cura del vostro
apparecchio, vi garantirete una perfetta efficien-
za ed una lunga durata dello stesso.
PULIZIA DEI FILTRI E DEGLI UGELLI (Fig.F)
Per mantenere efficiente l’apparecchio pulite
regolarmente il filtro all’interno della lancia (28)
e il filtro posto sul fondo del serbatoio (29).
Pulire gli ugelli e sturate i fori usando un pennel-
lino e detergente neutro diluito in acqua.
INTERNO (al termine di ogni utilizzo)
- Svuotate il serbatoio e la lancia; risciacquateli
più volte in modo da eliminare tutti i residui
del prodotto usato. Azionate l’apparecchio con
acqua pulita per qualche minuto.
- Asciugate molto bene.
Attenzione! Eventuali residui di prodotto possono
compromettere il successivo funzionamento;
questo guasto non è coperto dalla garanzia.
ESTERNO
- Rimuovete la polvere e le gocce con un panno.
- Non usate infiammabili, detergenti o solventi
vari ma solo un panno umido e acqua.
- Le parti in plastica sono aggredibili da agenti
chimici.
Attenzione! Eventuali residui di prodotto
possono compromettere il successivo funzio-
namento; questo guasto non è coperto dalla
garanzia.

- 12 -
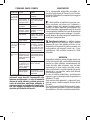
PROBLEMI, CAUSE E RIMEDI
PROBLEMA CAUSE RIMEDI
Non esce
il liquido
nebulizzato
dalla lancia
Batteria scarica Effettuare una ricarica
completa
Interruttore di
accensione in
posizione 0/OFF
Posizionare l’interrut-
tore sulla posizione
I/ON
Leva di erogazio-
ne chiusa
Premere la leva di
erogazione
Tubo piegato od
ostruito. Lancia
ed ugello ostruiti.
Controllare il tubo
flessibile, la lancia e
gli ugelli
Filtri otturati Pulire i filtri, vedere
capitolo manutenzio-
ne e pulizia
Ugelli otturati Pulire i fori degli ugelli
Gocce di
liquido
sull’appa-
recchio
Raccordi e tappo
non serrati
Serrare bene tutti i
raccordi e il tappo.
Se il problema per-
siste verificare tutte
le guarnizioni e sosti-
tuirle se necessario.
La b a t t eria
non si rica-
rica
Spinotto di ali-
mentazione non
inserito corretta-
mente nella presa
di ricarica
Togliere e reinserire
lo spinotto di alimen-
tazione nella presa di
ricarica
Caricabatteria
o batteria non
pronti per la ri-
carica. Batteria
surriscaldata
Attendere che la bat-
teria si raffreddi
Caricabatterie o
batteria guasti
Rivolgetevi a un
centro di assistenza
autorizzato
! ATTENZIONE! Se dopo aver eseguito gli
interventi sopra descritti l’apparecchio non
funziona correttamente o in caso di anomalie
diverse da quelle indicate, portatelo presso un
centro di assistenza autorizzato esibendo la
prova di acquisto e richiedendo ricambi origi-
nali. Fate sempre riferimento alle informazioni
riportate sull’etichetta dati tecnici.
SMALTIMENTO
Per la salvaguardia ambientale procedete se-
condo le leggi vigenti del Paese in cui vi trovate.
Rivolgetevi alle autorità competenti per maggiori
notizie in merito.
I rifiuti elettrici ed elettronici possono con-
tenere sostanze pericolose per l’ambiente e
la salute umana; non devono pertanto essere
smaltiti con quelli domestici ma mediante una
raccolta separata negli appositi centri di raccolta
o riconsegnati al venditore nel caso di acquisto di
una apparecchiatura nuova analoga. Lo smalti-
mento abusivo dei rifiuti comporta l’applicazione
di sanzioni amministrative.
Smaltimento batterie: Le batterie incluse
nell’apparecchio possono essere smaltite
assieme ad esso. Non gettate nel fuoco e non
disperdete nell’ambiente le batterie esauste ma
consegnatele agli appositi centri per il loro
smaltimento. Non smaltire assieme ai rifiuti
domestici.
GARANZIA
Il prodotto è tutelato a norma di legge contro non
conformità rispetto alle caratteristiche dichiarate
purché sia stato utilizzato esclusivamente nel
modo descritto dalle istruzioni, non sia stato
manomesso in alcun modo, sia stato conser-
vato correttamente, sia stato riparato da tecnici
autorizzati e, ove previsto, siano stati utilizzati
solo ricambi originali.
In caso di utilizzo industriale o professionale
oppure in caso di impiego simile la garanzia ha
validità di 12 mesi.
Sono esclusi dalla garanzia i componenti sog-
getti ad usura o deterioramento dovuto all’uso
normale.
Per emettere una richiesta di intervento in garan-
zia è necessario presentare la prova di acquisto
al rivenditore o ad centro assistenza autorizzato.

- 13 -
g
SAFETY WARNINGS
IMPORTANT! Read all the warnings and in-
structions.
Failure to observe the warnings and instructions
can harm your health and the environment.
Use the appliance as described in these instruc-
tions. Do not use it for purposes for which it was
not intended.
IMPORTANT! The pump is suitable for spraying
liquid phytosanitary products for agriculture
and gardening. It is prohibited to use paint,
varnish, flammable liquids, corrosive liquids
and hazardous liquids.
These instructions contain information deemed
necessary for proper use, knowledge and stan-
dard maintenance of the appliance. They do not
contain any information on the techniques for
using agricultural and gardening products. Users
can find more information in books and specific
publications or by taking part in training courses.
Store all warnings and instructions for future
reference.
Do not let inexperienced people or people
that have not read these instructions use the
appliance.
1) To prevent risks for humans and the envi-
ronment follow all the warnings and instruc-
tions for use.
2) Do not contaminate other crops or vegetation,
food and drinks or water courses.
3) Keep children, strangers and animals away
while the appliance is operating.
4) Use the appliance in a well-ventilated place.
Do not use inside a closed greenhouse.
5) Do not operate in the wind and try to stand
where the air cannot blow the chemical sub-
stances against you.
6) Use personal protective equipment (PPE, not
included with the appliance). Always wear pro-
tection for your eyes, respiratory tracts and body.
Protective equipment such as goggles, masks,
non-slip footwear, protective overalls and gloves
reduces the possibility of personal injury.
7) Keep long hair tied back in a cap.
8) Avoid contact between your body and the
liquid contained in the appliance; if necessary
wash yourself with plenty of clean water.
9) In case of doubt on how to use phytosanitary
products, contact a specialist technician with
consolidated experience.
10) Never allow yourself to be distracted. Control
what you are doing and use your common
sense when using the appliance.
11)Never use the tool when you are tired or
under the influence of drugs, alcohol or me-
dicines.
12)Do not lose your balance. Always keep an
appropriate position and balance. Do not use
on moving vehicles or on ladders.
13)During use do not eat, drink or smoke.
14)If you swallow the liquid product (not in-
cluded) seek medical advice straight away or
contact a poison control centre and show them
the product container or label.
15)Do not force the appliance. Use a suitable
appliance for the operation to be carried out.
17)Do not fill the tank to the brim, but stay below
the level corresponding to the nominal capacity
shown on the tank.
18)The pump must only be used with phytosa-
nitary products authorised by the authorities
and local/national regulations and with phyto-
sanitary products suitable for use with manual
pressure pumps.
19)Use chemical products respecting the dose
and safety instructions indicated by the manu-
facturer and in the event of accidental contact
immediately wash the contaminated part.
20)Do not spray toxic or harmful products on
people or animals.
21)Solvents or oil by-products can only be
used with pumps whose labels state they are
suitable for use with these substances, i.e.
equipped with specific gaskets.
22)Put away the pump where it is protected from
the sun and frost and away from heat sources,
foods, animal feed and drinks.
23)During filling, emptying, washing, mixing
and transport operations, place the pump on a
waterproof surface so that any liquid that leaks
out can be cleaned up without contaminating
the environment.
25)Do not use the pump with liquids at a tem-
perature of over 40 °C
26) Periodically check the delivery hose, do not
crush or bend the hose.
27)The user is responsible for other people as far
as accidents or damage to people or property
are concerned.
28)Store the machine out of the reach of children
and away from food and animal feeds.
29)After use, wash your hands and face and
have a shower with soap as soon as possi-
ble. Also wash clothes and clean or replace

- 14 -
protective equipment.
30)Perform the necessary maintenance on
the appliance. Check if any parts are worn
or broken and any other condition that could
affect its operation.
31)Use the appliance according to these instruc-
tions, considering the work conditions and the
operation to be performed.
32)Do not tamper with the appliance. Taking off,
replacing or adding components not included
in the instructions is prohibited and causes the
warranty to become null and void.
Use and precautions for using battery-opera-
ted appliances
a) Recharge only with the charger specified by
the manufacturer. A charger that is adequate
for one type of battery group can create a fire
hazard when used with other battery groups.
b) Use electrical appliances only with specifically
designated battery packs. Use of any other
battery pack creates the risk of injury and fire.
c) When the battery pack is not in use, keep it
away from other metal objects such as paper
clips, coins, keys, screws, or other small metal
objects that can create a connection between
the two clamps. Short circuiting the battery
terminals can cause burns or fire.
d) If the battery is in bad condition, liquid may
leak out; avoid any contact. If accidental con-
tact occurs, immediately flush with water. If
the liquid gets into your eyes, seek immediate
medical help. Liquid leaking from the battery
can cause irritation or burns.
e) Keep the appliance and batteries away from
heat and fire. Do not expose to temperatures
above 50°C. High temperatures can cause
batteries to explode.
Assistance
a) Have the maintenance operations performed
on electrical appliances by qualified technical
personnel using only original spare parts. This
will keep the electrical appliance safe.
b) Do not attempt to repair the electrical applian-
ce or access internal organs. Interventions
carried out by unqualified personnel who are
not authorized by the manufacturer may ge-
nerate serious hazards and void the warranty.
c) Request original spare parts only. The use of
non-original spare parts may compromise the
safety of the electrical appliance.
SAFETY WARNINGS OF BATTERY
AND BATTERY CHARGER
a) Do not disassemble or tear the battery casing.
Do not hit it or let it fall to the ground. Damaged
batteries can cause serious dangers.
b) Do not expose the battery to heat or fire. Do
not expose to direct sunlight. Do not leave it in
vehicles. Do not expose to temperatures higher
than 50 ° C. Danger of explosion.
c) An improperly used battery can cause vapors
to escape. Ventilate the room and consult a
doctor if necessary.
d) Put batteries and electrical appliances out
of the reach of children. It is good practice to
keep children away from electrical appliances.
e) Do not insert any metal object into the battery
compartment. Do not store the battery together
with high metal objects (such as the toolbox)
or with other batteries. Danger of generating
an electrical short circuit.
f) Use the battery charger indoors indoors away
from rain and moisture. Prevent possible
electric shocks.
g) Keep the charger clean at all times. Dust and
dirt prevent proper recharging.
h) Before each use, check the charger, cable
and plug. Do not use it in case of damage or
breakdown. Never open the charger and only
repair it by qualified personnel and only with
original spare parts.
i) Do not use the charger on highly flammable
bases (such as paper, fabrics, wood, etc.) or in
flammable or explosive environments. Prevent
possible fires due to overheating.
l) Recharge the battery at an ambient temperatu-
re between 10 ° C and 35 ° C. Lower or higher
temperatures can damage the battery and not
allow normal charging.
m) Disconnect the charger from the mains when
you are not using it. Do not leave the charger
switched on with a fully charged battery. Pre-
vent possible accidents.
n) It is normal for the charger and the battery to
warm up during the charging phase. However,
it is necessary to let them both cool down to
room temperature between two consecutive
recharges. High temperatures can cause the
battery to fail or explode.
o) Replace the batteries that have finished their
use cycle. If the battery discharges very quickly
and / or the charging cycles are very short, it
is the signal that is running out and should
therefore be replaced.

- 15 -
p) Only use original spare batteries, of the same
type and with the same characteristics as those
supplied with the tool. The use of batteries
of different types or with different voltages
can damage the tool and generate hazards.
Purchase only original spare parts.
q) Some batteries are equipped with a self-
restoring thermal protection that prevents
recharging if too high temperatures are rea-
ched; in this case the charger will flash red.
Remove the battery from its housing for a few
minutes before reinserting it into the charger.
The charge will automatically resume when the
temperature has returned within safety values.
r) The power supply voltage of the battery char-
ger must correspond to that stated on the data
plate of the same. Do not use any other type
of power supply.
s) Use of a life-saving device on the power
supply line is recommended. Consult your
local electrician.
t) Do not damage or step on the power cord.
Do not drag the charger by pulling the cable.
Do not pull the cable to remove the plug from
the mains.
u) Any extension cable must have a section
greater than that of the charger cable and must
be sized according to its length.
SYMBOLS
Look carefully at the symbols and memorise
their respective meanings. Correct interpretation
of the symbols allows safer use.
1 Type.
2 Technical data
3 Lot number and year of manufacture of the
machinery. The first 2 digits determines the year.
4 Trademarks of certifications.
5 Warning!
6 Carefully read all instructions before use.
7 Keep people at a safe distance when
spraying.
8 Do not spray towards people or animals.
9 It is compulsory to wear eye protection.
10 Wear overalls to protect your skin.
11 It is compulsory to wear a mask to protect
your respiratory tracts.
12 Wear protective gloves.
13 Wear high boots to protect your legs.
14 The tank capacity.
15 Maximum operating temperature.
16 Do not use oils, solvents or oil by-prodructs
for spraying.
17 Do not use in the rain and in damp envi-
ronments.
18 Danger of battery explosion. Keep the tool
and batteries away from heat and fire. Do
not expose to temperatures above 45 ° C.
19 Keep away from fire.
20 For internal use only and in dry environments.
21 Double electrical insulation.
22 Protection fuse (if present).
23 Self-resettable thermal switch (if present).
24 Battery charger with safety transformer (if
present)
25 Electrical and electronic waste can
contain substances that are dangerous for
the environment and for human health; they
must therefore not be disposed of with do-
mestic ones but by a separate collection in
the appropriate collection centers or returned
to the seller in the case of purchase of a
similar new device. Illegal disposal of waste
involves the application of administrative
sanctions.
26 The batteries included in the appliance
can be disposed of with it. Do not throw in
the fire and do not dispose of the exhausted
batteries in the environment but hand them
over to the appropriate disposal centers. Do
not dispose of with household waste.
COMPONENTS (FIG. A)
1 tank
2 Filter
3 Filler cap
4 Brass nozzle
5 Lancia, mobile part
6 Locking ring for moving part
7 Lancia, fixed part
8 Lance fixing ring
9 Flow stop always open
10 Dispensing lever
11 Handle
12 Tube
13 Battery charge level indicator
14 Internal filter
15 Carrying handle
16 Shoulder straps
17 Ignition switch
18 Ignition and flow control knob
19 Charging socket

- 16 -
20 Battery charger
21 Charge status LED
22 Charger connector
23 Battery charger power plug
24 Accessory nozzles
25 Seal of the closing cap
26 Spare gaskets
27 Spear support
ASSEMBLY (FIG. C1-C2)
Warning! For transport some components may
be supplied disassembled and can be found
inside the tank: check and take them out.
Take out the appliance and components and
visually check they are perfectly intact. Assem-
ble the various components and tighten all the
connections properly.
Assembly of components (Fig.C1)
1 Insert the gasket (25) inside the cap (3)
2 Insert the tube (12) on the handle (11) and
tighten the fixing ring nut.
3 Fix the lance (7) to the handle (11) and tighten
the fixing ring nut.
4 If necessary, fit one of the accessory nozzles
(24) by unscrewing the brass one (4).
Mounting the shoulder strap (Fig.C2)
1 Insert the belt (19) through the slit in the
support hook (27) and the locking clip (28).
2 Complete the insertion following the directions
in photos 3,4,5.
3 Insert the support hook (27) on the seat at the
base of the tank.
Adjust the length of the shoulder straps accor-
ding to your build.
Assembly of the lance support (Fig.C3)
1 Insert the lance support (27) on the rail (28)
on the side of the tank.
2 For transport and storage hook the lance to
the support.
SWITCHING ON
When using or charging the appliance it is advi-
sable to consider:
- that the area is not damp and is sheltered from
atmospheric agents.
- that a large operational area free of impedi-
ments is provided around.
- that children and strangers are kept at a
distance.
- that there is good lighting.
- which is used near the main switch with
Differential.
- that the environment is well ventilated
- that the ambient temperature is between 10°C
and 35°C.
- that the environment is not in a flammable /
explosive atmosphere.
If you observe any malfunctions, disconnect the
power supply and refer to the “Problems, causes
and remedies” chapter.
When not using the battery charger, pull the plug
out of the socket and store it in its packaging.
Battery charge (Fig.D)
! WARNING! WARNING! Recharge the batte-
ry immediately after purchase and before use.
! WARNING! Only recharge compatible bat-
teries indicated by the manufacturer.
1) Insert the charger connector (22) into the
charging socket (19).
2) Insert the plug of the charger (23) into a
socket.
3) When the red charging light (21) turns on, it
indicates that the battery has started charging.
The duration of the charge for a completely
discharged battery is approximately 9 hours.
4) At the end of the recharge the LED light (21)
changes to green.
5) When charging is complete, unplug the char-
ger plug and disconnect the connector (22)
from the charging socket (19).
Note: When the charger is connected to the
mains but the charging connector is discon-
nected, the green light (5) lights up to indicate
the presence of the network.
The battery charge level can be monitored on
the indicator panel (13) with the appliance
switched on.
Important!
To keep the battery efficient, do not discharge
it completely.

- 17 -
Perform a subsequent full top-up:
- After each use.
- At least every 4 months, even if not used.
- If you notice a clear drop in performance
during work.
Always remember that the battery must be
replaced after a certain period. The factors that
influence its duration are: number of charge /
discharge cycles, heavy use stress,
time from its manufacture, no maintenance, no
recharging, permanence at temperatures higher
than 20°C.
When charging is complete, disconnect the
connector (22) and the charger plug (23).
If you observe any malfunctions, disconnect the
power supply and refer to the “Problems, causes
and remedies” chapter.
When not using the battery charger, pull the plug
out of the socket and store it in its packaging.
SWITCHING ON AND OFF (FIG.A)
The appliance can work in two ways:
- Operation at maximum flow rate
- Operation with adjustable flow rate
Operation at maximum capacity:
1 Set the ignition switch (17) to position (I) / ON.
2 Press the dispensing lever (10) to operate
the pump.
3 When the dispensing lever (10) is released,
the pump switches off.
Operation with adjustable flow:
1 Make sure the ignition switch (17) is in position
(0) / OFF, off.
2 Turn the flow adjustment knob (18) clockwise.
3 Press the dispensing lever (10) and adjust
the flow by acting on the adjustment knob (18).
4 To turn off the appliance, turn the adjustment
knob (18) completely anticlockwise.
Shutdown:
To switch off the appliance, place the ignition
switch (17) on (0) / OFF and turn the adjustment
knob (18) counterclockwise until you hear a
shutdown click.
INSTRUCTIONS FOR USE (FIG. A)
! WARNING! Before using the appliance, it
is necessary to fully charge the battery (see
chapter on charging the battery).
Always wear the personal protective equipment
(PPE) listed in chap. “Safety warnings” and
prepare the liquid product (not included) to be
inserted into the tank.
Warning! Always observe the warnings of the
product in use concerning health and envi-
ronmental hazards.
Nb: At the first start test the functionality of
the pump using clean water.
Open the tank cap and pour the product inside,
without exceeding the nominal capacity of the
tank (see technical data table); close the cap
tightly and dry the device from any drops.
Wear the device on your shoulder (like a
backpack), grab the spray lance in the area of
the operating lever with one hand.
Now press the lance lever to open the tap and
spray the liquid on the vegetation. Adjust the
pump flow if necessary following the instruc-
tions given in the previous paragraph and act
on the nozzle ring (4) to adjust the nebulization.
During use keep the lance facing forward and
never against yourself.
Avoid spraying upwards so that the sprayed li-
quid does not wrap around your mouth and nose.
If you observe any malfunctions refer to the
chapter “Problems, causes and remedies”.
After use, operate the pump with clean water, rin-
se, empty the tank and switch off the appliance.
Install the accessories (Fig.E)
The machine is supplied with a series of spare
nozzles for specific applications.
To replace the nozzles, simply unscrew the main
brass nozzle (4) and screw on the accessory
one.
Lance length adjustment (Fig.E)
Unscrew the fixing ring nut (6), lengthen the
movable lance (5) and lock to the desired length
by screwing the fixing ring nut (6) fully.

- 18 -
TRANSPORT AND STORAGE
To transport the pump, hook the lance to the sup-
port (27 Fig.A) with the nozzle facing upwards
and lift the pump using the handle (15 Fig.A).
If the pump is transported in a vehicle make sure
it does not overturn.
Before storage clean the pump carefully fol-
lowing the indications in the “maintenance and
cleaning” chapter and leave it to dry with the
tank open and overturned.
Always use the packaging when storing the
appliance; this will protect it from impact, dust
and humidity which can compromise normal
operation.
Store the pump out of reach of children, away
from heat sources, food, animal feed or drinks
and protected from the sun and frost.
Warning! Before storage and at least every 4
months, perform a full battery recharge.
MAINTENANCE AND CLEANING
! WARNING! Before carrying out any checks
or maintenance, switch off the appliance and
disconnect the charger.
The duration and the operating cost also depend
on a constant and scrupulous maintenance.
Clean regularly and take care of your appliance,
you will ensure perfect efficiency and a long
service life.
CLEANING OF FILTERS AND NOZZLES (Fig.F)
To keep the appliance efficient, regularly clean
the filter inside the lance (28) and the filter lo-
cated on the bottom of the tank (29).
Clean the nozzles and clean the holes using a
brush and neutral detergent diluted in water.
INTERNAL (at the end of each use)
- Empty the tank and the lance; rinse them
several times to eliminate all residues of the
used product. Operate the appliance with clean
water for a few minutes.
- Dry very well.
Warning! Any product residues may compromi-
se subsequent operation; this fault is not covered
by the warranty.
EXTERNAL
- Remove dust and drops with a cloth.
- Do not use flammable, detergent or other sol-
vents but only a damp cloth and water.
- Plastic parts can be attacked by chemical
agents.
Warning! Any product residues may compro-
mise subsequent operation; this fault is not
covered by the warranty.
PROBLEMS, CAUSES AND SOLUTIONS
PROBLEM CAUSE SOLUTION
The nebu-
lised liquid
does not
come out of
the lance
Low battery Perform a full charge
Switch in posi-
tion 0 / OFF
Operate the switch in
the I / ON position
Closed dispen-
sing lever
Press the dispensing
lever
Pipe bent or blo-
cked. Cleat and
nozzle clogged.
Check the hose, lance
and nozzles
Clogged filters Clean the filters, see
maintenance and cle-
aning chapter
Clogged nozzles Clean the nozzle holes
Drops of li-
quid on the
appliance
Connections and
cap not tightened
Tighten all the con-
nections and cap
well. If the problem
persists check the
gaskets and replace
them if necessary
The battery
does not
charge
Power plug not
inserted cor-
rectly in the
charging socket
Remove and reinsert
the power plug into
the charging socket
Battery charger
or battery not
ready for char-
ging. Overheated
battery
Wait for the battery to
cool down
Battery charger
or battery failure
Contact an authorized
service center
! IMPORTANT! If the appliance still fails to
operate correctly after you have carried out
the above operations, or in the event of faults
other than those described above, take it to
an authorised service centre showing proof
of purchase, and ask for original spare parts.
Always refer to the information shown on the
technical specifications label.

- 19 -
DISPOSAL
In order to protect the environment, proceed
according to the local laws in force. Contact the
relevant authorities for more information.
Electric and electronic waste may contain
substances hazardous to the environment and
human health. It should therefore not be dispo-
sed of with household waste, but by means of
separate collection at special collection centres
or returned to the vendor in the event of purcha-
sing a new similar tool. Illegal disposal of waste
will result in administrative sanctions.
Battery disposal: The batteries included
in the equipment can be disposed of along
with it. Do not dispose of used batteries in fire
and do not dispose of them in the envronment,
but take them to special disposal centres. Do
not dispose of them with domestic waste.
WARRANTY
The product is protected by law against non-
compliance with the declared characteristics
provided it is used only in the manner described
in the instructions, it has not been tampered with
in any way, it has been stored properly, has been
repaired by authorized and, where applicable,
have been used only original spare parts.
In the case of industrial or professional use or
when using such a guarantee is valid for 12
months.
To issue a claim under warranty you must
present proof of purchase to your dealer or
authorized service center.

DICHIARAZIONE DI CONFORMITA’
La ditta indicata in etichetta dichiara sotto la
propria responsabilità che il prodotto ivi citato
è conforme ai requisiti essenziali di sicurezza e
salute contenuti nelle seguenti direttive europee:
2006/45/CE, 2009/127/CE, 2014/35/CE,
2014/30/CE, 2011/65/CE
DECLARATION OF CONFORMITY
The firm indicated on the label declares, under
its own responsibility, that the product cited there
complies with the essential health and safety require-
ments contained in the following European directives:
2006/45/CE, 2009/127/CE, 2014/35/CE,
2014/30/CE, 2011/65/CE
Persona autorizzata a costituire il fascicolo tecnico
presso:
The person authorized to compile the technical
file is in:
Valex SpA
Via Lago Maggiore, 24
36015 Schio (VI) - Italy
Schio, 11.2019
Un procuratore - Attorney
SMIDERLE STEFANO
DATI TECNICI
1. Pump
a. Massa a vuoto
b. Massa con serbatoio pieno
c. Capacità nominale del serbatoio
d. Livello di pressione acustica LpA
2. Caricabatteria
a. Tensione e frequenza nominale
b. Tensione in uscita
c. Corrente media in uscita
d. Tempo di ricarica
e. Classe di isolamento
3. Batteria
a. Tipo
b. Tensione
c. Capacità nominale
d Energia
TECHNICAL DATA
1. Pump
a. Mass when empty
b. Mass with full tank
c. Nominal tank capacity
d. Sound pressure level LpA
2. Battery charger
a. Voltage and nominal frequency
b. Output tension
c. Average output current
d. Charging time
e. Insulation class
3. Battery
a. Type
b. Voltage
c. Nominal capacity
d. Energy
1a 5,2 kg
b 21,2 kg
c 16 l
d <70 dB(A)
2a 110-240V~50/60 Hz
b 12V
c 1200 mAh
d 9 h
e II
3a Pb Piombo/Lead
b 12 V
c 8 Ah
d 96 Wh
-
 1
1
-
 2
2
-
 3
3
-
 4
4
-
 5
5
-
 6
6
-
 7
7
-
 8
8
-
 9
9
-
 10
10
-
 11
11
-
 12
12
-
 13
13
-
 14
14
-
 15
15
-
 16
16
-
 17
17
-
 18
18
-
 19
19
-
 20
20


Valex 1372048 Manuale del proprietario
- Tipo
- Manuale del proprietario
- Questo manuale è adatto anche per
in altre lingue
- English: Valex 1372048 Owner's manual
Documenti correlati
-
 Valex 1060104 Manuale del proprietario
-
 Valex 1060092 Manuale del proprietario
-
 Valex 1060103 Manuale del proprietario
-
 Valex 1429212 Manuale del proprietario
-
 Valex 1373102 Manuale del proprietario
-
 Valex 1372046 Manuale del proprietario
-
 Valex 1429210 Manuale del proprietario
-
 Valex 1959904 Manuale del proprietario
-
 Valex 1152245 Manuale del proprietario
-
 Valex 1152234 Manuale del proprietario


Altri documenti
-
Lavor COMPREX NPB 7,5 Manuale utente
-
-
Birchmeier 11925001 Scheda dati
-
Toro Dingo TX 700 Track Loader, Narrow Manuale utente
-
Toro e-Dingo 500 Compact Tool Carrier Manuale utente
-
-
-
-
Toro STX-26 Stump Grinder Manuale utente