
Quick Start Guide
PROTON
XQ30 Thermal Imaging
Monocular

EN Electromagnetic compatibility. This product complies with the requirements of
European standard EN 55032: 2015, Class A.
Caution: Operating this product in a residential area may cause radio interference.
Attention! A license is required for Thermal Imager Proton XQ30 when exporting
outside your country.
This product is subject to change in line with improvements to its design.
The current version of the User’s Manual can be found on the website
www.pulsar-vision.com
FR Compatibilité électromagnétique. Ce produit est conforme aux exigences de la
norme européenne EN 55032: 2015, classe A.
Attention: L’utilisation de ce produit dans une zone résidentielle peut provoquer des
interférences radio.
Attention! Les modules d’imagerie thermiques Proton XQ30 nécessitent l’obtention
d’une licence s’ils sont exportés hors de votre pays.
La conguration peut être modiée an d’améliorer l’utilisation de l’appareil.
La version actuelle du manuel d’utilisation est disponible sur le site
www.pulsar-vision.com
DE Elektromagnetische Verträglichkeit. Dieses Produkt entspricht den Anforderungen
der Europäischen Norm EN 55032:2015, Klasse A.
Achtung: Der Betrieb dieses Produktes in Wohngebieten kann Funkstörungen
verursachen.
Achtung! Die Wärmebildgeräte PROTON XQ30 erfordern eine Lizenz, wenn sie über
die Grenzen Ihres Landes exportiert werden.
Änderungen im Design zwecks höherer Gebrauchseigenschaften des Produktes
vorbehalten.
Die aktuelle Version der Bedienungsanleitung nden Sie unter www.pulsar-vision.com
ES Compatibilidad electromagnética. Este producto cumple con los requisitos de la
norma europea EN 55032:2015, Clase A.
Advertencia: el uso de este producto en la zona residencial puede provocar
interferencias de radiofrecuencia.
¡Atención! Los dispositivos de imagen térmica Proton XQ30 requieren una licencia si
se exportan fuera de su país.
El diseño de este producto está sujeto a modicaciones con el n de mejorar sus
características de uso.
Encontrará la última edición del manual de usuario en el sitio web
www.pulsar-vision.com
IT Compatibilità elettromagnetica. Questo prodotto è conforme ai requisiti della
norma europea EN 55032:2015, Classe A.
Attenzione: l’uso di questo prodotto in un’area residenziale può causare dei
radiodisturbi.
Attenzione! I visori termici Proton XQ30 necessitano di un certicato nel caso in cui
vengano esportati.
Per migliorare le proprietà del prodotto nella sua costruzione possono essere
apportate delle modiche.
La versione aggiornata delle istruzioni d’uso è disponibile sul sito
www.pulsar-vision.com
RU Электромагнитная совместимость. Данный продукт соответствует требованиям
европейского стандарта EN 55032:2015, Класс А.
Внимание: эксплуатация данного продукта в жилой зоне может создавать
радиопомехи.
Внимание! Тепловизоры Proton XQ30 требуют лицензии, если они
экспортируются за пределы Вашей страны.
Для улучшения потребительских свойств изделия в его конструкцию могут
вноситься усовершенствования.
Актуальную версию инструкции по эксплуатации Вы можете найти на сайте
www.pulsar-vision.com

Quick Start Guide
v.0821 v.v.
PROTON XQ30
Thermal Imaging Monocular Proton XQ30 1-6 ENGLISH
Module d’imagerie thermique Proton XQ30 9-16 FRANÇAIS
Wärmebildgeräte Proton XQ30 17-24 DEUTSCH
Dispositivo de imagen térmica Proton XQ30 25-32 ESPAÑOL
Visore termico Proton XQ30 33-40 ITALIANO
Тепловизор Proton XQ30 41-48 РУССКИЙ

ENGLISH
ENGLISH
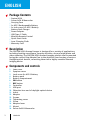
Package Contents
• Proton XQ30
• Pulsar 5x30 B Monocular
• Carrying Case
• 2x APS 5 Rechargeable Battery
• 2x Lock-cover for APS 5 Battery
• Battery Pack Charger
• Power Adapter
• USB Type-C Cable
• Wireless Remote Control
• Quick Start Guide
• Lens-Cleaning Cloth
• Warranty Card
Description
The PROTON XQ30 thermal imager is designed for a variety of applications,
including hunting surveillance, security activities, day and night photo and
video shooting. The PROTON XQ30 thermal imaging module can be mounted
(using the correct Ring Adapter) on to the objective lens housing of various
daylight optical devices, converting them into a highly-sensitive thermal
imaging device.
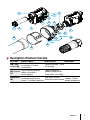
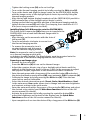
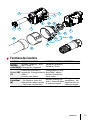
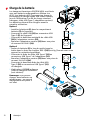
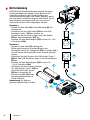
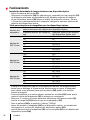
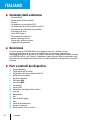
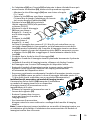
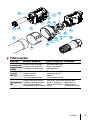
Components and controls
1. Lens cover
2. Eyepiece cover
3. Lock-cover for APS 5 Battery
4. Battery pack
5. Battery compartment
6. ON button
7. REC button
8. Controller
9. USB port
10. Objective lens end of daylight optical device
11. Insert
12. Adapter
13. Screws
14. Tightening screw
15. Screw
16. Adapter lever
17. Mount
18. Pulsar 5x30 B Monocular
1

ENGLISH
Open
Close
16
12
10
11
13
25
3 4 1
8
15 17
9
6
7
14 18
Description of buttons function
BUTTON SHORT PRESS LONG PRESS ROTATION
ON / OFF
button (6)
Turn on device / Turn
on display / Device
calibration
Turn off device / Turn
off display -
REC button
(7)
Start/Pause/Resume
video recording /
Photography
Toggle between
photo/video mode
Stop video recording -
Controller
(8)
Enter quick menu / Switch
between quick menu
items / Conrm selection
Exit quick menu /
Enter/exit main menu
Parameter
change / Main
menu navigation
2

ENGLISH
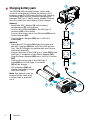
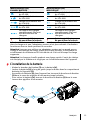
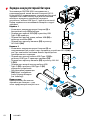
Charging battery pack
The PROTON XQ30 thermal imager comes with
an APS 5 rechargeable Lithium-ion battery. APS 5
batteries support USB Power Delivery fast charging
technology when using a standard charging set
(charger, USB Type-C cable, power adapter). Before
rst use, make sure the battery is fully charged.
Option 1
• Install the APS 5 battery (4) in the battery
compartment (5) of the device.
• Connect the USB cable (22) to the USB Type-C
connector (9) of the device.
• Connect the other end of the USB cable (22) to the
Power Adapter (23).
• Plug the Power Adapter (23) into a 100-240 V
socket (24).
Option 2
• Insert the APS 5 battery (4) along the guide into
the APS 5 charger (19) slot as far as it will go (see
Fig.). The APS charger is supplied with your device
and sold separately.
• Connect the plug of the USB Type-C cable (22) to the
USB Type-C connector of the Power Adapter (21).
• Plug the Power Adapter (23) into a 100-240 V socket
(24).
• Connect the other end of the USB Type-C
cable (22) to the USB Type-C connector
(21) of the charger.
• LED indicators (20) will
display the battery charge
level (see Table).
Note: Two batteries can be
charged at the same time,
a second slot is provided
for it.
24
9
22
23
4
4
20
24
21
19
23
22
3

ENGLISH
LED INDICATION (20)
IN THE BATTERY CHARGING MODE LED INDICATION (20)
IN THE STANDBY MODE*
Battery charge level is
from 0% to 25% Battery charge level is
from 0% to 25%
Battery charge level is
from 26% to 50% Battery charge level is
from 26% to 50%
Battery charge level is
from 51% to 80% Battery charge level is
from 51% to 80%
Battery charge level is
from 81% to 99% Battery charge level is
from 81% to 99%
Battery is fully charged. It
can be disconnected from
the charger. Battery is fully charged. It
can be disconnected from
the charger.
Defective battery.
Do not use the battery! Defective battery.
Do not use the battery!
* Standby mode is when the batteries are in the charger but the Power Adapter
is not connected. In this mode, the indicators are only on for 10 seconds.
Attention! When using a Power Adapter that does not support USB Power
Delivery fast charging technology, the icker frequency of the LED indicators
decreases by a factor of 3 and the charge time increases.
Attention! The charger heats up during fast charging. Excess heat is removed
through the radiator and does not affect the device operation.
Installing Battery Pack
• Put the Lock-cover (3) on the rechargeable APS 5 battery (4).
• Insert the APS 5 battery (4) along the guide into the battery compartment (5).
• Lock the battery (4) by turning the Lock-cover (3) clockwise until it stops.
• Turn the Lock-cover (3) counter-clockwise to remove the battery (4).
4
3 5
Operation
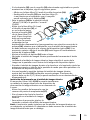
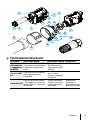
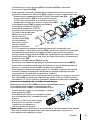
Installing thermal imaging module on the optical device
• Remove the eyepiece cover (2).
• Select the Ring Adapter (12) (sold separately) with the insert (11) of the
desired diameter depending on the outer diameter of the lens of your optical
device (10) (see table). The designation 42 mm / 50 mm / 56 mm in the name
of the adapter means the lens diameter of the optical device.
4

ENGLISH
Selection table for optical device inserts
Ring
Adapter
model
The internal diameter of the insert needs to match the outer
diameter of the objective lens housing of the daylight optical
device it is being installed on.
Insert internal diameter,
mm
Suitable for lens housing of daylight
optical devices with an outer
diameter of, mm
PSP Ring
Adapter 42
mm
45.5 45.5
46 46
46.5 46.5
47 46.7-47.6
48 47.7- 48.6
49 48.7-49.6
50 49.7-50.6
PSP Ring
Adapter 50
mm
51.6 51.6
53.4 53.4
55 54.7-55.6
56 55.7-56.6
57 56.7-57.6
58 57.7-58.6
59 58.7-59.6
PSP Ring
Adapter 56
mm
60 59.7-60.6
61 60.7-61.6
62 61.7-62.6
63 62.7-63.6
64 63.7-64.6
65 64.7-65.6
• Screw together the Ring Adapter (12) and the thermal imaging module along
the threads of the mounting area (17) until it stops. Then untighten a little
(no more than one turn) so that the lever (16) is on the right side (see Figure).
• Evenly tighten the screws (13) until the ball joint grips in the Ring Adapter (12).
• Apply 2-3 strips of double-sided tape to the outer surface of the insert (11)
of your choice.
• Push the insert (11) of your choice into the Ring Adapter (12) until it stops.
• Move the lever (16) to the OPEN position.
• Before installing the Ring Adapter (12) onto the optical device, it is
recommended to degrease the lens body of the optical device (10).
• Mount the Ring Adapter (12) with the insert (11) onto the lens of the daylight
optical device (10) as far as it will go.
• If the Ring Adaptor (12) with the insert (11) selected according to the table
cannot be mounted onto the lens (10), follow the steps below:
- Loosen the locking screw (14) with a 2mm Allen key.
- Untighten the screw (15) with a hex wrench (S = 4mm) until the Ring
Adaptor with the insert can be mounted onto the lens (10).
• Move the lever (16) from its initial OPEN position to the CLOSE position.
• Loosen the locking screw (14) with a 2mm Allen key, if it hasn’t been done before.
• Tighten the screw (15) using a 4mm Allen key. The clamping force should be
1.5-2 Nm (use a torque screwdriver) to ensure the lever is correctly tightened
(16), while the Ring Adapter with the thermal imaging module should not
move relative to the body of the optical device (10). If necessary, tighten or
loosen the screw (15) to operate the lever (16) in the best way possible.
5

ENGLISH
• Tighten the locking screw (14) as far as it will go.
• Turn on the thermal imaging module by briey pressing the ON button (6).
• Turn on the device and align the image center on the PROTON XQ30 display
with the image center of the daylight optical device by carefully tilting the
thermal imaging module.
• Align the top and bottom display boundaries of the PROTON XQ30 parallel to
the horizontal line of the daylight optical device’s reticle.
• Having reached the best possible position of the thermal imaging module,
tighten the two screws (13) until stop. The clamping force should be 6.5-7.5
N·m (use a torque screwdriver to check).
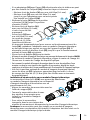
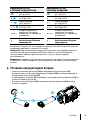
Installing Pulsar 5x30 B Monocular on to the PROTON XQ30
The Pulsar 5x30 B monocular (18) allows you to transform the
PROTON XQ30 into a hand-held thermal imager with 5x
magnication.
• Align the tabs on the monocular with the slots of
the mount (17).
• Turn the monocular clockwise to secure it on
the thermal imaging module.
• To remove the monocular, turn it
counterclockwise and disconnect
from the thermal imaging module.
Note: the monocular can be installed
on a thermal imaging module with
an Adapter already installed. The Ring Adaptor must be mounted onto the
mounting area of the thermal imaging module until it stops.
Powering on and image setup
• Remove the lens cover (1).
• Press the ON button (6) to turn on the thermal imager.
• Adjust the eyepiece diopter ring of your daylight optical device until the
symbols in the display are sharp. In future, it will not be necessary to adjust
the eyepiece diopter, regardless of the distance and other conditions.
• Enter the main menu with a long press of the controller button (8) and select
the desired calibration mode: manual (M), semi-automatic (SA) or automatic (A).
• Calibrate the image by briey pressing the ON button (6). Close the lens
cover before manual calibration.
• Select the desired observation mode (Forest, Rocks, Identication or User)
in the main menu. User mode allows you to change and save user brightness
and contrast settings in the quick menu.
• Enter the main menu with a long press of the controller (8) button and select
the desired color palette (see the Main Menu Functions section of the full
version manual for details).
• Activate the quick menu by briey pressing the controller button (8) to
adjust the brightness and contrast of the display (see the Quick Menu
Functions section of the full version manual for details).
• Upon completion of use turn the device off by a long press of the ON button (6).
18
17
6

ENGLISH
Stream Vision App
Download the Stream Vision app to stream the image (via Wi-Fi) from your
device to a smartphone or tablet, to view recorded les and update the
software on the device. A detailed user guide is available at pulsar-vision.com
Specications
MODEL PROTON XQ30
SKU 77378
MICROBOLOMETER
Type Uncooled
Resolution, Pixels 384x288
Pixel Pitch, µm 17
Frame Rate, Hz 50
OPTICAL CHARACTERISTICS
Monocular magnication, x 5
Recommended daylight optics magnication, x 1.5-4
Lens F30/1.2
Digital Zoom, x -
Eye Relief, mm/inch 18 / 0.7
Eye Relief Diameter, mm/inch 6 / 0.24
Field-of-view (Horizontal), deg/m per 100 m 12.4 / 21.8
Eyepiece Focusing Range, Diopter +5/-5
Detection Range (animal height 1.7 m), m/y 900 / 984.3
Minimum observation distance, m/y 15/16.4
DISPLAY
Type AMOLED
Resolution, Pixels 1024x768
OPERATIONAL CHARACTERISTICS
Power Supply, V 3-4.2
Battery type/Capacity/Rated Output Voltage Li-Ion Battery Pack APS 5 /
4900 mAh / DC 3.7 V
External Power Supply 5 V (USB)
Max. Battery Pack Life (at t = 22 °C), Hour* 6
Degree of protection IP code (IEC60529) IPX7
Operating temperature, °C -25 … +50
7

ENGLISH
MODEL PROTON XQ30
SKU 77378
Overall Dimensions, mm/inch 248х59х75 / 9.7x2.32x2.95
Weight (without battery and monocular), kg/oz 0.3 / 10.59
VIDEO RECORDER
Photo/Video Resolution, Pixels 864х648
Video/Photo Format .mp4/.jpg
Built-in Memory 16 GB
WI-FI CHANNEL**
Frequency 2.4 GHz
Standard 802.11 b/g
* Actual operating time will depend to what extent the Wi-Fi and built-in video
recorder is used.
**Reception range may vary depending on various factors: the presence of
obstacles, other Wi-Fi networks.
The device repair is possible within ve years.
8

FRANÇAIS
FRANÇAIS
Lot de livraison
• Proton XQ30
• Monoculaire Pulsar 5x30 B
• Housse de transport
• 2x Batterie rechargeable APS 5
• 2x Bouchon de xation de batterie APS 5
• Chargeur de batterie
• Adaptateur secteur
• Câble USB Type-C
• Télécommande sans l
• Manuel d’utilisation rapide
• Chiffon pour nettoyer l’optique
• Certicat de garantie
Description
Le module d’imagerie thermique PROTON XQ30 est conçu pour une variété
d’applications, y compris la surveillance de la chasse, les activités de sécurité,
la prise de photos et enregistrement vidéo de jour et de nuit. Inclus dans le
PROTON XQ30, le module d’imagerie thermique à l’aide d’adaptateurs spéciaux
peut être monté sur les objectifs de divers appareils optiques de jour, les
transformant en ceux d’imagerie thermique.
Éléments et commandes de l’appareil
1. Cache objectif
2. Cache d’oculaire
3. Bouchon de xation de batterie APS 5
4. Batterie rechargeable
5. Compartiment batterie
6. Bouton ON
7. Bouton REC
8. Contrôleur
9. Port USB
10. Objectif de l’appareil optique
11. Insert
12. Adaptateur
13. Vis
14. Vis de xation
15. Vis
16. Levier de l’adaptateur
17. Point de xation
18. Monoculaire Pulsar 5x30 B
9

FRANÇAIS
Open
Close
16
12
10
11
13
25
3 4 1
8
15 17
9
6
7
14 18
Fonctions des boutons
BOUTON PRESSION COURTE PRESSION LONGUE ROTATION
Bouton
marche/
arrêt ON (6)
Allumer l’appareil / Allu-
mer l’écran /
Calibrage de l’appareil
Éteindre l’appareil /
Éteindre l’écran -
Bouton REC
(7)
Démarrer/suspendre/
reprendre l’enregistrement
vidéo /
Prendre une photo
Changement de mo-
des vidéo/ photo /
Arrêter l’enregistre-
ment vidéo
-
Contrôleur
(8)
Entrer dans le menu rapide
/ Se déplacer entre les
éléments du menu rapide
/ Conrmer la sélection
Quitter le menu ra-
pide / Entrer/Quitter
le menu principal
Changement de
parameter / Na-
vigation dans le
menu principal
10

FRANÇAIS
Charge de la batterie
Les imageurs thermiques PROTON XQ30 sont livrés
avec une batterie rechargeable au lithium-ion
APS 5. Les batteries APS 5 prennent en charge la
technologie de charge rapide USB Power Delivery
lors de l’utilisation d’un kit de charge standard
(chargeur, câble USB Type-C, adaptateur secteur).
Les batteries doivent être chargées avant la
première utilisation.
Option 1
• Installez la batterie (4) dans le compartiment
batterie (5) de l’appareil.
• Connectez le câble USB (22) au connecteur USB
Type-C (9) de l’appareil.
• Connectez la deuxième extrémité du câble USB
(22) à l’adaptateur secteur (23).
• Branchez l’adaptateur secteur (23) dans une prise
de courant 100-240 V (24).
Option 2
• Insérez la batterie (4) le long du guide jusqu’en
butée dans la fente du chargeur APS 5 (19) (voir g.) fournie avec votre
appareil ou achetée séparément.
• Connectez la che du câble USB Type-C (22) au
connecteur USB Type-C de l’adaptateur (21).
• Branchez l’adaptateur secteur (23) dans une prise de
courant 100-240 V (24).
• Connectez la deuxième che du câble USB
Type-C (22) au connecteur USB Type-C (21)
du chargeur.
• L’indication LED (20) indiquera
l’état de charge de la batterie
(voir tableau).
Remarque: vous pouvez
charger deux batteries en
même temps - un second
emplacement est prévu à
cet effet
24
9
22
23
4
4
20
24
21
19
23
22
11

FRANÇAIS
INDICATION LED (20)
EN MODE BATTERIE INDICATION LED (20)
MODE VEILLE*
Charge de la batterie est
de 0 à 25% Charge de la batterie est
de 0 à 25%
Charge de la batterie est
de 26 à 50% Charge de la batterie est
de 26 à 50%
Charge de la batterie est
de 51 à 80% Charge de la batterie est
de 51 à 80%
Charge de la batterie est
de 81 à 99% Charge de la batterie est
de 81 à 99%
La batterie est chargée
complètement. Elle peut
être déconnectée du
chargeur.
La batterie est chargée
complètement. Elle peut
être déconnectée du
chargeur.
Batterie est défectueuse.
Ne pas utiliser la batterie. Batterie est défectueuse.
Ne pas utiliser la batterie.
* Mode veille est un mode de fonctionnement lorsque les piles sont insérées
dans le chargeur et que l’adaptateur secteur n’est pas connecté. L’indication
fonctionne dans ce mode pendant 10 secondes.
Attention! Lorsque vous utilisez un adaptateur secteur qui ne prend pas en
charge la technologie de charge rapide USB Power Delivery, la fréquence de
scintillement des indicateurs LED est réduite de 3 fois et le temps de charge
augmente.
Attention! Le chargeur chauffe pendant une charge rapide. L’excès de chaleur
est dissipé par le radiateur et n’agit pas sur le fonctionnement de l’appareil.
L’installation de la batterie
• Mettez le bouchon de xation (3) sur la batterie (4).
• Insérez la batterie (4) le long du guide jusqu’en butée dans le compartiment
batterie de l’appareil (5).
• Verrouillez la batterie (4) dans l’appareil en tournant le bouchon de xation
(3) dans le sens des aiguilles d’une montre jusqu’en butée.
• Pour retirer la batterie (4), tournez le bouchon de xation (3) dans le sens
inverse des qiguilles d’une montre.
4
3 5
12

FRANÇAIS
Utilisation
Installation d’un module d’imagerie thermique sur un appareil optique
• Retirez le capuchon de l’oculaire (2).
• Sélectionnez l’adaptateur (12) (à acheter séparément) avec le diamètre requis
d’insert (11) en fonction du diamètre extérieur de l’objectif de votre appareil
optique (10) (voir tableau). La désignation 42 mm / 50 mm / 56 mm dans le
nom de l’adaptateur désigne le diamètre de l’objectif de l’appareil optique.
Tableau de sélection d’inserts d’appareils optiques
Modèle de
l’adaptateur
Correspondance entre le diamètre intérieur de l’insert et le
diamètre extérieur du corps de l’objectif l’appareil de jour.
Diamètre intérieur d’insert, mm Le diamètre extérieur de
l’objectif l’appareil de jour,
mm
Adaptateur
PSP 42 mm
45,5 45,5
46 46
46,5 46,5
47 46,7-47,6
48 47,7-46,7
49 48,7-49,6
50 49,7-50,6
Adaptateur
PSP 50 mm
51,6 51,6
53,4 53,4
55 54,7-55,6
56 55,7-56,6
57 56,7-57,6
58 57,7-58,6
59 58,7-59,6
Adaptateur
PSP 56 mm
60 59,7-60,6
61 60,7-61,6
62 61,7-62,6
63 62,7-63,6
64 63,7-64,6
65 64,7-65,6
• Vissez l’adaptateur (12) sur le support (17) du module d’imagerie thermique
jusqu’en butée. Dévissez ensuite un peu l’adaptateur (pas plus d’un tour)
pour que le levier (16) se trouve à droite (voir gure).
• Serrez les vis (13) l’une après l’autre à plusieurs approches jusqu’à ce que la
rotule de l’adaptateur (12) soit bien serrée.
• Appliquez 2-3 bandes de ruban adhésif double face à l’extérieur d’insert (11)
de votre choix.
• Montez l’insert (11) dans l’adaptateur (12) jusqu’en butée.
• Déplacez le levier (16) jusqu’à la position «ouverte» (OPEN).
• Il est recommandé de dégraisser le corps de l’objectif de l’appareil optique
(10) avant de monter l’adaptateur (12) sur l’appareil optique.
• Montez l’adaptateur (12) avec l’insert (11) sur l’objectif de l’appareil optique
jusqu’en butée (10).
13

FRANÇAIS
• Si un adaptateur (12) avec l’insert (11) sélectionnée selon le tableau ne peut
pas être installé sur l’objectif (10), suivez les étapes ci-dessous:
- Dévissez la vis de xation (14) avec une clef Allen (S=2 mm).
- Dévissez la vis (15) avec une clef Allen (S=4 mm)
jusqu’à ce que l’adaptateur avec un insert puisse
être installé sur l’objectif (10).
• Déplacez le levier (16) depuis la position
«ouverte» (OPEN) jusqu’à la position
«fermée» (CLOSE).
• Dévissez la vis de xation (14)
avec une clef Allen (S=2 mm),
si cela n’a pas été fait
auparavant.
• Serrez la vis (15) avec
une clef Allen (S=4 mm).
Le couple de serrage
doit être de 1,5-2 N·m
(peut être vérié avec
un tournevis dynamométrique) pour assurer un fonctionnement serré du
levier (16), cependant l’adaptateur avec un module d’imagerie thermique
ne doit pas bouger par rapport au corps de l’appareil optique (10). Si
nécessaire, serrez ou dévissez la vis (15) jusqu’à ce que le fonctionnement
optimal du levier (16) soit atteint.
• Serrez la vis de xation (14) jusqu’en butée.
• Allumez le module d’imagerie thermique en pressant brièvement le bouton ON (6).
• En inclinant le module d’imagerie thermique, alignez le centre de l’image sur
l’écran avec le centre de l’image du dispositif optique.
• En tournant le module d’imagerie thermique dans le sens des aiguilles d’une
montre ou dans le sens inverse des aiguilles d’une montre, alignez les bords
supérieur et inférieur de l’écran parallèlement à l’horizontale de l’appareil optique.
• Une fois la position optimale du module d’imagerie thermique atteinte,
serrez les deux vis (13) à plusieurs approches jusqu’en butée. La force
de serrage doit être de 6,5-7,5 N·m (peut être vériée avec un tournevis
dynamométrique)
Installation d’un monoculaire sur un module d’imagerie thermique
Le monoculaire Pulsar 5x30 B (18) vous permet de transformer
un module d’imagerie thermique en un dispositif
d’imagerie thermique d’observation avec un
grossissement de 5 fois.
• Alignez les encoches du monoculaire avec les
fentes du support (17).
• Tournez le monoculaire dans le sens
des aiguilles d’une montre pour
le xer sur le module d’imagerie
thermique.
• Pour retirer le monoculaire,
tournez-le dans le sens inverse des
aiguilles d’une montre et déconnectez-le du module d’imagerie thermique.
Remarque: le monoculaire peut être installé sur un module d’imagerie
thermique avec un adaptateur déjà installé. L’adaptateur doit être vissé sur le
module d’imagerie thermique jusqu’en butée.
Open
Close
16
12
1110
13
15
14
17
18
17
14

FRANÇAIS
Allumage et réglage de l’image
• Enlevez le bouchon de l’objectif (1).
• Allumez l’imageur thermique en pressant le bouton ON (6).
• Réglez la résolution des icônes sur l’écran en faisant tourner la bague de
réglage dioptrique sur l’oculaire de votre viseur optique. Ultérieurement, il
n’est pas nécessaire de tourner la bague de réglage dioptrique de l’oculaire
quelles que soit la distance avec d’autres conditions.
• Entrez dans le menu principal en pressant longuement le bouton de
contrôleur (8) et sélectionnez le mode de calibrage souhaité - manuel (M),
semi-automatique (SA) ou automatique (A).
• Calibrez l’image en pressant brièvement le bouton ON (6). Fermez le
capuchon de l’objectif avant de calibrer manuellement.
• Sélectionnez le mode d’observation souhaité («Forêt», «Roches»,
«Identication», «Utilisateur») dans le menu principal. Mode utilisateur
vous permet de congurer et d’enregistrer des paramètres de luminosité et
de contraste personnalisés dans le menu rapide de l’appareil.
• Entrez dans le menu principal en pressant longuement le bouton de
contrôleur (8) et sélectionnez une palette de couleurs appropriée (pour
plus de détails, voir la section «Fonctions du menu principal» de la version
complète du manuel).
• Activez le menu rapide en pressant brièvement le bouton de contrôleur (8)
pour régler la luminosité et le contraste de l’écran (pour plus de détails, voir
la section «Fonctions du menu rapide» de la version complète du manuel).
• Une fois l’exploitation est terminée, éteignez l’appareil en pressant
longuement le bouton ON (6).
Application Stream Vision
Téléchargez l’application Stream Vision an de transférer l’image de votre
appareil vers votre smartphone ou tablette via Wi-Fi, pour visualiser les chiers
enregistrés et mettre à jour le logiciel de l’appareil. Manuel d’utilisation
détaillé est disponible sur pulsar-vision.com
15

FRANÇAIS
Spécications techniques
MODÈLE PROTON XQ30
SKU 77378
MICROBOLOMÈTRE
Type Non refroidi
Résolution, pixels 384x288
Taille du pixel, μm 17
Fréquence de rafraîchissement, Hz 50
CARACTÉRISTIQUES OPTIQUES
Grossissement, x 5
Grossissement recommandé pour l’optique de jour, x 1,5-4
Objectif F30/1,2
Zoom numérique, x -
Dégagement oculaire, mm 18
Pupille de sortie, mm 6
Champs de vision, degré/m par 100 m 12,4 /21,8
Plage de mise au point d’oculaire, dioptrie +5/-5
Distance de détection d’un animal de 1,7 m, m 900
Distance minimale d’observation, m 15
ÉCRAN
Type AMOLED
Résolution, pixels 1024x768
CARACTÉRISTIQUES DE FONCTIONNEMENT
Tension d’alimentation, V 3-4,2
Type de Batterie / Capacité / Tension nominale de
sortie Li-Ion Battery Pack APS
5 / 4900 mAh / DC 3,7 V
Alimentation externe 5 V (USB)
Durée maximale de fonctionnement à partir d’un bloc
de batteries (à t=22 °C), heure* 6
Degré de protection Code IP (IEC60529) IPX7
Plage de température de fonctionnement, °C -25 … +50
Dimensions hors tout, mm 248х59х75
Poids (sans batterie et monoculaire), kg 0,3
ENREGISTREUR VIDÉO
Résolution vidéo/ photo, pixels 864х648
Format vidéo/ photo .mp4/.jpg
Capacité mémoire interne 16 GB
CANAL WI-FI**
Fréquence 2,4 GHz
Standard 802.11 b/g
*L’autonomie réelle de la batterie varie selon l’utilisation du Wi-Fi et de
l’enregistreur vidéo.
**La portée de réception peut varier en fonction de différents facteurs: la
présence d’obstacles, d’autres réseaux Wi-Fi.
La période de maintenance de l’appareil est de cinq ans.
16

DEUTSCH
DEUTSCH
Lieferumfang
• Proton XQ30
• Monokular Pulsar 5x30 B
• Aufbewahrungstasche
• 2x APS 5 Akkumulatorenbatterie
• 2x Verschlussdeckel für APS 5 Akku
• Ladegerät für Akkumulatorenbatterie
• Netzadapter
• USB Kabel Type-C
• Fernbedienungspult
• Kurzanleitung
• Reinigungstuch für Optik
• Garantieschein
Beschreibung
Das Wärmebildgerät PROTON XQ30 ist für verschiedene Anwendungsbereiche
entwickelt, darunter Jagdbeobachtung, Überwachungstätigkeit, Foto- und
Videoaufnahmen sowohl in der Nacht als auch am Tag. Das zum Lieferumfang
vom PROTON XQ30 gehörende Wärmebildmodul kann mit Hilfe spezieller
Adapter an Objektiven verschiedener optischer Tageslichtgeräte montiert
werden, wobei die letzteren in Wärmebildgeräte umgewandelt werden.
Gerätekomponenten und Bedienungselemente
1. Objektivschutzdeckel
2. Okulardeckel
3. Verschlussdeckel für APS 5 Akku
4. Akkumulatorenbatterie
5. Akkufach
6. Taste ON/OFF
7. Taste REC
8. Controller
9. USB-Anschluss
10. Objektiv des optischen Gerätes
11. Einsatzring
12. Adapter
13. Schrauben
14. Halteschraube
15. Schraube
16. Adapterhebel
17. Halterung
18. Monokular Pulsar 5x30 B
17
La pagina si sta caricando...
La pagina si sta caricando...
La pagina si sta caricando...
La pagina si sta caricando...
La pagina si sta caricando...
La pagina si sta caricando...
La pagina si sta caricando...
La pagina si sta caricando...
La pagina si sta caricando...
La pagina si sta caricando...
La pagina si sta caricando...
La pagina si sta caricando...
La pagina si sta caricando...
La pagina si sta caricando...
La pagina si sta caricando...
La pagina si sta caricando...
La pagina si sta caricando...
La pagina si sta caricando...
La pagina si sta caricando...
La pagina si sta caricando...
La pagina si sta caricando...
La pagina si sta caricando...
La pagina si sta caricando...
La pagina si sta caricando...
La pagina si sta caricando...
La pagina si sta caricando...
La pagina si sta caricando...
La pagina si sta caricando...
La pagina si sta caricando...
La pagina si sta caricando...
La pagina si sta caricando...
La pagina si sta caricando...
-
 1
1
-
 2
2
-
 3
3
-
 4
4
-
 5
5
-
 6
6
-
 7
7
-
 8
8
-
 9
9
-
 10
10
-
 11
11
-
 12
12
-
 13
13
-
 14
14
-
 15
15
-
 16
16
-
 17
17
-
 18
18
-
 19
19
-
 20
20
-
 21
21
-
 22
22
-
 23
23
-
 24
24
-
 25
25
-
 26
26
-
 27
27
-
 28
28
-
 29
29
-
 30
30
-
 31
31
-
 32
32
-
 33
33
-
 34
34
-
 35
35
-
 36
36
-
 37
37
-
 38
38
-
 39
39
-
 40
40
-
 41
41
-
 42
42
-
 43
43
-
 44
44
-
 45
45
-
 46
46
-
 47
47
-
 48
48
-
 49
49
-
 50
50
-
 51
51
-
 52
52


in altre lingue
- français: Pulsar XQ30 Mode d'emploi
- español: Pulsar XQ30 Guía del usuario
- Deutsch: Pulsar XQ30 Benutzerhandbuch
Documenti correlati
-
Pulsar Krypton XG50 Manuale del proprietario
-
Pulsar Krypton FXG Manuale del proprietario
-
Pulsar AXION 2 LRF XQ Guida utente
-
Pulsar Axion XQ Manuale del proprietario
-
-
-
Pulsar XQ38 AXION LRF Thermal Imaging Scope Guida utente
-
-
-