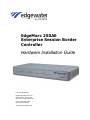
Edgewater Networks EdgeMarc 250AE Hardware Installation Manual
- Tipo
- Hardware Installation Manual

EdgeMarc 250AE
Enterprise Session Border
Controller
Hardware Installation Guide
U.S. Headquarters:
Edgewater Networks, Inc.
5225 Hellyer Ave. #100
San Jose, California 95138
Phone: 408.351.7200
Fax: 408.727.6430
edgewaternetworks.com

© 2014, Edgewater Networks, Inc.
Edgewater Networks Confidential, All Rights Reserved.
Trademarks
EDGEWATER NETWORKS and Design, EDGEMARC, EdgeMarc, and EDGECONNECT are registered trademarks of
Edgewater Networks, Inc. EDGEWATER NETWORKS and EDGEVIEW are trademarks of Edgewater Networks, Inc.
Any other trademarks appearing in this manual are owned by their respective companies.
Copyright
This document is protected by copyright and distributed under licenses restricting its use, copying, distribution, and
decompilation. No part of this document may be reproduced in any form by any means without prior written authorization
of Edgewater Networks, Inc. Documentation is provided “as is” without warranty of any kind, either express or implied,
including any kind of implied or express warranty of non-infringement of the implied warranties of merchantability or
fitness for a particular purpose.
Export Notice
You (Purchaser) acknowledge that these products are subject to the U.S. Export Administration Regulations (the “EAR”)
and that you will comply with the EAR. You are not located in Cuba, Iran, North Korea, Sudan, or Syria. You will not
export or re-export this product, directly or indirectly, to: (1) any countries that are subject to US export restrictions
(currently including, but not necessarily limited to, Cuba, Iran, North Korea, Sudan, and Syria); (2) any end user who
you know or have reason to know will utilize them in the design, development or production of nuclear, chemical or
biological weapons, or rocket systems, space launch vehicles, and sounding rockets, or unmanned air vehicle systems;
or (3) any end user who has been prohibited from participating in US export transactions by any federal agency of the
US government. In addition, you are responsible for complying with any local laws in your jurisdiction which may impact
your right to import, export or use these products.
Licensing
Use of this product is subject to Edgewater Networks Software License Agreement.
Portions of this product include software sponsored by the Free Software Foundation and are covered by the GNU
GENERAL PUBLIC LICENSE.
See License and Warranty Information and refer to www.edgewaternetworks.com/licensing
for more information
regarding licenses.
Typographical Errors
This publication could include technical inaccuracies or typographical errors, for which Edgewater Networks never can
or shall be held liable. Changes are made periodically to the information herein; these changes will be incorporated in
new releases of this publication. Edgewater Networks may make improvements or changes in the product or products
described in this publication at any time, without prior notice.
Warranty
Product warranty does not apply to damage caused by lightning, power surges, or wrong voltage usage.
Use this product in accordance with the instructions in Power Surge Protection and Grounding and refer to License and
Warranty Information.
Document Release Date
6/26/14

© 2014 Edgewater Networks. All Rights Reserved. i
Contents
Preface
Typographic Conventions . . . . . . . . . . . . . . . . . . . . . . . . . . . . 1
Document Organization . . . . . . . . . . . . . . . . . . . . . . . . . . . . . 2
Contact and Support Information. . . . . . . . . . . . . . . . . . . . . . . 2
1
Product Overview
EdgeMarc 250AE Front Panel. . . . . . . . . . . . . . . . . . . . . . . . . . 3
EdgeMarc 250AE Back Panel . . . . . . . . . . . . . . . . . . . . . . . . . . 6
2
Physical Installation
Overview . . . . . . . . . . . . . . . . . . . . . . . . . . . . . . . . . . . . . . . 7
EdgeMarc 250AE Appliance Shipping Contents. . . . . . . . . . . . . . 7
Required Tools and Materials. . . . . . . . . . . . . . . . . . . . . . . . . . 8
Power Surge Protection and Grounding. . . . . . . . . . . . . . . . . . . 8
Grounding the EdgeMarc . . . . . . . . . . . . . . . . . . . . . . . . . . . 8
Installing the EdgeMarc on a Desktop, Shelf, or Tray . . . . . . . . . 9
Wall Mounting the EdgeMarc . . . . . . . . . . . . . . . . . . . . . . . . . . 9
Connecting the Power and Cables . . . . . . . . . . . . . . . . . . . . . 10
Powering On the EdgeMarc . . . . . . . . . . . . . . . . . . . . . . . . . . 10
3
Configuring Basic Network Settings
Connecting to the EdgeMarc for the First Time . . . . . . . . . . . . 11
Changing Your Password. . . . . . . . . . . . . . . . . . . . . . . . . . . . 12
Changing the Administration Password . . . . . . . . . . . . . . . . 13
Changing the Read-Only Password . . . . . . . . . . . . . . . . . . . 14
Password Restrictions . . . . . . . . . . . . . . . . . . . . . . . . . . . 15
Deploying the EdgeMarc 250AE Appliance. . . . . . . . . . . . . . . . 15
A
Safety, Compliance, and Certifications
FCC Compliance Statements . . . . . . . . . . . . . . . . . . . . . . . . . 18
Class B Notice for FCC . . . . . . . . . . . . . . . . . . . . . . . . . . . 18
Class B Notice for Canada . . . . . . . . . . . . . . . . . . . . . . . . . 19
Class B Warning for Korea. . . . . . . . . . . . . . . . . . . . . . . . . 19
VCCI Compliance for Class B Equipment . . . . . . . . . . . . . . . 19
Radio Frequency Interference Statement . . . . . . . . . . . . . . . . 20
Canadian Doc Notice for Class B Computing Devices . . . . . . . . 20
Industry Canada (IC) . . . . . . . . . . . . . . . . . . . . . . . . . . . . 20

EdgeMarc 250AE Hardware Installation Guide
ii © 2014 Edgewater Networks. All Rights Reserved.
Canadian Certification Requirements for Bilingual Safety, Warning
and Caution Markings . . . . . . . . . . . . . . . . . . . . . . . . . . . . 21
EEA Regulatory Notices . . . . . . . . . . . . . . . . . . . . . . . . . . . . 22
CE Mark R & TTE Directive. . . . . . . . . . . . . . . . . . . . . . . . . 22
Declaration of Conformity . . . . . . . . . . . . . . . . . . . . . . . . . 22
Restriction of Hazardous Substances Directive (RoHS) . . . . . . . 24
End of Life Products . . . . . . . . . . . . . . . . . . . . . . . . . . . . . . . 24
Important Safety Instructions . . . . . . . . . . . . . . . . . . . . . . . . 24
B
License and Warranty Information
Licensing . . . . . . . . . . . . . . . . . . . . . . . . . . . . . . . . . . . . . . 27
EdgeMarc Hardware Warranty . . . . . . . . . . . . . . . . . . . . . . . . 27
Software Export Controls . . . . . . . . . . . . . . . . . . . . . . . . . . . 28

© 2014 Edgewater Networks. All Rights Reserved. 1
Preface
This guide provides a description of the hardware components for the
EdgeMarc 250AE Enterprise Session Border Controller, installation
instructions, and instructions for how to set up the EdgeMarc in your
network for the first time. It also includes compliance and certification
notices and the hardware warranty and software notice.
Refer to the EdgeMarc User Guide in the Edgewater Networks
Knowledgebase at www.edgewaternetworks.com/kb for instructions on
using the EdgeMarc VoIP Operation System (VOS) to configure, deploy, and
manage the EdgeMarc. The Knowledgebase includes documentation for
installing, deploying, and managing Edgewater Networks products and
solutions.
Typographic Conventions
User input is displayed in boldface type and can represent keyboard input,
mouse selections in a browser window, and buttons on the GUI, depending
on the context. For example, the notation File > Open... means that you
first click the File menu and then select Open... from the sub-menu in the
GUI.
Command Line Interface (CLI) text is shown in
courier font.
Note
Note
Note
Notes highlight information that is important or that has special interest.
Tip
Tip
Tips provide additional information that is helpful in performing a
particular task but is not mandatory to perform the task.
Caution
Caution
Caution
Cautions alert you of actions or events that may cause system damage or
loss of data.
Warning
Warning
Warnings alert you of actions or events that may cause bodily harm.

EdgeMarc 250AE Hardware Installation Guide
2 © 2014 Edgewater Networks. All Rights Reserved.
Document Organization
Contact and Support Information
Headquarters
5225 Hellyer Ave., #100
San Jose, CA 95138
(408) 351-7200
Fax: 408.727.6430
General: [email protected]
Sales: [email protected]
Edgewater Networks, Inc. - Technical Assistance Center
Phone: 408.351.7200 ext. 2
Item Description
Chapter 1, Product Overview Describes EdgeMarc 250AE hardware
components.
Chapter 2, Physical Installation Provides instructions for installing the
EdgeMarc 250 series hardware.
Chapter 3, Configuring Basic Network
Settings
Describes how to connect to the EdgeMarc and
access the graphical user interface (GUI) to
configure basic network settings for the first
time.
Safety, Compliance, and Certifications Describes EdgeMarc 250AE specifications and
certifications.
License and Warranty Information Provides license information related to the
operation of EdgeMarc hardware and software.

© 2014 Edgewater Networks. All Rights Reserved. 3
1
Product Overview
The EdgeMarc 250AE is used to connect users to SIP trunking, Hosted PBX
and other cloud-based IP services. It is also used to connect
branch/remote offices to datacenter communications systems. The
EdgeMarc 250AE is an all-in-box solution that ensures survivability,
provides quality of service, security services, and simplifies
troubleshooting. The EdgeMarc 250AE provides enterprise-class session
border controller features in a package that is optimized for small and
medium offices.
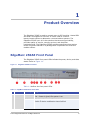
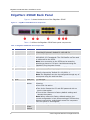
EdgeMarc 250AE Front Panel
The EdgeMarc 250AE front panel LEDs indicate the power, device, and data
status. Refer to Figure 1-1.
Figure 1-1 EdgeMarc 250AE Front Panel
Table 1-1 defines the front panel LEDs.
Table 1-1 EdgeMarc 250AE Front Panel LEDs
# LED Label Activity Signal
1 Power Green Off – No Power, the system is off
On – Power is good, the system is on
Red Flashing—Power-on self test is in progress
Solid—A device malfunction has occurred

EdgeMarc 250AE Hardware Installation Guide
4 © 2014 Edgewater Networks. All Rights Reserved.
# LED Label Activity Signal
2 Ethernet
LAN (1-8)
Solid Green A powered device is connected to the associated port.
Flickering
Green
LAN activity is occurring with the device that is connected
to the port.
Note: A flickering light is synchronized with actual data
traffic.
Off A device that is connected to the port is not powered on or
there is no network connection to the device.
3 DSL Solid Green DSL connection is synchronized with actual data traffic.
Off The device is not powered.
Flashing
Green
Attempting to synchronize the connection.
Flashing
Green and
Solid Red
Attempting to synchronize the connection after three
consecutive minutes have passed.
Flashing
Red
No DSL connection and no signal.
4 Internet Solid Green The device has a WAN IP address and is connected.
Off The device is not powered or the broadband connection is
not present.
Flashing
Green
Attempting PPP connection.
Red Device attempted to become IP connected and failed.
5 Activity Off The device is not powered or the broadband connection is
not present.
Flickering
Green
Internet activity detected via the broadband connection.
Note: The flickering of the light will be synchronized with
actual data traffic.
6 VoIP Off Not connected.
Solid Green Data is being streamed to the connection using RTP
forwarding.
Note: In the case of LAN to LAN calls, the LED light is off
because RTP forwarding is not present.
Solid
Amber
The system is booting.
Table 1-1 EdgeMarc 250AE Front Panel LEDs

Product Overview
© 2014 Edgewater Networks. All Rights Reserved. 5
# LED Label Activity Signal
7 Ethernet
WAN
Solid Green Powered device is connected to the associated port.
Flickering
Green
LAN activity is occurring with the device that is connected
to the port.
Note: The flickering of the light will be synchronized with
actual data traffic.
Off No device is connected to the port, or the connected device is
without power.
8 Phone
(1-4)
Off Phone is on-hook.
Solid Green Phone is off-hook.
9 Line Off The device is not powered or a PSTN call is not in
progress.
Solid Green A PSTN call is in progress.
10 USB Off The device is without power or a USB device is not
connected.
Solid Green A USB device is connected.
Flickering
Green
Activity detected on the USB device.
Table 1-1 EdgeMarc 250AE Front Panel LEDs

EdgeMarc 250AE Hardware Installation Guide
6 © 2014 Edgewater Networks. All Rights Reserved.
EdgeMarc 250AE Back Panel
Figure 1-2 shows the back view of the EdgeMarc 250AE.
Figure 1-2 EdgeMarc 250AE Back Panel Components
Table 1-2 defines the EdgeMarc 250AE back panel components.
Table 1-2 EdgeMarc 250AE Back Panel Components
# Label Function Description
1 Phone FXS ports (4) 10/100/1000 Mbps RJ-45 Ethernet FXS ports for
connecting IP phones. Default IP: 192.168.1.1
2 DSL/Line FXO port Connects the EdgeMarc to a phone line supporting
ADSL/ADSL 2/2+ standards. The FXO feature can be used
to make calls to the PSTN.
Note: Your connection to the PSTN can be tested by
attaching a phone to FXS port 4 and disconnecting the
EdgeMarc from the power source.
3 Ethernet WAN xDSL port Connects the EdgeMarc to a cable or xDSL modem.
4 Ethernet LAN LAN ports (8) 10/100/1000 Mbps RJ-45 Ethernet ports for LAN
network connectivity. Default IP: 192.168.1.1.
Note: The EdgeMarc can also be configured through any of
these ports using the web interface.
5 USB USB port (1) USB port.
6 Erase Erase
button
Press the Erase button in quick succession to control the
following:
• One click—No action.
• Two clicks—Resets the CLI and GUI password with no
service interruption.
• Three clicks—Restores to factory default settings and
reboots the system.
Note: When restored to factory default settings, the
current configuration is lost, disconnecting all VoIP devices,
Internet connectivity, and network access for computers
until the system is reconfigured.
7 Power Input
Power
Socket
Connects the EdgeMarc to an AC power outlet.

© 2014 Edgewater Networks. All Rights Reserved. 7
2
Physical Installation
The following sections describe how to install the EdgeMarc 250AE
hardware:
Overview
EdgeMarc 250AE Appliance Shipping Contents
Required Tools and Materials
Power Surge Protection and Grounding
Installing the EdgeMarc on a Desktop, Shelf, or Tray
Wall Mounting the EdgeMarc
Connecting the Power and Cables
Powering On the EdgeMarc
Overview
The EdgeMarc 250AE appliance is designed for desktop, shelf, tray, or wall
mount installation. Observe the following guidelines when installing the
system:
Always verify that the AC power cord is disconnected from a power
source prior to installation.
Do not stack multiple units on top of each other as this can cause
overheating.
Ensure that the installation site has adequate air circulation and meets
the minimum operating conditions for the system as specified in Safety,
Compliance, and Certifications.
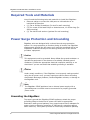
EdgeMarc 250AE Appliance Shipping Contents
The EdgeMarc 250AE appliance is shipped with the following components:
EdgeMarc 250AE appliance
Product license key card
(1) AC Power Cord

EdgeMarc 250AE Hardware Installation Guide
8 © 2014 Edgewater Networks. All Rights Reserved.
Required Tools and Materials
You will need the following tools and materials to install the EdgeMarc:
Ethernet cables to connect the LAN ports to LAN switches or to
individual VoIP devices
(1) Flat or Phillips Screwdriver (for shelf or wall mounting)
(2) Two round or flat head Philips or slotted screws, 1½ inches long (for
wall mounting)
(2) Two hollow wall anchors (optional for wall mounting)
Power Surge Protection and Grounding
EdgeMarc units are designed with a robust internal surge protection
system. For surge protection to function during all events, the EdgeMarc
supplemental ground (the AC power cord) must be connected with a low
impedance conductor directly to the same ground point as the service
providers’ equipment.
Caution
Caution
Caution
This equipment must be grounded. Never defeat the ground conductor or
operate the equipment in the absence of a suitably installed ground
conductor. Contact the appropriate electrical inspection authority or an
electrician if you are uncertain that suitable grounding is available.
Caution
Caution
Caution
Under certain conditions, if the EdgeMarc is not properly earth-grounded
using the AC power cord, you may experience various issues including:
electrostatic discharge problems, random EdgeMarc reboots, or damage to
the EdgeMarc unit.
Note
Note
Note
The EdgeMarc 250AE appliance has an internal power supply with a
grounded power cord that must be connected to a properly grounded
power outlet.
Grounding the EdgeMarc
To properly ground the EdgeMarc 250AE appliance, attach the proper
grounding strap to the device AC power cord with an appropriate
destination earth ground pathway. Any ground source that is adequate for
power circuits or lightning protection is sufficient for protection against
static electricity. This system provides an electrically conductive pathway

Physical Installation
© 2014 Edgewater Networks. All Rights Reserved. 9
for static electricity to follow and safely dissipate into the ground.The
grounding impedance to ground must not exceed 0.5 ohm. It is
recommended that a minimum 14AWG be used to ground the unit. Contact
the appropriate electrical inspection authority or an electrician if you are
uncertain that suitable grounding is available or the local applicable
standard.
Installing the EdgeMarc on a Desktop, Shelf,
or Tray
1. Remove the EdgeMarc and accessories from the shipping container.
2. Place the device on a flat, dry surface such as a desktop, shelf, or tray.
3. Connect the EdgeMarc to ground. Refer to Grounding the EdgeMarc.
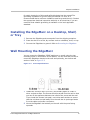
Wall Mounting the EdgeMarc
You can mount the EdgeMarc 250AE appliance on a wall using the two
mounting holes on the bottom of the chassis. You will need two screws to
mount the EdgeMarc chassis to the wall and optionally, two hollow wall
anchors. Refer to Figure 2-3.
Figure 2-3 Screw Specifications
1. Install two screws 5.9063 (150 mm) horizontally apart on a wall or
other vertical surface. The screws should protrude from the wall so that
you can fit the appliance between the head of the screw and the wall.
If you install the screws in drywall, use hollow wall anchors to ensure
that the unit does not pull away from the wall due to prolonged strain
from the cable and power connectors.
2. Mount the EdgeMarc horizontally on the wall with the ports facing
upwards.

EdgeMarc 250AE Hardware Installation Guide
10 © 2014 Edgewater Networks. All Rights Reserved.
Caution
Caution
Caution
Do not mount the EdgeMarc vertically on the wall!
Connecting the Power and Cables
The EdgeMarc 250AE comes with an AC power cord for connecting the unit
to an AC outlet.
Warning
Warning
Always connect the AC power cord to an AC outlet suitable for the power
supply that came with the unit to reduce the risk of damage.
1. Connect one end of the AC power cord to the EdgeMarc input power
socket and the other end to the AC outlet. You may need to apply a bit
of force to properly position the plug in the power socket.
Caution
Caution
Caution
Secure the AC power cord to a cable management system using a fastener
or tie wrap to insure the EdgeMarc does not hang from the AC outlet.
1. If connecting to an Internet router, Internet DMZ switch, cable modem
or DSL modem, connect the Ethernet cable to the WAN Interface port
(Port 2) on the EdgeMarc and the other end to the WAN device.
Powering On the EdgeMarc
1. Turn on the EdgeMarc power switch.
2. Make sure that the power and status LEDs on the front panel are solid
green after the EdgeMarc powers on.
3. Proceed to Chapter 3, Configuring Basic Network Settings.

© 2014 Edgewater Networks. All Rights Reserved. 11
3
Configuring Basic Network
Settings
This chapter explains how to connect to the EdgeMarc and access the
graphical user interface (GUI) to configure basic network settings for the
first time. Refer to the EdgeMarc User Guide for complete details on how to
configure your EdgeMarc device for your network deployment.
Connecting to the EdgeMarc for the First Time
Changing Your Password
Deploying the EdgeMarc 250AE Appliance
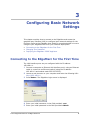
Connecting to the EdgeMarc for the First Time
The LAN interface ports are pre-configured with the IP address
192.168.1.1.
1. Connect a computer to Ethernet LAN interface port 1 using an Ethernet
cable or connect to an Ethernet switch (using the IP address
192.168.1.2 and subnet mask 255.255.255.0).
2. Launch a web browser on your computer and enter the following URL:
http://192.168.1.1.
3. Press Return. The EdgeMarc login screen is displayed.
4. Enter your initial username in the field provided: root
5. Enter your initial password in the field provided: default

EdgeMarc 250AE Hardware Installation Guide
12 © 2014 Edgewater Networks. All Rights Reserved.
6. Click OK. The EdgeMarc Admin landing page is displayed.
7. Proceed to Changing Your Password.
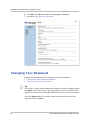
Changing Your Password
Change your password before setting any system parameters:
Changing the Administration Password
Changing the Read-Only Password
Tip
Tip
If the root or rouser account passwords need to be reset to defaults, press
the Erase button two times in quick succession on the rear panel of the
EdgeMarc to reset the CLI and GUI password with no service interruption.
Press the Erase button only twice; pressing three times restores the
system to factory defaults.

Configuring Basic Network Settings
© 2014 Edgewater Networks. All Rights Reserved. 13
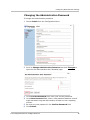
Changing the Administration Password
To change the administrative password:
1. Choose Admin from the Configuration Menu.
2. Scroll to Change Administrative Password and click Changed to
open the Set Administrative User Password page.
3. In the Current Password field, enter your current password.
4. In the New Password field, enter a new password between six and
eight characters long and that contains at least one non-repeating
number.
5. Re-enter the new password in the Confirm Password field.
6. Click Submit.

EdgeMarc 250AE Hardware Installation Guide
14 © 2014 Edgewater Networks. All Rights Reserved.
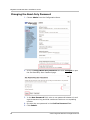
Changing the Read-Only Password
1. Choose Admin from the Configuration Menu.
2. Scroll to Change Read-Only Password and click Changed to open
the Set Read-Only User Password page.
3. In the New Password field, enter a new password between six and
eight characters long and that contains at least one non-repeating
number.
4. Re-enter the new password in the Confirm Password field.
5. Click Submit.

Configuring Basic Network Settings
© 2014 Edgewater Networks. All Rights Reserved. 15
Password Restrictions
Passwords must meet the following complexity requirements:
Must have a minimum length in the range of 8 to 15 characters,
depending on the configured value.
Must contain the minimum configured number of alphabet, numeric and
special characters. Configurable range is 1 to 2 characters for each
character class.
Must not exceed the maximum number of consecutive repeating
characters that are allowed in the password. Configurable range is 1 to
4 repeating characters.
Must contain the minimum configured number of changed characters
from the previously used password. Configurable range is 1 to 4
characters
Must not be identical to configured number of previously used
password. Configurable range is 8 to 16 previously used
Deploying the EdgeMarc 250AE Appliance
The EdgeMarc is deployed as a Session Border Controller on the network.
For details about how to configure and deploy the EdgeMarc device in your
network, refer to the EdgeMarc online help and the EdgeMarc User Guide
available in the Edgewater Networks Knowledgebase at
www.edgewaternetworks.com/kb.

EdgeMarc 250AE Hardware Installation Guide
16 © 2014 Edgewater Networks. All Rights Reserved.
La pagina si sta caricando...
La pagina si sta caricando...
La pagina si sta caricando...
La pagina si sta caricando...
La pagina si sta caricando...
La pagina si sta caricando...
La pagina si sta caricando...
La pagina si sta caricando...
La pagina si sta caricando...
La pagina si sta caricando...
La pagina si sta caricando...
La pagina si sta caricando...
-
 1
1
-
 2
2
-
 3
3
-
 4
4
-
 5
5
-
 6
6
-
 7
7
-
 8
8
-
 9
9
-
 10
10
-
 11
11
-
 12
12
-
 13
13
-
 14
14
-
 15
15
-
 16
16
-
 17
17
-
 18
18
-
 19
19
-
 20
20
-
 21
21
-
 22
22
-
 23
23
-
 24
24
-
 25
25
-
 26
26
-
 27
27
-
 28
28
-
 29
29
-
 30
30
-
 31
31
-
 32
32


Edgewater Networks EdgeMarc 250AE Hardware Installation Manual
- Tipo
- Hardware Installation Manual
in altre lingue
- English: Edgewater Networks EdgeMarc 250AE
Documenti correlati
-
Edgewater Networks EdgeMarc 2900a Hardware Installation Manual
-
-
-
-
-
Altri documenti
-
 Glomex V9112AGCU DVB-T2 TV Antennas Range Manuale del proprietario
-
LevelOne WAC-2000 Quick Installation Manual
-
 Atlantis Land A07-VTG3306C Manuale utente
-
Juniper J6350 Getting Started Manual
-
Ubiquiti UniFi USG Guida Rapida
-
-
Trendnet TEW-800MB Guida utente
-
Boston Whaler 250 Outrage Manuale del proprietario
-

