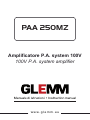
GLEMM PAA 250MZ Manuale del proprietario
- Tipo
- Manuale del proprietario

www.glemm.eu
Manuale di istruzioni • Instruction manual
PAA 250MZ
Amplificatore P.A. system 100V
100V P.A. system amplifier

32
Grazie per aver scelto il
marchio GLEMM
Il prodotto GLEMM da Lei acquistato è frutto di
un’accurata progettazione da parte di ingegneri
specializzati. Per la sua realizzazione sono stati
impiegati materiali di ottima qualità per garantirne
il funzionamento nel tempo. Il prodotto è stato
realizzato in conformità alle severe normative di
sicurezza imposte dalla Comunità Europea, garanzia
di adabilità e sicurezza. Vi consigliamo di leggere
attentamente questo manuale prima di cominciare ad
utilizzare l’apparecchio al ne di sfruttarne appieno
le potenzialità. Augurandoci che rimarrete soddisfatti
del vostro acquisto, Vi ringraziamo nuovamente per
la ducia riposta nel nostro marchio e vi invitamo a
visitare il nostro sito internet www.glemm.eu dove
troverete l’intera gamma dei prodotti GLEMM, assieme
ad informazioni ed aggiornamenti utili.
Thank you for choosing
GLEMM brand
The GLEMM product you have purchased is the
result of careful planning by specialized engineers.
High quality materials were used for its construction,
to ensure its functioning over time. The product
is manufactured in compliance with the strict
regulations imposed by the European Union, a
guarantee of reliability and safety. Please read this
manual carefully before starting using the device in
order to exploit its full potential.
Hoping that you will be satised of your purchase, we
thank you again for your trust in our brand and we
invite you to read our website www.glemm.eu
where you will nd the whole range of GLEMM
products, along with useful information and updates.
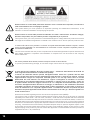
Precauzioni ed
avvertenze
• Leggete e seguite scrupolosamente le istruzioni
riportate su questo manuale.
• Conservate il manuale per future consultazioni e
allegatelo se cedete l’apparecchio ad altri.
• Il dispositivo funziona con pericolosa tensione di
rete 230V. Non apritelo, non smontatelo e non
cercate di intervenire al suo interno. In caso di
utilizzo improprio esiste il pericolo di una scarica
elettrica.
Rivolgetevi a un tecnico specializzato per l’installazione.
• Quando collegate l’apparecchio controllate
sempre che la tensione impostata sul prodotto
corrisponda a quella della sorgente di
alimentazione.
• Evitate di utilizzare l’unità:
- in luoghi con temperatura superiore ai 35°C
- in luoghi soggetti a vibrazione e/o possibili urti
- in luoghi esposti alla pioggia o con troppa
umidità
Cautions and
warnings
• Read and follow strictly the instructions
contained in this manual.
• Keep this manual for future reference and
include it if you give the product to another
user.
• This device works with dangerous 230V mains
power. Do not open, do not disassemble and
don’t try to operate inside. In case of wrong
use an electric shock may occur.
• Contact a specialized technician for
installation
• When you connect the device always check
that the voltage set on the unit corresponds to
the power outlet voltage.
• Avoid using the unit:
- in places with temperatures above 35 ° C
- in places subject to vibrations and / or
possible impacts
- in places exposed to rain or humidity.

32
Spedizione e reclami
Al momento dell’acquisto o della ricezione del
prodotto aprite la scatola e controllate attentamente
il contenuto per accertarvi che tutte le parti
siano presenti e in buone condizioni. Segnalate
immediatamente al venditore eventuali danni da
trasporto subiti dall’apparecchio.
In caso di invio in assistenza è importante che
il prodotto sia completo dell’imballo originale: vi
suggeriamo quindi di conservarlo.
Shipment and complaints
After buying or receiving the product, open the box
and carefully check the content, to make sure that all
parts are included and in good condition. Immediately
notify the seller of any transport damage suered by
the device.
In case of return for servicing it is important to ship
the product complete with the original packaging: we
therefore suggest you to keep it.
• Evitate che nel prodotto entrino liquido
inammabile, acqua o oggetti.
• Installate il prodotto in posizione areata, lontano
da fonti di calore e non ostruite la ventola
• In caso di problemi di funzionamento
interrompete l’uso immediatamente. Non
tentate di riparare l’apparecchio per conto
vostro, ma rivolgetevi all’assistenza autorizzata.
Riparazioni eettuate da personale non
competente potrebbero creare gravi danni sia
all’apparecchio che alle persone.
• Scollegate l’unità dall’alimentazione quando non
è in uso.
• Lasciate rareddare il prodotto prima di
eettuare pulizia o manutenzione.
• Se il prodotto non si accende controllate il
fusibile e se necessario sostituitelo con uno
dello stesso amperaggio, dopo aver scollegato
l’apparecchio dall’alimentazione.
• Non accendere e spegnere il prodotto a
brevi intervalli: potrebbe ridurre la durata del
dispositivo
• Non staccate il cavo di alimentazione tirandolo
dal lo.
• Controllate periodicamente che il cavo di
alimentazione non sia rovinato.
• Do not allow ammable liquid, water or objects
to enter the product.
• Install the product in a ventilated position, far
from heat sources and don’t obstruct the fan.
• In the event of a serious operating problem,
stop using the product immediately. Never
try to repair it by yourself, but contact the
authorized technical service center.
Repairs carried out by unskilled persons could
lead to serious damages both to the xture and
to people.
• Disconnect the unit from power when it is not
used.
• Wait for the product to cool before cleaning or
maintenance.
• If the product doesn’t turn on, check the fuse
and if necessary replace it with one of the
same amperage, after disconnecting the xture
from power.
• Do not turn the product on and o at short
intervals, it may reduce the life of the device.
• Never disconnect the product from the power
source by pulling on the cord.
• Periodically check the condition of the power
cord.

54
Condizioni di garanzia
Il prodotto è coperto da garanzia in base alle
vigenti normative nazionali ed Europee.
Per le condizioni complete di garanzia e per
eettuare richieste di assistenza visitate il sito:
www.glemm.eu
• La garanzia copre i difetti di fabbrica ed
i guasti vericatisi nei primi 2 anni dalla
data di acquisto. Nel caso di acquisto con
fattura, la garanzia è limitata ad 1 anno.
• Sono esclusi i guasti causati da imperizia
o da uso non appropriato dell’apparecchio
• La garanzia non ha più alcun eetto
qualora l’apparecchio risulti manomesso.
• La garanzia non prevede necessariamente
la sostituzione del prodotto.
• Sono escluse dalla garanzia le parti
esterne, le batterie, le manopole,
gli interruttori, e le parti asportabili o
consumabili.
• Le spese di trasporto e i rischi
conseguenti sono a carico del proprietario
dell’apparecchio
• A tutti gli eetti la validità della garanzia è
avallata unicamente dalla presentazione
della fattura o scontrino d’acquisto.
Warranty conditions
The product is covered by warranty according
to current national and European regulations.
For detailed warranty conditions and RMA
requests please refer to our website:
www.glemm.eu
• The warranty covers manifacturing defects
and faults occurred in the rst 2 years from
the date of purchase. In case of purchase
with invoice, the warranty is limited to 1 year
• Damages caused by negligence or wrong
use of the device are not covered by
warranty.
• The warranty is no longer eective if the
item is modied or disassembled by not
authorized people.
• This warranty doesn’t necessarily envisage
the product’s replacement.
• External components, batteries, knobs,
switches and any removable or subject
to wear and tear parts are excluded from
warranty.
• Shipment for the return of faulty items is at
expense and risk of the owner.
• For all intents and porpuses the warranty
is eective only upon exhibition of the
invoice or of the purchase receipt.

54
Questo amplicatore è stato realizzato per
applicazioni “P.A. system” in ambienti come
uci, scuole, chiese, negozi, centri commerciali,
ristoranti, centri congressi, auditorium etc.
Alcuni sistemi di protezione prevengono
danneggiamenti da corto circuiti, surriscaldamenti
e sovraccarichi, rendendolo sicuro ed adabile.
Semplice da installare, può essere inserito anche
in normali rack 19”.
Possiede 3 ingressi microfonici, 2 ingressi line e
2 uscite AUX/REC.
Prima di eettuare i collegamenti, assicuratevi
che l’unità sia scollegata dalla presa elettrica.
Tutti i collegamenti devono avvenire ad
apparecchio spento.
Before making any connection, check that
the unit is unplugged from the electrical
outlet. All connections must be made with
the appliance turned o.
This amplier has been designed for
“P.A. system“ applications. It is used for
example in oces, schools, churches,
shops, shopping centers, restaurants,
convention centers, auditoriums, etc.
Its particular protection systems prevent
damages caused by short circuits, overheating
and overloads, making it safe and reliable.
Easy to install, it can also be mounted in
ordinary 19” racks.
It comes with 3 microphone inputs, 2 line
inputs, 2 outputs (AUX/REC).

76
Collegamento diffusori a
tensione costante
E’ il tipo di impianto monofonico realizzato in
negozi, sale conferenze, chiese e in qualsiasi
ambiente si renda necessaria una diusione
uniforme del suono con la massima semplicità
di installazione ed impiego. Si utilizzano solo 2
li che partendo dall’amplicatore, arriveranno
no all’ultimo diusore. Sull’amplicatore andrà
collegato un lo al morsetto “com” (comune) e
l’altro lo al morsetto riportante 100V.
I due li faranno tutto il giro dell’impianto e a
questi verranno connessi i diusori o meglio i
trasformatori di cui ogni diusore dovrà essere
munito. Generalmente, i diusori di questo
tipo, possiedono un selettore dal quale settare
la potenza di riproduzione, dal valore minimo,
al massimo supportato dal trasformatore. In
pratica, collegati agli stessi 2 li principali, vi
saranno un certo numero di diusori, anche
diversi tra loro, persino con diversa potenza.
Il segnale dell’amplicatore raggiungerà il
trasformatore presente in ogni diusore e sarà il
trasformatore a fornire la potenza desiderata.
Quando si agirà sul volume dell’amplicatore,
si alzerà o abbasserà il volume di tutti i diusori
in proporzione. Importante: la somma della
potenza massima dei diusori deve essere
uguale o minore della potenza massima
dell’amplicatore.
Constant voltage
speaker connection
It is the type of monophonic system realized
in shops, conference rooms, churches and
in any environment where a uniform sound
diusion is necessary, with maximum ease
of installation and use. Only 2 wires are used,
starting from the amplier and getting up to
the last speaker. On the amplier you have
to connect a wire to the “com”(common)
terminal and the other wire to the terminal
indicating 100V.
The two wires will go all around the system,
and they will be connected to the speakers
or rather the transformers included in the
speakers. The speakers of this type, have
generally a selector to set power, from the
minimum to the maximum value supported by
the transformer.
As a matter of fact, it is possible to connect
to the same 2 main wires, a number of
speakers, even dierent from each other or
with dierent power. The amplier signal will
reach each speaker’s transformer and the
transformer will provide the desired power.
When you operate on the amplier volume,
you will increase or reduce the volume of all
speakers proportionally .Important: the total
maximum power of the speakers must be
equal to or less than the amplier’s maximum
power .

76
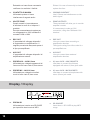
com
15W 20W
30W5W
20W
100V
Amplicatore 60W
com
15W 20W
30W5W
20W
100V
Amplicatore 60W
ESEMPIO: All’impianto sono stati collegati 5 dif-
fusori per un totale di 90W. L’amplicatore gestisce
no a 110W per cui in futuro potranno essere
collegati altri diusori no a saturare la potenza
dell’amplicatore.
EXAMPLE: You connect to the system 5 speakers for
a total of 90W. The amplier supports up to 110W: so
in the future you will be able to connect other
speakers, until you reach the amplier’s maximum
power.

98
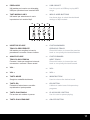
1. TASTO CHIME
Se premuto emette il classico “DIN-DON”
utile a richiamare l’attenzione prima di un
annuncio.
1. CHIME BUTTON
If pressed it emits the typical “DING-
DONG”, useful to draw attention before
an announcement.
Fronte / Front panel
Retro / Rear panel
Funzioni / Functions

98
2. FUNZIONE PRIORITY
Se collegate il microfono alla funzione
priority, il segnale AUX IN verrà
silenziato. La funzione priority è
attivabile sull’ingresso MIC 1.
3. REGOLATORE VOLUME MIC1 CON
PRIORITY
Utilizzatelo per regolare il volume del
microfono con funzione priority
4. REGOLATORE BASSI
E’ il regolatore dei toni bassi
5. REGOLATORE TREBLE
E’ il regolatore dei toni alti
6. REGOLATORE MASTER
E’ il regolatore di volume generale
dell’intera miscelazione.
7. REGOLATORI VOLUMI ZONE
Utilizzateli per regolare i volumi delle
singole zone del vostro prodotto
8. TASTO DI ACCENSIONE
Utilizzatelo per accendere il prodotto
9. VU METERS
Mostra in tempo reale il livello di
segnale in uscita. Assicuratevi che non
indichi costantemente la zona rossa. In
tale caso abbassate i volumi per evitare
di danneggiare l’apparecchio.
10. DISPLAY
Vi permetterà di visualizzare le funzioni
scelte o le tracce Mp3 riprodotte.
11. SELETTORE DI VOLTAGGIO
Per selezionare il corretto voltaggio
12. PRESA DI ALIMENTAZIONE CON
FUSIBILE
Collegate il cavo di alimentazione alla
presa per poter alimentare il dispositivo.
La presa contiene un vano portafusibile.
2. PRIORITY FUNCTION
By connecting the microphone to the
priority function, the AUX IN signal will
be muted. The priority function can be
activated on the MIC 1 input.
3. MIC1 VOLUME CONTROL WITH
PRIORITY
Use it to adjust the volume of the
microphone with priority function.
4. BASS CONTROL
To adjust bass tones.
5. TREBLE CONTROL
To adjust treble tones.
6. MASTER CONTROL
General volume control for the whole
mixing.
7. ZONE VOLUME CONTROLS
Use them to adjust independently the
volumes of your amplier’s zones.
8. ON / OFF BUTTON
Use it to turn on the product.
9. VU METERS
It shows the output signal level in real
time. Make sure it doesn’t constantly
indicate the red area. In this case,
reduce the volumes to avoid damaging
the appliance.
10. DISPLAY
It will allow you to view the selected
functions or the Mp3 tracks played.
11. VOLTAGE SELECTOR
Use it to select the correct voltage
12. POWER SOCKET WITH FUSE
Connect the power cable to the socket
to power the device.
The socket includes a fuse-holder.

1110
Estraetelo nel caso fosse necessario
vericare e/o sostituire il fusibile.
13. CONTATTO DI MASSA
Utilizzatelo qualora ci siano
interferenze di segnale audio.
14. USCITE ZONE
Questi morsetti vi permetteranno
di sfruttare le zone di cui dispone il
prodotto.
Dovrete necessariamente optare per
un collegamento a 100V sfruttando il
morsetto COM e 100V
15. REC OUT
Vi permetterà di collegare dispositivi
di registrazione o amplicazione. Il
segnale proveniente da questa presa è
di tipo pre-amplicato.
16. AUX OUT
Vi permetterà di collegare dispositivi di
amplicazione esterna
17. PRESE AUX - JACK 6,3mm
Utilizzatele per collegare apparecchi di
linea muniti di cavo Jack 6,3mm stereo
18. PRESE MIC - JACK 6,3mm
Utilizzatele per collegare microfoni
muniti di cavo Jack 6,3mm mono
Extract it in case of necessity to check or
replace the fuse
13. GROUND CONTACT
Use it if there are interferences on the
audio signal.
14. ZONE OUTPUTS
These terminals will allow you to use the
amplier’s zones.
It is necessary to make a 100V
connection, using the COM and 100V
terminal.
15. REC OUT
You can connect here recording or
amplication devices.
The signal coming from this socket is a
pre-amplied one.
16. AUX OUT
You can connect here external
amplication devices.
17. 6,3 mm JACK - AUX SOCKETS
Use them to connect line xtures,
equipped with stereo 6,3mm jack cable.
18. 6,3 mm JACK - MIC SOCKETS
Use them to connect microphones with
mono 6,3mm jack cable.
19 20 21
Display / Display
19. PRESA SD
Utilizzatela per inserire una SD CARD
per riprodurre brani musicali MP3
19. SD SOCKET
Insert here a SD CARD to play MP3
songs.

1110
26
22
27
23
28
24
29
25
20. PRESA USB
Utilizzatela per inserire una chiavettta
USB per riprodurre brani musicali MP3
21. TASTI MODULO MP3
Utilizzateli per selezionare le varie
impostazioni sul modulo Mp3.
22. INDIETRO VELOCE
TRACCIA PRECEDENTE
Utilizzatelo per scegliere la traccia
precedente o scorrere il brano indietro
23. AVANTI VELOCE
TRACCIA SUCCESSIVA
Premete il tasto per scegliere la traccia
successiva o scorrere il brano avanti
24. VOL -
25. VOL +
26. TASTO MODE
Sceglie la modalità desiderata
27. TASTO EQ
Permette di selezionare una delle
equalizzazioni preimpostate
28. TASTO PLAY/PAUSA
Per avviare e/o mettere in pausa
29. TASTO DI ACCENSIONE
20. USB SOCKET
Use it to put in a USB key to play MP3
songs
21. MP3 PLAYER BUTTONS
Use these keys to select the desidered
settings of Mp3 module.
22. FAST BACKWARD
PREVIOUS TRACK
Press this button to choose the previous
track or run quickly the track backwards.
23. FAST FORWARD
NEXT TRACK
Press this button to choose the next
track or run quickly the track forward.
24. VOL -
25. VOL +
26. MODE BUTTON
Used to choose the desired mode.
27. EQ BUTTON
It allows to select one of the preset eq
programs.
28. PLAY PAUSE / BUTTON
Use it to start or pause playing.
29. ON-OFF BUTTON

1312
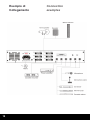
Esempio di
Collegamento
Connection
examples

1312
Risoluzione dei problemi
Di seguito elenchiamo i problemi più frequenti che si possono vericare, nel tentativo di darvi un aiuto per
risolverli. Nel caso il problema persista anche dopo aver eettuato le operazioni di seguito descritte, spegnere
l’unità, scollegarla e rivolgersi al personale autorizzato.
Anomalie Possibili cause Controlli e rimedi
L’unità non è
alimentata
• Mancanza di alimentazione di rete
• Cavo di alimentazione danneggiato
• Alimentazione interna difettosa
• Fusibile bruciato
• Vericare la presenza di alimentazione
• Controllare il cavo di alimentazione
• Rivolgersi all’assistenza tecnica
• Sostituire il fusibile
I diusori non
riproducono l’audio
• Collegamenti errati
• Diusori incompatibili
• Finali bruciati
• Controllare che i cavi siano collegati ai
morsetti corretti
• Vericare l’impedenza o la tensione
• Rivolgersi all’assistenza tecnica
I les MP3
non vengono
riconosciuti
• La chiavetta USB non è formattata
• La formattazione non è corretta
• I brani non sono Mp3
• Formattare la chiavetta
• Vericare che sia FAT32
• Altri formati potrebbero non essere ricon-
osciuti
Non è possibile
regolare il volume
delle zone
• Si sta utilizzando connessioni 8 Ohm
• Errati collegamenti
• Le zone sono disponibili solo per impianti a
tensione costante 100V
• Vericare che i cavi siano connessi corret-
tamente ai morsetti
L’unità funziona ad
intermittenza
• L’unità è troppo calda • Lasciare rareddare l’apparecchio speg-
nendolo e vericare che la ventola non sia
ostruita. L’apparecchio deve sempre essere
posizionato in posizione areata.
TROUBLESHOOTING
We list below the most common problems you can meet, trying to help you to solve them. If the problem still
persists after following our instructions, turn the unit o, disconnect it and contact our authorized technicians.
Troubles Possible causes Tests and solutions
The unit is not
powered
• Lack of power supply
• Damaged power cable
• Defective internal power supply
• Blown fuse
• Check power supply
• Check the power cable
• Contact technical service
• Replace the fuse
No audio from
speakers
• Wrong connections
• Speakers are not compatible
• Power supply circuit damaged
• Check that the cables are connected to the
correct terminals
• Check the impedance or voltage
• Contact the technical service
MP3 les are not
recognized
• The USB ash drive is not formatted
• The formatting is not correct
• The tracks are not Mp3 format
• Format the stick
• Verify that it is FAT32
• Other formats may not be recognized
The zones’ volume
cannot be adjusted
• You are using 8 Ohm connections
• Wrong connections
• Zones are available only for 100V constant
voltage systems
• Check that the cables are correctly connected
to the terminals
Unit runs
intermittently
• Unit is too hot • Wait for the xture to cool down and make
sure the fan is not obstructed. The xture must
always be positioned in an ventilated place.

1514
Per evitare possibili danni all’udito, limitare il tempo di ascolto a volumi elevati.
To prevent possible hearing damage, do not listen at high volume levels for long periods.
Questo simbolo vi avverte della presenza di istruzioni d’uso e manutenzione importanti, nel manuale o
nella documentazione che accompagna il prodotto
This symbol alerts you of the presence of important operating and maintenance instructions, in the
manual or in the documentation accompanying the product
II marchio CE indica che il prodotto è conforme ai requisiti essenziali delle direttive europee e relative
norme ad esso applicabili. La documentazione di conformità in forma completa è reperibile presso la
società Karma Italiana Srl.
The CE mark indicates that this product complies with the essential applicable European directives and
their related standards. Compliance documentation in complete form can be asked to the company
Karma Italiana Srl.
Ai sensi del Decreto Legislativo N°49 del 14 Marzo 2014 - “ Attuazione delle Direttive 2012/19/UE sui
riuti di apparecchiature elettriche ed elettroniche (RAEE)”.
Il simbolo del cassonetto barrato riportato sull’apparecchiatura indica che il prodotto alla ne della
propria vita utile deve essere raccolto separatamente dagli altri riuti. L’utente dovrà, pertanto, conferire
l’apparecchiatura integra dei componenti essenziali giunta a ne vita agli idonei centri di raccolta
dierenziata dei riuti elettronici ed elettrotecnici, oppure riconsegnarla al rivenditore al momento
dell’acquisto di nuova apparecchiatura di tipo equivalente, in ragione di uno a uno oppure 1 a zero per
le apparecchiature aventi lato maggiore inferiore a 25 cm. L’adeguata raccolta dierenziata per l’avvio
successivo dell’apparecchiatura dimessa al reciclaggio, al trattamento e allo smaltimento ambientale
compatibile contribuisce ad evitare possibili eetti negativi sull’ambiente e sulla salute e favorisce il
riciclo dei materiali di cui è composta l’apparecchiatura. Lo smaltimento abusivo del prodotto da parte
dell’utente comporta l’applicazione delle sanzioni amministrative di cui al D.Lgs n. Decreto Legislativo N°
49 del 14 Marzo 2014.
Directive 2012/19/UE regarding electric and electronic equipment waste (WEEE).
The symbol of the crossed-out dustbin indicates that the product at the end of its life must be collected
separately from other waste . The user must , therefore , confer the xture complete with all the essential
components to an authorized disposal center for collection of electronic and electrical waste, or return it to
the dealer when buying new equipment of equivalent type, at a rate of one to one, or one to zero if external
dimension is less than 25cm. Appropriate separate collection to send the decommissioned equipment to
recycling , treatment and environmentally compatible disposal helps to prevent negative impact on the
environment and human health and promotes recycling of the materials making up the product. In Italy
illegal dumping of the product by the user entails the application of administrative sanctions pursuant to
Legislative Decree n. 49 (14/03/2014).
Questo simbolo vi avverte della presenza di materiale non isolato “sotto tensione“ ad elevato voltaggio,
all’interno del prodotto, che può costituire pericolo di folgorazione per le persone.
This symbol alerts you to the presence of uninsulated dangerous voltage within the product’s enclosure
that might be of sucient magnitude to constitute a risk of electric shock. Do not open the product’s case.

1514
PAA 250MZ
Potenza max 250W
Potenza RMS 125W
Alimentazione 110V - 230V ~ AC
Controllo toni: Alti/Bassi
Ingombro Rack 2U
Ingressi Line 2 (Jack 6,3mm)
Ingressi Mic 3 (Jack 6,3mm)
Uscita Line 1
Rec Out 1
Lettore Mp3 Si
Multizona 6 Zone
Tensione costante in uscita 100V
Funzione Priority Si, solo Mic 1
VU Meters Si
Dimensioni 420 x 280 x 89 mm
Peso 8,4 Kg
PAA 250MZ
Max Power 240W
RMS Power 120W
Power Supply 110V - 220V ~ AC
Tone Control Bass / Treble
Rack 2U
Line In 2 (Jack 6,3mm)
Mic In 3 (Jack 6,3mm)
Line Out 1
Rec Out 1
Mp3 Player Yes
Multizone 6 Zones
Output costant tension 100V
Priority Function Yes, Mic 1 only
VU Meters Yes
Dimensions 420 x 280 x 89 mm
Weight 8,4 Kg
Il fabbricante, allo scopo di migliorare i propri prodotti, si riserva il diritto di modicarne le caratteristiche siano esse
tecniche o estetiche, in qualsiasi momento e senza alcun preavviso.
The manufacturer, in order to improve its products, reserves the right to modify their characteristics whether
technical or aesthetic, at any time and without notice.

Ver. 20.1
67 - Made in China
La linea GLEMM è prodotta e distribuita da:/ GLEMM line is produced and distributed by:
KARMA ITALIANA srl - Via Gozzano 38/bis - 21052 Busto Arsizio - www.karmaitaliana.it
-
 1
1
-
 2
2
-
 3
3
-
 4
4
-
 5
5
-
 6
6
-
 7
7
-
 8
8
-
 9
9
-
 10
10
-
 11
11
-
 12
12
-
 13
13
-
 14
14
-
 15
15
-
 16
16


GLEMM PAA 250MZ Manuale del proprietario
- Tipo
- Manuale del proprietario
in altre lingue
- English: GLEMM PAA 250MZ Owner's manual
Documenti correlati


Altri documenti
-
Karma STROBE 1500 Manuale del proprietario
-
-
-
-
-
PROEL AMP240V4 Manuale utente
-
-
-
-