Intermec EasyCoder 4100 Manuale utente
- Categoria
- Stampanti per etichette
- Tipo
- Manuale utente

User’s
Manual
4100 Bar Code Label Printer
P/N 057713-005

ii
4100 Bar Code Label Printer User's Manual
Helvitica condensed 9 pt italic
Code 39 18 pt
Intermec® Corporation
6001 36th Avenue West
P.O. Box 4280
Everett, WA 98203-9280
U.S. technical and service support: 1-800-755-5505
U.S. media supplies ordering information: 1-800-227-9947
Canadian technical and service support: 1-800-688-7043
Canadian media supplies ordering information: 1-800-268-6936
Outside U.S. and Canada: Contact your local Intermec service supplier.
The information contained herein is proprietary and is provided solely for the purpose of allowing
customers to operate and/or service Intermec manufactured equipment and is not to be released,
reproduced, or used for any other purpose without written permission of Intermec.
Information and specifications in this manual are subject to change without notice.
©1995 by Intermec Corporation
All Rights Reserved
The word Intermec, the Intermec logo, Duratran, and CrossBar are trademarks of Intermec Corporation.
The name Centronics is wholy owned by GENICOM Corporation.
IBM is a registered trademark of International Business Machines Corporation.
Throughout this manual, trademarked names may be used. Rather than put a trademark (
TM
) symbol in
every occurrence of a trademarked name, we state that we are using the names only in an editorial
fashion, and to the benefit of the trademark owner, with no intention of infringement.

iii
Helvitica condensed 9 pt italic
Code 39 18 pt
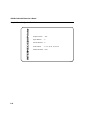
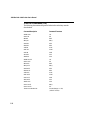
Contributors
Author Lori Austin
Mia Hayashida
Editor Craig Thompson
Technical Illustrators John Bickley
Karen Petruzzi
Technical Reviewers Scott Bale
Dzung Dang
Jim Davison
Terry Ho
Jaye Jarchow
Ed Millet
Lisa Morin
Mark Rasmussen

iv
4100 Bar Code Label Printer User's Manual
Helvitica condensed 9 pt italic
Code 39 18 pt
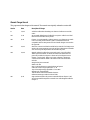
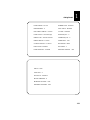
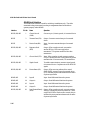
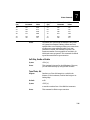
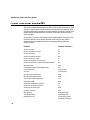
Manual Change Record
This page records the changes to this manual. The manual was originally released as version 001.
Version Date Description of Change
B 12/92 Added an addendum describing new features of ribbon save and the
cutter.
001 2/93 Incorporated addendum and added the cut option. Added a new label
that can be downloaded to the printer.
002 8/93 Chapter 7 was reformatted to make it easier to use. Chapter 8 was made
to be a universal printer reference guide. Commands that are not
compatible with the 4100 printer are noted. Small changes were made to
the appendix.
003 10/93 Firmware version 2.3 addendum added to the manual. The changes were
made to the communications protocols and the configuration commands
such as end-of-print skip distance and the label rest point.
004 10/94 Manual updated to reflect the current style guide. A new file called
4100u-fr.pm4 was added. It contains all of the front matter that was
previously included in Chapter 1. What used to be Chapter 2 is now
Chapter 1, and so forth. There is no longer a Chapter 8. Firmware
version 2.4 information added to the manual. The new information
includes:
Image before print command
HIBC Code 128
New Code 128 selection to ignore brackets and spaces
Label rest location range expanded to +/-30
Top of form adjust range expanded to -10 to 4000
Reimage only changed fields
Test and Service DIP switch settable functions
Different sensitivity number for DT and TTR
005 6/95 Page numbers added to the printer command tables in Chapter 7 and
several command descriptions corrected. New cable diagrams added to
Chapter 2.

v
Helvitica condensed 9 pt italic
Code 39 18 pt
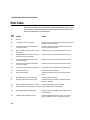
Contents
Contents
Before You Begin xix
Warranty Information xix
Safety Summary xix
Warnings and Cautions xx
About This Manual xxi
Customer Advisory xxiii
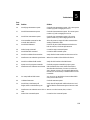
Getting Started
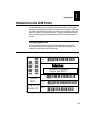
Introduction to the 4100 Printer 1-3
Printing Capabilities 1-3
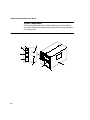
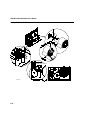
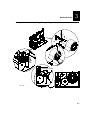
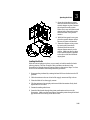
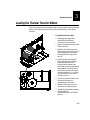
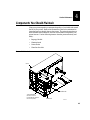
Printer Components 1-4
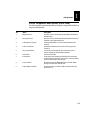
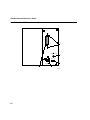
Printer Component Descriptions (Front View) 1-5
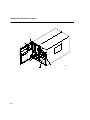
Printer Component Descriptions (Front Interior) 1-7
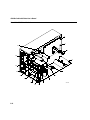
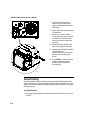
Printer Component Descriptions (Rear View) 1-9
Printer Component Descriptions (Mechanism Detail) 1-11
Printer Options 1-12
Ribbon Save 1-12
Cutter 1-12
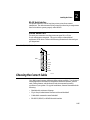
Unpacking the 4100 1-13
Checking the Order for Completeness 1-13
Reporting Damage or Defects 1-13
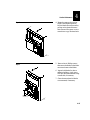
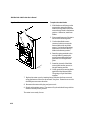
Installing the Front Panel Cover 1-14
Preparing the Printer for Installation 1-14
Plugging in the Printer 1-14
Checking the DIP Switch Settings 1-15
Opening the Printer 1-15
Loading Media 1-15
1

vi
4100 Bar Code Label Printer User's Manual
Helvitica condensed 9 pt italic
Code 39 18 pt
If You Have Difficulty Feeding the Media 1-17
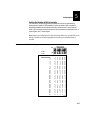
Printing Configuration Test Labels 1-18
What the Configuration Test Labels Tell You 1-18
Installing the Printer
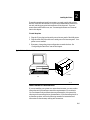
About Printer Installation 2-3
Preparing for Installation 2-3
Situating the Printer 2-4
Connecting the Printer to the Host 2-4
Default (Point-to-Point) Installation 2-4
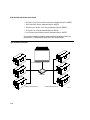
About Network Installations 2-5
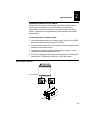
Modem Installation Procedure 2-7
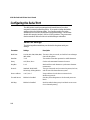
Configuring the Serial Port 2-8
Serial Port Settings 2-8
DIP Switch Settings 2-9
Connecting the Printer to a Network 2-10
Host Requirements 2-10
Communication Boundaries 2-10
Communication Protocols 2-10
Intermec “Standard” Protocol 2-11
Polling Mode D Protocol 2-12
Multi-Drop Protocol 2-12
XON/XOFF Protocol (Software and Hardware / Flow Control) 2-12
Ready/Busy Protocol 2-13
User-Defined Protocol 2-13
Communication Interfaces 2-14
RS-232C Serial Interface 2-15
RS-485 Serial Interface 2-16
RS-422 Serial Interface 2-17
Printer Serial Port 2-17
2

vii
Helvitica condensed 9 pt italic
Code 39 18 pt
Contents
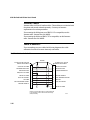
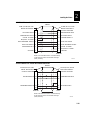
Choosing the Correct Cable 2-17
Intermec Cables 2-18
Cable Schematics 2-18
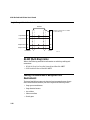
RS-485 (Multi-Drop) Cables 2-20
Cabling Considerations in Noisy Electrical Environments 2-20
Operating the Printer
About Printer Operation 3-3
Opening and Closing the Printer 3-3
Opening the Printer 3-4
Closing the Printer 3-4
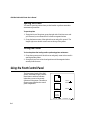
Using the Front Control Panel 3-4
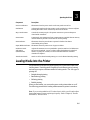
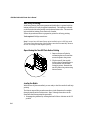
Loading Media Into the Printer 3-5
Straight-Through Printing 3-6
Self-Strip Printing 3-8
Repositioning the Tear-Off Plate Before Printing 3-8
Loading the Media 3-8
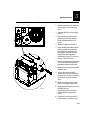
Batch Take-Up Printing 3-10
Installing the Rewind Adapter Before Printing 3-10
Loading the Media 3-11
Fanfold Printing 3-12
Adjusting the Label Gap Sensor 3-13
Adjusting the Label Gap Sensor for Die Cut Media 3-14
Adjusting the Label Gap Sensor for Tag Stock 3-14
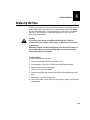
Setting Media Sensitivity 3-14
Setting the Approximate Sensitivity Rating for Your Media 3-15
Fine-Tuning the Sensitivity Rating 3-15
3

viii
4100 Bar Code Label Printer User's Manual
Helvitica condensed 9 pt italic
Code 39 18 pt
4
5
4
Loading the Thermal Transfer Ribbon 3-17
Image Band Setting 3-18
How the Image Bands Command works 3-18
Optimizing the Number of Image Bands 3-18
Modified Field Reimaging 3-19
Printing Labels 3-20
Routine Maintenance
About Printer Maintenance 4-3
Safety Precautions 4-3
Inspecting the Printer 4-4
Components You Should Maintain 4-5
Lubrication 4-6
Cleaning the Printer 4-6
Cleaning the Drive Roller 4-6
Cleaning the Media Path 4-7
Cleaning the Printer Case 4-7
Cleaning the Printhead 4-8
Cleaning the Cutter Blades 4-9
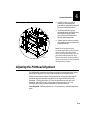
Adjusting the Printhead Support 4-10
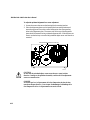
Adjusting the Printhead Alignment 4-11
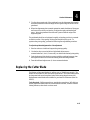
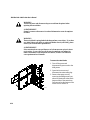
Replacing the Cutter Blade 4-13
Replacing the Fuse 4-17

ix
Helvitica condensed 9 pt italic
Code 39 18 pt
Contents
Troubleshooting
About Troubleshooting 5-3
Troubleshooting Checklist 5-3
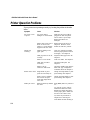
Printer Operation Problems 5-4
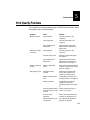
Print Quality Problems 5-5
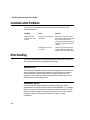
Communication Problems 5-6
Error Handling 5-6
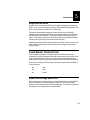
Syntax Errors 5-6
Parameter Errors 5-6
Image Overrun Errors 5-7
Invalid Numeric Character Errors 5-7
Insufficient Storage RAM Errors 5-7
Error Codes 5-8
Using Test and Service Mode 5-10
Printing Test Labels 5-12
Using Data Line Print 5-12
Performing Cloning 5-13
Performing Selective Transfer 5-14
Using Memory Reset 5-15
Changing Configuration Commands in Test and Service Mode 5-16
Setting the Number of Dot Increments 5-17
Adjusting the Label Rest Point 5-18
Using 86XX Emulation Mode 5-19
Forms Adjust 5-21
Setting the X Forms Adjust 5-22
Setting the Y Forms Adjust 5-23
Using Test and Service Mode Commands 5-24
5

x
4100 Bar Code Label Printer User's Manual
Helvitica condensed 9 pt italic
Code 39 18 pt
Designing Labels and Using Commands
Introduction to Label Design 6-3
Using Label Formats 6-3
Communicating With the Printer 6-6
Using Intermec Label Design Software 6-6
Using the Printer Command Set 6-6
Downloading Printer Commands Using DOS 6-6
Using a Text Editor or Word Processor to Create Your Label 6-7
Downloading Printer Commands Using PC Communications
Programs or Host Terminals 6-8
Switching Between Print Mode and Program Mode 6-9
Creating Label Design Components 6-9
Different Kinds of Fields 6-10
About Bar Code Symbologies 6-10
Character Fields and Fonts 6-14
User-Defined Fonts 6-15
Downloading Fonts 6-16
Lines and Boxes 6-17
Graphics 6-18
One Bit Per Byte 6-18
Downloading One Bit Per Byte Graphics 6-19
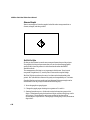
Diamond Graphic 6-20
Six Bits Per Byte 6-20
Editing Labels and Working With Fields 6-22
Editing Labels 6-22
Deleting Fields 6-23
Scaling Fields 6-23
Magnifying Fonts and Character Fields 6-23
Magnifying Bar Code Fields 6-24
Positioning Fields 6-24
6

xi
Helvitica condensed 9 pt italic
Code 39 18 pt
Contents
Rotating Fields 6-26
Storing Label Formats 6-27
Designing Pages 6-27
Format Examples 6-28
Example 1 6-28
Example 2 6-31
Graphic for Example 2 6-31
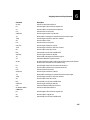
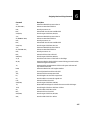
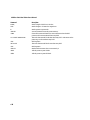
Printer Commands
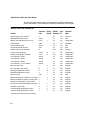
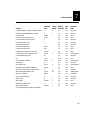
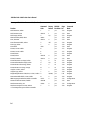
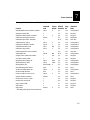
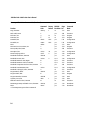
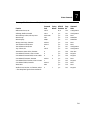
Introduction 7-3
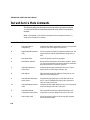
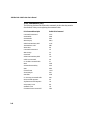
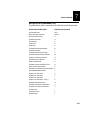
Command Set Summary 7-3
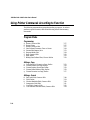
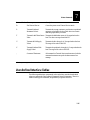
Using Printer Commands According to Function 7-10
Program Mode 7-10
Programming 7-10
Editing a Page 7-10
Editing a Format 7-10
Editing a Bar Code Field 7-11
Editing a Human-Readable Field 7-11
Editing an Interpretive Field 7-11
Editing a Line Field 7-11
Editing a UDC Field 7-12
Editing a Box Field 7-12
Editing a UDC 7-12
Editing a Bitmap User-Defined Field 7-12
Immediate Commands 7-12
System Commands 7-12
Print Mode 7-13
Print Commands 7-13
Configuration Commands 7-13
Transmit Commands 7-14
Protocol Modification Commands 7-14
Test and Service Commands 7-14
7

xii
4100 Bar Code Label Printer User's Manual
Helvitica condensed 9 pt italic
Code 39 18 pt
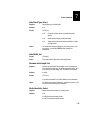
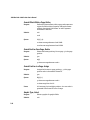
Immediate Commands 7-15
Abort Print Job 7-15
Error Code, Request 7-15
Label and Gap Length, Transmit 7-15
Remaining Quantity and Batch Count, Transmit 7-16
Reset 7-16
Status Dump 7-16
Status Enquiry 7-17
Print Mode Commands 7-18
86XX Emulation Mode, Select 7-19
Advanced Mode, Select 7-19
Alphanumeric Field Separator 7-19
Batch Count, Set 7-20
Clear All Data 7-20
Clear Data From Current Field 7-21
Command Terminator 1 7-21
Command Terminator 2 7-21
Configuration Parameters, Transmit 7-21
Cut 7-21
Data Shift – International Characters 7-22
Field, Select 7-22
Field Decrement, Set 7-22
Field Increment, Set 7-23
First Data Entry Field, Select 7-23
Font, Transmit 7-23
Form Feed 7-24
Format, Select 7-24
Format, Transmit 7-25
Increment and Decrement, Disable 7-25
Next Data Entry Field, Select 7-25
Numeric Field Separator 7-26
Options Selected, Transmit 7-26

xiii
Helvitica condensed 9 pt italic
Code 39 18 pt
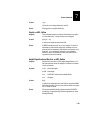
Page, Select 7-26
Page, Transmit 7-27
Print 7-27
Printhead Parameters, Transmit 7-27
Program Mode, Enter 7-27
Program Number, Transmit 7-28
Quantity Count, Set 7-28
Start and Stop Codes (Code 39), Print 7-28
Storage Area Usage, Transmit 7-29
Test and Service Mode, Enter 7-29
User-Defined Characters, Transmit 7-29
User-Defined Tables, Transmit 7-30
Warm Boot 7-30
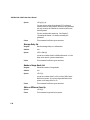
Configuration Commands 7-31
86XX or Advanced Mode on Power Up 7-31
Amount of Storage, Define 7-32
Audible Alarm, Enable or Disable 7-32
Auto-Transmit 1, Enable 7-32
Auto-Transmit 2, Enable 7-33
Auto-Transmit 3, Enable 7-33
Auto-Transmit 1, 2, and 3, Disable 7-33
Control Panel Access Permission, Set 7-34
Cutter, Enable or Disable 7-34
Dark Adjust, Set 7-34
End-of-Print Skip Distance, Set 7-34
IBM Language Translation, Enable or Disable 7-35
Intercharacter Delay, Set 7-35
Interlabel Ribbon Save, Enable or Disable 7-35
Label Rest Point, Adjust 7-36
Label Retract, Enable or Disable 7-36
Label Retract Distance, Set 7-36
Label Stock Type, Select 7-37
Label Width, Set 7-37
Contents

xiv
4100 Bar Code Label Printer User's Manual
Helvitica condensed 9 pt italic
Code 39 18 pt
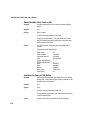
Maximum Label Length, Set 7-37
Media Sensitivity, Select 7-37
Message Delay, Set 7-38
Number of Image Bands, Set 7-38
Online or Offline on Power Up 7-38
Postamble, Set 7-39
Preamble, Set 7-39
Print Speed, Set 7-39
Printer Language, Select 7-40
Printhead Pressure, Set 7-40
Printhead Test Parameters, Set 7-40
Ribbon Save Zones, Set 7-40
Self-Strip, Enable or Disable 7-41
Top of Form, Set 7-41
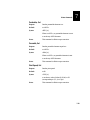
Program Mode Commands 7-42
Bar Code, Select Type 7-43
Bar Code Field, Create or Edit 7-48
Bitmap Cell Height for Graphic or UDF, Define 7-49
Bitmap Cell Width for Graphic or UDF, Define 7-49
Bitmap User-Defined Font, Clear or Define 7-50
Border Around Human-Readable Text, Define 7-50
Box Field, Create or Edit 7-50
Character Bitmap Origin Offset, Define 7-51
Character Rotation or Bar Code Ratio, Define 7-51
Code 39 Prefix Character, Define 7-52
Command Tables, Load 7-52
Current Edit Session, Save 7-53
Data Source for Format in a Page, Define 7-53
Field, Delete 7-54
Field Data, Define Source 7-54
Field Direction, Define 7-55
Field Origin, Define 7-55

xv
Helvitica condensed 9 pt italic
Code 39 18 pt
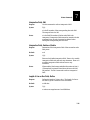
Font Character Width, Define 7-56
Font Type, Select 7-56
Format, Create or Edit 7-57
Format, Erase 7-57
Format Direction in a Page, Define 7-57
Format Offset Within a Page, Define 7-58
Format Position From Page, Delete 7-58
Format Position in a Page, Assign 7-58
Graphic Type, Select 7-58
Graphic or UDC, Define 7-59
Height Magnification of Bar, Box, or UDC, Define 7-59
Human-Readable Field, Create or Edit 7-60
Intercharacter Space for UDF, Define 7-60
Interpretive Field, Edit 7-61
Interpretive Field, Enable or Disable 7-61
Length of Line or Box Field, Define 7-61
Line Field, Create or Edit 7-62
Outline Font, Clear or Create 7-62
Outline Font, Download 7-62
Page, Create or Edit 7-63
Page, Delete 7-63
Pitch Size, Set 7-63
Point Size, Set 7-63
Print Line Dot Count Limit, Set 7-64
Program Mode, Exit 7-64
User-Defined Character, Clear or Create 7-64
User-Defined Character Field, Create or Edit 7-64
User-Defined Font Character, Create 7-65
Width of Line, Box, Bar, or Character, Define 7-65
Test and Service Mode Commands 7-66
Contents

xvi
4100 Bar Code Label Printer User's Manual
Helvitica condensed 9 pt italic
Code 39 18 pt
User-Defined Interface Tables 7-67
Print Commands (t=0) 7-68
Escape Print Commands (t=1) 7-69
Shift Print Commands (t=2) 7-70
Status Responses and Auto-Transmit Commands (t=3) 7-71
Protocol Commands (t=4) 7-72
Communication Protocol Characters 7-73
Printer Functional Boundaries 7-74
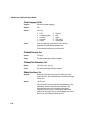
Appendix
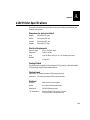
4100 Printer Specifications A-3
Dimensions (no options installed) A-3
Electrical Requirements A-3
Printing Method A-3
Printing Speed A-3
Printhead A-3
Media Specifications A-4
Ribbon Specifications A-4
Cutter Specifications A-4
Environment A-4
Communications A-5
Fonts and Graphics A-5
Character Sets A-5
Bar Code Symbologies A-5
Factory Defaults A-6
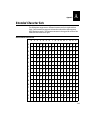
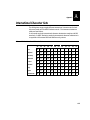
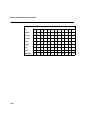
Extended Character Sets A-7
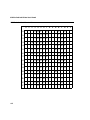
International Character Sets A-9
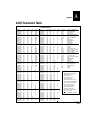
ASCII Translation Table A-11
A

xvii
Helvitica condensed 9 pt italic
Code 39 18 pt
G
I
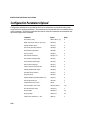
Configuration Parameters Upload A-12
4100 Printer Options A-13
Present Sensor/Self-Strip A-13
Memory Expansion A-13
Cutter and Tray A-13
Ribbon Save A-14
Glossary
Index
Contents

xviii
4100 Bar Code Label Printer User's Manual
Helvitica condensed 9 pt italic
Code 39 18 pt

xix
Helvitica condensed 9 pt italic
Code 39 18 pt
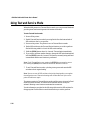
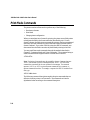
Before You Begin
This section introduces you to standard warranty provisions, safety
precautions, warnings and cautions, document formatting conventions, and
sources of additional product information.
Warranty Information
To receive a copy of the standard warranty provision for this product, contact
your local Intermec sales organization. In the U.S. call (800) 755-5505, and in
Canada call (800) 688-7043. Otherwise, refer to the Worldwide Sales & Service
list shipped with this manual for the address and telephone number of your
Intermec sales organization.
Safety Summary
Your safety is extremely important. Read and follow all warnings and cautions
in this book before handling and operating Intermec equipment. You can be
seriously injured, and equipment and data can be damaged if you do not
follow the safety warnings and cautions.
Do Not Repair or Adjust Alone Do not repair or adjust energized equipment
alone under any circumstances. Someone capable of providing first aid must
always be present for your safety.
First Aid Always obtain first aid or medical attention immediately after an
injury. Never neglect an injury, no matter how slight it seems.
Resuscitation Begin resuscitation immediately if someone is injured and stops
breathing. Any delay could result in death. To work on or near high voltage,
you should be familiar with approved industrial first aid methods.
Energized Equipment Never work on energized equipment unless authorized
by a responsible authority. Energized electrical equipment is dangerous.
Electrical shock from energized eqiupment can cause death. If you must
perform authorized emergency work on energized equipment, be sure that you
comply strictly with approved safety regulations.
Before You Begin

xx
4100 Bar Code Label Printer User's Manual
Helvitica condensed 9 pt italic
Code 39 18 pt
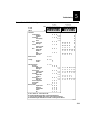
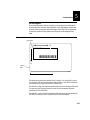
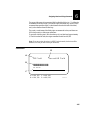
Warnings and Cautions
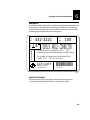
The warnings and cautions in this manual use the following format.
Warning
A warning warns you of an operating procedure, practice, condition, or
statement that must be strictly observed to avoid death or serious injury to the
persons working on the equipment.
Avertissement
Un avertissement vous alerte d'une procédure de fonctionnement, d'une
méthode, d'un état ou d'apport qui doit être strictement respecté pour éviter
l'occurrence de mort ou de blissures graves aux personnes manupulant
l'équipement.
Caution
A caution alerts you to an operating procedure, practice, condition, or
statement that must be strictly observed to prevent equipment damage or
destruction, or corruption or loss of data.
Conseil
Une précaution vous avertit d'une procédure de fonctionnement, d'une méthode,
d'un état ou d'un rapport qui doit être strictement respecté pour empêcher
l'endommagement ou la destruction de l'équipement, ou l'altération ou la perte
de données.
WARNING
CAUTION
La pagina sta caricando ...
La pagina sta caricando ...
La pagina sta caricando ...
La pagina sta caricando ...
La pagina sta caricando ...
La pagina sta caricando ...
La pagina sta caricando ...
La pagina sta caricando ...
La pagina sta caricando ...
La pagina sta caricando ...
La pagina sta caricando ...
La pagina sta caricando ...
La pagina sta caricando ...
La pagina sta caricando ...
La pagina sta caricando ...
La pagina sta caricando ...
La pagina sta caricando ...
La pagina sta caricando ...
La pagina sta caricando ...
La pagina sta caricando ...
La pagina sta caricando ...
La pagina sta caricando ...
La pagina sta caricando ...
La pagina sta caricando ...
La pagina sta caricando ...
La pagina sta caricando ...
La pagina sta caricando ...
La pagina sta caricando ...
La pagina sta caricando ...
La pagina sta caricando ...
La pagina sta caricando ...
La pagina sta caricando ...
La pagina sta caricando ...
La pagina sta caricando ...
La pagina sta caricando ...
La pagina sta caricando ...
La pagina sta caricando ...
La pagina sta caricando ...
La pagina sta caricando ...
La pagina sta caricando ...
La pagina sta caricando ...
La pagina sta caricando ...
La pagina sta caricando ...
La pagina sta caricando ...
La pagina sta caricando ...
La pagina sta caricando ...
La pagina sta caricando ...
La pagina sta caricando ...
La pagina sta caricando ...
La pagina sta caricando ...
La pagina sta caricando ...
La pagina sta caricando ...
La pagina sta caricando ...
La pagina sta caricando ...
La pagina sta caricando ...
La pagina sta caricando ...
La pagina sta caricando ...
La pagina sta caricando ...
La pagina sta caricando ...
La pagina sta caricando ...
La pagina sta caricando ...
La pagina sta caricando ...
La pagina sta caricando ...
La pagina sta caricando ...
La pagina sta caricando ...
La pagina sta caricando ...
La pagina sta caricando ...
La pagina sta caricando ...
La pagina sta caricando ...
La pagina sta caricando ...
La pagina sta caricando ...
La pagina sta caricando ...
La pagina sta caricando ...
La pagina sta caricando ...
La pagina sta caricando ...
La pagina sta caricando ...
La pagina sta caricando ...
La pagina sta caricando ...
La pagina sta caricando ...
La pagina sta caricando ...
La pagina sta caricando ...
La pagina sta caricando ...
La pagina sta caricando ...
La pagina sta caricando ...
La pagina sta caricando ...
La pagina sta caricando ...
La pagina sta caricando ...
La pagina sta caricando ...
La pagina sta caricando ...
La pagina sta caricando ...
La pagina sta caricando ...
La pagina sta caricando ...
La pagina sta caricando ...
La pagina sta caricando ...
La pagina sta caricando ...
La pagina sta caricando ...
La pagina sta caricando ...
La pagina sta caricando ...
La pagina sta caricando ...
La pagina sta caricando ...
La pagina sta caricando ...
La pagina sta caricando ...
La pagina sta caricando ...
La pagina sta caricando ...
La pagina sta caricando ...
La pagina sta caricando ...
La pagina sta caricando ...
La pagina sta caricando ...
La pagina sta caricando ...
La pagina sta caricando ...
La pagina sta caricando ...
La pagina sta caricando ...
La pagina sta caricando ...
La pagina sta caricando ...
La pagina sta caricando ...
La pagina sta caricando ...
La pagina sta caricando ...
La pagina sta caricando ...
La pagina sta caricando ...
La pagina sta caricando ...
La pagina sta caricando ...
La pagina sta caricando ...
La pagina sta caricando ...
La pagina sta caricando ...
La pagina sta caricando ...
La pagina sta caricando ...
La pagina sta caricando ...
La pagina sta caricando ...
La pagina sta caricando ...
La pagina sta caricando ...
La pagina sta caricando ...
La pagina sta caricando ...
La pagina sta caricando ...
La pagina sta caricando ...
La pagina sta caricando ...
La pagina sta caricando ...
La pagina sta caricando ...
La pagina sta caricando ...
La pagina sta caricando ...
La pagina sta caricando ...
La pagina sta caricando ...
La pagina sta caricando ...
La pagina sta caricando ...
La pagina sta caricando ...
La pagina sta caricando ...
La pagina sta caricando ...
La pagina sta caricando ...
La pagina sta caricando ...
La pagina sta caricando ...
La pagina sta caricando ...
La pagina sta caricando ...
La pagina sta caricando ...
La pagina sta caricando ...
La pagina sta caricando ...
La pagina sta caricando ...
La pagina sta caricando ...
La pagina sta caricando ...
La pagina sta caricando ...
La pagina sta caricando ...
La pagina sta caricando ...
La pagina sta caricando ...
La pagina sta caricando ...
La pagina sta caricando ...
La pagina sta caricando ...
La pagina sta caricando ...
La pagina sta caricando ...
La pagina sta caricando ...
La pagina sta caricando ...
La pagina sta caricando ...
La pagina sta caricando ...
La pagina sta caricando ...
La pagina sta caricando ...
La pagina sta caricando ...
La pagina sta caricando ...
La pagina sta caricando ...
La pagina sta caricando ...
La pagina sta caricando ...
La pagina sta caricando ...
La pagina sta caricando ...
La pagina sta caricando ...
La pagina sta caricando ...
La pagina sta caricando ...
La pagina sta caricando ...
La pagina sta caricando ...
La pagina sta caricando ...
La pagina sta caricando ...
La pagina sta caricando ...
La pagina sta caricando ...
La pagina sta caricando ...
La pagina sta caricando ...
La pagina sta caricando ...
La pagina sta caricando ...
La pagina sta caricando ...
La pagina sta caricando ...
La pagina sta caricando ...
La pagina sta caricando ...
La pagina sta caricando ...
La pagina sta caricando ...
La pagina sta caricando ...
La pagina sta caricando ...
La pagina sta caricando ...
La pagina sta caricando ...
La pagina sta caricando ...
La pagina sta caricando ...
La pagina sta caricando ...
La pagina sta caricando ...
La pagina sta caricando ...
La pagina sta caricando ...
La pagina sta caricando ...
La pagina sta caricando ...
La pagina sta caricando ...
La pagina sta caricando ...
La pagina sta caricando ...
La pagina sta caricando ...
La pagina sta caricando ...
La pagina sta caricando ...
La pagina sta caricando ...
La pagina sta caricando ...
La pagina sta caricando ...
La pagina sta caricando ...
La pagina sta caricando ...
La pagina sta caricando ...
La pagina sta caricando ...
La pagina sta caricando ...
La pagina sta caricando ...
La pagina sta caricando ...
La pagina sta caricando ...
La pagina sta caricando ...
La pagina sta caricando ...
La pagina sta caricando ...
La pagina sta caricando ...
La pagina sta caricando ...
La pagina sta caricando ...
La pagina sta caricando ...
La pagina sta caricando ...
La pagina sta caricando ...
La pagina sta caricando ...
La pagina sta caricando ...
La pagina sta caricando ...
La pagina sta caricando ...
La pagina sta caricando ...
La pagina sta caricando ...
La pagina sta caricando ...
La pagina sta caricando ...
La pagina sta caricando ...
La pagina sta caricando ...
La pagina sta caricando ...
La pagina sta caricando ...
La pagina sta caricando ...
La pagina sta caricando ...
La pagina sta caricando ...
La pagina sta caricando ...
La pagina sta caricando ...
La pagina sta caricando ...
La pagina sta caricando ...
La pagina sta caricando ...
La pagina sta caricando ...
La pagina sta caricando ...
La pagina sta caricando ...
La pagina sta caricando ...
La pagina sta caricando ...
La pagina sta caricando ...
-
 1
1
-
 2
2
-
 3
3
-
 4
4
-
 5
5
-
 6
6
-
 7
7
-
 8
8
-
 9
9
-
 10
10
-
 11
11
-
 12
12
-
 13
13
-
 14
14
-
 15
15
-
 16
16
-
 17
17
-
 18
18
-
 19
19
-
 20
20
-
 21
21
-
 22
22
-
 23
23
-
 24
24
-
 25
25
-
 26
26
-
 27
27
-
 28
28
-
 29
29
-
 30
30
-
 31
31
-
 32
32
-
 33
33
-
 34
34
-
 35
35
-
 36
36
-
 37
37
-
 38
38
-
 39
39
-
 40
40
-
 41
41
-
 42
42
-
 43
43
-
 44
44
-
 45
45
-
 46
46
-
 47
47
-
 48
48
-
 49
49
-
 50
50
-
 51
51
-
 52
52
-
 53
53
-
 54
54
-
 55
55
-
 56
56
-
 57
57
-
 58
58
-
 59
59
-
 60
60
-
 61
61
-
 62
62
-
 63
63
-
 64
64
-
 65
65
-
 66
66
-
 67
67
-
 68
68
-
 69
69
-
 70
70
-
 71
71
-
 72
72
-
 73
73
-
 74
74
-
 75
75
-
 76
76
-
 77
77
-
 78
78
-
 79
79
-
 80
80
-
 81
81
-
 82
82
-
 83
83
-
 84
84
-
 85
85
-
 86
86
-
 87
87
-
 88
88
-
 89
89
-
 90
90
-
 91
91
-
 92
92
-
 93
93
-
 94
94
-
 95
95
-
 96
96
-
 97
97
-
 98
98
-
 99
99
-
 100
100
-
 101
101
-
 102
102
-
 103
103
-
 104
104
-
 105
105
-
 106
106
-
 107
107
-
 108
108
-
 109
109
-
 110
110
-
 111
111
-
 112
112
-
 113
113
-
 114
114
-
 115
115
-
 116
116
-
 117
117
-
 118
118
-
 119
119
-
 120
120
-
 121
121
-
 122
122
-
 123
123
-
 124
124
-
 125
125
-
 126
126
-
 127
127
-
 128
128
-
 129
129
-
 130
130
-
 131
131
-
 132
132
-
 133
133
-
 134
134
-
 135
135
-
 136
136
-
 137
137
-
 138
138
-
 139
139
-
 140
140
-
 141
141
-
 142
142
-
 143
143
-
 144
144
-
 145
145
-
 146
146
-
 147
147
-
 148
148
-
 149
149
-
 150
150
-
 151
151
-
 152
152
-
 153
153
-
 154
154
-
 155
155
-
 156
156
-
 157
157
-
 158
158
-
 159
159
-
 160
160
-
 161
161
-
 162
162
-
 163
163
-
 164
164
-
 165
165
-
 166
166
-
 167
167
-
 168
168
-
 169
169
-
 170
170
-
 171
171
-
 172
172
-
 173
173
-
 174
174
-
 175
175
-
 176
176
-
 177
177
-
 178
178
-
 179
179
-
 180
180
-
 181
181
-
 182
182
-
 183
183
-
 184
184
-
 185
185
-
 186
186
-
 187
187
-
 188
188
-
 189
189
-
 190
190
-
 191
191
-
 192
192
-
 193
193
-
 194
194
-
 195
195
-
 196
196
-
 197
197
-
 198
198
-
 199
199
-
 200
200
-
 201
201
-
 202
202
-
 203
203
-
 204
204
-
 205
205
-
 206
206
-
 207
207
-
 208
208
-
 209
209
-
 210
210
-
 211
211
-
 212
212
-
 213
213
-
 214
214
-
 215
215
-
 216
216
-
 217
217
-
 218
218
-
 219
219
-
 220
220
-
 221
221
-
 222
222
-
 223
223
-
 224
224
-
 225
225
-
 226
226
-
 227
227
-
 228
228
-
 229
229
-
 230
230
-
 231
231
-
 232
232
-
 233
233
-
 234
234
-
 235
235
-
 236
236
-
 237
237
-
 238
238
-
 239
239
-
 240
240
-
 241
241
-
 242
242
-
 243
243
-
 244
244
-
 245
245
-
 246
246
-
 247
247
-
 248
248
-
 249
249
-
 250
250
-
 251
251
-
 252
252
-
 253
253
-
 254
254
-
 255
255
-
 256
256
-
 257
257
-
 258
258
-
 259
259
-
 260
260
-
 261
261
-
 262
262
-
 263
263
-
 264
264
-
 265
265
-
 266
266
-
 267
267
-
 268
268
-
 269
269
-
 270
270
-
 271
271
-
 272
272
-
 273
273
-
 274
274
-
 275
275
-
 276
276
-
 277
277
-
 278
278
-
 279
279
-
 280
280
-
 281
281
-
 282
282


Intermec EasyCoder 4100 Manuale utente
- Categoria
- Stampanti per etichette
- Tipo
- Manuale utente
in altre lingue
- English: Intermec EasyCoder 4100 User manual
Documenti correlati
-
Intermec 3440 Manuale utente
-
Intermec EasyCoder 4420 Manuale utente
-
Intermec 3400 Manuale utente
-
-
-
-
-
-
Altri documenti
-
HellermannTyton Thermal Transfer Printer TT4000+ Manuale del proprietario
-
Kensington 62024 Manuale utente
-
Toshiba Barcode Reader B-SV4D-GS Manuale utente
-
Paxar 6035 Manuale utente
-
Brady TLS PC Link Manuale utente
-
Monarch 9403 Manuale utente
-
König CMP-BARSCAN21 specificazione
-
 Ier 512C Manuale utente
-
-
Dymo Printer Rhino 6000 Manuale utente
