Weelko MultiEquipment F331 Manuale del proprietario
- Tipo
- Manuale del proprietario

MultiEquipment. Ref F331
Manual de instrucciones
4 EN 1
Martillo Frío & Calor
Alta Frecuencia
Brush
Vacum & Spray

Advertencia Reciclaje
Declaración de conformidad CE ¡Bienvenido!
Cuando aparezca este símbolo en cualquiera de
nuestros productos eléctricos o su embalaje, esto
significa que dichos productos no deben tratarse como
residuos domésticos convencionales en Europa. Para
asegurar un tratamiento de residuos adecuado, hágalo
de acuerdo con las leyes locales o según convenga
para el desecho de equipos eléctricos. Esto ayudará a
preservar el medio ambiente y mejorar los estándares
de protección medioambiental en relación con el
tratamiento de residuos eléctricos.
Muchas gracias por su compra. Por favor, lea deteni-
damente las instrucciones antes de utilizar el equipo.
También puede pedir orientación a un profesional para
asegurarse de que está utilizando el equipo correcta-
mente. No aceptaremos ninguna responsabilidad por
los accidentes que ocurran debido a un manejo
incorrecto.
La empresa se reserva el derecho de corregir detalles
de los equipos, sin previo aviso. Si encuentra algún
error en estas instrucciones, por favor no dude en
enviarnos un e-mail para informarnos y que podamos
corregirlos.
Este producto cumple lo estipulado en las siguientes
directivas:
1. Las medidas de la Directiva sobre Baja Tensión:
2014/35/EC
2. Las medidas de la Directiva de Compatibildad
Electromagnética: 2014/30/EC
• Nunca, en ninguna circunstancia, intente abrir o
inspeccionar los componentes o accesorios internos
de la máquina. Si fuera necesaria una inspección, por
favor póngase en contacto con su proveedor o un
técnico debidamente cualificado.
• No utilice nunca la unidad en ambientes húmedos o
insuficientemente ventilados, como zonas de baño,
baños, etc., con el fin de prevenir daños en los
componentes eléctricos de su equipo.
• Nunca utilice el equipo al aire libre, las inclemencias
meteorológicas pueden causar daños.
• Si el cable eléctrico estuviera roto, solicite a un
profesional que le suministre otro y lo cambie para
evitar riesgos, o contacte con el proveedor.
Barcelona
Pol. Ind. La Valldan
Camí de Garreta, 92
08600 Berga
Barcelona – Spain
T. +34 938 249 020
E. info@weelko.com
W. www.weelko.com

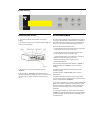
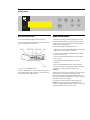
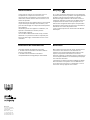
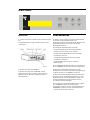
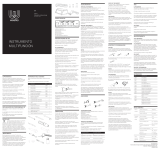
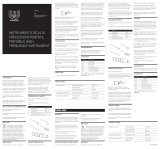
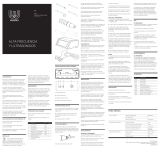
Instrucciones de uso ALTA FRECUENCIA
Panel frontal
1. Conecte el cable de alimentación en el panel
trasero.
2. Conecte los accesorios en el panel trasero según se
muestra en el esquema.
3. Encender el instrumento mediante el botón
“POWER”.
4. Pulse la tecla “FUNCTION” para seleccionar la
función deseada en el siguiente orden: alta frecuencia,
vacuum & spray, cepillo rotatorio martillo de frío y
calor.
1. Seleccione el tubo de cristal del electrodo correcto
e inserte el extremo de la tapa de metal en la boquilla
de salida del mango (intente no tocar el electrodo de
cristal con las manos o cualquier objeto de metal).
Elección de los electrodos de cristal:
a. Tubo de electrodo en forma de seta: para grandes
zonas de piel (cara, frente, cuello, etc).
b. Tubo de electrodo en forma de cucharón: para
zonas medias de la piel (la barbilla, etc).
c. Tubo de electrodo en forma de bola: usarse para
pequeñas áreas de la piel (la nariz, etc).
d. Tubo de electrodo recto: utilizar para el
tratamiento indirecto.
2. Encienda el equipo pulsando el botón “POWER” y
asegúrese de que la “ENERGY” está colocado al
mínimo.
3. Seleccione el tiempo de tratamiento deseado
mediante “TIME”.
4. Pulse el botón “START/PAUSE” para iniciar el
tratamiento.
5. Toque el área de tratamiento con el electrodo de
cristal. A continuación, puede ajustar la potencia poco
a poco usando el botón “ENERGY”.
6. Durante el tratamiento, cuando cambie de electrodo
debe volver a poner la potencia al nivel mínimo antes
de intercambiar los electrodos, y luego, lentamente,
ajustar el nivel de energía y volver a la intensidad
requerida.
7. Al final del tratamiento, bajar lentamente el botón
“ENERGY” al nivel de potencia mínima y luego apague
el botón “POWER” antes de retirar el electrodo de la
cara del cliente.
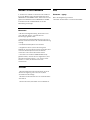
F-331
4 in 1 beauty
instrument
Timer
Energy
State
function
Start/Pause

Uso indirecto Precaución
• El polo del electrodo de cristal producirá una chispa
cuando esté a menos de 2,5 centímetros de distancia
de la piel con el instrumento encendido. En este caso,
reduzca la energía de la unidad de alta frecuencia. Si
el cliente aún siente la chispa, puede cubrirse la cara
con un paño seco pequeño, de algodón, pero nunca
con uno de nylon o sintético.
• Antes de retirar el electrodo de cristal de la piel,
disminuya “ENERGY” a su valor mínimo, y luego
apague la corriente antes de retirarlo de la piel.
1. Seleccione el electrodo de vidrio recto e inserte el
extremo de la tapa de metal en la boquilla de salida
del mango.
2. Dé el aparato de mano al cliente, asegurándose de
que sostenga el electrodo de vidrio.
3. Encienda la unidad pulsando el botón “POWER” y
asegúrese de que la “ENERGY” esté al mínimo.
4. Seleccione el tiempo de tratamiento deseado
mediante “TIME”.
5. Pulse el botón “START/STOP” para iniciar el
tratamiento.
6. Seleccione poco a poco la potencia mediante
“ENERGY”.
7. Lleve a cabo el masaje facial o tratamiento con el
producto correspondiente según sea necesario.
Durante el proceso de tratamiento completo,
asegúrese de no tocar o entrar en contacto con el
electrodo de cristal que sujeta el cliente.
8. Al final del tratamiento, reduzca lentamente
“ENERGY” a la mínima potencia y luego apagué el
botón “POWER”.

VACUUM & SPRAY
Succión de espinillas
Pulverización
Precaución
1. Compruebe que el filtro de espuma está en su
posición correcta en el mango.
2. Seleccione el botón “VACUUM” para iniciar la
bomba de succión.
3. Conecte el tubo de aire de succión a las boquillas de
vacío correspondientes en el lado de la máquina, y
luego conecte los otros extremos de los tubos al
mango de succión. Se incluyen cuatro tubos de
succión de cristal pequeños, que dan la opción de
realizar todo tipo de operaciones faciales de succión.
4. Ajuste la configuración de “ENERGY” y “TIMER” a
sus necesidades.
5. Pulse el botón “START/PAUSE” para iniciar el
tratamiento.
6. Puede ajustar el efecto de succión tapando o
destapando el agujero en el lado del mango con el
dedo.tiempo de operación pulsando “TIMER”. Se
pueden cambiar estos ajustes cuando se desee
durante el tratamiento.
Notas
• Normalmente, la operación no debe durar más de 5
minutos Si el equipo se sobrecalienta, desconecte
todos los botones y reinicie pasados 10 minutos.
• No deje el mango en la misma parte de la piel
durante mucho tiempo, ya que puede causar lesiones.
• Evite el uso en la piel irritada.
• Asegúrese siempre de que del tubo rociador se
conecta a la boquilla correcta de la máquina, para
evitar la aspiración accidental de cualquier solución de
pulverización en la bomba, que puede dañar la bomba
de la máquina y anular la garantía del fabricante.
1. Conecte un extremo del tubo de pulverización de
aire a la boquilla de pulverización de salida
correspondiente en el lado de la máquina, y luego
conecte el otro extremo a la boquilla de entrada de la
botella pequeña de pulverización. Se suministran dos
botellas de pulverización, que pueden contener
diferentes líquidos para los tratamientos
2. Ajuste la configuración de “ENERGY” y “TIMER” a
sus necesidades.
3. Pulse el botón “START/PAUSE” para iniciar el
tratamiento.
4. Para utilizar la botella de pulverización,
simplemente cubra el agujero de la parte superior de
la boquilla con el dedo índice, lo que permitirá que el
líquido deseado salga de la botella de aire. Para
detener el flujo de aerosol, basta con quitar el dedo de
la boquilla y el vacío se romperá.
Notas
• Pulverice hacia abajo desde la frente durante la
operación. Impida que el líquido entre en la nariz. Pida
al cliente que cierre los ojos y la boca.
• Mantenga una distancia adecuada de pulverización,
para que el efecto se sienta como un suave rocío sobre
la piel.
• Normalmente, la operación no debe durar más de 5
minutos Si el instrumento se sobrecalienta apague
todos los botones y reinicie después de 10 minutos.

CEPILLO ROTATORIO
Antes del tratamiento
Precaución
1. Frote la superficie de la piel con una esponja
húmeda
2. Use un vaporizador (o un paño caliente) para
suavizar la superficie de la piel en el área de
tratamiento.
3. Después del tratamiento de limpieza de la piel es
aconsejable aplicar un poco de aceite nutritivo en la
piel a tratar.
Inicio del tratamiento
1. Conecte los cables de alimentación en el panel
trasero, indicado en el esquema como “POWER LINE
INPUT”.
2. Conecte los accesorios correctamente en el panel
delantero/trasero como se indica en el esquema.
3. Elija el cabezal del cepillo apropiado de acuerdo con
el tipo de piel del cliente. En general, la piel delicada o
seca necesita un cabezal de cepillo blando, mientras
que los cepillos más duros pueden ser utilizados para
las pieles ásperas o grasas.
4. Encienda el botón “POWER”.
5. Ajuste la configuración deseada para “ROTATION”,
“ENERGY” y “TIMER”
6. Pulse el botón “START / PAUSE” para iniciar el
tratamiento.
7. Mientras sujeta el cepillo de mango, ajuste
“ENERGY”. La velocidad de rotación aumentará a
medida que se incremente el ángulo de ajuste.
• No presione demasiado el cabezal del cepillo
mientras esté en funcionamiento.
• No utilice este instrumento con cualquier ácido o
sustancia alcalina.
• Después de la operación, apague el instrumento y
desconecte el cable de alimentación.
• Esta función no debe ser utilizada en clientes que
sufren de piel hipersensible o dermatitis.
• Si los vasos capilares de la piel están dañados, no
limpie la piel con esta función.

MARTILLO DE FRÍO Y CALOR FAQ
Vacuum – spray
Notas
1. Pulsar “STATE” para seleccionar entre la función de
frio o calor.
2. Según las necesidades, ajustar la temperatura de
salida pulsando “ENERGY” y el tiempo de Trabajo
deseado pulsando “TIMER”.
3. Pulsar “START/PAUSE” para empezar el
tratamiento.
• Durante la primera utilización, el martillo de frío y
calor empezara a funcionar al cabo de 5 minutos una
vez se hayan realizado todos los ajustes.
• Después del primer tratamiento, se necesitan 3
minutos de pausa antes del siguiente tratamiento.
• La mejor temperatura ambiente de trabajo es de 25
grados.
• No obstruir las ranuras de ventilación en el martillo
ya que se puede producir un sobrecalentamiento y
consecuentemente un cortocircuito en el sistema
eléctrico.
• Después de pulsar el botón “START/PAUSE” para
empezar el tratamiento, asegurarse que también se ha
pulsado en el martillo los botones “-“ o “+”, en caso
contrario, el martillo no empezará a funcionar.
Si el efecto de succión se reduce:
• Vuelva a colocar los filtros de metal y los filtros de
espuma.

Cepillo rotatorio
• Tras la intervención, sumerja el cabezal del cepillo
en agua limpia con un poco de limpiador durante 5
minutos. Después de aclararlo, sumérjalo en alcohol
durante media hora.
• El cabezal del cepillo debe ser desinfectado usando
radiación ultravioleta y conservarse en su embalaje
original.
MANTENIMIENTO
Alta frecuencia
• Los tubos de cristal de los electrodos debe
mantenerse limpios y secos, y deben ser esterilizados
antes o después de cada uso.
Vacuum – spray
• El filtro de espuma en el mango tiene que ser
cambiado cada 5 tratamientos. Desmonte el mango y
reemplace el filtro. A continuación, vuelva a montar el
mango.

MultiEquipment. Ref F331
Instruction manual
4 IN 1
Cold & Hot Hammer
High frequency
Brush
Vacuum & Spray

Barcelona
Pol. Ind. La Valldan
Camí de Garreta, 92
08600 Berga
Barcelona – Spain
T. +34 938 249 020
E. info@weelko.com
W. www.weelko.com
Warning Recycling
EC-Declaration of compilance Welcome!
Whenever any of our electrical products or their
presentation packaging bear this symbol, it means
that these products should not be treated as
conventional household waste in Europe. To ensure
proper treatment of this waste, dispose of it in
accordance with local laws or as required for the
disposal of electrical equipment. This initiative will
help preserve save natural resources and improve
standards of environmental protection in regard to the
treatment of electrical waste.
Thank you very much for purchase. Please read the
instructions carefully before operating the instrument.
You can also ask a professional for guidance to make
sure you are using the instrument correctly. We will
accept no responsibility for any accidents that occur
due to incorrect operation.
The company reserves the right to amend the details of
the instruments with no prior notice. If any mistakes
are found in these instructions, please feel free to
send us an e-mail informing us so that we can correct
them.
This product meets the following requirements:
1. Conditions set out in the Low Voltage Directive:
2014/35/EC
2. Conditions set out in the Electromagnetic Compati-
bility Directive: 2014/30/EC
• Never under any circumstances attempt to open or
inspect the internal components or accessories of the
machine. If an inspection becomes necessary, please
contact your supplier or a suitably competent
technician.
• Never use the unit in humid or poorly ventilated
environments, such as wet rooms, bathrooms etc. to
prevent damage to the electrical components of your
unit.
• Never use the unit outdoors; exposure to the
elements can cause damage.
• If the power cord was destroyed, please ask a
professional to service and replace it to avoid hazards,
or contact the dealer for service.

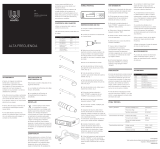
Instructions of use HIGH FREQUENCY
Front panel
1. Connect the power supply via the rear panel.
2. Connect the accessories properly to the front/rear
panel as indicated in the sketch.
3. Turn on the “POWER” button.
4. Press “FUNCTION” to select the desired function in
the following order: high frequency, vacuum & spray,
rotary brush, cold & hot hammer.
1. Select the proper glass electrode pipe and insert
the metal cap end into the output mouthpiece of the
handle (try not to touch the glass electrode with your
hands or any metal objects).
Glass electrode pipe assignment position:
a. Mushroom-shaped electrode pipe used for large
areas of skin: face, forehead, neck, etc.
b. Ladle-shaped electrode pipe used for medium
areas of skin: chin, etc.
c. Ball-like electrode pipe used for small areas of
skin: nose, etc.
d. Straight electrode pipe used for indirect
treatment.
2. Press “ START/PAUSE” button to start working
3. Touch the treatment area with the glass electrode.
You can then slowly adjust the output using
“ENERGY”.
4. During the course of the treatment, when changing
electrodes you should return the output to the
minimum level before swapping the electrodes, and
then slowly adjust the energy level and return in to the
appropriate intensity required.
5. At the end of the treatment, slowly reduce the
“ENERGY” level to the minimum output and then
switch the “START/PAUSE” button off before removing
the electrode from the customer’s face.
F-331
4 in 1 beauty
instrument
Timer
Energy
State
function
Start/Pause

Indirect application Cautions
• The glass electrode pole will sparkle when it is still
less than one inch away from the skin with the
instrument switched on. In this case, reduce the
energy of the high frequency unit. If the customer still
feels the sparkle, they may cover their face with a
small, dry cotton towel but never with a nylon or
synthetic one.
• Before removing the glass electrode from the skin,
decrease the “ENERGY” to its minimum setting, then
switch the power off before removing it from the skin.
• Customers should not be allowed to wear any metal
objects or jewelry; all items must be removed prior to
beginning any treatment.
• High-frequency treatments should not be carried out
on pregnant women, or any persons using a
pace-maker (or any electrical or rhythmic
heart-regulating device).
• The products used with the high-frequency
treatment must not contain any alcohol or spirit-based
substances in order to prevent accidental combustion
from arcing.
• Never touch the inner eye (eyeball) area with any
high-frequency electrode.
• Only hold the handle of the high-frequency handset.
1. Select the straight glass electrode and insert the
metal cap end into the output mouthpiece of the
handle.
2. Give the handset to the customer, making sure they
hold the glass electrode and not the handset.
3. Switch on the unit by pressing the “START/PAUSE”
button and make sure the “ENERGY” is set to the
minimum.
4. Slowly adjust the output using “ENERGY”.
5. Carry out the facial massage or treatment using the
prescribed product as required. During the whole
treatment process, make sure you do not touch or
come into contact with the glass electrode being held
by the customer.
6. At the end of the treatment, lowly reduce the
“ENERGY” level to the minimum output and then
switch the “START/PAUSE” button off.

VACUUM & SPRAY
Instructions of use vacuum
Instructions of use spray
Cautions
1. Connect the opposite side of the pipe in the vacuum
handle. Put the properly small glass vacuum pipe in
the handle. There are four types of small glass vacuum
pipes.
2. Check that the foam filter is in its properly position
in the handle.
3. Press “ STATE” to select vacuum function
4. According to the needs, adjust the output level by
pressing “ENERGY” and desired time of operation by
pressing “TIMER”.
5. Press “START/PAUSE” to start working.
6. You can adjust the suction effect by covering or
uncovering the lateral hole of the handle with your
finger.
7. After performance completed, first turn off the unit
by pressing “START/PAUSE” button.
Notes
• Normal performance should not last over 5 minutes,
in the event that the instrument is overheated, please
turn off all buttons and restart in 10 minutes.
• Do not leave the handle on the same part of skin for
too long since it can cause injuries.
• Avoid using in on irritated skin.
• Always make sure the spray pipe is connected to the
right nozzle of the machine, to prevent accidental
vacuuming of any spray solution into the pump, which
can damage the pump of your machine and void your
manufacturer’s warranty.
• Do not work the vac/spray pump for extended
periods without cool-down time between treatments
in order to prevent over heating of the pump and
damage to the machine. Damage caused by
overheating of the pump is not covered by the
manufacturer’s warranty.
1. Fill the spray bottles with the proper liquid. There
are two spray bottles, which can contain different
liquids.
2. Connect the opposite side of the pipe to the spray
bottle.
3. Press “ STATE” to select spray function
4. According to the needs, adjust the output level by
pressing “ENERGY” and desired time of operation by
pressing “TIMER”.
5. Press “START/PAUSE” to start working.
6. You can adjust the spray effect by covering or
uncovering the top hole of the bottle with your finger.
7. Once you have finished, first turn off the unit by
pressing the “START/PAUSE” button.
Notes
• Spray downwards from the forehead during
operation. Stop the liquid from going into the nose. Ask
the customer to close their eyes and shut their mouth.
• Maintain an adequate distance from the face whilst
spraying so that the effect is felt as a gentle mist
landing on the skin.
• Normally the operation should not last more than 5
minutes. If the instrument overheats, turn off all the
buttons and restart after 10 minutes.

ROTARY BRUSH
Before treatment
Cautions
1. Scrub the skin surface with a wet pad.
2. Using a steamer (or hot cloth) to soften the skin
surface in the treatment area.
3. After skin-cleansing maintenance, it is advisable to
daub some nutritional oil on the target skin surface.
Starting treatment
1. Choose the appropriate brush head according to the
customer’s skin type. In general, delicate or dry skin
needs a soft brush head, while harder brushes can be
used for rough or greasy skin.
2. According to the needs, adjust rotation direction by
pressing “STATE”, the output level by pressing
“ENERGY” and desired time of operation by pressing
“TIMER”.
3. Press “START/PAUSE” to start working.
• Do not press the brush head excessively while it is
running.
• Do not operate this instrument with any evident acid
or alkaline substance.
• After the operation, turn the instrument off and
disconnect the power cord.
• This function should not be used on customers who
suffer from hypersensitive skin or dermatitis.
• If the capillary vessels in the skin are injured, do not
cleanse the skin with this function.

HOT & COLD HAMMER FAQ
Vacuum – spray
Notes
1. Press “STATE” to select between cold or hot
function.
2. According to the needs, adjust the output
temperature by pressing “ENERGY” and desired time
of operation by pressing “TIMER”.
3. Press “START/PAUSE” to start working.
• For first time usage, function will start 5 minutes
after all set up.
• After the first treatment, it needs 3 minutes before
the next Cold or Hot treatment.
• Best working temperature condition is 25C.
• Do not block the air tank while using this function, if
not steaming water will be blocked inside the Cold &
Hot hammer, and may induce short circuit.
• Even after the “START/PAUSE” button has been
turned on to “START”, but need to check if the hammer
has been switched to “o“, if still in “-”, hammer would
not start working.
If the suction effect is reduced:
• Replace the metal and foam filters.

Rotary brush
• After the operation, submerge the brush head in
clear water with a little cleanser for 5 minutes. Then,
after rinsing it, submerge it in alcohol for half an hour.
• The brush head must be disinfected using ultraviolet
radiation and then kept in its original packaging.
MAINTENANCE
High frequency
• Glass electrode pipes must be kept clean and dry,
and should be sterilized before or after each use.
Vacuum – spray
• The foam filter in the handle needs to be changed
after every 5 treatments. Dismantle the handle and
replace the filter. Then reassemble the handle.

MultiEquipment. Ref F331
Mode d’emploi
4 SUR 1
Marteau froid et chaud
Haute fréquence
Brosses rotatives
aspiration et pulvérisation

Barcelona
Pol. Ind. La Valldan
Camí de Garreta, 92
08600 Berga
Barcelona – Spain
T. +34 938 249 020
E. info@weelko.com
W. www.weelko.com
Advertissement Recyclage
Déclaration de conformité CE Bienvenue!
Si l’un des composants électriques ou leur emballage
de présentation porte ce symbole, cela signifie que ces
produits ne doivent pas être traités comme des
déchets ménagers habituels. Afin de leur assurer un
traitement approprié, veuillez vous en débarrasser en
respectant les lois locales ou tel que requis en cas
d’élimination d’appareils électriques. Ceci permettra
de préserver et de sauver les ressources naturelles et
d’améliorer les normes de protection de
l’environnement portant sur l’élimination de déchets
électriques.
Merci beaucoup d’avoir fait cet achat. Veuillez lire les
instructions avec attention avant d’utiliser cet
appareil. Vous pouvez également demander conseil
auprès d’un professionnel afin de vous assurer
d’utiliser l’appareil correctement. Nous n’endosserons
aucune responsabilité en cas d’accident provoqué par
une mauvaise utilisation.
L’entreprise se réserve le droit de modifier les détails
des instruments sans préavis. Si vous détectez une
erreur dans ces instructions, n’hésitez pas à nous le
faire savoir afin d’y apporter une solution.
Ce produit répond aux exigences suivantes:
1. Conditions énoncées dans la Directive «Basse
tension»: 2014/35/EC
2. Conditions énoncées dans la Directive
«Compatibilité électromagnétique»: 2014/30/EC
• N’essayez en aucune circonstance d’ouvrir ou
d’inspecter les composants internes ou les
accessoires de votre appareil. Si une inspection est
nécessaire, veuillez contact votre fournisseur ou un
technicien qualifié.
•N’utilisez jamais votre appareil dans un lieu humide
ou peu ventilé (par exemple, salles de bains); ceci
pourrait endommager les composants électriques de
votre appareil.
•N’utilisez jamais votre appareil à l’extérieur, une
exposition aux éléments naturels pouvant
endommager l’appareil.
•Si le cordon d’alimentation était rompu, veuillez
demander à un professionnel de le remplacer pour
éviter tout dommage, ou demandez conseil à votre
revendeur.

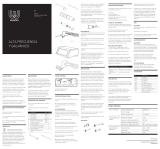
Mode d’emploi HAUTE FRÉQUENCE
Panneau avant
1. Branchez le cordon d'alimentation arrière du
panneau.
2. Relier les accessoires sur le panneau avant et
arrière, comme indiqué sur le schéma.
3. Allumez l'appareil en appuyant sur "POWER".
4. Appuyez sur "FUNCTION" pour sélectionner la
fonction désirée: haute fréquence, aspiration et
pulvérisation, brosses rotatives, marteau froid et
chaud.
1. Choisissez le tuyau d’électrode en verre adapté et
insérez l’extrémité en métal dans la partie de
rendement du manche (veillez à ne pas toucher
l’électrode de verre avec vos mains ou tout autre objet
en métal).
2. Types de tuyaux d’électrode en verre:
a. Tuyau d’électrode en forme dechampignon: utilise
sur de larges zones de peau, comme par exemple le
visage, le front, le cou, etc.
b. Tuyau d’électrode en forme de louche: utilisé sur
des zones moyennes, telles que le menton, etc.
c. Tuyau d’électrode en forme de balle: utilise sur de
petites zones, comme le nez, etc.
d. Tuyau d’électrode droit: utilisé en cas de
traitement indirect.
3. Allumez l’appareil en appuyant sur le bouton
“POWER” et assurez-vous que l’option “ENERGY” est
réglée sur le minimum.
4. Choisissez la duree de traitement souhaitée en
réglant l’option “TIME”.
5. Appuyez sur le bouton “START/STOP” pour
commencer le traitement.
6. Touchez la zone de traitement avec l’électrode en
verre. Vous pouvez ensuite ajuster doucement
l’éjection en réglant l’option “ENERGY”.
7. Au cours du traitement, veuillez reduire le niveau de
rendement au niveau minimal avant tout changement
d’électrode, puis ajustez lentement le niveau d’énergie
et choisissez l’intensité souhaitée.
8. A la fin du traitement, reduisez doucement l’option
“ENERGY” au niveau minimal puis éteignez l’appareil
en appuyant sur le bouton “POWER” avant de retirer
l’électrode du visage du client.
F-331
4 in 1 beauty
instrument
Timer
Energy
State
function
Start/Pause

Usage indirect Cautions
• L’électrode en verre brillera lorsque se trouve à
moins de 2 cm de la peau lorsque l’instrument est
allumé. Dans ce cas, réduisez l’énergie de l’appareil à
haute fréquence. Si le client sent toujours l’étincelle, il
peut se couvrir le visage avec une petite serviette en
coton mais jamais avec une serviette en nylon ou
synthétique.
• Avant de retirer l’électrode de verre de la peau,
réduisez l’option “ENERGY” à son minimum puis
éteignez l’appareil avant de le retirer de la peau.
1. Choisissez l’électrode en verre droite et insérez
l’extrémité en métal dans la partie de rendement du
manche.
2. Donnez le combine au client, en vous assurant que
le client tient l’électrode en verre et non le manche.
3. Mettez l’appareil en marche en appuyant sur le
bouton “POWER” et en vous assurant que l’option
“ENERGY” est reglee au minimum.
4. Choisissez la duree du traitement en réglant l’option
“TIMER”.
5. Appuyez sur le bouton “START/STOP pour
commencer le traitement.
6. Ajustez doucement l’éjection en réglant l’option
“ENERGY”.
7. Effectuez le massage facial ou le traitement en
utilisant le produit prescrit comme demande. Pendant
toute la duree du traitement, assurez-vous de ne pas
toucher ou entrer en contact avec l’électrode en verre
tenue par le client.
8. A la fin du traitement, reduisez doucement l’option
“ENERGY” jusqu’au minimum puis éteignez l’appareil
en appuyant sur le bouton “POWER ”.
La pagina si sta caricando...
La pagina si sta caricando...
La pagina si sta caricando...
La pagina si sta caricando...
La pagina si sta caricando...
La pagina si sta caricando...
La pagina si sta caricando...
La pagina si sta caricando...
La pagina si sta caricando...
La pagina si sta caricando...
La pagina si sta caricando...
La pagina si sta caricando...
La pagina si sta caricando...
La pagina si sta caricando...
La pagina si sta caricando...
La pagina si sta caricando...
La pagina si sta caricando...
La pagina si sta caricando...
La pagina si sta caricando...
La pagina si sta caricando...
-
 1
1
-
 2
2
-
 3
3
-
 4
4
-
 5
5
-
 6
6
-
 7
7
-
 8
8
-
 9
9
-
 10
10
-
 11
11
-
 12
12
-
 13
13
-
 14
14
-
 15
15
-
 16
16
-
 17
17
-
 18
18
-
 19
19
-
 20
20
-
 21
21
-
 22
22
-
 23
23
-
 24
24
-
 25
25
-
 26
26
-
 27
27
-
 28
28
-
 29
29
-
 30
30
-
 31
31
-
 32
32
-
 33
33
-
 34
34
-
 35
35
-
 36
36
-
 37
37
-
 38
38
-
 39
39
-
 40
40


Weelko MultiEquipment F331 Manuale del proprietario
- Tipo
- Manuale del proprietario
in altre lingue
Documenti correlati
-
 Weelko U-Tech F815 Manuale del proprietario
-
 Weelko B-Equipment F314A Manuale del proprietario
-
 Weelko U-Tech F803 Manuale del proprietario
-
 Weelko U-tech F806 Manuale del proprietario
-
 Weelko MultiEquipment Manuale del proprietario
-
 Weelko MultiEquipment F336B Manuale del proprietario
-
 Weelko Move P02 Manuale del proprietario
-
 Weelko B-Equipment F319A Manuale del proprietario
-
Weelko F314A Manuale utente
-
 Weelko U-Tech F812 Manuale del proprietario


