H.Koenig HK8 Gris Manuale del proprietario
- Tipo
- Manuale del proprietario

1
Instruction manual
Manuel d'utilisation
Benutzerhandbuch
Gebruiksaanwijzing
Manual de usuario
Manuale d’uso
Manual do usuário
HK8
Kitchen robot
Robot culinaire chauffant
Küchenmaschine
Food Processor
Procesador de Alimentos
Robot da cucina
Processador de alimentos

2
ENGLISH
Important Safety Instruction
The following safety precautions should always be
followed, to reduce the risk of electric shock, personal
injury or fire. It is important to read all of these
instructions carefully before using the product, and to
save them for future reference or new users.
• Appliances can be used by persons with reduced
physical, sensory or mental capabilities or lack of
experience and knowledge if they have been given
supervision or instruction concerning use of the
appliance in a safe way and if they understand the
hazards involved. Children shall not play with the
appliance.
• This appliance shall not be used by children. Keep
the appliance and its cord out of reach of children.
• Warning: potential injury from misuse. Care shall
be taken when handling the sharp cutting blades
emptying the bowl and during cleaning.
• Switch off the appliance and disconnect from
supply code before changing accessories or
approaching parts that move in use. Always
disconnect the appliance from the supply if it is left
unattended and before assembling, disassembling or
cleaning.
• If the supply cord is damaged, it must be replaced
by the manufacturer, its service agent or similarly
qualified persons in order to avoid a hazard.
• Accessories, other than those supplied with the
appliance, shall include instructions for their safe use.
• WARNING: Do not remove the lid while the water
is boiling. Do not set speed more than level 4 when
temperature higher than 90 degree centigrade.
• The appliance must not be immersed.

3
• This appliance is intended to be used in household
and similar applications such as:
- staff kitchen areas in shops, offices and other
working environments;
- farm houses;
- by clients in hotels, motels and other residential
type environments;
- bed and breakfast type environments.
• Please put the unit on stable, flat table which will
not become hot and ensure it is in safe distance from
the edge to avoid falling down. When it is used to
knead the dough or cut food, the unit may move
because of vibration. So please do not use it without
super vision of people so as to avoid the equipment
falling down to the floor.
• Please pull out the plug when cleaning the
appliance or put it away for a long time.
• Regularly check whether the main body, jar,
steamer or other components are damaged or not.
The damaged parts will decrease the safety of use.
Once something wrong is found, please stop using
and contact our after-sales service center.
• If the appliance stops unexpectedly or appears to
malfunction, switch off the power supply, unplug from
the mains and stop using immediately. Seek
professional advice to rectify the fault or make repairs.
• The measuring cup is the only part which can be
used to cover the round hole in the jar lid. Please do
not use cloth or similar things to cover the hole.
• Do not touch the edge of blades. Please be careful
and hold the top part when you assemble or remove
the blade.
• Pay attention to the capacity mark on the blender
jar.
• Open the lid until the food in the jar stops rotating.
• Pay attention to the high-temperature food when
you open the jar lid. Please put the measuring cup at
the hole of jar lid correctly when processing food.

4
• Do not touch the jar when processing hot food of
more than 60°C.
• Make sure that steamer and the jar are connected
well when using steamer.
• Pay attention that vapor will outflow through the
cover top or sides.
• In operation, do not touch any place of the steamer
except its handles.
• Do not use the steamer without the steamer lid in
place.
• When opening the steamer lid, be careful not to be
scalded by vapor.
• When using steaming and boiling setting, pay
attention that vapor will outflow through jar mouth
when move the steamer.
• Keep on checking that the vent hole on the
steamer lid is unblocked, or else the vapor may come
out somewhere else.
• Please put the appliance and its hot after-use parts
in the place which is out of the children’s reach and
warn the children that the unit will become hot and do
not touch it.
• The leakage of food: Make sure that the blade
sealing ring is placed well and the blade assembly is
tightly fixed by the fixing bracket on the bottom. The
failure of installation will cause the food leakage which
will damage the appliance.
• Damage of poor ventilation: Ensure that the vents
on the back of the main body are not blocked by any
articles, or else the equipment will be damaged.
• The jug and all the accessories are to be used only
with the stand provided. Do not use the foreign parts
on this machine.
• Pay attention to avoid spillage on the connector.
• The jug will be still hot due to residual heat after
use, take care not to get burnt.

5
• This appliance may be used by children of at least
8 years of age, as long as they are supervised and
have been given instructions about using the
appliance safely and are fully aware of the dangers
involved.
• Cleaning and maintenance should not be carried
out by children unless they are at least 8 years of age
and are supervised by an adult.
• Keep the appliance and its power cord out of
reach of children under 8 years of age.
• When using electrical equipment, safety
precautions must always be taken to prevent the risk
of fire, electric shock and/or injury in the event of
misuse.
• Make sure that the voltage rating on the type plate
corresponds to your main voltage of your installation.
If this is not the case, contact the dealer and do not
connect the unit
• Never leave the unit unattended while in operation.
• Never open the appliance from the front, always
position yourself slightly to the side to avoid burning
yourself with steam.
• The device must not be used if it has been dropped,
it obvious signs of damage are visible or if it has leaks.
• Do not operate this appliance if it has a damaged
cord or plug, if it is not working properly or if it has
been damaged or dropped. If the supply cord is
damaged, it must be replaced by the manufacturer or
its service agent or a similarly qualified person in order
to avoid a hazard.

6
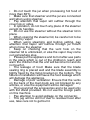
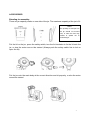
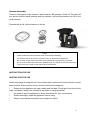
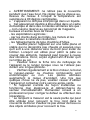
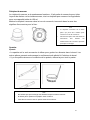
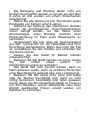
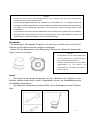
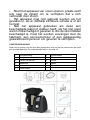
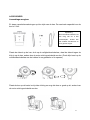
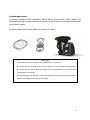
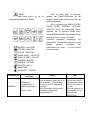
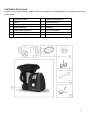
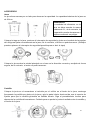
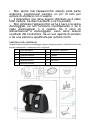
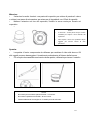
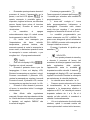
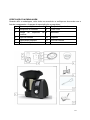
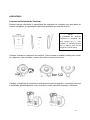
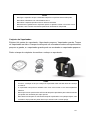
PACKAGE CHECKING
When opening the packing box, take out all the accessories and get to know them
according to the components list. The spare parts are as follows:
1
Main body
7
Steamer lid
2
Blending jar
8
Filter basket
3
Jar lid
9
Butterfly
4
Measuring cup
10
Spatula
5
Small steamer
11
Recipe book
6
Big steamer

7
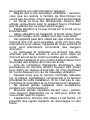
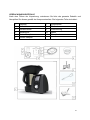
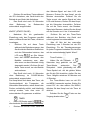
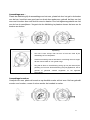
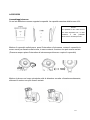
ACCESSORIES
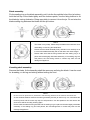
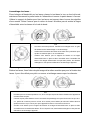
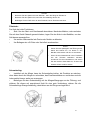
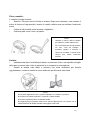
Blending Jar assembly:
There are jar capacity marks on one side of the jar. The maximum capacity of the jar is 2L.
Put the lid on the jar, press the safety switch, turn the lid clockwise to fix the lid onto the
jar, or else the motor can not be started. (Always push the safety switch first to lock or
open the lid)
Put the jar onto the main body at the correct direction and sit properly, or else the motor
cannot be started.
Notice
The quantity of food put into
the jar should not exceed
2.0L, or else the food may
outflow or splash out to
cause danger.
.

8
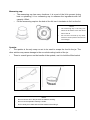
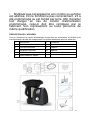
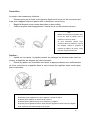
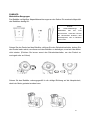
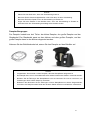
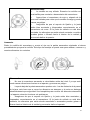
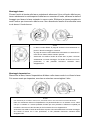
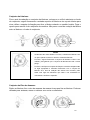
Blade assembly:
Fix the sealing ring on the blade assembly, put it into the through the hole of the jar bottom,
hold the half top of the blade tightly and turn bottom upside, use the fixing bracket to fix
the blade by turning clockwise. Doing oppositely to remove it from the jar. Do not miss the
blade sealing ring between the blade and the jar bottom.
Kneading shaft assembly:
Remove the blade, fix the kneading shaft the same way as fixing the blade. It can be used
for kneading, or stirring and mixing without cutting the food.
Notice
•
The blade is very sharp. Please wrap the blade with washcloth when
assembling or removing the blade base.
•
Please hold the blade assembly firmly and take it out carefully so as
to ensure that blade assembly will not fall down and cause danger.
•
Please make sure that the fixing bracket and the sealing ring is in
place and locked tightly with blade assembly. If the sealing ring isn’t
well placed, the food being mixed or cooked may leak out and
damage theappliance.
Notice
• Do not use it for speed over 3, otherwise it will cause big vibration to the machine and cause risk.
• As the smallest distance between the stirring assembly and the jar wall is only 1cm, sometimes the
food may stuck and the motor may stop for self protection. Use the spatula to mix and remove the
stuck and it will be smoothly working again.
• Please make surethat the fixing bracket and the sealing ring is in place and locked tightly with blade
assembly. If the sealing ring isn’t well placed, the food beingmixed or cooked may leak out and
damage theappliance

9
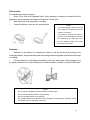
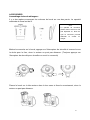
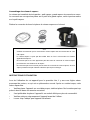
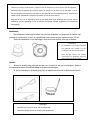
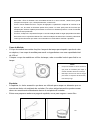
Measuring cup:
• The measuring cup has many functions: it is a part of the lid to prevent losing
heat or splashing; it is a measuring cup to measure the ingredients with full
capacity 150ml.
• Put the measuring cup into the hole of the lid, turn it clockwise to fix it on the lid.
Spatula:
• The spatula is the only comp on ent to be used to scrape the food in the jar. The
other articles may cause damage to the non-stick coating inside of the jar.
• There is a small groove on the handle of the spatula, use it to hold the fillter basket
Notice
• The measuring cup is the only part
which can be used to cover the round
hole of the lid
• Do not cover the hole by any other
articles to avoid splash of the food to
cause danger
Notice
• Do not use it to mix in the jar when the blade is working.
• Do not use the spatula if butterfly is inside.
• Do fix closely the handle with the filter basket before lifting it.

10
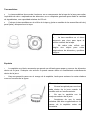
Filter basket:
The basket has many functions:
• Sieve. Filter fruit and Vegetable juice. After grinding or making fruit sauce with the
appliance, put the basket into thejar to help pour out the juice.
• Stew soft food such as pasta or noodles;
• Cook side dishes, such as rice and potatoes.
Butterfly:
• Installed on the blade, the butterfly can help to mix the food but preventing from
cutting by blades, and prevent the food from being adhesive together and let the food keep
on mixing.
• Fix the butterfly on the blade assembly by the hole, and press it with enough force
for good connection, turn the butterfly bar counterclockwise to make it locked onthe blade.
Notice
• To use the spatula handle to the hole
of the edge of the basket to put it into
or take out of the jar.
• If you want to decrease the water in
the food, such as tomatoes, then take
the measuring cup away and cover
with the basket instead. The water
can be easily removed.
Notice
• Do not start the appliance until the butterfly is fixed in place.
• Do not use above speed 4when using butterfly.
• Do not use spatula when using butterfly.
• Do not add ingredients into the jar when the appliance is working with the butterfly, orelse
the butterfly may be damaged or blocked.

11
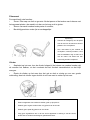
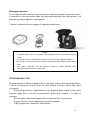
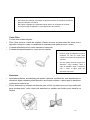
Steamer Assembly:
There are three parts of the steamer: Small steamer, Big steamer, Glass lid. The glass lid
can put on both the small steamer and big steamer, and the big steamer can sit on the
small steamer.
Remove the jar lid, sit the steamer on the jar.
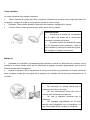
INSTRUCTION FOR USE
INSTRUCTION FOR USE
At the early stage of using this unit, there will be light smell from the motor which is normal
phenomenon. After a period of time, this kind ofsmell will disappear.
• Please put the appliance on clean, stable and flat table. Do not put it too close to the
edge, and keep it away from the built-in wardrobe or hanging bracket.
• It is better to put the appliance on some fixed place for your convenience.
• Please thoroughly clean the appliance before using.
• “Beep” sound shows the button has brought into effect.
• .
Notice
• Please make sure that the steamer lid is covered before steaming.
• The steamer cannot be used in microwave oven or other electric appliances.
• Do not touch or get close to the holes of the steamer lid to avoid hurt by hot steam.
• Do not cover or block the holes of the steamer lid by any articles or else the steam may
come out from the edge or other places and cause danger.

12
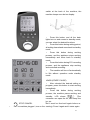
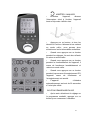
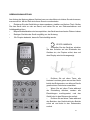
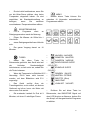
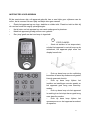
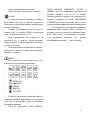
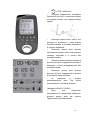
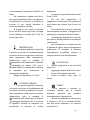
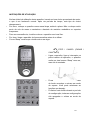
STOP/ CANCEL
• Get the machine plugged ,turn on the
switch at the back of the machine, the
machine beeps once but no display.
• Press this button, and all the back
lights turn on and comes to standby mode,
you can select the desired functions.
• Press this button during setting period,
all setting cleared and come back to standby
mode.
• Press this button during working
process, and the appliance stops working
immediately and come back to standby
mode.
• Press this button during DIY recording
process, and the appliance stop working
and cancelled recording.
• The machine will turn off automatically
in 30s without operation under standby
mode.
KNOB (START/ PAUSE)
• After selected the desired setting or
program, press this button to start working
immediately.
• Press this button during working
process, the machine pause working and
standby, LCD shows . (The
consumer can open the lid, take away the
jar, etc.
But it must be fixed well again before re-
starting). Press it again and it starts again.

13
• The machine will turn off automatically
in 10min without operation under PAUSE
status.
• It is also a knob for setting timer, speed,
temperature, heat power, with increasing
when turn the knob clockwise, and
decreasing when turn the knob anti-
clockwise, or choosing among the 15 auto
programs.
TIMER
• The LCD screen shows , it
means hour: minute: second.
• Press timerbuttonand the minute
signal on LCD flicker; Turn the knob to
adjust the minutes. Press it again, the
second signal on LCD flicker, turn the knob
to adjust the seconds. Press it again, the
hour signal on LCD flicker, turn the knob to
adjust the hours from 1-12h.
• Press the timer during working
process, the machine starts to count down
directly.
• Max 60min by manual setting; max 3h
under DIY setting. The timer limit of each
program please refer to chapter "MENU"
below.
Preset
Press Timer button and hold 3
seconds to enter preset / appointment
setting mode. Time digit flicking together
with preset logo. Use same way to set
preset time from 30 minutes to 12 hours.
Preset mode only goes with DIY or
Menu. Set DIY or choose Menu firstly. Press
knob after setting then time start to count
down,
Press preset to cancel.
SPEED
• Press this button in stand-by mode or
during working process (except some auto
programs locked the speed adjustment), the
appliance gets into speed setting mode.
The signal on LCD flicker, then
speed is adjustable. Turn the knob to select
desired speed.
• Speed range from level 1-10.
• Press this button in blending & heating
process, if the temperature setting or the
actual temperature is over 60℃,the speed
can be only adjustable from speed 1 to 4. If
it was working at high speed, it will drop to
speed 4 automatically.
• There is a speed transfer on the
structure, so it's normal to hear little noise
before the motor start working, or
transferring the speed between level 5 and
level 6.
• For crushing or chopping hard food or
big volume of food, it is suggested to select
speed 5 first and then turn to speed 10, to
avoid vibration and achieve perfect
performance.
• Please do not use speed 8,9,10 over 5
minutes each time; please do not use speed
5,6,7 over 10 minutes each time.
TEMPERATURE
• Press this button in stand-by mode or
during heating process (except some auto
programs locked the temperature
adjustment), the appliance gets into

14
temperature setting mode. The signal on
LCD flicker, then temperature is adjustable.
Turn the knob to select desired temperature.
• Temperature range: 37-120℃
HEAT POWER
• Press this button in stand-by mode or
during heating process (except some auto
programs locked the heat power
adjustment), the appliance gets into
temperature setting mode.
The signal on LCD flicker, then heat
poweris adjustable. Turn the knob to select
desired heat power.
• Heat power range from level 1-10.
• For some sticky food, it is suggested to
select low heat power to avoid being burnt
at the bottom.
• If food volume is small and it requires
precise temperature, it is suggested to
select low heat power.
• Low power will be more precise control;
High power will heat quicker.
• It will not work if just select the heat
power but no temperature selected. It is
suggested to follow the default setting when
choosing different temperature levels.
SELF-CLEANING
• This program is for cleaning purpose
after use.
• Add water from 500ml to 1 liter.
• Some detergent will be helpful
• Whole process takes around 10
minutes
TURBO
• Press and hold this button at standby
mode, the machine starts working at
maximum speed, release and it stop
immediately
• When the temperature in the jar is over
60℃, PULSE cannot be used, and the
screen will show E11.
• There is a speed transfer on the
structure, so it's normal to hear little noise
before the motor start working at the first
pulse.
• Maximum operation time for Pulse is 3
min and then rest for 10 minutes
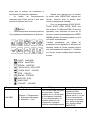
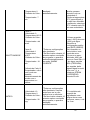
MENU
• This button is to choose among the
below 10 auto programs.
• CHOP(HACHER)
• STEW(MIJOTE2)
• STEAM(VAPEUR)
• THICK SOUP(VELOUTE)
• QUICK SOUP(SOUPE)
• STIR(SAUCE)
• KNEAD(PETRIR)
• RISOTTO (Rice)
• SMOOTHIE
• YOGURT(YAOURT)

15
• Press this button in standby mode, the
SMOOTHIE signal on LCD starts flicker turn
the knob to choose the desired program.
• For the program QUICK SOUP,
THICK SOUP, STIR, STEW, RICE, , after
completed, it will show "End". If no operation
after 10 minutes, it will turn to KEEP WARM
automatically for 12 hours until manually
stopped.
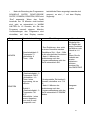
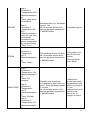
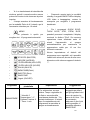
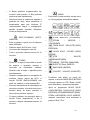
Some default setting of the program is
adjustable, and it shows the real data on the
screen; some of them are blocked and it
shows "--" on the screen, as following form
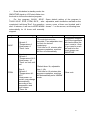
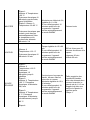
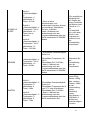
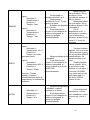
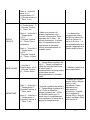
Programs
Default setting
Setting
Tips
CHOP
*Speed: 5
*Temperature: 0
*Heat power: 0
*Timer: 1min
*To crush but not to be
smoothie. Time adjustable from
1s-5min for desired
consistency.
*If left idle for 10 minutes after
program completion, machine
will turn off automatically
*Suggested chopped
size of the ingredients
with hard articles like
carrot, meat is 1-2cm.
*If you need to crush
the food to be the
finest, please use
SMOOTHIE
STEW
Step 1:
*Speed: 0
*Temperautre:100℃
*Heat power: 10
*Timer: no limit, until
boil
Step 2:
*Speed: 0
*Temperature: 90-
95℃
*Heat power: no
certain, may change
automatically
according to the
temperature and
food volume
*Timer: 3h
*Default timer 3h, adjustable
from 1-12h
*If left idle for 10 minutes after
program completion, machine
will automatically enter ‘WARM’
mode.
*Slow cook

16
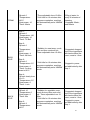
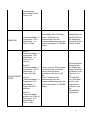
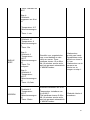
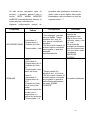
STEAM
*Speed: 0
*Temperature:
120℃
*Heat power: 10
*Timer: 20min
*Time adjustable from 15-60m
*If left idle for 10 minutes after
program completion, machine
will automatically enter ‘WARM’
mode.
*500g of water for
every 30 minutes of
steaming
*Vegetable 20min;
meat 30min
THICK
SOUP
Step 1:
*Speed: 0
*Temperature: 120
*Heat power: 10
*Timer: Till Boil
Step 2:
*Speed: 0
*Temperature:
100℃
*Heat power: 4
*Timer: 29.5min
Step 3:
*Speed: 0
*Temperature: 0℃
*Heat power: 0
*Timer: Cooling
down to 80℃
Step 4:
*Speed: slowly from
6 to 10
*Temperature: 0℃
*Heat power: 0
*Timer: 1 min
*Suitable for meat soup, crush
first and then cook and stir.
Timer adjustable from 15-60m.
*If left idle for 10 minutes after
program completion, machine
will automatically enter ‘WARM’
mode.
*Suggested chopped
size of the ingredients
with hard articles like
carrot, meat is 1-2cm
*Suggest to pause
and add butterfly after
Step 1.
QUICK
SOUP
Step 1:
*Speed: 10
*Temperature: 0
*Heat power: 0
*Timer: 30s
Step 2:
*Speed: 2
*Temperature:
120℃
*Suitable for vegetable soup,
crush first and then cook and
stir. Timer adjustable from 15-
60m.
*If left idle for 10 minutes after
program completion, machine
will automatically enter ‘WARM’
mode.
*Suggested chopped
size of the ingredients
with hard articles like
carrot, meat is 1-2cm
*Suggest to pause
and add butterfly after
Step 1.

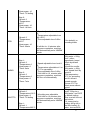
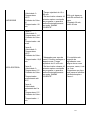
17
*Heat power: 10
*Timer: Till boiling
Step 3:
*Speed: 2
*Temperature:
100℃
*Heat power: 10
*Timer: 19.5min
STIR
*Speed: 2
*Temperature:
100℃
*Heat power: 10
*Timer: 30min
*Speed adjustable from level 0-
3;
*Temperature adjustable from
90-120℃.
*Time adjustable from 5-60m
*
If left idle for 10 minutes after
program completion, machine
will automatically enter ‘WARM’
mode.
*Use butterfly or
kneading blade
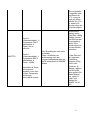
KNEAD
Step 1:
*Speed: 3
*Temperature: 0
*Heat power: 0
*Timer: 3min
Step 2:
*Speed: 2
*Temperature: 0
*Heat power: 0
*Timer: 7min
*Speed adjustable from level 2-
3;
*Temperature adjustable at 0 or
37℃ for spreading.
*Time adjustable from 3-20m
*If left idle for 10 minutes after
program completion, machine
will turn off automatically
*Knead for bread:
330g water + 500g
flour + other
ingredients; knead
10min by default
setting
*Knead for noodle:
200g water + 400g
flour; knead 3min by
speed 2
*Set temperature
37℃ for spreading,
and if it doesn't
spread enough,
choose 37℃ for
30min more without
speed
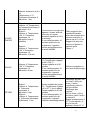
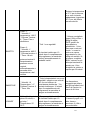
RISOTTO
Step 1:
*Speed: 0
*Temperautre:100℃
*Heat power: 6
*Timer: Till boiling
Step 1:
*Speed: 1
*Temperautre:965℃
*All setting non-adjustable
*If left idle for 10 minutes after
program completion, machine
will automatically enter ‘WARM’
mode.
*Suggested volume
(max): 500g rice +
800g water, run RICE
by default setting.
Rice crust will form at
the bottom.
*Or steam rice by
setting: 400g rice in
the filter basket, 2L
water, choose BOIL;

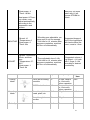
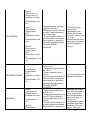
18
*Heat power: 4
*Timer: 18 Min
Heat power & Timer:
not certain, may
adjust automatically
according to the
temperature and
volume
then pour out some
water with 1L left,
choose STEAM for
20min
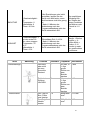
SMOOTHIE
*Speed: 10
*Temperature: 0
*Heat power: 0
*Timer: 30s
*All setting non-adjustable, run
once more if not fine enough.
*If left idle for 10 minutes after
program completion, machine
will turn off automatically
Suggested chopped
size of the ingredients
with hard articles like
carrot, meat is 1-2cm
YOGURT
*Speed: 1 at the first
30min, and then
stop
*Temperature: 37-
39℃
*Heat power: 1
*Timer: 6h
*Time adjustable from 3-12h
*If left idle for 10 minutes after
program completion, machine
will turn off automatically
*Suggested volume: 1
cup yogurt + 1L fresh
milk + sugar, 6-12h
according to desired
consistency
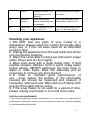
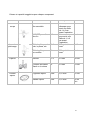
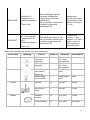
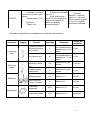
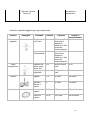
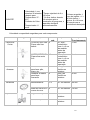
Tools
Picture
Function
Speed
Capacity
Operation
time
Cutting
blade
CHOP but not being
smoothie
5
2L max, chop to
be 1-2cm size
before operation
1min
CHOP to be finest
10
2L max, chop to
be 1-2cm size
before operation
1min
Kneading
blade
Knead dough for
bread, pizza, etc
2-3
800g flour max
5-10min
Knead dough for
noodles
2
500g flour max
3min
Butterfly
Stir
1-3
2L max
30min

19
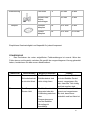
Suggested speed and capacity for each components:
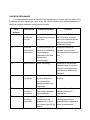
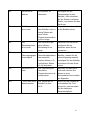
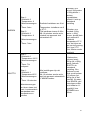
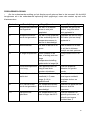
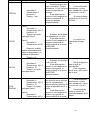
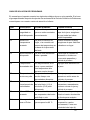
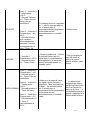
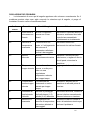
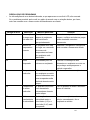
TROUBLE-SHOOTING
• The below error information appeared on the screen is normal. If it still appears the
problem after you acted according to the solution below, please contact our customer
service center.
Error code
Description
Possible reasons
Solution
E1
Safety switch
not fixed
Jar or jar lid is not fixed
properly.
Re-assemble the jar and jar lid,
make sure all the parts are
assembled properly and tightly
E2
Temperature
sensor
missing
The jar is not in place,
or connection of the
temperature sensor at
the jar base is damaged
Re-assemble the jar and make
sure it is fixed properly and
tightly
E3
Motor blocked
Too big loading in the
jar
Decrease the volume of the
food in the jar, or cut the food to
smaller pieces and re-start the
machine.
E4
Too high
temperature
No food in the jar, or
very little food with high
temperature setting for
too long time.
Add food in the jar
E5
Motor
temperature
too high
The machine works at
high loading for too long
time
Stop and let the machine to
cool before re-started
E7
Speed transfer
Speed changing
Remove the jar, turn the lower
whisk egg whites or
cream
4
2L max
10min
Steamer
Steam vegetables
N/A
3.5L max
15min
Steam meat
N/A
3.5L max
20-30min

20
failure
between low level (1-5)
and high level (6-10)
blocked
clutch manually and fix the jar
and restart.
E8
Motor NTC
missing
Motor temperature
sensor connection loose
or damaged
Stop using and send to after
sales service center to fix it
E11
Cannot use
Pulse
The temperature in the
jar is over 90℃
Cool down the food and Pulse
again, or use lower speed 4
Cleaning your appliance
1. DO NOT was any parts of your cooker in a
dishwasher. Always wash the cooker thoroughly after
every use, or it has not been used for an extended
period of time.
2. Unplug the appliance from the wall outlet and let the
unit cool before cleaning.
3. Wash the removable cooking pot with warm soapy
water. Rinse and dry thoroughly.
4. Wipe main body with a clean damp cloth. If food
residue remains, dampen cloth in warm soapy water
before wiping. NEVER submerge the main body in
water or other liquid. Wipe the stationary pot as
necessary to remove any food product.
5. In order to maintain good performance of
you ...soup maker, the bottom of the removable
cooking pot should be inspected and cleaned, if
necessary, after each use. Wipe with a soft damp cloth
and dry thoroughly before using.
6. If the soup maker is not used for a period of time,
please unplug it and keep in cool and clean area.
DISPOSAL AND ENVIRONMENT
If your electrical appliance requires replacement or is of no further use, please think of
protecting the environment. Contact your local authority for advice as many have facilities
for environmentally safe disposal
La pagina si sta caricando...
La pagina si sta caricando...
La pagina si sta caricando...
La pagina si sta caricando...
La pagina si sta caricando...
La pagina si sta caricando...
La pagina si sta caricando...
La pagina si sta caricando...
La pagina si sta caricando...
La pagina si sta caricando...
La pagina si sta caricando...
La pagina si sta caricando...
La pagina si sta caricando...
La pagina si sta caricando...
La pagina si sta caricando...
La pagina si sta caricando...
La pagina si sta caricando...
La pagina si sta caricando...
La pagina si sta caricando...
La pagina si sta caricando...
La pagina si sta caricando...
La pagina si sta caricando...
La pagina si sta caricando...
La pagina si sta caricando...
La pagina si sta caricando...
La pagina si sta caricando...
La pagina si sta caricando...
La pagina si sta caricando...
La pagina si sta caricando...
La pagina si sta caricando...
La pagina si sta caricando...
La pagina si sta caricando...
La pagina si sta caricando...
La pagina si sta caricando...
La pagina si sta caricando...
La pagina si sta caricando...
La pagina si sta caricando...
La pagina si sta caricando...
La pagina si sta caricando...
La pagina si sta caricando...
La pagina si sta caricando...
La pagina si sta caricando...
La pagina si sta caricando...
La pagina si sta caricando...
La pagina si sta caricando...
La pagina si sta caricando...
La pagina si sta caricando...
La pagina si sta caricando...
La pagina si sta caricando...
La pagina si sta caricando...
La pagina si sta caricando...
La pagina si sta caricando...
La pagina si sta caricando...
La pagina si sta caricando...
La pagina si sta caricando...
La pagina si sta caricando...
La pagina si sta caricando...
La pagina si sta caricando...
La pagina si sta caricando...
La pagina si sta caricando...
La pagina si sta caricando...
La pagina si sta caricando...
La pagina si sta caricando...
La pagina si sta caricando...
La pagina si sta caricando...
La pagina si sta caricando...
La pagina si sta caricando...
La pagina si sta caricando...
La pagina si sta caricando...
La pagina si sta caricando...
La pagina si sta caricando...
La pagina si sta caricando...
La pagina si sta caricando...
La pagina si sta caricando...
La pagina si sta caricando...
La pagina si sta caricando...
La pagina si sta caricando...
La pagina si sta caricando...
La pagina si sta caricando...
La pagina si sta caricando...
La pagina si sta caricando...
La pagina si sta caricando...
La pagina si sta caricando...
La pagina si sta caricando...
La pagina si sta caricando...
La pagina si sta caricando...
La pagina si sta caricando...
La pagina si sta caricando...
La pagina si sta caricando...
La pagina si sta caricando...
La pagina si sta caricando...
La pagina si sta caricando...
La pagina si sta caricando...
La pagina si sta caricando...
La pagina si sta caricando...
La pagina si sta caricando...
La pagina si sta caricando...
La pagina si sta caricando...
La pagina si sta caricando...
La pagina si sta caricando...
La pagina si sta caricando...
La pagina si sta caricando...
La pagina si sta caricando...
La pagina si sta caricando...
La pagina si sta caricando...
La pagina si sta caricando...
La pagina si sta caricando...
La pagina si sta caricando...
La pagina si sta caricando...
La pagina si sta caricando...
La pagina si sta caricando...
La pagina si sta caricando...
La pagina si sta caricando...
La pagina si sta caricando...
La pagina si sta caricando...
La pagina si sta caricando...
La pagina si sta caricando...
La pagina si sta caricando...
La pagina si sta caricando...
La pagina si sta caricando...
La pagina si sta caricando...
La pagina si sta caricando...
La pagina si sta caricando...
La pagina si sta caricando...
La pagina si sta caricando...
La pagina si sta caricando...
La pagina si sta caricando...
La pagina si sta caricando...
La pagina si sta caricando...
La pagina si sta caricando...
-
 1
1
-
 2
2
-
 3
3
-
 4
4
-
 5
5
-
 6
6
-
 7
7
-
 8
8
-
 9
9
-
 10
10
-
 11
11
-
 12
12
-
 13
13
-
 14
14
-
 15
15
-
 16
16
-
 17
17
-
 18
18
-
 19
19
-
 20
20
-
 21
21
-
 22
22
-
 23
23
-
 24
24
-
 25
25
-
 26
26
-
 27
27
-
 28
28
-
 29
29
-
 30
30
-
 31
31
-
 32
32
-
 33
33
-
 34
34
-
 35
35
-
 36
36
-
 37
37
-
 38
38
-
 39
39
-
 40
40
-
 41
41
-
 42
42
-
 43
43
-
 44
44
-
 45
45
-
 46
46
-
 47
47
-
 48
48
-
 49
49
-
 50
50
-
 51
51
-
 52
52
-
 53
53
-
 54
54
-
 55
55
-
 56
56
-
 57
57
-
 58
58
-
 59
59
-
 60
60
-
 61
61
-
 62
62
-
 63
63
-
 64
64
-
 65
65
-
 66
66
-
 67
67
-
 68
68
-
 69
69
-
 70
70
-
 71
71
-
 72
72
-
 73
73
-
 74
74
-
 75
75
-
 76
76
-
 77
77
-
 78
78
-
 79
79
-
 80
80
-
 81
81
-
 82
82
-
 83
83
-
 84
84
-
 85
85
-
 86
86
-
 87
87
-
 88
88
-
 89
89
-
 90
90
-
 91
91
-
 92
92
-
 93
93
-
 94
94
-
 95
95
-
 96
96
-
 97
97
-
 98
98
-
 99
99
-
 100
100
-
 101
101
-
 102
102
-
 103
103
-
 104
104
-
 105
105
-
 106
106
-
 107
107
-
 108
108
-
 109
109
-
 110
110
-
 111
111
-
 112
112
-
 113
113
-
 114
114
-
 115
115
-
 116
116
-
 117
117
-
 118
118
-
 119
119
-
 120
120
-
 121
121
-
 122
122
-
 123
123
-
 124
124
-
 125
125
-
 126
126
-
 127
127
-
 128
128
-
 129
129
-
 130
130
-
 131
131
-
 132
132
-
 133
133
-
 134
134
-
 135
135
-
 136
136
-
 137
137
-
 138
138
-
 139
139
-
 140
140
-
 141
141
-
 142
142
-
 143
143
-
 144
144
-
 145
145
-
 146
146
-
 147
147
-
 148
148
-
 149
149
-
 150
150


H.Koenig HK8 Gris Manuale del proprietario
- Tipo
- Manuale del proprietario
in altre lingue
- English: H.Koenig HK8 Gris Owner's manual
- français: H.Koenig HK8 Gris Le manuel du propriétaire
- español: H.Koenig HK8 Gris El manual del propietario
- Deutsch: H.Koenig HK8 Gris Bedienungsanleitung
- Nederlands: H.Koenig HK8 Gris de handleiding
- português: H.Koenig HK8 Gris Manual do proprietário
Documenti correlati
Altri documenti
-
Tristar BL-4433 Manuale del proprietario
-
Hendi 299289 Manuale utente
-
H Koenig LEO8 Manuale utente
-
Terraillon PETIT GOURMET Manuale del proprietario
-
Bellini SUPERCOOK BTMKM810X Manuale utente
-
UFESA Totalchef RK7 Manuale utente
-
Philips HR2098/30 Manuale utente
-
-
Silvercrest MONSIEUR CUISINEÉDITION PLUS Operating Instructions Manual
-
Silvercrest SMUK 1500 A1 Manuale del proprietario