

- 1 -
Content – Inhalt – Teneur – Contenuto
Instruction manual – English ........................................................................................ - 2 -
Bedienungsanleitung – Deutsch ................................................................................... - 9 -
Mode d‘emploi – Français .......................................................................................... - 16 -
Manuale d'istruzioni – Italiano ................................................................................... - 23 -

- 2 -
Instruction manual – English
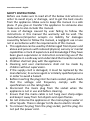
SAFETY INSTRUCTIONS
Before use make sure to read all of the below instructions in
order to avoid injury or damage, and to get the best results
from the appliance. Make sure to keep this manual in a safe
place. If you give or transfer this appliance to someone else
make sure to also include this manual.
In case of damage caused by user failing to follow the
instructions in this manual the warranty will be void. The
manufacturer/importer accepts no liability for damages
caused by failure to follow the manual, a negligent use or use
not in accordance with the requirements of this manual.
1. This appliance can be used by children aged from 8 years and
above and persons with reduced physical, sensory or mental
capabilities or lack of experience and knowledge if they have
been given supervision or instruction concerning use of the
appliance in a safe way and understand the hazards involved.
2. Children shall not play with the appliance.
3. Cleaning and user maintenance shall not be made by
children without supervision.
4. If the supply cord is damaged, it must be replaced by the
manufacturer, its service agent or similarly qualified persons
in order to avoid a hazard.
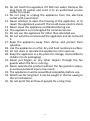
5. Before inserting the plug into the mains socket, please check
that the voltage and frequency comply with the
specifications on the rating label.
6. Disconnect the mains plug from the socket when the
appliance is not in use and before cleaning.
7. Ensure that the mains cable is not hung over sharp edges
and keep it away from hot objects and open flames.
8. Do not immerse the appliance or the mains plug in water or
other liquids. There is danger to life due to electric shock!
9. To remove the plug from the plug socket, pull the plug. Do
not pull the power cord.

- 3 -
10. Do not touch the appliance if it falls into water. Remove the
plug from its socket and send it to an authorized service
center for repair.
11. Do not plug or unplug the appliance from the electrical
outlet with a wet hand.
12. Never attempt to open the housing of the appliance, or to
repair the appliance yourself. This could cause electric shock.
13. Never leave the appliance unattended during use.
14. This appliance is not designed for commercial use.
15. Do not use the appliance for other than intended use.
16. Do not wind the cord around the appliance and do not bend
it.
17. Keep the appliance away from damp, and protect from
splashes.
18. Use the appliance on a flat, dry and heat resistance surface.
19. Do not store or operate the appliance in the open air.
20. Keep the appliance in a dry place for storage, inaccessible to
children (in its packaging).
21. Never put fingers or any other objects through the fan
guards when the fan is running.
22. Never operate the product without the fan guards in place,
as serious personal injury may result.
23. The appliance must be assembled completely before use.
24. Watch out for long hair! It can be caught in the fan owing to
the air turbulence.
25. Do not point the air flow at people for a long time.

- 4 -
TFN-214490.1 EN
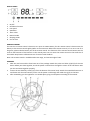
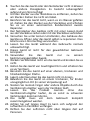
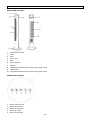
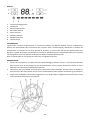
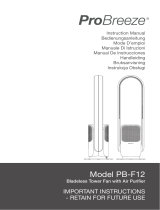
DESCRIPTION OF PARTS
1. Control panel
2. Display panel
3. Louver
4. Air outlet
5. Base
6. Remote control
7. Handle
8. Release tab of the rear grille cover
9. Rear grille cover
10. Release tab of the rear grille cover
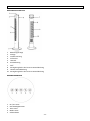
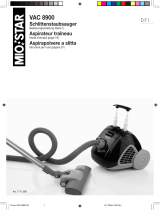
CONTROL PANEL
1. On/off button
2. Speed button
3. Timer button
4. Mode button
5. Swing button

- 5 -
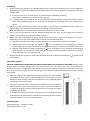
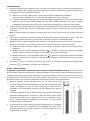
DISPLAY PANEL
1. On/off
2. Oscillation function
3. Fan speed
4. Speed bar
5. Timer value
6. Natural mode
7. Sleeping mode
8. Unit of time
REMOTE CONTROL
This unit has a remote control. Please use one piece of CR2032 battery for this remote control. Please insert the
battery to the remote control tightly (Refer to the instruction behind the remote control). If it is not in use for a
long time, please take the battery out of the remote control. The functions of the remote control buttons are the
same as the functions of the buttons on the control panel. You can store the remote control in the small slot of
the handle. Keep button cell batteries out of reach of small children.
Note: The remote control is available within 6m range, and remote angle of ±30°.
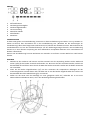
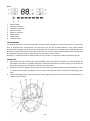
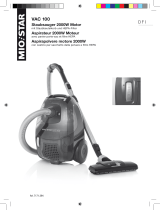
ASSEMBLY
1. Take the rear base and the front base out of the package. Match the poles and holes (a/b/c/d) of the two
bases. Before join them together, uncoil the power cord and let it through the center of the two bases. Now
join the two bases together properly.
2. Loosen the two butterfly screws (e/f) from the bottom of the main body. Attach the assembled base onto it
and fasten with the two butterfly screws. Fix the power cord through the cable slots (g/h) on the base.
3. After assembling, put the appliance in a suitable place, plug in and operate according to the manual.

- 6 -
OPERATION
1. On/off: Connect the appliance to a suitable power source. Press the on/off button to turn on the appliance,
the display panel will be illuminated. Press the button again to turn off the appliance. The appliance will be in
standby mode.
1) If the unit is turned on at the first time, it will work with the following presetting:
Speed: level 1 / Mode: normal / Swing: off / Timer: off
2) In standby mode, press on/off button, the unit will resume former settings; except the functions of natural
mode, sleeping mode and timer. But, if you pull out the plug from the socket, the former settings will all
be lost.
2. Speed: Press the speed button to adjust the fan speed. 7 speed levels are available from low to high. The
indicator light of the speed bar will illuminate accordingly on the display panel.
Note: Wind direction can be adjusted up and down by the louver in the air outlet.
3. Timer: Press the timer button to set your desired working time from “01h” to “12h”. When the set time has
elapsed, the fan will be off and under standby condition.
4. Mode: Press the mode button to choose the functions from normal → Natural → Sleeping → normal …
(Repeating). You can press the speed button to choose your desired speed level.
1) Normal mode: under this mode, no display will be on. The motor works with the preset speed.
2) Natural mode: under this mode, the display of is on. The appliance runs according to the natural
mode program, generating softer and more comfortable air volume. You feel like the wind from the nature.
3) Sleeping mode: under this mode, the display of is on. The appliance runs according to the sleeping
mode program. Air volume will weaken with the decrease of body temperature when you fall asleep,
which will protect you from catching cold.
5. Swing: Press the swing button to control the oscillation function on and off. The display of will be on and
off accordingly.
CARE AND CLEANING
CAUTION: ALWAYS UNPLUG THE PRODUCT FROM THE ELECTRICAL OUTLET PRIOR TO CLEANING IT or may cause
electric shock or product damage. Dust may accumulate on the rear grille cover, which would affect fan
performance. Thus, it is suggested to clean the fan at least once per month. Unplug the unit and wait until the fan
stops running before cleaning. Use normal detergent and soft brush instead of chemical cleaner when cleaning
the product.
1. Wipe the surface of the appliance with a damp cloth. Do not spray water to
the machine directly. Do not clean the appliance with corrosive or solvent
detergent. After cleaning, make sure the appliance is dry completely before
connecting to the power supply.
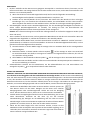
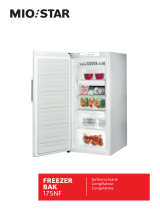
2. Press the release tabs of the rear grille cover to detach it from the appliance.
Remove the filter (A) from the rear grille cover (B). Use a neutral cleaner and
a soft brush to clean the cover and filter. Rinse with clear water thoroughly.
Dry before putting back.
3. If the appliance will not be used for a long period of time, unplug the power
cord and pack the product well to avoid dust accumulating into the fan body.
Store the product in a dry and ventilated place.
TECHNICAL DATA
Operating voltage: 220-240V ~ 50Hz
Power consumption: 15W

- 7 -
GUARANTEE AND CUSTOMER SERVICE
Before delivery our devices are subjected to rigorous quality control. If, despite all care, damage has occurred
during production or transportation, please return the device to your dealer. In addition to statutory legal rights,
the purchaser has an option to claim under the terms of the following guarantee:
For the purchased device we provide 2 years guarantee, commencing from the day of sale. If you have a defective
product, you can directly go back to the point of purchase.
Defects which arise due to improper handling of the device and malfunctions due to interventions and repairs by
third parties or the fitting of non-original parts are not covered by this guarantee. Always keep your receipt,
without the receipt you can’t claim any form of warranty. Damage caused by not following the instruction manual,
will lead to a void of warranty, if this results in consequential damages then we will not be liable. Neither can we
hold responsible for material damage or personal injury caused by improper use if the instruction manual is not
properly executed. Damage to accessories does not mean free replacement of the whole appliance. In such case
please contact our service department. Broken glass or breakage of plastic parts is always subject to a charge.
Defects to consumables or parts subjected to wearing, as well as cleaning, maintenance, replacement of said parts
or shipping and transportation costs to and from any place of repair are not covered by the warranty and are to
be paid.
ENVIRONMENT FRIENDLY DISPOSAL
Recycling – European Directive 2012/19/EU
This marking indicates that this product should not be disposed with other household wastes. To
prevent possible harm to the environment or human health from uncontrolled waste disposal, recycle
it responsibly to promote the sustainable reuse of material resources. To return your used device,
please use the return and collection systems or contact the retailer where the product was purchased. They can
take this product for environmentally safe recycling.
BATTERY MUST BE RECYCLED OR DISPOSED OF PROPERLY. DO NOT OPEN. DO NOT DISPOSE
OR IN FIRE OR SHORT CIRCUIT.
Migros-Genossenschafts-Bund
Limmatstrasse 152
CH-8031 Zürich

- 8 -
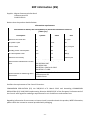
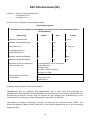
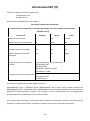
ERP information (EN)
Supplier:
Migros-Genossenschafts-Bund
Limmatstrasse 152
CH-8031 Zürich
Declare that the product detailed below:
Information requirements
Information to identify the TFN-214490.1 to which the information relates to
[Tower fan]
Description
Symbol
Value
Unit
Maximum fan flow rate
F
2.0
m3/min
Fan power input
P
12.8
W
Service value
SV
0.2
(m3/min)/W
Standby power consumption
PSB
0.4
W
Fan sound power level
LWA
55
dB(A)
Maximum air velocity
c
1.6
meters/sec
Measurement standard for service
value
(EU) No 206/2012 + (EU) 2016/2282
EN ISO 5801:2017
EN 50564:2011
EN 60704-1:2010+A11:2012
EN 60704-2-7:1998
Contact details for obtaining more
information
Migros-Genossenschafts-Bund
Limmatstrasse 152
CH-8031 Zürich
Satisfies the requirement of the Council Directives:
COMMISSION REGULATION (EU) No 206/2012 of 6 March 2012 and Amending COMMISSION
REGULATION (EU) 2016/2282 implementing Directive 2009/125/EC of the European Parliament and of
the Council with regard to ecodesign requirements for air conditioners and comfort fans
Regarding information for consumers on how to install, use and maintain the product, WEEE information,
please check the instruction manual provided with packaging.

- 9 -
Bedienungsanleitung – Deutsch
SICHERHEITSHINWEISE
Lesen Sie vor dem Gebrauch unbedingt die nachfolgenden
Anleitungen, um Verletzungen oder Beschädigungen zu
vermeiden und das beste Ergebnis mit dem Gerät zu erzielen.
Bewahren Sie diese Bedienungsanleitung an einem sicheren
Ort auf. Wenn Sie dieses Gerät an eine andere Person
weitergeben, stellen Sie sicher, dass Sie auch diese
Bedienungsanleitung aushändigen.
Im Falle von Beschädigungen, die durch die Missachtung der
Anleitungen in dieser Bedienungsanleitung verursacht wurden,
wird die Garantie ungültig. Der Hersteller/Importeur haftet
nicht für Schäden, die durch Missachtung der
Bedienungsanleitung, fahrlässigen Gebrauch oder Benutzung,
die nicht in Übereinstimmung mit den Anforderungen dieser
Bedienungsanleitung erfolgt, verursacht wurden.
1. Dieses Gerät kann von Kindern ab 8 Jahren und Personen
mit eingeschränkten körperlichen, sensorischen oder
geistigen Fähigkeiten oder mangelnder Erfahrung und
Kenntnis benutzt werden, wenn sie beaufsichtigt werden
oder in die sichere Benutzung des Gerätes unterwiesen
werden und die damit verbundenen Gefahren verstehen.
2. Kinder dürfen nicht mit dem Gerät spielen.
3. Die Reinigung und vom Benutzer auszuführende
Wartungsarbeiten dürfen von Kindern nur unter Aufsicht
durchgeführt werden.
4. Wenn das Netzkabel beschädigt ist, muss es vom Hersteller,
seinem Kundendienst oder einer ähnlich qualifizierten
Person ausgewechselt werden, um Gefahren zu vermeiden.
5. Bevor Sie den Stecker mit der Netzsteckdose verbinden,
prüfen Sie bitte, ob die Spannung und die Frequenz mit den
Angaben auf dem Typenschild übereinstimmen.
6. Ziehen Sie den Netzstecker aus der Steckdose, wenn das
Gerät nicht benutzt und bevor es gereinigt wird.
7. Achten Sie darauf, dass das Netzkabel nicht über scharfe
Kanten hängt und halten Sie es von heißen Objekten und
offenen Flammen fern.

- 10 -
8. Tauchen Sie das Gerät oder den Netzstecker nicht in Wasser
oder andere Flüssigkeiten. Es besteht Lebensgefahr
aufgrund von Stromschlag!
9. Um den Stecker aus der Steckdose zu entfernen, ziehen Sie
am Stecker. Ziehen Sie nicht am Kabel.
10. Berühren Sie das Gerät nicht, wenn es ins Wasser gefallen
ist. Ziehen Sie den Stecker aus der Steckdose und schicken
Sie es an einen autorisierten Kundendienst zwecks
Reparatur.
11. Den Netzstecker des Gerätes nicht mit einer nassen Hand
aus der Steckdose ziehen oder mit der Steckdose verbinden.
12. Versuchen Sie unter keinen Umständen, das Gehäuse des
Gerätes zu öffnen oder das Gerät selbst zu reparieren. Dies
könnte einen Stromschlag verursachen.
13. Lassen Sie das Gerät während des Gebrauchs niemals
unbeaufsichtigt.
14. Dieses Gerät ist nicht für den gewerblichen Gebrauch
konzipiert.
15. Verwenden Sie das Gerät nur zu seinem
bestimmungsgemäßen Zweck.
16. Wickeln Sie das Kabel nicht um das Gerät und knicken Sie es
nicht.
17. Halten Sie das Gerät von Feuchtigkeit fern und schützen Sie
es vor Spritzern.
18. Benutzen Sie das Gerät auf einer ebenen, trockenen und
hitzebeständigen Fläche.
19. Lagern oder benutzen Sie das Gerät nicht im Freien.
20. Bewahren Sie das Gerät an einem trockenen, für Kinder
unzugänglichen Ort (in seiner Verpackung) auf.
21. Stecken Sie niemals Finger oder andere Objekte durch das
Ventilatorschutzgitter, wenn der Ventilator läuft.
22. Lassen Sie das Produkt niemals ohne das
Ventilatorschutzgitter laufen, da es sonst zu schweren
Verletzungen kommen könnte.
23. Das Gerät muss vor dem Gebrauch komplett
zusammengebaut werden.
24. Achten Sie auf langes Haar! Es kann sich aufgrund der
Luftwirbel im Ventilator verfangen.
25. Richten Sie den Luftstrom nicht über längere Zeit auf
Personen.

- 11 -
TFN-214490.1 DE
BESCHREIBUNG DER TEILE
1. Bedienungsanzeige
2. Anzeige
3. Lamellenvorhang
4. Luftauslass
5. Unterteil
6. Fernbedienung
7. Griff
8. Entriegelungslasche der hinteren Gitterabdeckung
9. Hintere Gitterabdeckung
10. Entriegelungslasche der hinteren Gitterabdeckung
BEDIENUNGSANZEIGE
1. Ein-/Aus-Taste
2. Geschwindigkeitstaste
3. Timer-Taste
4. Modus-Taste
5. Schwenktaste

- 12 -
ANZEIGE
1. Ein/Aus
2. Schwenkfunktion
3. Ventilatorgeschwindigkeit
4. Geschwindigkeitsbalken
5. Timer-Einstellung
6. Natürlicher Modus
7. Schlaf-Modus
8. Zeiteinheit
FERNBEDIENUNG
Zu dem Gerät gehört eine Fernbedienung. Setzen Sie in diese Fernbedienung eine Batterie vom Typ CR2032 ein.
Achten Sie darauf, dass die Batterie fest in der Fernbedienung sitzt. (Beachten Sie die Anweisungen zur
Fernbedienung.) Wenn diese längere Zeit nicht benutzt wird, nehmen Sie die Batterie heraus. Die Funktionen der
Fernbedientasten sind mit den Schalterfunktionen auf der Bedienungsanzeige identisch. Die Fernbedienung
können Sie in einer kleinen Aussparung am Griff aufbewahren. Knopfzellen-Batterien nicht in Reichweite von
Kindern aufbewahren.
Hinweis: Die Fernbedienung hat eine Reichweite von maximal 6 m und kann in einem Winkel von ±30° benutzt
werden.
MONTAGE
1. Nehmen Sie den vorderen und hinteren Teil des Unterteils aus der Verpackung. Richten Sie die Stäbe und
Löcher (a/b/c/d) der beiden Unterteile aufeinander aus. Bevor Sie die Teile zusammenstecken, wickeln Sie
das Netzkabel ab und führen Sie es durch die Mitte der beiden Unterteile. Stecken Sie die beiden Unterteile
nun ineinander.
2. Lösen Sie die beiden Flügelschrauben (e/f) von der Unterseite der Haupteinheit. Befestigen Sie das
zusammengesetzte Unterteil daran und schrauben Sie es mit den beiden Flügelschrauben fest. Führen Sie
das Netzkabel durch die Kabelschlitze (g/h) im Unterteil.
3. Stellen Sie das Gerät nach der Montage an einer geeigneten Stelle auf, verbinden Sie es mit einer
Netzsteckdose und bedienen Sie es, wie in der Bedienungsanleitung beschrieben.

- 13 -
BENUTZUNG
1. Ein/Aus: Schließen Sie das Gerät an eine geeignete Stromquelle an. Drücken Sie die Ein-/Aus-Taste, um das
Gerät einzuschalten. Die Anzeige leuchtet auf. Drücken Sie die Taste erneut, um das Gerät auszuschalten. Das
Gerät ist nun im Stand-by-Modus.
1) Wenn das Gerät zum ersten Mal eingeschaltet wird, läuft es mit der folgenden Voreinstellung:
Geschwindigkeit: Stufe 1/Modus: normal/Schwenkfunktion: aus/Timer: aus
2) Drücken Sie im Stand-by-Modus die Ein-/Aus-Taste. Das Gerät setzt den Betrieb mit den vorherigen
Einstellungen fort, mit Ausnahme des natürlichen Modus, des Schlaf-Modus und der Timer-Funktion.
Wenn Sie jedoch den Stecker aus der Steckdose ziehen, werden die vorherigen Einstellungen gelöscht.
2. Geschwindigkeit: Drücken Sie die Geschwindigkeitstaste, um die Ventilatorgeschwindigkeit einzustellen. Es
stehen sieben Geschwindigkeitsstufen zur Auswahl, von niedrig bis hoch. Die Kontrollleuchte des
Geschwindigkeitsbalkens leuchtet dementsprechend auf der Anzeige auf.
Hinweis: Die Luftstromrichtung kann mithilfe des Lüftungsschlitzes im Luftauslass angepasst werden (nach
oben und unten).
3. Timer: Drücken Sie die Timer-Taste, um Ihre gewünschte Betriebszeit von 01h bis 12 h einzustellen. Wenn die
eingestellte Zeit abgelaufen ist, schaltet der Ventilator in den Stand-by-Modus.
4. Modus: Drücken Sie die Modus-Taste, um durch die Funktionen von Normal → Natürlich → Schlaf → Normal …
(wiederholend) zu zirkulieren und eine auszuwählen. Sie können die Geschwindigkeitstaste drücken, um Ihre
gewünschte Geschwindigkeitsstufe einzustellen.
1) Normaler Modus: In diesem Modus zeigt die Anzeige nichts an. DerMotor läuft mit der voreingestellten
Geschwindigkeit.
2) Natürlicher Modus: In diesem Modus ist dieses Symbol auf der Anzeige zu sehen. Das Gerät läuft
im natürlichen Modus. Das heißt, es erzeugt einen sanfteren und angenehmeren Luftstrom, der sich wie
ein natürlicher Luftzug anfühlt.
3) Schlaf-Modus: In diesem Modus ist dieses Symbol auf der Anzeige zu sehen. Das Gerät läuft im Schlaf-
Modus. Wenn Sie einschlafen wird der Luftstrom mit dem Absinken der Körpertemperatur schwächer, um
Sie vor einer Erkältung zu schützen.
5. Schwenkfunktion: Drücken Sie die Schwenktaste, um die Schwenkfunktion ein- und auszuschalten. Die
Anzeige des Symbols ist entsprechend aktiviert oder deaktiviert.
PFLEGE UND REINIGUNG
VORSICHT: ZIEHEN SIE VOR DER REINIGUNG IMMER DEN NETZSTECKER DES PRODUKTES AUS DER STECKDOSE,
sonst besteht Stromschlaggefahr oder das Produkt könnte beschädigt werden. Auf der hinteren Gitterabdeckung
kann sich Staub ansammeln, der die Leistung des Ventilators beeinträchtigen kann. Aus diesem Grund empfiehlt
es sich, den Ventilator mindestens einmal im Monat zu reinigen. Ziehen Sie den Netzstecker des Geräts aus der
Steckdose und warten Sie, bis der Ventilator stillsteht, bevor Sie ihn reinigen. Verwenden Sie zum Reinigen des
Produkts, ein normales Reinigungsmittel und eine weiche Bürste, anstatt chemische Reinigungsmittel.
1. Wischen Sie die Oberfläche des Geräts mit einem weichen Tuch ab. Spritzen Sie
kein Wasser direkt auf das Gerät. Reinigen Sie das Gerät nicht scharfen
Reinigungsmitteln oder Verdünnungsmittel. Stellen Sie nach der Reinigung
sicher, dass das Gerät trocken ist, bevor Sie es an das Stromnetz anschließen.
2. Drücken Sie die Entriegelungslaschen der hinteren Gitterabdeckung, um sie vom
Gerät abzunehmen. Entfernen Sie den Filter (A) von der hinteren
Gitterabdeckung (B). Reinigen Sie die Abdeckung und den Filter mit einem
Neutralreiniger und einer weichen Bürste. Spülen Sie die Teile mit klarem Wasser
gründlich ab. Trocknen Sie sie ab, bevor Sie die Teile wieder einsetzen.
3. Wenn Sie das Gerät längere Zeit nicht benutzen werden, trennen Sie das
Netzkabel von der Stromquelle und verpacken Sie das Produkt sorgfältig, um zu
verhindern, dass sich Staub im Ventilator ansammelt. Lagern Sie das Produkt an
einem trockenen und gut belüfteten Ort.

- 14 -
TECHNISCHE DATEN
Betriebsspannung: 220-240V ~ 50Hz
Leistungsaufnahme: 15W
GEWÄHRLEISTUNG UND KUNDENSERVICE
Vor der Lieferung werden unsere Geräte einer strengen Qualitätskontrolle unterzogen. Wenn, trotz aller Sorgfalt,
während der Produktion oder dem Transport Beschädigungen aufgetreten sind, senden Sie das Gerät zurück an
den Händler. Zusätzlich zu den gesetzlichen Rechten hat der Käufer die Option, gemäß den folgenden Bedingungen
Gewährleistung zu fordern:
Wir bieten eine 2-Jahres-Gewährleistung für das erworbene Gerät, beginnend am Tag des Verkaufs. Wenn Sie ein
defektes Produkt haben, nehmen Sie bitte direkt Kontakt mit dem Verkäufer auf.
Defekte, die aufgrund von unangemessenem Umgang mit dem Gerät entstehen und Störungen aufgrund von
Eingriffen und Reparaturen Dritter oder das Montieren von nicht-Originalteilen, werden nicht von dieser Garantie
abgedeckt. Die Quittung immer aufbewahren, ohne Quittung wird jegliche Garantie ausgeschlossen. Bei Schäden
durch Nichteinhalten der Bedienungsanleitung erlischt die Garantie, Wir sind für daraus resultierende
Folgeschäden nicht haftbar. Für Materialschäden oder Verletzungen aufgrund falscher Anwendung oder
Nichtbefolgen der Sicherheitshinweise sind wir nicht haftbar. Schäden an den Zubehörteilen bedeutet nicht, dass
das gesamte Gerät kostenlos ausgetauscht wird. In diesem Fall kontaktieren Sie unseren Kundendienst.
Zerbrochenes Glas oder Kunststoffteile sind immer kostenpflichtig. Schäden an Verbrauchsmaterialien oder
Verschleißteilen, sowie Reinigung, Wartung, Austausch oder Kosten für Versand/Transport zum Reparaturort und
zurück, der besagten Teile werden durch die Garantie nicht abgedeckt und sind deshalb kostenpflichtig.
UMWELTGERECHTE ENTSORGUNG
Wiederverwertung – Europäischen Richtlinie 2012/19/EG
Dieses Symbol zeigt an, dass das Produkt nicht zusammen mit Haushaltsabfällen entsorgt werden darf.
Um Umwelt- und Gesundheitsschäden durch unkontrollierte Abfallentsorgung zu verhindern, bitte
verantwortungsbewusst entsorgen, um die nachhaltige Wiederverwertung von Ressourcen zu fördern.
Nutzen Sie zur Rückgabe Ihres Altgeräts bitte die Rückgabe- und Sammelsysteme oder wenden Sie sich an den
Händler, bei dem Sie dieses Gerät erworben haben. Dieser kann das Gerät umweltschonend entsorgen.
BATTERIEN MÜSSEN WIEDERVERWERTET ODER KORREKT ENTSORGT WERDEN. NICHT
ÖFFNEN. NICHT WEGWERFEN, IN FEUER WERFEN ODER KURZSCHLIESSEN.
Migros-Genossenschafts-Bund
Limmatstrasse 152
CH-8031 Zürich

- 15 -
ERP-Informationen (DE)
Lieferant: Migros-Genossenschafts-Bund
Limmatstrasse 152
CH-8031 Zürich
Erklärt für das im Folgenden beschriebene Produkt:
Erforderliche Angaben
Informationen zur Angabe des TFN-214490.1, auf das/die sich die Informationen beziehen:
[Turmventilator]
Bezeichnung
Symbol
Wert
Einheit
Maximaler Volumenstrom
F
2.0
m3/min
Ventilator-Leistungsaufnahme
P
12.8
W
Serviceverhältnis
SV
0.2
(m3/min)/W
Leistungsaufnahme im
Bereitschaftszustand
PSB
0.4
W
Ventilator-Schallleistungspegel
LWA
55
dB(A)
Maximale Luftgeschwindigkeit
c
1.6
m/s
Messnorm für die Ermittlung des
Serviceverhältnisses
(EU) No 206/2012 + (EU) 2016/2282
EN ISO 5801:2017
EN 50564:2011
EN 60704-1:2010+A11:2012
EN 60704-2-7:1998
Kontaktadresse für weitere
Informationen
Migros-Genossenschafts-Bund
Limmatstrasse 152
CH-8031 Zürich
Erfüllt die Anforderung der Richtlinien des Rates:
VERORDNUNG (EU) Nr. 206/2012 DER KOMMISSION vom 6. März 2012 und Anpassung der
VERORDNUNG (EU) 2016/2282 DER KOMMISSION zur Durchführung der Richtlinie 2009/125/EG des
Europäischen Parlaments und des Rates im Hinblick auf die Festlegung von Anforderungen an die
umweltgerechte Gestaltung von Raumklimageräten und Komfortventilatoren
Informationen bezügliche Aufstellung, Nutzung und Wartung des Produktes sowie Elektro- und
Elektronik-Altgeräten (WEEE) finden Verbraucher in der Bedienungsanleitung, die in der Verpackung
mitgeliefert wird.

- 16 -
Mode d‘emploi – Français
CONSIGNES DE SÉCURITÉ
Avant d’utiliser l’appareil, lisez toutes les consignes suivantes
pour éviter des blessures et des dommages, et pour optimiser
les performances de votre appareil. Conservez cette notice
d’utilisation dans un endroit sûr. Si vous donnez ou transférez
cet appareil à un tiers, veillez à lui remettre également cette
notice d’utilisation.
En cas de détérioration due au non-respect par l’utilisateur des
instructions de cette notice d’utilisation, la garantie est
annulée. Le fabricant/importateur rejette toute responsabilité
en cas de dommages dus au non-respect des instructions de la
notice d’utilisation, à un usage négligent ou à l’usage non
conforme aux exigences de cette notice d’utilisation.
1. Cet appareil peut être utilisé par des enfants âgés d'au
moins 8 ans et par des personnes ayant des capacités
physiques, sensorielles ou mentales réduites ou dénuées
d’expérience ou de connaissance, s'ils (si elles) sont
correctement surveillé(e)s ou si des instructions relatives à
l'utilisation de l'appareil en toute sécurité leur ont été
données et si les risques encourus ont été appréhendés.
2. Les enfants ne doivent pas jouer avec l’appareil.
3. Le nettoyage et la maintenance ne doivent pas être
effectués par des enfants sans surveillance.
4. Si le câble d'alimentation est endommagé, il doit être
remplacé par le fabricant, son service après vente ou des
personnes de qualification similaire afin d'éviter un danger.
5. Avant d’insérer la fiche de l’appareil dans une prise secteur,
vérifiez que la tension et la fréquence du secteur
correspondent aux spécifications indiquées sur la plaque
signalétique.
6. Débranchez la fiche électrique de la prise électrique quand
l’appareil n’est pas utilisé et avant de le nettoyer.
7. Veillez à ce que le cordon d’alimentation ne pende pas sur
des arêtes coupantes et maintenez-le éloigné des objets
chauds et des flammes nues.

- 17 -
8. N'immergez jamais l'appareil ou sa fiche dans de l'eau ni
dans aucun autre liquide. Cela peut provoquer un choc
électrique !
9. Pour débrancher la fiche de la prise, saisissez la fiche et
tirez-la hors de la prise. Ne tirez pas sur le cordon
d’alimentation.
10. Ne touchez pas l’appareil s’il tombe dans de l’eau.
Débranchez la fiche de la prise électrique et rapportez-le au
centre de réparation agréé pour le faire réparer.
11. Ne branchez pas et ne débranchez pas l’appareil de la prise
électrique avec les mains mouillées.
12. N’essayez pas d’ouvrir le boîtier de l’appareil ni de réparer
l’appareil vous-même. Cela peut provoquer un choc
électrique.
13. Ne laissez jamais l'appareil sans surveillance quand il est en
fonctionnement.
14. Cet appareil n’est pas conçu pour un usage commercial.
15. N’utilisez pas cet appareil à un usage autre que celui pour
lequel il a été conçu.
16. N’enroulez pas le cordon d’alimentation autour de l’appareil
et ne le pliez pas.
17. Maintenez l’appareil éloigné des endroits mouillés et
protégez-le des éclaboussures.
18. Placez l’appareil sur une surface plane, sèche et résistante à
la chaleur.
19. Ne rangez pas et n’utilisez pas l’appareil en plein air.
20. Rangez l’appareil dans un endroit sec et inaccessible aux
enfants (dans son emballage).
21. N’insérez jamais vos doigts ni aucun objet dans les grilles du
ventilateur quand il est en fonctionnement.
22. N’utilisez jamais le produit sans ses grilles assemblées, car
cela pourrait provoquer de graves blessures corporelles.
23. L’appareil doit être correctement assemblé avant d’être
utilisé.
24. Faites attention aux cheveux longs ! Ils peuvent être happés
par le ventilateur à cause des turbulences de l’air.
25. Ne dirigez pas le flux d’air vers des personnes pendant
longtemps.

- 18 -
TFN-214490.1 FR
DESCRIPTION DES PIÈCES
1. Panneau de contrôle
2. Écran
3. Ouïe
4. Sortie d'air
5. Base
6. Télécommande
7. Poignée
8. Languette de libération du couvercle de la grille arrière
9. Grille arrière
10. Languette de libération du couvercle de la grille arrière
PANNEAU DE CONTRÔLE
1. Bouton marche/arrêt
2. Bouton de la vitesse
3. Bouton du minuteur
4. Bouton du mode
5. Bouton d’oscillation

- 19 -
Écran
1. Marche/Arrêt
2. Fonction oscillation
3. Vitesse de ventilation
4. Barre de vitesse
5. Valeur du minuteur
6. Mode naturel
7. Mode dormir
8. Unité de temps
TÉLÉCOMMANDE
Cet appareil est pourvu d’une télécommande. Utilisez une pile CR2032 pour cette télécommande. Insérez la pile
dans la télécommande (reportez-vous aux instructions au dos de la télécommande). Avant toute période
d’inutilisation prolongée, retirez la pile de la télécommande. Les fonctions des touches de la télécommande sont
identiques à celles des touches du panneau de contrôle. Vous pouvez ranger la télécommande dans la petite fente
de la poignée. Conservez les piles cellulaires hors de portée des jeunes enfants.
Remarque : La télécommande est effective dans un rayon de 6 m, et l'angle de la télécommande est de ±30°.
ASSEMBLAGE
1. Sortez la base arrière et la base avant de l'emballage. Faites correspondre les pôles et les trous (a/b/c/d) des
deux bases. Avant de les assembler, déroulez le cordon d'alimentation et faites-le passer par le centre des
deux bases. Maintenant, assemblez les deux bases correctement.
2. Desserrez les deux vis papillon (e/f) situées au bas du boîtier principal. Attachez la base assemblée sur celle-
ci et fixez-la avec les deux vis papillon. Fixez le cordon d'alimentation dans les fentes pour câbles (g/h) de la
base.
3. Après l'assemblage, placez l’appareil dans un endroit approprié, branchez-le et utilisez-le conformément aux
instructions de la notice.
La pagina si sta caricando...
La pagina si sta caricando...
La pagina si sta caricando...
La pagina si sta caricando...
La pagina si sta caricando...
La pagina si sta caricando...
La pagina si sta caricando...
La pagina si sta caricando...
La pagina si sta caricando...
La pagina si sta caricando...
-
 1
1
-
 2
2
-
 3
3
-
 4
4
-
 5
5
-
 6
6
-
 7
7
-
 8
8
-
 9
9
-
 10
10
-
 11
11
-
 12
12
-
 13
13
-
 14
14
-
 15
15
-
 16
16
-
 17
17
-
 18
18
-
 19
19
-
 20
20
-
 21
21
-
 22
22
-
 23
23
-
 24
24
-
 25
25
-
 26
26
-
 27
27
-
 28
28
-
 29
29
-
 30
30


in altre lingue
- English: Emerio TFN-214490.1 User manual
- français: Emerio TFN-214490.1 Manuel utilisateur
- Deutsch: Emerio TFN-214490.1 Benutzerhandbuch
Documenti correlati
Altri documenti
-
 Pro Breeze PB-F12W-UK-FBA Manuale utente
-
DREO DR-HTF007 Manuale utente
-
Philips CX5535/11 Manuale utente
-
Ikra GBS 7050 LI Migros Manuale del proprietario
-
-
Migros BUNNY Manuale utente
-
 Miostar VAC8900 Manuale utente
-
 Miostar VAC100SB Manuale utente
-
 Miostar BAK179 Guida utente
-
 Miostar VAC200 Manuale utente


