
Important
Please read PRECAUTIONS, this User’s Manual, and the Setup Guide
(separate volume) carefully to familiarize yourself with safe and
effective usage.
• Please refer to the Setup Guide for basic information ranging from
connection of the monitor to a PC to using the monitor.
• The latest User’s Manual is available for download from our web site:
http://www.eizo.com
Cover

2
Location of Caution Statement
This product has been adjusted specically for use in the region to which it was originally shipped. If operated
outside this region, the product may not perform as stated in the specications.
No part of this manual may be reproduced, stored in a retrieval system, or transmitted, in any form or by any means,
electronic, mechanical, or otherwise, without the prior written permission of EIZO NANAO CORPORATION.
EIZO NANAO CORPORATION is under no obligation to hold any submitted material or information condential
unless prior arrangements are made pursuant to EIZO NANAO CORPORATION’s receipt of said information.
Although every effort has been made to ensure that this manual provides up-to-date information, please note that
EIZO monitor specications are subject to change without notice.

3
Noticeforthismonitor
Notice for this monitor
Aside from general purposes like creating documents, viewing multimedia content, this product is also suited to
applications such as creations of images and graphics, and digital photo processing, where accurate color reproduction
is a priority.
This product has been adjusted specically for use in the region to which it was originally shipped. If the product is
used outside the region, it may not operate as specied in the specications.
This product may not be covered by warranty for uses other than those described in this manual.
The specications noted in this manual are only applicable when the following are used:
· Power cords provided with the product
· Signal cables specied by us
Only use optional products manufactured or specied by us with this product.
It takes about 7 minutes (under our measurement conditions) for the performance of electrical parts to stabilize. Please
wait 7 minutes or more after the monitor power has been turned on, and then adjust the monitor.
Monitors should be set to a lower brightness to reduce changes in luminosity caused by long-term use and maintain a
stable display.
When the screen image is changed after displaying the same image for extended periods of time, an afterimage may
appear. Use the screen saver or power save function to avoid displaying the same image for extended periods of time.
Periodic cleaning is recommended to keep the monitor looking new and to prolong its operation lifetime (refer to
“Cleaning” (page 4)).
The LCD panel is manufactured using high-precision technology. Although, missing pixels or lit pixels may appear on
the LCD panel, this is not a malfunction. Percentage of effective dots: 99.9994% or higher.
The backlight of the LCD panel has a xed lifetime. When the screen becomes dark or begins to icker, please contact
your local EIZO representative.
Do not press on the panel or edge of the frame strongly, as this may result in display malfunctions, such as interference
patterns, etc. If pressure is continually applied to the panel, it may deteriorate or damage your panel. (If the pressure
marks remain on the panel, leave the monitor with a black or white screen. The symptom may disappear.)
Do not scratch or press on the panel with any sharp objects, as this may result in damage to the panel. Do not attempt
to brush with tissues as this may scratch the panel.
When the monitor is cold and brought into a room or the room temperature goes up quickly, dew condensation may
occur on the interior and exterior surfaces of the monitor. In that case, do not turn the monitor on. Instead wait until
the dew condensation disappears, otherwise it may cause some damage to the monitor.

4
Noticeforthismonitor
Cleaning
Attention
• Chemicals such as alcohol and antiseptic solution may cause gloss variation, tarnishing, and fading of the cabinet or panel,
and also quality deterioration of the image.
• Never use any thinner, benzene, wax, and abrasive cleaner, which may damage the cabinet or panel.
If necessary, the stains on the cabinet and panel surface can be removed by using the provided ScreenCleaner.
To use the monitor comfortably
• An excessively dark or bright screen may affect your eyes. Adjust the brightness of the monitor according to
the environmental conditions.
• Staring at the monitor for a long time tires your eyes. Take a 10-minute rest every hour.

5
CONTENTS
CONTENTS
Cover ...................................................................... 1
Notice for this monitor ......................................... 3
Cleaning .................................................................... 4
To use the monitor comfortably ............................. 4
CONTENTS ............................................................. 5
Chapter 1 Introduction ....................................... 7
1-1. Features ......................................................... 7
1-2. Controls and Functions ............................... 9
1-3. EIZO LCD Utility Disk...................................10
●
Diskcontentsandsoftwareoverview............10
●
TouseColorNavigator...................................10
1-4. Basic Operations and Functions ...............11
●
BasicAdjustmentmenuoperations...............11
●
ShowingButtonGuide...................................12
●
Functions........................................................13
Chapter 2 Adjusting Screens .......................... 15
2-1. Compatible Resolutions .............................15
●
DigitalInput(DVI-D,DisplayPort)..................15
●
DigitalInput(HDMI)........................................15
2-2. Setting Resolution .......................................16
●
Windows7......................................................16
●
WindowsVista................................................16
●
WindowsXP...................................................16
●
MacOSX.......................................................16
2-3. Adjusting Color ............................................17
●
Toselectthedisplaymode(colormode).......17
●
Toperformadvancedadjustments................18
●
Adjustablesettingsineachmode..................18
●
AdjustingBrightness......................................19
●
Adjustingthetemperature..............................19
●
AdjustingGamma.......................................... 20
●
AdjustingHue................................................ 20
●
AdjustingSaturation.......................................21
●
Toenhanceoutlineofimage..........................21
●
Tosetclipping............................................... 22
●
AdjustingGain............................................... 23
●
Adjustingthebrightnessandcolorof
black“BlackLevel”........................................ 23
●
Adjusting6Colors..........................................24
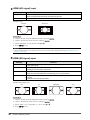
2-4. Expanding Signal Output Range .............. 24
2-5. Selecting Screen Size ................................ 25
●
DVI,DisplayPort(PCsignal)input................ 25
●
HDMI(HDsignal)input................................. 26
●
HDMI(SDsignal)input................................. 26
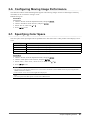
2-6. Conguring Moving Image Performance . 27
2-7. Specifying Color Space ............................. 27
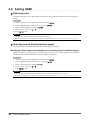
2-8. Setting HDMI ................................................ 28
●
Reducingnoise............................................. 28
●
Selectinghowtodisplayinterlacesignal...... 28
●
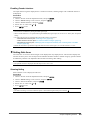
SettingSafeArea.......................................... 29
Chapter 3 Setting Monitor ............................... 31
3-1. Enabling/Disabling Mode Selection ..........31
3-2. Selecting the Language ..............................31
3-3. Setting Orientation ......................................31
3-4. Changing Adjustment Menu Display
Position ........................................................ 32
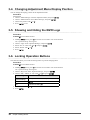
3-5. Showing and Hiding the EIZO Logo ......... 32
3-6. Locking Operation Buttons ....................... 32
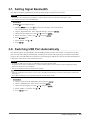
3-7. Setting Signal Bandwidth .......................... 33
3-8. Switching USB Port Automatically ........... 33
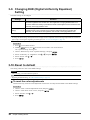
3-9. Changing DUE (Digital Uniformity
Equalizer) Setting ....................................... 34
3-10. Reset to default ........................................... 34
●
Toresetthecoloradjustments...................... 34
●
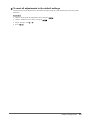
Toresetalladjustmentstothedefault
settings.......................................................... 35
Chapter 4 SelfCalibration ................................ 36
4-1. Setting Calibration Details ......................... 36
●
Settingmonitordateandtime....................... 36
●
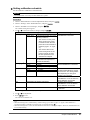
Settingcalibrationschedule...........................37
●
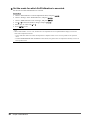
SetthemodeforwhichSelfCalibration
isexecuted.................................................... 38
●
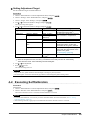
SettingAdjustmentTarget............................. 39
4-2. Executing SelfCalibration .......................... 39
4-3. Checking Adjustment Results ................... 40
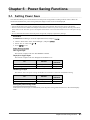
Chapter 5 Power Saving Functions ................ 41
5-1. Setting Power Save ......................................41
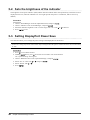
5-2. Sets the brightness of the indicator ......... 42
5-3. Setting DisplayPort Power Save ............... 42
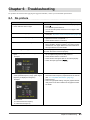
Chapter 6 Troubleshooting .............................. 43
6-1. No picture .................................................... 43
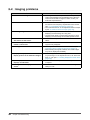
6-2. Imaging problems ....................................... 44
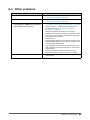
6-3. Other problems ........................................... 45
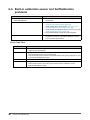
6-4. Built-in calibration sensor and
SelfCalibration problems ........................... 46
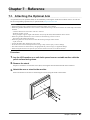
Chapter 7 Reference ........................................ 47
7-1. Attaching the Optional Arm ........................47
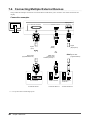
7-2. Connecting Multiple External Devices ..... 48
●
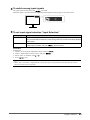
Toswitchamonginputsignals...................... 49
●
Tosetinputsignalselection“Input
Selection”...................................................... 49

6
CONTENTS
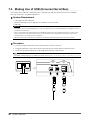
7-3. Making Use of USB (Universal Serial
Bus) ............................................................... 50
●
SystemRequirement..................................... 50
●
Procedure...................................................... 50
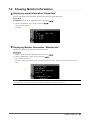
7-4. Showing Monitor Information.....................51
●
Displayingsignalinformation“SignalInfo”....51
●
DisplayingMonitorInformation“MonitorInfo”51
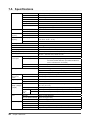
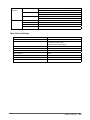
7-5. Specications ............................................. 52
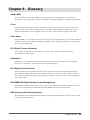
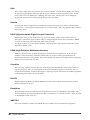
Chapter 8 Glossary .......................................... 55
Appendix .............................................................. 58
Trademark ............................................................... 58
License .................................................................... 58
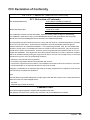
FCC Declaration of Conformity ............................ 59
Hinweise zur Auswahl des richtigen
Schwenkarms für Ihren Monitor ........................... 60
Hinweis zur Ergonomie : ....................................... 60
LIMITED WARRANTY ..............................................61
Recycling Information ............................................70
China Measures for RoHS Compliance in
ChinaRoHS ...............................................................74

7
Chapter1Introduction
Chapter 1 Introduction
1-1. Features
• 27.0″ wide format LCD
• Wide color gamut (Adobe RGB coverage: 97%)
• Applicable to the resolution of 2560 × 1440.
• IPS panel with 178˚ horizontal and vertical viewing angles
• Frame synchronization mode supported (23.75 - 30.5Hz, 47.5 - 61.0Hz)
• 3 signal input terminals (DVI-D × 1, HDMI × 1, DisplayPort × 1)
- DisplayPort (applicable to 8 bit and 10 bit)
*1
- HDMI (applicable to 8 bit, 10 bit, and 12 bit)
*1
*1 Not applicable to audio signals.
• Color mode function
Reproduces a color gamut and gamma compliant with the following standard.
- Broadcasting standards “EBU/REC709/SMPTE-C”
- Digital cinema standard “DCI”
- Adobe
®
RGB
See “To select the display mode (color mode)” (page 17)
• Attaching the “Adjustment Certicate”, which describes the factory measurement results of the grayscale and
uniformity characteristics for each monitor
• Supports portrait and landscape format (rotate 90˚ clockwise)
• This product is equipped with a built-in calibration sensor, and supports SelfCalibration in which the monitor
executes calibration independently.
See “Chapter 4 SelfCalibration” (page 36)
• The provided “ColorNavigator” calibration software enables you to calibrate monitor characteristics and
generate color proles
See “1-3. EIZO LCD Utility Disk” (page 10)
• Supports Color Vision Deciency Simulation Software “UniColor Pro”
This software can be downloaded from our web site (http://www.eizo.com).
• Power saving function
Suppressing the power consumption reduces the carbon dioxide emissions. This product is equipped with power saving
function.
- 0 W when the main power is off
Equipped with main power switch.
Turning off the main power switch completely shuts off power supply to the monitor while the monitor is not used.
• Displays HDCP (High-bandwidth Digital Protection) protected contents.

8
Chapter1Introduction
Attention
Be careful of the following points when using the built-in calibration sensor.
Do not touch the built-in calibration sensor.
Itmayreducethemeasurementaccuracyofthebuilt-incalibrationsensor,orresultininjury
orequipmentdamage.
Attention
• A high temperature or high humidity environment may affect the measurement accuracy of the built-in calibration
sensor. We suggest storing and using the monitor under the following conditions.
- Temperature 30ºC or less
- Humidity 70% or less
Avoid storing or using the sensor where it may be exposed to direct sunlight.
Note
• This monitor supports both portrait and landscape format. You can change the orientation of the Setting menu when
using the monitor screen in vertical display position. (See “3-3. Setting Orientation” (page 31))
• For using the monitor with “Portrait” position, the graphics board supporting portrait display is required. When placing
the monitor in a “Portrait” position, settings of your graphics board need to be changed. Refer to the User’s Manual of
the graphics board for details.

9
Chapter1Introduction
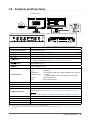
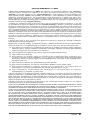
1-2. Controls and Functions
1
16
17
10 11 12
13
14
15
7
8 92 4
5
3
6
Adjustmentmenu
*1
1. Built-in calibration sensor Executescalibrationforanindependentmonitor.SelfCalibrationfunction(page36)
2. Ambient Light Sensor Measuresambientlight.
3.
button Switchesinputsignalsfordisplay(“Toswitchamonginputsignals”(page49)).
4.
button ChangesColorMode(page17).
5.
button Cancelsthesetting/adjustmentandexitstheAdjustmentmenu.
6.
buttons
• Providesthemenuselectionaswellastheadjustmentandsettingofafunction.
• DisplaystheBrightnessmenu(“AdjustingBrightness”(page19)).
7.
button
DisplaystheAdjustmentmenu,determinesanitemonthemenuscreen,andsaves
valuesadjusted(page11).
8.
button Turnsthepoweronoroff.
9. Power Indicator
Indicatesthemonitor’soperationstatus.
Blue: Operating
Flashingblue
(2timesforeach):
Inthefollowingcases,thisnotiesthatdisplayre-correction
isrequired.
• WhenthetimerissetinColorNavigator(CALmode)
Orange: Powersavingmode
OFF: Mainpower/Poweroff
10. Main power switch Turnsthemainpoweronoroff.
11. Power connector Connectsthepowercord.
12. Input signal connectors Left:DVI-Dconnector/Center:HDMIconnector/Right:DisplayPortconnector
13. USB upstream port
ConnectstheUSBcabletousethesoftwarethatneedsUSBconnection,ortouse
USBhubfunction(“7-3.MakingUseofUSB(UniversalSerialBus)”(page50)).
Attention
• By default, USB upstream port 1 is enabled. Connect the cable to USB upstream port 1 rst.
14. USB downstream port ConnectsaperipheralUSBdevice.
15. Stand
*2
Usedtoadjusttheheightandangleofthemonitorscreen.
16. Security lock slot ComplieswithKensington’sMicroSaversecuritysystem.
17. Cable holder Coversthemonitorcables.
*1 See “1-4. Basic Operations and Functions” (page 11) for how to use.
*2 An optional arm (or an optional stand) can be attached by removing the stand section (see “7-1. Attaching the Optional Arm”
(page 47)).

10
Chapter1Introduction
1-3. EIZO LCD Utility Disk
An “EIZO LCD Utility Disk” (CD-ROM) is supplied with this product. The following table shows the disk contents
and the overview of the software programs.
●
Disk contents and software overview
The disk includes application software programs for adjustment, and User’s Manual. Refer to “Readme.txt” or
the “read me” le on the disk for software startup procedures or le access procedures.
Contents Overview Windows Macintosh
A“Readme.txt”or“readme”le √ √
ColorNavigator Anapplicationsoftwareforcalibratingmonitor
characteristicsandgeneratingICCproles(for
Windows)andAppleColorSyncproles(for
Macintosh).
(APCmustbeconnectedtothemonitorwith
thesuppliedUSBcable.)
√ √
User’sManualofthismonitor(PDFle) √ √
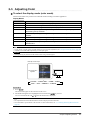
●
To use ColorNavigator
Refer to the corresponding User’s Manual on the CD-ROM disk in order to install and use the software.
When using this software, you will need to connect a PC to the monitor with the supplied USB cable. For
details of the USB cable connection, see “7-3. Making Use of USB (Universal Serial Bus)” (page 50).

11
Chapter1Introduction
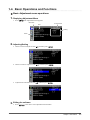
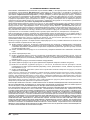
1-4. Basic Operations and Functions
●
Basic Adjustment menu operations
1.
Displaying Adjustment Menu
1. Press . The Adjustment menu appears.
Currentmode
Menutitle
Setting
Menu
Item
2.
Adjusting/Setting
1. Choose a menu to adjust/set with , and then press .
2. Choose an item to adjust/set with , and then press .
3. Adjust/set the selected item with , and then press .
3.
Exiting the software
1. Press a few times. The Adjustment menu nishes.

12
Chapter1Introduction
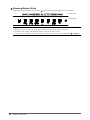
●
Showing Button Guide
When you press the front buttons (except the button), the button guide appears next to the button.
ButtonGuide
Controlbutton
Note
• The button guide will continue to appear while the Adjustment menu or Mode menu is showing.
• The button guide is displayed differently depending on the selected menu or status.
• In CAL mode, the brightness cannot be adjusted even though the button guide is displayed above the
and buttons.

13
Chapter1Introduction
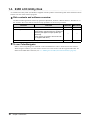
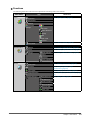
●
Functions
The following table shows the menus for adjustment and setting items of each menu.
Main Menu Item Reference
Color
*1
Brightness
“2-3.AdjustingColor”(page17)
Temperature
Gamma
Advanced
Settings
Hue
Saturation
OutlineEnhancer
Clipping
Gain
BlackLevel
6Colors
ColorReset
“3-10.Resettodefault”(page34)
SelfCalibration
Execute
“4-2.ExecutingSelfCalibration”(page39)
Result
“4-3.CheckingAdjustmentResults”(page40)
Settings
ModeSelection
“4-1.SettingCalibrationDetails”(page36)
Target
Schedule
ClockAdjustment
Screen
ScreenSize
“2-5.SelectingScreenSize”(page25)
Overdrive
“2-6.ConguringMovingImage
Performance”(page27)
ColorSpace
“2-7.SpecifyingColorSpace”(page27)
RangeExtension
“2-4.ExpandingSignalOutputRange”(page
24)
HDMISettings
*2
NoiseReduction
“2-8.SettingHDMI”(page28)
FilmDetection
PseudoInterlace
SafeAreaMarker
SafeAreaSize
BorderColor

14
Chapter1Introduction
Power
Manager
PowerSave
“5-1.SettingPowerSave”(page41)
Indicator
“5-2.Setsthebrightnessoftheindicator”
(page42)
MenuSettings
Language
“3-2.SelectingtheLanguage”(page31)
Orientation
“3-3.SettingOrientation”(page31)
MenuPosition
“3-4.ChangingAdjustmentMenuDisplay
Position”(page32)
Tools
InputSelection
“Toswitchamonginputsignals”(page49)
ModePreset
“3-1.Enabling/DisablingModeSelection”
(page31)
USBSelection
DVI “3-8.SwitchingUSBPortAutomatically”
(page33)
DisplayPort
HDMI
SignalInfo
“7-4.ShowingMonitorInformation”(page51)
MonitorInfo
AllReset
“3-10.Resettodefault”(page34)
*1 The adjustment/settings available on the “Color” menu depend on the selected mode. (See “2-3. Adjusting Color”
(page 17))
*2 These functions can be adjusted with HDMI signal input.

15
Chapter2AdjustingScreens
Chapter 2 Adjusting Screens
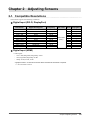
2-1. Compatible Resolutions
The monitor supports the following resolutions.
●
Digital Input (DVI-D, DisplayPort)
Resolution Applicable Signals
Vertical scan
frequency
Dot clock DVI-D DisplayPort
640×480 VGA 60Hz
242.0MHz
(Max.)
√ √
720×400 VGATEXT 70Hz
√ √
800×600 VESA 60Hz √ √
1024×768 VESA 60Hz √ √
1280×960 VESA 60Hz √ √
1280×1024 VESA 60Hz √ √
1600×1200 VESA 60Hz √ √
1920×1080 VESACVTRB 60Hz √ √
1920×1200 VESACVTRB 60Hz √ √
2560×1440 SingleLink 30Hz √ -
2560×1440
*1
VESACVTRB 60Hz √ √
●
Digital Input (HDMI)
• Video signal
- VGA / 480i,480p,1080i,720p,1080p: 60 Hz
- 576i,576p,1080i,720p,1080p: 50 Hz
- 1080p: 24 Hz, 25 Hz, 30 Hz
AgraphicsboardinconformancewiththeVESAandCEA-861standardsisrequired.
*1 Recommended resolution

16
Chapter2AdjustingScreens
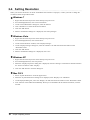
2-2. Setting Resolution
When you connect the monitor to the PC and nd that the resolution is improper, or when you want to change the
resolution, follow the procedure below.
●
Windows 7
1. Right-click the mouse anywhere on the desktop except for icons.
2. From the displayed menu, click “Screen resolution”.
3. On the “Screen Resolution” dialog box, select the monitor.
4. Click “Resolution” to select the desired resolution.
5. Click the “OK” button.
6. When a conrmation dialog box is displayed, click “Keep changes”.
●
Windows Vista
1. Right-click the mouse anywhere on the desktop except for icons.
2. From the displayed menu, click “Personalize”.
3. On the “Personalization” window, click “Display Settings”.
4. On the “Display Settings” dialog box, select the “Monitor” tab and select desired resolution in the
“Resolution” eld.
5. Click the “OK” button.
6. When a conrmation dialog box is displayed, click “Yes”.
●
Windows XP
1. Right-click the mouse anywhere on the desktop except for icons.
2. From the displayed menu, click “Properties”.
3. When the “Display Properties” dialog box is displayed, click the “Settings” tab and select desired resolution
for “Screen resolution” under “Display”.
4. Click the “OK” button to close the dialog box.
●
Mac OS X
1. Select “System Preferences” from the Apple menu.
2. When the “System Preferences” dialog box is displayed, click “Displays” for “Hardware”.
3. On the displayed dialog box, select the “Display” tab and select desired resolution in the “Resolutions” eld.
4. Your selection will be reected immediately. When you are satised with the selected resolution, close the
window.

17
Chapter2AdjustingScreens
2-3. Adjusting Color
●
To select the display mode (color mode)
This function allows easy selection of a desired mode according to monitor application.
Display Modes
Mode Purpose
1-Custom Availableforthecolorsettingsaccordingtoyourpreference.
2-Adobe
®
RGB SuitableforcolormatchingwithAdobe
®
RGBcompatibleperipherals.
3-sRGB SuitableforcolormatchingwithsRGBcompatibleperipherals.
4-EBU SuitableforreproducingthecolorgamutandgammaassetforthbyEBU(European
BroadcastingUnion)standards.
5-REC709 SuitableforreproducingthecolorgamutandgammaassetforthbytheITU-RRec.709
standard.
6-SMPTE-C SuitableforreproducingthecolorgamutandgammaassetforthbySMPTE-Cstandards.
7-DCI SuitableforreproducingthecolorgamutandgammaassetforthbyDCIstandards.
8-CAL Displaysthescreenadjustedbythe“ColorNavigator”calibrationsoftwareand
SelfCalibration.
Note
• In CAL mode, ColorNavigator and SelfCalibration can be used for adjustment. (See “Chapter 4 SelfCalibration” (page 36))
• Available CAL mode differs depending on each input signal.
Attention
• Avoid operating any function of the monitor while using ColorNavigator.
Example:AtDVIinput
Themodemenu
appears.
1-Custom←→2-Adobe
®
RGB←→3-sRGB←→4-EBU
8-CAL←→7-DCI←→6-SMPTE-C←→5-REC709
Procedure
1. Press
.
The mode menu appears at the bottom left of the screen.
2. The mode among the list is highlighted in turn each time is pressed.
You can switch the mode with or while the mode menu is displayed.
Note
• The Adjustment menu and the Mode menu cannot be displayed at the same time.
• You can disable a specic mode to be selected. For more information, see “3-1. Enabling/Disabling Mode Selection”
(page 31).

18
Chapter2AdjustingScreens
●
To perform advanced adjustments
“Color” of the Adjustment menu allows you to congure and save a separate set of color settings for each
mode.
Attention
• It takes about 7 minutes (under our measurement conditions) for the performance of electrical parts to stabilize. Please
wait 7 minutes or more after the monitor power has been turned on, and then adjust the monitor.
• The same image may be seen in different colors on multiple monitors due to their monitor-specic characteristics. Make
ne color adjustment visually when matching colors on multiple monitors.
• Using ColorNavigator enables the monitor adjustment that prioritizes color matching of multiple monitors. For details,
refer to the ColorNavigator User’s Manual (on the CD-ROM).
Note
• The values shown in “%” or “K” are available only as reference.
●
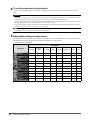
Adjustable settings in each mode
The adjustable settings depend on the mode. (You cannot select any non-adjustable or non-settable function.)
The adjustments or settings made for each mode are applied to all input signals.
√: Adjustable -: Not adjustable
Function
Color Mode
1-Custom
2-Adobe
®
RGB
3-sRGB 4-EBU
5-REC709
6-SMPTE-C 7-DCI 8-CAL
Brightness √ √ √ √ √ √ √ -
Temperature √ √ √ √ √ √ √ -
Gamma √ √ √ √ √ √ √ -
Hue √ - - - - - - -
Saturation √ - - - - - - -
OutlineEnhancer √ √ √ √ √ √ √ -
Clipping - √ √ √ √ √ √ -
Gain √ - - - - - - -
BlackLevel √ √ √ √ √ √ √ -
6Colors √ - - - - - - -
ColorReset √ √ √ √ √ √ √ -

19
Chapter2AdjustingScreens
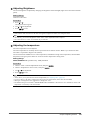
●
Adjusting Brightness
The screen brightness is adjusted by changing the brightness of the backlight (light source from the LCD back
panel).
Setting Range
75cd/m
2
to 350 cd/m
2
Procedure
1. Press
or .
The Brightness menu appears.
2. Use or for adjustment.
3. Press
to exit.
Attention
• If the entered value cannot be set, the value will appear in magenta. In such a case, change the value.
Note
• Alternatively, you can use “Brightness” under “Color” in the Adjustment menu to adjust it.
• The values shown in “cd/m
2
” are available only as reference.
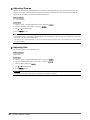
●
Adjusting the temperature
The color temperature can be adjusted.
The color temperature is normally used to express the hue of “White” and/or “Black” by a numerical value.
The value is expressed in degrees “K” (Kelvin).
The screen becomes reddish at a low color temperature, and bluish at a high color temperature, like the ame
temperature. The gain preset values are set for each color temperature setting value.
Setting Range
Native, 4000K-10000K (specied every 100K), Standard
Procedure
1. Choose “Color” from the Adjustment menu, and press
.
2. Choose “Temperature” from “Color”, and press
.
3. Use
or for adjustment.
4. Press
to exit.
Note
• “Gain” allows you to perform more advanced adjustment (see “Adjusting Gain” (page 23)).
• If you set “Native”, the image is displayed in the preset color of the monitor (Gain: 100% for each RGB).
• When gain is changed, the color temperature is changed to “User”.
• The default setting for each Adobe
®
RGB/sRGB/EBU/REC709/SMPTE-C/DCI mode is set to “Standard”, which is the
temperature in conformity with each standard.

20
Chapter2AdjustingScreens
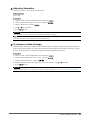
●
Adjusting Gamma
Gamma can be adjusted. The brightness of the monitor varies depending on the input signal, however, the
variation rate is not proportional to the input signal. To keep the balance between the input signal and the
brightness of the monitor is called as “Gamma correction”.
Setting Range
1.6 - 2.7, Standard
Procedure
1. Choose “Color” from the Adjustment menu, and press
.
2. Choose “Gamma” from “Color”, and press
.
3. Use
or for adjustment.
4. Press
to exit.
Note
• The default setting for each Adobe
®
RGB/sRGB/EBU/REC709/SMPTE-C/DCI mode is set to “Standard”, which is the
gamma in conformity with each standard.
• The gamma curve can be adjusted to L* by using ColorNavigator. For details, refer to the ColorNavigator User’s Manual
(on the CD-ROM).
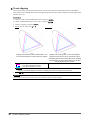
●
Adjusting Hue
This function allows you to adjust the hue.
Setting Range
-100 to 100
Procedure
1. Choose “Color” from the Adjustment menu, and press
.
2. Choose “Advanced Settings” from “Color”, and press
.
3. Choose “Hue”, and press
.
4. Use
or for adjustment.
5. Press
to exit.
Attention
• Using this function may make some color gradations unavailable for display.
La pagina si sta caricando...
La pagina si sta caricando...
La pagina si sta caricando...
La pagina si sta caricando...
La pagina si sta caricando...
La pagina si sta caricando...
La pagina si sta caricando...
La pagina si sta caricando...
La pagina si sta caricando...
La pagina si sta caricando...
La pagina si sta caricando...
La pagina si sta caricando...
La pagina si sta caricando...
La pagina si sta caricando...
La pagina si sta caricando...
La pagina si sta caricando...
La pagina si sta caricando...
La pagina si sta caricando...
La pagina si sta caricando...
La pagina si sta caricando...
La pagina si sta caricando...
La pagina si sta caricando...
La pagina si sta caricando...
La pagina si sta caricando...
La pagina si sta caricando...
La pagina si sta caricando...
La pagina si sta caricando...
La pagina si sta caricando...
La pagina si sta caricando...
La pagina si sta caricando...
La pagina si sta caricando...
La pagina si sta caricando...
La pagina si sta caricando...
La pagina si sta caricando...
La pagina si sta caricando...
La pagina si sta caricando...
La pagina si sta caricando...
La pagina si sta caricando...
La pagina si sta caricando...
La pagina si sta caricando...
La pagina si sta caricando...
La pagina si sta caricando...
La pagina si sta caricando...
La pagina si sta caricando...
La pagina si sta caricando...
La pagina si sta caricando...
La pagina si sta caricando...
La pagina si sta caricando...
La pagina si sta caricando...
La pagina si sta caricando...
La pagina si sta caricando...
La pagina si sta caricando...
La pagina si sta caricando...
La pagina si sta caricando...
La pagina si sta caricando...
-
 1
1
-
 2
2
-
 3
3
-
 4
4
-
 5
5
-
 6
6
-
 7
7
-
 8
8
-
 9
9
-
 10
10
-
 11
11
-
 12
12
-
 13
13
-
 14
14
-
 15
15
-
 16
16
-
 17
17
-
 18
18
-
 19
19
-
 20
20
-
 21
21
-
 22
22
-
 23
23
-
 24
24
-
 25
25
-
 26
26
-
 27
27
-
 28
28
-
 29
29
-
 30
30
-
 31
31
-
 32
32
-
 33
33
-
 34
34
-
 35
35
-
 36
36
-
 37
37
-
 38
38
-
 39
39
-
 40
40
-
 41
41
-
 42
42
-
 43
43
-
 44
44
-
 45
45
-
 46
46
-
 47
47
-
 48
48
-
 49
49
-
 50
50
-
 51
51
-
 52
52
-
 53
53
-
 54
54
-
 55
55
-
 56
56
-
 57
57
-
 58
58
-
 59
59
-
 60
60
-
 61
61
-
 62
62
-
 63
63
-
 64
64
-
 65
65
-
 66
66
-
 67
67
-
 68
68
-
 69
69
-
 70
70
-
 71
71
-
 72
72
-
 73
73
-
 74
74
-
 75
75


in altre lingue
- English: Eizo CG276 User manual
- français: Eizo CG276 Manuel utilisateur
Documenti correlati
-
Eizo ColorEdge CG245W Manuale utente
-
-
-
Eizo FDSV1201T Manuale utente
-
-
-
-
-
-